Mobiclinic EARPLUS1 User manual

ES
Manual de instrucciones
Anweisungen
Manuel D’Utilisation
Gebruiksaanwijzing
Instrukcja obsługi
Instruction manual
Instruções
Manuale D’Istruzioni
Bruksanvisning
Brugsanvisning
DE
EN
PT
FR
NL
PL
IT
SWE
DK
MANUAL DE INSTRUCCIONES
Amplicador de sonido
EARPLUS1
Última revisión: 21 de septiembre de 2023
Last revision: September 21st, 2023
ES- Lea las instrucciones antes de usar el producto.
EN - Please read instructions before use.

Amplicador de sonido
EARPLUS1
ENES
2
1. ADVERTENCIAS
1. ¡ADVERTENCIA! Este amplicador de sonido está recomendado para personas
de 18 años o más.
2. ¡ADVERTENCIA! El amplicador de sonido no debería de causar dolor en el
momento de insertarlo.
3. ¡ADVERTENCIA! Si experimenta picor, enrojecimiento, dolor, inamación o
sensación de quemazón en o alrededor de los oídos, deje de utilizar el producto.
4. ¡ADVERTENCIA! El tapón del amplicador de oído no debe ser incómodo ni
doloroso.
5. ¡ADVERTENCIA! Quítese el amplicador de sonido para las resonancias
magnéticas u otros procedimientos electromagnéticos.
6. ¡ADVERTENCIA! Si alguna parte del amplicador de sonido, como el tapón,
se te queda atascada en el oído y no puedes extraerla fácilmente con los dedos,
busca ayuda médica lo antes posible. No intentes utilizar pinzas ni bastoncillos de
algodón, ya que podrían empujar la pieza hacia el interior del oído.
7. ¡ADVERTENCIA! No comparta su amplicador de sonido con otras personas.
8. ¡ADVERTENCIA! Las personas que empiezan a utilizar amplicador de sonido a
veces necesitan unas semanas para acostumbrarse a ellos.
9. ¡ADVERTENCIA! El amplicador de sonido, sus piezas y las pilas no son un
juguete. Manténgalos fuera del alcance de los niños.
10. ¡ADVERTENCIA! Es posible que note una acumulación acelerada de cerumen al
utilizar el amplicador de sonido. Esto es normal.
11. ADVERTENCIA! Precaución con el volumen alto por su impacto auditivo como
pérdida auditiva con exposiciones prolongadas.
2. LEER ANTES DE SU USO
1. Aplicación: El amplicador de sonido está destinado a amplicar y transmitir el
sonido al oído. Este amplicador de sonido está destinado a ser utilizado por adultos
mayores de 18 años.
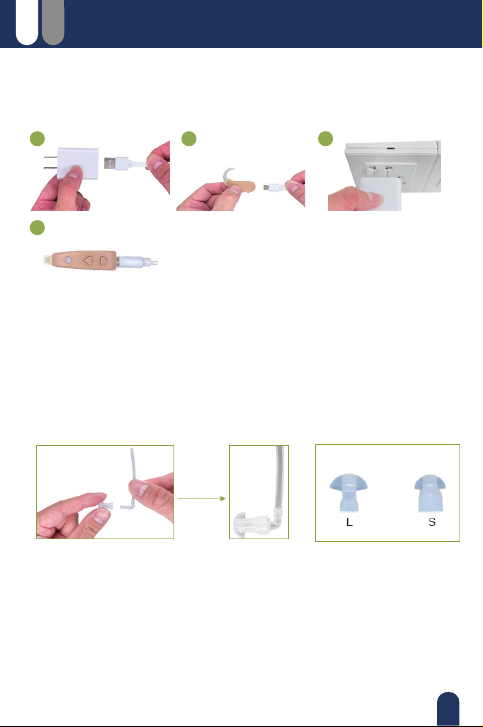
2. Antes de utilizar el amplicador de sonido por primera vez, se recomienda
cargarlo durante 4 horas.
3. Espere entre 4 y 8 semanas para que su cerebro se adapte a los sonidos con su
nuevo amplicador auditivo.

Amplicador de sonido
EARPLUS1
ENES
3
Amplicador de sonido
(Tapón tamaño M)
Adaptadores oído
(L/S)
Funda protectora
Brocha de limpieza Tubo
Cable USB
3. PIEZAS INCLUIDAS

Amplicador de sonido
EARPLUS1
ENES
4
4. PARTES DEL AMPLIFICADOR DE SONIDO
ENCENDER/APAGAR EL AMPLIFICADOR AUDITIVO
Mantenga pulsado el botón multifunción del amplicador de sonido durante 2
segundos hasta que el indicador luminoso parpadee.
- ENCENDIDO: El indicador luminoso verde parpadea 3 veces.
- APAGADO: La luz azul indicadora parpadea 3 veces.
AJUSTES DE MODO
Pulse brevemente el botón multifunción para cambiar de modo.
5. CÓMO CARGAR EL AMPLIFICADOR DE SONIDO
1. Conecte el extremo más grande del cable USB a la fuente de alimentación.
2. Conecte el extremo más pequeño en el puerto de carga USB del amplicador
auditivo.
3. Enchufe la fuente de alimentación a una toma de corriente.
Entrada de micrófono
Botón para subir el
volumen
Botón para bajar el
volumen
Puerto de carga USB
Tapón
Tubo
Adaptador conector
de tapón
Gancho para la oreja
Botón multifunción
con indicador luminoso

Amplicador de sonido
EARPLUS1
ENES
5
4. El indicador luminoso se ilumina en azul cuando el cargador está conectado a la
red eléctrica. Cuando esté completamente cargado, la luz será verde y tendrá una
duración de 20-24 horas de uso.
6. UTILIZAR EL AMPLIFICADOR
ELEGIR EL TAPÓN
El tapón de tamaño M viene preinstalado en el amplicador auditivo, si siente que el
tamaño mediano (M) le queda demasiado holgado, sustitúyalo por el tamaño grande
(L), éste se adaptará mejor a sus oídos.
CORTAR EL TUBO SEGÚN EL TAMAÑO DETU OREJA
Paso 1: Retira el tubo del gancho de la oreja.
Paso 2: Introduzca el tapón en el oído, y coloque el dispositivo sobre la oreja, marque
el punto donde se unen el tubo y el gancho. El tubo debe cortarse con unas tijeras.
Paso 3: Empuje el tubo sobre las ranuras del gancho hasta que quede bien sujeto.
1 2
4
3

Amplicador de sonido
EARPLUS1
ENES
6
SUSTITUCIÓN DEL TUBO DEL AMPLIFICADOR DE SONIDO
Paso 1: Retire el tubo del gancho para la oreja y del adaptador.
Paso 2: Coge el tubo viejo y alinéalo con el tapón y el tubo nuevo, recorta el tubo
nuevo para que tenga la misma longitud que el viejo.
Paso 3: Empuje el tubo sobre las ranuras del gancho y el adaptador hasta que quede
bien sujeto.
Consejo: Recomendamos reemplazar el tubo cada 3-6 meses.
PONERSE EL AMPLIFICADOR DE SONIDO EN LA OREJA
Paso 1: Ajuste la dirección del tapón para que se adapte a cualquiera de los dos oídos.
Paso 2: Colóquese el amplicador de sonido sobre la parte superior de la oreja.
Paso 3: Introduzca con cuidado el tapón en el oído. El tapón debe quedar bien
ajustado y cómodo.
AJUSTAR EL VOLUMEN
Pulse el interruptor arriba/abajo para subir/bajar el volumen. Deberá oír pitidos
después de cada pulsación del interruptor. Cuando oigas dos pitidos, signica que ha
alcanzado el volumen más bajo o más suave.

Amplicador de sonido
EARPLUS1
ENES
7
CAMBIAR DE PROGRAMA DE AUDICIÓN
Pulse el botón multifunción del amplicador para cambiar de modo. Su amplicador
auditivo emitirá un pitido para indicarle en qué programa se encuentra.
Cuando el amplicador se apaga y se vuelve a encender, siempre está en la última
conguración que haya realizado.
- NIVELES DE AUDICIÓN
Nivel 1 ganancia máxima 28±5.
Nivel 2 ganancia máxima 31±5.
Nivel 3 ganancia máxima 34±5.
Nivel 4 ganancia máxima 37±5.
Nivel 5 ganancia máxima 40±5.
7. MANTENIMIENTO
Mantenga limpio su amplicador de sonido. El calor, la humedad y las sustancias
extrañas pueden provocar un rendimiento deciente.
1. Limpiar diariamente con un pañuelo de papel.
2. Limpie regularmente con un cepillo de limpieza para eliminar los residuos. Utilice los
cepillos de limpieza para eliminar los residuos que obstruyen el micrófono.
3. Evite golpes físicos como dejar caer el amplicador auditivo sobre una supercie
dura.
4. Evitar la exposición a la humedad o al calor y guardar en un lugar fresco y seco.
5. No utilice nunca agua, disolventes, líquidos de limpieza ni aceite para limpiar el
amplicador de sonido.
Conguración del programa Pitidos Medio ambiente
P1: Modo normal Bip En casa o en la ocina
P2: Modo de reducción de ruido
medio Bip bip En la carretera, en el super-
mercado o en el restaurante
P3: Modo de reducción de ruido Bip bip bip Al aire libre, conversando
con la gente a tu lado

Amplicador de sonido
EARPLUS1
ENES
8
PROBLEMA CAUSA POSIBLE SOLUCIÓN
El amplicador no
funciona
Altavoz / auricular
bloqueado
Limpie la abertura del
altavoz / auricular
Amplicador
apagado Encienda el amplicador
Batería agotada Recargar el amplicador
Retraso de arranque Espere unos segundos y
vuelva a comprobar
Amplicador demasiado
alto
Volumen demasiado
alto Disminuir el volumen
El amplicador no tiene el
volumen suciente o está
distorsionado
Volumen demasiado
bajo Aumentar el volumen
Batería baja Recargar el amplicador
Altavoz / auricular
bloqueado
Limpie la abertura del
altavoz / auricular
Su salud auditiva a
cambiado
Póngase en contacto con
su audioprotesista
Sonido intermitente
o ausencia de sonido
procedente del
amplicador
El tubo delgado/
cúpula está
obstruido con cera
Limpiar / sustituir el tubo
delgado o la cúpula
Humedad en el tubo
delgado
Elimine la humedad del
tubo delgado
6. El puerto de carga debe mantenerse siempre limpio y seco.
7. No desmonte el amplicador auditivo ni introduzca en su interior las herramientas
de limpieza.
8. Cuando no lo utilice, guarde el amplicador auditivo en el estuche protector.
9. Lejos de la luz directa del sol o del calor para evitar temperaturas extremas.
8. RESOLUCIÓN DE PROBLEMAS

Amplicador de sonido
EARPLUS1
ENES
9
El amplicador suena
bajo / El amplicador no
suena claro
Batería baja Recargar el amplicador
El tubo delgado
/ cúpula está
obstruido con cera
Limpiar/sustituir el tubo
delgado o la cúpula
El control de
volumen no está lo
sucientemente alto
Aumente el volumen de su
amplicador hasta un nivel
cómodo
Rendimiento poco claro y
distorsionado Reinicio necesario
Colóquelo en el cargador
hasta que comience la
carga y, a continuación,
retírelo. Esto apagará y
encenderá su amplicador
Silbando
El amplicador
no se inserta
correctamente en el
oído. Cerumen en el
canal auditivo
Colocar correctamente el
amplicador
Cúpula mal
introducida en el
conducto auditivo
Quítese el amplicador
y vuelva a introducir el
terminal en el conducto
auditivo
Cúpula demasiado
pequeña para su
canal auditivo
Seleccione un tamaño
de cúpula mayor para
asegurarse de que la cúpula
sella completamente el
canal auditivo
Grietas en el tubo
delgado Sustituya el tubo delgado
Pelo o ropa que
cubra el micrófono
del amplicador
Aleje el pelo o la ropa del
micrófono del amplicador

Amplicador de sonido
EARPLUS1
ENES
10
El amplicador emite
pitidos
El sonido es
demasiado alto Baje el volumen
La cúpula está
bloqueada con cera
Limpiar o cambiar el
auricular
Los amplicadores silban
en el cargador
Orientación
incorrecta
Vuelva a colocar los
amplicadores en el puerto
con el auricular apoyado en
el depósito del cargador.
Compruebe que el LED de
carga comienza a brillar
Batería agotada
La batería del cargador
se ha agotado. Enchufe
el cargador. Si no lleva el
cable, mantenga pulsado
el control de usuario del
amplicador durante 7
segundos para apagarlo.
Esto conservará la carga de
su amplicador
El amplicador no se
enciende
Batería totalmente
descargada Cargar el amplicador
El botón se ha
desactivado
inadvertidamente al
pulsarlo durante más
de 7 segundos
Vuelva a colocar los
amplicadores en el
estuche cargador y
reinícielos
La luz indicadora del
amplicador no se
enciende cuando se
coloca el amplicador en
el estuche cargador o en el
cable USB
El amplicador
no se inserta
correctamente en el
cargador
Inserte correctamente el
amplicador en el cargador
Batería del
amplicador
totalmente
descargada
Espere 2-3 horas después
de colocar el amplicador
en el cargador,
independientemente del
comportamiento del LED

Amplicador de sonido
EARPLUS1
ENES
11
Indicador luminoso de
los interruptores de los
amplicadores apagado al
retirar el amplicador del
cargador
La función“Auto ON”
está desactivada Encender el amplicador
No hay indicador LED
cuando los amplicadores
se insertan en el puerto
de carga
Batería agotada
Conecta el micro USB a
tu cargador y enchúfelo
a la corriente. Los LED de
la batería integrada se
encenderán durante unos
segundos para indicar
la conexión a la fuente
de alimentación. Si no,
póngase en contacto con
su audioprotesista
Orientación
incorrecta
Vuelva a colocar los
amplicadores en el puerto
con el auricular apoyado en
el depósito del cargador. El
amplicador se cargará en
el puerto correcto
La carga no se inicia (pero
la luz indicadora alrededor
del puerto USB del
cargador está conectado a
la toma de corriente)
El amplicador no
está correctamente
insertado en el
cargador
Inserte correctamente el
amplicador en el cargador
El amplicador se sigue
cayendo
Cúpula demasiado
pequeña para el
canal auditivo
Sustituye tu cúpula por
una de mayor tamaño.
Recuerda seguir las
instrucciones para
seleccionar el tamaño de
la cúpula y la longitud de
tubo delgado correctos

Amplicador de sonido
EARPLUS1
ENES
12
9. PARÁMETROS TÉCNICOS
NÚMERO DE MODELO EARPLUS1
Salida máxima de sonido ≤130dB+3dB
Potencia sonora media 120dB ± 4dB
Ganancia acústica media 42dB ± 5dB
Ruido de entrada equivalente ≤29dB + 3dB
Gama de frecuencias F1≤300HZ, F2 ≥4500Hz
Distorsión total de ondas armónicas ≤5%
Batería Litio
Corriente de trabajo ≤5mA
Peso neto 4g
- CONDICIONES DE TRABAJO
1. Temperatura ambiente: -10ºC ~ 40ºC.
2. Humedad relativa: ≤80%
3. Presión atmosférica: 86kPa ~ 106kPa
4. Tensión de funcionamiento: DC 3.7V
5. Nivel de seguridad del dispositivo: Tipo B Parte aplicada

Sound amplier
EARPLUS1
ENES
13
1. WARNINGS
1. WARNING! This sound amplier is recommended for persons aged 18 years and
over.
2. WARNING! The sound amplier should not cause pain at the time of insertion.
3. WARNING! If you experience itching, redness, pain, swelling, inammation or a
burning sensation in or around the ears, stop using the product.
4. WARNING! The earplug of the ear amplier should not be uncomfortable or
painful.
5. WARNING! Remove the sound amplier for MRI or other electromagnetic
procedures.
6. WARNING! If any part of the sound amplier, such as the earplug, gets stuck in
your ear and you cannot easily remove it with your ngers, seek medical help as
soon as possible. Do not try to use tweezers or cotton buds, as they may push the
part into the ear.
7. WARNING! Do not share your sound amplier with others.
8. WARNING! People who start using sound amplier sometimes need a few weeks
to get used to them.
9. WARNING! The sound amplier, its parts and batteries are not a toy. Keep them
out of the reach of children.
10. WARNING! You may notice an accelerated build-up of earwax when using the
sound amplier. This is normal.
11. WARNING! Caution with high volume because of its auditory impact such as
hearing loss with prolonged exposure.
2. READ BEFORE USE
1. Application: The sound amplier is intended to amplify and transmit sound to
the ear and thus compensate for mild to severe hearing impairments, this sound
amplier is intended for use by adults over 18 years of age.
2. Before using the hearing instrument for the rst time, it is recommended to
charge it for 4 hours.
3. Allow 4 to 8 weeks for your brain to adapt to the sounds with your new hearing
amplier.

Sound amplier
EARPLUS1
ENES
14
Sound amplier
(Plug size M)
Adapters ear
(L/S)
Protective cover
Cleaning brush Tube
USB cable
3. INCLUDED PARTS

Sound amplier
EARPLUS1
ENES
15
4. PARTS OF THE SOUND AMPLIFIER
SWITCHING THE HEARING AMPLIFIER ON/OFF
Press and hold the multi-function button on each sound amplier for 2 seconds until
the indicator light ashes.
- ON: The green indicator light ashes 3 times.
- OFF: The blue indicator light ashes 3 times.
MODE SETTINGS
Briey press the multifunction button to switch modes.
5. HOW TO CHARGE THE SOUND AMPLIFIER
1. Connect the larger end of the USB cable to the power supply.
2. Plug the smaller end into the USB charging port on the hearing amplier.
3. Plug the power supply into a power outlet.
Microphone input
Volume up button
Volume down button
USB charging port
Plug
Tube
Adapter plug
connector
Ear hook
Multifunction button
with indicator light

Sound amplier
EARPLUS1
ENES
16
4. The indicator light illuminates blue when the charger is connected to the mains.
When fully charged, the light will be green and will last for 20-24 hours of use.
6. USING THE AMPLIFIER
CHOOSING THE STOPPER
The size M earplug comes pre-installed in the hearing amplier, if you feel that the
medium size (M) is too loose, replace it with the large size (L), it will t better in your
ears.
CUT THE TUBE TO YOUR EAR SIZE
Step 1: Remove the tube from the ear hook.
Step 2: Insert the earplug into the ear, and place the device over the ear, mark the point
where the tube and hook meet. The tube should be cut with scissors.
Step 3: Push the tube over the grooves of the hook until it is securely fastened.
1 2
4
3

Sound amplier
EARPLUS1
ENES
17
REPLACEMENT OF THE SOUND AMPLIFIER TUBE
Step 1: Remove the tubing from the ear hook and adapter.
Step 2: Take the old pipe and align it with the cap and the new pipe, trim the new pipe
to the same length as the old one.
Step 3: Push the tube over the grooves of the hook and adapter until it is securely
fastened.
Tip: We recommend replacing the tube every 3-6 months.
PUT THE SOUND AMPLIFIER IN THE EAR
Step 1: Adjust the direction of the earplug to t either ear.
Step 2: Place the hearing instrument over the top of your ear.
Step 3: Carefully insert the earplug into the ear. The earplug should t snugly and
comfortably.
ADJUSTING THE VOLUME
Press the up/down switch to increase/decrease the volume. You should hear beeps
after each press of the switch. When you hear two beeps, it means you have reached
the lowest or softest volume.

Sound amplier
EARPLUS1
ENES
18
CHANGE HEARING PROGRAMME
Press the multi-function button on the amplier to change modes. Your hearing
amplier will beep to tell you which programme you are in.
When the amplier is switched o and on again, it is always in the last conguration
you have made.
- HEARING LEVELS
Level 1 maximum gain 28±5.
Level 2 maximum gain 31±5.
Level 3 maximum gain 34±5.
Level 4 maximum gain 37±5.
Level 5 maximum gain 40±5.
7. MAINTENANCE
Keep your sound amplier clean. Heat, moisture and foreign substances can cause
poor performance.
1. Wipe daily with a tissue.
2. Clean regularly with a cleaning brush to remove debris. Use cleaning brushes to
remove debris that clogs the microphone.
3. Avoid physical shocks such as dropping the hearing amplier on a hard surface.
4. Avoid exposure to moisture or heat and store in a cool, dry place.
5. Never use water, solvents, cleaning uids or oil to clean the hearing instrument.
6. The charging port should always be kept clean and dry.
Programme conguration Beeps Environment
P1: Normal mode Beep At home or in the oce
P2: Medium noise reduction
mode Beep Beep On the road, in the super-
market or in the restaurant
P3: Noise reduction mode Beep Beep
Beep
In the open air, chatting
with the people next to you

Sound amplier
EARPLUS1
ENES
19
7. Do not disassemble the hearing amplier or insert cleaning tools inside the hearing
amplier.
8. Store the hearing amplier in the protective case when not in use.
9. Away from direct sunlight or heat to avoid extreme temperatures.
8. PROBLEM SOLVING
PROBLEM CAUSE POSSIBLE SOLUTION
Amplier does not work
Speaker / earphone
blocked
Clean the speaker /
earphone opening
Amplier o Turn on the amplier
Battery depleted Recharge the amplier
Start-up delay Wait a few seconds and
check again
Amplier too loud Volume too high Decrease the volume
Amplier is not loud
enough or is distorted
Volume too low Increasing the volume
Low battery Recharge the amplier
Speaker / earphone
blocked
Clean the speaker /
earphone opening
Your hearing health
has changed
Contact your Hearing Care
Professional
Intermittent sound or no
sound from the amplier
Thin tube/dome is
clogged with wax
Clean / replace thin tube
or dome
Moisture in the thin
tube
Remove moisture from the
thin tube

Sound amplier
EARPLUS1
ENES
20
Amplier sounds low /
Amplier sounds unclear
Low battery Recharge the amplier
Thin tube / dome is
clogged with wax
Clean/replace the thin tube
or dome
Volume control is not
loud enough
Increase the volume of your
amplier to a comfortable
level
Unclear and distorted
performance Reboot required
Place it in the charger until
charging begins, then
remove it. This will turn
your amplier o and on
Whistling
Amplier is not
inserted correctly in
the ear. Cerumen in
the ear canal
Correct positioning of the
amplier
Dome not properly
inserted in the ear
canal
Remove the amplier and
reinsert the dome into the
ear canal
Dome too small for
your ear canal
Select a larger dome size
to ensure that the dome
completely seals the ear
canal
Cracks in the thin
tube Replace the thin tube
Hair or clothing
covering the
microphone of the
amplier
Move hair or clothing
away from the amplier
microphone
Table of contents
Languages: