Get Started with Q-Band X2
Download i-gotU Life App
1 2
3 4
Start Using Q-Band X2
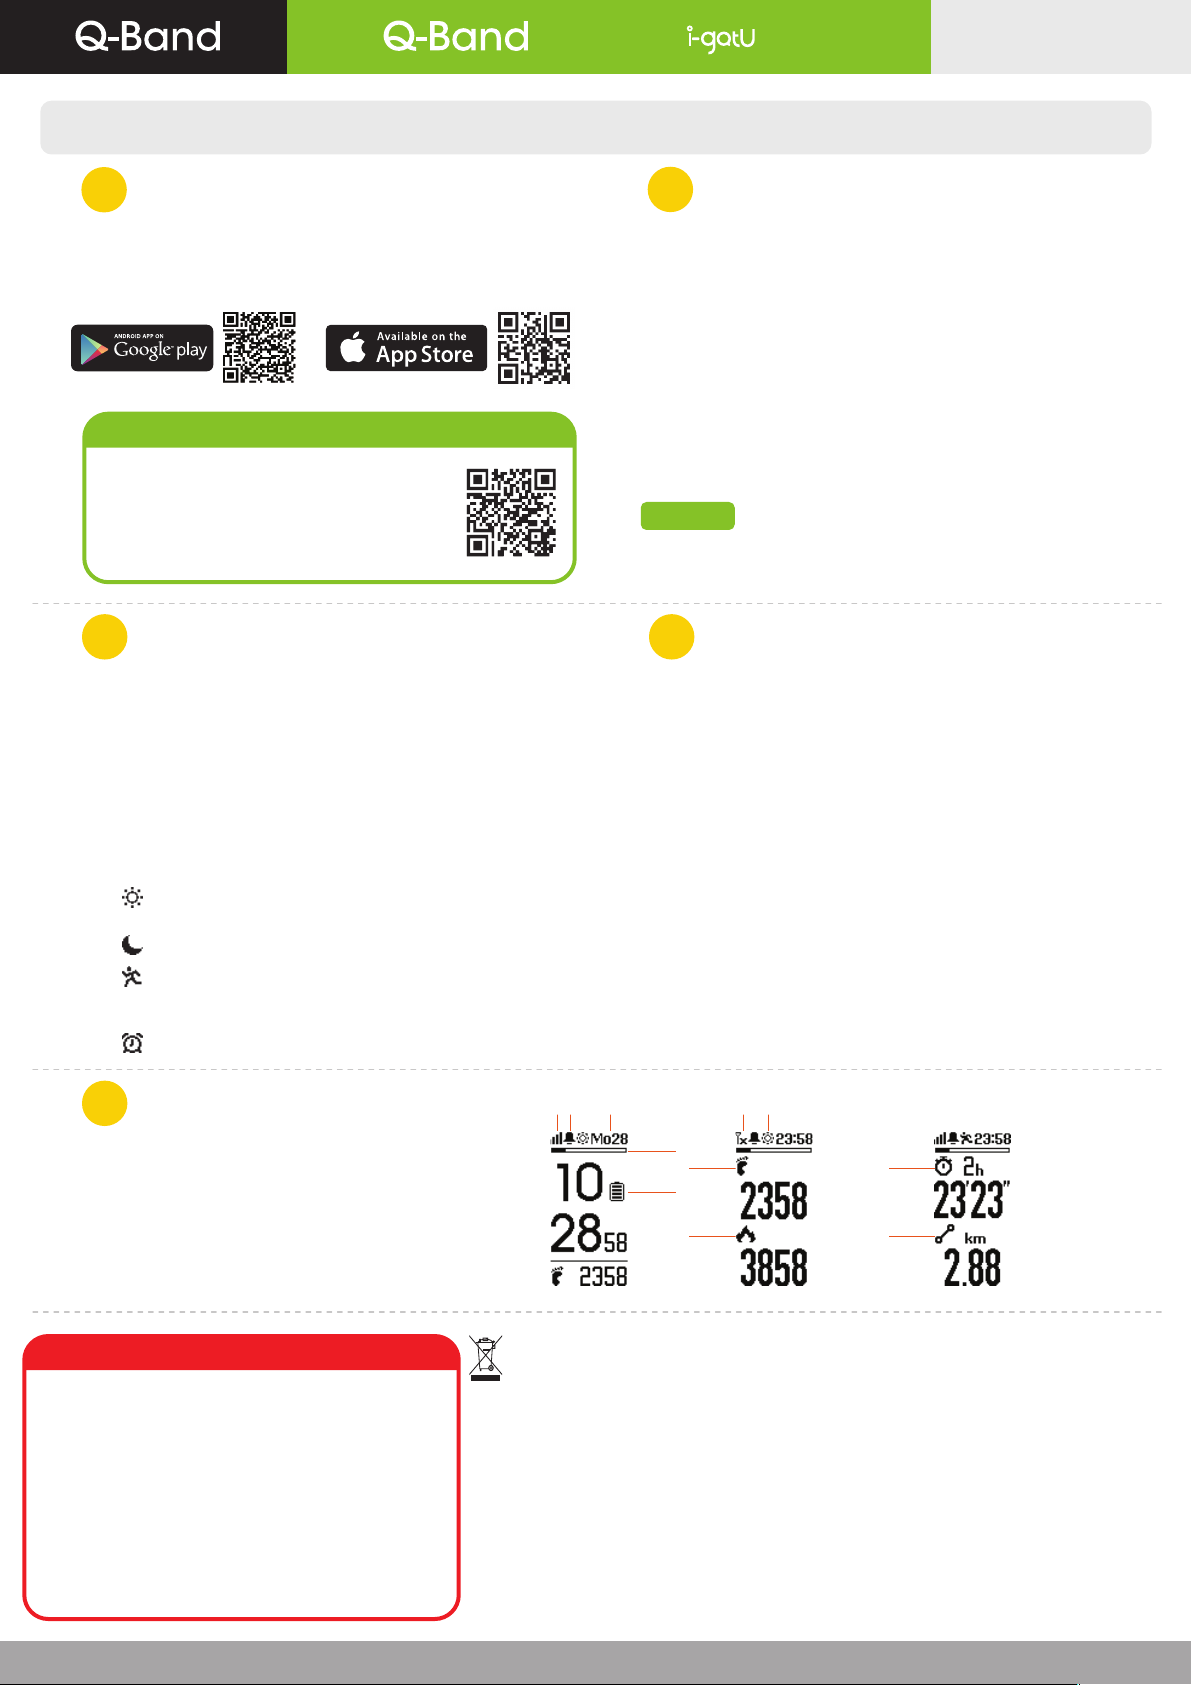
5Screen Description
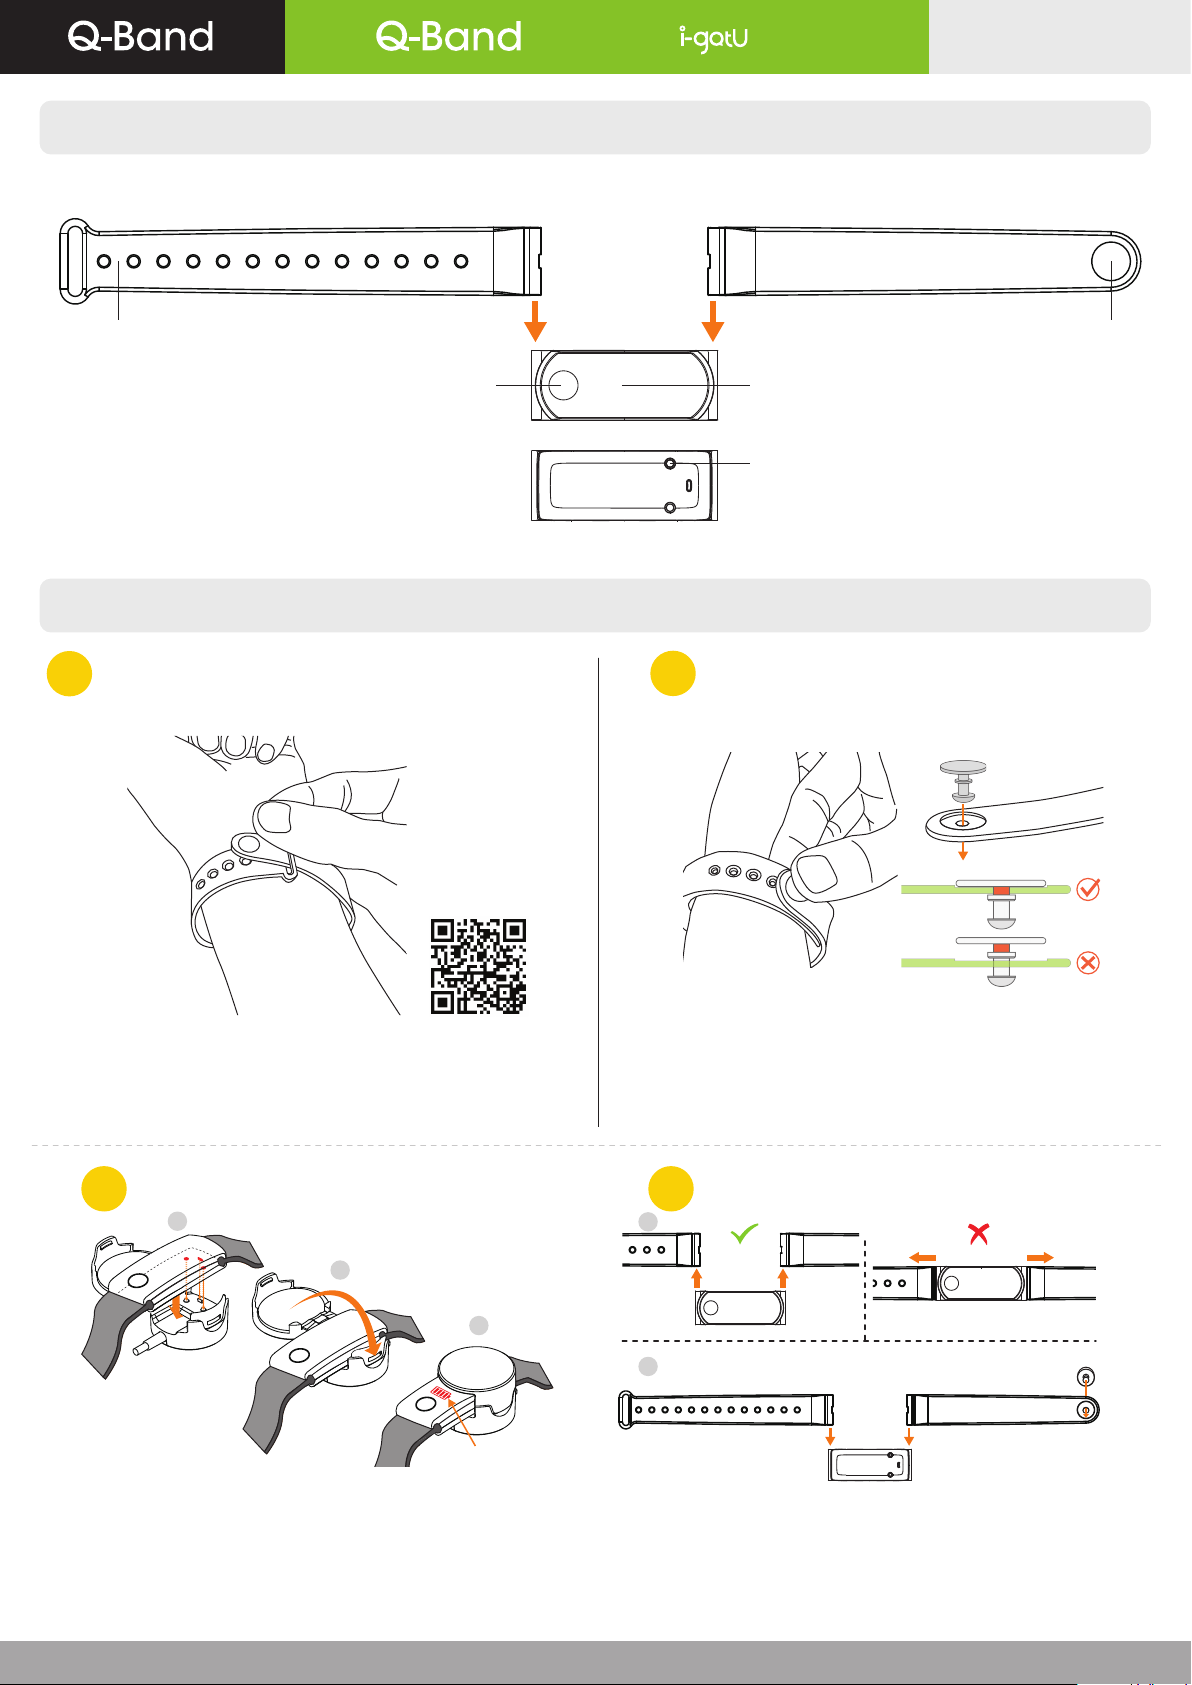
Set up Q-Band X2
Features of Q-Band X2 & i-gotU Life App
User Manual
Download i-gotU Life app from Google Play or App Store on your
smartphone:
https://play.google.com/store/apps/details?id=com.mobileaction.ilife
http://appstore.com/igotulife
Apk download: http://global.mobileaction.com/download/apk
Supported Device
Any Android smartphone (v4.3 and up) with built-in 4.0
Bluetooth connectivity; or
iPhone 4s and later models, iPad 2 and later models,
and iPod Touch (all with iOS version 7.0 and up).
A complete list of supported smartphone models or
mobile devices can be found at:
http://ww2.voiis.com/qband/devices.html
Your Q-Band X2 can be configured directly on the i-gotU Life app.
First time setup:
Charge the device to unlock the key and screen.
Open the i-gotU Life app.
A Setup Wizard will be launched automatically.
Follow the on-screen instructions to proceed with more settings.
Set up a new device from Settings:
Open the i-gotU Life app.
Tap the app icon at the upper left corner to open function menu.
Choose Settings.
Tap Setup New Device under MORE DEVICE SETTINGS.
Follow the on-screen instructions to continue.
Note
Your personal information is used to calculate your Base Metabolic
Rate (BMR), which determines your calories burned.
1.
2.
3.
4.
1.
2.
3.
4.
5.
1. Switch between different function modes
2. Change display information
3. Q-Band X2 modes
1. Tap the button twice to wake up the device screen.
2. Long-press the button on the Q-Band X2 until you see 4 icons
on the screen for mode selection.
3. Tap the button twice to switch mode.
4. You’ll be entering the selected mode in 3 seconds.
Information shown on the screen will vary as you press the
button on the Q-Band X2 to toggle between screens.
Daily mode: Analyzes your daily data, including steps taken
and calories burned.
Sleep mode: Tracks your sleep pattern and quality.
Sports mode: Starts a workout and displays information
including duration, steps taken, calories burned, and distance
traveled during the workout.
Nap mode: Awakes you via vibration after a short nap.
1
2
3
4
5
6
7
8
9
10
11
Connecting
Disconnected
Alarm
Daily Mode
Date
Overall Progress (the average of Calories + Steps)
Battery Status
Steps
Calories
Duration
Distance
Silent Alarm
Notification
Online Help
Manual download
Frequently Asked Questions
Silent alarm of Q-Band X2 gives you a wake-up alert via soft vibrations.
While in the sleep mode, the alarm can be dismissed by long-pressing
the button on Q-Band X2. By pressing the button once, the alarm will
not be dismissed but alert you again in 5 minutes. Alarm settings can be
changed in: open i-gotU Life app > Menu > Silent Alarm.
You will be notified with incoming calls, SMS, E-Mail, or alerts from the
social apps via vibration. When notified about an incoming call on an
Android smartphone, you may reject the call by long-pressing the button
on Q-Band X2. Notification can be set up from: i-gotU Life App Menu ->
Notification.
Note on environmental protection:
After the implementation of the European Directive
2002/96/EU in the national legal system, the following
applies:
Electrical and electronic devices may not be disposed
of with domesticwaste. Consumers are obliged by law
to return electrical and electronic devices at the end
of their service lives to the public collecting points set
up for this purpose or point of sale. Details to this are
defined by the national law of the respective country.
This symbol on the product, the instruction manual or
the package indicates that a product is subject to
these regulations. By recycling, reusing the materials
or other forms of utilizing old devices, you are making
an important contribution to protecting our
environment.
WEEE
•
•
•
Important Notice
Please make sure your Q-Band X2 is fully charged when used for
the first time. It takes about 2 hours before it is fully charged.
Although the device is usable in the rain, its use under water is
prohibited. Please avoid showering or sauna/steam bathing
because high temperature, steam and water jet may cause
damage to the device.
Please do not use any corrosive chemical to clean the device.
The built-in Li-Polymer Battery might be damaged if it remains
low voltage for a long time. It is suggested that you charge the
battery once every three months to prolong the battery's
lifetime, even though you don't use the device very often or do
not plan to use it for a while.
Federal Communications Commission (FCC) Statement 15.21
You are cautioned that changes or modifications not expressly approved by the part responsible for
compliance could void the user’s authority to operate the equipment.
15.105(b)
This equipment has been tested and found to comply with the limits for a Class B digital device,
pursuant to part 15 of the FCC rules. These limits are designed to provide reasonable protection
against harmful interference in a residential installation. This equipment generates, uses and can
radiate radio frequency energy and, if not installed and used in accordance with the instructions, may
cause harmful interference to radio communications. However, there is no guarantee that interference
will not occur in a particular installation. If this equipment does cause harmful interference to radio or
television reception, which can be determined by turning the equipment off and on, the user is
encouraged to try to correct the interference by one or more of the following measures:
-Reorient or relocate the receiving antenna.
-Increase the separation between the equipment and receiver.
-C
onnect the equipment into an outlet on a circuit different from that to which the receiver is connected.
-Consult the dealer or an experienced radio/TV technician for help.
This device complies with Part 15 of the FCC Rules. Operation is subject to the following two
conditions: (1) this device may not cause harmful interference and (2) this device must accept any
interference received, includinginterference that may cause undesired operation of the device.
FCC RF Radiation Exposure Statement:
This equipment complies with FCC radiation exposure limits set forth for an uncontrolled environment.
End users must follow the specific operating instructions for satisfying RF exposure compliance. This
transmitter must not be co-located or operating in conjunction with any other antenna or transmitter.
Operating temperature:-10° to 65°C (14° to 149°F)
Charging temperature:0° to 45°C (32° to 113°F)
Power input type:DC 5V USB cable
Battery type:Rechargeable Li-Poly, 3.7 Vdc
Input:Maximum DC 5V, 0.1A
1.
2.
3.
4.
Android: http://ww2.voiis.com/igotu-life/help.html?language=en
iOS: http://ww2.voiis.com/igotu-life/help.html?language=en&platform=ios
http://www.mobileaction.com/download/Q-Band_download.jsp
http://www.mobileaction.com/web/en/faq_en/q-68hr/
1 3 5 2 4
6
8
7
9
10
11
Q-68
(
(
X2