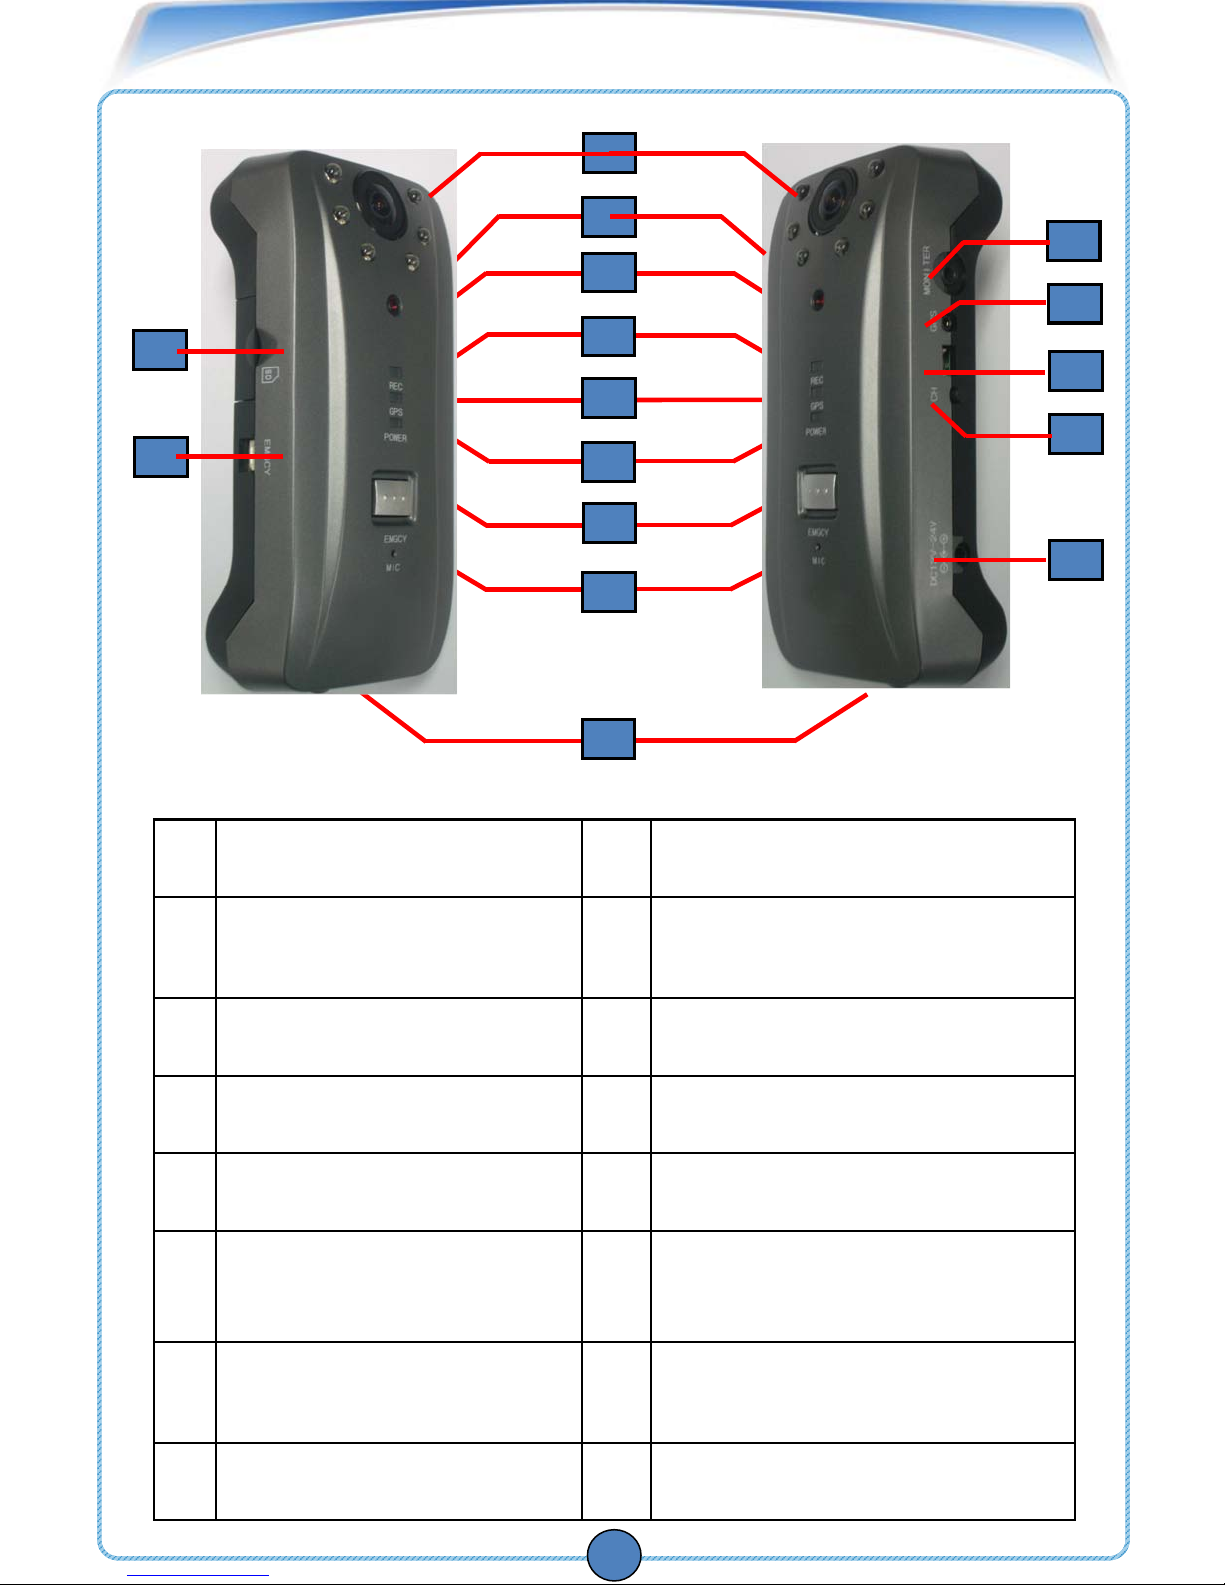
Mobile Video Systems Passive 2 User manual

Mobile Video Systems
23905 Clinton Keith Road Suite 114-388 • Wildomar
California 92595 • Tel: 888.721.5777 • Fax: 951.257.0411
www.mobilevideosystems.net • [email protected]

CONTENTS
CAUTIONS
FEATURES
PRODUCT CONTENTS
BEFORE YOU BEGIN
PRODUCT NAME
SPECIFICATION
BASIC INSTALLATION
MOUNTING BRACKET & MOUNTING PASSIVE2
IN STALLING A EMERGENCY BUTTON
RECORDING WITH PASSIVE2
PASSIVE2 VIEWER INSTALLATION
PASSIVE2 VIEWER GUIDE
PASSIVE2 CONFIGURATION
HOW TO SETTING
USER’S DIRECTION
REFERENCE I
REFERENCE II
REFERENCE II (GPS tip)
-------------------------------------------------------------1
-------------------------------------------------------------2
---------------------------------------------4
-----------------------------------------------5
----------------------------------------------------6
----------------------------------------------------7
---------------------------------------------8
-----------9
----------------------10
------------------------------11
----------------------------12
-------------------------------------13
------------------------------------23
--------------------------------------------------30
-----------------------------------------------31
------------------------------------------------------32
------------------------------------------------------33
-------------------------------------------34

CAUTION
Do not clean the unit
with liquid as it may
damage the product
and cause a fire or
electric shock.
Do not disassemble,
repair, or modify the
unit for it will void the
warranty.
Keep the unit
out of the sun
For it will distort
the image.
!
Do not adjust the
unit while
operating the
vehicle.
STOP
To prevent data
loss, turn off the
device prior to
removing the
SD card.
!
Do not insert unrelated
into the product
as it may
cause a fire or electric
shock.
For better visual
quality, keep the
lenses clean.
!
If the unit begins
to smoke, turn off
the product
immediately.
and contact
1

Thank you for purchasing this product. We commit to providing
our customers with a high quality, reliable security solution.
CAUTION RISK OF ELECTRIC SHOCK
DO NOT OPEN
CAUTION: TO REDUCE THE RISK OF ELECTRIC SHOCK DO
NOT REMOVE COVER. NO USER SERVICABLE PARTS INSIDE
REFER SERVICING TO QUALIFIED SERVICE PERSONNEL.
The lightning flash with arrowhead symbol, within an equilateral triangle, is
intended to alert the user to the presence of unisolated "dangerous voltage"
within the products ' enclosure that may be of sufficient magnitude to
constitute a risk of electric shock. The exclamation point within an equilateral
triangle is intended to alert the user to the presence of important operating and
maintenance (servicing) instructions in the literature accompanying the
appliance.
WARNING: TO PREVENT FIRE OR SHOCK HAZARD, DO NOT EXPOSE THIS
UNIT TO RAIN OR MOISTURE.
CAUTION: TO PREVENT ELECTRIC SHOCK, MATCH WIDE BLADE OF THE
PLUG TO THE WIDE SLOT AND FULLY
2
CAUTION
CAUTION

■ PRODUCT FEATURES
Thank you for purchasing the PASSIVE2. The PASSIVE2 features a built-in GPS
antenna, h.264 video compression for ultra-clear video, and intuitive playback software
for you to archive and view your recorded videos. PASSIVE2 is designed to record daily
driving events inside your vehicle, and from the driver’s view. To play back the events,
use the included PASSIVE2 software.
PASSIVE2 Features
• 4 hours(15fps/sec) recording time on a 4 GB (gigabyte) SDHC memory card (included);
(Supports a maximum of a 32GB SDHC memory card)
• 2 high resolution color cameras to record a vehicle’s interior and driver’s view
• Viewing angles: Driver-view camera: 120° field of view
In-Car view camera: 175° field of view
• H.264 video compression for high quality, compact video files
• Record driving events and pinpoint the location of the event using Google Maps™
(Internet connection required).
• Integrated GPS antenna, impact sensor and microphone
• Record video events inside and outside your vehicle
• Automatically records if an emergency event occurs
• IR LEDs for night vision recording inside the vehicle
.
PASSIVE2 Viewer
• Manage, backup and view your recorded videos
• Easy, intuitive menu navigation
• View your video while tracking the location of your vehicle with Google Maps
(Internet connection required).
• Save videos as AVI files for easy sharing
• Sort videos by event type
** As our products are subject to continuous improvement, we and our subsidiaries
reserve the right to modify product design, specifications, and prices without notice
and without incurring any obligation.
FEATURES
3

Product Contents
PASSIVE2 GPS and bracket Monitor Cable
Power Cable
(Cigar Jack)
SDHC Memory Card
External Emergency
Button
Cable Holder(option)
4
Electronic manual
(Located in Software CD)
Software CD
External SD card
reader(option)

Before you begin
5
1. Setting the Time and Date
To set the time and date, you must first install the PASSIVE2 Viewer software (included).
To install the PASSIVE2 Viewer software:
1. Insert the PASSIVE2 Viewer CD into your PC’s CD/DVD drive.
2. Locate the PASSIVE2 (3.x.x).exe file on the CD.
3. Double-click the PASSIVE2 (3.x.x).exe file.
The installer window appears.
4. Click Next.
5. Read and scroll to the very bottom of
the software User Agreement. Select the
"I Agree" box and click Next.
6.Choose Automatic Installation or Manual Installation and click Next.
The "Select Installation Method" window appears.
7.Click Finish when program installation completes. PASSIVE2 Viewer opens.
To adjust the Time and Date with the PASSIVE2 Viewer open:
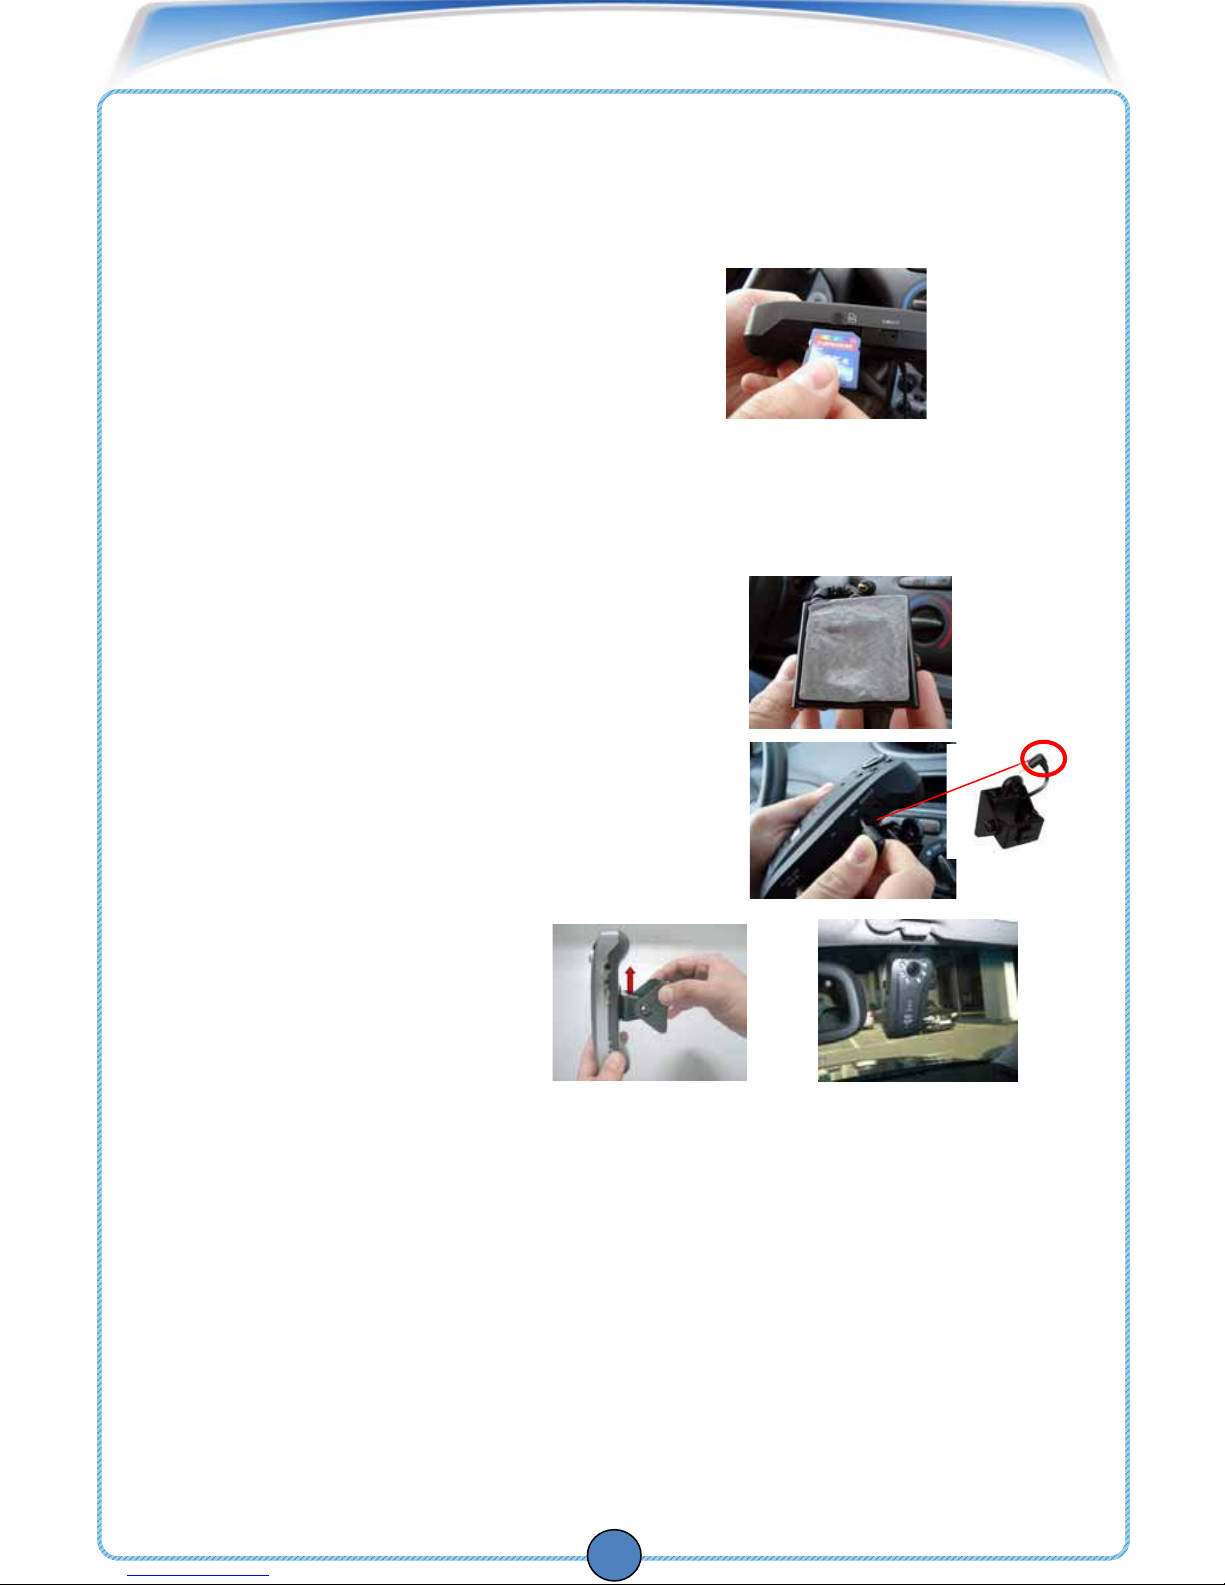
1. Insert the SDHC memory card into the memory card reader and plug memory card
reader into your computer’s USB port.
NOTE: Use the included memory card reader to ensure compatibility.
NOTE: The SDHC memory card slides smoothly all the way into the memory
card reader.
The SDHC memory card goes in one way only. Do not force in the card.
2.Click OK on the log in window prompt. The default login is: admin.
The default password is left blank.
3. Click (Setup). The Setup window opens.
4.In the Systems tab, under Standard time
zone, select your time zone and daylight
savings settings. Click OK.
The Save As window appears.
5.Locate the SDHC memory card reader directory. Click Save.
NOTE: Make sure that you save the JDF file onto your SDHC memory card, and
NOT onto your PC hard drive (ie. C:\). All PASSIVE2 Settings must
save onto the SDHC memory card for settings to take effect.
6. Eject memory card and insert it into the PASSIVE2. Your PASSIVE2
automatically synchronizes the date with the satellite once powered on.

1 SD Memory Slot 9 Emergency Button
2 Emergency Extension
Cable Connector 10 MIC
3 In- car Camera 11 Driver-View Camera
4 IR LED 12 Monitor Connector
5 CDS(daylight) Sensor 13 GPS Connector
6 Recording LED 14
Network port
(only for the external SD card
reader)
7 GPS LED 15 Channel Switch
(When monitor is connected)
8 Power LED 16 Power Cable Connector
6
3
4
5
6
7
8
9
10
11
1
2
12
13
14
15
16
Name of each part

Product Specification
7
CAMERA 2EA CMOS Built-in
VIDEO INPUT Digital 2ch built-in
AUDIO INPUT/OUTPUT C- MIC built-in
VIDEO COMPRESSION H.264
AUDIO COMPRESSION ADPCM
RECORDING RESOLUTION VGA 640X480
RECORDING SPEED Max.60fps (CH/30fps)
EMERGENCY SWITCH Emergency recording
VIBRATION SENSOR Impact detection and recording
GPS SENSOR Instantly records after sudden acceleration and breaking.
RECORDING MEDIA SDHC Memory card Class 6 (Max: 32GB, Default 4GB)
LENS Driver-view 120° and In-car view 175° Wide angle
IR LED 850n 6PCS with CDS Sensor
VIEWER Windows XP/ VISTA support
POWER DC 12V (enable Car Battery)
OPERATING TEMPERATURE 0° ~ 50°C (maintain temperature: -25° ~ 85°C)
HUMIDITY 10~95%
WEIGHT 150g
DIMENSION (W x D x H) 65 (W) x 140 (D) x 30(H)mm
* Specifications can be changed without notice

BASIC INSTALLATION
8
1. Insert the SDHC memory card.
a. Open the SD memory slot cover
b. Insert the SDHC memory card into the slot
with the sticker face up, and upright.
Push memory card firmly until you hear a click.
Memory card locks in place.
c. Close SD memory slot cover.
NOTE: The SDHC memory card should slide smoothly into the memory slot.
The SDHC memory card is designed to go in one way only. Do not force
in the card.
2. Install the mounting bracket
a. Stick the double-sided adhesive onto the base
of the mounting bracket.
b. Plug the mini-jack connector from the mounting
bracket into the side of the PASSIVE2 labeled GPS.
c. Slide mounting bracket upwards on the back of
the device . The mounting bracket locks in place.
d. Connect the car adapter to the
PASSIVE2 and cigar lighter.
3. Mount the PASSIVE2
NOTE: See “Mounting your PASSIVE2” for mounting tips.
a. Orient the unit upright .
Firmly press the mounting bracket onto the windshield.
Hold for three seconds to secure.
b. Loosen the screws on the mounting bracket to adjust the
mounting angle. Tighten screws to secure mounting position.
CAUTION: Always have a clear view of the road. Adjust the positioning of the
PASSIVE2 so that it does not affect your driving reflexes and traffic
awareness. Check local laws before mounting unit on windshield.

Mounting Bracket & Mounting PASSIVE2
9
1. Mini-jack connector: Transmits GPS tracking information to the PASSIVE2.
2. GPS Antenna: The GPS (Global Positioning System) antenna tracks your
current location in relation to satellites orbiting around the globe.
The GPS antenna records information onto the SDHC memory card.
When watching videos with the PASSIVE2 Viewer, you can track the location
and speed of your vehicle on Google Maps.
NOTE: The built-in GPS antenna DOES NOT act as a portable navigation system.
The purpose of the GPS antenna on the mounting bracket is to track
your location, and transmit the information to the SDHC memory card
only. See “Enabling Google Maps View”.
3. Mounting Bracket Screws: Tightens and loosens the mounting bracket elbow.
Twist screws clockwise to tighten, counter clockwise to loosen.
2
1
3
4. Mounting the PASSIVE2 at the correct angle allows the unit to receive optimal
GPS reception and recording angles.
NOTE: Apply double-sided adhesive to the mounting
bracket base, and orient unit upright before
mounting .
To mount your PASSIVE2 for the first time:
a. Secure unit to the right of your rear-view mirror.
Position the unit so that it does not interfere with your view.
b. Press and hold the mounting base firmly to the windshield for three seconds to
secure the unit in place.
c. Plug in the car adapter to the PASSIVE2 and into the cigarette lighter to power up
REMINDER: The mounting bracket adhesive has a powerful bond to surfaces.
Double-check the mounting position before securing in place. The Driver-View
Camera adjusts to three angles. Push camera up or down to lock in place.
d. Adjust the angle of the mounting bracket by loosening the screws on the side .
Tighten screws to secure position.
NOTE: The PASSIVE2 takes 30 seconds to start up.
Wait for the GPS LED to glow solid green, followed
by a beep before driving. The REC and POWER LEDs
glow solid red. During normal operation, the REC,
GPS and POWER LED will always be on.

INSTALLING A EMERGENCY BUTTON
10
The Emergency button extension allows you to bookmark an event as an "Emergency"
for easy searching in the PASSIVE2 Viewer. Emergency recordings capture video at 30
FPS for enhanced detail. Place the emergency button extension where you can easily
reach.
To install the Panic Button extension cable:
1. Remove rubber cover on the side of the unit with a thin,
rigid object.
2. Insert the end of the panic button
extension into the EMGCY port .
3. Run the cable along the dashboard to
conceal the cable out of view.
4. Remove the double-sided adhesive on
the back of the panic button, and stick on surface .
NOTE: The end of the panic button extension connects one way into the
EMGCY port. Do not force. 3. Insert the bracket from the bottom and slide it
up until you hear a click.
Adjusting Driver-View Camera
The Driver-View Camera adjusts to three angles.
Push camera up or down to lock in place.

RECORDING WITH PASSIVE2
11
The PASSIVE2 records continuously once it receives power.
Before recording, familiarize yourself with how the PASSIVE2
records events.
The PASSIVE2 comes with a built-in monitor-out port.
You can hook up a portable monitor (not included) to
view what the PASSIVE2 records in real-time.
This ensures that you have the best possible recording angle.
To connect your portable display to the PASSIVE2:
1 .Connect the mini-jack from the video cable into the MONITOR port on the side
of the unit.
2. Connect the yellow RCA video cable into the portable
display (not included).The video displays on the monitor.
3. Adjust camera angles as needed.
To change camera views:
• Press the CH button on the side of the unit to change
between channel 1 and channel 2. This switches camera views between
the in-car camera and the Driver-View camera.
How the PASSIVE2 Interprets Bumps and Impacts
When your vehicle goes over a bump or receives a sudden
force, the built-in sensor causes the REC LED on the unit to flash for several seconds.
This means the PASSIVE2 has bookmarked the event. When an event is bookmarked,
you can easily categorize and find the particular moment in the Event window when you
encountered the sudden bump or impact. See “Viewing Recorded Video Files” for
details on how to find videos by events.
Using the Emergency Button
The emergency button engages the PASSIVE2 to record at maximum quality, and marks
the event as "Emergency" when viewing the file in the PASSIVE2 viewer.
When you press the emergency button:
a. The video automatically pre-records and post records a set duration that you
can configure.
b. The video is tagged as an "Emergency" event that you can later search and
categorize the video using the included PASSIVE2 Viewer. The video records at
maximum resolution (30 FPS).

PASSIVE2 VIEWR INSTALLATION
1. Run “PASSIVE2 (3.X.X).exe” file from the Installation CD.
(If the OS is VISTA, right click the mouse and install with user’s authorization.
Foreign languages are provided and the program will be translated according to
the PC’s OS)
2. After clicking “Finish Installation”, open the PASSIVE2 ICON on the desktop.
12

PASSIVE2 VIEWER GUIDE
13
■ PASSIVE2’s main screen (Before opening the recording data).
1. If security is needed for the recorded data in SDHC card, you can
restrict access to recorded data with your own ID and password.
Caution: You will not be able to playback the recorded data if you forget the ID and
password
• Setting -> User setting(ID & Password) -> OK to save
Insert SDHC card into the PASSIVE2’s SD card slot Driving & Recording
Pull out SDHC card from the PASSIVE2 Checking it in your PC with
inputting your own ID and password on PASSIVE2 viewer

PASSIVE2 VIEWER GUIDE
14
1 Event Searching Button 6 Open Files
2 Minimize 7 Backup to (JDF, AVI,JPEG, BMP)
3 Maximize 8 Configuration
4 Shut Down 9 Print
5 Play Button 10 E-map Open
Move 1 frame backward Play backward
Pause Play
Move 1 frame forward 1 Channel play
2 Channel Play 2 Channel in one time (PIP)
Play Button
A
G-Sensor Graph : When the event happens, the impact level of left& right, up &down,
front & rear displays.
• X axis : Front & rear movement
• Y axis : Left & right movement
• Z axis : Up & down movement
A
①②③④
⑤⑥⑦⑧⑨⑩
B
B Data folder section : data will be shown automatically once you’ve loaded from the folder

PASSIVE2 VIEWER GUIDE
■ Play modes
• 1channel play(channel can be switched)
• 2channel play(channel can be switched)
• 2Channels simultaneously (PIP function)
15

PASSIVE2 VIEWER GUIDE
• Enlarge the screen mode
When double clicking on the image, the view will become full screen
(1024 x 768 resolution is the recommended)
16
Double click
• Magnifying function
Click right button on mouse, enlarge the spot

PASSIVE2 VIEWER GUIDE
When playing the recorded files, they are distinguished by category such as
normal, emergency, impact or over speed.
The files are displayed in order by year/month/day/time/minute/second/event.
■ Play modes
Event search icon : divide event categories
17

PASSIVE2 VIEWER GUIDE
■ Event Search
18
When you click the event button, the video playback stops and the event search
window box is to pop up.
Search and check the event by incident type with clicking application then data list
displays for your selected incident types.
But, in case that there is no data for your selected incident type, the warning box
pops up.
Table of contents