MobilitySmart CRM20059 User manual

INSTRUCTIONS & TECHNICAL MANUAL
BATHLIFT
INDEX
Important Sa ety in ormation...................2
The product ...................................................3
The battery and Charger............................3
Temperature Gauge and probe.................4
Hand Held Controller...................................4
Operation........................................................4
Indicator Lights ............................................6
Maintenance.................................................6
Installation.....................................................7
Wall Mounting the Unit..............................7
Floor Anchor Fixing.....................................8
Contained in your Delivery Carton..........8
Guarantee/Weights & Measurements....8
CE and EMC Approval.................................8
Environmental In ormation .......................8
BATHLIFT
MODEL CRM20059
Instructi ns updated:BATHLIFT RELAXA 5/8/10 15:52 Page 1

IMPORTANT SAFETY
INFORMATION
It is important this instruction manual is
retained with the bath lift for future
reference. Should the bathlift be sold or
transferred to another owner or should
you move house and leave the bathlift,
always ensure this instruction manual is
available for the new owner to know the
functioning of the bathlift and the relevant
warnings. These warnings are important
and MUST be read before installing or
using the bathlift.
INSTALLATION
IIt is imperative the installation is
carried out safely and correctly and is
undertaken by an experienced
professional familiar with building
construction.
IEnsure there are no pipes or electrical
cables that could be damaged when
fixing the unit to the wall and floor.
IWhen fixing to a “studded” or non-solid
wall, reinforcement may be required to
ensure the bathlift will take the
person’s weight and operate safely.
IThe maximum lifting weight is 127 kgm
(280 lbs) and MUST not be exceeded.
CHILD SAFETY
IDo not allow children to play with the
bathlift. It is not a toy.
IRemove the battery to a safe and
secure place if there is a possibility
children will have access to the
bathlift.
USE
IThe battery charger must not be used
in the bathroom.
IThe battery weighs 1.5 Kgm (3.3 lbs)
and should be handled carefully.
IKeep the battery well charged.
IThe belt must be located in the floor
anchor correctly. Make sure the
retaining discs prevent the belt from
coming out.
IAlways be aware of the floor anchor
fitting. DO NOT TRI OVER IT.
IIf you have any doubt as to your ability
to use the bathlift totally unattended
you should ensure that you have a
capable carer present.
IMake use of the grab rail to steady
yourself when entering or exiting the
bath.
IThe maximum lifting weight of 127 kgm
(280 lbs) should not be exceeded and
the bathlift used only for the purpose it
is intended.
IThe bather should take care to keep
fingers away from where the belt
enters the bathlift cover.
IWhen used for the first few times the
bather should accustom themselves to
the lifting and lowering motion
particularly the sideways re-adjustment
as the belt is being fed from one side
only.
IEnsure the battery charger lead is
plugged into the small socket on the
battery shown by the arrow and NOT
in the large central socket.
IDo not clean the belt with bleach or
similar skin irritating substance.
2
Instructi ns updated:BATHLIFT RELAXA 5/8/10 15:52 Page 2

THE PRODUCT
The bathlift is a motorised device
designed for the use of the elderly and
those who find that getting into and out of
a bath has become increasingly more
difficult. With its use, access becomes
safe and easy.
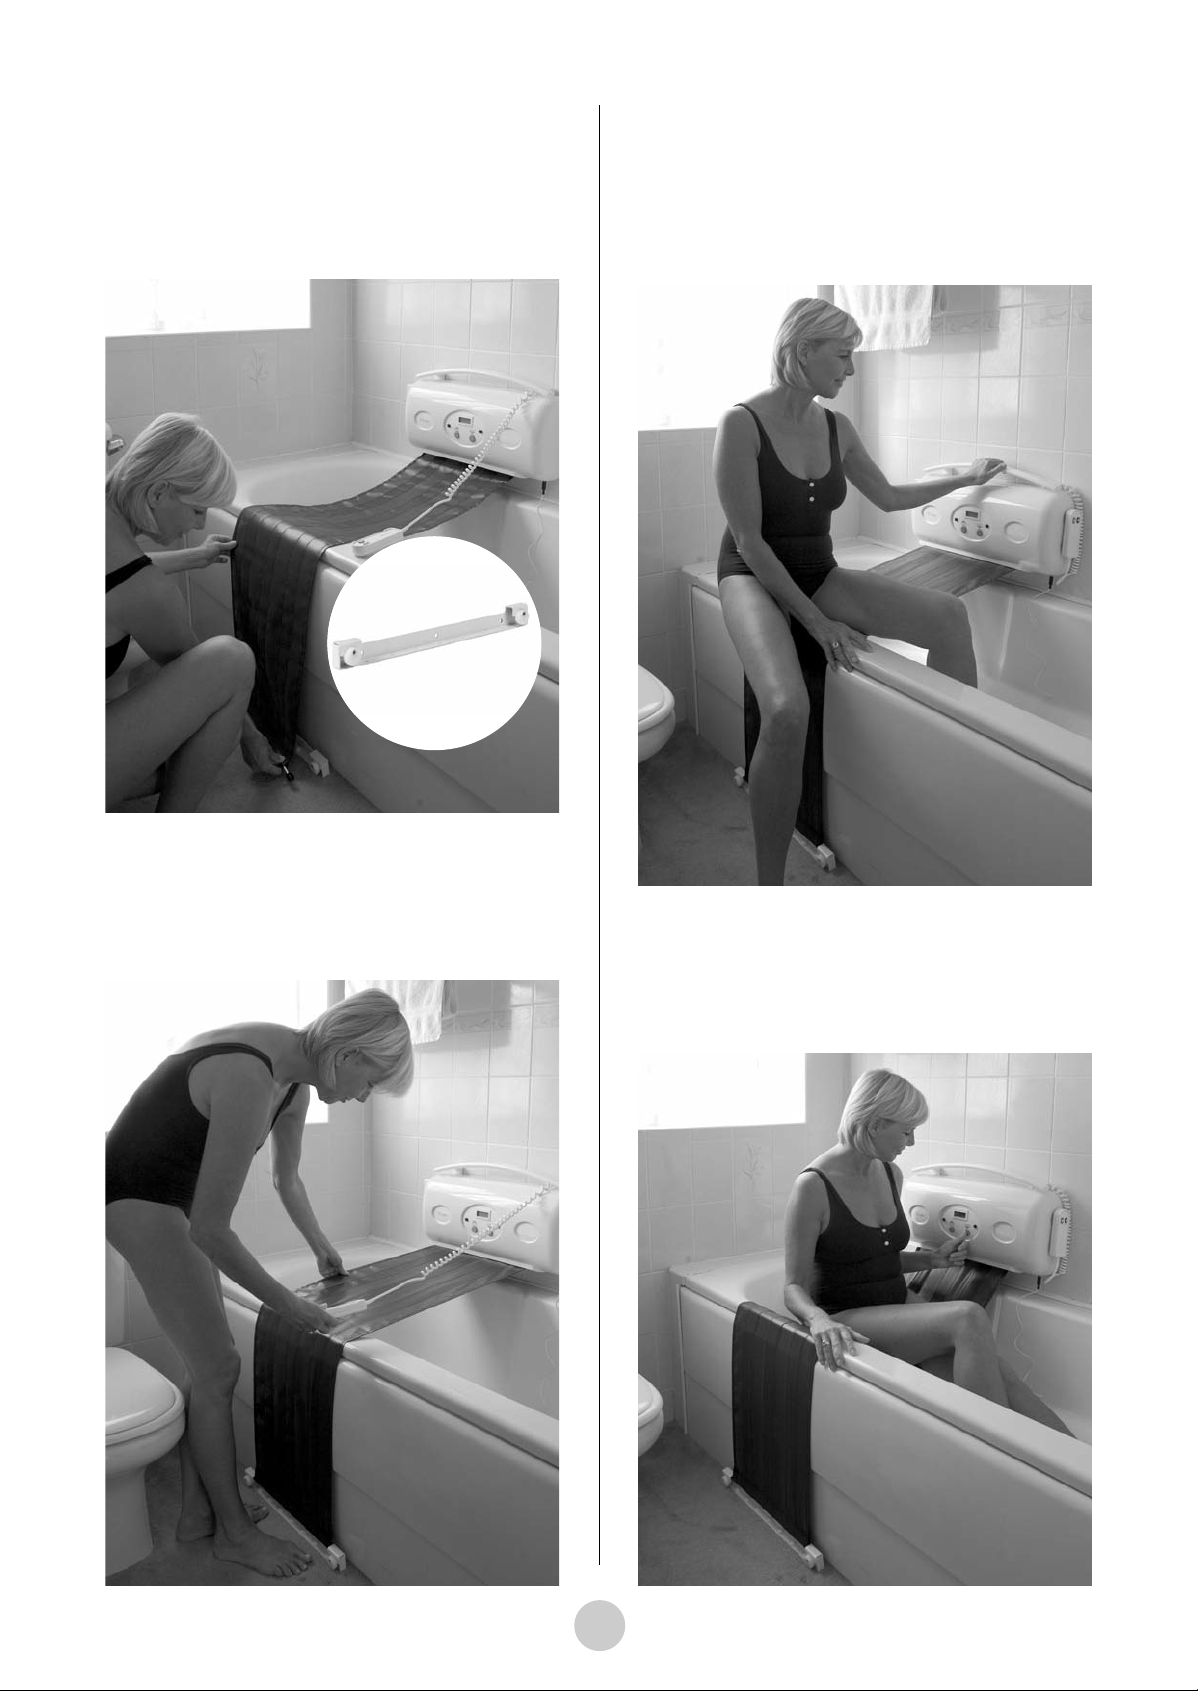
Operated by two control buttons it will
gently lower and raise the bather into and
out of the bath when the user is seated on
the reinforced polypropylene seating belt.
This flexible belt is firmly secured to a
winding shaft within the cabinet case and
the other end anchored to a sturdy floor
fitting at the side of the bath.
Features
IThe unit is powered by a 24-volt DC
rechargeable battery pack. No mains
electricity supply is required in the
bathroom. Operation is by control
buttons to raise and lower the bathlift
as required.
IIndicator lights in green and red shows
the battery is in operation and the
battery condition.
IA water thermometer with immersible
probe is fitted which states the
temperature of the water, to avoid the
risk of scalding. The probe is shown in
photo 2
IHand held remote controller, which is
water-resistant.
IA safety feature is built into the bathlift
which prevents excessive tensioning if
the control button is held down too
long when stretching the belt across
the bath.
IA belt reversal device is also fitted to
prevent the belt from rolling up in
reverse.
IA micro switch prevents the bar being
taken into the unit if the UP button is
pressed too long.
IStainless steel is used to fabricate the
interior of the cabinet to provide
improved corrosion resistance.
THE BATTERY AND BATTERY CHARGER
Following the installation the battery
should be charged for a minimum of 15
hours
IMPORTANT
Ensure the charger lead is plugged into
the small socket indicated by the arrow.
(see fig 1) NOT the large central socket.
The charger must not be used in the
bathroom.
To charge the battery, plug the charger
into a 13-amp mains socket and the
charger connector lead into the small
socket of the battery.
The charger has a red and green
indicator light. When the charger is
switched on and it is connected to the
battery, the green indicator light will
change to red. This indicates that the
battery is being charged and the state of
the battery is low. As the battery receives
its full charge the red light will fade and
the green light will come on until only the
green light is seen. Since the charging
rate is small the battery may be left on
charge without any detriment to the
battery. Indeed it is important for
batteries to be fully charged as under
charged batteries can deteriorate much
quicker.
It is important that the battery is charged
regularly as this will prolong the life of the
battery cells. It is recommended that the
battery is charged at least once a week.
As the battery becomes older so the
number of charges per week should
increase.
3
1
Instructi ns updated:BATHLIFT RELAXA 5/8/10 15:52 Page 3

TEMPERATURE GAUGE AND PROBE:
Insert the Temperature Probe Jackplug
into the small socket underneath the unit
at the right hand side. The probe has a
small plastic disc attached. Place this
suction disc onto the side of the bath
under the water line (see photo 2)
Briefly press either button and the gauge
will show the water temperature for about
20 seconds. If the water level does not
cover the probe or if it is not plugged in
then the gauge will show the bathroom
temperature (see photo 3)
The probe is a delicate item. Take care
not to inadvertently damage it. Remove
carefully from the unit after use and store
in a safe place.
HAND HELD CONTROLLER
The Hand Held controller has ‘UP’ and
‘DOWN’ buttons and operates in the same
way as the control buttons on the unit
itself. It can be operated by the bather or
by a helper. For easy recognition the
GREY arrowed button is for DOWN into
the water. There are suction pads on the
controller to attach it to the bathlift or
bathroom wall, whichever is convenient.
The Hand control is also water tight
should it fall in the bathwater.
OPERATION
With the battery fully charged and the
temperature probe in position (optional)
the bathlift can be used.
STEP 1
Place the battery in the hole on the left-
hand side of the bathlift
STEP 2
Ensure it is firmly pushed into position
STEP 3
Press the down button and feed out the
belt sufficiently for it to reach the
mounting bar
When the hand held remote controller is
used either by the bather or by an
assistant, the device will operate the
bathlift without the need to use the control
buttons on the cabinet face.
4
2
3
Instructi ns updated:BATHLIFT RELAXA 5/8/10 15:52 Page 4

STEP 4
By rotating the discs the anchor bar can
be located into the mounting bar itself.
Turn the discs to ensure the anchor bar is
positively locked in. THIS IS VERY
IM ORTANT.
STEP 5
Tension up the belt by pressing the ‘UP’
button until the belt is tight across the
bath. The automatic cut out will stop the
belt when it is tight.
STEP 6
The bathlift is now ready for the bather to
sit on the belt, ease their legs over the
side of the bath and into the water
holding on to the inbuilt grabrail for extra
support.
STEP 7
Now press the DOWN button which will
slowly and gently lower the user to the
bottom of the bath. You can now relax
and enjoy a refreshing bath
5
Instructi ns updated:BATHLIFT RELAXA 5/8/10 15:52 Page 5

STEP 8
When bathing is finished press the UP
button and this will raise and return the
user back to the original bath height, so
that the bather can again hold on to the
grabrail and place their feet over the bath
edge and onto the floor
STEP 9
With the belt slackened, free the end
secured to the floor bracket. By pressing
the up button once more the seating belt
will retract back into the cabinet, ready for
future use. Leave about 75 mm (3”) of
the belt outside the unit.
INDICATOR LIGHTS
When the buttons are pressed, the unit
will ‘come to life’ and the green indicator
light will illuminate together with the
temperature module. If the unit is not in
use for more than 30 seconds it will ‘go to
sleep’. This conserves the battery. When
the button is pressed the unit will again
illuminate.
A red light will appear on the front of the
unit to indicate that the battery is low.
However, after this light appears there is
still enough power in the battery to lift you
out of the bath. You should, however,
charge the battery IMMEDIATELY.
MAINTENANCE
With attention to regular recharging, the
battery should provide about two years of
reliable service. To replace the battery at
the end of its life, simply release the three
screws which are at the opposite end to
the pull out handle. Remove the TWO
batteries positioned in line within, and
replace with two NP1.2-12 volt sealed
lead acid batteries, and reassemble.
These are available from most battery
stockists throughout the United Kingdom
and the continent at a modest cost.
It is important to mention that batteries at
the end of their working life must be
disposed of environmentally safely e.g.
they must NOT be disposed of on an open
fire or by any other hazardous means.
Whilst stainless steel is used to totally
eliminate rust on the interior of the cabinet it
is important to understand that as the unit
must have entry points for the battery and
the hand control unit it is NOT waterproof.
WATER CAN GAIN ACCESS.
When showering, care must be taken to
avoid soaking the unit with an excess of
water which could damage the interior
electronics. There is a purpose made
shower cover protection cap which your
Distributor can supply.
6
Instructi ns updated:BATHLIFT RELAXA 5/8/10 15:52 Page 6

This will effectively prevent water
damage.
Apart from the above, the bathlift needs
no maintenance other than normal good
housekeeping attention to cleanliness.
However, do not use bleach or other skin
irritant substance to clean the belt. The
bathlift will give constant service for many
years to its user.
INSTALLATION
Because it is imperative that the
installation is carried out safely and
correctly, it is strongly suggested that
this work be undertaken by an
experienced professional, familiar with
building construction.
Walls of various constructions each
require different treatment and different
fixings. By the operation of the bathlift
with its lifting weight of up to 127 kilos
(280 lbs) the wall supporting this item and
the securing fittings used therewith must
be sufficiently robust to meet the purpose.
Note: this bathlift will not operate
100% efficiently against a bath with a
curved exterior.
THE CHASSIS BACKPLATE AND THE
WALL PLATE:
Illustrated in Photo 5 is the chassis
backplate and the wall plate marked as
Photo 4. The wall plate has six projecting
studs which have provision for screws,
bolts or other suitable fixings to pass
through the centre of the stud to secure
the wall plate firmly to the wall.
The chassis backplate is machined with 6
keyhole slots which allow this steel plate
to slot tightly down over the projecting
studs. Both plates should fit together
flush and level at the bottom edge. The
bathlift should finally be fitted 130 mm
from the top of the bath to the centre of
the first line of securing screws and best
positioned to suit the user’s comfort.
WALL MOUNTING THE UNIT
Fitting to a solid brick wall with sound
tile or plaster finish:
Position the wall plate as described
above. Use 6 off 6mm Rawl Bolts of
sufficient length to fix to this type of wall.
Follow the bolt manufacturers instructions
for correct fitting. Make certain that all six
fittings are securely fitted.
Fitting to a ʻstuddedʼ or non-solid wall:
An absolutely secure fixing to this type of
wall is vital. Reinforcement of or the
insertion of a solid area is essential.
Consult a builder experienced in this
work. If screwed rods with nuts are used
to fix right through the wall together with a
load spreading plate on the rearside then
make certain that the rods finish FLUSH
with the nuts inside the unit
OTHERSWISE THE BELT COULD BE
DAMAGED WHEN USED. osition as
above.
7
4
5
Instructi ns updated:BATHLIFT RELAXA 5/8/10 15:52 Page 7

FLOOR ANCHOR FIXING
Fitting to a stone or concrete floor:
First make certain that there are no services
that might be damaged by drilIing into the
floor. With the unit soundly fixed to the wall
extend the belt square across the bath and
vertically down the side and position the
anchor floor bracket snugly against the
bath panel. Use 7 off No: 10 stainless steel
screws into suitable rawl plugs to fix to this
type of floor. Follow the plug manufacturers
instructions for correct fitting.
Fitting to a wooden boarded floor
Procedure as above. Use 7 off of No: 10
screws to fasten the mounting bar to the
floor. If it is thought that the flooring is not
adequate to take the strain then add a
cross baton under the floor to reinforce
the boarding.
WEIGHTS AND MEASUREMENTS
Dimensions: Length 55.5cm (21.8”)
Height 32.5 cm (12.8”)
Depth 11.8 cm (4.6”)
Weight unpacked 11 kilos (24 3
/4lbs)
Weight packed 15.9 kilos (353
/4lbs)
GUARANTEE
The manufacturers undertake to provide a
full one year’s guarantee effective from
the date of purchase of the Bathlift
subject to (A) the bathlift being unable to
fulfil its function due to proven faulty
components or faulty workmanship and
(B) that the faulty product is returned
direct to the factory.
ENVIRONMENTAL INFORMATION
At the end of its useful life, this product
contains materials which when processed
correctly can be recovered and recycled.
By participating in the responsible
recycling of this product you will be
reducing the requirement for new raw
materials and reducing the amount of
material that would otherwise end up in
landfill.
The bath lift etc can be taken to your local
recycling centre. The local authority will
advise you of the collection facilities
available for waste electronic products in
your area.
8
MANUFACTURED BY: AND EMC A ROVED
C R Manufacturing EEE roducer Registration No. GA0292UQ
Frederick Street
Waddesdon
Aylesbury
Bucks HP18 0LU
(In the light of continuous improvement the company reserves the right to change the specification of the product and manual)
CONTAINED IN YOUR DELIVERY CARTON
I1 Bathlift with remote control
I1 Wall mounting Plate
I1 Water temperature probe and suction disc
I1 Floor Anchor Bar
I1 Manual (fixing and fixing screws are NOT included)
I1 Battery Box
I1 Charger
08/10
Instructi ns updated:BATHLIFT RELAXA 5/8/10 15:52 Page 8
Table of contents
Popular Bathroom Fixture manuals by other brands

Delta
Delta DRYDEN H251 Installation

Delta
Delta Windemere B2596LF quick start guide

Dreamline
Dreamline ALLIANCE PRO SDAH48W700 installation instructions

Delta
Delta 54446 PK Series installation instructions

Dreamline
Dreamline Unidoor-X D58580 Series installation instructions

RamonSoler
RamonSoler Soltronic 8102 manual