The HiRes Video Company
EN
www.mobotix.com
HiRes Video Innovations– Made in Germany
The German company MOBOTIX AG is known as the leading pioneer in network camera technology and its
decentralized concept has made high-resolution video systems cost-ecient.
MOBOTIX
AG
•
D-67722
Langmeil
•
Phone:
+49
6302
9816-103
•
Fax:
+49
6302
9816-190
•
[email protected] MX-Overvoltage-Protection-Box: Quick Install
2013 • Declaration of Conformity: www.mobotix.com> Support> MX Media Library> Certificates
Copyright © MOBOTIX AG 2013 • Made in Germany • Technical information subject to change without notice.
80mm/3.2in
80mm/3.2in
75mm/3in
15mm/
0.6in
MX-Overvoltage-Protection-Box
VarioFlex Wall Mount
Drilling templates for other MOBOTIX wall mounts: www.mobotix.com> Support> Manuals
Drilling Template for VarioFlex Wall Mount
with MX-Overvoltage-Protection-Box
1. Attach the box
Attach the MX-Overvoltage-Protection-Box-LSA at the
mounting position with the cable ports pointing down-
wards and open the lid of the box (three screws).
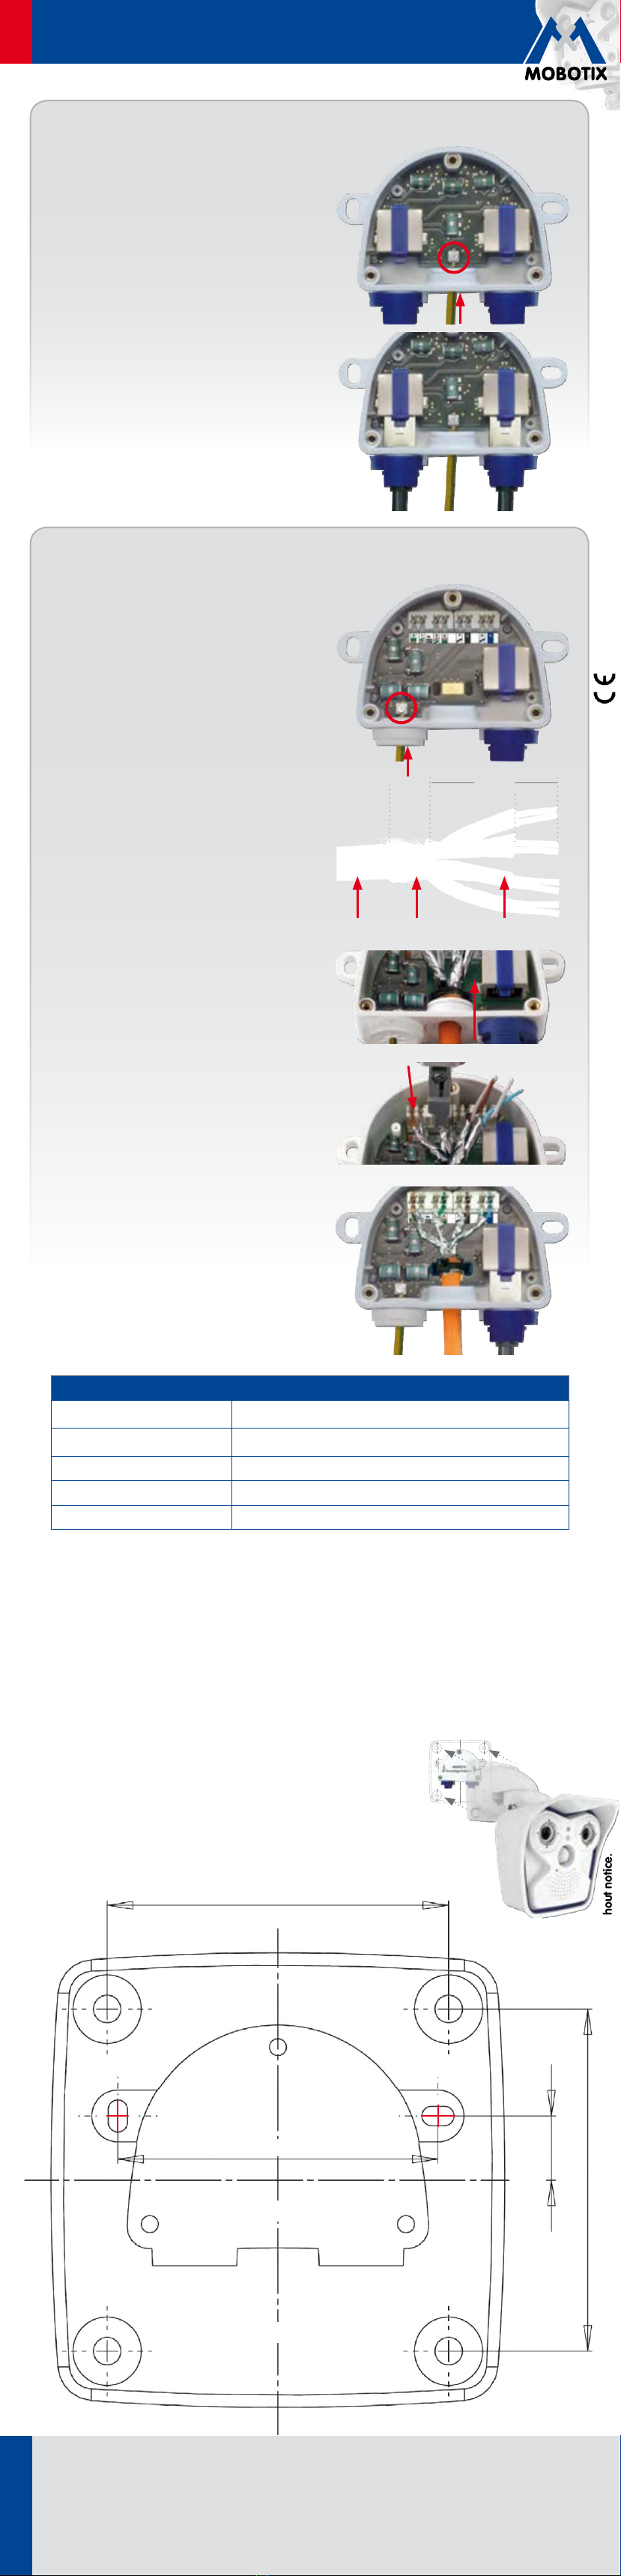
2. Connect ground wire
Open the terminal screw (red circle in figure) using a
regular screw driver. Strip the insulation of the ground
wire for approx. 5mm/0.2in and push the wire through
the eight-wire plug at the left. Insert wire into terminal
and fasten terminal screw.
3. Prepare the installation cable
Cut the installation cable to size, push it through the
cable plug 5to 7mm in the center, strip the cable for
at least 35mm and separate the individual wires of the
cable into twisted pairs with 20mm shielding. Wrap
the shield mesh around the cable sheath 10mm wide
so that it can rest on the contact plate of the board.
The cable will be fastened with a cable tie later on.
4. Feed the cable into the box
In order to prevent humidity entering the box, the rub-
ber sleeve needs to be tight against the cable. Guide
the supplied cable tie through the two cable slots as
shown and pull the cable tie tight around the cable
shield to provide proper strain relief.
5. Connect the cable wires
Use an LSA PLUS wire insertion tool to insert the in-
dividual wires into the LSA terminal. Decide on using
either the EIA/TIA-568A or B wiring standard as in the
rest of the building. The color code sticker in front of
the LSA terminal shows both standards.
If no LSA PLUS tool is available, you can use a tool with
interchangeable blades (LSA/Krone blade with setting
"Low Impact").
6. Attach the patch cable, close box
Remove right-hand bayonet catch and sealing plug,
insert MOBOTIX patch cable into the cable port and
secure it using the bayonet catch as shown. Only use
MOBOTIX patch cables with integrated sealing ring!
Mount the cover back onto the box (torque 0.4Nm).
MX-Overvoltage-Protection-Box-LSA
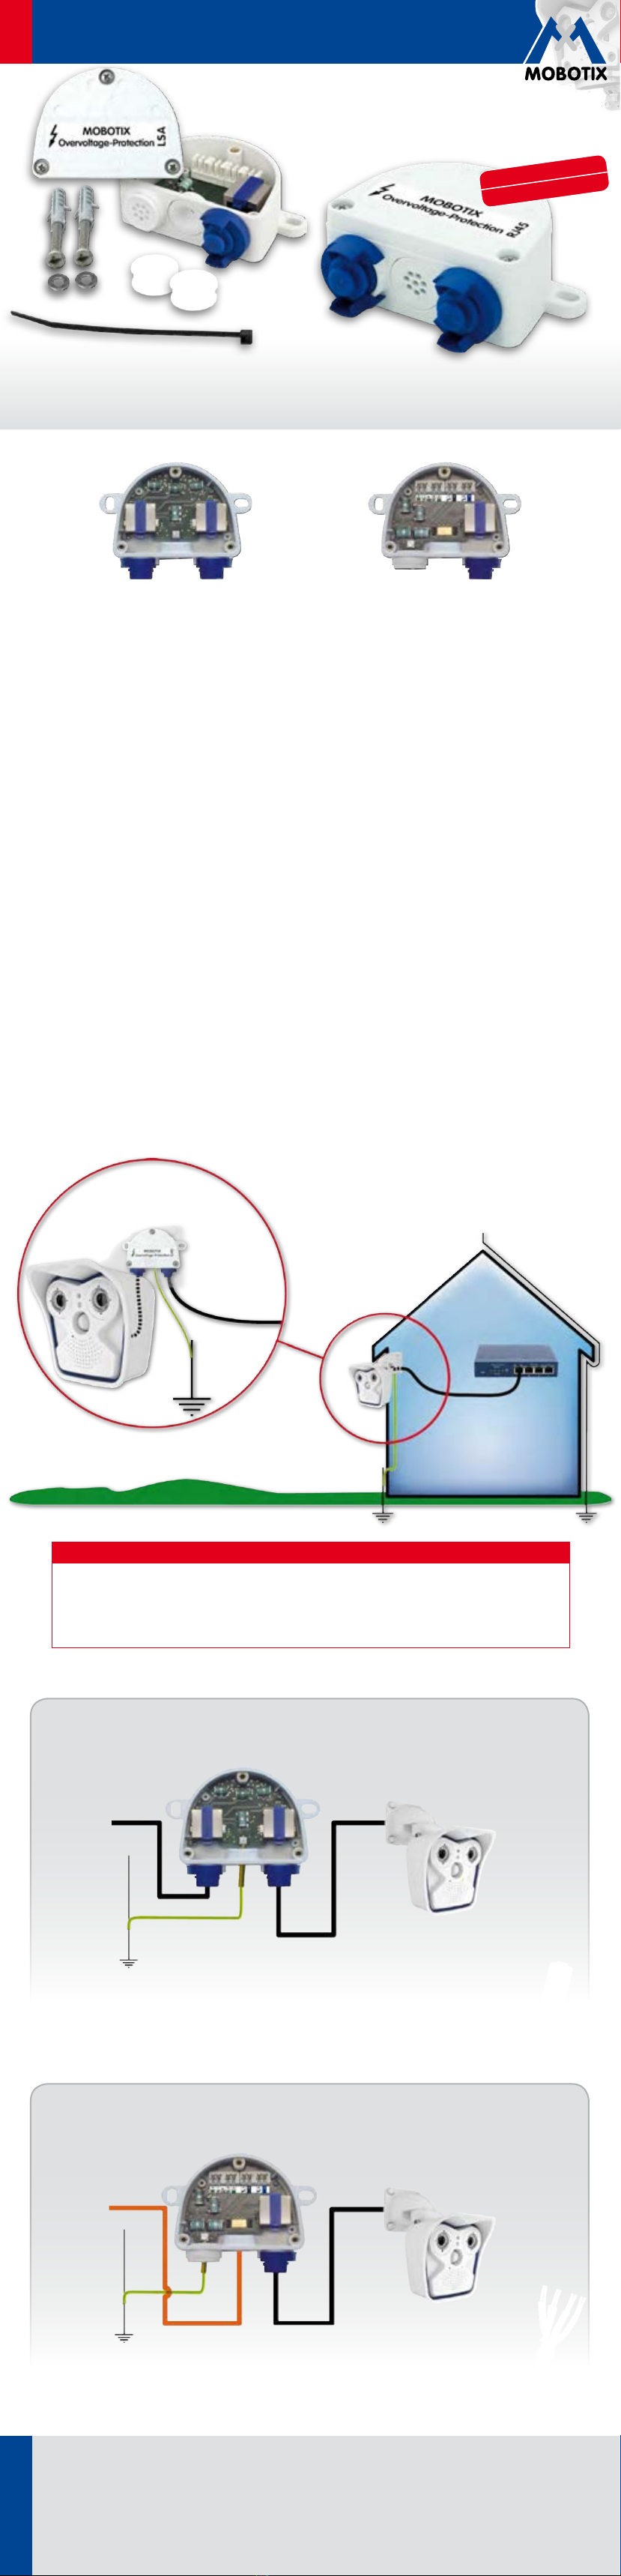
Installing the MX-Overvoltage-Protection-Box-LSA
~20mm
~35 mm
~15 mm
~10 mm
Shield meshCable sheath Pair shield
Important Notes
• The cable from the MOBOTIX device to this product must not be longer than 50cm/19.7in.
• When using an installation cable, pay attention to the correct twisting and shielding of the cable.
• Position of holes in combination with VarioFlex wall mount: see drilling template below.
• All unused ports must be closed with the supplied rubber seals.
• Maximum torque for all box cover screws: 0.4Nm.
• The ground wire may only be connected by qualified electricians.
• This product must not be used in locations exposed to the dangers of explosion.
• It is only allowed to connect one MOBOTIX device to this product.
• Make sure that you are installing this product on a solid surface.
• Make sure that you are installing this product with the connectors point-
ing downwards.
Technical Specifications
Normal Usage Surge protection for MOBOTIX cameras with PoE power supply
(PoE+ according to IEEE 802.3at up to 57V)
Protection Against Surges Tested up to 4kV on all wires of an attached cable according to test standard
EN61000-4-5
Protection class IP65 (DIN EN 60529)
Operating temperature –30 to +60°C/–22 to 140°F (DIN EN 50125)
Strength of the Ground Wire 1.5to 2.5mm2
1. Attach the box
Attach the MX-Overvoltage-Protection-Box-RJ45 at
the mounting position with the cable ports pointing
downwards and open the lid of the box (three screws).
2. Connect ground wire
Open the terminal screw (red circle in figure) using a
regular screw driver. Strip the insulation of the ground
wire for approx. 5mm/0.2in and push the wire through
the eight-wire plug in the center. Insert wire into terminal
and fasten terminal screw.
3. Attach the patch cable, close box
Remove both bayonet catches and the sealing plugs,
insert MOBOTIX patch cables into the cable ports and
secure them using the bayonet catches as shown. Only
use MOBOTIX patch cables with integrated sealing ring!
Mount the cover back onto the box (torque 0.4Nm).
MX-Overvoltage-Protection-Box-RJ45
Installing the MX-Overvoltage-Protection-Box-RJ45