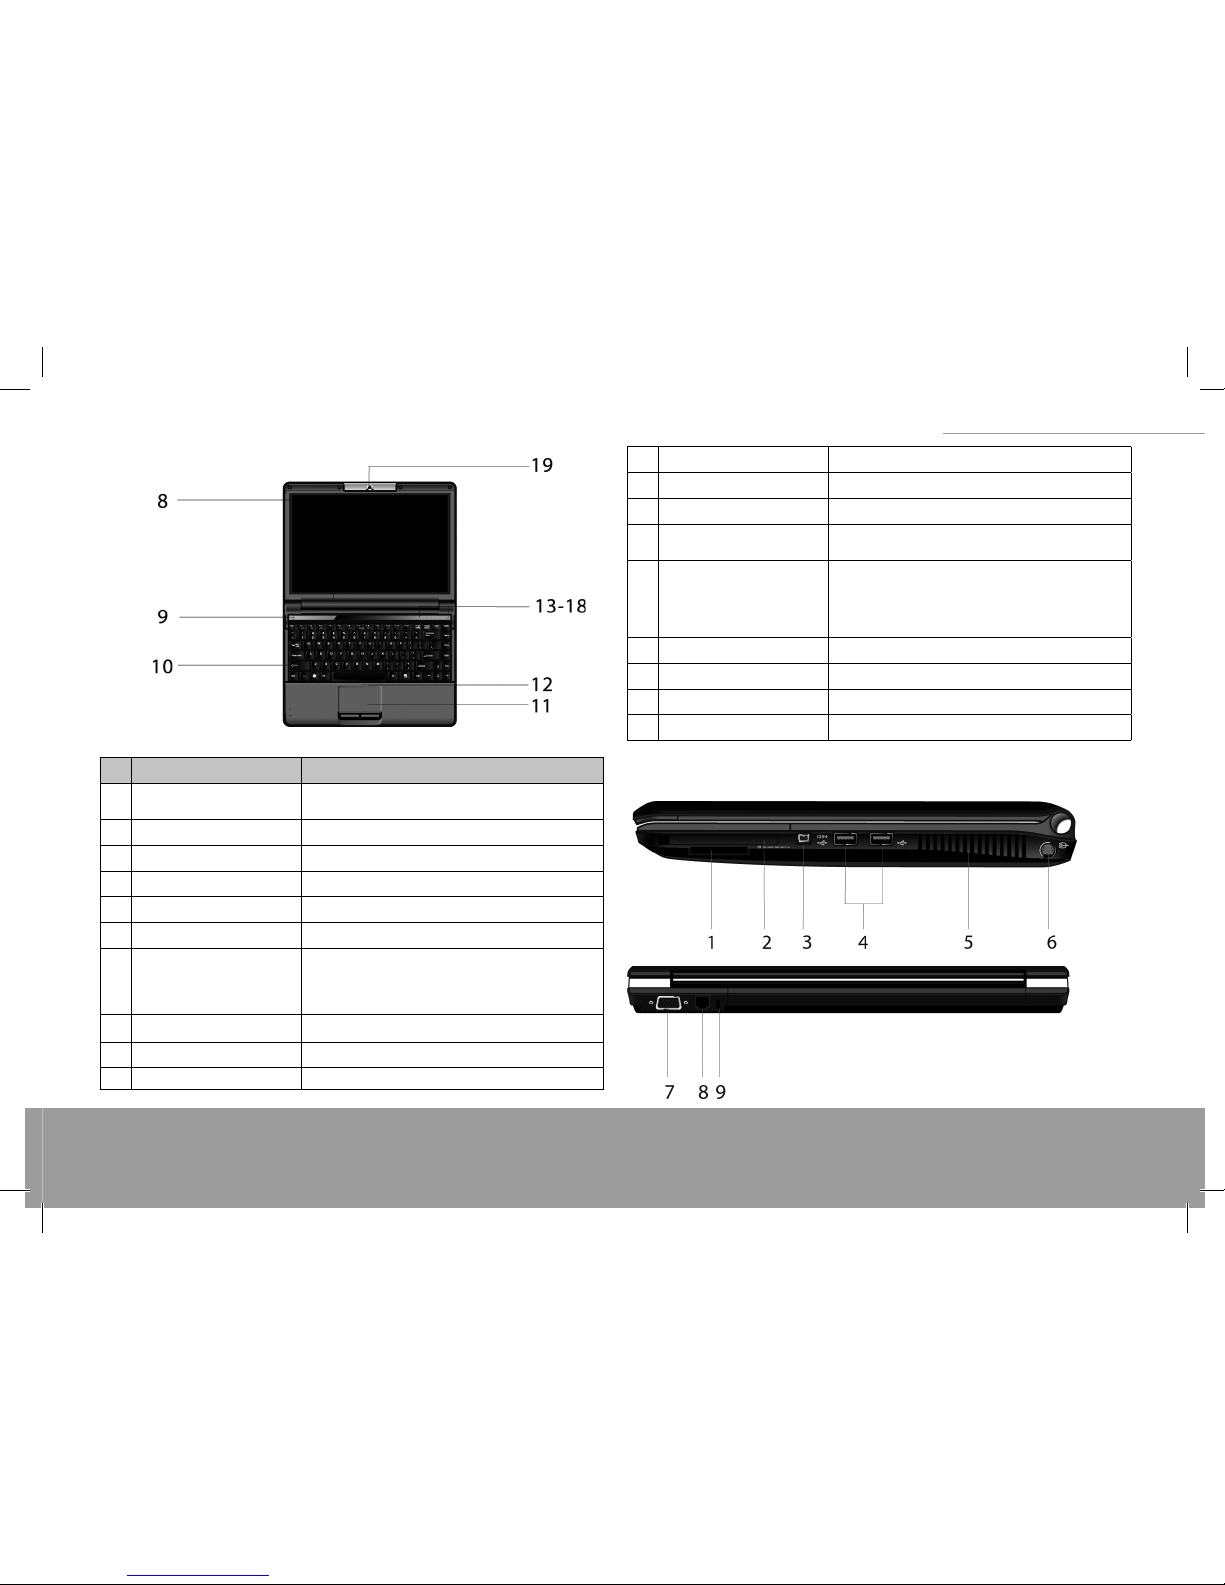
Modecom XINO PRO User manual

www.modecom.eu
2
XINO PRO notebook
Notes for this manual 4
Chapter 1 Learning the parts 4
Left view and Front view 4
Right view and rear view 5
Bottom Items 6
Chapter 2 Using your Notebook PC 6
External power supply 6
Opening the display panel 6
Turning the notebook PC on/o 7
Power on 7
Shutting down the Notebook PC 7
shortcut keys 7
Using the Touchpad 8
Customizing the Touchpad 8
Using the hard disk 8
Using the optical disk drive 8
Inserting and removing a disk 9
Display Function 9
Power management 9
Using the audio function 9
Audio devices connection 9
Using the communication function 10
Using the modem 10
Using the network function 10
Connection to LAN 10
Connection to WLAN 10
Using camera 12
Using control center 13
Main information 13
System information 13
Battery information 13
CPU and Fan information 14
Display 14
Hot Key 14
Environment setting 14
Device controller 15
Battery learning 15
Operating system 15
Support software 15
Chapter 3 Power management 16
AC adapter 16
Battery pack 17
INDEX

3
XINO PRO notebook
Charge 17
Replacing the battery pack 17
Low battery 18
Power management 18
Hibernation 18
Tips for power-saving 18
Chapter 4 Adding peripherals 19
Connecting an external CRT monitor 19
Connecting an external TV set 19
Using the Card reader 19
Connecting USB devices 19
Connecting 1394 device 19
Using Bluetooth 20
Using express card 23
Express card format 23
Inserting a PC card 23
Ejecting a PC card 23
Update internal components 23
Chapter 5 BIOS utilities 23
Using Setup utility 23
Entering setup 23
How to select 24
Main menu 24
Advanced menu 24
Security menu 25
TPM menu 25
Physical presence operations menu 25
Boot menu 26
Exit menu 26
Chapter 6 Taking care of your notebook PC 26
Securing your notebook PC 27
Using passwords 27
Using anti-virus protection 27
Using a Kensington lock 27
Daily maintenance 27
Environmental guides 27
General guides 27
Cleaning guides 27
Battery guides 27
Travelling with the Notebook PC 28
Depending on the model you purchase, the appearance of the Notebook PC may be not exactly the same as those shown in this manual.

www.modecom.eu
4
XINO PRO notebook
Xino Pro is a 13,3 inch laptop, what makes it, one of the smallest available on the market.
Xino Pro features very good conguration and high quality. It’s simple, solid and el-
egant form, makes Xino Pro universal and interesting. MODECOM Xino Pro is ideal
for business, as well as for home usage, like browsing the internet, watching pho-
tos, movies or listening to the music. 1.3 Mpix built-in webcam enables video chat-
ting.
Xino Pro comes without any O/S, in order to leave the end-users free choice, re-
garding to their requirements and needs.
Introduction
This Manual is designed to help you understand better the performance of your
notebook PC and how to operate it.
Chapter 1. Knowing the parts. A brief introduction to your Notebook PC.
Chapter 2. Using your Notebook PC. Quick instructions for using the components and
their functions.
Chapter 3. Power Management. Information about power management.
Chapter 4. Notebook PC Expansion. How to install peripheral devices.
Chapter 5. System BIOS Setup. The use of Setup utility program.
Chapter 6. Taking care of your Notebook PC.
Chapter 7. Troubleshooting tips.
Notes For This Manual
Some words or phrases are highlighted with special format in this manual.
Note Tips and useful information.
Important Important instruction that must be followed to prevent damage to data
and components vor harming users.
Optional To remark a function or asset is not the standard conguration. You can
choose the proper conguration for your requirement, only you choose it, you can use
the function.
When more than one key is connected with the symbol of + it means that you should
press the rst key and hold it, then press the others, after that release all at the same
time. Other keys will also be symbolized with marks.
Chapter 1 Learning the Parts
Congratulations on your purchase of this Notebook PC!
Your Notebook PC combines powerful information processing and convenient mobil-
ity. It enhances your eciency whether you are in the oce, on-the-go or at home.
This guide explains the components and provides a brief introduction to the PC.
Note Information contained herein is for reference only and the description of your
Notebook PC may dier slightly from specic details in this manual.

5
XINO PRO notebook
Item Description
1Wireless LAN / Bluetooth
Switch Turn on/o Wireless LAN and Bluetooth device.
2 DC Jack Connector for the AC-adapter.
3 RJ-45 port Ethernet Network Connection
4 USB port Connector for USB devices.
5 ODD Optical Driver module
6 Microphone port Audio input
7 Audio output port
Audio output 5.1 channel front-side output.
Compatible with headphone, speaker or other line
out audio devices.
8 Display Panel Display panel for your notebook PC
9 Power button Power on/o
10 Keyboard Input device
11 TouchPad Function like the mouse
12 Microphone Built-in M icrophone
13 HDD Activity indicator Green light indicates hard disk is in use
14 Power indicator Solid light indicates system is on. Flashing light in-
dicates s
y
stem is in standb
y
15 Wireless LAN Activity indi-
cator
Green light indicates wireless connection is ac-
cessed. It blinks every three seconds when no con-
nection is available. It is o when the wireless LAN
is not active
16 Number Lock indicator Num Lock is active when lit
17 CAPS Lock indicator Caps Lock is active when lit
18 Environment Button Change environment mode
19 Camera Built-in 1.3 mega pixel camera
Right View and Rear View

www.modecom.eu
6
XINO PRO notebook
Item Description
1 Card Reader slot (optional) Accept SD/MMC/MS/MS PRO card
2 Express card slot Accept Express card
3 1394 port (optional) Connector for 1394 devices
4 USB port Connector for usb devices
5 Ventilation holes For system cooling
6 S-video port Connector for s-video cable to transfer the screen
to TV set.
7 VGA port Connector for an external display device
8 RJ-11 port (optional) Phone cord connection
9 Kensington lock Connector for a Kensington-Type lock
Bottom Items
Item Description
1 Ventilation slot For system cooling
2 Speaker(optional) Althorn
3 Battery lock Locks the battery pack in place
4 Battery Built-in power supply of the notebook PC
5CPU /FAN /WLAN
/HDD Memory cover
Protects and provides access to the built-in
CPU /FAN / WLAN/HDD module/Memory
Chapter 2 Using Your Notebook PC
This chapter provides a brief introduction to setting up the Notebook PC from power-
ing the system on to installing system drivers.
EXTERNAL POWER SUPPLY
Either the external AC adapter or the built-in battery pack can provide power to
Notebook PC. It is strongly recommended to use the AC adapter when you turn on
your Notebook PC for the rst time.
Important Please use the attached AC adapter only. Using other AC adapters may
cause damage to the system.
Make sure that the Notebook PC is powered o Connect the mains adaptor to jack on
the back of the Notebook PC.
Connect one end of the AC plug to the AC adapter, and the other end to the AC outlet.
Power on your system.
Note The AC adapter can both power the Notebook PC and charge the built-in battery
pack at the same time. For more information on the battery pack, please see chapter 3.
OPENING THE DISPLAY PANEL
Important Please be gentle when open or close the display cover. Any rough handling
may cause damage to the Notebook PC.
Directly lift the top cover to reveal the LCD screen and keyboard, then adjust the angle
of LCD for comfortable viewing.

7
XINO PRO notebook
TURNING THE NOTEBOOK PC ON/OFF
Power on
Please make sure that the Notebook PC has been connected with the AC adapter or as-
sembled with the battery pack. Press the power button and hold for one second.
Shutting down the notebook PC
When you nish your work and want to stop using the Notebook PC, you can either
shut it down completely, put it into standby, or put it into hibernation mode.
If you shut down the Notebook PC by putting it into standby or hibernation mode,
this will enable you to carry on working where you left o previously when you next
power on the system.
Name Methods Resume Methods
Power o
Please follow the power-o procedures of
the operating system to avoid data loss.
When the system does not respond becau-
se of a system resource conict, you can
shut the notebook PC down by pressing
the power button for at least 4 seconds
until the power is o. Please note that any
unsaved data will be lost.
Use the power but-
ton
Standby
Standby settings can be congured within
the operating system. To put the Notebook
PC into standby mode, the following me-
thods can be used: Close the Lid Press
Fn+Esc. Press the power button
Open the display pa-
nel or use the power
button
Hibernation
Depending on the settings in the operating
system, the following methods can be used
to put the system into hibernation mode:
Close the display cover. Press Fn+Esc. Press
the power button
Use the power but-
ton
Important Do not power up the Notebook PC immediately after shutting it down.Wait
for at least ve seconds to avoid damage.
SHORTCUT KEYS
The very rst line of the keyboard consists of several shortcut keys from Esc to F11.The
software in use customizes their functions. Combined with the Fn key, those shortcut
keys can perform special functions. See the table below for more details.
Key Description
Fn+Esc Sleep toggle, customized by the Windows power ma-
nagement
Fn+F1 Enable or disable touchpad function
Fn+F3 While wireless Lan turn on, this keys is set to enable or
disable wireless LAN function
Fn+F4 Mute toggle
Fn+F5 Decrease Screen brightness
Fn+F6 Increase Screen brightness
Fn+F7 Switch displays. Depending on presence of
external display
Fn+F8 Toggle the LCD display on and o
Fn+F9 User dene, fault as quickly launch IE
Fn+F10 User dene, fault as quickly launch Email
Fn+F11 User dene, fault as quickly launch Windows Media
player
Fn+F12 Bluetooth switch turne on, this keys is set to enable or
disable bluetooth application
Fn+ Increase volume
Fn+ Decrease volume

www.modecom.eu
8
XINO PRO notebook
USING THE TOUCHPAD
Glossary
Item Description
Point Move your nger tip so that the cursor is on the object
you want to select
Click
Press the left button and release it quickly. Another way
is to move the cursor onto the object and tap once on
the Touchpad with your nger tip.
Double- click
Quickly click the left button twice. Another way is to
point the cursor to the object and press twice quickly
on the TouchPad with your nger tip
Drag and drop Point the cursor to the object, press the left button and
hold until you move the cursor to a new location.
Scroll Slide your nger up or down on the right side of the
TouchPad to sroll a window up or down.
If you have exchanged the functions of the left and right buttons of the Touchpad, tap-
ping on the TouchPad cannot function like clicking the left button.
Note Do not use sharp objects on the TouchPad (such as the tine of a pencil).
Important To maintain the high sensitivity of the TouchPad, please keep TouchPad dry
and clean. When tapping the Touchpad to perform mouse clicks, do not use excessive
force; a gentle tap should be all that is necessary. The TouchPad is a tool for commu-
nication between you and the Notebook PC. It enable you to move the cursor around
the screen and make the selection by clicking the buttons. The square surface of the
TouchPad is like a small image of the LCD; when you move your nger around the
TouchPad, the cursor on the screen will follow the direction of your nger on the pad.
CUSTOMIZING THE TOUCHPAD
The TouchPad can be customized to suit the user’s needs, for example, the user can ex-
change the functions of the left and right buttons if they are left handed, and it is also
possible to change the size and speed of the cursor. The Mouse icon in the Control Panel
allowing you change these settings,although the available options can vary depend-
ing on the version of operating system. In addition to these standard options, more ad-
vanced functionality is available by installing the Touch-Pad driver that is bundled with
the Notebook PC.
Note If the TouchPad is disabled before the system is put into standby, it will also
be toggled ON automatically when the system wakes up. If you want to disable the
TouchPad, you can do this by pressing ‘Fn+F1’.
USING THE HARD DISK
A hard disk for the operating system and other software has been installed in your
Notebook PC.
The hard disk is of 2.5 inches IDE (Integrated Drive Electronics) specication.
This kind of hard disk has the control unit integrated directly on to the hard disk itself
for high performance and reliability.
Important The data on your hard disk should be backed up periodically to other disks
or other storage media to prevent data loss in case of damage by virus or user error.
Do not remove or assemble the hard disk when the Notebook PC is powered on be-
cause it may cause data loss and damage to the electronic circuits of the hard disk
or PC.
When the HDD indicator is lit, do not shut down or restart the Notebook PC.
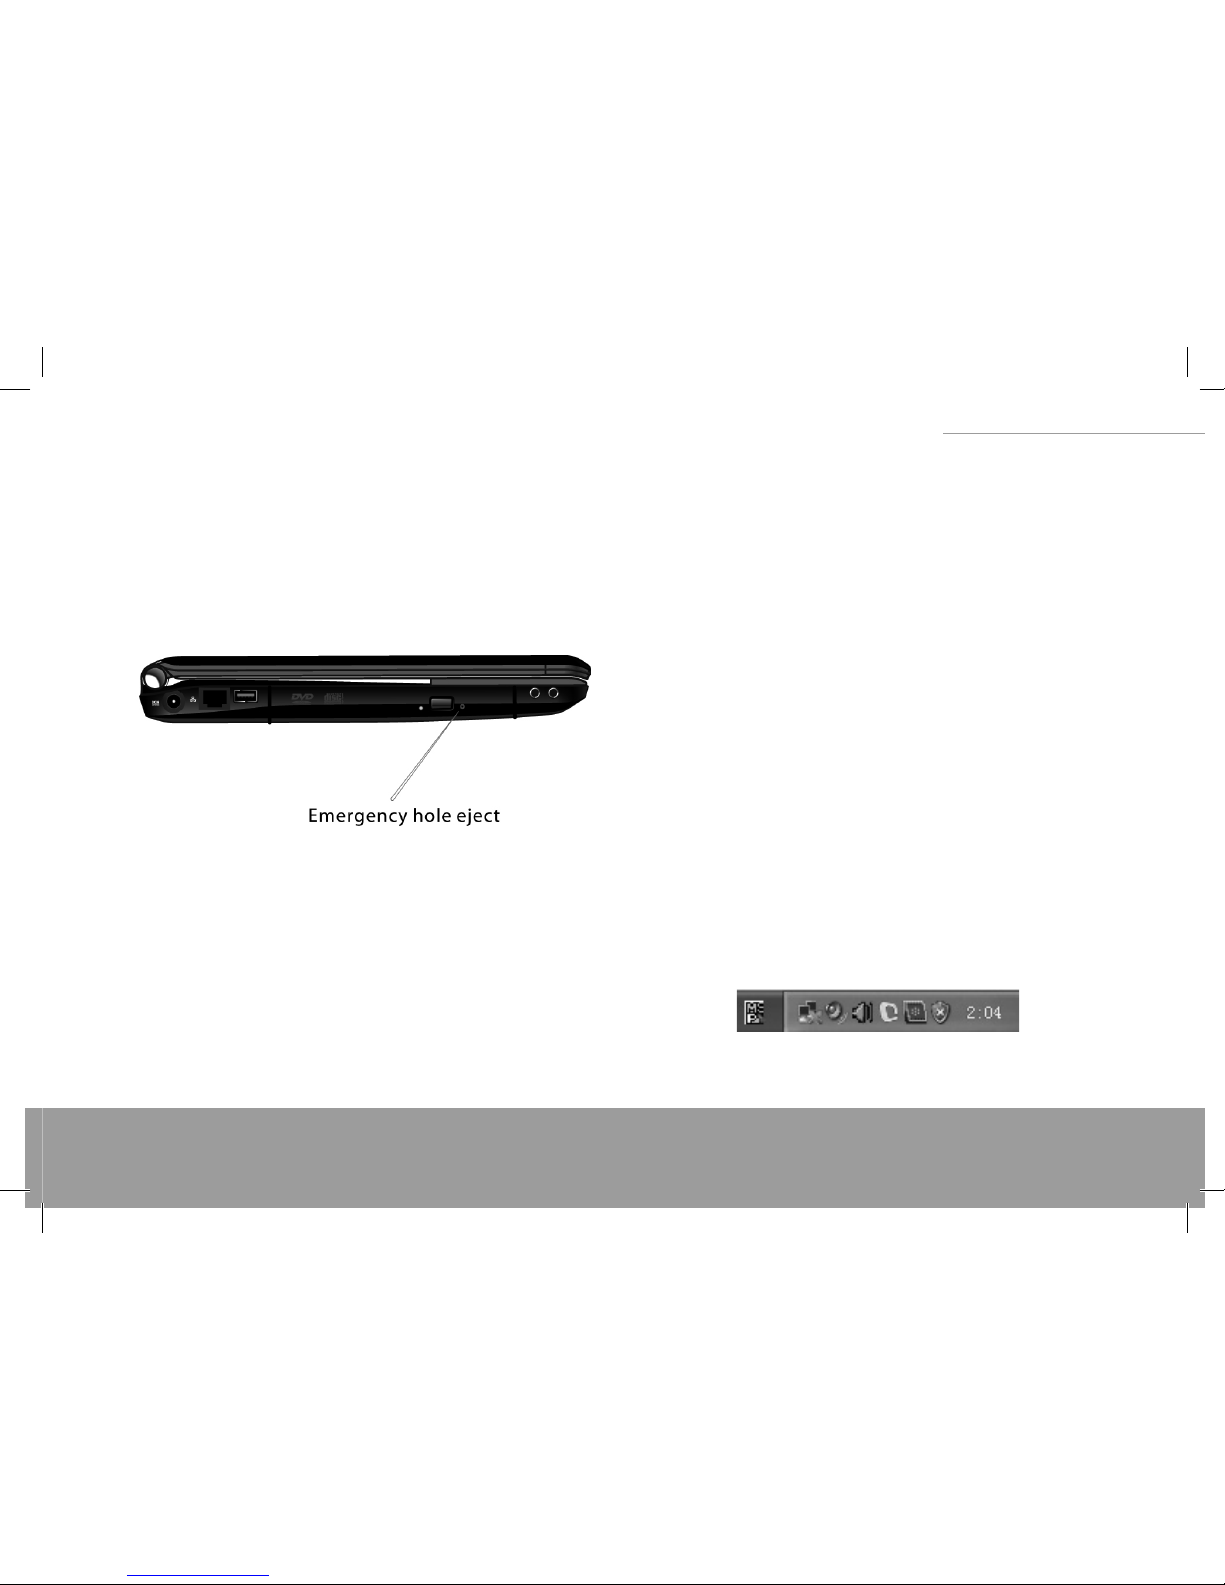
USING THE OPTICAL DISK DRIVEODD
An ODD has been installed in your Notebook PC for reading optical media.Depending
on your Notebook PC model, your optical drive may be one of the following:
Combo drive: in additional to DVD drive’s function, it can write CD-Rs, CD-RWs.
Super Multi DVD: it can read and write DVDR/ RW, DVD+R/RW, DVD-RAM besides the
functions of combo.

9
XINO PRO notebook
Inserting and Removing a disk
To eject the disk when the Notebook PC is on, press the drive eject button and pull the
tray out gently.
Holding the disk around the edge,place it right on the tray with the labeled side up.
Lightly press the center of the disk to seat it well. Ensure that the disk is securely locat-
ed in position before closing the ODD. Gently push the disk tray back.
Note When you want to eject the tray when the power is o, please insert the point of
a pen into the emergency eject hole and pull out the tray.
DISPLAY FUNCTION
The display function of the Notebook PC includes:
13.3 inch TFT (Thin-Film Transistor) colour LCD (Liquid Crystal Display), resolu-
tion of WXGA 1280x768, WXGA 1280x800, WSXGA 1680x1050 or WUGA1920x1200.
(Specication depend on model of notebook). Both LCD and CRT or TV monitors sup-
port display synchronization and display expansion. Display synchronization is helpful
in giving a lesson, having a meeting or seeing a movie.
POWER MANAGEMENT
Important When you close the display cover, your Notebook PC may be put into
Standby or Hibernation status.
If you want your Notebook PC to work with the display panel closed, please disable this
function in the Power Management Setup within the Operating system.
USING THE AUDIO FUNCTION
Important Please install the audio driver bundled with your Notebook PC.
If any jamming occurs when recording, please reduce the input volume of the microphone.
The audio function of your Notebook PC includes: Digital audio and analog mixer sup-
porting. Supporting Sound Blaster Pro, Adlib, Microsoft Windows, and System Sound.
Directly compatible with 3DTM. Built-in microphone, stereo speakers and subwoofer
(optional). Volume control with function keys. Two external ports: Line-in/Rear-out
(SPDIF), External microphone-in/Center and Bass -out( ). Support 7.1-channel output,
the basic function of family-cinema and DVD drive. It brings a 3D surround eect to ac-
cess reality for display.
AUDIO DEVICES CONNECTION
For better audio eect, you can connect external audio devices to your Notebook PC.
The microphone input port supports external microphone connections for external
sound input or recording.
The Audio Output port supports audio output devices such as speakers and head-
phone. A 7.1-Channel speaker is also supported.
For better recording eect, please chose microphone boost, the method is as following:
when the audio drive installed, there is an icon in the task bar, double-click the icon.
Click Mixer, then the small button under Mic Volume, Advanced setting window is
shown, select Microphone Boost, click ok to enhanced recording eect.

www.modecom.eu
10
XINO PRO notebook
Note When using the external audio devices, the built-in speakers will be automatical-
ly disabled. The methods of connect extra audio device, playing and recording sound,
please follow the instructions of your operating system or its online help.
USING THE COMMUNICATION FUNCTION
Using the modem(optional)
Important The data driver program bundled with your Notebook PC must be installed
before you use the modem.
The built-in 56K voice/fax/data MODEM enables you to communicate with others through
an ordinary phone line, such as fax, E-mail, BBS or on-line services.
The proper way of connecting a phone line is to connect one end of the phone line to the
RJ-11 port of your Notebook PC and the other end to the phone line outlet.
Note When using the communication software, you may disable the power management
function. Setup all the parameters, such as baud rate and line type (pulse dialing or tone
dialing).
USING THE NETWORK FUNCTION
Connection to LAN
Your Notebook PC comes with an internal 10 Base-T/100Base-TX LAN module that con-
nects your Notebook PC to other Notebook PCs/networks through a local area network
(LAN) and supports data transfer rates up to 1000Mbps. The 10Base-T standard, also
called Twisted Pair Ethernet, is connected with RJ-45 connectors. The 100Base-TX is based
on the older Ethernet standard. Because it is 10 times faster than Ethernet, it is often re-
ferred to as Fast Ethernet. The built-in LAN module provides a standard RJ-45 connector.
Connection to WLAN (optional)
Your notebook PC has a PCIE slot, allows you to insert a WLAN card WLAN lets user con-
nect to the LAN without using any wire to the traditional RJ-45 jack. User can enjoy the
wireless connection within the range of Access Point (AP) of LAN.
Note According to local settings, the picture may be a little dierent from this chapter.
An Access Point (AP) is a wireless transmission and receiving device and is generally con-
nected to the server of a LAN environment or acts as a LAN hub with wireless connec-
tion. The access point can be set in an oce environment, airport or major railway sta-
tion. Details depend on the specics of each country. In most cases, you will probably use
it at the oce. Please consult with the network department of your company for more
details.
This computer has a built-in 3945ABG or 4965 AG WLAN module, using the Intel PRO/
Wireless network solution as part of the Intel Santa Rosa mobile technology platform.
The WLAN supports, at most, a 54 Mbps wireless connection speed. You can connect to
the WLAN Access Point without having to insert an extra WLAN card into the Express card
slot. WLAN module is similar to LAN module. You need to install a software driver before
using it.
After setting up the WLAN, computers can share documents, folders and printers as in an
ordinary LAN. WLAN is categorized into AP and Computer to computer(ad-hoc).

11
XINO PRO notebook
1. AP: An AP is a network device which connects wired LAN and wireless LAN together.
It functions like a wireless Hub which connects computers equipped with wireless LAN
devices together. You can get access to the internet by connecting to AP. This works only
when an AP is available.
There is an icon showing in the task bar, click this icon and select Connect to a network.
Available network showing in, if the network
you need is not showing in the list, you can
click icon to research available network.
Select a network, then click connect.
Type the security key or passphrase to continue, if you don’t know the key, please con-
tact your administrator. Then click connect.
Successfully connected to the network.

www.modecom.eu
12
XINO PRO notebook
Move the mouse to wireless icon in the task bar, you can see the properties as follow-
ing, you can nd that the icon has been changed.
USING CAMERA
Your notebook PC has a built-in 1.3 mega pixel camera. This camera has three working
mode can be used: Picture mode, Video mode, Monitor mode.
Note Ensure driver is installed before use.
When nish installation, Click Start---> Program--->Webmate--->Webmate to open
camera application.
The camera is in the picture mode when open, Showing as the following picture:
Picture mode
ideo mode
Monitor mode
Click snapshot to take photos.
Click video mode change to video mode, showing as the picture:

13
XINO PRO notebook
Click start to begin capture dynamic video, click stop to nish.
Click monitor mode change to monitor mode, showing as the picture:
Click start monitor to begin monitor, click stop monitor to nish.
USING CONTROL CENTER
By Control Center,you can see system Information, change system setting.
Note Ensure driver is installed before use. Changes may be made to the Control Center
in this publication. Please refer to your Notebook PC as nal The picture in this capital
is just for your reference.
Main menu
When you open control center program, you can see the main menu as following:
System information
Click System info to see information of the system, such as operation system, BIOS ver-
sion, EC Version, CPU, HDD, memory information and so so, you can click the up and
down arrow on the right hand side to see more information.
Click back button to go back to the main menu.
Battery information
Click Battery icon to see battery information, and battery low warning setting. click
saving to save your changes, click defaults to go back to default setting, click battery
learning to run battery learning program, can be also run from start-->control center
-->battery learning.

www.modecom.eu
14
XINO PRO notebook
CPU and Fan information
Click the thermal condition icon to see CPU and Fan info, you can also change Fan
mode here.
Display information
Click the display icon to select the display device, and adjust the brightness.
If an external CRT or TV is connected, you can click its icon, then click switch to select to
display on this device. It can be shown on less then two display device.
Hot key
Click the hot key icon setting the function of the hot key. Double click the icon to choose
the program you want to run quickly. Click defaults to go back to original setting.
Environment setting
Click the environment icon to see and change the environment mode. There are 8
modes of working mode: High performance, standard, Cinema, Quiet, Music, Game,
User dene, don’t use.

15
XINO PRO notebook
Note Environment setting is disabled under vista operating system.
Device controller
Click the device controller icon to set the action of same device, such as enable or dis-
able the touchpad, what does the system to do when i close the lid, and so on. Click
saving to save your setting.
Battery learning
There is a deviation between the display and actual capacity of the battery. Battery
learning can calibrate the deviation.
8~12 hours are needed to complete a full learning mode. when learning in process,
you must plug in the AC adapter, or learning process will be terminated.
The battery learning program will be installed as you install control center program.
After installing, click the program in the start menu-> „control center” ->”Battery
learning”, now click start button on the dialog as following, the learning process
begin.
There are four step in battery learning, you can follow the instruction to nish it.
OPERATING SYSTEM
This Notebook PC support Microsoft Vista or Windows XP operating system.The choic-
es and languages will depend on the region of sale. The levels of hardware and soft-
ware support may vary depending on the installed operating system. The stability and
compatibility of other operating systems cannot be guaranteed.
Support Software.
This Notebook PC comes with an optical disk that provides drivers and applications
to enable hardware features, extend functionality, help manage your Notebook PC,
and add functionality not provided by the native operating system. If update or re-
placement of the optical disk is necessary, contact your dealer or visit the web sites to
download individual software drivers and utilities. The optical disk contains all drivers,
utilities and software for all popular operating systems including those that have been
pre-installed. The disk does not include the operating system itself. The optical disk is
necessary even if your Notebook PC has come pre-congured in order to provide ad-
ditional soft-ware not included as part of the factory pre-install.

www.modecom.eu
16
XINO PRO notebook
Driver Path Description
Chipset
Driver \Chipset\Setup.exe It conrms the integrity of the sys-
tem.
VGA Driver \VGA\XP\Setup.exe
\VGA\Vista\setup.exe
Ensure the integrality of VGA di-
splay and enables you to setup the
screen solution and other eects.
Audio
Driver
\Audio\ XP\Setup.exe
\Audio\Vista Setup.exe
Enables you to setup and use the
audio function
Modem
Driver \Modem\Setup.exe Enables you to access the internet
through the phone line.
LAN Driver \LAN\XP\Setup.exe
\LAN\Vista\Setup.exe Enables you to use LAN function.
Touchpad
Driver \Touchpad \Setup.exe Enables the enhanced Touchpad
functions.
Control
center
Driver
\Controlcenter\Setup_cn.exe Enables you to set the system con-
guration.
Bluetooth
Driver
\Bluetooth\XP\BlueSoleil.exe
\Bluetooth\Vista\BlueSoleil.exe
Enables you to use bluetooth
function.
Cardreader
Driver
\Cardreader\ XP\Setup.exe
\Cardreader\Vista Setup.exe Enables you to use cardreader.
Wireless
Driver \Wireless\iProdifx.exe Enables you to use wireless func-
tion.
Camera
Driver \E
TPM Driver \TPM\Setup.exe Enables you to use TPM function.
Chapter 3 Power Management
Your Notebook PC can be powered by either external AC adapter or built-in battery
pack.
This chapter will show you how to use and manage power as eciently as possible
while using this Notebook PC. Please follow the battery management instructions for
the best battery performance.
This chapter covers:
AC adapter, Charging, Replacing battery packs, What should you do when the battery
is low, Power management, Tips for power-saving.
AC ADAPTER
Important The AC adapter is for your Notebook PC only. It may cause damage to the
AC adapter or the connected device if the adapter is connected to other appliances.
When disconnecting the AC adapter, you must unplug the plug of AC adapter rst and
then unplug the powerconnector to your Notebook PC. Failure to do so may cause
damage to the Notebook PC or the AC adapter because of the voltage and current
surge.
When unplugging, do not pull on the power cable, you should hold the plug grip
(The picture is only for your reference.)

17
XINO PRO notebook
An AC adapter is a device which converts the alternating current input to the direct
current output for the Notebook PC. The input range of alternating current is between
100V-240V AC.
BATTERY PACK
A battery pack is the built-in power supply for your Notebook PC. It can be charged by
the external AC adapter. Battery life is determined by the operation of your Notebook
PC, the status of the battery pack and the battery capacity.
Note Battery pack maintenance and usage is described in Chapter 7.
Charge
Note When the battery temperature is beyond the range of 0~45 degrees Celsius, the
battery pack will automatically stop charging to preserve its integrity and longevity..
When the battery pack is fully charged, do not immediately unplug AC adapter and
then connect again. It may damage the battery pack.
Connect the AC adapter to the Notebook PC and plug the AC cable to the outlet. The
battery will charge automatically as soon as the AC Adapter is connected. In 30 sec-
onds, if the system determines that the capacity of the battery pack is lower than 98%
(this will vary from model to model), charge will continue, the charge and battery sta-
tus indicator will light orange; or charge will stop. When the light changes from orange
to green, it indicates that the batteries have been fully charged.
Generally speaking, it will take about 2.5 hours to charge fully when the Notebook PC
is powered o, and 3 to 4 hours when on.
Replacing the battery pack
Note Improper replacement of batteries may result in damage to your system. Only
use the battery packs oered by your Notebook PC’s manufacturer as replacements.
Used battery packs need to be handled according to the dealer’s instructions and ac-
cording to local law.
Do not disassemble the battery pack. If you regularly run on battery power when us-
ing your Notebook PC, you may need to buy an extra battery pack from the dealer.This
way,when one pack runs out, you can replace it with a fully charged battery pack im-
mediately.
Replacing battery packs:
Ensure that the Notebook PC is powered-o and disconnected from the mains power.
Carefully turn the Notebook PC upside down. Push the battery latch outward to the
Open position. Pull out the battery pack.
Battery latch
Place the new battery pack in; make sure that the battery latch is positioned to
lock.

www.modecom.eu
18
XINO PRO notebook
Low battery
When the battery life decreases to around 10%, the Notebook PC will beep every 16
seconds as an alarm, and at the same time the orange indicator blinks. You should
save all work as soon as possible to avoid damage or loss of data. When the power
decreases to around 3%, the Notebook PC will be into standby mode, if the power ex-
hausted, the notebook PC will shut down automatically.
Note Low battery alarms can be congured in the Power Management settings within
the Windows operating system. The run time remaining when running on battery de-
pends on the work status of your Notebook PC. If you are running the audio functions,
WLAN, or HDD, then the battery may run down quicker.
Important Data will be lost if it is not saved before the battery runs out. If you are us-
ing a Compact Flash card, please do not read the card when there is little battery life
remaining as the power may run out before the reading process nishes.
Please run battery learning regularly.Please See also in chapter 2 battery learning.
POWER MANAGEMENT
Your Notebook PC supports the ACPI (Advanced Conguration and Power Interface)
power management modes.
In ACPI mode, the components of your Notebook PC consume power depending on
the practical requirements so that the system can get both power-saving and high
performance at the same time.
In Windows, you can setup the operation in Power Management of the Control Panel.
The operation is:
Result Case
Shut down the hard disk System is inactive for a set period of time
Shut down the screen System is inactive for a set period of time
System standby: both the
hard disk and the screen
will be shut down to con-
serve energy.
System is inactive for a set period of time
Lid is closed*
Press Fn+Esc*
Press power button*
Shut down the hard disk
System is inactive for a set period of time
Lid is closed*
Press Fn+Esc*
Press power button*
Note * Depending on Power Management Conguration withinWindows. For more in-
formation about Power Management please refer to the On-line help of Windows.
Hibernation
Hibernation is a very useful function. When using the Notebook PC, you may run more
than one program or open more than one le at the same time. Before powering o,
you need to shut them down one by one. It will take some time to re-open these pro-
grams and les when you turn on your Notebook PC next time. When you use the hi-
bernation function, all data in use will be stored for hibernation in a special le on the
hard disk before the Notebook PC is automatically shut down. When you turn on the
Notebook PC next time, it will read the data from this special le and will resume to the
status of which was at before being powered o.
Tips for power-saving
Besides the automatic power-saving function of the Notebook PC, you can also follow
the following suggestions to save power.
Enable Power Management.
Decrease the screen brightness as much as is unable. If a program needs to run the

19
XINO PRO notebook
Express card, shut down the program when it nishes. Take the Express card out when
it is not in use because some Express cards still consume power even when they are not
in use. Shut down the Notebook PC if you do not need to use it.
Chapter 4 Adding Peripherals
You can enhance your Notebook PC’s capabilities by attaching peripheral devices.
When using peripheral devices, please follow the instructions in the user’s guide that
comes with these devices.
This chapter will show you how to installand use the following devices: External CRT
Monitor, External TV set, Card reader, USB Devices, Connect 1394 device, Using blue-
tooth, Express Card.
CONNECTING AN EXTERNAL CRT MONITOR
Make sure that the Notebook PC is powered-o and disconnected from the AC adapter.
Connect the D-type plug of the CRT’s signal cable to the VGA interface of your Notebook
PC. Connect the power cord of the monitor. Turn on the monitor rst and then turn on the
Notebook PC. In system initialization, when you have nished the steps above, the screen of
the external monitor will display some images. If not, press Fn+F7 to transfer the video out-
put to the external CRT monitor, or make them display at the same time. You can also switch
the display mode with the monitor setup in Control Panel in Windows operation system.
CONNECTING AN EXTERNAL TV SET
Make sure that the Notebook PC is powered o and disconnected from the AC adapter.
Use S-video cable to connect the notebook PC and TV set. Turn on the TV set rst and
then turn on the Notebook PC.In system initialization, when you have nished the steps
above, the screen of the TV set will display some images. If not press Fn+F7 to transfer
the video output to the external VGA monitor, or make them display at the same time.
Note When the Notebook PC is in standby or hibernation mode, do not unplug the ex-
ternal monitor. If the external monitor is not connected when the Notebook PC is wok-
en up, the LCD screen will not show anything.
USING THE CARD READER OPTIONAL
Your Notebook PC includes a 4 in 1memory card reader that supports SD, MMC, MS, MS PRO
card types. This card reader supports plug,play and hot plug technology, so you do not need
to shut down the notebook PC before plugging or unplugging SD/MMC/MS/MS PRO card.
Note Ensure drivers are installed before use. When nished installing, there is a symbol
showing in the status bar when a SD, MMC, MS or MS Pro card insert.
CONNECTING USB DEVICES
Your Notebook PC has four USB 2.0 ports for USB devices such as a keyboard, mouse,
printer, modem, scanner or digital camera. USB (Universal Serial Bus) is an industrial
standard developed for the PC. It supports the technology of PnP (Plug and play), so
you do not need to shut down the Notebook PC before plugging or unplugging the
USB devices. Besides, it is capable of handling multiple connections in a conguration
called daisy-chain. It can support up to 127 devices connected using this method. You
can also use an USB hub to convert a USB port to more than one port for more USB de-
vices. Connecting devices is straightforward:simply plug the cable of the USB hub into
the USB port on the Notebook PC.
CONNECTING 1394 DEVICE OPTIONAL
Your notebook PC has a 1394 interface can connect 1394 device such as digital cam-
era, DVD, digital TV set and so on. IEEE1394 supports high data transfer speeds (up
to 400Mbps), plug and play and Hot plug technology. Because of these features,
1394 is widely used in many computer peripheral devices including digital video
cameras.

www.modecom.eu
20
XINO PRO notebook
USING BLUETOOTH OPTIONAL
Your notebook PC support Bluetooth function. Note Ensure Bluetooth driver is in-
stalled before use. Press Fn+F12 to enable Bluetooth. This chapter will tell you how to
set up and use Bluetooth, using mobile phone with bluetooth function as an example.
The picture herein is only for your reference. Double click the Bluetooth icon in the task
bar: if the bluetooth is enabled but not connected, the icon is blue. If is disabled, the
icon is gray.Press Fn+F12 to enable.
Show as following, click add,
Please ensure that your bluetooth device is turn on and can be discoverable.Then click
the check box before„My device is set up and ready to be found”, there is a in the check
box, click Next.
System nd a bluetooth mobile phone, select this device and click next
Set the passkey, type your passkey then click next.

21
XINO PRO notebook
Your mobile phone need to type the same key as you set in your notebook PC. then
click next to continue.
Completing the add bluetooth device, then click nish. You can enjoy your bluetooth
function.
Right-click the bluetooth icon, select send a le to verify if it can be used.
Table of contents
Languages:
Other Modecom Laptop manuals
Popular Laptop manuals by other brands

Lenovo
Lenovo THINKPAD X40 Service and troubleshooting guide

Dell
Dell Latitude 12 5000 Series quick start guide

Dell
Dell Inspiron 15 5501 Setup and specifications

Lenovo
Lenovo 82RK00P5IX Hardware Maintenance Manual

Fujitsu
Fujitsu LIFEBOOK T935 operating manual

Fujitsu
Fujitsu lifebook t726 quick start guide