Modern Water OVA 7000 User manual

.
OVA 7000
ON-LINE HEAVY METALS ANALYSER
ROUTINE SERVICE MANUAL
V1.2

Copyright © 2012 Modern Water Monitoring Ltd. All rights reserved.
Modern Water Monitoring Ltd.
15 –17 Cambridge Science Park
CAMBRIDGE CB4 0FQ
UNITED KINGDOM
Email: info@modernwater.co.uk
Web address: www.modernwater.com
Telephone: +44 (0) 1483 696000
P/N. 210-071-1.2

OVA 7000 Routine Service Manual V1.2 3
Contents
1Introduction 5
1.1 Typographical Conventions....................................................................................................................... 5
2Getting Started 6
2.1 Powering Up and Communicating With the OVA 7000........................................................................... 6
2.2 Priming Reagent Lines.............................................................................................................................. 8
2.3 Initiating OVA 7000 Operation................................................................................................................. 8
2.4 Stopping OVA 7000 Operation................................................................................................................. 8
2.5 Powering Down the OVA 7000 ................................................................................................................ 8
3Weekly Maintenance 9
3.1 Reagent Replacement and Monitoring ...................................................................................................... 9
3.1.1 Replacing Reagent during a Run.................................................................................................. 10
3.2 Pump Calibration..................................................................................................................................... 10
3.2.1 Non Drain Pump Calibration ....................................................................................................... 11
3.2.2 Drain Pump Calibration ............................................................................................................... 11
3.3 Working Electrode Maintenance............................................................................................................. 12
3.3.1 Polishing procedure...................................................................................................................... 12
3.4 Filter Maintenance................................................................................................................................... 12
3.4.1 Filter Pump Tubing ...................................................................................................................... 13
3.4.2 Filter maintenance procedure....................................................................................................... 13
4Checklist Sheet 14

OVA 7000 Routine Service Manual V1.2 4
Figures
Figure 1. Ultra VNC Viewer Screen ...................................................................................................... 6
Figure 2. OVA 7000 Main Screen.......................................................................................................... 7
Figure 3. OVA 7000 Run Screen ........................................................................................................... 7
Figure 4. OVA 7000 Calibrate Screen.................................................................................................. 10
Figure 5. Filter pump cover removal.................................................................................................... 13
Figure 6. Filter pump tubing replacement ............................................................................................ 13
Figure 7. Filter assembly...................................................................................................................... 13
Figure 8. Service Checklist Sheet......................................................................................................... 15

OVA 7000 Routine Service Manual V1.2 5
The On-Line Voltammetric Analyser (OVA) has been designed to enable reliable continuous on–line monitoring
of selected heavy metals. The robust and versatile OVA 7000 is suitable for use in a variety of industrial
applications.
Samples are taken automatically and analysed using the technique of Anodic Stripping Voltammetry. In some
instances the sample may require filtration, acidification or UV digestion before it can be analysed. All these
options are available and can be incorporated into the fully automated analysis cycle.
1.1 Typographical Conventions
The following kinds of formatting in the text identify special information.
Convention
Type of Information
Triangular Bullet()
Step-by-step procedures. You can follow these
instructions to complete a specific task.
Emphasis
Use to emphasize the importance of a point.
Special Bold
Items you must select, such as menu options,
command buttons.
Caution:
Important information.
Note:
A tip or an item of note.
1Introduction

OVA 7000 Routine Service Manual V1.2 6
This manual is a simple step-by-step guide to routine servicing of the OVA 7000. For more detailed information
and instructions on more advanced functions, please refer to the other manuals supplied with the instrument –the
OVA 7000 Operation Manual and the OVA 7000 Reference Manual.
2.1 Powering Up and Communicating With the
OVA 7000
Caution: Always ensure that there is liquid covering the working electrode inside the voltammetry cell. Failure to
do this may cause an alarm condition, or damage to the electrode.
To power up and communicate with the OVA 7000.
1. Switch on the external supply power to OVA 7000 and press the pushbutton located at the bottom rear
of OVA 7000. The pushbutton will glow green to indicate that power is being supplied, and the
OVA 7000 will take a few minutes to start up.
2. Log into the OVA 7000 via the remote desktop connection, using a laptop or PC running Ultra VNC
Viewer. Enter the IP address of the OVA 7000 (and the port number if the network requires) and press
connect. After establishing contact with the OVA 7000’s Ultra VNC Server the Viewer will be asked to
enter a password.
Figure 1. Ultra VNC Viewer Screen
The Ultra VNC viewer is freely available from http://www.uvnc.com/.
Once the remote desktop connection is established, the OVA 7000 application software will show the
Main screen as shown below.
2Getting Started

OVA 7000 Routine Service Manual V1.2 7
Figure 2. OVA 7000 Main Screen
3. Click the Log In button, located in the bottom right section of the OVA 7000 Main Screen, and enter
your username and password.
4. Click the Run button, located in the top right section of the OVA 7000 Main Screen, to enter the Run
screen.
Figure 3. OVA 7000 Run Screen
The OVA 7000 is now ready for use but is not yet operational.
5. To begin OVA 7000 operation, follow the instructions in sections 2.2, Priming Reagent Lines and 2.3,
Initiating OVA 7000 Operation.

OVA 7000 Routine Service Manual V1.2 8
2.2 Priming Reagent Lines
Before OVA 7000 operation, all tubing lines should be full of fresh reagent and free of air bubbles. To ensure
this, the lines need to be primed.
Prime reagent lines.
1. Ensure all reagent lines are sitting in full reagent containers, and the ends have tube weights.
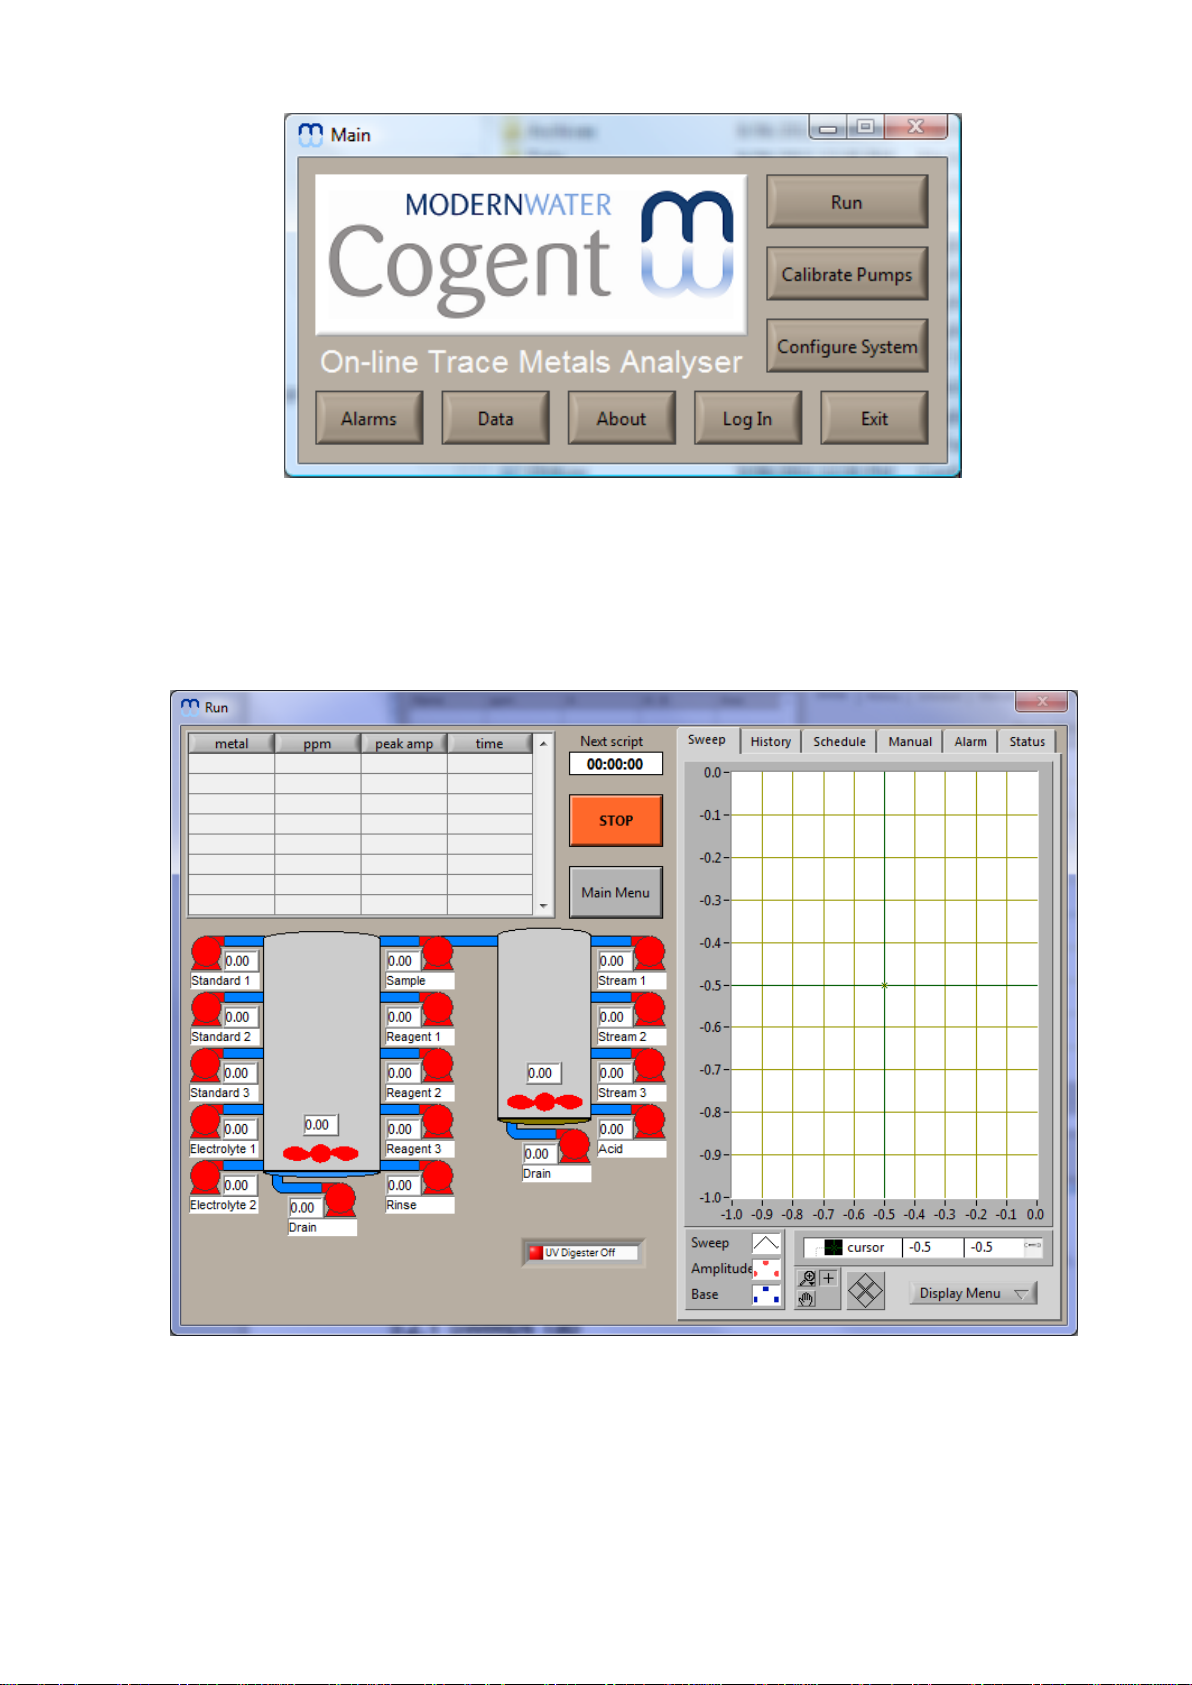
2. Select the Manual tab on the Run screen.
3. Click on the pump icon for each pump to be primed. When on, the pump will turn and the pump icon
will change from red to green. All necessary pumps can be primed simultaneously if required. Also
select the drain pump for each cell to drain the cell and to prevent overflow.
4. When a line is full of reagent & free of air bubbles, click its icon again to turn the pump off.
2.3 Initiating OVA 7000 Operation
If the OVA 7000 has been inactive for a significant time, the weekly (see section 3) and or 3-monthly
maintenance procedures (see OVA 7000 Operation Manual) will need to be carried out before initiation.
Initiate OVA 7000 operation.
1. Select the Schedule tab in the Run screen.
2. Click on Run Schedule button to initiate automatic operation.
The OVA 7000 will now operate automatically in accordance with the method scripts activated by the
Scheduling feature of the OVA 7000 software. These are described in the OVA 7000 Operation Manual as they
are not routinely modified and should only be modified by suitably trained personnel.
2.4 Stopping OVA 7000 Operation
Stop OVA 7000 operation.
1. Click the Stop button in the Run screen.
2. If desired, both the Analytic and Prep cells can be drained by clicking the Drain all Cells button.
3. Exit the Run screen to the Main screen by clicking the Main Menu button.
2.5 Powering Down the OVA 7000
It is not normally necessary to power down the OVA 7000 for weekly maintenance. If it does become necessary
for any reason, follow the below procedure after stopping the OVA 7000 as described above.
Caution: Selecting the “Shut down” option for the OVA 7000 via a remote desktop connection will result in the
OVA 7000 turning off, and an operator having to physically visit the OVA 7000 to turn it back on.
Selecting the “Restart” option will turn off and restart the OVA 7000 without a physical visit required.
Power down the OVA 7000.
1. Close the OVA 7000 software by clicking the Exit button from the Main page.
2. Shut down Windows from the Start menu in the bottom left hand corner of the screen. Select Shut Down
as with any other computer. This may take a minute to exit Windows.
3. After a minute the power to the OVA 7000 can be turn off at the supply point if desired.
Alternatively the user can restart Windows from the Start menu in the bottom left hand corner of the screen.
Select Restart as with any other computer. Power is maintained to the OVA 7000 throughout a restart
operation.

OVA 7000 Routine Service Manual V1.2 9
Routine maintenance should be carried out when the OVA 7000 is to be started for the first time after installation
or repair as well as on a regular basis. The frequency of the maintenance will be dictated by the nature of the
sample and the frequency of analysis. After one month of operation, the ideal frequency will be determined.
More frequent checks before this are advisable to ensure the OVA 7000 provides accurate data.
The essential maintenance tasks are:
1. Ensure an adequate supply of all reagents is available.
2. Check the peristaltic pumps are calibrated at least every 14 days.
3. Clean the working electrode surface as required.
4. Check that the reference silver electrode has an adequate coating on it.
5. Check the reference electrode is more than three quarters full of electrolyte and free of air bubbles.
Monitoring the peak height and position for each metal being analysed is a good indicator of how well the
OVA 7000 is functioning. The peak height and position of a standard concentration of the metals will be
recorded during the initial installation. For additional information refer to the OVA 7000 Operation Manual. A
variation of greater than 30% indicates a problem that should be investigated.
A weekly maintenance checklist is supplied with this manual which may be photocopied and used as a
maintenance guide and record.
3.1 Reagent Replacement and Monitoring
Reagents can usually be replaced while the OVA 7000 is carrying out an analysis providing precautions are
taken to stop air from being sucked into the reagent tubes. The OVA 7000 will normally use electrolyte, standard
and cell rinse solution (normally deionised water). Other applications may also use various acid and working
electrode plating solutions.
For each application cycle it will be necessary to calculate the consumption of each of these reagents and pre-
plan their replacement. If possible, plan the replacement procedure so that it can be carried out at a set time (e.g.
Friday afternoon or Monday morning) each week.
For example, an application that uses 9.5 mL of electrolyte per sample in the voltammetry cell and runs an
analysis every 15 minutes will require 912 mL of acid per 24 hours of run time. ((24 x 60)/15) x 9.5. In seven
days of continuous running approximately 7 litres of electrolyte will be required.
It is essential that each reagent is replaced when the relevant pump is not operating. Identify the longest period in
the analytical cycle that the pump does not operate. If the time the pump is off is never less than 5 minutes, it
may be advisable to stop the OVA 7000 by using the Stop button. In this way you will not inadvertently admit
air to the reagent tubes.
3Weekly Maintenance

OVA 7000 Routine Service Manual V1.2 10
3.1.1 Replacing Reagent during a Run
Replacing reagent during OVA 7000 operation (Run).
1. When the corresponding pump is off, carefully remove the flexible tubing from the reagent container to
be changed and place on a clean surface.
2. Refill the container with fresh reagent.
3. Re insert the flexible tubing into the container. Ensure the tubing reaches the bottom of the container.
The reagent is now ready for use.
Warning: If for any reason air bubbles are admitted to the tubing, the instrument will have to be stopped and
the line will have to be purged.
3.2 Pump Calibration
Calibration allows each pump to be set for accurate delivery of the required volume. This must be carried out
every week, each time the pump or pump tubing is replaced, when the instrument has not been used for a few
weeks or when the instrument is used for the first time.
An accurate 10 mL volumetric cylinder is required, along with a laptop computer with VNC Viewer software so
as to allow interaction with the OVA 7000 application. As the laptop will need to be at the same location as the
OVA 7000, the network connection should be either by Wifi or a LAN cable plugged into the OVA 7000 front
pump panel.
Ensure access to the OVA 7000 Main screen as per section 2.1, Powering Up and Communicating With the
OVA 7000 on page 6.
From the Main screen select Calibrate Pumps. The Calibration screen will be displayed.
Figure 4. OVA 7000 Calibrate Screen

OVA 7000 Routine Service Manual V1.2 11
3.2.1 Non Drain Pump Calibration
Non drain pump calibration procedure.
1. Ensure the pump inlet tube is in reagent or distilled water and that the tubing is full of liquid from the
inlet through to the outlet.
2. Remove the pump outlet tube from the cell and insert the end of the tube into the 10 mL measuring
cylinder. Use either of the following methods to pump a volume of liquid into the measuring cylinder.
3. Start the relevant pump turning by clicking the pump icon. When the volume in the measuring cylinder
reaches about 7 or 8 mL, stop the pump by clicking on the pump icon again or pressing the “Esc” key.
Alternatively enter the number 8 next to the pump’s “Add” button on the “Pumps” tab page. If this page
is set for “mL”(see centre top button) then clicking “Add” will attempt to pump 8mL. If this page is set
for “Sec” (see centre top button) then clicking “Add” will pump for 8 seconds (this is useful for when
the previous recorded calibration is very inaccurate).
4. Read the pumped volume from the measuring cylinder and enter it into the pop up dialog. Press cancel
if you feel an incorrect volume was collected.
5. Check the calibration by repeating step 3 and ensure the pumped volume (displayed next to the pump
icon) matches that collected in the measuring cylinder.
6. Empty the measuring cylinder and repeat for all other pumps.
3.2.2 Drain Pump Calibration
Drain pump calibration procedure.
1. Select Back. To return to the main screen and press Manual to enter the manual screen.
2. Empty both the analytical and sample pretreatment cell(s) by clicking the drain pump icons. Stop the
drain pumps when the cells are empty.
3. Fill the analytical cell(s) with 12mL of distilled water by pressing the corresponding Rinse Pump icon
and waiting for the cell to fill, or setting the 12mL volume in the dialogue on the right side of the screen
and clicking the “Add” button.
4. Enter 12 into the analytical cell drain pump dialogue on the right of the screen and click the “Add”
button. Ensure the cell is completely empty when the pump stops turning.
5. Repeat steps 1 to 4 above for and pretreatment cells present, using raw sample in place of the rinse
pump.
Note that calibration for the Drain pumps does not need to be highly accurate, so long as the scripts
used consistently over estimate the drain volumes required to be pumped during operation.

OVA 7000 Routine Service Manual V1.2 12
3.3 Working Electrode Maintenance
The electro-active surface of the working electrode will not remain perfect for an indefinite period. Periodically
the electrode surface will need to be renewed.
A deterioration of the surface will usually manifest itself as a low standard peak or lack of reproducibility,
particularly on repeat analyses of a standard sample whose characteristics are known.
3.3.1 Polishing procedure
Working electrode polishing procedure.
1. Click the Stop button to stop the OVA 7000.
2. Drain the cell by clicking the drain pump in the Run screen with the Manual tab selected.
3. Press Back to return to the Main screen, which puts the instrument into standby mode.
4. Remove the electrode with the electrode tool supplied.
5. Wipe the surface of the electrode with a clean tissue.
6. Open the polishing kit supplied and put 2 or 3 drops of the polishing fluid onto the polishing pad.
7. Place the electrode onto the polishing pad and gently polish the surface by moving the electrode in a
circular motion for approximately 30 seconds.
8. Rinse the electrode surface with deionised water.
Warning: Do not allow fingers to touch the surface of the electrode at any time. Grease will severely
reduce the sensitivity of the electrode.
9. Replace the electrode in the cell but do not connect alligator clip. Add a couple of mL of rinse or
electrolyte solution to the cell.
10. Restore the OVA 7000 to operational mode as described in section 2.3, Initiating OVA 7000 Operation
on page 8.
3.4 Filter Maintenance
Filter maintenance may be divided into three components per stream, each of which may be required at different
intervals.
The filter pump’s tubing lifespan is very much dependent on the OVA 7000’s application. Where the filter
pump is required to run continuously it is recommended the tubing is replaced every 2 weeks. In
applications where the pump is non-continuous then the following formula can be used as a guide:
Tubing life (weeks) = 2 x 24 ÷ hours running per day
The other application dependent factor is the corrosive properties of the raw sample fluid. If this is an issue,
then the tubing will need to be replaced regularly, irrespective of how often the pump runs. For very
corrosive sample streams this should be weekly.
The filter pump does not require calibration as it is only required to ensure consistent sample flow.
The filter assembly should be cleaned as required. This may vary from weekly to monthly depending on the
level of solids in the sample.
Non-pump sample stream tubing need generally only be replaced every 3 to 6 months. This may
occasionally be more frequently required if visible deterioration of tubing occurs.
Before performing any filter related maintenance, stop the OVA 7000 as per section 2.4, Stopping OVA 7000
Operation on page 8.

OVA 7000 Routine Service Manual V1.2 13
3.4.1 Filter Pump Tubing
Filter pump tubing replacement procedure.
1. Open the pump cover facing by undoing the 2 front screws as shown in Figure 5.
2. Insert the pump tubing as shown in Figure 6. It may be helpful to turn the pump rotor as you do this.
3. Replace the pump facing and the 2 screws.
Figure 5. Filter pump cover removal
Figure 6. Filter pump tubing replacement
3.4.2 Filter maintenance procedure
Filter maintenance procedure.
1. Unscrew the bottom of the filter assembly as shown in Figure 7.
Warning: The filter assembly will contain a considerable amount of untreated sample. If this is a
corrosive, toxic or otherwise hazardous solution, appropriate safety precautions must be taken before
opening the filter assembly.
Figure 7. Filter assembly
2. Remove the disk filter (shown in red in Figure 7) from the assembly. This will automatically expand
when removed and can easily be cleaned under a tap in most cases.
3. Re-assemble the filter assembly.

OVA 7000 Routine Service Manual V1.2 14
This checklist sheet over-page should be photocopied and kept as a record of OVA 7000 maintenance history.
4Checklist Sheet

OVA 7000 Routine Service Manual V1.2 15
Figure 8. Service Checklist Sheet
Other manuals for OVA 7000
1
Table of contents
Other Modern Water Measuring Instrument manuals