DS POCKET CHECKER-PRO User manual

Sensor
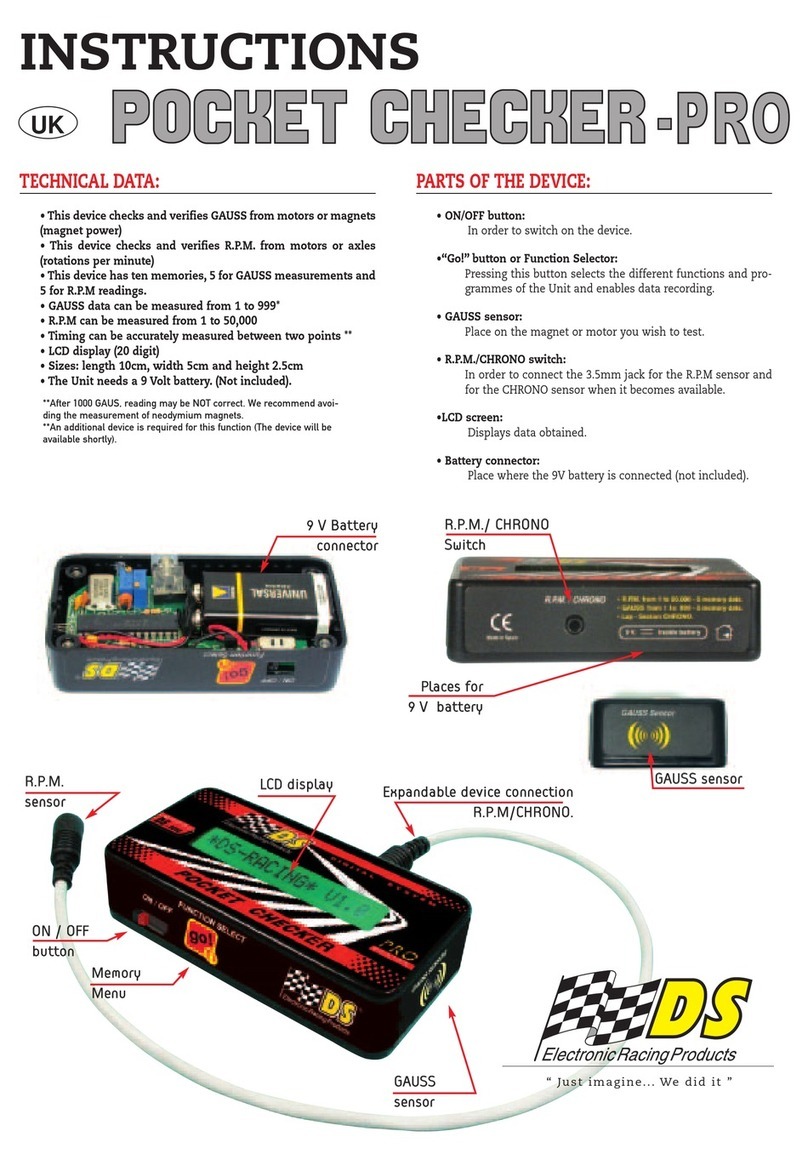
· This device contains a LCD screen (20 digits).
· Checks and veries the motor or axle R.P.M.
(revolutions per minute) and records the
maximum value.
· Reads up to 50.000 R.P.M.
· Checks and veries the magnetic eld
(expressed in GAUSS) in three dierent options:
- Maximum value.
- Actual value.
- Maximum value measured during 2,1 seconds.
· This new version integrates a new and more
sensible liner symmetric sensor for the
magnetic eld which allows the neodymium
magnet measuring.
· Dimensions: length: 10 cm; weight: 5 cm;
height: 2,5 cm
· The unit needs a 9 Volt battery (not included).
• Switch: ON/OFF
Switches on or o the device.
• “Go!” button or Function Selector
To choose and execute the functions of dierent
measurements.
• Gauss sensor:
To be placed next to the motor or magnet in order
to test the magnetic camp expressed in Gauss.
• Connector for R.P.M. sensor:
To connect the 3,5mm stereo jack with the probe that
reads the R.P.M.
• LCD screen
Displays data obtained.
• Internal connector for the 9 Volt battery
(not included)
TECHNICAL DATA: PARTS OF THE DEVICE:
INSTRUCTIONS
RPM reading :
Connect the R.P.M. reading probe to the 3,5mm stereo jack connector. You’ll nd it situated on the side of
the “ DS-Pocket Checker ”.
Press the “Go!” button several times till the menu Wheel RpmMax is displayed.
One minute past without pressing more the “Go!” button, the LCD screen visualizes:
R=0 Max=000 waiting to start the revolutions reading.
R= shows the real revolutions value and Max= shows the maximum measured value.
Place the reading probe in a few mm from the unit you want to check the R.P.M. Rpm will be displayed on
the LCD screen.
In order to realise the R.P.M. measurement correctly you’ll need a sucient dierence of the
colours. We recommend realising this test on the black surface (tyres, crowns, for example) and a white
label stuck or mark painted on the area to read (a correction uid as Tipp-Ex is a good solution). This white
should cover one quarter of the diameter area you want to read (photos 2 and 3).
Developed and designed by:
IBB Auto Racing S. L.
c/ La Masia, 26 08711 ODENA ( IGUALADA )
Barcelona - SPAIN www.ds-racingproducts.com
+34 938 030 880 Fax +34 938 055 057
Internacional Sales:
P.O. Box 790 St. Heiler JE4 OSW
Jersey (Great Britain) www.mrrc.com
Copyright by Model Road Racing Cars Ltd 2008
2
3
Switch
ON/OFF
Display LCD
Gauss
Prove
R.P.M.
R.P.M.
Sensor
Sensor
Menu
Connector for
R.P.M. sensor
Connector for
R.P.M. sensor
Internal 9v
battery.
ENG

Running of the device:
Switch the unit ON
On the LCD screen appears the message “Pocket Cheker9.0” that indicates the version of the software.
Pressing twice the button “Go!” displays the rst menu available: Wheel RpmMax
Pressing again the button “Go!” displays the second menu available: Gauss ValueMax (magnetic eld maximum value)
Pressing again the button “Go!” displays the third menu available: Gauss Just time (magnetic eld actual value)
Pressing again the button “Go!” displays the fourth menu available: Gauss max 2sec
(magnetic eld maximum value measured during 2,1 seconds)
Pressing again the button “Go!” displays the rst menu available: Wheel RpmMax.
*Note: we recommend switching on the “ DS-Pocket Checker ” without any magnet close to the magnetic eld GAUSS sensor, as
when the device starts, it’s been autogauged supposing there are no magnetic camp interferences.
Gauss reading
:
1
Press the “Go!” button several times till the menu you want to execute is displayed:
Menu: Gauss ValueMax (the maximum magnetic eld value)
One minute past without pressing more the“Go!” button, the LCD screen visualizes:
Gauss Max S 0 o Gauss Max N 0
S shows the South Pole and N shows the North Pole followed by the maximum magnetic
eld value measured and expressed in Gauss. The system maintains the maximum value till detecting
any change on the polarity (from North to South or from South to North) or till pressing the “Go!”
button to access the next menu.
Menu: Just time (the actual magnetic eld value)
One minute past without pressing more the“Go!” button, the LCD screen visualizes:
Gauss JT S 0 o Gauss JT N 0
S shows the South Pole and N shows the North Pole followed by the actual magnetic eld
value expressed in Gauss. The system shows the instantaneous measured value till pressing the “Go!”
button to access the next menu.
Menu: Gauss max 2sec (the maximum magnetic eld value measured during 2,1 seconds)
Gauss 2s S 0 o Gauss 2s N 0
S shows the South Pole and N shows the North Pole followed by the maximum magnetic
eld value measured during the previous 2 seconds and expressed in Gauss. The system shows the
maximum value measured during the previous 2 seconds till pressing the “Go!” button to access the
next menu.
In order to measure the motor or magnet magnetic eld the “DS-Pocket Checker” should be
placed touching the Gauss sensor. It should be moved within the area of the magnetic inuence
looking for the highest value, which shows the maximum value of the magnet (photo 1).

· Contiene display LCD ( 20 dígitos ).
· Comprueba y verica las R.P.M. del motor o eje
( numero de revoluciones por minuto ) y registra el
valor máximo.
· Lee hasta 50.000 r.p.m.
· Comprueba y verica el campo magnético imán
(expresado en GAUSS) con tres diferentes opciones:
- Valor máximo.
- Valor actual.
- Valor máximo durante 2,1 segundos.
· Esta nueva versión puede medir imanes de neodimio
gracias a la incorporación de un nuevo sensor de
campo magnético más sensible, lineal y simétrico.
· Tamaño: longitud: 10 cm., ancho: 5 cm.
y altura: 2.5 cm.
· Necesita una batería de 9 V. (no incluida).
• Interruptor: ON/OFF
Para la puesta en marcha.
• Tecla "Go!" o Función Selección
Pulsando sobre esta tecla, se efectúan las diferentes
funciones de medidas.
• Sensor de Gauss:
Donde se coloca el motor o imán a chequear para
obtener el valor del campo magnetico expresado en
Gauss.
• Conector sensor R.P.M.
Para conectar el jack estéreo de 3.5 mm. que lleva la
sonda para la lectura de las r.p.m.
• Pantalla LCD
Visualiza la lectura de los datos obtenidos.
• Conector interior para la pila / batería de 9 V.
(no incluida)
Menú
Memoria
Interruptor
ON / OFF
Interior para
bat ería 9 V.
CARACTERISTICAS TECNICAS: ELEMENTOS QUE COMPONEN
EL APARATO:
INSTRUCCIONES
E
Sensor
GAUSS
Pantall a LCD
Sensor
R.P.M .
Conexión
s ensor R .P. M/ CHR ONO.
Sonda
R.P.M .
Conexión
s ensor R .P. M/ CHR ONO.
Lectura R.P.M.:
Conectar la sonda de lectura de r.p.m. en el conector para jack estéreo situado en el lateral del“ DS-Pocket
Checker ”.
Pulsar la tecla "Go!" varias veces hasta que aparezca el menu: Wheel RpmMax.
Si no tocamos mas la tecla “ Go! ” al cabo de 1 segundo se pasa a visualizar en la pantalla LCD :
R=0 Max=000 a la espera de iniciar la lectura de revoluciones.
El valor que indica R= es el valor real de revoluciones y el valor Max= guarda el valor maximo
medido.
Colocar la so nda de lectura a unos mm. del lugar a leer las r.p.m., que serán indicadas en la pantalla LCD.
Para realizar esta medida es necesario que exista una diferencia de color suciente para que la
lectura sea correcta. Se recomienda que llectura se efectúe en una supercie de color negro, por ejemplo
ruedas, coronas…, en la cual se le pegará una etiqueta en color blanco o se pintará de este color, (una
buena solución es el tan conocido "tippex" para tapar los errores de escritura), esta parte blanca debe
cubrir una cuarta parte del diámetro destinado a la lectura (fotos 2 y 3 ).
Desarrollado y diseñado por:
IBB Auto Racing S. L.
c/ La Masia, 26 08711 ODENA ( IGUALADA )
Barcelona - SPAIN www.ds-racingproducts.com
+34 938 030 880 Fax +34 938 055 057
Internacional Sales:
P.O. Box 790 St. Heiler JE4 OSW
Jersey (Great Britain) www.mrrc.com
Copyright by Model Road Racing Cars Ltd 2008
2
3

FUNCIONAMIENTO:
Se coloca el interruptor en la posición ON.
Se leerá en la pantalla LCD la palabra Pocket Cheker 9.0 que indica el numero de versión del software.
Al pulsar la tecla de “Go! dos vezes leerá el primer menú disponible: Wheel RpmMax.
Al pulsar la tecla de “Go!” otra vez leerá el segundo menú disponible: Gauss ValueMax
( valor del campo magnético máximo medido )
Al pulsar la tecla de “Go!” otra vez leerá el tercer menú disponible: Gauss Just time
( valor del campo magnético en este instante )
Al pulsar la tecla de “Go!” otra vez leerá el cuarto menú disponible: Gauss max 2sec
(valor del campo magnético máximo medido durante 2’1 segundos)
Al pulsar la tecla de “Go!” otra vez leerá el primer menú disponible: Wheel RpmMax.
* Nota: Hay que intentar encender el “ DS-Pocket Checker ” sin tener ningun iman cerca del detector de campo
magnetico ya que cuando arranca de autocalibra suponiendo que no hay inuencia de ningun campo magnetico.
Lectura de Gauss
:
1
Pulsar la tecla “ Go! “ varias veces hasta que aparezca el menú deseado según el tipo de medida que
desee realizar:
Menu: Gauss ValueMax ( valor del campo magnético máximo medido )
Si no tocamos mas la tecla “ Go!” al cabo de 1 segundo se pasa a visualizar en la pantalla LCD :
Gauss Max S 0 o Gauss Max N 0
S indica polo Sur y N polo Norte seguido del valor maximo de campo magnetico medido
expresado en Gauss. El sistema mantiene el valor maximo medido hasta que se detecta un cambio de
polaridad ( de Norte a Sur o de Sur a Norte ) o hasta que presionando la tecla“ Go!”accedemos a otro
menú.
Menu: Just time ( valor del campo magnético en este instante )
Si no tocamos mas la tecla “ Go!” al cabo de 1 segundo se pasa a visualizar en la pantalla LCD :
Gauss JT S 0 o Gauss JT N 0
S indica polo Sur i N polo Norte seguido del valor instantáneo del campo magnetico
expresado en Gauss. El sistema muestra el valor instantaneo medido hasta que presionando la tecla “
Go!” accedemos a otro menú.
Menu: Gauss max 2sec ( valor del campo magnético máximo medido durante 2’1 segundos)
Si no tocamos mas la tecla “ Go!” al cabo de 1 segundo se pasa a visualizar en la pantalla LCD :
Gauss 2s S 0 o Gauss 2s N 0
S indica polo Sur i N polo Norte seguido del valor maximo del campo magnetico medido los
dos segundos anteriores expresado en Gauss. El sistema muestra el valor maximo medido los 2
segundos anteriores hasta que presionando la tecla “ Go!” accedemos a otro menú.
Para realizar la medida del campo magnético se deve colocar“ DS-Pocket Checker ” por la
parte del sensor de Gauss tocando el motor o imán que se desee vericar, desplazándolo por toda la
zona de inuencia magnética, buscando la lectura con el número más alto que indica el máximo valor
del imán (foto 1).
Table of contents
Languages:
Other DS Measuring Instrument manuals