Mogatec GBS 6050 LI EX User manual

GBS 6050 LI EX
Prima della messa in funzione leggere le istruzioni perl‘utilizzo!
Istruzioni per l’uso
IT
Instrucciones de Uso
¡Lea las instrucciones de uso antes de efectuar la puesta en marcha!
ES
Gebrauchsanweisung
Vor Inbetriebnahme Gebrauchsanweisung lesen !
DE
Operating Instruction
Read operating instructions before use!
GB
Brugsanvisning
Læs instruktionerne, inden maskinen tages i brug!
DK
Lire attentivement le mode d‘emploi avant chaquemise en service !
FR Manuel d’utilisation
Οδηγίες χρήσεως
Πριν την χρησιμοποίηση διαβάστε τις οδηγίες χρήσεως
GR

1
3
6
4
D
1 Ausziehbarer Handgriff
2 Akku
3 Akku-Ladegerät
4 Grasschermesser
5 Gehäuse
6 Buschschermesser
7 Laufräder
8 Einschaltsperre
9 Schalter
1
2
5
7
8
9
F
1 Poignée télescopique
2 Accu
3 Station de charge de l’accu
4 Lame d’équilibrage
5 Boîtier
6 Outil de cisaille
7 Roues
8 Bouton de sécurité
9 L’interrupteur
I
1 Impugnatura telescopica
2 Accumulatore
3 Stazione di carica per l’accumulatore
4 Lame trimmer
5 Scatola
6 Lame cesoie
7 Rotelle
8 Pulsante di sicurezza
9 L’interruttore
GB
1 Telescopic handle
2 Accumulator
3 Charging device for accumulator
4 Grass cutting blade
5 Housing
6 Shrub cutting blade
7 Running wheel
8 Switch-on lock
9 Switch
1

ES
1 Mango telescópico
2 Acumulador
3 Estación de carga
4 Cuchilla de la recortadora de arbustos
5 Armazón
6 Cuchilla de la recortadora de hierba
7 Ruedas portantes
8 bloqueo de conexión
9 interruptor
DK
1Udtrækkeligt håndtag
2Batteri
3Batteri ladeapparatets
4 Trimmerkniv
5Huset
6Skærekniv
7Løbehjul
8Startspærren
9afbryder
GR
1 τηλεσκοπικής χειρολαβής
2 μπαταρία
3συσκευή φόρτισης
4 μαχαίρι
5χλοοκοπτικού ψαλιδιού
6θαμνοκοπτικό ψαλίδι μαχαίρια
7κινούμενη βάση
8ασφάλεια ενεργοποίησης
9διακόπτη
2 3
4
5
X
A
B
A
B
2

6 7
1
12
3
8 9
12
D
C
3

1 2 3 4 5 6
7 8 9
D
1Augen- und Gehörschutz tragen!
2Warnung!
3Gefahr! Werkzeug läuft nach!
4Gebrauchsanweisung lesen!
5Dieses Elektrowerkzeug nicht dem Regen aussetzen!
6Dritte aus dem Gefahrenbereich halten
7Defekten Akku dem Recycling zuführen !
8Akku enthält Lithium ! Nicht in der Mülltonne entsorgen !
9Achtung Umweltschutz ! Dieses Gerät darf nicht mit
dem Hausmüll/Restmüll entsorgt werden. Das Altge-
rät nur in einer öffentlichen Sammelstelle abgeben.
Abbildung und Erklärung der Piktogramme
Représentation et explication des pictogrammes
Illustrazione e spiegazione dei simboli
Imagens e Explicações dos Pictogramas
Pictogram illustration and explanation
Afbeelding en toelichting van de pictogrammen
Símbolos y su signicado
Απεικόνιση και επεξήγηση των συμβόλων
GB
1Use protective means for eyes and ears!
2Warning!
4Read the operation instructions
6Keep third persons out of the danger zone
3After-running of the appliance!
5Do not use tool in wet weather conditions
7Defective accumulators should be recycled !
8 Battery contains lithium ! Do not dispose of as house-
hold refuse !
9Attention: Environmental Protection! This device may not
be disposed of with general/household waste. Disposeof
only at a designated collection point.
I
1Portare dispositivos per proteggere l’udito e gli cchi!
2Avvertimento!
3L’attrezzo prosegue il movimento anche dopo l’inter-
ruzzione!
4Leggere le istruzioni sull’uso!
5Non esporre questo utensile elettrico alla pioggia!
6Tenere lontano terze persone dall’area di lavoro!
7Portare l’accumulatore difettoso al riciclaggio!
8L’accumulatore contiene lithium ! Nonsmaltire nei rifiuti
di casa
9Attenzione protezione dell’ambiente! Questo apparecchio
non può essere smaltito con la spazzatura domestica/
con rifiuti non riciclabili. Consegnare l’apparecchio vecchio
esclusivamente in un punto di raccolta pubblico.
F
1Porter des protections des yeux et des oreilles!
2Attention!
3Outil avec marche à vide!
4Lisez l’instruction de service!
5Ne pas laisser cet outil électrique sous la pluie!
6Ecarter des tiers personnes de la zone dangereuse!
7Les accus défectueux doivent toujours être mis au
recyclage !
8Un accu contient du lithium ! Ne pas le jeter aux ordures
ménagères !
9Attention ! Protection de l’environnement! Le présent
appareil ne peut en aucun cas être éliminé avec les
ordures ménagères/déchets. Toujours déposer les
appareils usagés dans un centre de collection.
4

ES
1Utilicen protectores de ojos y oídos!
2Cuidado!
4Lea las instrucciones de manejo!
6Mantener alejado terceros de la zona peligrosa!
3Cuchillas no se paran inmediatamente despuésde parar
el motor!
5No exponga esta herramienta eléctrica a la lluvia!
7Retorne el acumulador defectuoso al reciclaje!
8 El acumulador contiene litio. ¡No lo tire al cubo de basura
casera!
9Atención: protección del medio ambiente. Este aparato no
debe evacuarse junto a la basura doméstica ni el rechazo.
El aparato, una vez desechado, deberá entregarse en un
puesto de recolección colectivo.
GR
1Χρησιμοποιείτε μέσα ασφάλειας ματιών και ακοής!
2Προσοχή
4Πριν την χρησιμοποίηση διαβάστε τις οδηγίες χρήσεως
6Κρατάτε μακριά τα σύρματα από την επκίνδυνη περιοχή
3Λειτουργια και μετά τηυ αποσύνδεση απ το ρεύμα
5Αυτό το μηχάνημα να μην εκτείθετε στην βροχή
7 Οδηγείτε την κατεστραμμένη επαναφορτιζόμενη
μπαταρία στην ανακύκλωση !
8 Η επαναφορτιζόμενη μπαταρία περιέχει λίθιο ! Μην
την πετάτε στα οικιακά απορρίμματα !
9Προσοχή προστασία περιβάλλοντος! Αυτή η συσκευή
δεν επιτρέπεται να πεταχτεί στα οικιακά απορρίμματα.
Την παλιά συσκευή την παραδίδετε μόνο σε ένα
δημόσιο κέντρο περισυλλογής.
DK
1Benyt øje- og ørebeskyttelse!
2Advarsel!
4Læs instruktionerne, inden maskinen tages i brug!
6 Hold øje med andre personer i klippezonen!
3Efter-løb på maskinen!
5Brug ikke dette elektriske apparat i fugtigt vejr!
7 Aflever defekte akkumulatorer til passende affaldsbe-
handling!
8Batteriet indeholder lithium! Må ikke bortskaffes
9NB! Miljøbeskyttelse! Dette apparat må ikke bortskaffes
sammen med husholdningsaffald/restaffald. Aflever det
gamle apparat kun på en kommunal modtagestation.
5

DE | Gebrauchsanweisung
6
Technische Daten
Modell GBS 6050 LI EX
Akku-/Betriebsspannung V/DC 3,6
Akkutyp Ah 1,1 Lithium-Ionen
Ladestrom mA/DC 350
Ladedauer h 4 Std.
Betriebsdauer min. ca. 40
Betriebsleistung W 6
Schnittbewegungen min-1 1000 * / 2000 **
Schnittbreite * mm 80
Schnittlänge ** mm 160
Schnittstärke ** mm 8
Schalldruckpegel (DIN EN 60745-2-15) dB (A) 73
Vibration (DIN EN 60745-2-15) m/s2< 2,5
Das Geräte entspricht der Schutzklasse III.
Technische Änderungen bleiben vorbehalten.
* Akku-Grasschere ** Akku-Buschschere
Akku- Gras- und Buschschere
Verehrter Kunde,
um eine zuverlässige Inbetriebnahme zu gewährleis-
ten, haben wir diese Gebrauchsanweisung geschaffen.
Wenn Sie die folgenden Hinweise beachten, wird ihr
Gerät stets zu Ihrer Zufriedenheit arbeiten und eine
lange Lebensdauer besitzen.
Unsere Geräte werden vor der Serienherstellung
unter härtesten Bedingungen erprobt und während
der Fertigung ständigen Kontrollen unterzogen.
Dies gibt uns die Sicherheit und Ihnen die Gewähr,
stets ein ausgereiftes Produkt zu erhalten.
Im Interesse der technischen Weiterentwicklung
sind Konstruktions- und Ausführungsänderungen
vorbehalten.
Bitte beachten Sie: Dieses Gerät darf in
Wohngebieten nach der deutschen Maschin-
en-lärmschutzverordnung vom September
2002 an Sonn- und Feiertagen sowie an
Werktagen von 20:00 Uhr bis 7:00 Uhr nicht
in Betrieb genommen werden.
Beachten Sie zusätzlich auch die landes-
rechtlichen Vorschriften zum Lärmschutz !
Bestimmungsgemäßer Gebrauch
Anwendungshinweis :
Die Buschschere kann und soll keine Heck-
enschere ersetzen.
Sie ist ausschließlich zum Trimmen und Schne-
iden von Ziersträuchern und Gebüsch von ger-
inger Stärke bestimmt. Eine andere oder darüber
hinausgehende Benutzung gilt als nicht bestim-
mungsgemäß. Für hieraus resultierende Schäden
haftet der Hersteller/ Lieferant nicht.
Bei Bedarf kann diese Buschschere durch leich-
tes Auswechseln des mitgelieferten Schermess-
ers in eine Grasschere umgerüstet werden.
Sicherheitshinweise
Achtung : Sämtliche Sicherheitshinweise dies-
er Anleitung beachten und befolgen. Nicht-
beachtung kann elektrischen Schlag, Brand
und schwere Verletzungen verursachen.
Achtung, Gefahr!
• Diese Maschine kann ernsthafte Verletzungen
verursachen. Lesen Sie sorgfältig die Gebrauchs-
anweisung zum korrekten Umgang, zur Vorberei-

DE | Gebrauchsanweisung
7
tung, zur Instandhaltung, zum sachgemäßen Ge-
brauch der Busch - und Grasschere. Machen Sie
sich vor dem ersten Gebrauch mit der Maschine
vertraut und lassen Sie sich auch praktisch ein-
weisen.
• Werkzeugläuftnach.
• VordemSäubernistdasGerätauszuschalten.
•Achtung!FingerundFüßeausdemSchnitt-
bereich fernhalten!
• Motorersteinschalten,wennHändeundFüße
von den Schneidwerkzeugen entfernt sind.
• VordemEinsatzdesGerätesArbeitsfläche
von Fremdkörpern befreien und während
des Arbeitens auf Fremdkörper achten!
• Zum Transport immer erst das Gerät ab-
schalten und Stillstand der Messer abwarten.
Wartungs- und Reinigungsarbeiten immer
nur bei ausge-schaltetem Gerät vornehmen
• Kinder und Jugendliche unter 16 Jahren
dürfen das Gerät nicht bedienen.
• Beachten Sie Ihre Verantwortlichkeit ge-
genüber Dritten im Arbeitsbereich.
• DerGebrauchderHeckenschereistzuverme-
iden, wenn sich Personen, vor allem Kinder,
in der Nähe befinden.
• Busch - und Grasschere nur bei Tageslicht
oder ausreichender künstlicher Beleuchtung
verwenden.
• DieSchereistsachgemäßzuwartenundzu
überprüfen. Das Messer darf bei Beschädi-
gung nur komplett ausgewechselt werden.
Bei Beschädigung durch Stoß ist fachmän-
nische Überprüfung unumgänglich.
• DieScheresollteregelmäßigüberprüftwerden
und zwar nur von einem zuständigen Repara-
turdienst.
• TragenSiegeeigneteArbeitskleidungwieSchutz-
brille, Gehörschutz, rutschfeste geschlossene
Schuhe und Arbeitshandschuhe. Vermeiden Sie
das Tragen von weiter Kleidung, da sie von sich
bewegenden Teilen erfaßt werden kann.
• NachAblegenderSchereundvorReinigungs-
arbeitenist sicherzustellen,dassdasGerätnicht
unbeabsichtigt eingeschaltet werden kann, z.B.
durch Betätigen der Einschaltsperre.
• Das Messer ist regelmäßig auf Beschädigun-
gen zu überprüfen.
• HaltenSiedieSchereinkeinemFallanden
Messern, Verletzungsgefahr selbst bei Still-
stand der Messer.
• GreifenSieniemalsindielaufendenMesser,
um Fremdkörper zu entfernen oder wenn die
Messer einmal blockieren sollten. Schalten
Sie immer erst das Gerät aus und nehmen
Sie die Akku-Energiezelle aus dem Gerät.
• VorsämtlichenArbeitenwieWartungundPflege
am Gerät entnehmen Sie bitte vorher den Akku.
• DasGerätaneinemkindersicherenOrtauf-
bewahren.
• Nehmen Sie stets einen sicheren Stand ein
während der Arbeit mit der Busch - und Grass-
chere, besonders wenn Sie Tritte oder eine
Leiter benutzen.
• Benutzen Sie die Busch - und Grasschere
nicht mit beschädigter oder übermäßig ab-
genutzter Schneideinrichtung.
•VersuchenSieniemals,eineunvollständige
Maschine in Betrieb zu nehmen.
• VerwendenSiestetsdenMesserschutzzum
Transport oder bei Lagerung der Busch - und
Grasschere.
• MachenSiesichvorArbeitsbeginnvertrautmit
Ihrer Umgebung und achten Sie auf mögliche
Gefahren, die Sie wegen des Maschinenlärms
vielleicht nicht hören können.
• NurdievomHerstellerempfohlenenErsatz
- und Zubehörteile verwenden.
Vor der Inbetriebnahme
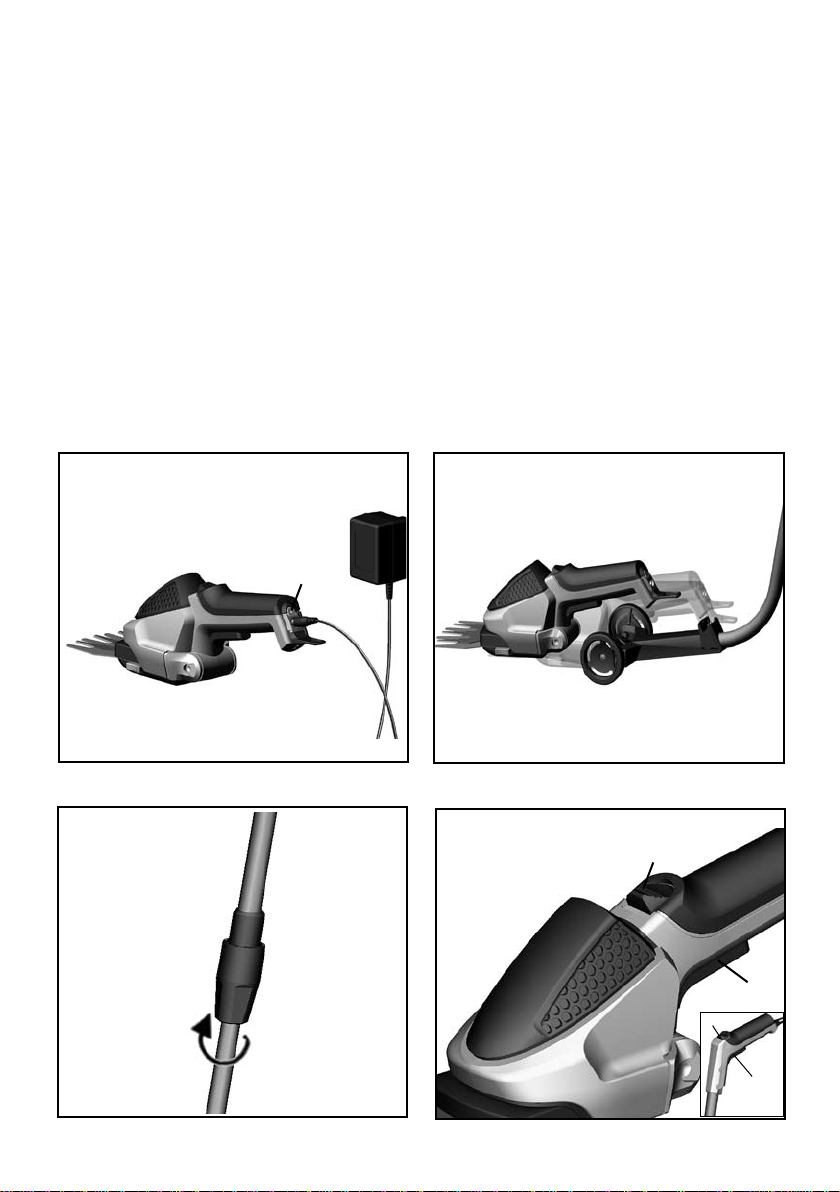
Laden des Akkus
Sicherheitshinweise:
Das Gerät wird bereits mit vorgeladenem Lithium-
Ionen Akku ausgeliefert. Wir empfehlen jedoch vor der
ersten Inbetriebnahme den Akku nochmals zu laden.
- Verwenden Sie dazu nur das mitgelieferte Lade-
gerät. Es ist speziell auf diesen Akku abgestimmt.
- Niemals andere Ladegeräte verwenden. Da-
durch besteht Brand – oder Explosionsgefahr !
- Ladegerät stets von Regen oder Feuchtigkeit
fernhalten. Gefahr eines elektrischen Schlags.
- Niemals ungeschützt im Freien laden, sondern
an trockenem geschützten Ort.
- Niemals Fremdakkus mit diesem Ladegerät
laden. Gefahr von Brand oder Explosion.
- Vor jeder Benutzung des Ladegerätes Gehäuse,
Stecker und Kabel auf Beschädigung überprüfen.
Nicht benutzen, wenn eine Beschädigung vorliegt.
- Ladegerät nicht gewaltsam öffnen. Bei einem De-
fekt muss das Ladegerät ausgetauscht werden.
- Ladegerät erwärmt sich beim Ladevorgang.
Nicht auf leicht brennbarem Untergrund oder in
brennbarer Umgebung betreiben. Brandgefahr.
- Akkuzellen niemals öffnen. Kurzschlussgefahr.
- Bei Beschädigung des Akkus können schädli-

DE | Gebrauchsanweisung
8
che Dämpfe oder Flüssigkeiten austreten. Bei
versehentlichem Kontakt mit Wasser abspülen
und sofort Arzt aufsuchen. Die Flüssigkeit kann
Hautreizungen oder Verätzungen verursachen.
- Akku vor Hitze, starker Sonnenbestrahlung und
Feuer schützen. Explosionsgefahr.
Ladevorgang :
Zum Laden des Akkus das Steckerladegerät in
eine Steckdose stecken. Anschließend den Steck-
er des Ladekabels in die Ladebuchse der Gras
– und Strauchschere stecken (Abb. 2)
Der beginnende Ladevorgang wird durch die grüne
Kontrollleuchte (X) Abb. 2 am Ende des Griffes
angezeigt. Bei leerem Akku beträgt die Ladedauer
ca. 4 Stunden. Nach erfolgter Ladung schaltet
die elektronische Überwachung den Ladevorgang
automatisch ab. Die grüne Kontrollleuchte erlischt
dann und signalisiert damit das Ende des Ladevor-
gangs. Es ist nicht notwendig, die Ladezeit zu
überwachen.
Ladegerät und Handgriff des Gerätes erwärmen
sich beim Ladevorgang. Dies ist normal.
Bei Nichtgebrauch das Ladegerät aus der Steck-
dose entfernen.
Während des Ladevorgangs darf das Gerät nicht
benutzt werden.
Der Akku sollte nachgeladen werden, wenn Sie
ein deutliches Nachlassen der Leistung beim
Schneiden bemerken. Zusätzlich ist ein elek-
tronischer Tiefent-ladungsschutz integriert, der
eine Beschädigung des Akkus verhindert. Dieser
schaltet bei den Akku bei Erreichen der Entlade-
grenze ab. Schalten Sie danach das Gerät nicht
mehr ein, sondern laden Sie zunächst den Akku.
Montage des Teleskop-Handgriffs mit
Fahrgestell
Zum Anbau des Teleskopgriffes die beiden
Nocken am Fahrgestell in die Aussparungen des
Grasschergehäuses bis Anschlag einführen (Abb.
3) Anschließend das hintere Ende des Haltegriffs
der Grasschere auf das Fahrgestell niederdrück-
en, bis dieser mit einem deutlichen Klickgeräusch
einrastet. Der elektrische Kontakt zum Schalter
wird damit automatisch hergestellt.
Zum Abnehmen des Teleskopgriffes einfach den
Griff der Grasschere mit leichtem Zug nach oben
aus dem Fahrgestell ausrasten und Fahrgestell
aus dem Grasschergehäuse herausziehen.
Grifflänge des Teleskopgriffs einstellen
Die Teleskopgrifflänge kann zum Anpassen der
Körpergröße bis zu 12 cm variiert werden.
Dazu Schraubhülse Abb. 4 eine halbe Umdrehung
im Uhrzeigersinn lösen, Grifflänge einstellen und
Schraubhülse im Gegenuhrzeigersinn wieder fest-
schrauben.
Ein – und Ausschalten
Einschaltsperre A (Abb. 5) nach vorn schieben und
Schalter B drücken. Nach dem Einschalten muss
die Einschaltsperre A nicht mehr gehalten werden.
Zum Ausschalten Schalter B loslassen.
Vorsicht ! Messer läuft nach.
Umrüstung des Gerätes/ Wechsel der
Schersysteme
Zum Schutz vor Verletzungen schieben Sie den
mitgelieferten Messerschutz über das Messer
und benutzen Sie Schutzhandschuhe.
Die beiden seitlichen Drucktasten gleichzeitig drücken
und Schermesser abnehmen (Abb. 7)
Entfernen Sie evtl eingedrungenen Schmutz aus
dem Getrieberaum.
Vor Einsetzen des Austauschmessers bitte den
Antriebsbereich (C) leicht einfetten mit handelsübli-
chem Universalfett, wie auch unter Abschnitt War-
tung beschrieben (Abb. 9).
Anschliessend Schermesser mit der hinteren Halte-
nase in das Grasschergehäuse einführen, wie in Abb.
8 gezeigt, und durch kräftigen Druck auf die Messer-
grundplatte das Click-System einrasten.
Die Position des Excenterantriebes muss bei Messer-
wechsel nicht beachtet werden. Beim Einschalten
rückt der Getriebeexcenter selbsttätig in die entsprech-
ende Aussparung des Schermessers ein.
Das Gerät ist nun wieder betriebsbereit.
Hinweise zum Arbeiten
Mit der Buschschere lassen sich Ziersträucher
und leichtes Gebüsch schneiden. Auch für Form-
schnitte z.B. bei der Grabpflege ist dieses Gerät
gut geeignet. Da das Gerät mit einer Hand geführt
wird, bringen Sie bitte auf keinen Fall die freie an-
dere Hand in die Nähe des laufenden Messers.
Mit der Grasschere lassen sich Rasenkanten bzw. Gras-
flächen an unzugänglichen Stellen sauber schneiden.

DE | Gebrauchsanweisung
9
Zum bequemen Arbeiten in ungebückter Position
kann der mitgelieferte Teleskopgriff montiert werden.
Wartung (Abb. 9)
Die Messer von Pflanzensäften und Schmutz
sauber-halten. Das Messerpaar sollte je Saison
mindestens einmal abgenommen werden. Pflan-
zenreste und Fremdkörper sind dabei zu ent-
fernen. Die Ritzel C und den Messerrücken D
vorsichtig mit dünnem Fett schmieren. Den Motor
und andere Teile nicht schmieren.
Achtung! Die Gleitflächen der Messer müssen
geölt werden, um die Gleitfähigkeit zu erhalten.
Ungeölte Gleitflächen können die Standzeit neg-
ativ beeinflussen.
Wenn die Messer nach langem Gebrauch stumpf
geworden sind, ersetzen Sie diese bitte nur durch
original Ersatzmesser.
Reinigen Sie die Schere nur mit Bürste oder Lap-
pen. Niemals Gerät mit Wasser abspritzen oder
in Wasser eintauchen.
Messer nach jedem Gebrauch mit Pflegespray
behandeln.
Abgenutzte stumpfe Messer ersetzen.
Nach Gebrauch immer Messerschutz aufziehen.
Gerät auf offensichtliche Mängel überprüfen und
gegebenenfalls in einer autorisierten Services-
telle reparieren lassen.
Lagerung
Gerät immer an einem trockenen, sauberen Ort
ausserhalb der Reichweite von Kindern aufbe-
wahren. Frostfrei lagern.
Umweltschutz
Bitte beachten Sie folgende Hinweise zur.
Akku-Entsorgung:
Ausgediente Akkus oder Batterien gehören nicht
in den Hausmüll. Als Verbraucher sind Sie geset-
zlich verpflichtet, gebrauchte Batterien bzw. Akkus
zurückzugeben. Am Ende der Lebensdauer Ihres
Gerätes müssen die Batterien bzw. Akkus aus dem
Gerät entnommen und gesondert entsorgt werden.
Vor Rückgabe sind die Altakkus zu entladen und
gegen Kurzschluß zu sichern. Sie können Ihre
alten Akkus an den örtlichen Sammelstellen Ihrer
Gemeinde oder bei Ihrem Händler bzw. der Verkauf-
sstelle abgeben.
Wenn Ihr Gerät eines Tages unbrauchbar wird
oder Sie es nicht mehr benötigen, geben Sie
das Gerät bitte auf keinen Fall in den Hausmüll,
sondern entsorgen Sie es umweltgerecht. Geben
Sie das Gerät bitte in einer Verwertungsstelle ab.
Kunststoff- und Metallteile können hier getrennt
und der Wiederverwertung zugeführt werden.
Auskunft hierzu erhalten Sie auch in Ihrer Ge-
meinde- oder Stadtverwaltung.

GB | Operating Instruction
10
Technical Specications
Model GBS 6050 LI EX
Battery voltage/operation voltage V/DC 3,6
Battery type: Ah 1.1 lithium-ion
Charging current: mA 350
Charging time: h 4 hours
Operating time: min. ca. 40
Betriebsleistung W 6
Cutting movements min-1 1000 * / 2000 **
Cutting width * mm 80
Cutting length ** mm 160
Cutting thickness ** mm 8
Noise pressure level as per (DIN EN 60745-2-15) dB (A) 73
Vibrations (DIN EN 60745-2-15) m/s2< 2,5
The machines comply with the safety class III.
Technical changes are reserved.
* Grass trimmer ** Shrub trimmer
Accu- Grass- und Shrub shear
Dear customer,
We have created this instruction manual for you in
order to ensure the reliable operation of your clippers.
By following the instructions, your machine will always
work to your satisfaction and we can guarantee its
long lifetime.
Our machines were tested under extremely severe
conditions priorto production. They were also subjected
to continuous testing during production. This series of
tests guarantees the consumer a high quality product.
Design and performance are subject to change,
without prior notice, due to improvements.
Attention: Noise protection ! Please observe the
local regulations when operating your device
Bestimmungsgemäßer Gebrauch
Application note:
The battery-powered grass and shrub shear
can not and should not replace your hedge
shears.
They are exclusively designed to trim and cut back
ornamental shrubs and brush -wood with a low
wood thickness. Any other use is not deemed
appropriate and the manufacturer/ supplier is not
liable for damages resulting from such use.
If required, the shrub trimmer may be easily
turned into a grass trimmer by replacing
the assembled shearing blade with the one
provided with your package.
Safety instruction
Attention: Read and observe the Safety
Instructions contained in these Operating
Instructions. Non-observance may result
in electric shock, fire, and serious injury.
Warning, danger !
• This machine may cause serious injuries.
Please read the instruction manual carefully
as to the correct handling, the preparations,
the maintenance and the proper use of the
hedgetrimmer. Familiarize yourself with the
machine before the first use and also have
yourself introduced to practical use of the
machine.
• The instrument does not cease movement
after being turned off.

GB | Operating Instruction
11
• Turnoffpowerbeforecleaning.
• Beware! Keep your fingers away from the
cutting area !
• Onlyswitchonthedeviceifyourhandsand
feet are away from the cutting tools.
• Remove all debris from the working area
before use and pay attention to such debris
while working!
• Turnthemachineoffbeforetransportingand
wait until the blade stops moving. Maintenance
and cleaning should be performed only when
the machine is turned off.
• Children and teenagers under 16 years of
age must never use this device!
• Beawareofthirdpersonsintheworkarea.
• Donotusetheshearsifotherpersons,children
or domestic animals are found nearby.
• Only use the trimmer in daylight or
sufficiently bright artificial illumination.
• The clippers must be subjected to regular
maintenance and checks. Damaged blades
must be replaced as a pair. Professional repair
is required if damage occurs due to impact.
• Thetrimmershouldberegularlymaintained
by an accordingly authorised service point.
• Wear suitable working clothes, i.e. protective
glasses, protective means for ears, non-slippery
shoes and working gloves. Do not wear broad
clothes which could be caught by the moving
parts.
• Afteryoufinishusingtheclippersandbefore
cleaning them, it is necessary to ensure that
the machine cannot be accidentally turned
on, such as by unlocking the switch.
• Checkthecuttingunitregularlyfordamage
• Never hold the clippers by the blades, you
may run the risk of injury even when the
clippers are not moving!
• Nevertouchmovingbladesinanattemptto
remove debris or if the blades are blocked.
Always switch off the device first if you want
to remove the battery pack.
• Beforeperforminganyworkonthemachine
such as maintenance or treatment, take out
the batteries.
• Keep the machine away from children and
store it in a safe place.
• Whenworkingwiththeshears,alwaystakea
stabile standing position, particularly when
you are using steps or a ladder.
• Donotuseshearswithadamagedorexcessively
worn-out cutting part
• Ensurethatallprotectivedevicesandhandles
are installed on the machine. Never try to put
an incomplete machine in operation.
• Alwaysusetheprotectivepartdesignedfor
the blade when transporting and storing the
shears.
• Beforestartingthework,makeyourselffamiliar
with the surroundings and possible dangers
which you may not hear because of the noise.
• Onlyusethesparespartsandaccessories
recommended by the manufacturer.
Before starting
Charging the battery
Safety Instructions:
The tool is delivered with the lithium-ion battery
charged. However, we recommend recharging the
battery before the tool is operated for the first time.
- Use the included charging unit for charging the
battery only. It is specially designed to match
the tool’s battery.
- Never use other charging unit. This will result in
fire and/or explosion hazard!
- Always keep the charging unit clear of rain or
moisture. Hazard of electric shock! - Never
charge the battery in the open without protection,
always choose a dry, protected place.
- Never try to charge third-party batteries with
this charging unit. This will result in fire and/or
explosion hazard!
- Check the housing, plug and cable for damage
before each use of the charging unit. Do not use
the unit if you detect damage.
- Do not open the charging unit by force. In case
of a defect, the charging unit must be replaced.
- The charging unit heats up during the charging
process. Do not place the unit on a flammable
surface or operate it in a flammable environment.
Fire hazard!
- Never open the battery cells. Hazard of short
circuits!
- In case of damage to the battery, hazardous
vapours or fluids may escape. In case of incidental
contact flush with water and seek medical advice
immediately. The fluid may have irritating or
caustic effects on the skin.
- Protect the battery from heat, intense insolation
and fire. Explosion hazard!
Charging process:
To charge the battery connect the charging unit to

GB | Operating Instruction
12
an electrical socket. Then connect the plug of the
charging cable to the charging socket of the grass
and shrub shears or trimmer (fig. 2)
The start of the charging process is indicated by the
green control light (X) fig. 2 at the end of the handle.
If the battery is completely empty the charging time
is about 4 hours. After the charging process has
been completed, the electronic control automatically
switches off the charging process. The green
control light extinguishes thereby indicating the end
of the charging process. It is not required to monitor
the charging time.
The charging unit and the handle of the tool heat up
during the charging process. This is nothing unusual.
Pull the plug of the charging unit if it is not in use.
The tool must never be switched on during the
charging process!
Recharge the battery every time you realise
a considerable decrease of the tool’s cutting
performance. The battery additionally features an
electronic total discharge protection that protects
the battery from damage. This feature switches
the battery off if the discharging threshold is
reached. Do not switch the tool on afterwards and
make sure to recharge the battery first.
Assembly of the telescopic handle
with chassis
To attach the telescopic handle to the tool lead
the two toes of the chassis into the jogs provided
on the housing of the grass shears as far as they
will go (fig. 3). Then push the rear end of the grass
shears’ handle down onto the chassis until it locks
in place with a clearly audible ‘click’ sound. This
will automatically establish the electrical contact
to the switch.
To remove the telescopic handle simply unlock
the grass shears’ handle by gently pulling it
upwards out of the chassis and pulling the
chassis out of the grass shears’ housing.
Adjusting the length of the telescopic
handle
The length of the telescopic handle can be adjusted
within a range of 12 cm to better match the operator’s
height.
To do so loosen the tapped sleeve (fig. 4) by turning
it one half turn clockwise, adjust the length of the
handle, and fasten the tapped sleeve again by
turning it anti-clockwise.
Switching the tool on/off
Slide the switch-on lock A (fig. 5) forward and push
switch B. After the tool has been switched on, you do
not have to hold the switch-on lock A any longer.
To switch off just let go of the switch B.
Attention! The blades will coast for a
certain time after switch-off!
Refitting the tool / Changing the shear
systems
Put the included blade guard into the blade(s) and use
protective gloves to protect yourself from injury.
Push both lateral push buttons concurrently and re-
move the shearing blades (Fig. 7).
Remove any dirt from the gear area (if necessary).
Please slightly grease the drive area using com-
mer-cial universal grease as described in the
Maintenance section before putting the replace-
ment shears in place (Fig. 9).
Lead the cutting blades with the rear holding toe
into the housing of the grass shears as shown in
fig. 8 and lock the click system in place by strongly
pushing on the blade base plate.
The position of the eccentric drive does not have
to be considered when changing the blades. When
the device is switched on, the gear eccentric unit
automatically engages into the appropriate relief in
the shearing blade.
The device is now ready for operation.
Hints for your work with the tool
The shrub trimmer cuts ornamental shrubs and
light undergrowth or bushes. The device is also
well-suited for ornamental cuts as, for example,
for the care of graves. As the device is operated
with one hand please be careful not to move the
other hand near the running cutting tools.
The grass shears allow for clean cuts of lawn edges
or hardly accessible lawn areas.
For convenient working in an upright position, the
included telescopic handle may be assembled to
the tool.
Maintenance
Clean the blade from any crushed plants and dirt.
The blades should be detached at least once a
season for the removal of debris. Lubricate the
C pinion and the D back of the blade with a light

GB | Operating Instruction
13
oil. Do not lubricate the motor and other parts.
Should the blade become dull after a long period
of use, a spare part can be ordered.
Warning!Theleadingedges of thebladesmustbeoiled
toensureproperlubrication.Iftheleadingedgesarenot
oiled, blade durability may be adversely affected.
If the cutting tools have become dull after long use
please replace them with original spare parts.
Clean the device using only a brush or cloth. Do never
wash down the device with water and do never dip the
device into water.
Apply protective spray to the blades after each use.
Replace blunt blades.
Always put on the blade guard after use.
Examine the tool for obvious defects and have it
repaired in an authorised service shop if required.
Storage
Always store the tool in a dry, clean place outside
the reach of children. Make sure that the place of
storage is frost-free.
Waste disposal and environmental
protection
Please observe the following directions for
the disposal of your accumulator/battery.
Batteries are not to be put into the rubbish. As a
con-sumer you are legally obliged to return used
batteries and accumulators. At the end of the dura-
tion of your apparatus, the batteries or accumula-
tors have to be taken from the apparatus, dispos-
ing of them separately. You have the possibility of
delivering your old batteries and accumulators to
the local collecting points of your municipality or to
your dealer or to the distribution centers.
If your device should become useless somewhere
in the future or you do not need it any longer, do not
dispose of the device together with your domestic
refuse, but dispose of it in an environmentally friendly
manner.
Please dispose of the device itself at an according
collecting/recycling point. By doing so, plastic and
metal parts can be separated and recycled. Informa-
tion concerning the disposal of materials and devices
are available from your local administration.

FR | Mode d‘emploi
14
Données techniques
Modèle GBS 6050 LI EX
Tension de l’accu, tension de service V/DC 3,6
Type d’accu Ah 1,1 ions lithium
Courant de charge mA 350
Durée de chargement h 4 heures
Durée de service min. ca. 40
Puissance W 6
Mouvements de coupe min-1 1000 * / 2000 **
Largeur de coupe mm 80
Longueur de coupe mm 160
Epaisseur de coupe mm 8
Niveau de pression acoustique (DIN EN 60745-2-15) dB (A) 73
Vibration (DIN EN 60745-2-15) m/s2< 2,5
La débroussailleuse est conforme à la classe de protection III.
Sous réserve de modifications techniques.
* Cisaille à accu ** Débrousailleuse à accu
Cisaille et débroussailleuse à accu
Cher client,
Le présent mode d‘emploi a été préparé afin d‘as-
surer le fonctionnement optimal de votre appareil.
Si vous observez scrupuleusement les instructions
cidessous, votre appareil vous donnera entière
satisfaction pendant longtemps. Nos appareils doi-
vent répondre aux plus hautes exigences vnt leur
production en série et sont soumis aux contrôles de
qualités très sévères, même pendant la fabrication.
Ceci nous donne la sécurité et vous offre la garantie
de disposer toujours d‘un produit de haute fiabilité.
En vue de l‘amélioration du produit nous réservons
le droit d‘apporter des modifications de conception
et d‘exécution.
Attention : protection contre le bruit !
Avant la mise en marche, informez-vous
des prescriptions locales.
Consignes générales de sécurité
Conseil d’utilisation :
La cisaille et taille-haie avec accu ne peut
nine doit remplacer un taille-haie.
Elle est uniquement conçue pour écourter et
dégager les arbustes décoratifs et les buissons
de petite taille. Une utilisation autre ou dépas-
sant ce but est consi-dérée comme inadéquate.
Le fabricant / fournisseur n’assume en aucun
cas la responsabilité des dommages pouvant
en résulter.
En cas de nécessité, le taille-haie peut être trans-
formé en cisaille, il suffit de remplacer la lame
livrée avec l’appareil.
Avis de sécurité
Attention : Lire et respecter toutes les
consignes de sécurité mentionnées par le
manuel d’utilisation afin d’éviter tout ris-
que de décharges électriques, d’incendie
ou de blessures graves.
Attention, danger!
• Cettemachine peut provoquerdes blessu-
res graves. Lisez soigneusement les ins-
tructions concernant le maniement correct,
à la maintenance et à l’utilisation adéquate
du taille-haie. Avant la première utilisation
familiarisez-vous avec la machine

FR | Mode d‘emploi
15
•Lamesenmouvement.
• Avant de nettoyer l‘appareil, il faut le dé-
brancher.
•Attention! Doigts et pieds doivent être te-
nusàbonnedistancedurayond‘action.
• Ne mettre le moteur en marche que si les
mains et les pieds sont suffisamment éloi-
gnés des instruments de coupe.
• Avantlamiseenservicedel‘appareil,ilfaut
enleverlescorpsétrangersetfaites-yatten-
tion pedant sa mise en service!
• Pour transporter l‘appareil prendre soin de
toujoursledébrancheretattendezl‘arrêtcom-
plet des lames. L‘appareil doit toujours être
débranché lors des opérations de contrôle et
denettoyage.
• L’appareilneserajamaisutilisépardesenfants
et/ou des adolescents de moins de 16 ans!
• Pendant l‘utilisation de l‘appareil pensez à
votre responsabilité envers les tiers.
• Nevousservezpasdelacisailleencasoùil
yad‘autrespersonnes,desenfantsoudes
animaux domestiques à proximité.
• N’utiliser la cisaille qu’à la lumière du jour
ou si un éclairage suffisant est assuré.
• Contrôlez régulièrement les lames. En cas de
détérioration il faut les remplacer obligatoirement
parpaires.Encasd‘endommagementparchocs
il est indispensable de les faire contrôler.
• Les lames doivent être régulièrement véri-
fiées et ce, uniquement par un service de
réparation compétent.
• Portez un vêtement propice, des lunettes de
protection,uneprotectiondel‘ouie,unepaire
de chaussures solides et non glissantes et des
gantsdetravail.Neportezjamaisunvêtement
ample qui puisse être accroché avec des piè-
ces mobiles.
• Portez un vêtement propice, des lunettes de
protection,uneprotectiondel‘ouie,unepaire
de chaus-sures solides et non glissantes et
desgantsdetravail.Neportezjamaisunvê-
tement ample qui puisse être accroché avec
des pièces mobiles.
• Alafindutravailetavantlenettoyage,as-
surezquel‘appareilnepuisseêtremisen
marche par inadvertance, en actionnant p.e.
le bouton de verouillage.
• Nejamaissaisirl‘appareilparleslamesqui
sonttranchantesmêmeàl‘arrêtcomplet.
• N‘avancez jamais vos doigts vers l‘appareil en
marche pour essayer d‘enlever d‘éventuels ob-
jets étrangers ou tenter éventuellement de déblo-
quer les lames. Avant de retirer l’accu de l’appa-
reil, toujours mettre l’appareil hors service.
• Sortez les accumulateurs au cours des
travaux qui concernent l‘appareil (mainte-
nance, entretien...)
• Mettezl‘appareil en sûretéet le tenirhors
de portée des enfants.
• Pendantletravailaveclacisaille,prenezla
position ferme et surtout si vous vous ser-
vezd‘unescabeauoud‘uneéchelle.
• N‘utlisez jamais la cisaille avec le dispositif de
cisaillement excessivement usé mais faites rem-
placer ce dernier dans une station de service.
• Faites le nécessaire pour que tous les dis-
positifs de protection et des manches soient
montés à l‘appareil. N‘essayez jamais de
mettre en marche un dispositif incomplet.
• En cas de transport ou de stockage de la
cisaille, utilisez toujours une protection du
couteau.
• Avant de commencer à travailler, familiari-
sez -vous avec des environs et des dangers
possibles qui puissent être inaudibles à
causedubruitdel‘appareil.
• N’utiliserquedespiècesderechangeetdes
accessoires recommandés par le fabricant.
Avant la mise en service
Chargement de l’accu
Consignes de sécurité :
L’accu à ions lithium de cet appareil est déjà chargé
lors de la livraison. Il est cependant conseillé de
charger de nouveau l’accu avant la première mise
en service.
- Pour ce faire, utiliser uniquement la station de charge
fournie, conçue spécialement pour cet accu.
- Ne jamais utiliser d’autres stations de charge,
ceci pourrait entraîner un risque d’incendie ou
d’explosion !
- Ne jamais exposer la station de charge à la pluie
et à l’humidité. Risque de décharge électrique.
Ne jamais charger en plein air mais toujours dans
un endroit sec et abrité.
- Ne jamais utiliser cette station de charge pour
charger des accus d’autres marques. Risque
d’incendie ou d’explosion.
- Contrôler le boîtier, la fiche et le cordon de la station
de charge avant chaque utilisation pour déceler
d’éventuelles détériorations. Ne pas utiliser la sta-
tion de charge si elle est endommagée.
- Ne pas ouvrir la station de charge. Remplacer
toute station de charge défectueuse.

FR | Mode d‘emploi
16
- La station de charge chauffe lorsqu’elle fonctionne.
Ne pas l’utiliser sur un support facilement inflam-
mable ou dans un environnement exposé aux
incendies. Risque d’incendie.
- Ne jamais ouvrir les accus. Risque de court-circuit.
- Un accu endommagé peut libérer des vapeurs
ou des liquides nocifs. En cas de contact fortuit,
rincer à l’eau et consulter immédiatement un
médecin. Le liquide peut provoquer des irrita-
tions cutanées ou des brûlures.
- Tenirl’accuàl’écartdelachaleur,del’ensoleillement
direct et du feu. Risque d’explosion.
Chargement :
Pour charger l’accu, introduire la fiche de la sta-
tion de charge dans une prise de courant ensuite
la fiche du câble d’alimentation dans la douille de
chargement de la cisaille (fig. 2)
Le voyant lumineux vert(X), fig. 2, situé à l’extrémité de
la poignée indique que le chargement est en cours. La
durée de chargement est d’environ 4 heures lorsque
l’accu est vide. Le dispositif de contrôle électronique
arrête le chargement automatiquement lorsqu’il est
terminé. Le voyant lumineux vert s’éteint, indiquant que
le chargement est terminé. Aucune surveillance n’est
nécessaire pendant le chargement.
La station de charge et la poignée de l’appareil
chauffent pendant le chargement. Ce phénomène
est normal.
Retirer la station de charge de la prise de courant
lorsque l’on ne l’utilise pas.
Ne pas utiliser l’appareil pendant le chargement.
Recharger l’accu lorsque l’on constate une baisse
de puissance significative pendant la coupe. Le
dispositif électronique de protection intégré empêche
toute décharge totale, ce qui endommagerait l’accu.
Ce dispositif déconnecte l’accu lorsque la limite de
décharge est atteinte. Recharger d’abord l’accu
avant de pouvoir remettre l’appareil en marche.
Montage du manche télescopique avec
châssis à roues
Pour monter le manche télescopique, introduire à
fond les deux cames situées sur le châssis à roues
dans les encoches du boîtier de la cisaille (fig. 3).
Ensuite, rabattre l’extrémité arrière du manche de
la cisaille sur le châssis à roues jusqu’à ce que le
manche s’encliquète en émettant un bruit distinct.
Cette opération permet d’établir automatiquement
le contact électrique avec l’interrupteur.
Pour retirer le manche télescopique, dégager
simplement le manche de la cisaille du châssis à
roues en le tirant légèrement vers le haut ensuite
retirer le châssis à roues du boîtier de la cisaille.
Réglage de la longueur du manche
télescopique
Vous pouvez modifier la longueur du manche téle-
scopique de 12 cm au maximum, pour l’adapter à
la taille de l’utilisateur.
Pour ce faire, desserrer la douille filetée fig. 4 d’un
demi-tour dans le sens horaire, régler la longueur
du manche ensuite resserrer la douille filetée dans
le sens antihoraire.
Mise en marche et arrêt
Pousser le bouton de sécurité A (fig. 5) vers l’avant
et appuyer sur l’interrupteur B. Relâcher le bouton de
sécurité A dès que l’appareil tourne.
Relâcher l’interrupteur B pour arrêter l’appareil.
Attention ! La lame continue de tourner
par inertie.
Adaptation de l’appareil / Changement
du dispositif de coupe
Pour éviter toute blessure, placer le protège-lame
fourni sur la lame et porter des gants de protection.
Exercez une pression simultanée sur les deux
boutons-poussoirs et retirez les lames (Ill. 7).
Enlevez les salissures pouvant s’être logées
dans l’engrenage.
Avant de placer le nouvel outil de coupe, graissez
légèrement les éléments de l’entraînement (C) avec
de la graisse universelle d’usage courant, comme le
décrit le paragraphe « entretien » (Ill. 9).
Introduire la lame dans le boîtier de la cisaille en
présentant d’abord le taquet de retenue arrière,
comme le montre la fig. 8, ensuite exercer une
forte pression sur le socle de la lame pour en-
clencher le dispositif d’encliquetage.
La position de la commande à excentrique ne doit pas
être prise en compte lors du changement de lames.
Lors du démarrage, l’excentrique de l’engrenage
se replace automatiquement dans l’encoche cor-
respondante de la lame.
L’appareil est de nouveau prêt à l’emploi.

FR | Mode d‘emploi
17
Remarques concernant l’utilisation
Le taille-haie permet de couper des arbustes d’agré-
ment et des petits buissons. Cet appareil convient
aussi parfaitement pour la coupe en forme, pour
l’entretien des tombes, par exemple. L’appareil
étant guidé d’une main, n’approchez en aucun cas
l’autre main libre des lames en fonctionnement.
Cette cisaille permet de tailler proprement les bordures
de gazon et les pelouses difficilement accessibles.
Installer le manche télescopique livré avec l’appareil
pour travailler confortablement sans se pencher.
Maintenance (fig. 9)
Débarrassez les lames de toutes traces de sève et sa-
leté. Une fois par saison au moins il faut démonter les
lames. Enlevez à cette occasion l‘herbe et autres par-
ticules. Lubrifiez les galets d‘entraînement C et la lame
D avec un peu de graisse fluide. Ne graissez jamais ni
le moteur ni aucune autre pièce. Lorsqu‘au bout d‘un
certain temps les lames se sont émous-sées, il vous
suffit de commander les lames de rechange.
Attention! Lubrifier les surfaces de glissements en
vue d‘entretenir leur parfait fonctionnement. Les sur-
faces non huilées pourraient avoir un impact négatif.
Si les lames sont émoussées suite à une longue
utilisation, ne les remplacez que par des lames
de rechange originales.
Ne nettoyez la cisaille qu’avec une brosse ou un
chiffon. Ne jamais laver l’appareil avec de l’eau
ou l’immerger.
Vaporiser un produit d’entretien sur la lame après
chaque utilisation.
Remplacer les lames usées et émoussées.
Toujours replacer le protège-lame après avoir util-
isé l’appareil.
Contrôler l’appareil pour déceler les défauts mani-
festes et le faire réparer par un spécialiste agréé si
nécessaire.
Stockage
Toujours entreposer cet appareil dans un endroit
sec, propre et à l’abri du gel. Le tenir hors de portée
des enfants.
Recyclage et protection de l’environ-
nement
Veuillez tenir compte des conseils suivants
pourlerecyclagedel’accu:
Des accus ou piles vides ne doivent pas être jetés
aux ordures ménagères. En tant que consomma-
teur, vous êtes tenu par la loi de restituer les piles
ou accus usagés. Les piles ou accus doivent, à
la fin de la vie de votre appareil, être retirés de
celui-ci et éliminés en bonne et due forme. Avant
de recycler les accus usagés, ceux-ci doivent être
déchargés et sécurisés contre les courts-circuits.
Vous pouvez déposer vos accus usagés dans les
centres de recyclage locaux de votre commune,
chez votre revendeur ou au point de vente.
Au cas où votre appareil devenait un jour inutilisa-
ble ou si vous n’en aviez plus l’usage, ne jetez en
aucun cas l’appareil avec les déchets ménagers,
mais veillez à un recyclage conforme aux princi-
pes écologiques.
Allez déposer l’appareil dans un centre de recy-
clage. Les éléments en matière synthétique et
en métal seront séparés et réutilisés. Votre com-
mune ou l’administration urbaine vous fourniront
tous les renseignements à ce sujet.

IT | Istruzioni per l‘uso
18
Dati tecnici
Modello GBS 6050 LI EX
Tensione di esercizio dell’accumulatore V/CC 3,6
Accumulatore di tipo Ah 1,1 agli ioni di litio
Corrente di carica mA/CC 350
Tempo di carica Ore 4
Tempo di funzionamento min. ca. 40
Potenza d´esercizio W 6
Moti di taglio min-1 1000* / 2000**
Larghezza di taglio * mm 80
Lunghezza delle lame ** mm 160
Profondità di taglio ** mm 8
Livello di pressione acustica (DIN EN 60745-2-15) dB (A) 73
Vibrazione(DIN EN 60745-2-15) m/s2< 2,5
Le cesoie per cespugli corrispondono alla classe di protezione III.
La casa produttrice si riserva la facoltà di apportare modifiche tecniche alle presenti istruzioni.
* Cesoia ad accumulatore per prato ** Cesoie per cespugli
Cesoie per erba e cespugli con accumulatore
Spettabile cliente,
per poter garantire la messa in funzionamento
affi-dabile, abbiamo preparato per Voi queste
istruzioni per l´uso. Se manterrete i seguenti
consigli, la macchina lavorerá sempre alla Vo-
stra soddisfazione e noi garantiamo per la sua
lunga durata.
Le nostre macchine sono state provate, prima
della messa in produzione di serie, alle condi-
zioni piú difficili e durante la produzione sono
sottoposti ad un permanente controllo. Questo
a noi da la sicurezza e a Voi la garanzia, che
avete acquistato il prodotto maturo.
Nell´interesse dell´altro sviluppo tecnico sono
riservati i cambiamenti della costruzione e della
esecuzione.
Attenzione: inquinamento acustico! Pri-
ma dell’impiego prendere conoscenza
delle norme regionali.
Norme di sicurezza generali
Avvertenza per l’uso :
Queste cesoie per cespugli non possono
né debbono essere usate in sostituzione
delle cesoie da siepe.
Esse servono esclusivamente per sfoltire e ta-
gliare arbusti ornamentali e cespugli di piccolo
spessore. Pertanto qualsiasi altro tipo d’impiego é
considerato non conforme alle norme. Il produtto-
re/fornitore non si assume alcuna responsabilità
per eventuali danni risultanti dall’uso improprio
dell’attrezzo.
In caso di necessità, queste cesoie possono esse-
re trasformate in cesoie per erba mediante la sem-
plice sostituzione della lama fornita in dotazione.
Avvisi sulla sicurezza
Attenzione: osservare e seguire tutte le av-
vertenze di sicurezza contenute nelle pre-

IT | Istruzioni per l‘uso
19
senti istruzioni. L’inosservanza può provocare
scosse elettriche, incendi e gravi lesioni.
Attenzione, pericolo !
• Questo utensile può causare delle serie ferite.
Leggete con attenzione le istruzioni sull’uso del
taglisiepi, per usarlo in modo corretto nell’am-
bito in cui opererete, per la sua preparazione,
manut-enzione e per un uso appropriato. Prima
di metterlo in funzione, familiarizzate con l’uten-
sile lasciatevi eventualmente consigliare da chi
ha esperienza con questi utensili.
• Lamacchinahalafasedicoda.
• Primadellapuliziadellamacchinaspegnete
la macchina.
• Leditaeipieditenetefuorizonaditaglio!
• Accendereilmotoresoltantoselemaniei
piedi sono lontani dagli utensili da taglio.
• Prima di utilizzare la macchina, eliminate
dalla superfice di lavoro i corpi estranei e
durante lavoro state attenti a tali oggetti !
•Periltrasportolamacchinaspegnetesem-
pre e aspettate, quando la lama si ferma.
La manutenzione e la pulizia é possibile
eseguire solo con la macchina spenta.
• Igiovanifinoa16annidietánonpossono
usare la macchina.
• Stateattentialleterzepersonenellazonadi
lavoro.
• Non usate la cesoia, se nella vicinanza si
trovano altre persone, i bambini o animali.
• Utilizzarelecesoiesoloallalucedelgiorno
o con sufficiente illuminazione artificiale.
• Lacesoiaéneccessariomantenereecontrol-
lare regolarmente. Il coltello é neccessario,
quando é difettoso, solo come il paio comple-
to. Quando é stato danneggiato da un urto,
serve farlo controllare dal personale esperto.
• Le cesoie debbono essere sottoposte a perio-
diche revisioni che dovranno essere effettuate
esclusivamente da un servizio di riparazione
specializzato.
• Usateopportunivestitiperlavoro,vuoldiregli
occhiali, dispositivi per la diffesa dell´udito,
le scarpe antisdrucciolo chiuse e i guanti da
lavoro. Non portate i vestiti larghi, che potreb-
bero essere affermati dagli elementi mobili.
• Quandoappoggiatelacesoiaequandovolete
pulirla, é neccessario assicurare, che la cesoia
non puó essere accesa per sbaglio, per es.
sbloccando l´interruttore.
• La lama di taglio deve essere ispezionata ad
con regolarità per identificare eventuali danni.
• Nonmanteneteinnessuncasolacesoiaper
i coltelli, c´é pericolo del ferimento anche
con la cesoia ferma.
• Non toccate mai i coltelli in movimento, se
volete togliere i corpi estranei o quando la
cesoia si blocca. Prima spegnere sempre le
cesoieedestrarrel’elementodell’accumulatore
dall’apparecchio.
• Primadiiniziare qualsiasi operazione sulla
macchina, come é manutenzione o la puli-
zia, é bisogno estrare gli accumulatori.
• Lamacchinaconservateinunpostosicuro,
fuori portata dei bambini.
• Duranteil lavoro conla cesoia prendetela
posizione sicura, prima di tutto se durante
lavoro usate la scala o i gradini.
• Nonusatelacesoiaconilstrumentoditaglio
troppo consumato o difettoso.
• Noncercatedimettereinfunzionelamacchina
non completa.
• Periltrasportoestoccaggiodellacesoiausate
sempre il dispositivo per la diffesa della lama.
• Primadell´iniziodilavoroguardateilluogodi
lavoro e possibile pericolo, che per causa del
rumore della macchina potreste non sentire.
• Utilizzaresoltantogliaccessoriediricambi
raccomandati dal produttore.
Prima della messa in funzione
Carica dell’accumulatore
Avvertenze di sicurezza
L’apparecchio viene consegnato con la batteria
agli ioni di litio già carica. Si raccomanda, tuttavia,
prima di mettere in funzione il dispositivo per la
prima volta, di ricaricare l’accumulatore.
- A tal fine utilizzare il dispositivo caricabatterie
fornito in dotazione. Esso è specifico per questo
accumulatore.
- Non utilizzare mai altri caricabatterie. Ciò compor-
terebbe il rischio di incendio o di esplosione!
- Tenere sempre il caricabatterie lontano dalla piog-
gia e dall’umidità. Pericolo di scossa elettrica. - Non
caricare mai il dispositivo all’aperto in luoghi non
protetti, ma sempre in ambienti asciutti e protetti.
- Non caricare mai accumulatori di altro tipo con que-
sto caricabatterie. Pericolo d’incendio o esplosione.
- Prima di utilizzare il caricabatterie controllare
sempre che scatola, spina e cavo non siano
danneggiati. Non utilizzare il dispositivo in pre-
senza di danneggiamenti.
Table of contents
Languages:
Popular Lawn And Garden Equipment manuals by other brands

Dura Trel
Dura Trel DURAFLEX TRELLIS Assembly instructions

Dura Trel
Dura Trel Elmwood Trellis 11190 Assembly instructions

Big League Lawns
Big League Lawns CheckMate installation guide

Euro Systems
Euro Systems M250 EVO Assembly manual

Dura Trel
Dura Trel winchester TRELLIS Assembly instructions

Oleo-Mac
Oleo-Mac BC 22 TR Operator's instruction manual