manuals.online logo
Brands
  1. Home
  2. •
  3. Brands
  4. •
  5. MOLOK
  6. •
  7. Garbage Disposal
  8. •
  9. MOLOK MolokDomino Plus User manual

MOLOK MolokDomino Plus User manual

Molok Oy Nosturikatu 16 37150 Nokia, Finland Tel. +358 10 3429 400 [email protected] www.molok.com
DEEP COLLECTION®
9/2016/MTJ © Molok Oy
MolokDomino® Plus installation instruction
1. Dig a 500 mm installation pit for MolokDomino® Plus. Width of the pit should be 2400 mm. Carefully level the
bottom with 0/16mm crushed gravel, check the straightness with spirit lever/ line laser and compact the ground
carefully.
2. Fix the plastic bottom anchors into the container
with two bolts each (bolts are tightened max. 25 Nm).
3. Lift the container to the installation pit by using lifting
loops. Note to remove the lifting loops after the installation.
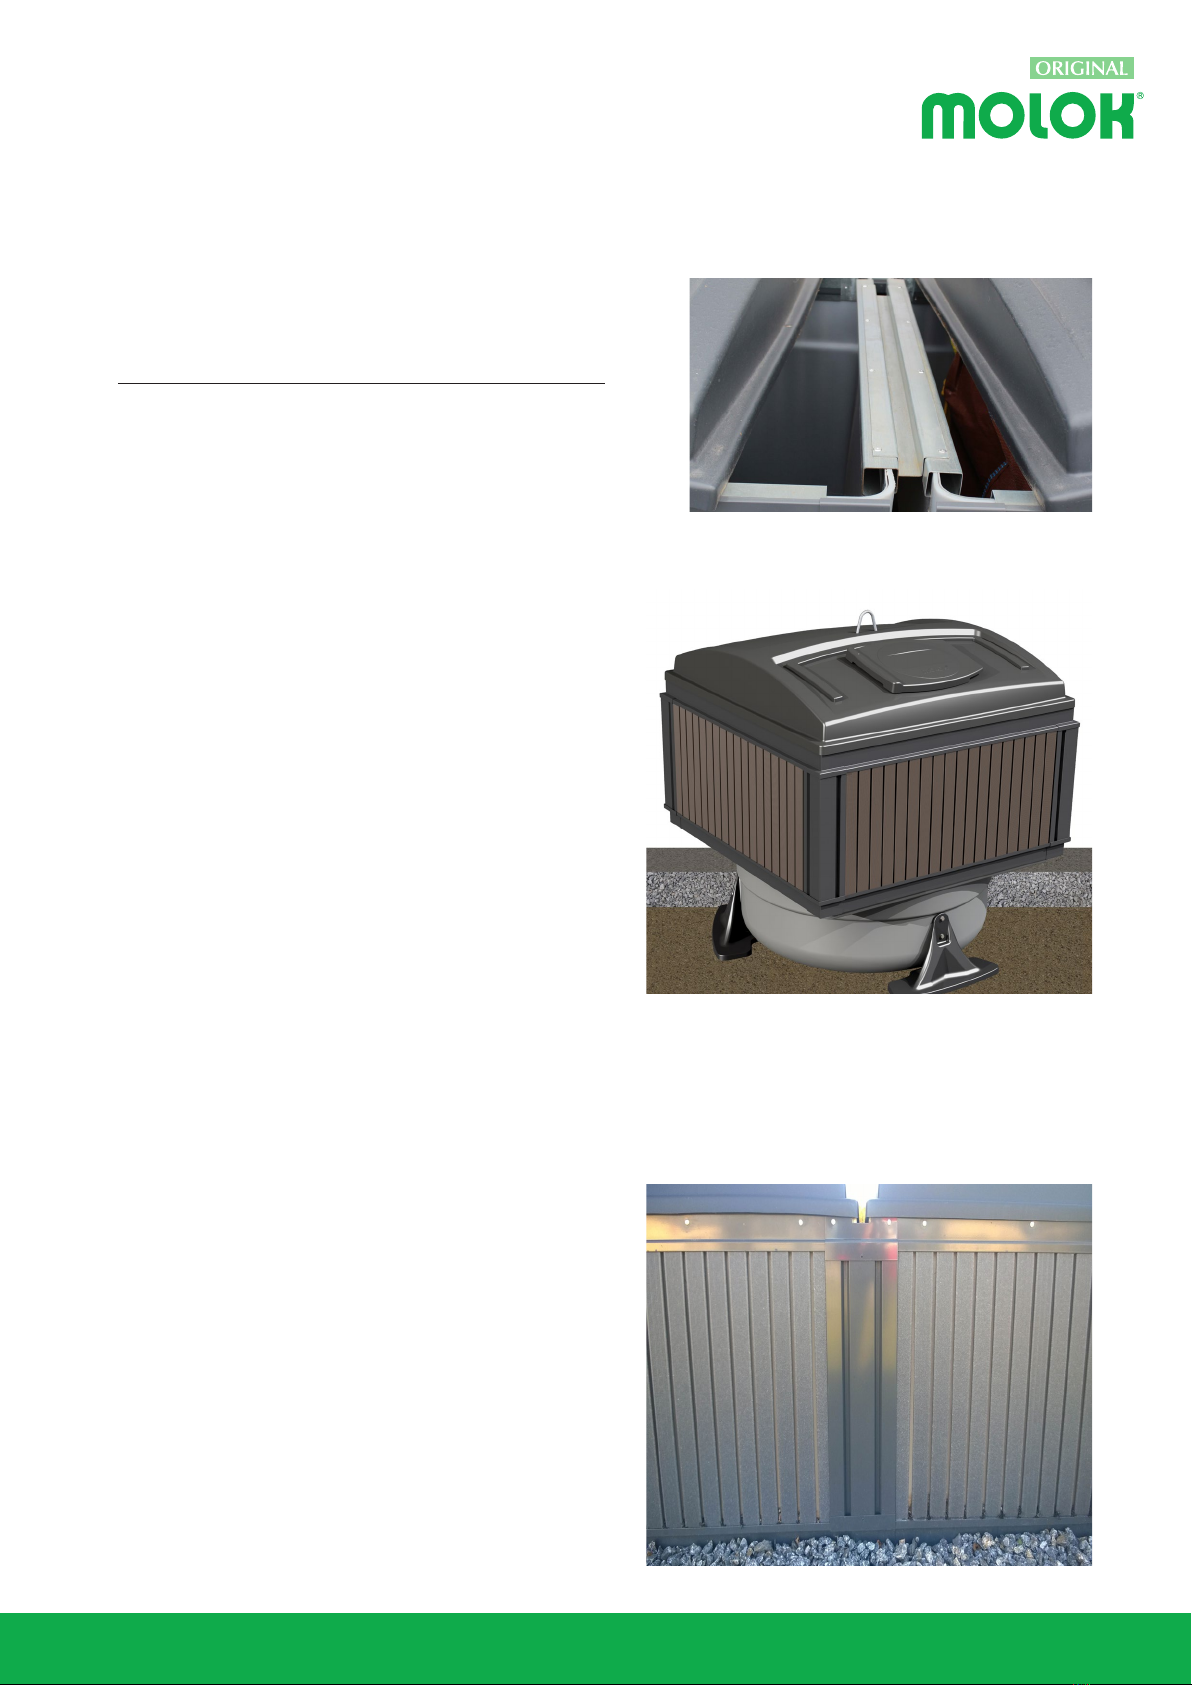
When installing the containers into a group, leave 40 mm distance
between the tops of the wells and attach the adjacent containers
with an upper rail (u-profile). The rail is drilled through the support
frame and fastened from 8 points with pop rivets, see image 1.
4. Fill the pit as described in the image 2 - note to change the
soil types accordingly. Fill evenly on both sides of the containers
to keep the container straight. With a light plate compactor,
compact the filling soil carefully with every 200 mm layer.
We recommend to use max. 100 kg round compactor.
Expanded clay ( e.g. Leca®) is used between the containers near
ground level.
Make sure that the finishing layer slopes slightly downward
from the container.
5. In group installations, finish the framings by fastening
extension pieces for framing (A+B) with pop rivets, see image
3. First fasten the lower horizontal support profile (B)
in line with the framing element. Place the vertical
extension piece (A) on correct place between the
two framing elements and fasten the upper horizontal
support profile (B). Finish the framing by fastening
the vertical extension piece (A) to the horizontal support
profiles (B). Make sure the vertical extension piece is installed
straight.
6. Lift and open the lifting bag carefully and check that the
bottom of the lifting bag is closed tightly and the rope is
placed according to the instructions. It is possible for the
lifting bag’s closing mechanism to open during delivery.
7. Place the lids, lifting bags and quick systems on their place.
If the lid is not fastened to the quick system; fasten the lid with
M8 x 35 torx screws. There are 3 screws per lid. Cover plate is
used on the hole of the lifting handle: fasten the cover plate
with screws.
A
B
C
Image 2. Filling the pit
A- Finishing layer, 100 mm
B - Gravel 0/32, 400 mm
C- Crushed gravel 0/16, min. 50 mm
B
A
B
Image 3. Finishing the framing
Image 1. Fastening the upper rail
Molok Oy Nosturikatu 16 37150 Nokia, Finland Tel. +358 10 3429 400 [email protected] www.molok.com
DEEP COLLECTION®
9/2016/MTJ © Molok Oy
1. ANCHORING THE CONTAINER TO DRY OR SLIGHTLY MOIST SOIL
Make sure that the soil type has proper water drainage; such soil types are for example silt, grit and moraine.
Install the containers according to the given instructions. If the soil type seems to have poor drainage, or if the
installation pit collects surface water, consider installing the containers according to point 3 below.
2. INSTALLING THE CONTAINER TO WET SOIL OR SOIL WITH CLAY
Use filter cloth between the ballast and gravel and if necessary also under the crushed gravel on the bottom of the
pit. Make sure there is enough fabric also for the sides of the pit.
Fasten the bottom anchors according to instructions on first page.
Install a plywood plate (# 15 mm, 820x300 mm) as an extra anchor between every bottom anchor. Install the ply-
wood on top of the bottom anchors in a way that the center of the plate touches the container on the inside and is
in level with the bottom anchors on the outside. Fasten the plywood plate by
screwing it from both ends to the bottom anchors, for example with 4x40 mm screws.
If necessary, use a drain pipe on the bottom of the installation pit under the Crushed gravel.
Finish the installation according the instructions above.
3. INSTALLING TO A VERY WET SOIL
Start the installation according to poits 1-3 on the first page
Begin filling with crushed gravel, for example 0/16 mm.
Cast 15 cm ready-mixed concrete (for example K30, #16 mm, S3) on the gravel, and around the container.
Make sure that the container does not move during concreting. Finish the filling according to given
instructions.
If necessary, use a drain pipe on the bottom of the installation pit under the Crushed gravel.

Popular Garbage Disposal manuals by other brands

Haigh Quattro Vanguard Original manual

Haigh

Haigh Quattro Vanguard Original manual

GE Disposall GFC290Y Installation use & care instructions

GE

GE Disposall GFC290Y Installation use & care instructions

Emerson InSinkErator Evolution PRO Series manual

Emerson

Emerson InSinkErator Evolution PRO Series manual

IMC 500 Series Installation and operating manual

IMC

IMC 500 Series Installation and operating manual

Emerson InSinkErator WasteXpress WX-500-7-WX101 manual

Emerson

Emerson InSinkErator WasteXpress WX-500-7-WX101 manual

Toro FP-2200 Operator's manual

Toro

Toro FP-2200 Operator's manual

KitchenAid KaDette KCDB150 Use and care guide

KitchenAid

KitchenAid KaDette KCDB150 Use and care guide

InSinkErator PowerRinse PRP Series Installation, Care and Use Manual

InSinkErator

InSinkErator PowerRinse PRP Series Installation, Care and Use Manual

Made Rask 60L operating instructions

Made

Made Rask 60L operating instructions

Criterion 681-4009 owner's manual

Criterion

Criterion 681-4009 owner's manual

NatureMill NEO quick guide

NatureMill

NatureMill NEO quick guide

InSinkErator Evolution Compact Manual reset

InSinkErator

InSinkErator Evolution Compact Manual reset

KWC STRATOS STRX605E Installation and operating instructions

KWC

KWC STRATOS STRX605E Installation and operating instructions

KitchenAid KCDB250S0 installation instructions

KitchenAid

KitchenAid KCDB250S0 installation instructions

Bort Alligator X manual

Bort

Bort Alligator X manual

Kuezen DSA-1104 manual

Kuezen

Kuezen DSA-1104 manual

InSinkErator Badger 5 Specifications

InSinkErator

InSinkErator Badger 5 Specifications

IMC 500 Series Maintenance manual

IMC

IMC 500 Series Maintenance manual

manuals.online logo
manuals.online logoBrands
  • About & Mission
  • Contact us
  • Privacy Policy
  • Terms and Conditions

Copyright 2025 Manuals.Online. All Rights Reserved.