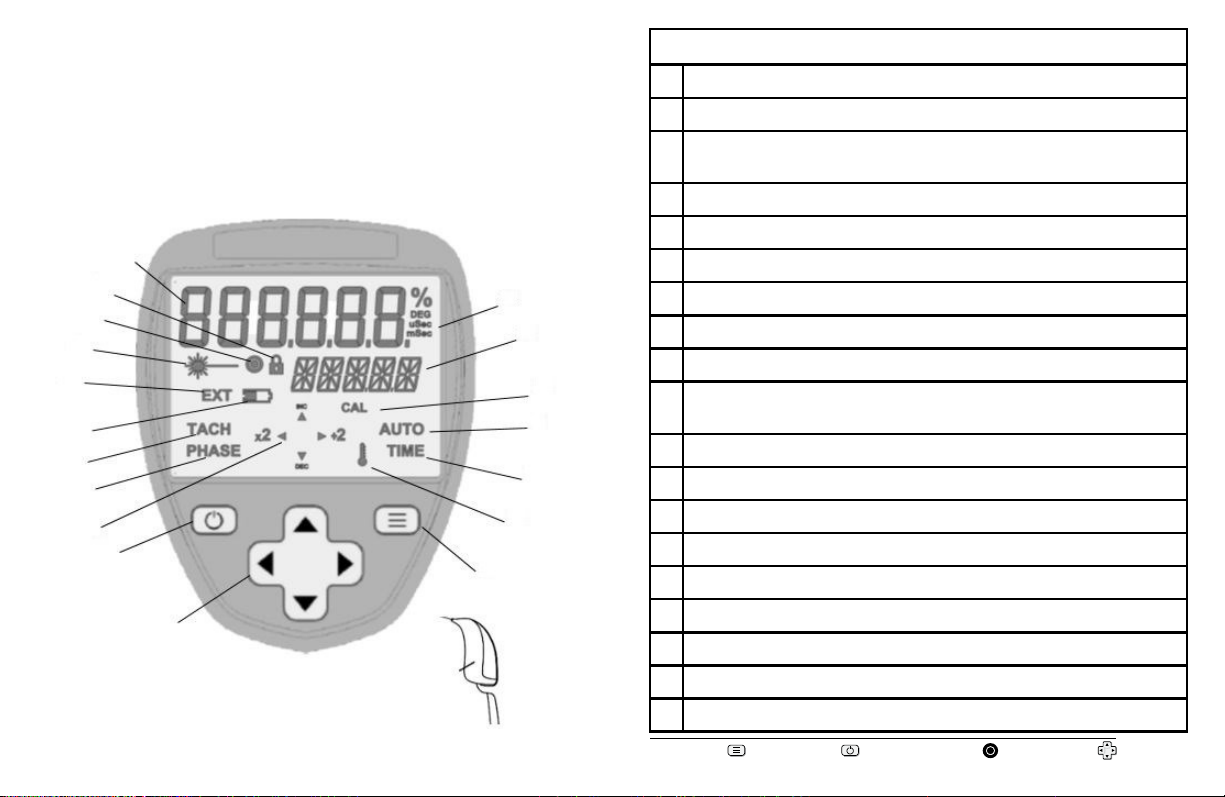
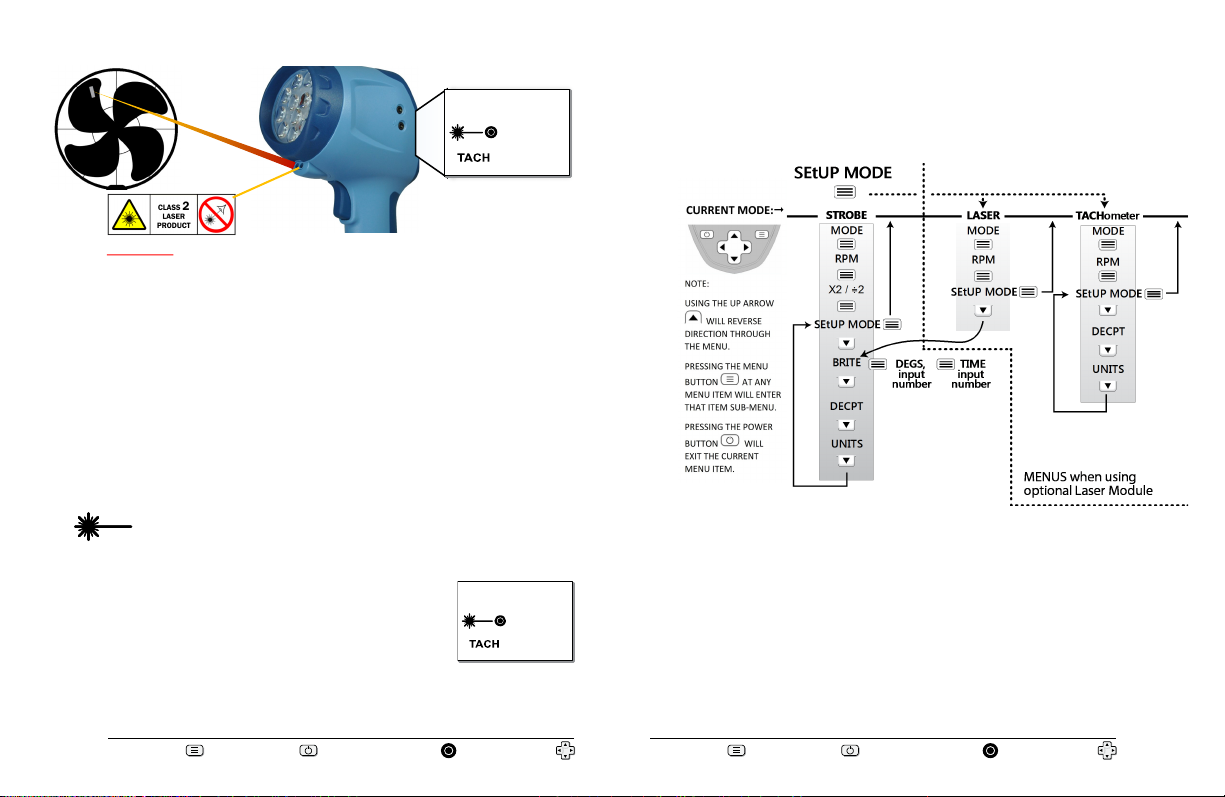
MENU buon POWER buon On-Target Indicator Joysck Arrows
A value of 600 will be displayed as 600, 600.0, 600.00, 600.000 de-
pending on the setting.
Press the MENU button to enter the DECPT menu. The current value
is shown on the top line with DECPT on the lower line. The On-Target
indicator will be on for the currently selected value.
Use the arrows on the joysck to select the desired value.
Press the MENU buon followed by the Power buon to save the
decimal point seng.
To exit without seng the units press the Power buon.
5.4 UNITS Menu
This menu opon selects the Engineering Units used to display the
ash rate or speed. The choices are:
FPM - Flashes per Minute (Not available in TACH Mode)
FPS - Flashes per Second (same as Hz, not available in TACH Mode)
RPM - Revoluons per Minute
RPS - Revoluons per Second (same as Hz)
Press the MENU buon to enter the UNITS menu. Unit is shown on
the top line with the current engineering unit on the lower line.
The On-Target indicator will be on for the currently selected value.
Use the arrows on the joysck to select the desired value.
Press the MENU buon followed by the Power buon to save
the value.
To exit without seng the units press the Power buon.
6. STROBE BRIGHTNESS
The strobe’s brightness depends on how wide the strobe’s flash pulse is; the
16
MENU buon POWER buon On-Target Indicator Joysck Arrows
wider the pulse, the brighter the flash from the LEDs appears to be. There is
however, a downside to the wider pulses. All strobes work by giving short
bursts of light (the pulse width) at a rapid repetition rate (the flash rate).
Strobes rely on the persistence of the human eye (the ability to remember
and image) and its response to bright light to give an apparent stop motion
image. Imagine a shaft rotating at 6000 RPM or one rotation every 1/100 of
a second (10 msec). If the strobe flashes once every 10 msec for a brief
moment, the user sees the flash at the same spot in the rotation of the shaft
and the persistence of the eye remembers this until the next flash making
the shaft appeared to be stopped. As the target is rotating there is some
movement evident during the strobe flash. The longer the flash duration,
the more obvious the rotation is and this increases the blur.
6.1 Calculang Blur
Blur can be calculated– if the sha is turning
at 6000 RPM, it takes 10 msec to complete
one revoluon. If the strobe ash duraon
is 100 µsec (1/100 of a millisecond), the
sha will turn: (ash duraon/me per rota-
on) x 360°, which is (.0001/.01) x 360 =
3.6°. So you will see the sha appear to
move 3.6°.
As the flash pulse widens you will see greater
degrees of rotaon which results in more
blur and a brighter perceived illuminaon
(the LEDs are on longer so the average light
the eyes see is greater). The trade o is blur
versus brightness. The further away the rotating point is from the
center axis the faster the tangenal velocity and the worse the blur
appears to be.
17
MENU buon POWER buon On-Target Indicator Joysck Arrows
A value of 600 will be displayed as 600, 600.0, 600.00, 600.000 de-
pending on the setting.
Press the MENU button to enter the DECPT menu. The current value
is shown on the top line with DECPT on the lower line. The On-Target
indicator will be on for the currently selected value.
Use the arrows on the joysck to select the desired value.
Press the MENU buon followed by the Power buon to save the
decimal point seng.
To exit without seng the units press the Power buon.
5.4 UNITS Menu
This menu opon selects the Engineering Units used to display the
ash rate or speed. The choices are:
FPM - Flashes per Minute (Not available in TACH Mode)
FPS - Flashes per Second (same as Hz, not available in TACH Mode)
RPM - Revoluons per Minute
RPS - Revoluons per Second (same as Hz)
Press the MENU buon to enter the UNITS menu. Unit is shown on
the top line with the current engineering unit on the lower line.
The On-Target indicator will be on for the currently selected value.
Use the arrows on the joysck to select the desired value.
Press the MENU buon followed by the Power buon to save
the value.
To exit without seng the units press the Power buon.
6. STROBE BRIGHTNESS
The strobe’s brightness depends on how wide the strobe’s flash pulse is; the
16
MENU buon POWER buon On-Target Indicator Joysck Arrows
wider the pulse, the brighter the flash from the LEDs appears to be. There is
however, a downside to the wider pulses. All strobes work by giving short
bursts of light (the pulse width) at a rapid repetition rate (the flash rate).
Strobes rely on the persistence of the human eye (the ability to remember
and image) and its response to bright light to give an apparent stop motion
image. Imagine a shaft rotating at 6000 RPM or one rotation every 1/100 of
a second (10 msec). If the strobe flashes once every 10 msec for a brief
moment, the user sees the flash at the same spot in the rotation of the shaft
and the persistence of the eye remembers this until the next flash making
the shaft appeared to be stopped. As the target is rotating there is some
movement evident during the strobe flash. The longer the flash duration,
the more obvious the rotation is and this increases the blur.
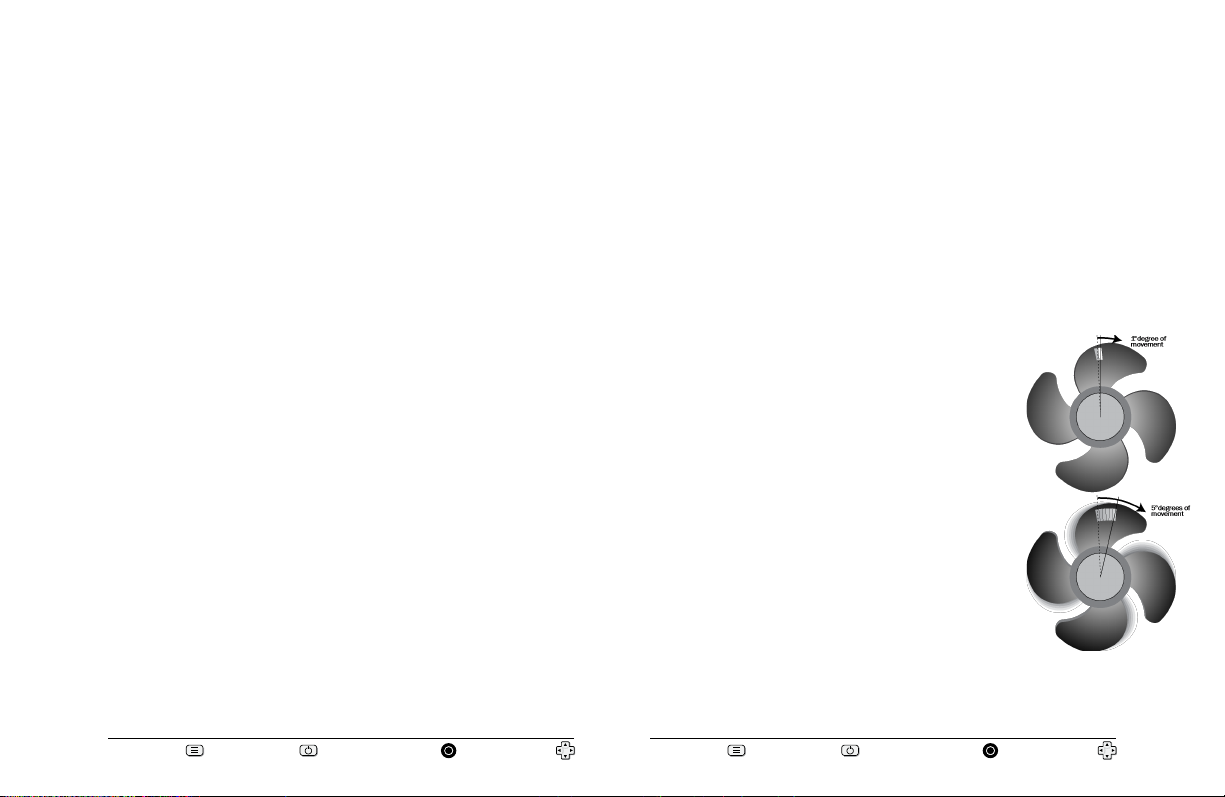
6.1 Calculang Blur
Blur can be calculated– if the sha is turning
at 6000 RPM, it takes 10 msec to complete
one revoluon. If the strobe ash duraon
is 100 µsec (1/100 of a millisecond), the
sha will turn: (ash duraon/me per rota-
on) x 360°, which is (.0001/.01) x 360 =
3.6°. So you will see the sha appear to
move 3.6°.
As the flash pulse widens you will see greater
degrees of rotaon which results in more
blur and a brighter perceived illuminaon
(the LEDs are on longer so the average light
the eyes see is greater). The trade o is blur
versus brightness. The further away the rotating point is from the
center axis the faster the tangenal velocity and the worse the blur
appears to be.
17