Montgomery Ward 774679 User manual

Instruction Manual
Item: 774679
Wards.com 1•888•557•3848
Montgomery Ward Customer Service
8:00 am to Midnight, Monday through Friday
Painting
made
easy!
Wards.com 1•888•557•3848
Electric Sprayer
®
®

Thank you for purchasing your Montgomery Ward Electric Sprayer.
Put through the paces by the experts, we guarantee that it will
perform to the highest standard, time after time, with all the
convenience and durability you rely on from Wards.
3
Important Safeguards ................... 3
Electrical Safety ...............................4
Specications.................................... 4
Parts & Features............................... 5
How to Use.....................................6-9
Cleaning & Care..........................9–10
Troubleshooting............................... 11
Return Information ........................12
Warranty..............................................13
Table of Contents
21•888•557•3848
Wards.com
Important Safeguards
READ CAREFULLY BEFORE USING AND SAVE THESE INSTRUCTIONS!
• FOR HOUSEHOLD USE ONLY. DO NOT USE THIS SPRAYER FOR OTHER THAN
ITS INTENDED USE.
• Remove all packaging materials and labels before rst use. Dispose of the
packaging materials via the appropriate recycling system.
• DO NOT drape the cord where it can be pulled on or tripped over. DO NOT
wrap the cord tightly around the tool, as this could cause the cord to fray or
break.
• We DO NOT recommend using an extension cord with this tool. However, if an
extension cord is used, it must be a cord for outdoor use and the marked
electrical rating should be at least as great as the electrical rating of this tool.
• CLOSE SUPERVISION IS NECESSARY WHEN USING THIS TOOL NEAR
CHILDREN OR ANIMALS.
• DO NOT use near water.
• DO NOT use an accessory or attachment not recommended by Wards, as this
may cause injury or damage the sprayer.
• Keep hands, hair and clothing away from all moving parts.
• Turn off and unplug when not in use.
• THERE ARE NO SERVICEABLE PARTS INSIDE THIS POWER TOOL.
• DO NOT USE A POWER TOOL WITH A DAMAGED CORD OR PLUG, OR AFTER
IT MALFUNCTIONS, OR HAS BEEN DAMAGED IN ANY MANNER.
• DO NOT use sprayer in areas where ammable items or fumes are present.
Solvent and paint fumes can explode or ignite. Severe injury or property
damage can occur.
• Know how to stop the sprayer quickly. Be thoroughly familiar with the controls
before using.
• Stay alert. DO NOT operate this tool when fatigued or under the inuence of
alcohol or drugs.
• This item is intended for outdoor use ONLY with materials having a ashpoint
above 70oF (21oC).
• Follow all appropriate local, state and national codes governing ventilation, re
prevention and operation.
• DO NOT spray outdoors on windy days.
• Wear protective clothing to keep paint off skin and hair.
• DO NOT aim sprayer at people, animals or plants.
• Appliances/tools contain valuable materials that can be recycled. Dispose of
your old appliances/tools using appropriate collection systems in accordance
with federal and local regulations.
Thank you
for your
purchase!
®

Parts & Features
Specications
Electrical Safety
41•888•557•3848
Wards.com
45
This power tool is equipped with a polarized plug in which 1 prong is wider than
the other. This is a safety feature to reduce the risk of electrical shock. The plug
will t into a polarized outlet only 1 way. If you are unable to insert the plug into the
outlet, try reversing the plug. If it still does not t, contact a qualied electrician.
DO NOT attempt to modify the plug in any way. Montgomery Ward cannot
accept any liability for damage or injury resulting from failure to observe these
safety procedures.
POWER RATING 120V, 60Hz, 400W
MAX. VISCOSITY 60 DIN/SEC
CAPACITY 28 oz.
CORD LENGTH 80"
WEIGHT 3.2 lbs.
DIMENSIONS 11½" W x 11½" H x 4½" D
MODEL SSG-3020
1. Nut
2. Air Cap
3. Nozzle
4. Seal
5. Trigger
6. Volume Regulator Knob
7. Container
8. Viscosity Test Cup
9. Sprayer Assembly
10. Locking Knobs (2)
11. Housing
12. Filter Cover
13. Air Compressor Assembly
14. Handle
15. Power Cord
16. Suction Tube (not shown)
Nozzle Assembly
1
6
5
7
12
11
10
13
432
8
14
9
15

1•888•557•3848
Wards.com 7
6
How to Use How to Use (cont.)
WARNINGS:
• Use only outdoors or in a well-ventilated area.
• Provide exhaust and fresh air introduction to avoid accumulation of ammable
vapors.
• Avoid all ignition sources such as static electric sparks, open ames, pilot
lights, electrical appliances and hot objects. Connecting or disconnecting
power cords or working light switches can make sparks. The sprayer
contains arcing parts that emit sparks and can ignite vapors.
• Plastic can cause static sparks. Never hang plastic to enclose the spray area.
DO NOT use plastic drop cloths when spraying ammable materials.
• Avoid physical contact with grounded surfaces like pipes, heating elements,
stoves and refrigerators.
• DO NOT smoke in spray area.
• A working re extinguisher must be kept near the spray area.
• Follow the material and solution manufacturer warnings and instructions.
• DO NOT use materials or solutions with a ashpoint below 70°F (21°C).
• DO NOT use materials or solutions containing bleach or chlorine.
• Contact your material or solution supplier about compatibility with aluminum.
• DO NOT use halogenated hydrocarbon solvents such as bleach, mildewcide,
methylene chloride and 1,1,1--trichloroethane. (They are not compatible with
aluminum.)
• Paints, solvents, insecticides and other materials can be harmful if inhaled or
if they come in contact with the body. Vapors can cause severe nausea,
fainting or poisoning:
a. Use a respirator or mask if vapors can be inhaled. Read all
instructions supplied with the mask to be sure it will provide the
necessary protection.
b. Wear protective eyewear.
c. Wear protective clothing as required by material or solution
manufacturer.
• Keep the sprayer away from rain and moisture.
• DO NOT carry the tool by the cord or plug.
• Keep the cord away from heat, oil, sharp edges or moving tool parts.
ASSEMBLY
1. Turn both locking knobs to UNLOCK and insert the sprayer and nozzle assembly
into place in the housing.
2. Turn both knobs to LOCK to hold the pieces in place.
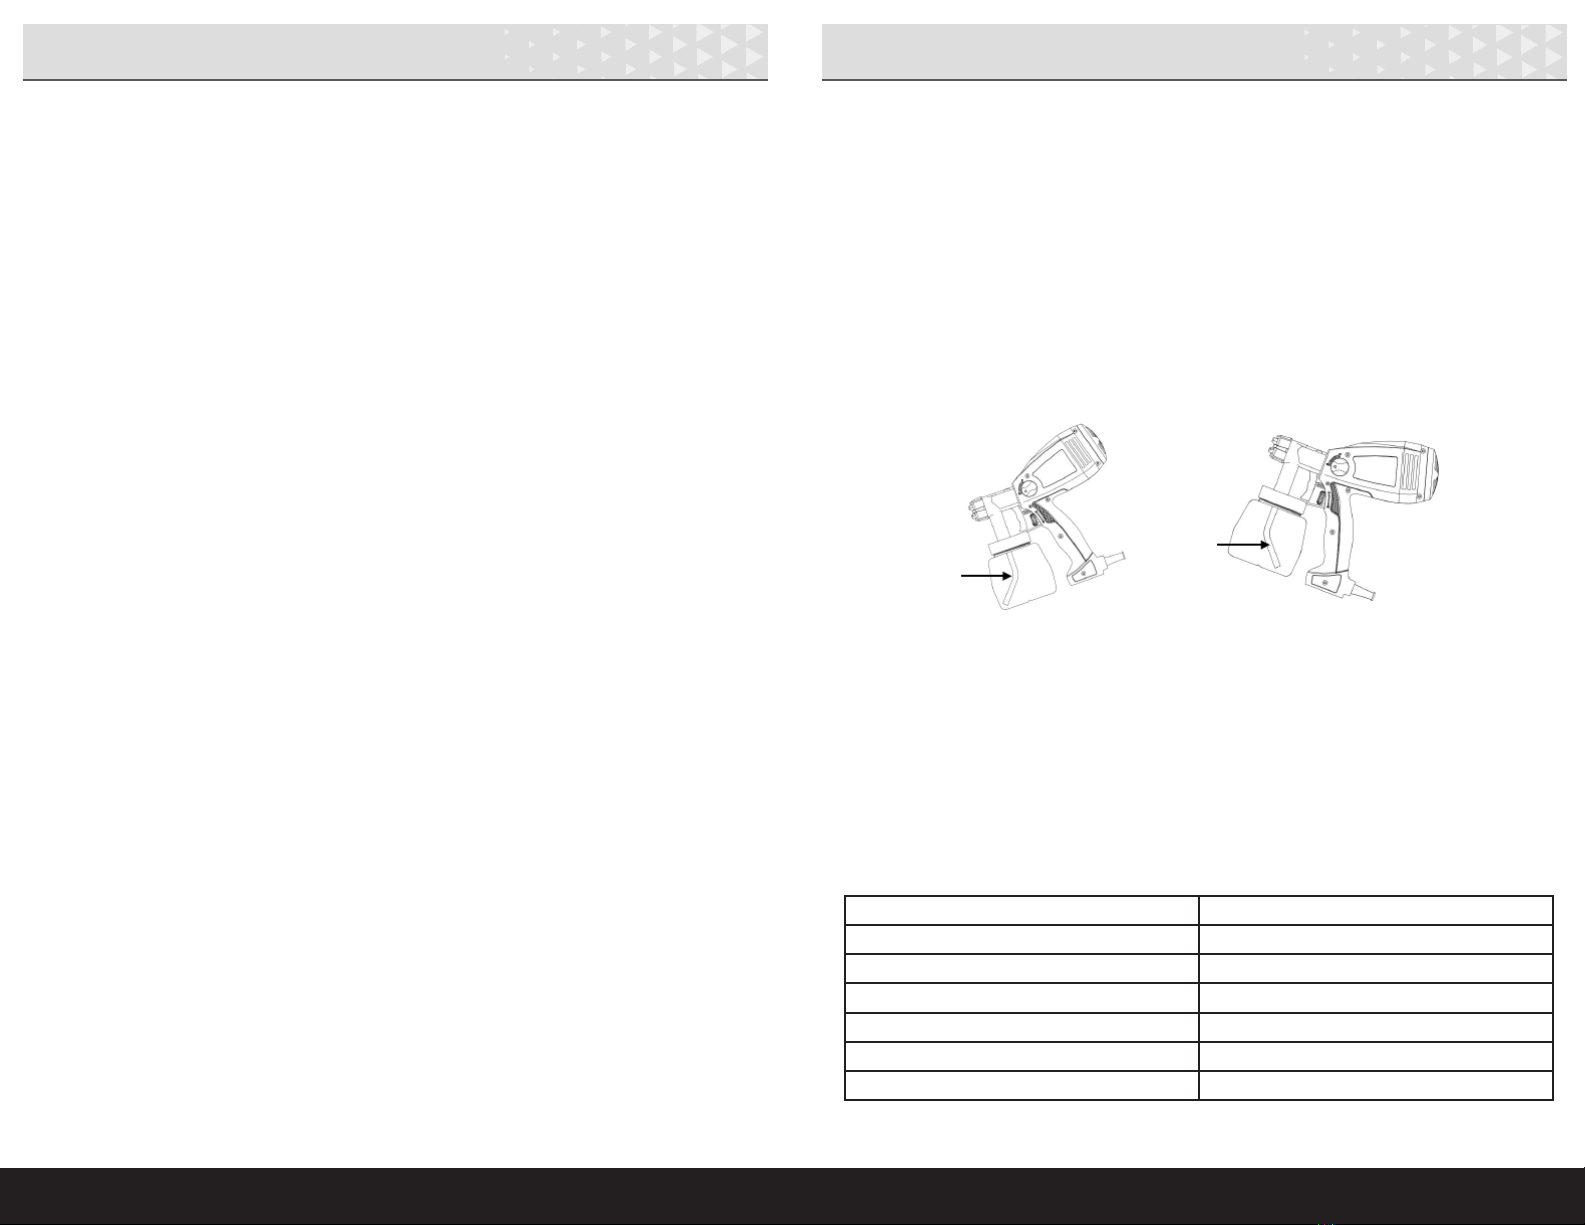
3. By aligning the suction tube (within the container), you will not have to rell
the container as often:
a. If spraying in a downward direction, the angled end of the suction tube
should be pointing toward the front of the sprayer.
b. If spraying in an upward direction, the angled end of the suction tube
should be pointing toward the rear of the sprayer.
MATERIAL OR SOLUTION PREPARATION
1. Before spraying, the material or solution to be sprayed may need to be thinned
with the proper solvent as specied by the material or solution manufacturer.
a. Stir the material or solution thoroughly before measuring viscosity.
b. Dip the viscosity test cup completely into the material or solution.
c. Hold the test cup up and measure the time in seconds until the liquid
empties out. This time is referred to as “runout time.”
Material or Solution Runout Time (seconds)
Oil enamel 25-40
Oil based primer 30-45
Oil stain No thinning required
Clear sealer No thinning required
Polyurethane No thinning required
Varnish 20-50
a. b.

1•888•557•3848
Wards.com
89
How to Use (cont.)How to Use (cont.)
2. Material or solution to be sprayed should always be strained to remove any
impurities which may clog the sprayer or cause poor performance/nish.
FILL THE CONTAINER
1. Unscrew the container from the sprayer.
2. After the material or solution has been properly thinned and strained, ll the
container to the neck.
3. Carefully screw the container back onto the sprayer.
SPRAY PATTERN
The spray pattern shape is adjusted
by loosening the nut and turning the
“ears” of the air cap to either the
vertical, horizontal, or diagonal
position. Tighten the nut. Test each
pattern to determine which is
best for your application. When
painting, we recommend practicing
on a hidden area rst.
FLOW ADJUSTMENT
Adjust the material or solution volume by turning the regulator knob (behind the
trigger) toward + or - to increase or decrease volume.
SPRAY AREA PREPARATION
The spray area must be clean and free of dust in order to avoid blowing dust onto
your freshly sprayed surface.
SPRAYING
1. Position the sprayer perpendicular to, and at least 1"from, the surface to be
sprayed.
2. Depress the trigger to activate spray. Always trigger the sprayer after each
spray pass has begun and release the trigger before stopping the pass.
3. Spray parallel to the surface with smooth passes at a consistent speed. Doing
this will help avoid runs and sags. DO NOT ex wrist while spraying.
4. When painting, always apply a thin coat of material on the rst pass and allow
to dry before applying a second, slightly heavier coat.
5. Adjust distance from surface being sprayed as needed.
6. Keep strokes smooth and at an even speed.
7. When painting, keep the sprayer pointed squarely at the surface and overlap
passes slightly to obtain the most consistent nish possible.
Cleaning & Care
1. Unplug the sprayer. Depress the trigger so the material or solution left inside
the sprayer ows back into the container.
2. Screw off the container. Empty any remaining material or solution back into its
original packaging.
3. In a well-ventilated area (using gloves, mask or other protective equipment as
needed), pour a small amount of the appropriate cleaning solution into the
container (check material or solution label to determine appropriate cleaner).
DO NOT use solvents or lubricants which contain silicone.
4. Clean container and properly dispose of used cleaning solution.
5. Rell the container with fresh cleaning solution.
6. Attach the container to the sprayer and plug cord into an outlet.
7. Direct the nozzle into a pail lined with paper and spray the cleaning solution
through the sprayer for 2 seconds. Spray again for 2 seconds. Properly dispose
of the soiled paper.
8. Unplug the sprayer and depress the trigger so the cleaning solution left
inside the sprayer ows back into the container.
9. Remove the nut and air cap. Use a pliers to take out the nozzle and a at
screwdriver to pull out the seal. Clean all pieces with a small brush and cleaning
solution.
10. Turn both locking knobs to UNLOCK; pull and separate the sprayer from the
housing.
1–12"
incorrectcorrect

1•888•557•3848
Wards.com
10 11
TroubleshootingCleaning & Care (cont.)
11. Wipe down the exterior of the housing, as needed, with a soft cloth and the
cleaning solution. Wipe the exterior of the container and sprayer until clean.
DO NOT immerse into liquid or water!
12. Turn the suction tube counterclockwise and pull downward to disassemble it
from the sprayer. Clean the suction tube with the cleaning solution.
13. Clean the area where the suction tube attaches to the sprayer and the rear of
the sprayer (opposite the nozzle) with cleaning solution. Dry thoroughly.
Reassemble the suction tube, container and nozzle pieces.
14. Remove the lter cover from the housing with a at screwdriver. Remove the
sealing cover and lter. Wipe the sealing cover clean and rinse the lter with
water as needed. Let the lter air dry.
15. Replace the lter, sealing cover and lter cover. DO NOT operate the sprayer
without the air lter in place.
Problem Cause Solution
Poor ow Nozzle clogged.
Suction tube clogged or
loose.
Regulator knob setting
turned too low.
Too little pressure in
container.
Filter clogged.
Clean.
Clean and inspect.
Change setting.
Tighten container.
Clean.
Leaking Nozzle loose.
Nozzle worn.
Nozzle seal worn.
Buildup on air cap and/or
nozzle.
Tighten.
Replace.
Replace.
Clean.
Spray is too dense Viscosity too high.
Regulator knob setting
too high.
Nozzle clogged.
Air lter clogged.
Too little pressure in
container.
Thin.
Change setting.
Clean.
Clean.
Tighten container.
Spray pulsates Material or solution in
container running out.
Air lter clogged.
Rell.
Clean.
Spray pattern runs
or sags
Volume too heavy. Adjust regulator knob or
increase movement of
sprayer.
Too much overspray Sprayer too far from
object.
Applying too heavy.
Reduce distance.
Adjust regulator knob or
increase movement of
sprayer.
Spray pattern is light
and splotchy
Moving the sprayer too
fast.
Adjust regulator knob or
decrease movement of
sprayer.
Filter Cover
Filter
Sealing
Cover

1•888•557•3848
Wards.com
12 13
If any item, for any reason, does not meet your expectations, just
return it to us. We’ll gladly either:
• Refund your merchandise amount
• Credit your account
• Send a replacement
You can return any unused item in its original packaging within 60
days of its receipt for a full refund of the purchase price (excluding
shipping and handling charges).
Please send returns to:
Montgomery Ward, Inc.
Attn: Customer Returns
2000 Harrison Suite 100
Clinton, IA 52732-6676
When returning an item:
• Use the original packaging and pack it securely.
• Please adequately insure your item in case you need to
make a claim with the carrier you choose for returning your
item.
• Include your order number and reason for return.
• We recommend keeping the receipt for 4 weeks.
Montgomery Ward, Inc. warrants this product
to be free from defects in material and workmanship
for one year from provable date of purchase.
Within this warranty period,
Montgomery Ward will repair or
replace, at its option, defective parts of this
product at no charge provided the product is returned
freight prepaid with proof of purchase to
Montgomery Ward.
Allow 2–4 weeks for return shipping.
This warranty does not cover improper installation, misuse,
abuse or neglect on part of the owner. Warranty is also
invalid in any case that the product is taken apart or
serviced by an unauthorized service station.
This warranty gives you specic legal rights and they may
vary from state to state.
THE FOREGOING WARRANTIES ARE IN LIEU OF ALL
OTHER WARRANTIES AND CONDITIONS,
EXPRESS OR IMPLIED, INCLUDING
BUT NOT LIMITED TO THOSE OF MERCHANTABILITY
OR FITNESS FOR A PARTICULAR PURPOSE.
1 Year Limited Warranty
Montgomery Ward Customer Service
8:00 am to Midnight CST, Monday through Friday
Wards.com 1•888•557•3848
Returns ®

1514
Table of contents