MORBILIFY MDR-150 User manual

Please read and follow all instructions and features before use. Save for
future reference.
Manual Ver 12 20
User Guide
MDR-150
1080P HD Dash Cam w WiFi
w w w . M o r b i l i f y . c o m i n f o @ m o r b i l i f y . c o m

Warning – Safety Precaution
§Please read these safety instructions thoroughly before operating
the product and keep this manual for future reference.
§Please be aware that micro SD memory card have limited product
life expectancy and will eventually degrade in time - causing errors in
recordings / data corruption.
§It is highly recommended to format and check the integrity of the
Micro SD card on a regular basis. Micro SD memory card related
problems are not under warranty and the manufacturer or the
supplier is not responsible for data loss or missing recordings.
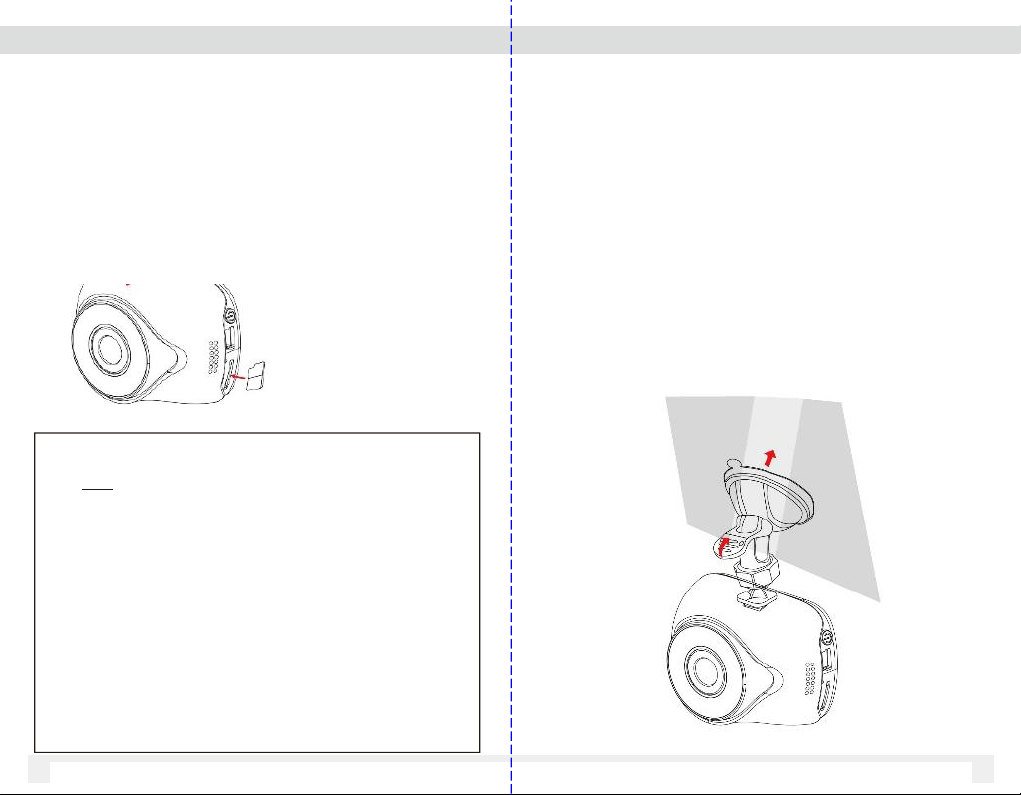
§Install the device in a manner that does not obstruct the driver’s
view of the front or sides of the vehicle, or interfere with the safety
of operating the vehicle.
§When exposed to direct sunlight for extended period of time, the
equipment may become hot. Please exercise caution when
touching the equipment.
§Do not operate, adjust or view the MDR-150 while driving or when
vehicle is in motion as it may lead to accidents and or injuries.
§Do not place the device insecurely on the dashboard, or place the
device in front of or above an airbag.
§Altering and disassembling of the product may result in a fire or
electric shock. Disassembling the product will void the warranty.
Inquire with Morbilify in the event the product needs repair.
Warning – Safety Precaution
§Please comply with all local, state and federal driving and traffic
regulations.
§To reduce the risk of fire or electric shock, do not expose this unit to
water, liquid, rain or moisture.
§Disconnect and replace cable if wire is stripped or damaged.
§In the event of an impact or accident, please check to ensure
the equipment is properly secured. Inspect the mounting bracket and
adhesive for any signs of damage.
§Do not put foreign material into card insertion slot of the terminal, it may
cause product damage.
§The product is designed to be installed inside the vehicle. Any damage
caused by placing the device outside the vehicle, or damage due to
misuse or handling of the product will void the warranty.
§The warranty does not cover claims related to mishandling, tampering
and / or disassembling of the product.
IMPORTANT NOTICE
Built-In Shock Sensor
§The built-in shock sensor may not recognize slight shock or
minor collision as an event. Different sensitivity levels may
be adjusted to match the level of sensitivity.
GPS Signal:
GPS Signal may take several minutes to acquire depending on
several factors such as location, environment, buildings.

Windshield Mounted Device Legal Notice
Please check and comply with ALL local, state and federal laws and or
regulations regarding windshield mounted devices. Some state laws
prohibit drivers from using suction mounts on their windshield when
operating motor vehicles. Other state laws allow the suction mount to
be mounted to be located only in specific locations on the windshield.
Numerous states have enacted restrictions against placing objects on
the windshield in locations that obstruct the driver’s vision.
IT IS THE USER’S RESPONSBILITY TO MOUNT MORBILIFY EQUIPMENT IN
COMPLIANCE WITH ALL PPLICABLE LAWS AND ORDINCANCE.
Audio and Video Recording Legal Notice
Certain local, state and federal laws may prohibit recording of audio and
or video in vehicles or public area, or without knowledge and or consent,
please check and comply with ALL local, state and federal laws and
regulations.
Certain local, state and federal laws may require signage or display that
indicate recording of audio and or video in vehicles or public area.
Please check and comply with ALL local, state and federal laws and
regulations.
IT IS THE USER’S RESPONSBILITY TO USE MORBILIFY EQUIPMENT IN
COMPLIANCE WITH ALL PPLICABLE LAWS AND ORDINCANCE.
Use of this product other than its intended purpose is strictly prohibited.
Morbilify does not assume any responsibility for any fines, violation,
penalties or damages that may be incurred as a result of the use of the
product.
Morbilify is not responsible for any direct, indirect, incidental or
consequential damages, arising out of use, misuse or inability to use of
our products.
MDR-150 Specifications
Item
Description
Image sensor
1/3” CMOS sensor
MCU
Novatek
Video Resolution
1920 x 1080 @ 30 FPS
1280 x 720 @ 120 / 60 / 30 FPS
Storage media
Max. up to 64GB class 10 / U1 or above Micro
SDHC
LCD display
2” LCD 360 x 240
Lens
140 Degrees Wide Angle Lens F/2.0
WiFi
Built-in
Video Format
MP4 MOV
Still image picture
Format: JPEG
8 MP (3264 x 2448)
Shut ter (Electronic shutter)
Auto:1/2 ~1/2000 sec.
G-Sensor
3-Axis G- Force sensor
Exposure (EV)
+2, +5/3, +4/3, +1.0, +2/3, + 1/3, 0.0, -1/3, -2/3,
-1.0, -4/3, - 5/3, -2.0
Wide Dynamic Range (WDR)
Yes
Microphone / Rec Audio
Yes
Speaker
Yes
Connection
Mini USB
Battery
Built-in 3 00mAH Li- ion rechargeable (This
battery is NOT replaceable)
Working Voltage
12 VDC – 32 VDC
Operating Temperature
32° ~ 120° F
Operating Humidity
20 ~ 70% RH
Storage Temperature
-2° ~ 155° F
Dimensions
65.8 x 36.7 x 50.8 mm
Weight Approx. 77g (without memory card)

1 Introduction
Morbilify MDR-150 is an all-in-one high performance Dual
Camera Vehicle HD Recorder. The plug and play setup
makes this system the ideal choice for both passenger and
commercial vehicle.
1.1 Features
* Wide Dynamic Range Imaging (WDR)
* 1080P Full HD video
* 140 Degree Wide Angle Lens
* Built-in G-sensor
* Built-in WiFi
* Motion Detection
* Passive GPS record speed and route history
Car Charger
USB Cable
1.2 Product Overview
Number
ITEM
Number
ITEM
1
Enter / OK
6
USB connection
2
Up selection
7
Micro SD card slot
3
Down selection
8
Mount bracket slot
4
Menu / Mode
9
LCD screen
5
Power Button
10
Lens
02 03
MDR-150 Camera
MDR-150 Main Camera
Package Contents
EX15-GPS GPS Receiver Power
Cable (page 16)
Windshield
Suction Mount
Recording Mode
Video Segment Length
Light Exposure
Parking Mode SD Card
Video Resolution
Audio
Recording
Date Clock
Video Clip
Timer
Battery
Event
Video
Rec.
Status

2 Getting Started
2.1 Inserting the Memory Card
Insert the Mirco SD card (max. 64GB capacity – not included)
into the MDR while system is powered OFF. Gently push the
memory card in place until it clicks
To remove the memory card
Power off the system first, then gently push to eject the
memory card out of the slot.
Important Note:
1.Do NOT remove or insert the memory card when the camera is
powered on. This will corrupt the file and damage the memory
card.
2.It is recommended to use Class 10/U1 or above micro SD card.
3. Please format the micro SD card prior to the initial use.
4.Only purchase SD cards from authorized reseller to ensure
quality and performance
5.SD cards require periodic maintenance (Format) to ensure
optimal performance. SD cards can be formatted in the MDR-150.
6.Formatting SD card will erase all data, please ensure important
files are backed up prior to format
2.2 Installing in Vehicle
1. Attach the bracket to the MDR main camera. Slide it into
the bracket holder until click.
3. Before installing the bracket, please use alcohol to clean
the windshield. Wait for it to dry and press camera mount to
windshield
04 05
2. Select the location to mount the MDR. Ideally in the
center section of the windshield, below the rear view mirror.
64GB Max. capacity
– not included
4. Remove the plastic film from suction mount. Secure the
mount to windshield by firmly pressing against the glass and
lift up the tab towards the windshield to secure

2.2.2 Adjust the camera angle position
1. MDR-150 camera angle can be
tilted up / down, as well as swivel.
Tighten the bracket mount to
secure angle
2.3 Connecting Power
Use only the supplied car adapter to power up
the camera and charge the built-in battery.
1. Connect one end of the car power to the USB connector of
the MDR-150.
Ensure the GPS receiver is mounted to windshield with
adhesive side facing the sky for better signal reception
Power output of MDR power cable : DC 5V / 1500mA
2. Plug the other end of the car charger to the cigarette lighter
socket of the vehicle. Once the vehicle engine is started, the
camera automatically turns on. Car charger input:
Important Note:
1.Use the MDR with the supplied charger only. Do NOT use
other power chargers to avoid damage to camera or battery.
2. Do NOT modify the power cable or connection method as
outlined in this manual. Altering the power cable will void all
warranty.
06 07
Note: On certain vehicles, the cigarette lighters are
constantly ON (Hot) so the MDR recording will continue
even when the vehicle is powered off. If this happens,
please manually turn off the camera or remove the car
adapter from the cigarette lighter to prevent battery drain
GPS Receiver / Power Cable
GPS Receiver

2.4 Powering the MDR-150 On / Off
2.4.1.1 Power On / Recording
MDR will automatically power and
record on when vehicle powers on. Red
blinking dot displayed on the top left
corner of screen
To turn off the MDR power, press the
button on the Left side of camera
2.4.1.2 Stop Video Recording
To stop recording, press the OK button once.
Red blinking dot will stop.
To resume recording press OK button again
2.4.1.6 Enable / Disable Audio Recording
Press the arrow button to Enable / Disable audio recording
while MDR is recording Video. Microphone icon will display
3. Settings Menu
Settings 1 - Pg. 1
08 09
2.4.1.7 Enter Menu Setting Mode
Stop recording by pressing the OK button once. Red blinking
dot will stop
Press M button to enter 1st page of setting menu, press M
button again for 2nd page of settings
Settings 1 – Pg. 1 Cont’d
Settings 2 - Pg. 1 Settings 2 – Pg. 1 Cont’d
2.4.1.4 Motion Recording
Motion recording can be enabled in settings if MDR is
constantly powered by vehicle. MDR will ONLY record video
when motion is activated. When no motion is detected,
system returns to standby mode. To stop Motion recording,
press OK while MDR is recording in this mode and no
movement is detected in front of the MDR.
2.4.1.3 Parking Monitor (Video saved to SOS folder)
MDR will auto wake up and record 30 sec video clip when
impact or shock is detected while vehicle is parked. This
feature utilizes the built-in Li-Ion battery to power the MDR
during this mode, feature will continue until battery power is
depleted.
2.4.1.5 G–Sensor Impact (Video saved to SOS folder)
MDR built-in shock sensor auto detect impact (based on
sensitivity) and will save recordings when detected. Shock
sensor sensitivity can be adjusted in settings – Low, Med, High

3.1 Setting List 3.1 Setting List
Menu Item
Description
Available opt ion
Vide o Res o lut i on
Set the vi de o re c ordin g reso l ution
1920 X 1080 @ 30 F PS
1280 X 720 @ 120 / 60 / 30 FP S
Lo o p Recording
Set the rec or ding du r ation for
each vide o file segment. A new video cl i p
will automatically s t a r t w he n r e a c hes
duration
Off, 1 Mi n , 3 M i n, 5 M ins, 1 0 Mi n s
WD R
Wide Dynamic R ange for v i d e o
Off / On
EV
Set the expos ure comp e ns ation
Set e xposu r e level bet w een + 2 . 0 ~ -2. 0
Mot ion Detection
MDR will ONLY rec o r d v id e o for 3 0 s e c onds
when came r a det e cts any motio n . M DR
mu s t be p ow e re d b y p o we r c abl e f or
fea tur e t o w or k .
NOTE: MDR does NOT record if not motion is
detected.
On / Off
Audio
Enabl e/Dis able v oice r ecord i ng
On / Off
Date Sta m p
Enabl e/Dis able t h e date st a mp.
On / Off
G Se n sor ( Sho c k)
The b uilt- in sh o ck s e ns or w ill d e tect t he
leve l of i m pact based on the setti ng s.
MDR will aut o mati c ally trigger eve n t
reco r ding when c orre s pondi n g lev e l of
shoc k is d et ected whil e dri v ing
Off / Low / Med i um / High
Parking Monitor
Whe n v ehic l e is pa rked , MDR wil l auto
wake u p and recor d vid e o cli p when
shoc k or i mpac t to th e vehi cle i s dete c ted.
It ut i lize s the M DR’ s bui l t-in batter y for
power
Off / Low / Med i um / High
GPS
GPS i s en a bl ed by d efaul t so t h at MD R
reco r ds s p eed an d rout e his t or y. M ust
use E X15-G PS po w er c a ble
Off / KMH / MPH
11
10
Settings Page 1 - Press M button Once
Dat e / Time
Set the date, time and dis pl a y f o r mat
Pres s but t on to
adjus t the val u e, pr e ss the OK b u tton
to sw i tch the field and confi rm
WiF i
Enabl e / D i sabl e the W iFi on MD R .
WiF i mu s t fir st be en abled on MD R to view
the v ideo u s ing M orbi l ify s mart p hone a pp
Go t o sma r tphon e WiF i set t ing, f ind an d
conn e ct to M DR - 150XX X XXXX
PW: 12345678a
Conn e ct to MDR - 150 W iFi on sm ar tphon e ,
then r etur n to M D R a p p
On / Off
Auto Power Off
Auto power off timer to shut off the MDR (Not
recommended)
Off / 3 Mins / 5 Mins / 10 Mins
Screensaver Time
Tim er befo r e LC D scr een tu r ns o f f (M D R w i ll
remain powered on)
Off, 1 Mi n , 3 M i n, 5 M ins
Beep Sou n d
Beep sound when button is pressed
On / Off
Language
Set the OS D men u la n guage.
Engl i sh, F rança i s, E s pañol ,
Port u guês, Deuts ch, Italiano,
Simplified Chinese, Trad i tiona l
Chin es e, R u ssia n , Japan e se,
Kore a n
Frequency
Recommend 60 Hz for US
50 Hz / 60 Hz
Format SD Card
(64GB SD card max)
Format and delete all data on SD card
Save any important video prior to format
Yes / No
Lice n se # MDR -150
Set l icens e plate info t o be w aterm arke d on
vide o
Defa u lt = Morb i lify MDR - 150
Long press M button to enter setup
option
Once cursor moves to letter, press
to change letter
Press OK to enter
Repeat as needed
Long Press M to go to next row
When done, long press M to go to OK.
Press M to exit men
Def a ult
Rese t all setti n gs to facto r y defaul t
Yes / No
Vers i on
Fir m war e V er s i on
Settings Page 2 - Press M button twice

4. Video Playback
4.1 Playback directly on MDR-150
Video playback can only be accessed when MDR is NOT
recording.
1. To stop recoding, press OK button
2. Long press (2 seconds) the M button twice
3. Navigate the saved video files by pressing /
4. Press OK to play file
5. Exit playback mode by pressing M button
4.2 Playback video via MDR App
12 13
MDR app available on iOS and Google (MORBILIFY MDR)
Video playback can only be accessed when MDR is NOT in
recording mode
1. Quick access button – Press Up button on MDR-150
for shortcut access toWiFi setting. Select WiFi and enable
1. Standard Operation: To stop recoding, press OK button
2. Press M button twice to access 2nd page of Settings menu
3. Press to highlight WiFi
4. Press OK to select WiFi
5. Press OK to enable WiFi
4.2 Playback video via MDR App - Continued
1. Press ON to turn on WiFi on MDR
2. See the WiFi SSID MDR150-xxxxxxxx
Go to Smartphone (iPhone or Android)
1. Go to WiFi setting in Smartphone
2. Find SSID MDR-150-xxxxxxxxxx
3. Connect to SSID MDR-150-xxxx
4. PW = 12345678a
5. Open Morbilify MDR app
6. Return to MDR-150 camera, select Connect
7. Once connected, can see live view, SD card playback,
image playback and setting configuration
AP Mode
SSID: Morbilify MDR-150_xxxxxxxx
PW: 12345678a
Refresh WiFi_Off

14 15
4.2.1 MDR App 5 View Recordings on PC
5.1 Using Media Player
MDR-150 videos are saved as MOV files and can be
viewed via standard Media Players.
Do NOT remove SD Card from MDR while system is
recording or powered on. This will corrupt the SD card
To view recordings:
1. Safely remove the Memory card from the MDR-150
after it has been powered off.
2. Insert Memory card to a computer. A SD card slot
or USB SD card is required (Not included)
3. Select the Drive the SD card is located and select
the file folder to view .
4. Select the file to view via Media Player.
App Name = Morbilify MDR

5 View Recordings on PC
5.1 Using Media Player
MDR-150 videos are saved as MOV files and can be
viewed via standard Media Players.
.
17
16
6 EX15-GPS (Passive GPS Power Cable)
6.1 Record Speed and Route History
EX15-GPS receiver cable is included with MDR and is
equipped with built-in passive GPS receiver, which records
speed and route history along with the video.
When EX15-GPS is utilized, the playback of video recordings
can be viewed via PC Desktop software.
PC Desktop Software
A special PC desktop software is required and available free
of charge to download on www.Morbilify.com
When playback on PC desktop software, the video, speed and
map are displayed concurrently to show the location of the
vehicle.
All recordings are shown from pre-recorded data. System
does NOT show real time tracking / location.
NOTE:
GPS Signal may take several minutes to acquire
depending on several factors such as location,
environment, buildings.

18 19
MORBILIFY LIMITED WARRANTY
Morbilify warrants the system against defects in material and workmanship for a period of
one (1) year from the date of original purchase. During this period, Morbilify’s liability for
any defective product, or any product part, shall be limited to the repair or replacement of
the product, at Morbilify’s sole discretion.
This warranty does not apply to defects or damages resulting from mishandling, accident,
abuse, negligence, lightning, water/liquid, power surges, improper interfacing, operation
outside of design limits, misapplication, improper repair, or unauthorized modification.
The term "Morbilify Product" is limited to the hardware components and required firmware.
It DOES NOT include software applications or programs, non-Morbilify products or
peripherals. To the extent permitted by local law, all non-Morbilify products or non-
Morbilify branded peripherals - such as external storage SD card are provided with the
respective manufacturer's own warranties directly to you, and are not covered by this
Limited Warranty.
To o b t a i n s e r v i c e w i t h i n t h e w a r r a n ty p e r i o d , p l e a s e c o n t a c t M o r b i l i fy a t
tech@morbilify.com for assistance. If product repair or replacement is necessary, a
Return Merchandise Authorization (RMA) will be issued. The Customer will be solely
responsible for shipping charges, insurance and proper packaging to prevent breakage in
transit, whether or not the product is covered by this warranty. All shipments of repaired or
replaced products by Morbilify will be F.O.B. California.
MORBILIFY MAKES NO OTHER WARRANTIES, EXPRESS OR IMPLIED, AS TO
MERCHANTABILITY OR FITN ESS FOR A PART ICULAR PU RPOSE OF ANY
PRODUCT SOLD UNDER THIS CONTRACT. UNDER NO CIRCUMSTANCES SHALL
MORBILIFY BE LIABLE FOR ANY INDIRECT, INCIDENTAL, SPECIAL, PUNITIVE OR
CONSEQUENTIAL DAMAGES INCLUDING, WITHOUT LIMITATION, INFRINGEMENT
OF THIRD PARTY RIGHTS, LOST GOODWILL, LOST REVENUES OR PROFITS,
WORK STOPPAGE, DATA LOSS, SYSTEM FAILURE, IMPAIRMENT OF OTHER
GOODS, COSTS OF REMOVAL AND REINSTALLATION OF THE SYSTEM, LOSS OF
USE, INJURY TO PERSONS OR PROPERTY ARISING OUT OR RELATED TO THE
SYSTEM WHETHER BASED ON BREACH OF WARRANTY, BREACH OF CONTRACT,
TORT OR OTHERWISE. IN NO EVENT SHALL MORBILIFY’S LIABILITY EXCEED THE
ACTUAL PURCHASE PRICE OF THE SYSTEM WITH RESPECT TO WHICH ANY
CLAIM IS MADE.
The information in this user guide reflects the current technical specifications at the time
of print. Morbilify reserves the right to change the technical or physical specifications
and features without prior notification. While every effort has been made to ensure the
accuracy of the information, certain specifications are based on approximate figures.
All trademarks, service marks, trade names, product names and logos are the property of
their respective owners.
Morbilify www.mobrilify.com Email: [email protected]
6.2 View Speed and Route History via PC Player
To view video with speed and location history:
1. Insert SD card into Windows PC
2. Open PC Playback software (GX Player)
3. Go to settings Menu, Select (English), MPH, and Google
Map
4. Select Folder icon and select SD card to view videos
Speed indicated in video will differ slightly from
the speedometer in PC Player
Table of contents