Morphy Richards 460021 User manual

SC460021 MU Rev1
Easy Time Slow Cooker
Please read and keep these instructions for future use
* Register online for your 2 year guarantee. See the back of this instruction book for details (U and Ireland customers only).
www.morphyrichards.co.uk/blog
For competitions, product hints and tips
and more join us at www.facebook.com/morphyrichardsuk
@loveyourmorphy
SC460021 MUK Re 1.qxp_Layout 1 01/07/2021 14:04 Page 1

2
Health And Safety
Location
•Always locate your appliance away from the edge of
the worktop.
•Ensure that the appliance is used on a firm, flat, heat
resistant surface.
Mains cable
•The mains cable should reach from the socket to the
appliance without straining the connections.
•Do not let the mains cable hang over the edge of the
worktop or open space where a child could reach it.
•Do not let the cable run across a cooker or hot area which
might damage the cable.
Personal safety
•WARNING: Do not touch the top of the
appliance or other hot parts during or
after use, use handles or knobs. The
heating element surface is subject to
residual heat after use.
•To protect against the risk of electrical shock do not put
base in water or in any other liquid.
•Do not touch hot surfaces. Use oven gloves or a cloth
when removing lid or handling hot containers.
•Extreme caution must be used when moving an
appliance containing hot food, water, or other hot liquids.
ther safety considerations
•Do not switch on the Slow Cooker if the Cooking Pot is
empty.
•Allow the Glass Lid and Cooking Pot to cool before
immersing in water.
•Never cook directly in the Base Unit. Use the Cooking Pot.
•Do not use the Cooking Pot or Glass Lid if cracked or
chipped.
•The Glass Lid and Cooking Pot are fragile. Handle them
with care.
•The use of attachments or tools not recommended by
Morphy Richards may cause fire, electric shock or injury.
•Do not place on or near a hot gas or electric burner or in a
heated oven.
•Unplug from the socket when not in use, before putting on
or taking off attachments, and before cleaning.
•Avoid spillage onto the Power Cable.
Electrical requirements
Check that the voltage on the rating plate of your
appliance corresponds with your house electricity supply
which must be A.C. (Alternating Current).
Should the fuse in the mains plug require changing,
replace it with a fuse of the same rating as originally fitted.
WARNING: This appliance must be earthed.
The use of any electrical appliance requires the following common sense safety rules.
Please read these instructions carefully before using the product.
•This appliance can be used by children from 8 years and above if
they have been given supervision or instruction concerning use of
the appliance in a safe way and if they understand the hazards
involved. Cleaning and user maintenance shall not be made by
children unless they are older than 8 and supervised. eep the
appliance and its cord out of reach of children aged less than
8 years. Children shall not play with the appliance.
•Appliances can be used by persons with reduced physical,
sensory or mental capabilities or lack of experience and
knowledge if they have been given supervision or instruction
concerning use of the appliance in a safe way and understand the
hazards involved.
•This appliance is intended to be used in household and similar
applications such as: farm houses, by clients in hotels, motels
and other residential type environments, and bed and breakfast
type environments.
•If the supply cable is damaged, it must be replaced by the
manufacturer, its service agent or similarly qualified persons in
order to avoid a hazard.
•WARNING: Misuse of appliance could cause personal injury.
•WARNING: Do not immerse the Base in water for cleaning.
•The appliance is not intended to be operated by means of an
external timer or separate remote system.
SC460021 MUK Re 1.qxp_Layout 1 01/07/2021 14:04 Page 2

3
Health And Safety ..............................................................
Introduction .......................................................................
Product verview ..............................................................
Features..............................................................................
Before First Use .................................................................
Using Your Slow Cooker ...................................................
Guide To Automated Heat Selection ................................
Care and Cleaning .............................................................
Handling The Cooking Pot ................................................
Handling The Glass Lid .....................................................
Foods For Slow Cooking ...................................................
Slow Cooking Tips .............................................................
Caring For The Glass Lid and Cooking Pot ......................
Recipes ..............................................................................
Cooking Guide ...................................................................
Recipes - Mains .................................................................
Recipes - Desserts ............................................................
Troubleshooting .................................................................
Contact Us .........................................................................
Guarantee ..........................................................................
Contents
Thank you for purchasing your new Morphy Richards Easy Time Slow cooker.
Easy Time has been designed with your convenience in mind and takes the
guess work out of your slow cooking. It selects the right Heat Setting for the
time you set to ensure your meal is cooked perfectly. The Auto eep Warm
feature keeps your meal ready in case there are any last minute changes to
your schedule.
Introduction
2
3
4
4
5
5
6
6
6
6
6
7
7
8
8
9
14
15
15
16
SC460021 MUK Re 1.qxp_Layout 1 01/07/2021 14:04 Page 3

4
Features
(1) Lid Handle
(2) Glass Lid
(3) Cooking Pot
(4) Base Handles
(5) Base Unit
(6) Control Panel
(7) Cooking Indicator Light
(8) Timer Lights
(9) Keep Warm Light
(10) Time Select Dial
(11) Heat Setting Indicator
Lights
(12) Heat Setting Buttons
Product verview
1
2
3
4
5
6
7
8
9
10
11
12
SC460021 MUK Re 1.qxp_Layout 1 01/07/2021 14:05 Page 4

5
DO NOT IMMERSE THE BASE UNIT (5) IN
WATER.
Wash the Glass Lid (2),and Cooking Pot (3) in
hot, soapy water. Rinse and dry.
Before First Use
The Cooking Pot (3) is not suitable for use
on an induction hob.
Note
1
Place the Cooking Pot (3) into the
Base Unit (5).
2
Add the ingredients to the Cooking Pot (3).
Ingredients can be sautéed in a pan before
adding to the Cooking Pot.
3
Turn the Time Select Dial (10) to your desired
cooking time. The Timer Lights (8) will indicate the
time selected. The suggested heat setting will
automatically be selected for you.
Using Your Slow Cooker
4
Simply push the Time Select Dial (10) to start the
slow cooker. The Cooking Indicator Light (7) will
illuminate and the Timer Lights (8) will count down
so you know how many hours of cooking are left.
5
Alternatively, if needed, you can override the
suggested heat setting by selecting one of the
Heat Select Buttons (12) before pushing the Time
Select Dial (10) to start the slow cooker.
6
When finished, the slow cooker will automatically
enter eep Warm mode, so your meal will be
ready for when you are. eep Warm mode
operates for up to 2 hours. After 2 hours the Slow
Cooker will automatically switch off.
SC460021 MUK Re 1.qxp_Layout 1 01/07/2021 14:05 Page 5

6
As a guide, the slow cooker selects the heat
setting based on the following:
1-4 hours 5-8 hours 9-12
High Medium Low
These timings are a guide and together with the
recipes provided are intended to help you get the
best from your slow cooker. Items such as
chicken joints or breasts are less fibrous than
meat and cook more quickly, be guided by the
recommendations in our recipes before trying
your own.
•Turn off and unplug the Slow Cooker from the
mains. Allow to cool completely before cleaning.
•Do not use metal utensils or abrasive cleaners
when cleaning.
•Remove the Glass Lid (2) and Cooking Pot (3) and
clean in hot soapy water.
•Wipe the sides of the Base Unit (5) with a damp
cloth.
•The Cooking Pot (3) is dishwasher safe.
D N T IMMERSE THE BASE UNIT IN WATER.
•WARNING: The Cooking Pot (3) will become
very hot when in use.
•Do not use metal utensils to stir food in the
Cooking Pot (3) as this will scratch and remove
the non stick coating. Use either wood or
silicone plastic utensils.
•WARNING: The Lid Handle (1), Base Unit (5) and
Cooking Pot (3), as well as the outside of the
Base Unit (5), all become hot during cooking.
Always use oven gloves when handling ANY
part of the Slow Cooker during cooking.
•When removing the Glass Lid (2), tilt so that the
opening faces away from you to avoid being
burned by steam.
•Use the Lid Handle (1).
•Most foods are suited to slow cooking methods,
however there are a few guidelines that need to
be followed.
•Ensure all frozen ingredients are thoroughly
defrosted prior to cooking.
•Cut root vegetables into small, even pieces, as
they take longer to cook than meat. They can be
gently sautéed for 2-3 minutes before slow
cooking. Ensure that root vegetables are always
placed at the bottom of the Cooking Pot (3) and
all ingredients are immersed in the cooking liquid.
•Trim all excess fat from meat before cooking, as
the slow cooking method does not allow fat to
evaporate.
•If adapting an existing recipe from conventional
cooking, you may need to reduce the amount of
liquid used. Liquid will not evaporate from the
Slow Cooker to the same extent as conventional
cooking.
•Never leave uncooked food at room temperature
in the Slow Cooker.
•Uncooked kidney beans must be soaked
overnight and boiled for at least 10 minutes to
remove toxins before use in a Slow Cooker.
•Insert a meat thermometer into joints of roasts,
hams or whole chickens to ensure they are
cooked to the desired temperature.
•Do not use the Slow Cooker to reheat food.
Guide To Automated Heat
Selection
Care And Cleaning
Handling The Cooking Pot
Handling The Glass Lid
Foods For Slow Cooking
SC460021 MUK Re 1.qxp_Layout 1 01/07/2021 14:05 Page 6

7
•The Slow Cooker must be at least half full for best
results.
•If cooking soups, leave 5cm gap from the rim of
the Cooking Pot (3) and the food surface to allow
for simmering.
•Removing the Glass Lid (2) will allow heat to
escape, reducing the efficiency of your Slow
Cooker and increasing the cooking time. If you
remove the Lid to stir or add ingredients, you will
need to allow 10-15 minutes extra cooking time
for each time you remove the Glass Lid (2).
•Many things can affect how quickly a recipe will
cook, including water and fat content, initial
temperature of the food and the size of the food.
Check food is properly cooked before serving.
•Many recipes will take several hours to cook. If
you don’t have time to prepare food in the
morning, prepare it the night before, storing the
food in a covered container in the fridge. Transfer
the food to the Cooking Pot (3) and add boiling
liquid/stock. In most of the recipes in this book,
the meat ingredients are browned first to improve
their appearance and flavour.
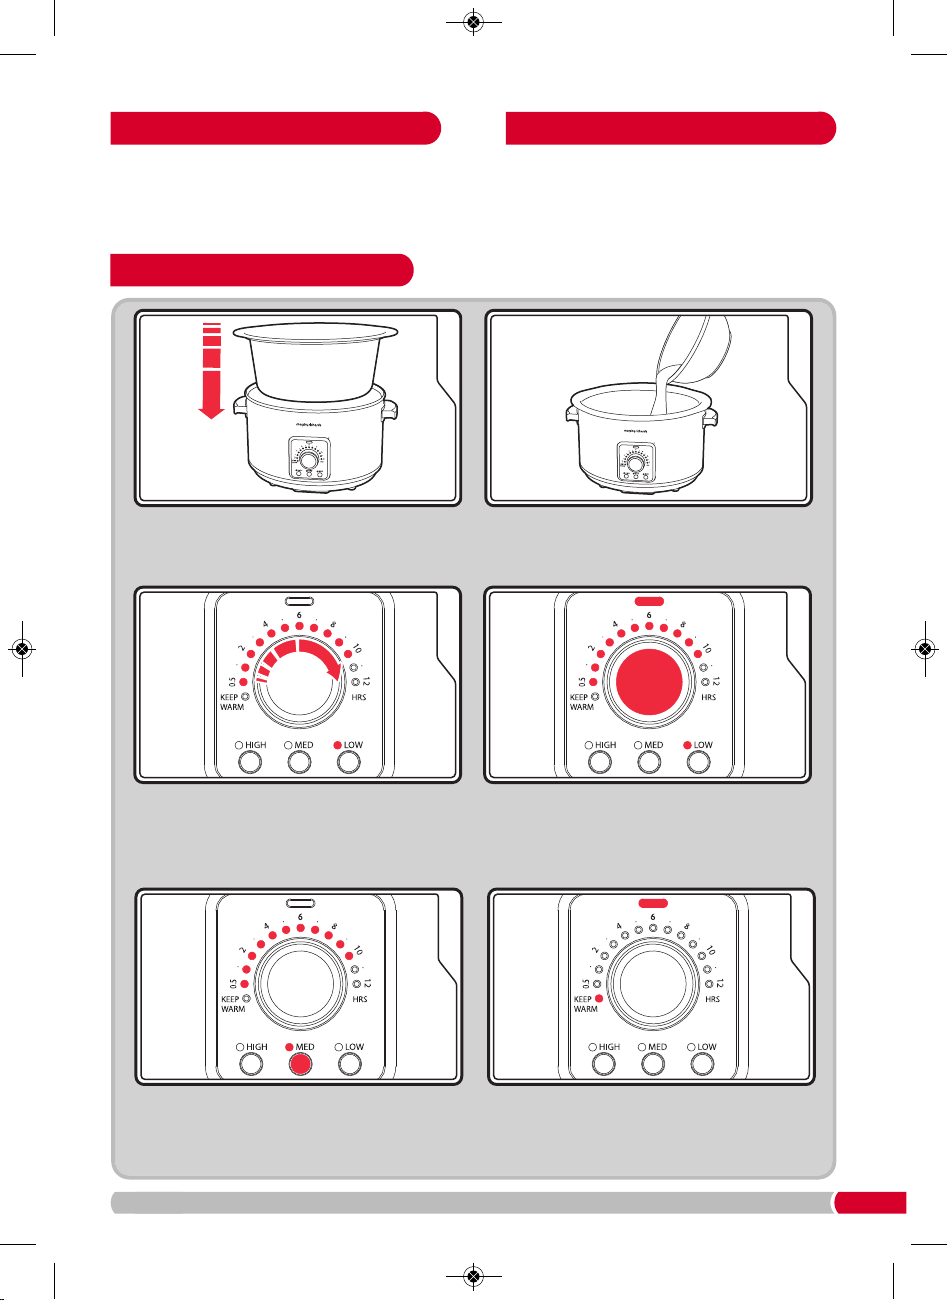
•Most recipes require 9-12 hours on Low, 5-8
hours on Medium and 4 hours on High setting.
•Some ingredients are not suitable for slow
cooking. Pasta, seafood, milk and cream should
be added towards the end of the cooking time.
•Pieces of food cut into small pieces will cook
quicker. A degree of ‘trial and error’ will be
required to fully optimise the potential of your
Slow Cooker.
•All food should be covered with a liquid, gravy or
sauce. In a separate pan or jug, prepare your
liquid, gravy or sauce and completely cover the
food in the Cooking Pot (3).
•When cooking joints of meat, ham, poultry etc,
the size and shape of the joint is important. Try to
keep the joint in the lower 2/3 of the pot. If
necessary, cut into two pieces. Joint weight
should be kept within the maximum limit see
recipe for guidance.
•For ham and brisket fill with hot water to just
cover 2/3 of the depth of the joint. For beef, pork
or poultry cover to 1/3 depth.
•Extreme caution must be used when moving an
appliance containing hot food, water, or other
hot liquids.
•Please handle the Glass Lid (2) and Cooking
Pot (3) carefully to ensure long life.
•Avoid sudden, extreme temperature changes to
the Glass Lid (2). For example, do not place a hot
lid into cold water or onto a wet surface.
•Avoid hitting the Glass Lid (2) against any hard
surfaces.
•Do not use the Glass Lid (2) if chipped, cracked
or severely scratched.
•Do not use abrasive cleansers or metal scouring
pads.
•Never heat the Cooking Pot (3) when empty.
•Never place the Glass Lid (2) or Cooking Pot (3)
under a grill, in the oven, in a microwave or
toaster oven.
•Never place the Lid directly on a burner or hob.
•Do not use metal utensils to stir food in the
Cooking Pot (3) as this will scratch and remove
the non stick coating. Use either wooden
or silicone plastic utensils.
Caring For The Glass Lid
and Cooking Pot
Slow Cooking Tips
SC460021 MUK Re 1.qxp_Layout 1 01/07/2021 14:05 Page 7

8
We have developed 12 recipes for your Easy Time Slow Cooker. There are a variety of recipes
to suit all tastes.
Please note that these cooking times are for guidance only and may vary depending on food
type and personal tastes. Should you want to increase or decrease the cooking time, select
your preferred cooking time and the slow cooker will select the appropriate heat setting.
Ensure food is thoroughly cooked before serving.
The recipes are based on the maximum working volume of the slow cooker. The working
volume of the 3.5L model is 2.5 litres / 4½ pts. The working volume of the 6.5L model is 5
litres / 10½ pts. This allows a 2cm space between the top of the pot and the food.
If you are cooking a joint of meat, chicken portions, spare ribs etc. refer to each individual
recipe. Use our recipes as a guide when following your own.
Cooking Guide
Recipes
As a guide the slow cooker selects the heat setting based on the following:
1-4 hours 5-8 hours 9-12 hours
High Medium Low
SC460021 MUK Re 1.qxp_Layout 1 01/07/2021 14:05 Page 8

9
Method:
1Heat the butter in a pan and brown the chicken pieces
in batches, remove and set aside.
2Add the onions and mushrooms and stir for a couple of
minutes with a wooden spoon.
3Add the rest of the ingredients and stir until slightly
thickened.
4Transfer the pan contents to the Cooking Pot and then
add the chicken pieces. Stir gently and then cover with
the Glass Lid.
5Place into the Base Unit and cook for 3-4 hours on
High setting, 5 hours on Medium or 9 hours on Low
setting.
Ingredients:
3.5L 6.5L
•4 8 Chicken leg quarters
with skin on
•20g 40g Butter
•100g 200g Onion, chopped
•200g 400g Mushrooms, sliced
•150ml 250ml White wine
•1L 1.5L Hot Chicken stock
•2½ tbsp 5 tbsp Cornflour
•1 tsp 2 tsp Mixed herbs
•To taste To taste Salt and pepper
Chicken and Mushroom Casserole
Method:
1Brown the mince in a large pan on the hob, in batches
if necessary, without adding any oil or fat.
2When browned, add the chopped onion, and stir for a
couple of minutes.
3Add the garlic, tomatoes, tomato puree, chilli powder,
vinegar and sugar and stir well.
4T
ransfer the contents into the Cooking Pot and place in
the Base Unit, cover with the Glass Lid.
5Cook for 4-5 hours on the High setting, 5-8 hours on
the Medium setting or 9-10 hours on the Low setting.
Note:
For best results add the drained kidney beans for the
last hour.
Ingredients:
3.5L 6.5L
•750g 1.5kg Minced beef
•200g 400g Onion, chopped
•3 6 Garlic cloves, crushed
•2 x 400g 4 x 400g Chopped tomatoes
cans cans
•1 tbsp 2 tbsp Tomato puree
•3½ tsp 7 tsp Hot Chilli powder
•1½ tsp 1 tbsp Malt vinegar
•1 tsp 2 tsp Sugar
•2 x 400g 3 x 400g idney beans canned,
cans cans drained and rinsed
Chilli Con Carne
Recipes - Mains
SC460021 MUK Re 1.qxp_Layout 1 01/07/2021 14:05 Page 9

10
Method:
1Marinade the ribs overnight in the sauce.
2Next day, transfer to the Cooking Pot and cover with
the Glass Lid.
3Cook for 4-5 hours on the High setting, 7-9 hours on
Medium or 10-12 hours on Low.
Ingredients:
3.5L 6.5L
•800g 1.6kg Pork spare ribs
•300ml 600ml Barbecue sauce
Barbecue Spare Ribs
Method:
1Heat the oil in a large pan and brown the meat in
batches, remove and set aside.
2Reduce the heat to medium setting and cook the
onions for about 5 minutes, stirring occasionally with a
wooden spoon.
3Return the meat to the pan, add the garlic, flour and
paprika and stir well.
4T
ransfer to the Cooking Pot, then add the canned
chopped tomatoes and the water. Season with a little
salt and cover with the Glass Lid.
5Cook on High for 4-6 hours, Medium setting for 7-8
hours or for 9-12 hours on Low setting. Add the
chopped green pepper 1½ - 2 hours before you want
to serve the food.
6When ready, stir in the soured cream and check the
seasoning. Serve with rice or potatoes and spring
cabbage.
Note:
For best results, add the chopped green pepper to the
Cooking Pot 1½- 2 hours before you want to serve.
Stir in the soured cream, just before serving.
Ingredients:
3.5L 6.5L
•2 tbsp 4 tbsp Sunflower oil
•800g 1.6kg Stewing beef, cut into
bitesize chunks
•350g 700g Onions, chopped
•1 2 Garlic clove, crushed
•1½ rounded 3 rounded Plain flour
tbsp tbsp
•1½ rounded 3 rounded Smoked paprika
tbsp tbsp
•1 x 400g 2 x 400g Chopped tomatoes
can cans
•150ml 300ml Hot Water
•¼ tsp ½ tsp Salt
•1 2 Green pepper, deseeded
and cut into bitesize
chunks
•150ml 300ml Soured cream
Hungarian Goulash
SC460021 MUK Re 1.qxp_Layout 1 01/07/2021 14:05 Page 10

11
Method:
1Brown batches of the sausages in the oil in a pan over
medium heat, remove and set aside.
2Add the vegetables and sauté for a couple of minutes.
3T
ransfer the vegetables to the Cooking Pot, stir in the
remaining ingredients and then add the sausages. Stir
gently.
4Place the Cooking Pot into the Base Unit and cover
with the Glass Lid.
5Cook for 4-5 hours on the High setting, 5-7 on the
Medium or 9-10 hours on Low.
6Any excess fat may be removed from the surface of the
Cooking Pot after cooking.
Note:
Use good quality sausages made with a high
percentage of meat.
Ingredients:
3.5L 6.5L
•1 tbsp 1 tbsp Sunflower oil
•750g 1.5kg Good quality pork
sausages
•200g 450g Onions, peeled and
chopped
•200g 400g Carrots, peeled and
sliced
•250g 500g Leeks, washed and
sliced
•3 tbsp 6 tbsp Red onion chutney
•1½ tbsp 3 tbsp Plain flour
•2½ tbsp 5 tbsp Worcestershire sauce
•800ml 1.3L Hot beef stock
•To taste To taste Salt and pepper
Sausage Pot
Method:
1Brown batches of the meat free sausages in the oil in a
pan over medium heat, remove and set aside.
2Add the vegetables and sauté for a couple of minutes.
3Transfer the vegetables to the Cooking Pot, stir in the
remaining ingredients and then add the sausages. Stir
gently.
4Place the Cooking Pot into the Base Unit and cover
with the Glass Lid.
5Cook for 4 hours on the High setting.
Note:
Use good quality meat free sausages made with a high
percentage (around 70%) textured soya. For best
results cook on the High setting for 4 hours.
Ingredients:
3.5L 6.5L
•1 tbsp 2 tbsp Sunflower oil
•540g 1080g Good quality meat free
sausages
•200g 400g Onions, peeled and
chopped
•280g 360g Carrots, peeled and
sliced
•250g 500g Leeks, washed and
sliced
•3 tbsp 6 tbsp Red onion chutney
•1½ tbsp 3 tbsp Plain flour
•2 tbsp 4 tbsp Henderson’s Relish
•800ml 1.5L Hot vegetable stock
•To taste To taste Salt and pepper
Vegan Sausage Pot
SC460021 MUK Re 1.qxp_Layout 1 01/07/2021 14:05 Page 11

12
Note:
When buying a joint of meat, the shape is just as
important as the weight.
Ensure the meat does not protrude from the Cooking
Pot when covered with the lid.
Method:
1Add the oil to a large pan and brown the joint on all
sides on the hob.
2Remove the joint, add the vegetables to the pan and
cook for a couple of minutes, stirring occasionally with
a wooden spoon.
3Transfer the vegetables to the Cooking Pot, add the
bouquet garni, thyme, peppercorns and salt and stir
well. Place the joint on top of the vegetables.
4Add enough hot stock to cover the vegetables and
then place the Cooking Pot in the Base Unit, cover with
the Glass Lid.
5Cook for 4- 5 hours on the High setting, 7-8 hours on
Medium setting or 9-10 hours on Low setting.
6When ready, remove the joint using a slotted spoon
and allow to rest for 10 minutes before carving.
Ingredients:
3.5L 6.5L
•1 tbsp 1 tbsp Sunflower oil
•1.0kg max 1.5kg max Brisket of beef
•225g 550g Carrots, sliced
•100g 300g Swede, diced
•4 10 Shallots
•1 1 Bouquet Garni
•1 tsp 2 tsp Dried Thyme
•1 tsp 2 tsp Black peppercorns
•Good pinch Good pinch Salt
•700ml 1L Hot beef stock to cover
vegetables
Pot Roast of Beef
Method:
1Heat the oil in a pan on the hob and then brown the
meat in batches until sealed, remove as it is done and
reserve.
2Add the onions and stir for a couple of minutes, then
add the other vegetables and stir well.
3Transfer to the Cooking Pot, add the browned meat,
cornflour, herbs and seasoning and stir well. Stir in the
stock, then cover with the Glass Lid.
4Place the Cooking Pot in the Base Unit, and cook for
4-6 hours on High setting, 6-8 hours on Medium or
9-12 hours on Low setting.
Ingredients:
3.5L 6.5L
•1 tbsp 2 tbsp Sunflower oil
•600g 1.2kg Stewing beef cut into
bitesize pieces
•150g 280g Onions, roughly
chopped
•400g 800g Potatoes, cut into
large dice
•400g 800g Carrots, sliced into
rounds
•250g 500g Leeks, sliced
•1½ tbsp 3 tbsp Cornflour
•1 tsp 3 tsp Mixed herbs
•850ml 1.7L Hot beef stock
•To taste To taste Salt and pepper
Beef Stew
SC460021 MUK Re 1.qxp_Layout 1 01/07/2021 14:05 Page 12

13
Chicken and Lentil Curry
Method:
1Remove the skin from the chicken thighs.
2Place oil into a large pan, and brown the chicken in
batches over medium heat. Remove and set aside.
3Add the onion, garlic and ginger to the pan. Cook
gently for two minutes, stirring with a wooden spoon.
4Add the spices and chopped chilli and cook over low
heat for a further 2 minutes.
5Add the tinned tomatoes, lentils, lemon juice, chicken
stock and a little salt and stir well. Transfer to the
Cooking Pot, add the chicken joints and then stir
gently.
6Cover with the Glass Lid and cook for 4 hours on High
setting, 5 hours on Medium or 9 hours on Low setting.
7When ready, stir gently, check the seasoning, sprinkle
with chopped coriander and serve with Naan bread
and/or boiled rice.
Ingredients:
3.5L 6.5L
•1 tbsp 1½ tbsp Sunflower oil
•750g 1.5kg Chicken thighs on the bone
•150g 300g Onion, finely chopped
•2 4 Garlic cloves, crushed
•10g 20g Fresh ginger, peeled and
finely grated
•1½ tbsp 3 tbsp Ground cumin
•1½ tbsp 3 tbsp Ground coriander
•¾ tsp 1½ tsp Turmeric
•10g 20g Red chilli with seeds,
finely chopped
•½ x 400g 1 x 400g Chopped tomatoes
can can
•100g 150g Red lentils
•1½ tbsp 3 tbsp Lemon juice
•300ml 600ml Hot chicken stock
•To taste To taste Salt
•2 tbsp 4 tbsp Garnish: Fresh coriander
leaves, chopped
Gammon Ham
Method:
1Remove the outer packaging from the joint leaving any
collar in place. Rinse the joint with cold running water
and then place into the Cooking Pot. Place the
Cooking Pot into the Base Unit.
2Pour boiling water from the kettle into the Cooking Pot
to just cover the joint and then cover with the Glass
Lid.
3Cook for 4 hours on the High setting, 6-7 hours on
Medium or 9-10 hours on Low setting.
4Carving the joint will be easier if it is allowed to rest
before serving.
Note:
When buying a joint of meat, ensure it will fit into the
Cooking Pot. The joint must not protrude above the rim
of the Pot. The shape of the joint is just as important as
the weight.
Ingredients:
3.5L 6.5L
•1.3kg max 1.8kg max Gammon joint
SC460021 MUK Re 1.qxp_Layout 1 01/07/2021 14:05 Page 13

14
Recipes - Desserts
Syrup Sponge Pudding
Method:
1Lightly grease the pudding basin and line the bottom
with a circle of greaseproof paper.
2Put the syrup into the basin.
3Put the remaining ingredients into a mixing bowl and
mix well.
4Place the sponge mixture on top of the syrup and
smooth the surface.
5Cover with a pleated double layer of greaseproof
paper. Tie with string to secure and make a handle.
6Place into the Cooking Pot and add boiling water so
that it comes halfway up the basin side. Cover with the
Glass Lid.
7For best results cook on High setting for 4 hours.
8To serve, remove the string and greaseproof paper. Run
a palette knife around the edge of the basin, put a
plate over the top of the sponge and invert. Remove
the greaseproof circle and serve with custard.
Note:
You will need a Pyrex or other oven proof pudding
basin of capacity 500ml (3.5L Easy Time) or 1.25L (6.5L
Easy Time). Do not use a plastic basin.
Ingredients:
3.5L 6.5L
•2 rounded 4 rounded Golden syrup
tbsp tbsp
•60g 125g Soft margarine
•50g 100g Caster sugar
•¼ lemon ½ lemon Lemon zest
•1 2 Egg(s), medium, beaten
•100g 200g Self-raising flour
•1 tbsp 2 tbsp Milk
•1 tbsp 2 tbsp Lemon juice
Rice Pudding
Method:
1Butter the sides of the Cooking Pot.
2Add all the ingredients and stir well.
3Transfer the Cooking Pot into the Base Unit, cover with
the Glass Lid.
4For best results, cook for 3 hours on High setting or 4
hours on Medium setting.
Ingredients:
3.5L 6.5L
•25g 60g Butter
•100g 250g Pudding rice
•100g 250g Granulated sugar
•1L 2L Whole milk
•½ tsp 1 tsp Nutmeg, grated
SC460021 MUK Re 1.qxp_Layout 1 01/07/2021 14:05 Page 14

15
•Food is undercooked. •Loss of power.
•Food cooked on wrong setting
for cooking time.
•Glass Lid not placed correctly
on the Cooking Pot.
•Test the mains outlet with a
lamp known to be working.
•Check the Control Panel
settings and the recipe details.
•Check the Glass Lid is
correctly placed and nothing is
obstructing it.
Problem Reason Solution
•Food is overcooked. •Cooking Pot was under half
full.
•Food cooked too long.
•Cooking Pot placed in Base
Unit while still very hot.
•The Slow Cooker has been
designed to thoroughly cook
food in a filled Cooking Pot. If
the Cooking Pot is only
half-filled, check to see if the
food is cooked 1 to 2 hours
earlier than recipe time.
•Check the Control Panel
settings and the recipe details.
•Cooking time may be
shortened. Check food is
cooked 30 minutes to 1 hour
earlier than the stated recipe
time.
Troubleshooting
Helpline
If you are having a problem with your appliance,
please call our Helpline, as we are more likely to
be able to help than the store you purchased the
item from.
Please have the product name, model number
and serial number to hand when you call to help
us deal with your enquiry quicker.
U Helpline: 0344 871 0944
IRE Helpline: 1800 409 119
Spares: 0344 873 0710
Talk To Us
If you have any questions, comments, want some
great tips or recipe ideas to help you get the most
out of your products, join us online:
Blog: www.morphyrichards.co.uk/blog
Facebook: www.facebook.com/morphyrichardsuk
Twitter: www.twitter.com/loveyourmorphy
Website: www.morphyrichards.com
Contact Us
SC460021 MUK Re 1.qxp_Layout 1 01/07/2021 14:05 Page 15

SC460021 MU Rev1 06/21
Stoney Lane
Prescot
Merseyside
L35 2XW
U
Helplines (office hours)
U 0344 871 0944
Spare Parts 0344 873 0710
Republic of Ireland 1800 409 119
www.morphyrichards.com
IF Y U ARE HAVING A PR BLEM
WITH NE F UR PR DUCTS,
CALL UR HELPLINE:
UK: 0344 871 0944
EIRE: 1800 409 119
SPARES: 0344 873 0710
Y
our standard one year guarantee is extended for an
additional 12 months when you register the product within
28 days of purchase with Morphy Richards. If you do not
register the product with Morphy Richards within 28 days,
your product is guaranteed for 1 year. To validate your 2
year guarantee register with us online at
www.morphyrichards.co.uk
Or call our customer registration line quoting model and
serial number, these numbers can be found on the base of
the product.
UK 0344 871 0242
IRE 1800 409 119
N.B. Each qualifying product needs to be registered with
Morphy Richards individually.
Please note that the 2 year guarantee is only available in
the U and Ireland. Please refer to the one year guarantee
for more information.
It is important to retain the retailer’s receipt as proof of
purchase. Staple your receipt to this back cover for future
reference.
Please quote the following information if the product
develops a fault. These numbers can be found on the base
of the product.
Model no.
Serial no.
All Morphy Richards products are individually tested before
leaving the factory. In the unlikely event of any appliance
proving to be faulty within 28 days of purchase, it should
be returned to the place of purchase for it to be replaced.
If the fault develops after 28 days and within 12 months of
original purchase, you should contact the Helpline number
quoting Model number and Serial number on the product,
or write to Morphy Richards at the address shown.
You may be asked to return a copy of proof of purchase.
Subject to the exclusions set out below (see Exclusions),
the faulty appliance will then be repaired or replaced as
appropriate and dispatched usually within 7 working days
of receipt.
If, for any reason, this item is replaced or repaired during
the 1 year guarantee period, the guarantee on the new
item will be calculated from original purchase date.
Therefore it is vital to retain your original till receipt or
invoice to indicate the date of initial purchase.
To qualify for the 1 year guarantee, the appliance must
have been used according to the instructions supplied.
For example, crumb trays should have been emptied
regularly.
Morphy Richards shall not be liable to replace or repair the
goods under the terms of the guarantee where:
1The fault has been caused or is attributable to accidental
use, misuse, negligent use or used contrary to the
manufacturer’s recommendations or where the fault has
been caused by power surges or damage caused in transit.
2The appliance has been used on a voltage supply other
than that stamped on the products.
3Repairs have been attempted by persons other than our
service staff (or authorised dealer).
4The appliance has been used for hire purposes or non
domestic use.
5The appliance is second hand.
6Morphy Richards reserves the right not to carry out any
type of servicing under the guarantee at its discretion.
7Plastic filters for all Morphy Richards kettles and coffee
makers are not covered by the guarantee.
8Batteries and damage from leakage are not covered by
the guarantee.
•This guarantee does not confer any rights other than those
expressly set out above and does not cover any claims for
consequential loss or damage. This guarantee is offered
as an additional benefit and does not affect your statutory
rights as a consumer. Morphy Richards products are
intended for household use only. See usage limitations
within the location safety instructions.
Morphy Richards has a policy of continuous improvement
in product quality and design. The company, therefore
reserves the right to change the specification of
its models at any time.
For electrical products sold within the
European Community. At the end of the
electrical products useful life, it should not be
disposed of with household waste.
Please recycle where facilities exist. Check with
your Local Authority or retailer for
recycling advice in your country
Exclusions
Registering Your 2 Year
Guarantee
Your 1 Year Guarantee
Disclaimer
SC460021 MUK Re 1.qxp_Layout 1 01/07/2021 14:05 Page 16
This manual suits for next models
1
Table of contents
Other Morphy Richards Cooker manuals

Morphy Richards
Morphy Richards Digital Slow Cooker User manual

Morphy Richards
Morphy Richards Chef Xpress 200 User manual

Morphy Richards
Morphy Richards 48730 User manual

Morphy Richards
Morphy Richards MRMP5SG User manual

Morphy Richards
Morphy Richards D55T User manual

Morphy Richards
Morphy Richards 48730 User manual