The Specialist In Drum Handling Equipment
Drum Pumps
morsedrum.com
Copyright 2019 - Morse Mfg. Co., Inc. Form PL26 (Updated 11 Jun, 2019) 8
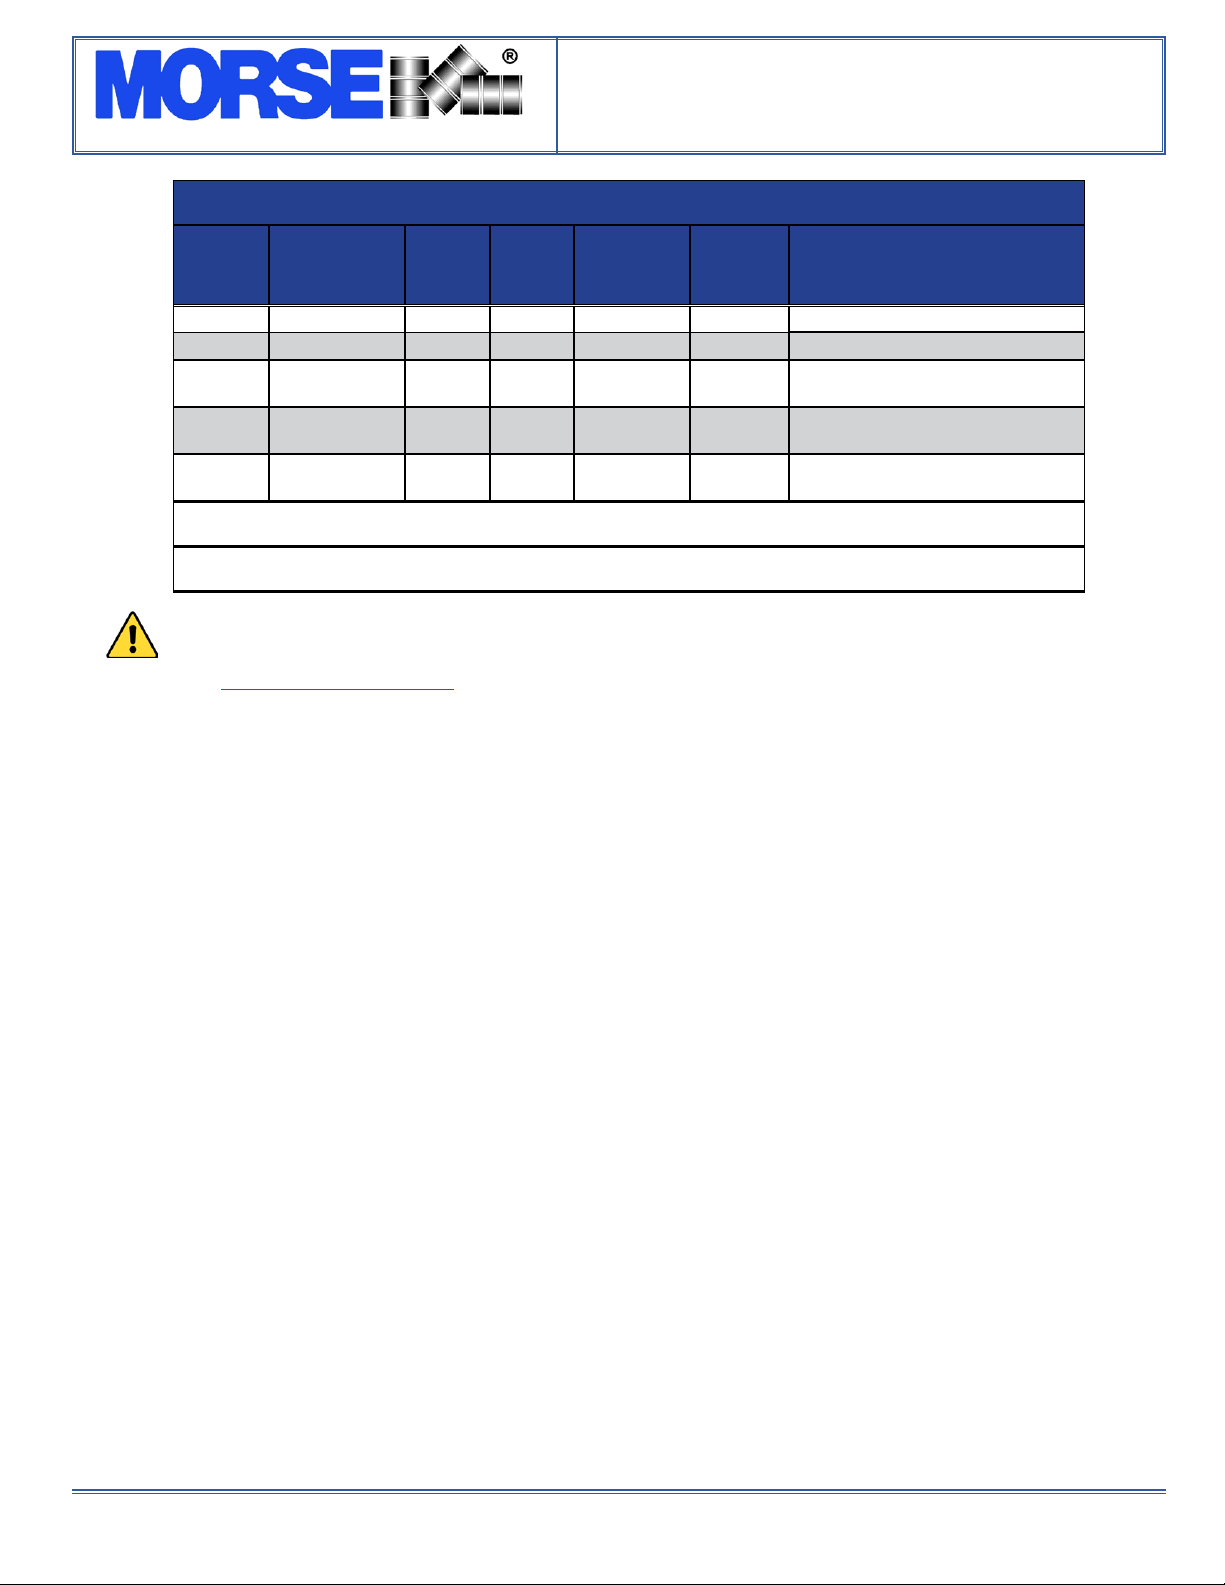
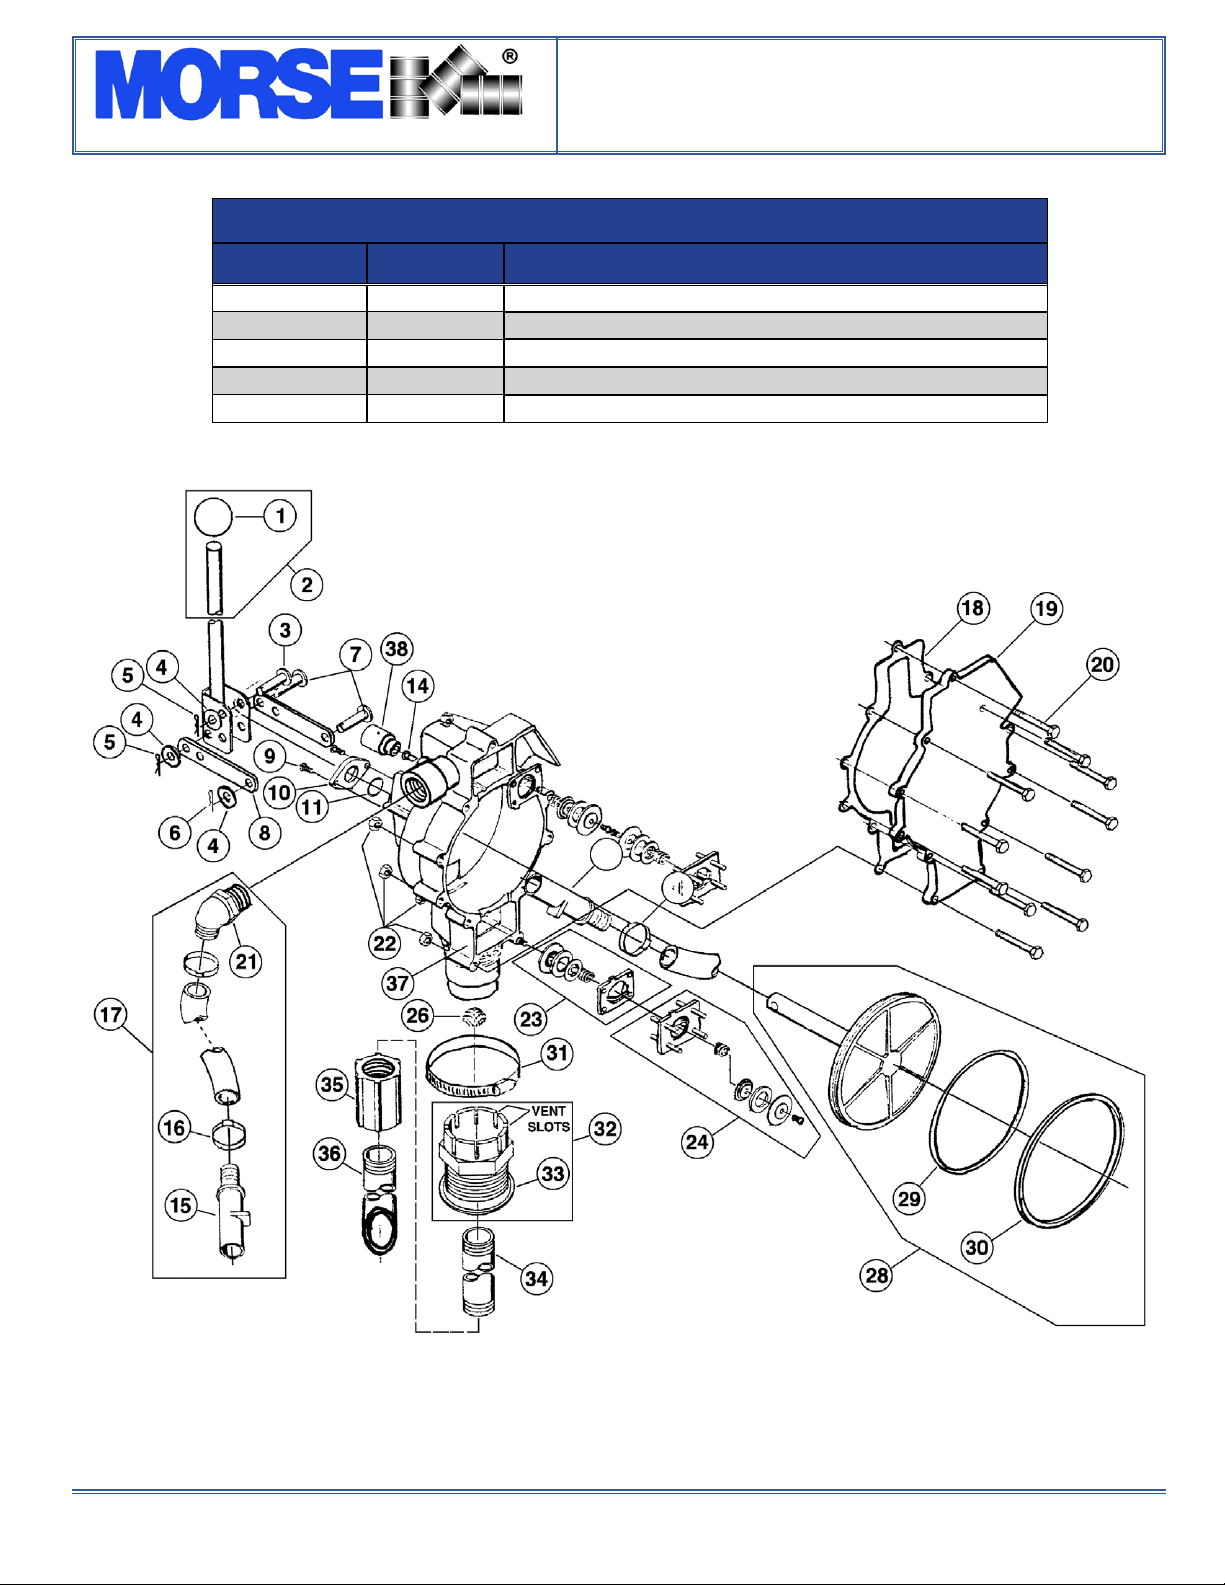
ITEM QTY. MODEL PART # DESCRIPTION
1 1 ALL PUMP MODELS 1049-40 KNOB, POLYPROPYLENE, PAC
2 1 ALL PUMP MODELS 1050-01 HANDLE ASM, PUMP, PAC
3 1 ALL PUMP MODELS 1053-00 PIN, CLEVIS 5/16 X 1-1/8, PAC
4 4 ALL PUMP MODELS 1380-90 WASHER, FLAT, NYLON, PAC
5 2 ALL PUMP MODELS 1379-00 CLIP, HAIRPIN, SMALL, PAC
6 1 ALL PUMP MODELS 1027-00 CLIP, HAIRPIN, LARGE, PAC
7 2 ALL PUMP MODELS 1031-00 PIN, CLEVIS, 5/16 X 1-1/4 PAC
8 2 ALL PUMP MODELS 1052-00 LINK, PLATED STEEL, PAC
9 2 ALL PUMP MODELS 1348-10 SCREW, 10-14 X 3/4 SS, PAC
10 1 26, 27-1AE, 27-4AV 1032-30 PLATE, RETAINING, PE, PAC
10 1 28-5BV, 28-6BE 1032-90 PLATE, RETAINING, HALAR, PAC
11 1 27-1AE, 28-6BE 1030-72 O-RING, PISTON ROD, EPDM PAC
11 1 26, 27-4AV, 28-5BV 1030-73 O-RING, PISTON ROD, VITON PAC
14 1 27-1AE, 28-6BE 1040-72 VACUUM BREAKER, EPDM, PAC
14 1 26, 27-4AV, 28-5BV 1040-73 VACUUM BREAKER, VITON, PAC
15 2 26, 27-1AE, 27-4AV 1325-30 NOZZLE, NO-LEAD, PE, PAC
15 1 28-5BV, 28-6BE 1325-90 NOZZLE, NO-LEAD, HALAR, PAC
16 2 ALL PUMP MODELS 1044-12 CLAMP, HOSE, CRIMPED, SS, PAC
17 1 26, 27-1AE, 27-4AV 1342-02 HOSE, PVC W/ PE NOZZLE, PAC
17 1 28-5BV, 28-6BE 1342-92 HOSE, PVC, HALAR NOZZLE, PAC
17 1 26, 27-1AE, 27-4AV 1342-04 HOSE, NITRILE, PE NOZZLE, PAC
17 1 28-5BV, 28-6BE 1342-94 HOSE, NITRILE, HALAR NOZZLE
17 1 26, 27-1AE, 27-4AV 1342-05 HOSE, EPDM W/ PE NOZZLE
17 1 28-5BV, 28-6BE 1342-95 HOSE, EPDM, HALAR NOZZLE, PAC
17 1 26, 27-1AE, 27-4AV 1342-07 HOSE, CLPE W/ PE NOZZLE, PAC
17 1 28-5BV, 28-6BE 1342-97 HOSE, CLPE, HALAR NOZZLE, PAC
18 1 27-1AE, 28-6BE 1204-72 GASKET, COVERPLATE, EPDM, PAC
18 1 27-4AV, 28-5BV 1204-73 GASKET, COVERPLATE, VITON, PAC
18 1 26 1204-90 GASKET, COVERPLATE, CORK, PAC
19 1 26, 27-1AE, 27-4AV 1209-30 COVERPLATE, PE, RED, PAC
19 1 28-5BV, 28-6BE 1209-60 COVERPLATE, RYTON, BLACK, PAC
20 11 26, 27-1AE, 27-4AV 1206-00 SCREW, 1/4-20 X 2, PAC
20 11 28-5BV, 28-6BE 1206-10 SCREW, 1/4-20 X 2 SS, PAC
21 1 26, 27-1AE, 27-4AV 1214-30 ADAPTER, HOSE, PE, 60DEG, PAC
21 1 28-5BV, 28-6BE 1214-90 ADAPTER, HOSE, HALAR 60DEG PAC
22 11 26, 27-1AE, 27-4AV 0721-00 NUT, 1/4-20 HEX, PLATED, PAC
ITEM QTY. MODEL PART # DESCRIPTION
22 11 28-5BV, 28-6BE 0721-10 NUT, 1/4-20 HEX, SS, PAC
23 2 27-1AE 1340-02 VALVE ASM, SMALL, PE EPDM PAC
23 2 26, 27-4AV, 28-5BV 1340-03 VALVE ASM, SMALL PE VITON PAC
23 2 28-6BE 1340-92 VALVE ASM SMALL, HALAR, EPDM
23 2 28-6BE 1340-93 VALVE ASM SMALL, HALAR VITON
24 2 27-1AE 1341-02 VALVE ASM LARGE, PE EPDM, PAC
24 2 26, 27-4AV, 28-5BV 1341-03 VALVE ASM, LARGE PE VITON, PAC
24 2 28-6BE 1341-92 VALVE ASM LARGE, HALAR EPDM
24 2 28-6BE 1341-93 VALVE ASM LARGE, HALAR VITON
26 1 ALL PUMP MODELS 1038-10 SCREEN, FILTER, SS, PAC
28 1 27-1AE 1338-02 PISTON ASM, PE, EPDM, PAC
28 1 26, 27-4AV, 28-5BV 1338-03 PISTON ASM, PE, VITON, PAC
28 1 28-6BE 1338-92 PISTON ASM, HALAR, EPDM, PAC
28 1 28-6BE 1338-93 PISTON ASM, HALAR, VITON, PAC
29 1 27-1AE, 28-6BE 1029-72 O-RING, PISTON, EPDM, PAC
29 1 26, 27-4AV, 28-5BV 1029-73 O-RING, PISTON, VITON, PAC
30 1 26, 27-1AE, 27-4AV 1028-90 RING, PISTON, TEFLON, PAC
30 1 28-5BV, 28-6BE 2024-90 RING, PISTON, TEFLON, THICKER
31 1 ALL PUMP MODELS 1056-10 CLAMP, BUNG ADAPTER, SS, PAC
32 1 26, 27-1AE, 27-4AV 1043-01 ADAPTER, PE, CORK NITRILE, PAC
32 1 28-6BE 1201-92 ADAPTER, HALAR W/ EPDM, PAC
32 1 27-4AV, 28-5BV, 28-6BE 1201-93 ADAPTER, HALAR W/ VITON, PAC
33 1 26, 27-1AE, 27-4AV 1381-90 GASKET, BUNG ADAPTER, PAC
33 1 28-6BE 1822-72 O-RING, BUNG ADAPTER, EPDM PAC
33 1 28-6BE 1822-73 O-RING, BUNG ADAPTER VITON PAC
34 1 26, 27-1AE, 27-4AV 1007-30 TUBE, EXTENSION, 16-1/2 PE PAC
34 1 28-5BV, 28-6BE 1007-90 TUBE, EXTENSION, 16-1/2 TEFLON
35 1 26, 27-1AE, 27-4AV 1055-30 COUPLING, 1” NPT PE, PAC
35 1 28-5BV, 28-6BE 1055-90 COUPLING, 1” NPT HALAR, PAC
36 1 26, 27-1AE, 27-4AV 1045-30 TUBE, SUCTION, 16-1/2 PE, PAC
36 1 26, 27-1AE, 27-4AV 2029-30 TUBE, SUCTION, 10-1/4” PE, PAC
36 1 28-5BV, 28-6BE 1045-90 TUBE, SUCTION, 16-1/2 TEFLON
37 1 26, 27-1AE, 27-4AV 1022-30 HOUSING, PUMP, HALAR, PAC
37 1 28-5BV, 28-6BE 1022-60 HOUSING, PUMP, RYTON, PAC
38 1 26, 27-1AE, 27-4AV 2022-30 PLUG, VENT, PE, PAC
38 1 28-5BV, 28-6BE 2022-90 PLUG, VENT, HALAR, PAC