manuals.online logo
Brands
  1. Home
  2. •
  3. Brands
  4. •
  5. moska
  6. •
  7. Indoor Furnishing
  8. •
  9. moska Marlow Cabinet User manual

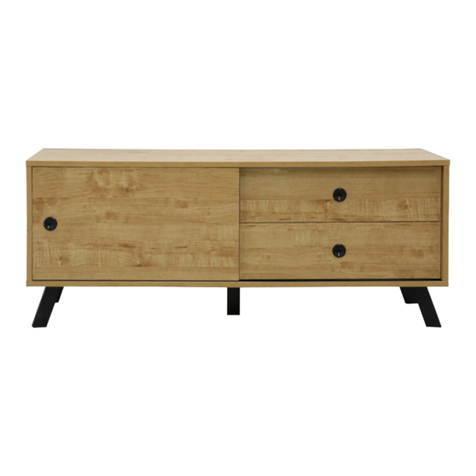
moska Marlow Cabinet User manual

A B C D E F G HJ
K L M N
I
O
Hardware Supplied
dowel
x16
bolt
x23
locking
nut x23
small
screw x54
long
screw x8
slide
rails x3
*We recommend using a Flathead
screwdriver to tighten all locking nuts
100% before first use.
Please clear any loose wood from the
locking nut holes before inserting the nut
to ensure it locks 100%.
screw
x25
stopper
x2
shelf
plug x8
small
screw x8
hinge
x4
long
bolt x4
nut
x4
slide
rails x3
connector
x1
safety
strap x2
Q R S
washer
x2
wall
plug x2
wedge
x4
T
P
r/washer
screw x2
Phillips & Flathead screwdrivers required
WARNING: Any furniture that is not anchored to a wall has the potential to tip
over in certain circumstances, i.e. if a child attempts to climb up on the furniture
or in the event of an earthquake. Accordingly, we recommend that all furniture
is anchored to a wall. We supply a free safety wall anchor with all furniture sold
and we recommend these are used to prevent your product tipping. The fixing
device provided should fit most wall types, but please note that different wall
materials may require different fixing devices from those supplied.
Marlow Cabinet
1
mocka.co.nz | mocka.com.au
Assembly Instructions
Thank you for your purchase.
Please follow the instructions below for correct assembly.
12
Attach 3x slide rails (J) to panel [3] with 9x small screws (C). Attach 3x
slide rails (K) to panel [4] with 9x small screws (C). Tighten with a
screwdriver.
Attach 2x stoppers (O) to panel [1] and secure with 4x small screws (L).
Tighten with a screwdriver. Insert 8x bolts as shown.
4
3
1
J
J
J
C
C
C
C
C
C
C
C
C
C
C
C
C
C
C
C
C
C
K
K
K
A
A
A
A
A
A
A
A
O
O
LL
LL
Marlow Cabinet
2
mocka.co.nz | mocka.com.au
Assembly Instructions
12
Attach 3x slide rails (J) to panel [3] with 9x small screws (C). Attach 3x
slide rails (K) to panel [4] with 9x small screws (C). Tighten with a
screwdriver.
Attach 2x stoppers (O) to panel [1] and secure with 4x small screws (L).
Tighten with a screwdriver. Insert 8x bolts as shown.
4
3
1
J
J
J
C
C
C
C
C
C
C
C
C
C
C
C
C
C
C
C
C
C
K
K
K
A
A
A
A
A
A
A
A
O
O
LL
LL
34
Attach panels [11] to the ends of panels [12] and secure using 4x long
bolts (G) and 4x nuts (H). Tighten with a screwdriver.
Attach panels [2], [3], [4] and [5] to the bolts in panel [1] using 8x dowels
(I) and secure with 8x locking nuts (B). Tighten with a screwdriver.
12
11
11
12
HH
HH
G
G
G
G
5
4
3
2
1
B
B
B
B
B
B
B
H
I
I
I
I
I
I
I
I
Marlow Cabinet
3
mocka.co.nz | mocka.com.au
Assembly Instructions
56
Insert connector (M) to join panels [7]. Slide panels [6] and [7] between the grooves of panels [2], [3], [4] and [5]
to form the back of the unit, as shown.
7
7
M
7
6
5
4
3
2
6
7
Marlow Cabinet
Assembly Instructions
4
mocka.co.nz | mocka.com.au
Jolt Wardrobe
ASSEMBLY INSTRUCTIONS
5
mocka.co.nz | mocka.com.au
56
Insert connector (M) to join panels [7]. Slide panels [6] and [7] between the grooves of panels [2], [3], [4] and [5]
to form the back of the unit, as shown.
7
7
M
7
6
5
4
3
2
6
7
78
Insert 8x dowels (I) into the ends of panels [2], [3], [4] and [5]. Attach
panel [10] and secure with 8x screws (E). Tighten with a screwdriver.
Attach slide rails (J) and (K) to side panels [14] and [15] and secure with
4x small screws (C). Attach panels [14], [15] and [22] to panel [13] with 5x
screws (E). Slide the base panel [16] between the side panels to form the
base. Attach front panel [17] with 5x bolts (A) and 5x locking nuts (B).
10
5
4
3
2
I
I
II
I
I
I
I
14 15
C
CC
C
JK
Drawers x 2
13
14
15
E
E
E
E
E
22
E
E
E
E
E
E
E
E
14
15
13
16
14
15
13
17
16
B
B
BB
A
B
A
A
A
A
Marlow Cabinet
Assembly Instructions
5
mocka.co.nz | mocka.com.au
910
Attach slide rails (J) and (K) to side panels [19] and [20] and secure with
4x small screws (C). Attach panels [19], [20] and [22] to panel [18] with
5x screws (E). Slide the base panel [16] between the side panels to form
the base. Attach front panel [21] with 5x bolts (A) and 5x locking nuts (B).
Attach the leg panels [11] and [12] to the base of the cabinet [10] and
secure with 8x long screws (F). Tighten with a screwdriver. Attach the
adjustable support leg [23] as shown.
10
19 20
C
CC
C
JK
E
E
E
E
Drawer x 1
12
11
12
11
E
18
19
20
22
F
F
F
F
F
FF
F
23
19
20
18
16
19
20
21
16
B
B
BB
A
B
A
A
A
A
Marlow Cabinet
Assembly Instructions
6
mocka.co.nz | mocka.com.au
910
Attach slide rails (J) and (K) to side panels [19] and [20] and secure with
4x small screws (C). Attach panels [19], [20] and [22] to panel [18] with
5x screws (E). Slide the base panel [16] between the side panels to form
the base. Attach front panel [21] with 5x bolts (A) and 5x locking nuts (B).
Attach the leg panels [11] and [12] to the base of the cabinet [10] and
secure with 8x long screws (F). Tighten with a screwdriver. Attach the
adjustable support leg [23] as shown.
10
19 20
C
CC
C
JK
E
E
E
E
Drawer x 1
12
11
12
11
E
18
19
20
22
F
F
F
F
F
FF
F
23
19
20
18
16
19
20
21
16
B
B
BB
A
B
A
A
A
A
11
12
Insert 8x shelf plugs (N) into the end cavities of the cabinet as shown.
Insert the shelf panels [8] and balance on top of the plugs. Now insert
the completed bottom drawer.
Attach door panels [9] to the cabinet using 4x hinges (D) and 24x small
screws (C) as shown. Tighten with a screwdriver. Now insert the
completed top drawers, ensuring they all slide smoothly along the rails.
17
9
8
2
1
8
21
N
NN
N
NN
9
D
C
C
D
C
D
Marlow Cabinet
Assembly Instructions
7
mocka.co.nz | mocka.com.au
13 14
Attach 4x wedges (T) to the corners of the back panels [6] as shown, and
secure with 4x small screws (L). Tighten with a screwdriver.
E
Q
R
S
E
Q
R
S
Wall Strap
T
L
L
T
T
L
L
T
Once assembled lift furniture into place, do not drag. Secure the bottom
of the 2x straps (R) to the cabinet with 2x r/washer screws (P). Attach the
top end of the strap (R) to the wall using 2x wall plugs (Q), 2x washers (S)
and 2x screws (E). Tighten with a screwdriver. You’re done, enjoy!
6
6
7
7
P
P
Marlow Cabinet
Assembly Instructions
8
mocka.co.nz | mocka.com.au

Other moska Indoor Furnishing manuals

moska Hudson User manual

moska

moska Hudson User manual

moska Kirra Entertainment Unit User manual

moska

moska Kirra Entertainment Unit User manual

Popular Indoor Furnishing manuals by other brands

Costway NP10447-2 manual

Costway

Costway NP10447-2 manual

Ameriwood HOME Carver Queen Headboard 5988196COM Instruction booklet

Ameriwood HOME

Ameriwood HOME Carver Queen Headboard 5988196COM Instruction booklet

Walker Edison W58ASP Assembly instructions

Walker Edison

Walker Edison W58ASP Assembly instructions

Rowico KATO 113037 Assembly instruction

Rowico

Rowico KATO 113037 Assembly instruction

SEGUE Sunrise VK-1853 quick start guide

SEGUE

SEGUE Sunrise VK-1853 quick start guide

fantastic furniture Montana manual

fantastic furniture

fantastic furniture Montana manual

URBAN OUTFITTERS WILLOW TALL 82996737 Assembly instructions

URBAN OUTFITTERS

URBAN OUTFITTERS WILLOW TALL 82996737 Assembly instructions

Moebelix MDIS711L Assembling Instruction

Moebelix

Moebelix MDIS711L Assembling Instruction

Sunnydaze Decor MERANTI FRN-893 Assembly instructions

Sunnydaze Decor

Sunnydaze Decor MERANTI FRN-893 Assembly instructions

Southern Enterprises Milo MS904400TX Assembly instructions

Southern Enterprises

Southern Enterprises Milo MS904400TX Assembly instructions

Unfinished Furniture of Wilmington TV-31 Assembly instructions

Unfinished Furniture of Wilmington

Unfinished Furniture of Wilmington TV-31 Assembly instructions

Sauder International Lux 421434 Instruction booklet

Sauder

Sauder International Lux 421434 Instruction booklet

IKEA KNOXHULT 004.879.73 manual

IKEA

IKEA KNOXHULT 004.879.73 manual

nbf Signature Series operating instructions

nbf

nbf Signature Series operating instructions

agape Evoluzione EVO E2 Assembly instructions

agape

agape Evoluzione EVO E2 Assembly instructions

Whittier Wood 2386GAC Assembly instructions

Whittier Wood

Whittier Wood 2386GAC Assembly instructions

John Lewis ABACUS 816/00201 manual

John Lewis

John Lewis ABACUS 816/00201 manual

ME MARCKERIC I-5674 Assembly instructions

ME MARCKERIC

ME MARCKERIC I-5674 Assembly instructions

manuals.online logo
manuals.online logoBrands
  • About & Mission
  • Contact us
  • Privacy Policy
  • Terms and Conditions

Copyright 2025 Manuals.Online. All Rights Reserved.