Mothers choice flair II User manual

motherschoice.com.au
follow us on
Illustrations and designs may vary.
MONTHS
6YEARS
8
flair II
convertible
booster
IMPORTANT: KEEP THIS BOOKLET IN THE
PLACE PROVIDED ON THE CHILD RESTRAINT.
6
m
t
o
6
-
8
y
a
p
p
r
o
x
.
*
TO

2
3
Mother’s Choice | Flair II
convertible car seat preparing vehicle for your seat
quick start guide Harnessed mode:
6 months to 4 years approximately
Front of vehicle
BEHIND
SEAT
CLICK
LOOSEN TOP TETHER
PUSH
DOWN

2
3
Mother’s Choice | Flair II
convertible car seat preparing vehicle for your seat
quick start guide Harnessed mode:
6 months to 4 years approximately
Front of vehicle
REMOVE
SLACK
ATTATCH TOP TETHER
CORRECT USE INCORRECT USE
For detailed step by step installation instructions, please refer to page 23.

4
5
Mother’s Choice | Flair II
4
convertible car seat preparing vehicle for your seat
quick start guide Transitioning to Booster mode:
Removing harness
ROLL
For detailed step by step installation instructions, please refer to page 25.
PULL COVER OVER
TUCK INTO TRIM
BOOSTER MODE
LIFT
FLAP
ROLL
FOLD

4
5
Mother’s Choice | Flair II
5
convertible car seat preparing vehicle for your seat
quick start guide Booster mode:
4 years to 8 years approximately
For detailed step by step installation instructions, please refer to page 29.
ATTATCH
TOP
TETHER
PUSH
DOWN
CLICK
Front of vehicle
LOOSEN TOP TETHER
CORRECT USE INCORRECT USE

6
7
Mother’s Choice | Flair II
Quick start guide
Before you start
Warnings
preparing seat and vehicle
Next seat for your child
Harnessed shoulder height
markers
Components list for harnessed use
Anchor tting locations
Anchor tting installation
Forward-facing vehicle position
seat operation and adjustment
Adjusting top tether strap
Adjusting harness and seat conguration
Loosening and fastening harness straps
Adjusting the headrest, recline and cup holders
Buckle fastening and operation
installation
Forward-facing harness installation
Removing the harness for booster use
Booster shoulder height markers
Components list for booster use
Correct positioning of booster seat
Securing child and booster seat to vehicle
care and maintenance
Buckle maintenance
Fabric cleaning and care instructions
Removing and tting accessories
Hardware cleaning and care instructions
contacts
Warranty
Customer service
2-5
7
8-9
10
11
12
13
14-16
17
18
19
20
21
22
23-24
25
26
27
28
29
30-31
32
33
34
35
36
contents

6
7
Mother’s Choice | Flair II
Thank you for purchasing this child seat. This product is
suitable for newborns to children approximately 4 years old.
We welcome you as a valued customer, and trust that your
child will enjoy many years of comfort and safety.
No child restraint can guarantee absolute protection from a
crash. However proper use of this restraint may reduce the
risk of injury or death!
before you start:
motherschoice.com.au
follow us on
Call our Customer Service Team: 1300 809 526
Monday to Friday (8:30am - 5:00pm AEST)
www.motherschoice.com.au mother’s choice
need assistance?
2-5
7
8-9
10
11
12
13
14-16
17
18
19
20
21
22
23-24
25
26
27
28
29
30-31
32
33
34
35
36

8
9
Mother’s Choice | Flair II
8
IMPORTANT: RETAIN FOR FUTURE REFERENCE
THESE INSTRUCTIONS DETAIL THE SAFE USE, FITMENT AND MAINTENANCE
OF THE SEAT.
PLEASE READ THESE INSTRUCTIONS CAREFULLY AND ENSURE THAT THEY
ARE FOLLOWED AT ALL TIMES.
NO SAFETY SEAT CAN GUARANTEE PROTECTION FROM INJURY HOWEVER,
PROPER USE OF THIS SEAT REDUCES THE RISK OF SERIOUS INJURY OR
DEATH TO YOUR CHILD.
THIS RESTRAINT MUST BE ATTACHED TO A CHILD RESTRAINT UPPER
ANCHORAGE POINT IN THE CAR. REFER TO CAR OWNER’S HANDBOOK FOR
LOCATION OF UPPER ANCHORAGE POINTS. REFER TO A CHILD RESTRAINT
FITTING STATION IF NO UPPER ANCHORAGE POINTS ARE IN THE MOTOR
CAR.
Follow the manufacturer’s instructions at all times.
• To be used in a forward-facing position with built-in harness by a child whose
shoulders are above the lower shoulder height marker (approximately 6 months of
age) until their shoulders reach the middle shoulder height marker (approximately
4 years of age). Then to be used with a lap-sash seatbelt until the child’s shoulders
reach the upper shoulder height marker (approximately 6 to 8 years of age).
• Continue to use this child restraint until the child reaches this limit. Children are
safest in a booster seat until their shoulders reach the upper shoulder height
marker of the booster seat.
• Do not use this child restraint until child’s shoulders are above the lower shoulder
height marker.
• THIS RESTRAINT MUST BE USED IN CARS WITH FORWARD-FACING SEATS
WITH A LAP-SASH SEATBELT. THIS BOOSTER SEAT IS NOT SUITABLE FOR
USE WITH A CHILD HARNESS.
• If the knees do not bend in front of the vehicle seat cushion continue to use a
Please read and follow all of the instructions outlined in this manual for maximum
protection.
If you have any questions regarding the installation or use of this child restraint in
Australia or New Zealand, please contact our customer service numbers provided.
An alternative option is to also contact any registered child tting station authorised
by your local transport authority.
No child restraint can guarantee absolute protection from a crash. However proper
use of this restraint may reduce the risk of injury or death.
before you start...
WARNINGS

8
9
Mother’s Choice | Flair II
9
booster seat.
• Just using a seatbelt is not recommended for children that have outgrown this
seat. Use a larger booster seat.
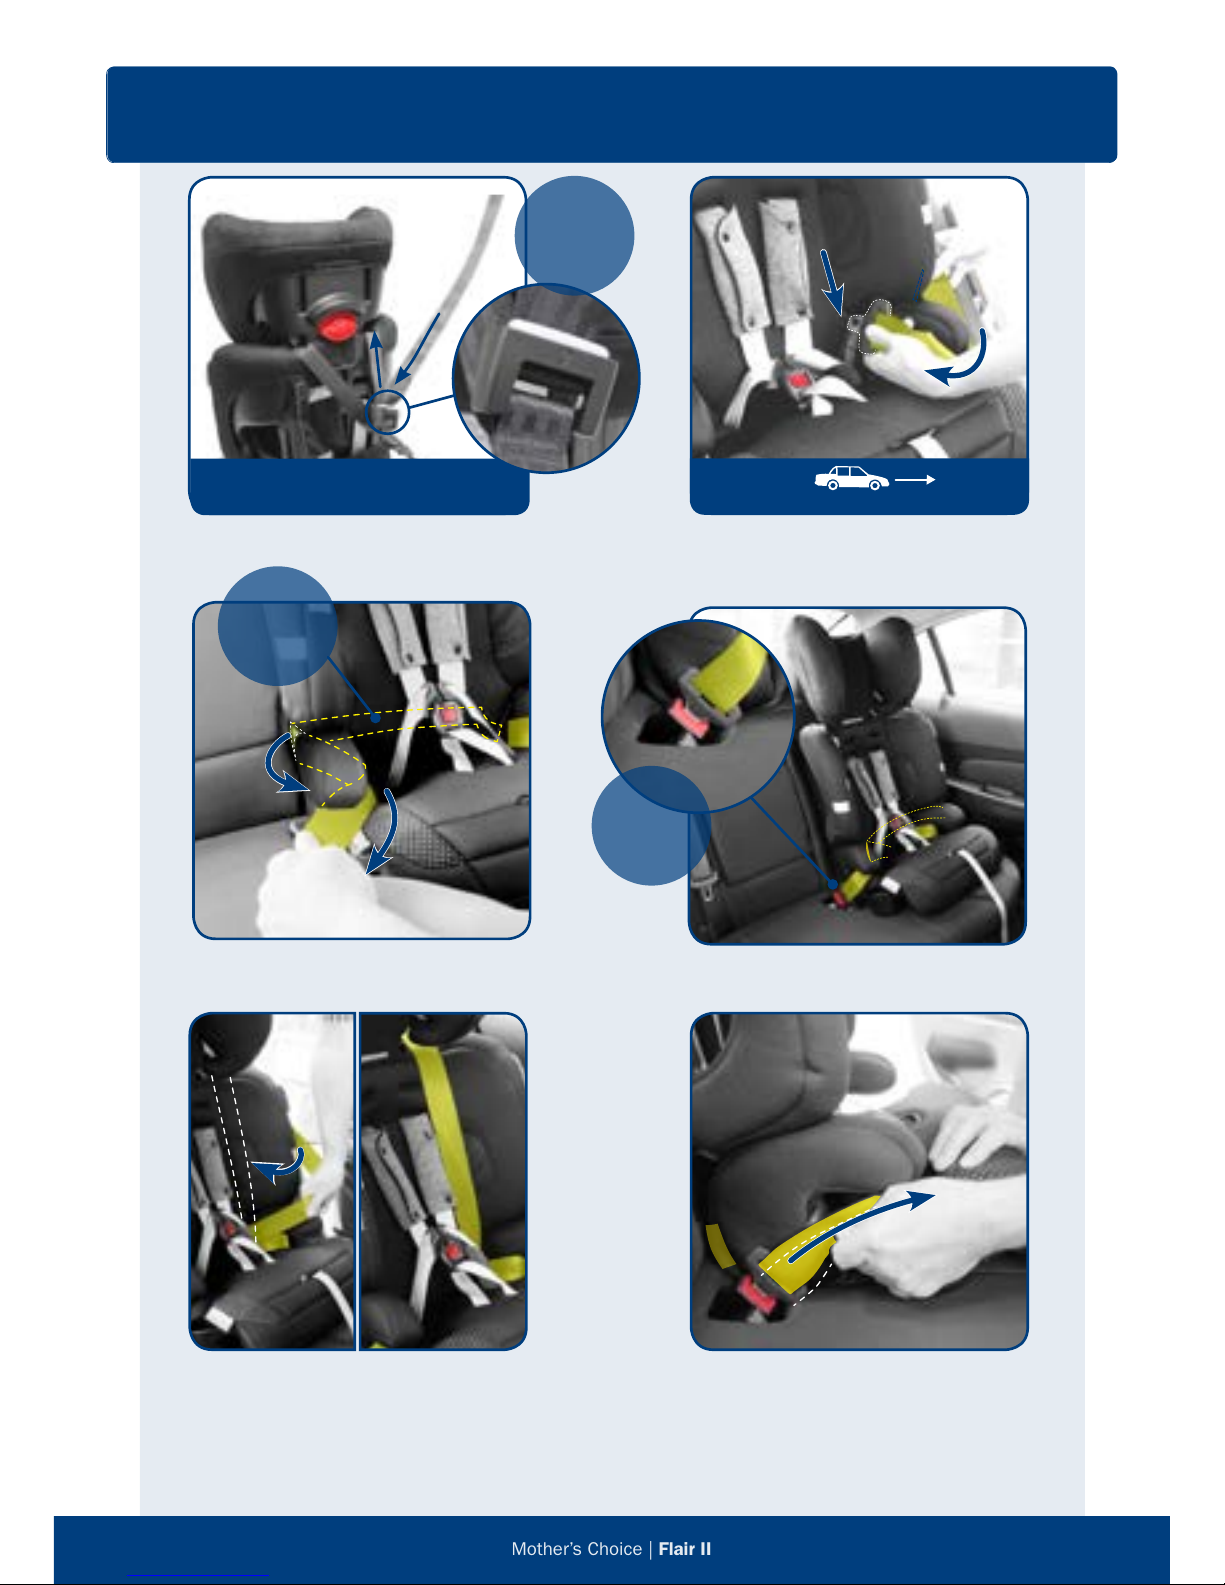
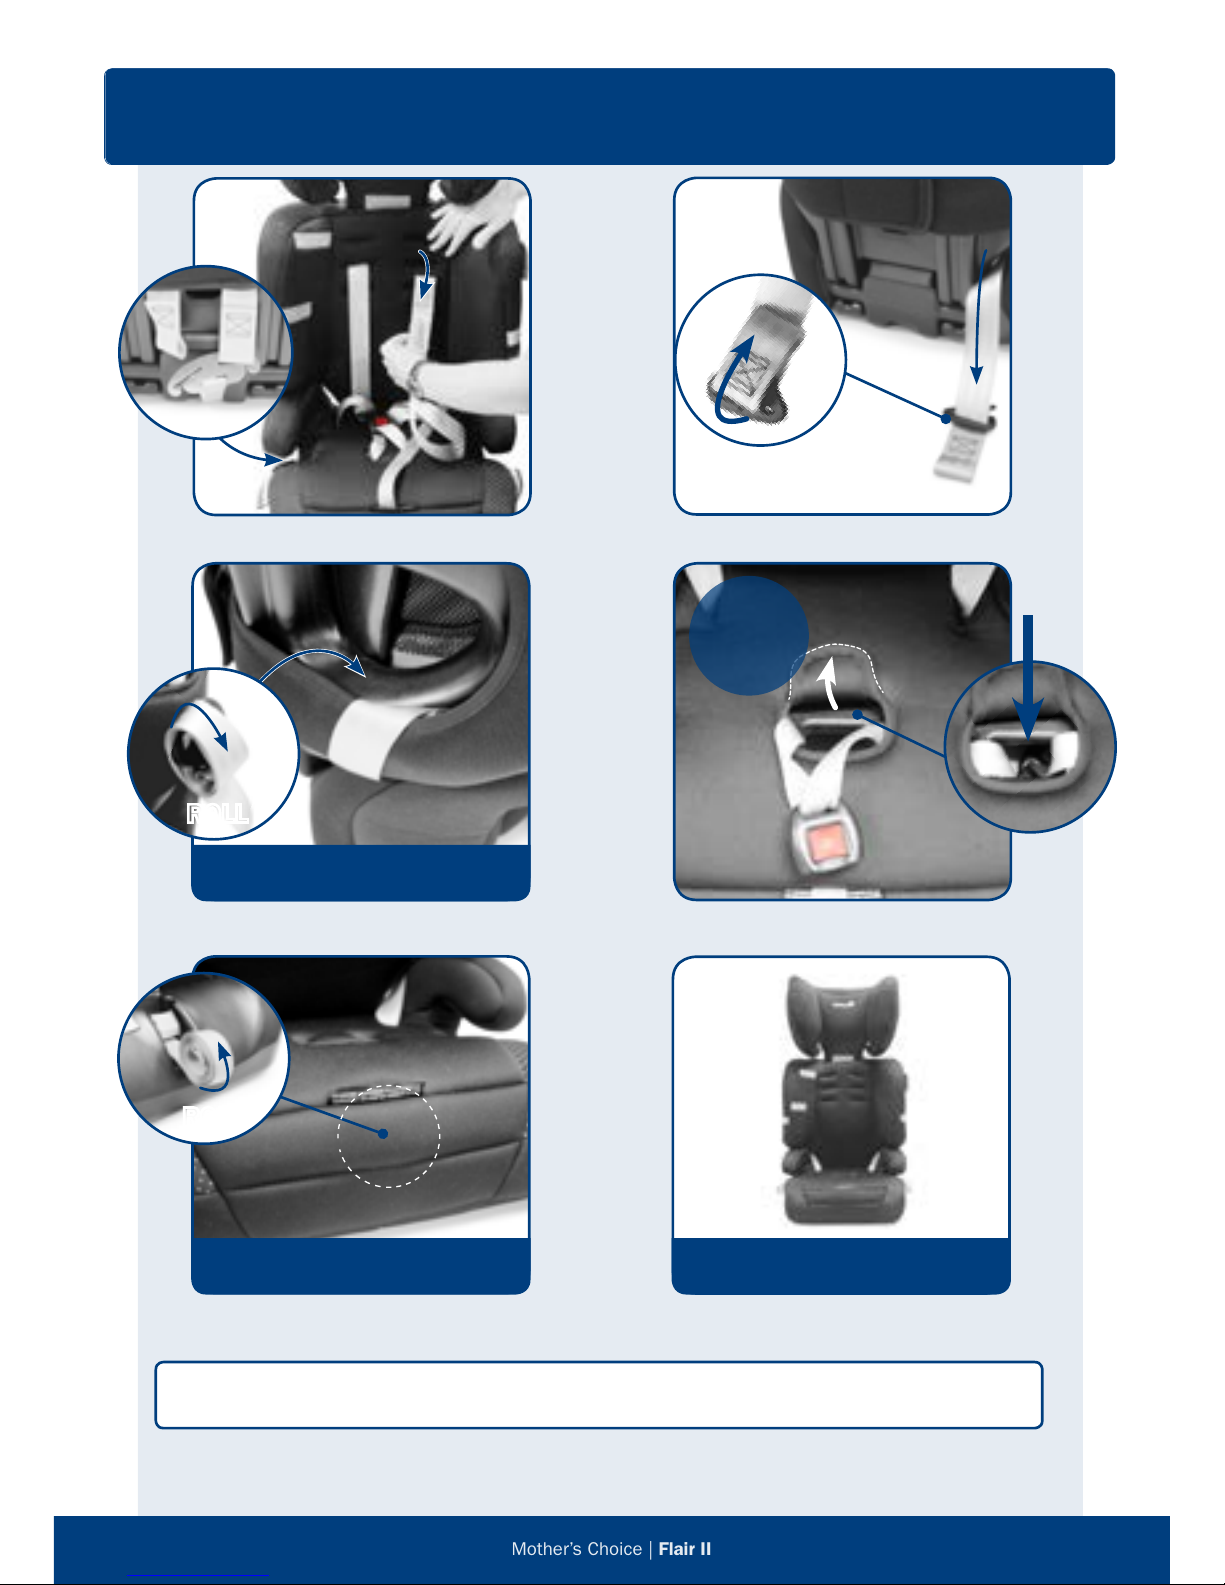
• Use the restraint exactly as shown in the instructions.
• Supervision of children is needed because they may be able to undo the buckles.
• DO NOT LEAVE CHILDREN UNATTENDED IN THE CAR.
• Do not alter or modify this restraint.
• Repairs must only be done by the manufacturers or agent.
• Do not allow the restraint to come into contact with polishes, oils, bleach and other
chemicals.
• Destroy the restraint if it has been in a severe crash, even if no damage is visible.
• DO NOT USE THIS RESTRAINT WITHOUT THE COVER.
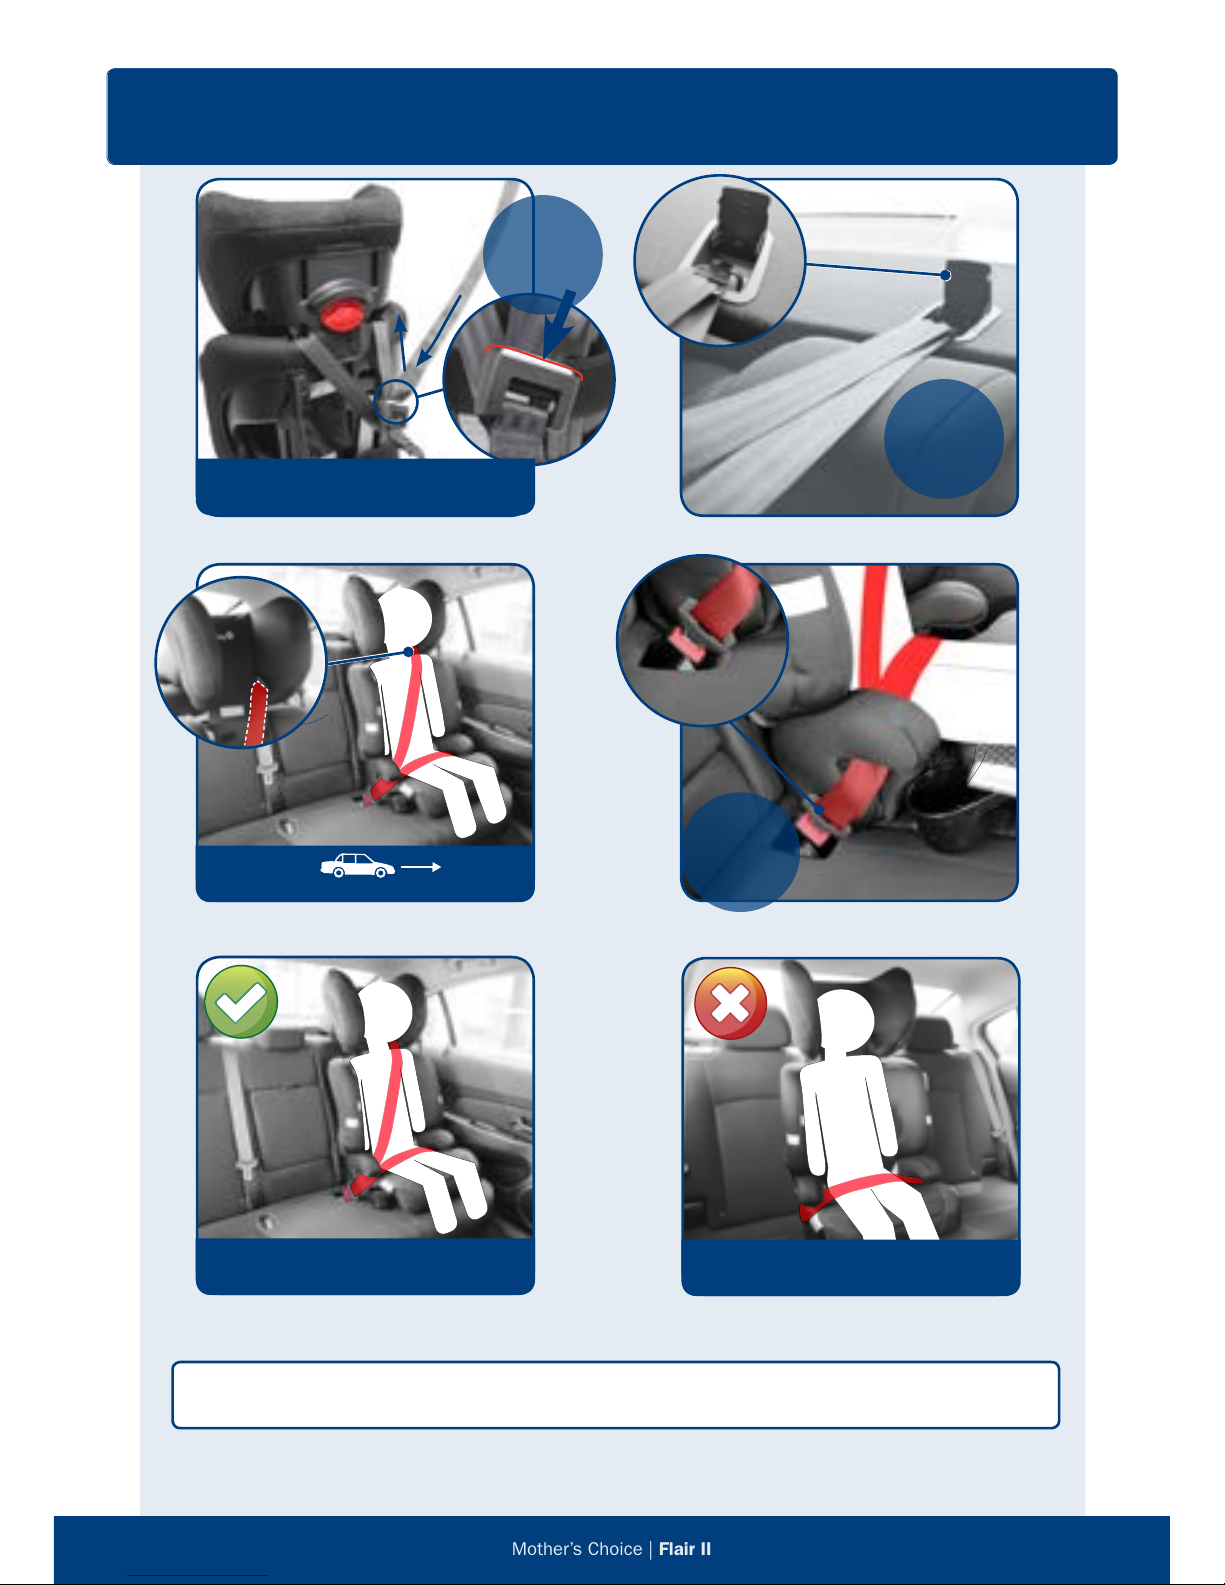
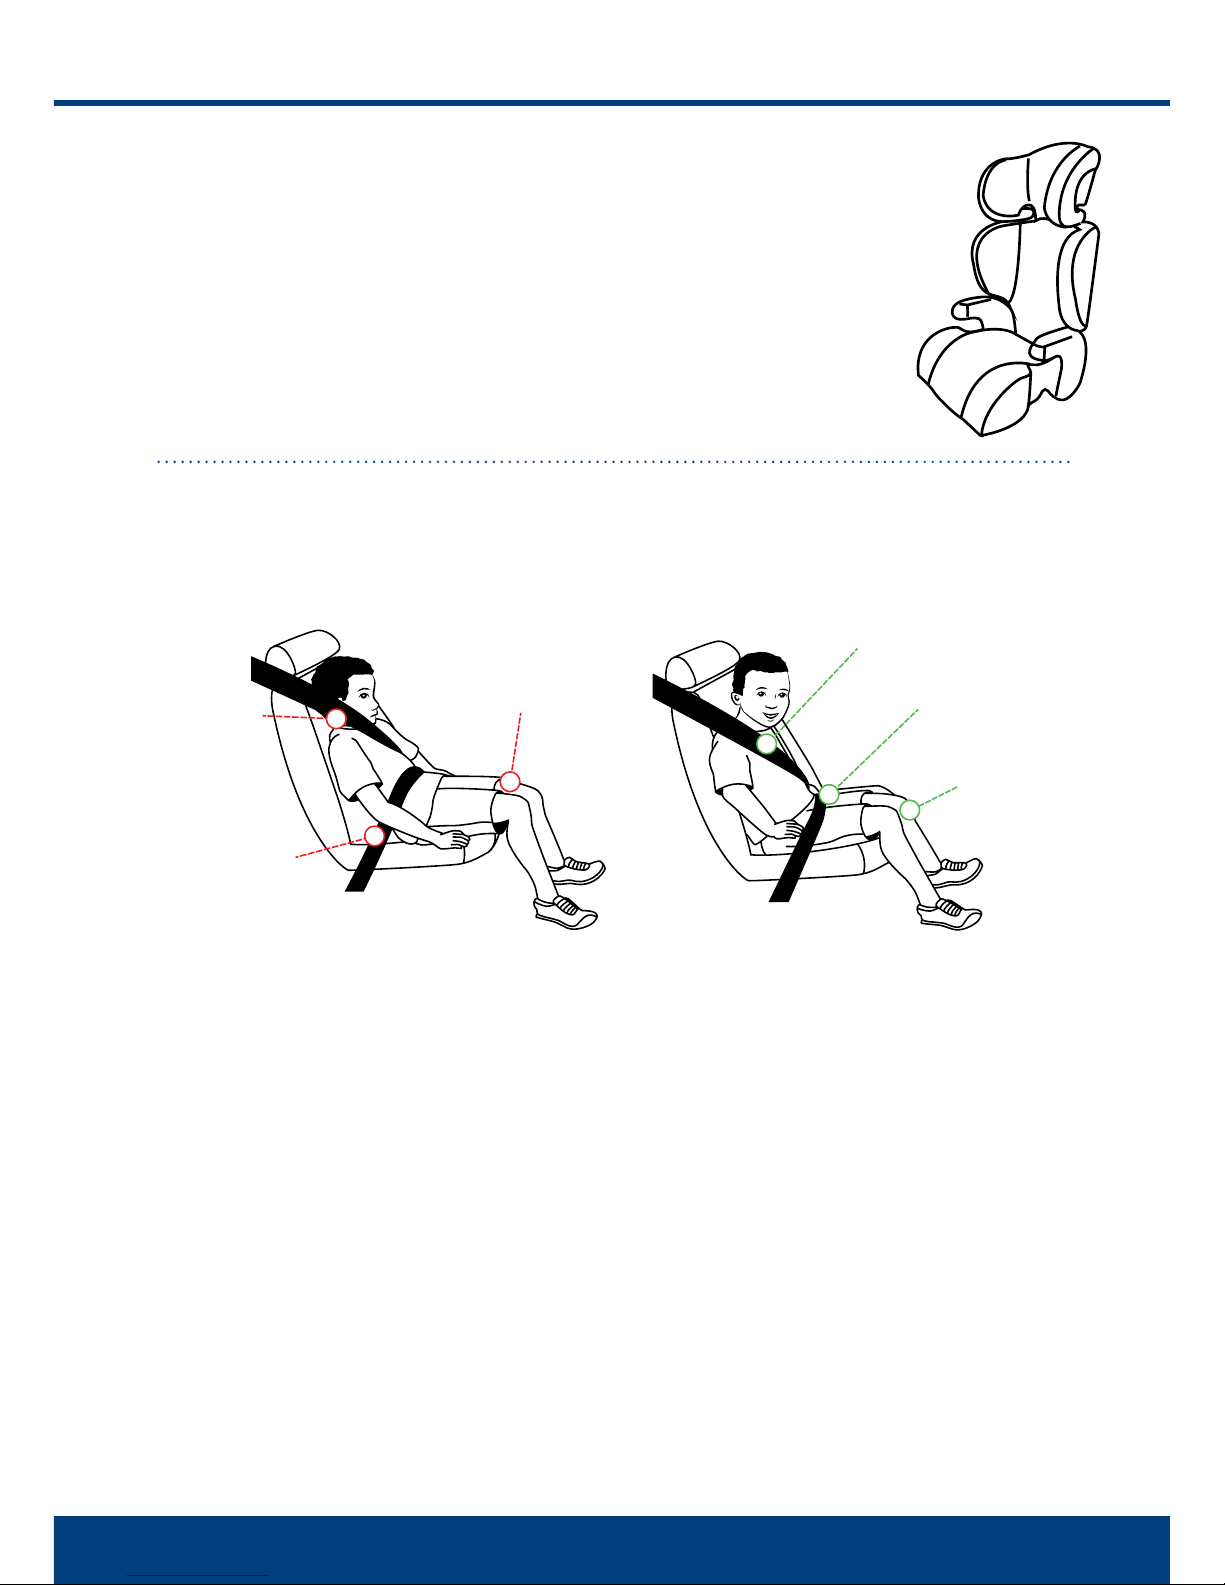
• DO NOT USE WITH JUST A LAP BELT. You must use with a lap-sash seatbelt.
• The lap part of the seatbelt must be rmly across the thighs and the sash belt tted
diagonally across the chest and on the shoulder.
• Fit the restraint rmly to the car seat.
• Fit the harness rmly to the child.
• A loose restraint or harness is dangerous.
• Always secure the loose end of the top tether strap. Do not use the child restraint
where this strap may fall into a split in the seat back or o the side of the seat.
• ALWAYS ATTACH HOOK AND REMOVE SLACK.
• Seatbelt extenders are not recommended to be used if the seatbelt is not long
enough to secure the child restraint. If seatbelts are too short then advice should
be sought from a child restraint tter and their recommendation be considered
before using a seatbelt extender.
• This child restraint is not approved for use with any connectors that connect to the
car’s ISOFIX low anchorages.
• The use of child restraints in the front seat may be restricted for children of specic
ages by local legislation. Please check with your local legislation regarding any
restriction for child restraint.
• Care and attention should always be given to ventilation and shading of the
occupant.
• Use of aftermarket accessories (i.e. items not provided in the box with the child
restraint), can reduce the safety provided by child restraint and may cause injury
or death. For approved aftermarket accessories please refer to page 13.
• Ensure the belt webbing is not twisted.
• TO BE USED WITH A LAP-SASH SEATBELT IN THE FRONT/BACK
OF MOST CARS WITH FORWARD FACING SEATS.
WARNINGS

10
11
Mother’s Choice | Flair II
If your child is transitioning out of a booster, try this simple three point test. You
may nd that your child is not yet ready to use an adult seatbelt without the booster.
1. Does the sash part of the seatbelt sit on the middle of the shoulder and
not touch the neck or face?
2. Does the lap part of the seatbelt sit low down on the hips and not on the
abdomen?
3. When you sit the child on the seat with their bottom all the way back, are
their thighs long enough for their knees to bend allowing the legs to hang
over the front of the seat?
If you answered “no” to any of these questions, your child needs to be in a booster
seat to make both the sash and the lap part of the seatbelt t right to ensure
maximum crash protection.
INCORRECT CORRECT
1
2
3
1
2
3
1
2
3
1
2
3
Sash part across
neck and face
and not shoulder
Lap belt across
stomach and not
low on hips
Legs are not long
enough so child is
slumping in seat
Sash on shoulder
and not on neck
or face
Lap belt low
across hips and
not stomach
Legs long enough
to bend at knees
- no slumping
3 point test:
When your child has outgrown the seat, you can either use:
A booster seat suitable for children up to 8-10 years of age until
their shoulders reach the upper height marker of the booster seat.
NOTE: This illustration is representative only.
Or, follow the steps below to see if your child is ready to use
a vehicle seat belt.
PREPARING SEAT AND VEHICLE
The Next Seat for Your Child
information obtained from www.raa.com.au

10
11
Mother’s Choice | Flair II
Marker A
The child’s shoulders must be in-line
or above this marker. If the child’s
shoulders are below then the child
should remain in their previous child
restraint.
Marker B
Convert to Booster Mode when the
child’s shoulders reach this middle
height marker. If the child’s shoulders
are below, then continue to use the
harness.
MARKER A: YOUNG TODDLER Lower Shoulder Height Marker
MARKER B: OLDER CHILD Middle Shoulder Height Marker
The child restraint is unsuitable for the occupant when the shoulders are below the
lower marker (Marker A) or above the upper marker (Marker C, refer to page 26).
The child needs to be moved into the next form of restraint when they reach the
top shoulder height marker. For more information, refer to page 10.
PREPARING SEAT AND VEHICLE
Shoulder Height Markers for Harnessed Use
IMPORTANT: FOLLOW THIS ADVICE

12
13
Mother’s Choice | Flair II
1. Adjustable Headrest
2. Shoulder Height Markers
3. Harness Slots
4. Belt Mates (x2)
5. Harness
6. Buckle
7. Removable Insert
8. Harness Release Lever
(under trim)
9. Forward-Facing Belt Path
Markers
10.Cup Holder (both sides)
11. Adjuster Strap
16
17
3
5
8
11
4
14
15
6
7
9
10
13
2
1
12
12.Headrest Lever
13.Top Tether Strap
14.Top Tether Adjuster
15. Top Tether / Instruction
Manual Storage Pocket
16.Top Tether Hook
17.Anchor Fitting
18.Forward-Facing Belt Path
Markers
19.Splitter Plate
Forward-Facing Belt Path Markers
19
18
PREPARING SEAT AND VEHICLE
Components List for Harnessed Use

12
13
Mother’s Choice | Flair II
PREPARING SEAT AND VEHICLE
Anchor Fitting Locations
• The anchor point can be found in different locations in different cars. The illustration
above shows possible locations of anchor points. Sometimes it is on the parcel shelf
in sedans, and on the oor area in station wagons, vans and hatchbacks. Make sure
that you do not confuse the luggage hook in the back of a station wagon with anchor
points. Refer to your owner’s manual.
• An extension strap may be needed for vehicles without a xed parcel shelf. Extension
straps and extra ttings are available from various stores.
• Use of aftermarket accessories (i.e. items not provided in the box with the child
restraint), can reduce the safety provided by the child restraint
and may cause injury or death.
Extension straps 300mm ref no. 015057
Extension straps 600mm ref no. 015058
Locking clip ref no. 015059

14
15
Mother’s Choice | Flair II
Child restraints must be used correctly to provide proper protection for your child.
The anchorage system on child restraint must be used in the correct way.
CORRECT
Make sure there is no slack in the top strap and the attachment clip is upright in the
anchorage tting.
INCORRECT
The clip must not lie at on the anchorage tting.
INSTALLATION CORRECT
MAKE SURE THERE
IS NO SLACK IN THE
TOP STRAP AND THE
ATTACHMENT CLIP IS
UPRIGHT IN THE AN-
CHORAGE FITTING.
ANCHORAGES IN
VERTICAL PANEL AT
REAR OF VEHICLE
FLOOR MOUNTED
ANCHORAGES
THE CLIP MUST NOT
LIE FLAT ON THE
ANCHORAGE FITTING.
INCORRECT
gure
2
gure
1
PREPARING SEAT AND VEHICLE
Anchor Installation

14
15
Mother’s Choice | Flair II
Front of vehicle
Vehicle metal
structure
Spacer(s)
(if required)
Attachment bolt
Anchor fitting
Vehicle trim
1
Centre line of
seating position
200mm
min.
FOR SEDANS ONLY:
2
Vehicle metal
structure
Spacer(s)
(if required)
Attachment bolt
Anchor fitting
Vehicle trim
Lock washer
Nut
Reinforcing
washer
3
PREPARING SEAT AND VEHICLE
For cars tted with a child restraint upper
anchorage point:
Locate the upper anchorage point behind the rear
seating position (consult the car owner’s handbook
for the location of the upper anchorage point).
Remove the thread plug from the parcel shelf/oor/
roof and install the attachment bolt as shown in
Figure 1.
CAUTION: DO NOT OVERTIGHTEN THE
ATTACHMENT BOLT. OVERTIGHTENING MAY
FRACTURE OR BREAK BOLT. MAXIMUM TORQUE
IS 20 Nm.
For cars not tted with a child restraint upper
anchorage point:
For sedans only:
Drill a 9mm diameter hole in the parcel shelf on the
centre-line of the seating position as shown in Figure
2. Install the anchor bolt as shown in Figure 3. It is
recommended that this installation be carried out
by a child restraint tting station or licenced motor
mechanic.
For vehicles other than sedans:
In Australia, consult your nearest child restraint
tting station or trafc authority for vehicle
inspection to nd the best, correct position for the
placement of the upper anchorage point, and for the
correct attachment bolt length and use of spacers.
In New Zealand, consult the agent for the vehicle.

16
17
Mother’s Choice | Flair II
CHILD RESTRAINTS MUST NOT BE ATTACHED TO UNSOUND METAL
OR TO WOOD OR SYNTHETIC STRUCTURES. WHEN DRILLING THE
9mm HOLE DO NOT DRILL THROUGH FUEL LINES, FUEL TANKS,
ELECTRICAL WIRING, OR RADIO SPEAKERS. WEBBING STRAPS MUST
BE PROTECTED FROM SHARP CORNERS AND EDGES.
THE ANCHOR FITTING MUST BE USED ONLY AS DESCRIBED ABOVE. IT
MUST NOT BE HOOKED ONTO ANY OTHER OBJECT.
IMPROPER PLACEMENT OF THE SAFETY SEAT INCREASES THE RISK
OF SERIOUS INJURY OR DEATH.
Some seating positions in your vehicle may NOT be safe for this safety seat.
Some vehicles do not have any seating positions that can be used safely with
the seat. If you are not sure where to place the booster seat in your vehicle,
consult your vehicle’s owner’s handbook.
WARNINGS
PREPARING SEAT AND VEHICLE

16
17
Mother’s Choice | Flair II
• IMPROPER PLACEMENT OF THE SAFETY SEAT INCREASES
THE RISK OF SERIOUS INJURY OR DEATH.
WARNING
CORRECT USE
CORRECT USE
INCORRECT USE
Correct Forward-Facing Vehicle Position
PREPARING SEAT AND VEHICLE

18
19
Mother’s Choice | Flair II
18
Always secure the loose end of the top tether strap to prevent it hanging out
of the car or being accessible by the child. Please store excess webbing in
the rear pocket at the rear of the restraint.
CAUTION: CHILDREN CAN BE INJURED OR RESTRAINTS AND TOP TETHER
STRAP DAMAGED BY UNSECURED CARGO IN A COLLISION. SECURE OR
REMOVE HAZARDOUS CARGO BEFORE USING THIS CHILD RESTRAINT.
THIS RESTRAINT IS NOT SUITABLE FOR USE WHERE THE TOP TETHER
STRAP MAY FALL INTO A SPLIT IN THE SEAT BACK OR OFF THE SIDE OF
THE SEAT.
NOTE: Ensure the base of the seat
is not lifted from the car seat.
PULL
TO
TIGHTEN
Adjusting Top Tether Strap
SEAT OPERATION AND ADJUSTMENT
• Press on the adjuster button and pull
strap to loosen.
• Attach top tether strap to vehicle
anchor point.
• Place one knee on child restraint,
push down firmly and tighten top
anchorage strap by pulling free end
of strap.

18
19
Mother’s Choice | Flair II
19
To adjust shoulder strap height:
1. Place thumb or nger through cover opening
and press the harness release lever at the front
of seat.
2. Pull both shoulder straps simultaneously
to loosen.
3. Undo the straps from the splitter plate located on
NOTE: Ensure the harness
heights are of equal length.
Strap can
be next slot
above
Child
shoulders
Strap cannot
be more than
25mm below
the back of the child restraint.
4. Re-thread the shoulder straps
through the desired slots.
Reconnect the straps to the
splitter plate.
You MUST make these adjustments to your child restraint before you install
the seat in the vehicle. Please adjust harness according to the infants
shoulder height marker prior to installation.
LOOSEN
PRESS
CORRECT INCORRECT
The shoulder straps must be in the slots which
are nearest to the child’s shoulders, but not
more than 25 mm below the child’s shoulders.
(6 months to 4 years)
FORWARD-FACING
SEAT OPERATION AND ADJUSTMENT
Adjusting Harness and Seat Congurations
• Always adjust the height of the shoulder straps as the child
WARNING

20
21
Mother’s Choice | Flair II
20
1. Place thumb through cover opening and
press the harness release lever at the front
of seat.
2. Pull both shoulder straps simultaneously
to loosen.
3. Press the red button to release the buckle.
4. Place child into the child restraint.
NOTE: Remove insert if not
required.
PULL TO
TIGHTEN
5. Fasten buckle (see page 22).
6. Pull the adjuster strap at the front of the seat
until the harness straps lay firmly against
the child.
LOOSEN
PUSH
SEAT OPERATION AND ADJUSTMENT
Loosening and Fastening Harness Straps
Table of contents