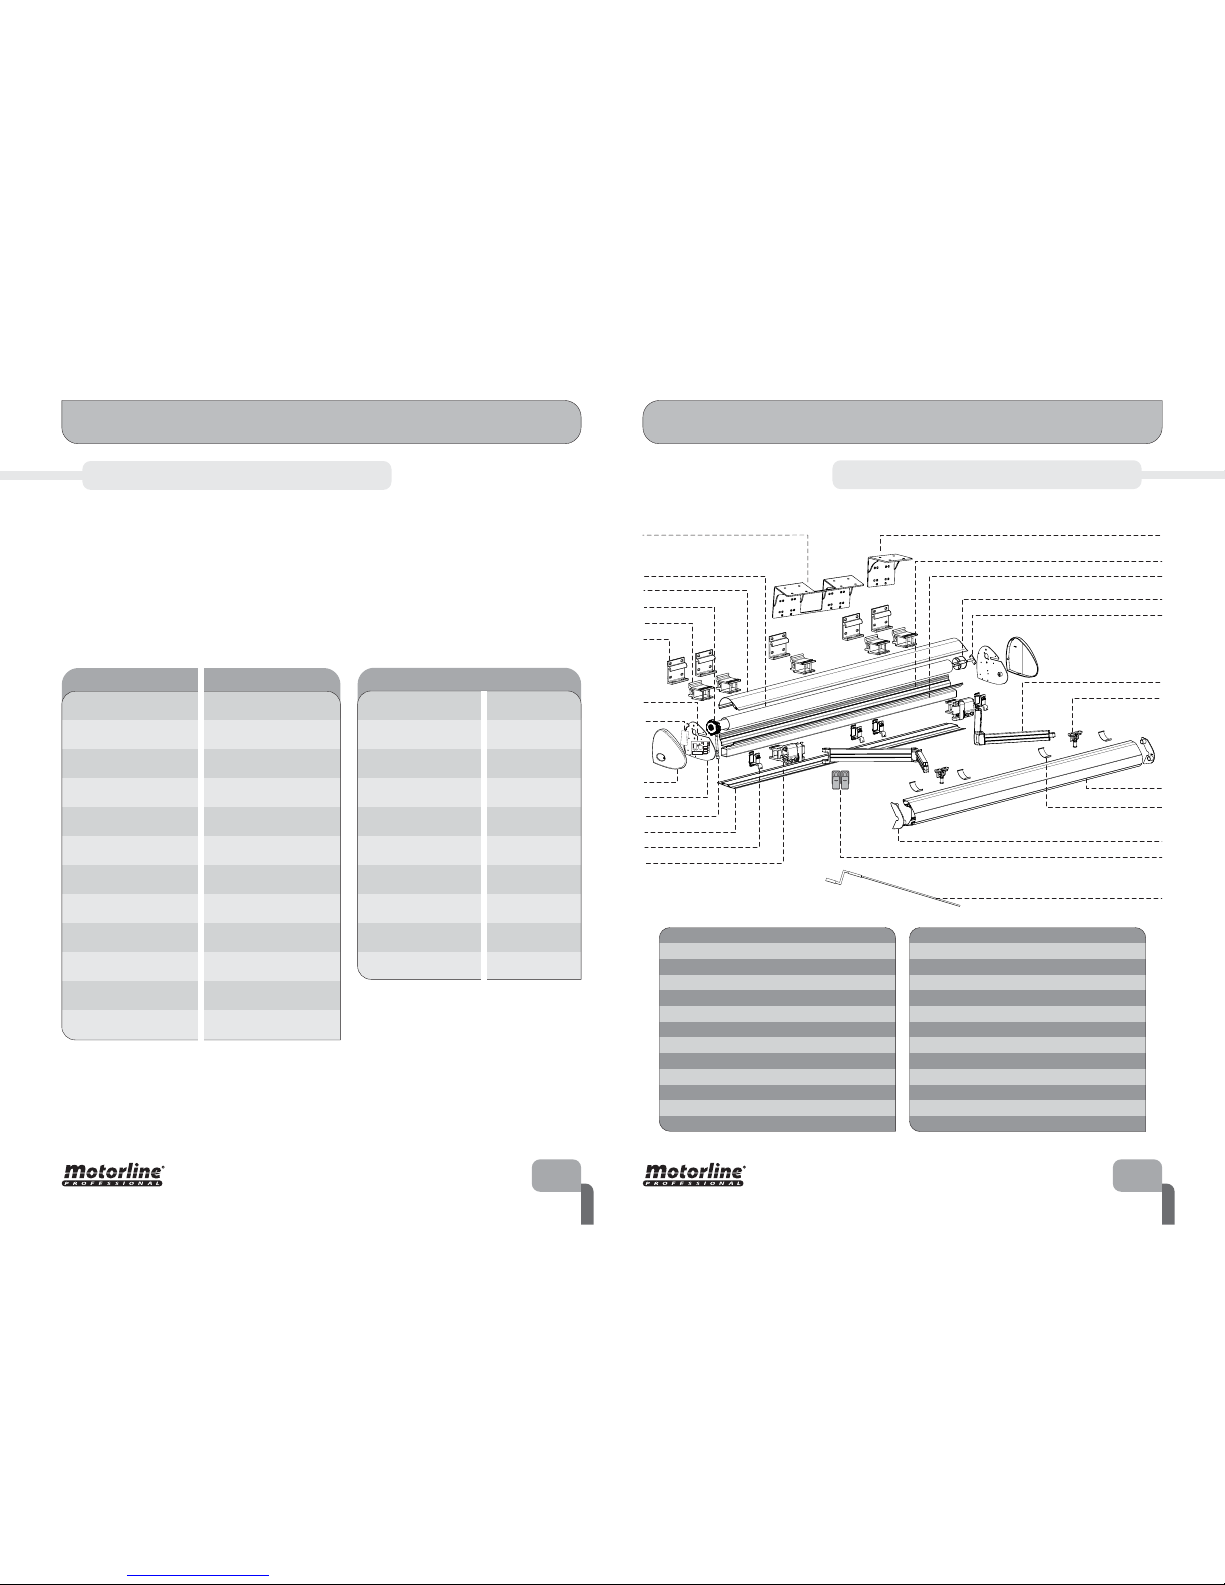
Motorline COFRE 600 Operation and installation manual

COFRE 600
INSTALLER AND USER’S MANUAL
v1.1
REV. 12/2014

STANDARDS TO FOLLOW
INDEX
00. CONTENT 01. SAFETY INSTRUCTIONS
. CONTENT
índex | page .A
. SAFETY INSTRUCTIONS
standards to follow | page .B
. AWNING
technical characteristics | page .A
exploded view |page .B
. INSTALLATION
information preinstallation | page .A
wall installation | page .B
ceiling installation | page .B
tuning of the articulation | page .A
regulation of the arm inclination | page .B
regulation the top | page .A
manual release | page .A
tuning the limit switch | page .B
regulation the fabric | page .A
scheme direct connection of the motor to power | page .A
. CONTROL BOARD
technical specifications | page .B
connections of plate | page .A
centralization of group or general | page .A
functions | page .B
programming | page .A
. TROUBLESHOOTING
instructions for consumers and specialized technical | page .B
. CONNECTIONS TO CONTROL BOARD
scheme of connections control board mc | page .A
ATTENTION:
To ensure the safety of people, it is important that you read all the following
instructions.Incorrect installation or incorrect use of the product can cause physical
injury and material damage.
Keep these instructions in a safe place for future reference.
This product was designed and produced strictly for the use indicated in this
manual. Any other use, not expressly indicated here, could compromise the good condi-
tion/operation of the product and/or be a source of danger.
ELECTROCELOS SA is not responsible for the improper use of the product, or
other use than that for which it was designed.
ELECTROCELOS SA is not responsible if safety standards were not taken into
account when installing the equipment, or for any deformation that may occur to it.
ELECTROCELOS SA is not responsible for the safety and proper operation
when using components not sold by them.
Do not make any modifications to the operator components and / or their
accessories.
Before installation unplug the automatism from the source of power.
Not perform the installation before adverse climatic conditions (wind, rain,
snow).
The installer must inform the client how to handle the product in case of
emergency and provide this manual to user.
Keep remote controls away from children, to prevent the automated system
from being activated involuntarily.
The customer shall not, under any circumstances, attempt to repair or tune
the operator. Must call qualified technician only.
Connect the awning to a 230Vplug with ground wire.
Do not make any modifications to the operator components and / or their
accessories.
01.A 01.B

02. AWNING 02. AWNING
TECHNICAL CHARACTERISTICS
4,7 x 4,0
5,0 x 4,0
5,0 x 3,5
5,5 x 3,5
5,5 x 4,0
6,0 x 3,5
6,0 x 4,0
4,7 x 3,5
7,0 x 3,5
6,5 x 4,0
6,5 x 3,5
TUB 70MT
TUB 70MT
TUB 70MT
TUB 70MT
TUB 70MT
TUB 70MT
TUB 70MT
TUB 70MT
TUB 70MT
TUB 70MT
TUB 70MT
7,0 x 4,0 TUB 70MT
Measure production Motor used
Frequency
Speed
Force
Lift up
Noise
Working time
Diameter
Voltage
Consumption
Weight set
230v AC
50Hz
0.95A
2,60Kgs
45mm
4min.
<43dB
<70Kgs
12RPM
40Nm
Technical specifications of motor TUB 70MT
EXPLODED VIEW
02.A 02.B
Awning COFRE 600 is an awning of large size, fully enclosed. It has articulated arms
double cable, more robust and strong to give added strength and enable greater
projection of the fabric. Optionally, the awning may be provided with an independent
lighting kit that can be applied to the area protected by the awning. Allows a maximum
incline of 20 °. 10
9
8
7
6
1
18
17
15
13
12
11
2
3
4
5
14
16
19
230V
CODEL.
SET
SEL
CN1
CN2
LAMP
FCOM
N
123456789
FUSE FUSE
20
21
22
23
25 26
* *
Not included in the awning.
Top cover
Support casing
Interior protection profile
Square support of awning
Set support arm
Wall bracket
Support casing
Motor TUB MT
Superior profile of the casing
Rolling tube ømm
Inferior profile of the casing
Square tube x
Bushing for tube
Pin of support
Articulated arm
Terminal
Top
Protective Plastic
Top cover
Remote controls MXSSP
Crank
Control board MC
Transformer
Safety crank
Double console
Console
*

INFORMATION PRE-INSTALLATION
03. INSTALLATION 03. INSTALLATION
03.A 03.B
Before starting the installation, check the alignment of the wall.
Should this not be flat to create new support fixing, so that the clamping
points of the awning to the wall are perfectly aligned and level (above
figures). You should also make sure that the metal bushings / bolts are
tightened on a solid, resistant surface so there is no risk of loosening and the
sheets fall. Never open the safe without the installation is completed it may
endanger their physical integrity.
These points are very important for the security and stability awning
reside mainly in its fixation!
WALL INSTALLATION
01 - Place the wall brackets (nº6) in holders of casing (nº7). These must be properly
centered.
Make the measurement with supports for the application on the wall is correct.
Chock
AWNING
WALL WITH CHOCKS NECESSARY FOR INSTALLATION
AWNING
For correct operation of the awning, is obligatory placing the brackets (nº7) identicadas
zones in the illustration (B). Always put one support on each side of the arm (image 2)
and divide the rest in a balanced way. Never change the placement of the arm brackets
(nº4)!
Awning between m/m
Brackets nº
Awning until m
Brackets nº
Awning 6m to
7m: Dimension A
divided by Cand E.
Awning up to
6m: Dimension A
divided by Cand D.
Bracket
Bracket Arm
4
7
7
A
B
==
B
X X
C
E
C
C
C
DD
E
Awning up to m to
m brackets
Awning up to m
brackets
WALL WITHOUT CHOCKS NECESSARY
FOR INSTALLATION

03. INSTALLATION 03. INSTALLATION
04.A 04.B
03 - With the help of a pencil or marker, identify the drilling points for the placing of the
wall brackets (nº6). Make holes with 100mm deep and Ø20mm.
04 - Put metal bushings M12 in the created holes Ø20mm. Position the wall bracket
(nº6) in the holes and apply the screws M12x90 with their respective washers (screws,
washers and bushings not included in the kit).
05 - Make the application of safe holders (nº7) in the wall bracket (nº6).
06 - Place the screws ISO 7380 (M10 x 30) with washers to fix the brackets
nº6 to nº7.
07 - Fit the awning / square tube the safe
(nº 12) on the bracket (nº7). Apply screws
DIN933 M8x75 with washers and tighten
until it is completely safe.
02 - Take the measurement the location where the awning will be applied always on
the attention the leveling of wall brackets (nº6) for fixing the awning.
=
=
300mm
A
CEILING
100mm
=
A
A

03. INSTALLATION 03. INSTALLATION
05.A 05.B
INSTALLATION ON CEILING
Put the wall brackets (nº6) in
holders of the casing (nº7) and
measure (A) with supports.
Transport this measure (A) to the
ceiling where will fix.
From here, follow all the steps
used in the wall installation (page
03.B) using in this case the
brackets (nº25) for the safe fixation
in the area Bof the image 1.
Make fixation on consoles (nº25) using one of the two options identified in the images
20 and 21 (use M12 screws with washers).
08 - Remove the screw and
the cover (nº1) on one side.
OPTION 1
OPTION 2
25
26
26
25
25
Double Console (nº25) to be used in zone B of image 1 (page 03.A)
Console (nº26) to be applied in zone Xof image 1 (page 03.A)
12 - Finally, replace the cover in safe the
tops of together with the respective
screws (image 15).
11 - Raise the profile until it is possible to
tighten the screw as shown in picture
19.
10 - Insert the profile into the slot.
09 - Open the awning with the crank (nº21) in 500mm
and apply the inferior protection profile.
A

03. INSTALLATION
06.A 06.B
01 - With open awning in about 500 mm,
slightly loosen the screws
shown on image 24 (must assist the arm
as shown in the image 27 of 06.B page
until finished tuning).
123 4
02 - To move up and down the joint, turn
the wheel one way or another.
While performing the operations on
the image 25 the articulation will
start the ascent or descent changes.
03. INSTALLATION
ADJUSTMENT THE ARTICULATION REGULATION OF INCLINATION OF ARMS
01 - To start the regulation of the inclination arms, place the awning in full open. Is to
help the arms by hand in the whole process (J).
02 - Adjust screw and until the desired inclination. Rotating clockwise the
awning up , rotating to the left down .
Make this operation on one arm and only
then in the other. Should not loosen the
two arms at the same time.
03 - Tighten the screws and (image
24).
12
3 4
↑↓
1
2
34
RELIEVE 1 ARM EACH TIME
34
↑
↓↑
↓
+
-
IArea to assistance in tuning the joint.
JArea to assistance in the regulation of inclination arms.
II
J

To optimize the awning closure is
necessary to adjust the inclination of
top (nº17),
as a function of arm inclination (nº15).
Put the open awning in about
500mm:
tighten or loosen the screws (F, G),
shown in the image 29, until the
desired tuning is found.
This regulation is only necessary when
the arm inclination is changed.
Never loosen the screws in its totality!
Adjustment of the top badly executed, can cause damage during awning
closing!
One too low or too high positioning of the articulation can cause deterioration
of the canvas or the top, where the awning is closed!
03. INSTALLATION 03. INSTALLATION
07.A 07.B
The awning is prepared for, in case of
power failure or other situation that
prevents the electrical operation of
the equipment, be possible to make
the opening or closing awning
manually by using the crank (nº21).
Place the handle as shown in the
image 30 and turn it to open / close
the awning.
REGULATION THE TOP ADJUSTMENT THE MOTOR LIMIT SWITCH
01 - Loosen the screws and remove the
covers (nº1) on the left and right side.
02 - Loosen completely the 2 screws
identified in the image 32, the left and
right side.
03 - Remove the superior profile of the safe
(nº9).
04 - The tuning can be carried out.
MANUAL RELEASE
+
-
F
G
Crank
Limit switch
A
B
+
-
+
-
Limit switch of
Opening
Controls of the
opening course the
motor
A
Limit switch of
Closing
Controls of the
closing course the
motor
B
B
CLOSING
OPENING

08.B
04. CONTROL BOARD
To detect possible problems in the motor, it will be necessary to conduct tests with
direct connection to a power supply to 230V.
In the scheme shown how it should be done this connection and how to connect
dierent wires.
To make the tests do not need to remove the location of the automatism where it is
installed, because this way you can see if the automatism connected directly to the
current can function properly.
The common must always be connected to the power supply.
To invert the operating direction of the automation just need replace the wire by of
Black to Brown wire the automatism in direct connection to the power supply.
If you detect any abnormalities in the
fabric winding (closing in an entire
side only), make the opening of the
awning and place plastic chocks in
place identified in the image 36 (the
side that does not close).
The chocks should be positioned
between the fabric and the winding
tube.
If necessary, add more shims until the
fabric shows the correct conditions.
REGULATION OF THE FABRIC
SCHEME DIRECT CONNECTION OF THE MOTOR TO POWER
08.A
03. INSTALLATION
Power supply
Motor output
Output courtensy light
Number of radio commands for memorize
Number of sensors Wireless for memorize
Radio receiver
Compatible radio commanders
Working temperature
AC 230V50/60Hz 1000W máx.
230V~ 500W máx.
230V ~ 500W máx.
5 máx.
1 máx.
433,92 MHz
-20÷55°C
12-18 Bit - Rolling Code
Control board MC6, for automation of awnings, with the possibility of connecting the
timer light presence, with operation via remote control and Sensor Wireless (sun / wind /
rain).
TECHNICAL SPECIFICATIONS
TUB MOTOR
Common (Blue) Brown
Black
Ground wire
Power supply
230V The motor will rotate in a particular
direction. To invert the direction of
rotation of the wire to change the
Black to Brown, always keeping Blue.

CN2 CN1
04. CONTROL BOARD
FUNCTIONS
04. CONTROL BOARD
09.A 09.B
Input massa antenna.
Input pole control board antenna.
01 Input connection Earth.
02 Input connection Earth.
03 Input line 230v~(FASE)
04 Input line 230V~(NEUTRO)
05 Output motor Rise / Closing
06 Output motor Common
07 Output motor Descent / Opening
08 Output present light 230V ~ (FASE)
09 Output present light 230V ~ (NEUTRAL)
Centralization via radio through remote control
The centralization of two or more control boards via radio allows simultaneous
movement of ascent or descent of more awnings.
The centralization carried out by entering the same codes keys of a remote control to
all boards or a group that meets at a maximum distance of meters from the point of
command in order to get the general or partial motion more automations. For a radio
centralization that is satisfactory, should carefully choose the location of installation.
The scope is not only connected with the technical characteristics of the device, but
may vary in accordance with the radio conditions of the location.
Operation Present Light with remote control
It is also possible to program a channel of remote control to turn on or off a lamp
Vac at a distance, connected to connectors of the board CN.
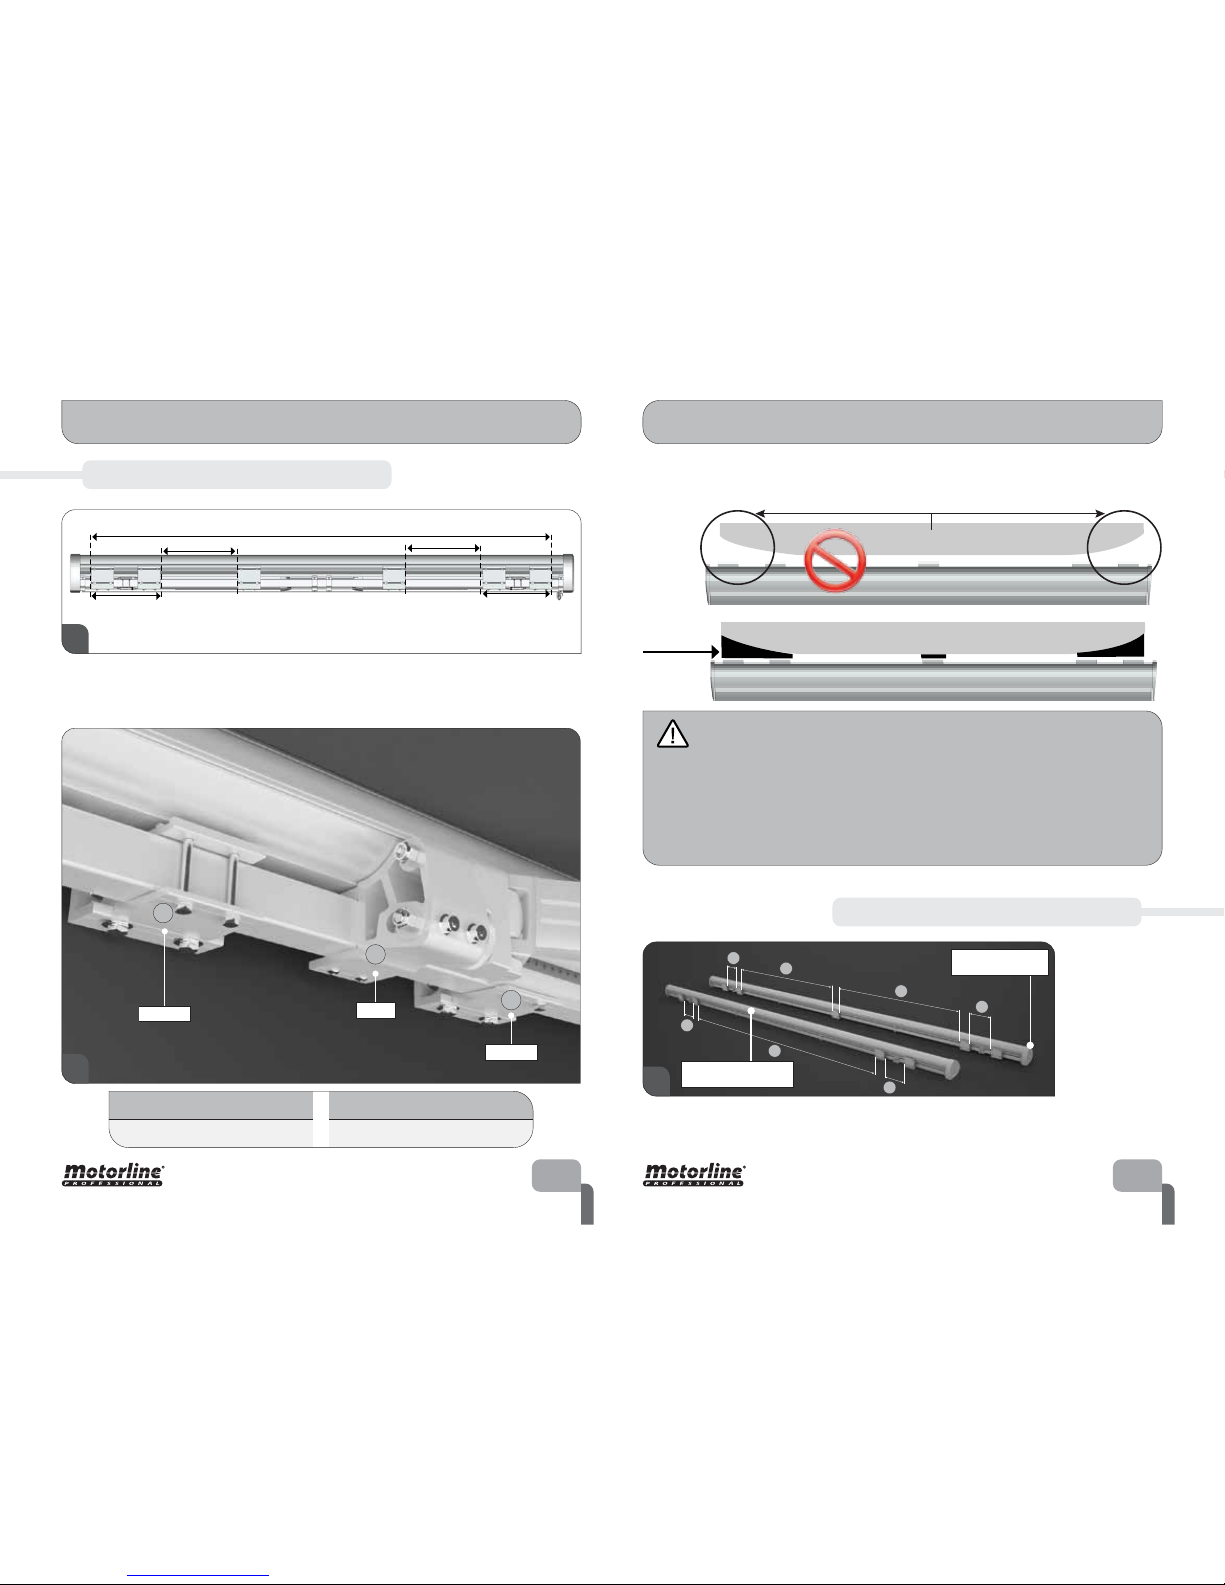
The end of automatic course to phase opening / closing
Is present in the control board an automatic system limit switch to the use of the
awning. Whenever during operation of ascent / closing, is identified an excessive
Sempre que for efectuada uma subida/fecho completa do toldo, a central
apaga a luz de permanência.
current absorption by a one parte of motor due to the possible presence of an obstacle
or full movement opening / closing, the control board to immediately stop this
movement and relieves.
Buttons of programming and indicator LEDs
SE key: selects the type of function to be memorized, the choice is indicated by the flashing
of the LED. Pressing the button more times, it is possible to position yourself in the desired
function. The flashing LED indicates that the selection is active, but the duration is
seconds. At the end of this period, the control board resumes its normal status.
SET button: makes the programming chosen with the SEL button.
LED signaling
LED on: memorized option.
LED off: no memorized option.
Intermittent LED: option selected.
Main menu
CODE Programming the remote control for operation of awning Wind Sensor and Wireless
CODE LAMP Programming the remote control to operate the lamp of awning
T.MOT Programming of time the work / motor
Programming the remote control or keys and Wireless Sensor
The programming codes for transmission of remote control is performed as follows:
press the SEL button and CODE LED will blink. At the same time, send the first code
closing selected with the desired remote control. The LED CODE will flash rapidly. Send
the second code opening to be memorized, the LED CODE will remain on and
programming finish. If the second code is not sent within seconds, the unit exits the
programming phase, selecting operation, leaving only a button on the remote control to
work step by step open / stop / close.
CODE
CODE LAMP.
No code
Ref. LED LED off LED on
Programmed code
No code Code of permanent light
programmed
Time of motor programmedTime engine min
T.MOT
CONNECTIONS OF PLATE
CENTRALIZATION GROUP OR GENERAL

04. CONTROL BOARD
FUNCTIONS
04. CONTROL BOARD
10.A 10.B
Programming sensor wireless sun / wind / rain
If you want to memorize a wireless sensor, follow these steps:
º Power the sensor;
º Open the memory of the control board MC. For this step we have two options.
option Open the control board as follows: position with the SEL button flashing
LED CODE. option With open awning and lighting off, continually press the
channel's opening remote controls memorized for more than seconds until that the
light the awning flashes one time;
After opening the memory control board, has seconds to send the order of sensor
the control board.
º Sensor Position with the SEL button flashing LED CODE, immediately press the
SET button sensor so that it emits a rapid flashing of the LED CODE until that the
light the awning flashes one time;
º With the SEL button sensor must now select the
functions you want to leave assets in sensor the
sun / wind / rain. Press SEL repeatedly until
the desired function LED flashes. With the
LED flashing, press the SET button for more
than second until it is fixed LED lit active
function.
To disable any function, repeat point but
press the SET button at least second and the
LED goes out, leaving the function disabled.
º To test the sensor should follow the next
instructions.
With the SEL button position the LED TEST will begin to
flash this. Press the SET button for more than second and the LED stays on.
TEST RAIN SENSOR Pass a wet finger over the sensor until the awning begins to close
the awning will close during seconds.
TEST WIND SENSOR Turn the propeller. The awning will close for seconds.
TEST SUN SENSOR Turn VR clockwise + and the awning will open for seconds.
Turn the VR anticlockwise and the awning will close for seconds.
If the awning perform the indicated operations successfully, the sensor is programmed
and the test finished.
Return to deactivate the LED TEST that in case of emergency, close the awning in
its entirety. If the LED TEST stay on, the awning only will close during seconds.
When the awning close by order of sensor, we can see what the order is to be sent,
checking that the LED of the sensor is on within the monitor.
For more information on how to adjust the wind speed, sensitivity and illuminance
sensor, read the manual of sensor Wiweather.
To reset the sensor, simultaneously press the SEL and SET buttons of sensor for
seconds. LEDs light on and all the sensor back to the factory programming.
Deactivation of functions sun / rain via remote control
If you want to disable the Sun / Rain functions, begin by opening order and without
allowing the awning to finish the opening by the end of the course, press the remote
control, the awning will stop immediately and turn off the Sun / Rain functions.
However, whenever the awning does not open fully, having been stopped opening with
the remote control, the Sun / Rain functions are disabled and the Wind function
remains active.
For the functions being reactivated, leave the awning open the whole its course.
Maximum number of memorable Wireless Sensors
The control board allows memorize only Sensor Wireless. Programming a new
Wireless Sensor annuls definitely the previously memorized code.
Poor communication Sensor
In case of poor of communication between the Wireless Sensor and control board MC,
after minutes activates automatically ascent / closing the awning. If poor of
communication continues, other remote controls makes that the control board to keep
in a state of security not allowing the opening of the awning when receive opening
order opens a little bit and returns to the point of closed. If the sensor is active with
functions sun, rain and wind, where there sun, minutes after sends the awning
open. When the sun finished minutes later sends the awning collapse. During the
time that the awning is open, in case of rain or wind the awning collects.
Menu Extensive
The control board is supplied by the manufacturer with the possibility of selecting only the
main menu functions.
To enable the functions described in menu , proceed as follows: press the SET button
continuously for seconds and then there is the alternating flashing of the LEDs CODE
LAMP and LED T. MOT, in this mode, you have seconds to select the menu functions
through the use of SEL and SET buttons, after seconds, the control board returns to the
main menu.
CODE LAMP (Programming the remote control for operating the light inside of the awning)
The programming the channels of the remote control is performed as follows: position
with the SEL button flashing LED CODE LAMP. Then send the desired channel of remote
control. LED CODE LAMP remains lit and programming is completed.
T. MOT. (Programming time motor - 4 minutes max.)
The control board is supplied with LED T.MOT. OFF means that the motor time is
minutes. With T.MOT LED. OFF and the remote control programmed we can move the
awning in the sense of opening / closing until make tuning of limit switches. Follow the
signs. Always should be set working time / motor.
The programming the time of the motor must be performed during the closing of
the awning
Programming time of the motor with limit switches only in opening and closing by
effort is performed as follows:
Untune completely the closing limit switches
for the awning close to maximum and stop by
effort.
Programming time of motor is performed
as follows:
With open awning and already with the limit
switch opening limiter set, position the SEL
button to LED T. MOT and then press
continuously the SET button and closing
starts. When the awning close in full and the
motor off, release the SET button, getting
right now defined working time / motor and
the LED T.MOT stays on.
When it is intended that the awning stop on
opening and closing by limit switch, with the
open awning and the two limit switches
regulated opening / closing, with the SEL
button, position the LED T.MOT flash and
press continually SET button until the awning
close and the motor stops by limit switch.
Wait more seconds and release the SET
button. LED T.MOT will illuminate and time of
the motor will be programmed.
FUNCTIONS

Programming sensor wireless sun / wind / rain
If you want to memorize a wireless sensor, follow these steps:
º Power the sensor;
º Open the memory of the control board MC. For this step we have two options.
option Open the control board as follows: position with the SEL button flashing
LED CODE. option With open awning and lighting off, continually press the
channel's opening remote controls memorized for more than seconds until that the
light the awning flashes one time;
After opening the memory control board, has seconds to send the order of sensor
the control board.
º Sensor Position with the SEL button flashing LED CODE, immediately press the
SET button sensor so that it emits a rapid flashing of the LED CODE until that the
light the awning flashes one time;
º With the SEL button sensor must now select the
functions you want to leave assets in sensor the
sun / wind / rain. Press SEL repeatedly until
the desired function LED flashes. With the
LED flashing, press the SET button for more
than second until it is fixed LED lit active
function.
To disable any function, repeat point but
press the SET button at least second and the
LED goes out, leaving the function disabled.
º To test the sensor should follow the next
instructions.
With the SEL button position the LED TEST will begin to
flash this. Press the SET button for more than second and the LED stays on.
04. CONTROL BOARD 04.CONTROL BOARD
11.A 11.B
PROGRAMMING
TEST RAIN SENSOR Pass a wet finger over the sensor until the awning begins to close
the awning will close during seconds.
TEST WIND SENSOR Turn the propeller. The awning will close for seconds.
TEST SUN SENSOR Turn VR clockwise + and the awning will open for seconds.
Turn the VR anticlockwise and the awning will close for seconds.
If the awning perform the indicated operations successfully, the sensor is programmed
and the test finished.
Return to deactivate the LED TEST that in case of emergency, close the awning in
its entirety. If the LED TEST stay on, the awning only will close during seconds.
When the awning close by order of sensor, we can see what the order is to be sent,
checking that the LED of the sensor is on within the monitor.
For more information on how to adjust the wind speed, sensitivity and illuminance
sensor, read the manual of sensor Wiweather.
To reset the sensor, simultaneously press the SEL and SET buttons of sensor for
seconds. LEDs light on and all the sensor back to the factory programming.
Deactivation of functions sun / rain via remote control
If you want to disable the Sun / Rain functions, begin by opening order and without
allowing the awning to finish the opening by the end of the course, press the remote
control, the awning will stop immediately and turn off the Sun / Rain functions.
However, whenever the awning does not open fully, having been stopped opening with
the remote control, the Sun / Rain functions are disabled and the Wind function
remains active.
For the functions being reactivated, leave the awning open the whole its course.
Maximum number of memorable Wireless Sensors
The control board allows memorize only Sensor Wireless. Programming a new
Wireless Sensor annuls definitely the previously memorized code.
Poor communication Sensor
In case of poor of communication between the Wireless Sensor and control board MC,
after minutes activates automatically ascent / closing the awning. If poor of
communication continues, other remote controls makes that the control board to keep
in a state of security not allowing the opening of the awning when receive opening
order opens a little bit and returns to the point of closed. If the sensor is active with
functions sun, rain and wind, where there sun, minutes after sends the awning
open. When the sun finished minutes later sends the awning collapse. During the
time that the awning is open, in case of rain or wind the awning collects.
CODE PGM
Programming a new remote control or Wireless Sensor
The control board allows programming of another remote control, without intervening
directly in the SEL of the control board, performing an operation at a distance.
The programming code of a remote control on distance, is carried out as follows: with the
open awning and the lighting of the awning is off press continuously, for longer than
seconds, the opening of a channel remote control previously memorized. After seconds
the control board goes into programming mode indicated by the flashing of the awning
lighting the lamp. Press the closing channel of the new remote control until the awning
illumination light flashes one time, and then press the release channel until the awning
illumination light flashes time successfully programming.
Programming the remote control, button of illumination the awning
With the illumination on, press continuously the lighting channel of a remote control
previously memorized, for longer than seconds until the awning illumination light flashes
time. Press the channel of new remote control to memorize until the awning illumination
light flashes time successfully programming.
Programming the wireless sensor without access to control board
With open awning and the lighting of the awning off, press continuously the opening
channel remote control that a previously memorired, for longer than seconds until the
awning illumination light flashes time. Position with the SEL button flash to LED CODE
sensor, and then press the sensor SET button to this issue a quick flashing of the LED CODE
until the awning illumination light flashes time successfully programming.
Cancellation Codes
The cancellation of all codes memorized for the functioning of awning remote controls and
Wireless Sensor, proceed as follows: press the SEL button, LED CODE will flash, and then
press the SET button for less than second, LED CODE turns off and the procedure ends.
The cancellation of all codes memorized for the operation of the permanence of light, is
carried out as follows, press the SEL button until the flashing of the LED CODE LAMP, and
next, press the SET button in less than second, LED CODE LAMP switches off and the
procedure ends.
If necessary restore the control board to the initial factory settings, press the SEL and SET
buttons at the same time and the LED display will be lit temporarily, confirming the success
of the operation.
If you have been reached the memory limit codes, repeating the programming operation,
all indicator LEDs will flash quickly, signaling that are not possible other memorizations.
Menu Extensive
The control board is supplied by the manufacturer with the possibility of selecting only the
main menu functions.
To enable the functions described in menu , proceed as follows: press the SET button
continuously for seconds and then there is the alternating flashing of the LEDs CODE
LAMP and LED T. MOT, in this mode, you have seconds to select the menu functions
through the use of SEL and SET buttons, after seconds, the control board returns to the
main menu.
The control board is supplied by the manufacturer with programming for motor RPM.
This function the extensive menu allows be changed. When it comes to awning, to close, if
not use the limit switch of the motor to control board analyzes that the awning closed and
entered into effort and automatic turn off the motor after turning off the motor reverses
direction by thousandths of a second so you do not get to effort the fabric too much..
This inversion time is selected through the extensive menu , in accordance with the motor
installed in the case of a motor or rotations to that the awning not reverse too much
time.
Menu Extensive
The control board is supplied by the manufacturer with the possibility of selecting only the
main menu functions.
To enable the functions described in menu , proceed as follows: press the SET button
continuously for seconds and then there is the alternating flashing of the LEDs CODE
LAMP and LED T. MOT, in this mode, you have seconds to select the menu functions
through the use of SEL and SET buttons, after seconds, the control board returns to the
main menu.
CODE LAMP (Programming the remote control for operating the light inside of the awning)
The programming the channels of the remote control is performed as follows: position
with the SEL button flashing LED CODE LAMP. Then send the desired channel of remote
control. LED CODE LAMP remains lit and programming is completed.
T. MOT. (Programming time motor - 4 minutes max.)
The control board is supplied with LED T.MOT. OFF means that the motor time is
minutes. With T.MOT LED. OFF and the remote control programmed we can move the
awning in the sense of opening / closing until make tuning of limit switches. Follow the
signs. Always should be set working time / motor.
The programming the time of the motor must be performed during the closing of
the awning
Programming time of the motor with limit switches only in opening and closing by
effort is performed as follows:
Untune completely the closing limit switches
for the awning close to maximum and stop by
effort.
Programming time of motor is performed
as follows:
With open awning and already with the limit
switch opening limiter set, position the SEL
button to LED T. MOT and then press
continuously the SET button and closing
starts. When the awning close in full and the
motor off, release the SET button, getting
right now defined working time / motor and
the LED T.MOT stays on.
When it is intended that the awning stop on
opening and closing by limit switch, with the
open awning and the two limit switches
regulated opening / closing, with the SEL
button, position the LED T.MOT flash and
press continually SET button until the awning
close and the motor stops by limit switch.
Wait more seconds and release the SET
button. LED T.MOT will illuminate and time of
the motor will be programmed.
See how to access the motor on the page 07.B
A
B
Limit switches
OPENING
A
B
CLOSING
+
-
+
-
PROGRAMMING
CODE
CODE LAMP.
PGM distance = ON
Ref. LED LED OFF LED ON
MENU Extensive
PGM distance = OFF
Intermittent ON/OFF
Intermittent ON/OFF
T.MOT

12.A 12.B
CODE PGM
Programming a new remote control or Wireless Sensor
The control board allows programming of another remote control, without intervening
directly in the SEL of the control board, performing an operation at a distance.
The programming code of a remote control on distance, is carried out as follows: with the
open awning and the lighting of the awning is off press continuously, for longer than
seconds, the opening of a channel remote control previously memorized. After seconds
the control board goes into programming mode indicated by the flashing of the awning
lighting the lamp. Press the closing channel of the new remote control until the awning
illumination light flashes one time, and then press the release channel until the awning
illumination light flashes time successfully programming.
Programming the remote control, button of illumination the awning
With the illumination on, press continuously the lighting channel of a remote control
previously memorized, for longer than seconds until the awning illumination light flashes
time. Press the channel of new remote control to memorize until the awning illumination
light flashes time successfully programming.
Programming the wireless sensor without access to control board
With open awning and the lighting of the awning off, press continuously the opening
channel remote control that a previously memorired, for longer than seconds until the
awning illumination light flashes time. Position with the SEL button flash to LED CODE
sensor, and then press the sensor SET button to this issue a quick flashing of the LED CODE
until the awning illumination light flashes time successfully programming.
Cancellation Codes
The cancellation of all codes memorized for the functioning of awning remote controls and
Wireless Sensor, proceed as follows: press the SEL button, LED CODE will flash, and then
press the SET button for less than second, LED CODE turns off and the procedure ends.
The cancellation of all codes memorized for the operation of the permanence of light, is
carried out as follows, press the SEL button until the flashing of the LED CODE LAMP, and
next, press the SET button in less than second, LED CODE LAMP switches off and the
procedure ends.
If necessary restore the control board to the initial factory settings, press the SEL and SET
buttons at the same time and the LED display will be lit temporarily, confirming the success
of the operation.
If you have been reached the memory limit codes, repeating the programming operation,
all indicator LEDs will flash quickly, signaling that are not possible other memorizations.
Menu Extensive
The control board is supplied by the manufacturer with the possibility of selecting only the
main menu functions.
To enable the functions described in menu , proceed as follows: press the SET button
continuously for seconds and then there is the alternating flashing of the LEDs CODE
LAMP and LED T. MOT, in this mode, you have seconds to select the menu functions
through the use of SEL and SET buttons, after seconds, the control board returns to the
main menu.
The control board is supplied by the manufacturer with programming for motor RPM.
This function the extensive menu allows be changed. When it comes to awning, to close, if
not use the limit switch of the motor to control board analyzes that the awning closed and
entered into effort and automatic turn off the motor after turning off the motor reverses
direction by thousandths of a second so you do not get to effort the fabric too much..
This inversion time is selected through the extensive menu , in accordance with the motor
installed in the case of a motor or rotations to that the awning not reverse too much
time.
INSTRUCTIONS FOR CONSUMERS AND SPECIALIZED TECHNICAL
04. CONTROL BOARD 05. TROUBLESHOOTING
The awning not
stay leveling after
opening.
The top does not
close on one side.
Natural extension of the fabric.
The awning does
not hold correctly
on the wall.
The screws are not suitable for
the wall structure.
Changes in the awning after
several maneuvers.
Improper adjustment on top or
the articulated arms.
Check the installation dimensions which
are on the pages páginas 03 B and 04 A.
Verify if the quantity of screws is
sucient and are indicated in this
manual (page 04.A).
Check the level of wall brackets (nº 6).
Check the level of the square tube (nº12).
Correct the arms inclination considering the
manual's instructions (06.B page).
Adjust the arms (06.B page).
Adjust the top inclination (page 07A).
Adjust the limit switches of the motor
(page 07.B and 11.A).
Put a plastic shim, on the side where the
fabric suers the changes between the
tube and the fabric. If necessary add more
shims until the fabric to meet with the
normal extension (image 36).
The top does not
close completely.
The awning does
not work and the
motor does not
make noise.
The motor goes into thermal
protection after 2 openings and
1 closure.
Wait 20 minutes.
Check the motor connection.
Check the operation of the motor,
connecting directly into electric current
(image 37).
Problem of protection.The awning does
not work and the
motor does not
make noise.
Problems Causes Solutions
Detuning the top or limit
switch.
CODE
CODE LAMP.
RPM Motor
Ref. LED LED OFF LED ON
MENU Extensive
RPM Motor
Intermittent ON/OFF
Intermittent ON/OFF
T.MOT

230V T.MOT.
CODE L.
CODE
SET
SEL
CN1
CN2
LAMP
NCOM
F
1 2 3 4 5 6 7 8 9
FUSE FUSE
Circuit breaker 16A. not supplied
Alimentation (3x1.5mm²)
Transformer
LEDs
Ground wire
Brown wire
Blue wire
Brown wire
Blue wire
Black wire
Blue wire
Brown wire
Blue wire
Ground wire
Motor TUB
Ground wire
+
LED
Brown wire
06. CONNECTIONS TO CONTROL BOARD
13.A
SCHEME OF CONNECTIONS (CONTROL BOARD MC6)

04. CONTROL BOARD
FUNCTIONS
04. CONTROL BOARD
10.A 10.B
Programming sensor wireless sun / wind / rain
If you want to memorize a wireless sensor, follow these steps:
º Power the sensor;
º Open the memory of the control board MC. For this step we have two options.
option Open the control board as follows: position with the SEL button flashing
LED CODE. option With open awning and lighting off, continually press the
channel's opening remote controls memorized for more than seconds until that the
light the awning flashes one time;
After opening the memory control board, has seconds to send the order of sensor
the control board.
º Sensor Position with the SEL button flashing LED CODE, immediately press the
SET button sensor so that it emits a rapid flashing of the LED CODE until that the
light the awning flashes one time;
º With the SEL button sensor must now select the
functions you want to leave assets in sensor the
sun / wind / rain. Press SEL repeatedly until
the desired function LED flashes. With the
LED flashing, press the SET button for more
than second until it is fixed LED lit active
function.
To disable any function, repeat point but
press the SET button at least second and the
LED goes out, leaving the function disabled.
º To test the sensor should follow the next
instructions.
With the SEL button position the LED TEST will begin to
flash this. Press the SET button for more than second and the LED stays on.
TEST RAIN SENSOR Pass a wet finger over the sensor until the awning begins to close
the awning will close during seconds.
TEST WIND SENSOR Turn the propeller. The awning will close for seconds.
TEST SUN SENSOR Turn VR clockwise + and the awning will open for seconds.
Turn the VR anticlockwise and the awning will close for seconds.
If the awning perform the indicated operations successfully, the sensor is programmed
and the test finished.
Return to deactivate the LED TEST that in case of emergency, close the awning in
its entirety. If the LED TEST stay on, the awning only will close during seconds.
When the awning close by order of sensor, we can see what the order is to be sent,
checking that the LED of the sensor is on within the monitor.
For more information on how to adjust the wind speed, sensitivity and illuminance
sensor, read the manual of sensor Wiweather.
To reset the sensor, simultaneously press the SEL and SET buttons of sensor for
seconds. LEDs light on and all the sensor back to the factory programming.
Deactivation of functions sun / rain via remote control
If you want to disable the Sun / Rain functions, begin by opening order and without
allowing the awning to finish the opening by the end of the course, press the remote
control, the awning will stop immediately and turn off the Sun / Rain functions.
However, whenever the awning does not open fully, having been stopped opening with
the remote control, the Sun / Rain functions are disabled and the Wind function
remains active.
For the functions being reactivated, leave the awning open the whole its course.
Maximum number of memorable Wireless Sensors
The control board allows memorize only Sensor Wireless. Programming a new
Wireless Sensor annuls definitely the previously memorized code.
Poor communication Sensor
In case of poor of communication between the Wireless Sensor and control board MC,
after minutes activates automatically ascent / closing the awning. If poor of
communication continues, other remote controls makes that the control board to keep
in a state of security not allowing the opening of the awning when receive opening
order opens a little bit and returns to the point of closed. If the sensor is active with
functions sun, rain and wind, where there sun, minutes after sends the awning
open. When the sun finished minutes later sends the awning collapse. During the
time that the awning is open, in case of rain or wind the awning collects.
Menu Extensive
The control board is supplied by the manufacturer with the possibility of selecting only the
main menu functions.
To enable the functions described in menu , proceed as follows: press the SET button
continuously for seconds and then there is the alternating flashing of the LEDs CODE
LAMP and LED T. MOT, in this mode, you have seconds to select the menu functions
through the use of SEL and SET buttons, after seconds, the control board returns to the
main menu.
CODE LAMP (Programming the remote control for operating the light inside of the awning)
The programming the channels of the remote control is performed as follows: position
with the SEL button flashing LED CODE LAMP. Then send the desired channel of remote
control. LED CODE LAMP remains lit and programming is completed.
T. MOT. (Programming time motor - 4 minutes max.)
The control board is supplied with LED T.MOT. OFF means that the motor time is
minutes. With T.MOT LED. OFF and the remote control programmed we can move the
awning in the sense of opening / closing until make tuning of limit switches. Follow the
signs. Always should be set working time / motor.
The programming the time of the motor must be performed during the closing of
the awning
Programming time of the motor with limit switches only in opening and closing by
effort is performed as follows:
Untune completely the closing limit switches
for the awning close to maximum and stop by
effort.
Programming time of motor is performed
as follows:
With open awning and already with the limit
switch opening limiter set, position the SEL
button to LED T. MOT and then press
continuously the SET button and closing
starts. When the awning close in full and the
motor off, release the SET button, getting
right now defined working time / motor and
the LED T.MOT stays on.
When it is intended that the awning stop on
opening and closing by limit switch, with the
open awning and the two limit switches
regulated opening / closing, with the SEL
button, position the LED T.MOT flash and
press continually SET button until the awning
close and the motor stops by limit switch.
Wait more seconds and release the SET
button. LED T.MOT will illuminate and time of
the motor will be programmed.
FUNCTIONS
Other manuals for COFRE 600
1
Table of contents
Other Motorline Accessories manuals