Motwane DM6K3 User manual

DIGITAL
MULTIMETER
DM6K3
Trms
1

TABLE OF CONTENTS
1. Welcome & Congratulations 1
2. Safety Instructions 2
3. General Information 5
4. Product at Glance 6
5. Operating Instructions 12
a.Push button over view
6. Making Measurement 14
7. Specifications 21
8 Maintenance 26
9. Warranty 27
10. Service Call Check 25
2

Congratulations on your excellent choice and sound investment in Trms-6000
Count Digital Multimeter Model - DM6K3
Your new Multimeter represents both the latest in engineering development
and the culmination of many years of experience from the leading
manufacturer of Measuring Instruments.
Your new Multimeter is the most efficient and reliable measuring instrument
available today. To assure its dependability spend just a few minutes with this
booklet. Learn about the operation of your multimeter and the small amount of
maintenance it takes to keep it operating at its peak efficiency. With minimal
care, your new Instrument will provide you with comfort – both now and for
years to come.
This Instruction Manual provides specific operating instructions for your
model. Use your Multimeter as instructed in this manual. These instructions
are not meant to cover up the entire possible situation that would arise while
operating this Multimeter. CAUTION AND ALERTNESS must be regularly
practiced when installing, operating and maintaining any appliance.
NEED HELP
Visit the Motwane's Web Site at: http://www.motwane.com
Before you call for service, there are a few things you can do to help us serve
you better.
Read this manual- It contains instructions to help you use and maintain your
Multimeter properly.
If you have received a damaged Multimeter... immediately send it back to the
factory.
If there are any kind of operating problems or some common problems, you
can relax knowing help is only a phone call away. The phone numbers are
provided in this manual.
1. Welcome & Congratulations
1
3

2. SAFETY INSTRUCTIONS
SAFETY INFORMATION
COMMON SYMBOLS
Caution! Risk of danger
Earth (Ground)
Double Insulation
Fuse
AC -Alternating Current
Warning Mark
(Document must be consulted all cases)
Conformity of European
Direct Current
AC /DC Select
Diode
Capacitance
Continuity
IEC 61010-1 CATEGORY IV
CAT IV
42

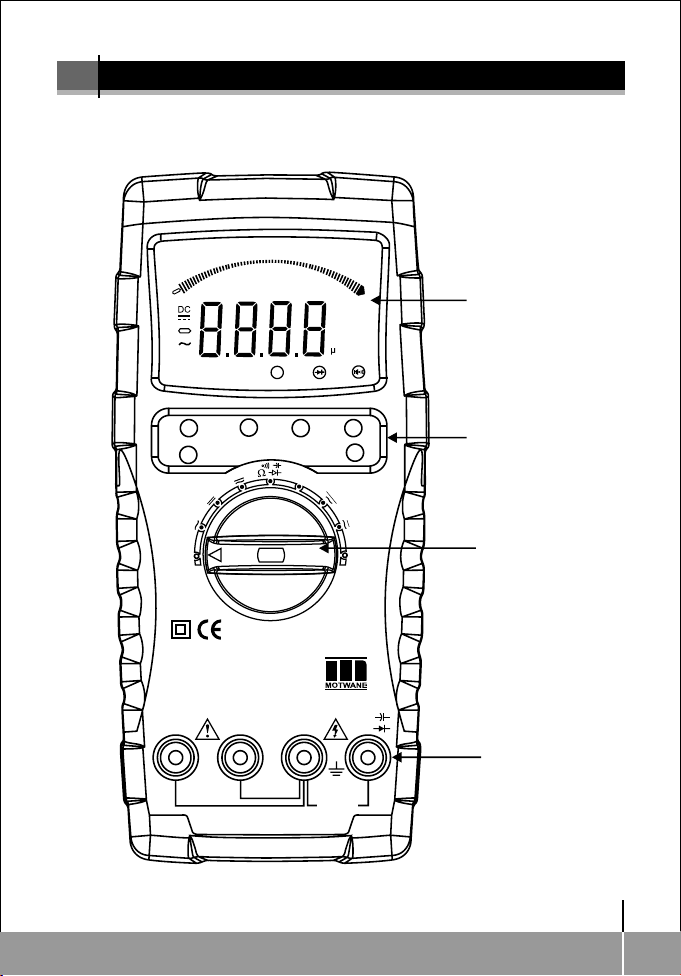
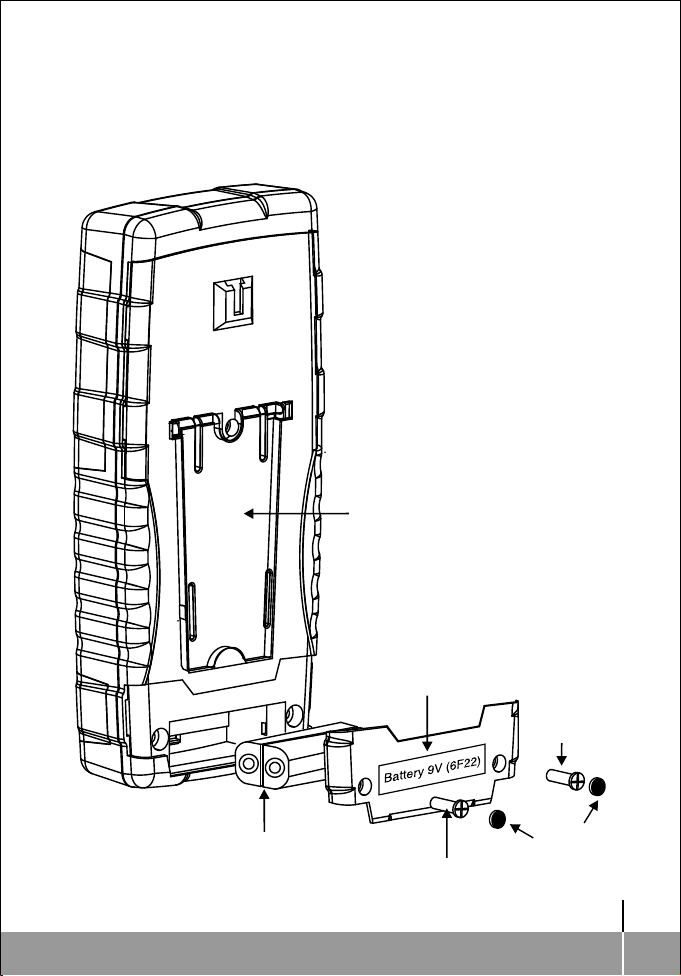
2.1 SAFETY CONSIDERATION
Understand the words DANGER, WARNING, or CAUTION. These words are
used with the safety-alert symbol or
DANGER - Identifies the most serious hazards, which will result in severe
personal injury or death.
WARNING - Signifies hazards that could result in potential damage to the
instrument.
CAUTION - Identifies unsafe practices, which would result in minor personal
injury or product and property damage.
53
THE WARNINGS PROVIDED ARE IN THE INTEREST OF YOUR SAFETY.
ENSURE THAT YOU UNDERSTAND THEM ALL BEFORE INSTALLING OR
USING THE MULTIMETER. PLEASE READ THE INSTRUCTIONS
CAREFULLY BEFORE USING THE MULTIMETER.
Warning
To protect your investment and to eliminate unnecessary service calls,
familiarize yourself with the following facts:
lBefore using the Multimeter, inspect the case. Do not use the Multimeter if
damaged or the case (or part of the case) is removed. Look for cracks or
missing plastic parts. Pay attention to the insulation around the
connectors.
lInspect the test leads for damaged insulation or exposed metal. Check the
test leads for continuity. Replace damaged test leads with identical model
number or electrical specifications before using the Multimeter.
lDo not apply more than the rated voltage, as marked on the Multimeter,
between the terminals or between any terminal and ground.
lPrior to measurement, ensure that the rotary switch is in proper position.
To prevent potential damage to the Multimeter, do not change range or
mode function during measurement.
lWhen the Multimeter is working at an effective voltage over 60V DC, or
30V RMS AC, take special care, for there is danger of electric shock.
lUse the proper terminals, functions, and ranges for your measurements.

64
l
range and reduce the range gradually until a satisfactory reading is
obtained.
lDo not use or store the Multimeter in an environment of high
temperature, humidity, explosive, flammable gas or strong magnetic field.
Do not use the meter if it is wet.
lWhen using the test leads, keep your fingers behind the finger guards.
lDisconnect circuit power and discharge all high-voltage capacitors before
testing resistance, continuity, diodes, current, or capacitance.
lBefore measuring current, check the Multimeters fuses and turn off power
to the circuit before connecting the Multimeter to the circuit.
If the value to be measured is unknown, use the maximum measurement

3.0 GENERAL INFORMATION
3.1 INTRODUCTION
The DM6K3 Multimeter is 6000 count handheld, Trms & battery operated
professional industrial grade multimeter providing high resolution, high
accuracy, measurements of AC voltage & current, DC voltage & Current,
Resistance, Capacitance, Diode, Continuity, Frequency and Duty cycle.
The multimeter is designed by a special purpose ASIC which ensures low
component count assuring a very high reliability. The Multimeter has a
pleasant Blue Backlit LCD with elaborate annunciation.
3.2 FEATURES
l6000 Count LCD display with pleasant blue backlit
lAuto ranging, Trms AC Voltage & Current Measurment.
l15 minutes Auto power off facility provided to save battery life.
l60 position Analog bar graph for trend indication.
lHighly linear Readings
lSelect, Range, Hold/Light, Relative, Min/Max measurement facility.
lCapacitance, Diode and Continuity.
lSelectable Frequency and Duty Cycle measurement.
lPolycarbonate, rugged, Dust proof and fire retardant case for high
temperature endurance.
lCE and IEC 61010-1 CAT IV for enhanced safety in outdoor use.
75

Backlit LCD Display
Keypad for
extended functions
Rotary Switch for
function selection
Measurement
Terminals
4.0 PRODUCT AT GLANCE
4.1 FRONT VIEW
86
Hz
mA
A
OFFOFF
V
V
RANGE
HOLD/LIGHT
SELECT
REL
Digital Multimeter
DM6K3
Trms
FUSED
20A MAX.
FUSED
600mA MAX.
AmA COM VW
Hz
0
10
20
30 40
50
60
APO
MIN AUTO MAX
LO BAT
AC
S1
S2
RS232 REL
0 0
hFE C F
% RPM
MkWHz
6 60 600
DH
mVA
nF
43 2 1
mV
Hz
DUTY
MAX
MIN
CAT IV
1000 VDC
750VAC
MAX.

4.2 REAR VIEW
Stand
Battery Cover
Screw
Battery : 9V (6F22)
97

4.3 EXPLODED VIEW
Friction
Pad
Stand
Screw
Screw
Battery Cover
Battery
9V (6F22)
10 8

1. Low Battery Indicator.
2. 60 Segment Bar graph Display.
3. DC Voltage or DC Current Indicator.
4. Negative Sign for Negative reading of polarity reversed.
5. AC Voltage or AC Current Indicator
6. RS 232 Communication. (This function is not applicable to this model)
7. Seven segment display.
8. REL function Enabled.
9. Data Hold (DH) function Enabled
10. Diode Test function selected.
11. Continuity function Selected.
12. Annunciations
13. Auto Power OFF function Enabled.
14. Max hold function Enabled.
15. Auto Ranging Enabled.
16. Min Hold function Enabled.
11 9
0
10
20
30 40
50
60
APO
MIN AUTO MAX
LO BAT
AC
RS232 REL
0 0
hFE C F
% RPM
MkWHz
6 60 600
DH
mVA
nF
43 2 1
4.4 DISPLAY
1
2
3
4
5
6
78910 11
12
13
14
15
16

Table : Terminal connections for different measuring functions
Rotary Switch Position Input Terminal
4.5 INPUT TERMINAL CONNECTIONS
mA
A
COM
mA
A
COM
COM
12
Digital Multimeter
DM6K3
Trms
FUSED
20A MAX.
FUSED
600mA MAX.
AmA COM VW
Hz
CAT IV
1000 VDC
750VAC
MAX.
10
WARNING: To avoid damaging this Multimeter do not exceed the input limit.
(Refer specifications)

1. Power off.
2. AC V Measurement.
3. DC V Measurement.
4. mV AC Trms & DC Measurement.
5. Resistance W , Diode ( ),
Continuity or Capacitance test .
6. Frequency /Duty Cycle Measurement
7. Current measurement (mA) AC/DC.
8. Current measurement (A) AC/DC.
9. Power OFF.
4.6 PUSH BUTTONS
Push Button functions, for details read "Push button Overview"(5.1)
4.7 Rotary Switch
13
Hz
mA
A
OFF
OFF
V
V
1
2
3
4
5
6
7
8
9
mV
RANGE
HOLD/LIGHT
SELECT
REL
Hz
DUTY
MAX
MIN
11

5.1 PUSHBUTTON OVERVIEW
5.1.1 SELECT BUTTON
1. Pressing the select button can choose the needed measurement mode :
To choose DC or AC in DC/AC mode, to choose Ohm, Diode or Buzzer,
Capacitance in Ohm/Diode / Continuity, Capacitance mode.
2. The Select button can also be used to turn off " Auto Power Off" condition.
To deactivate APO, Select the rotary knob to power off condition. Keep the
select button pressed and power on the Multimeter.
5.1.2 RANGE BUTTON
1. When the Multimeter is powered ‘ON’ it is in the Auto mode. In the auto
mode, the Multimeter selects the best range for the input detected.
AUTO will be displayed on the LCD.
2. Press the Range Button momentarily to select manual-ranging mode and
the Multimeter will remain in the range it was in, the LCD annunciator
AUTO turns off. Press the button momentarily again to step through the
ranges. Press and hold the button for few seconds to resume the auto
ranging mode.
5.0 OPERATING INSTRUCTIONS
5.1.3 HOLD/LIGHT
HOLD
1. Press HOLD to enter the hold mode; the Multimeter beeps & the reading
will get locked on the display.
2. Press HOLD again or RANGE or turn the rotary switch to exit HOLD mode;
the multimeter beeps.
3. In HOLD mode, is displayed.
4. Enabling HOLD function in auto ranging mode makes the multimeter
switch to manual mode.
LIGHT
Press HOLD/LIGHT for about 3 second to turn on the display backlit. The
backlit will automatically switch off after about 10 secs. to conserve power.
14 12

5.1.4 REL.
1. The function is available only under the Manual Measurement Mode. The
system will save the displayed value in the memory as reference value and
will subtract it from new measured reading.
2. Pressing REL button will put the Multimeter in Manual Measurement
Mode.
3. In REL measurement mode, press the switch again, the REL function will
be cancelled.
4. Pressing RANGE, SELECT switch will cancel REL measurement mode,
and go back to the normal mode (REL will disappear from the LCD).
5. Bar graph function will disappear in REL mode.
CAUTION
The current consumption in LIGHT mode is high & can reduce the battery
life. Use only when needed.
15
5.1.5 Hz / DUTY
Pressing this button will select frequency or duty cycle (%)measurements.
13
5.1.6 MAX / MIN BUTTON
1. Press the MAX/MIN button to display the MAX. Measurement value
(Max is dispayed).
2. Press the MAX/MIN button again to display the MIN. measurement value
(MIN is displayed).
3. Entering in the MAX/MIN mode will be in the Manual measurement
mode. REL, HOLD/LIGHT, RANGE, SELECT functions are not available
under this mode.
4. The measured MAX or MIN values are saved automatically after
entering into the MAX or MIN measurement mode.
5. Pressing the MAX/MIN button over than 2 seconds will exit from the
MAX or MIN measurement mode.
WARNING
After completing MAX/MIN measurement, always exit from the function as
it may give erratic readings for normal measurement.

6.0 MAKING MEASUREMENT
WARNING
To avoid possible electric shock, instrument damage and/or equipment
damage, do not attempt to measure voltages higher than 1000V DC / 750V AC,
although readings may be obtained. Be careful not to touch any energized
conductors with any part of your body.
6.1 AC Voltage Measurement
Understanding AC Zero Input Behavior of Trms Meters
Unlike averaging meters, which can accurately measure only pure sine
waves, Trms meters accurately measure distorted waveforms. Calculating
Trms converters require a certain level of input voltage to make a
measurement. This is why AC voltage and current ranges are specified from
10% of range to 95% of range. Non-zero digits that are displayed on a Trms
meter when the test leads are open or are shorted are normal. They do not
affect the specified AC accuracy above 10% of range.
To measure AC Voltage, connect the Multimeter as follows:
1. Insert the red test lead into the 'VW' terminal & the black test lead into
the 'COM' terminal.
2. Set the rotary switch to ACV position for AC voltage measurement.
3. Connect the DEVICE UNDER TEST (DUT) to the leads. The measured
value will read on the display.
4. When measurements are completed, disconnect the test leads from
the DUT. Remove the test leads from the multimeter.
5. In each range, the Multimeter has an input impedance of 10MW shunted
by 30 pf approx.
6. Normally the Multimeter is in AUTO mode, if source to be measured is
unknown. Select highest range 750V AC by Range button,
7. Never apply voltage greater than the specified limit otherwise, the
Multimeter can be damaged beyond repair.
17 14

6.2 DC Voltage Measurement
To measure DC Voltage, connect the Multimeter as follows:
1. Insert the red test lead into the 'VW' terminal & the black test lead into
the 'COM' terminal.
2. Set the rotary switch to DCV position for DC voltage measurement.
3. Connect the DEVICE UNDER TEST (DUT) to the leads. The measured
value will read on the display.
4. When measurements are completed, disconnect the test leads from
the DUT. Remove the test leads from the Multimeter.
In each range, the Multimeter has an input impedance of 10MW.
5. Normally the Multimeter is in AUTO mode. Select highest range 1000V
DC by Range button if the source, being measured is unknown.
6. Never apply voltage greater than the specified limit otherwise, the
Multimeter can be damaged beyond repair.
Note: When range is selected and the test leads are open it shows some count
on display this is because of high input impedance of meter which does not
affect the specified accuracy
6.3 AC/DC VOLTAGE MEASUREMENT (mV)
To measure AC/DC Voltage in mV, connect the Multimeter as follows:
1. Insert the red test lead into the 'VW' terminal & the black test lead into the
'COM' terminal.
2. Set the rotary switch to mV position & press SELECT switch for DC/AC
measurement mode.
3. Connect the DEVICE UNDER TEST (DUT) to the test leads. The
measured value will read on the display.
4. When measurements are completed, disconnect the test leads from the
circuit under test. Remove the test leads from the instrument.
CAUTION: Never apply voltage more than the specified limit else, the DMM
may damage beyond repairs. If the source is unknown, select highest range on
the DMM.
18 15

To measure resistance, connect the meter as follows:
1. Insert the red test lead into the ‘VW’ terminal and the black test lead into
the ‘COM’ terminal.
2. Set the rotary switch to ‘W ’ position to measure resistance.
3. Connect the DEVICE UNDER TEST (DUT) to the test leads. The
measured value will read on the display.
4. Completely de-energize the DUT. Connect the test leads to the DUT (the
red test lead is positive with respect to the black test lead). ‘OL’ indicates
an over range condition. This will occur with the test leads open on all
resistance ranges. If over range occurs when taking a reading, switch to
the next highest range.
5. Do not measure resistance if "LOBAT'' is displayed otherwise it will give
erroneous reading.
The test leads can add 0.1W to 0.2W of error to resistance measurement on
600 W range. To obtain precision readings in low resistance measurement,
that is the range of 600W, short-circuit the input terminals by using test leads
press ‘REL’ button so that the error reading can be subtracted from
measurement. Now connect the low value resistance.
6.4 RESISTANCE MEASUREMENT
Note: When range is selected and the test leads are open it may show
overload indication on display & Buzzer beeps, this is because of high input
impedance of meter which does not affect the specified accuracy.
19 16
To test for continuity, connect the meter as follows:
1. Insert the red test lead into the ‘VW’ terminal and the black test lead into the
COM terminal.
WARNING
To avoid damages to the Meter or to the device under test, disconnect circuit
power & discharge all the high-voltage capacitors before testing for continuity.
CONTINUITY MEASUREMENT

To test a diode out of a circuit, connect the Meter as follows:
1. Insert the red test lead into the ‘VW’ terminal and the black test lead into the
COM terminal.
2. Set the rotary switch to W position. Select Diode function by SELECT
switch, the display should show symbol.
3. Connect the test leads across with the diode being tested.
4. If the diode is good, 0.700V approx. in case of silicon diode or 0.200V in
case of germanium diode will displayed. If the diode is short, “0.000” will
be displayed.
5. If the diode is open, “OL” is displayed in both directions.
6. Do not measure the diode when it is connected in any circuit.
Use the diode test to check diodes, transistors, and other semiconductor
devices. The diode test sends a current through the semiconductor junction,
and then measures the voltage drop across the junction. A good silicon
junction shows forward voltage drop of 0.7V.
WARNING
To avoid damages to the Multimeter or to the device under test, disconnect circuit
power and discharge all the high-voltage capacitors before testing capacitance.
Use the DC Voltage function to confirm that the capacitor is discharged.
CAPACITANCE MEASUREMENT
20 17
DIODE MEASUREMENT
2. Set the rotary switch to ‘ ’ range to measure continuity.
3. Press Select button till Symbol appears on the LCD.
4. The buzzer sounds, if the resistance of the circuit under test is less than
30W approx.
W
WARNING
To avoid damages to the Multimeter or to the device under test, disconnect
circuit power and discharge all the high-voltage capacitors before testing diode.
To measure capacitance, connect the meter as follows
1. Insert the red test lead into the VΩ terminal and the black test lead into the
COM terminal.

1. Insert the red test lead into the terminal and the black test lead
into the COM terminal.
2. Set the rotary switch to Frequency mode.
3. Connect the test lead across the device under test. The measured value
is read on the display.
4. By pressing Hz/Duty switch, select DUTY Cycle measurement.
6.5 Hz/DUTY
Note: Only operated in Auto mode, Relative function will not operate. Kindly
note that the range of the counter is 10MHz. If you have to measure 50Hz AC
line voltage it is likely that the Multimeter can show 100Hz this is due to the
band width (Refer Specifications).
6.6 CURRENT MEASUREMENT in mA:
Understanding AC Zero Input Behavior of Trms Meters
Unlike averaging meters, which can accurately measure only pure sine
waves, Trms meters accurately measure distorted waveforms. Calculating
Trms converters require a certain level of input voltage to make a
measurement. This is why AC voltage and current ranges are specified from
10% of range to 95% of range. Non-zero digits that are displayed on a Trms
meter when the test leads are open or are shorted are normal. They do not
affect the specified AC accuracy above 10% of range.
For current measurement in mA, connect the Multimeter as follows:
1. Insert the red test lead into the mA terminal and the black test lead into the
COM terminal.
2. Set the rotary switch to mA position.
3. The multimeter defaults to DC Current measurement mode. To toggle
between DC & AC Current measurement function, press SELECT switch.
Then AC current is read on the display.
21 18
2. Set the rotary switch to the position and then by pressing
SELECT buttons till the (capacitance) function nF/uF Symbol is
displayed.
3. Connect the test leads across with the object being measured. The
measured value is read on the display.
Note: Only operated in "Auto Mode"
Table of contents