Moulinex Cuisine Companion User manual

p. 1- 15
p. 16 - 30
p. 31 - 46
p. 47 - 62
p. 63 - 77
p. 78 - 92
p. 93 - 107
p. 108- 122
p. 123- 137
Ref. 0828821
D3
D2
D1
D5
F1
F2
F3
F4
F5
E1
E2
E3
E4
E
D
F
G
D4
FR
EN
NL
ES
PT
AR
FA
DE
T
FR
EN
NL
ES
PT
AR
FA
DE
T

OKOK
“clic” “clic”
1 2
4.1
4.2 4.3
3
2
D3
D4
3
1
“clic”
22
2
1
6
7 8
9
5
10.1
a
b
2
1
22
11
12
10.2
D2
1
2
15
3
2
13
14
D3
D5
!!
1

1
FR
Vis-à-vis de la sécurité de la personne
• Lisez attentivement le mode d’emploi
avant la première utilisation de votre
appareil et conservez-le : une utilisation
non conforme au mode d’emploi déga-
gerait le fabricant de toute
responsabilité.
• Toujours déconnecter l’appareil de l’ali-
mentation si on le laisse sans surveillance
et avant montage, démontage ou net-
toyage. Ne pas laisser les enfants utiliser
l’appareil sans surveillance.
• Cet appareil ne doit pas être utilisé par
les enfants. Conserver l’appareil et son
câble hors de portée des enfants.
• Cet appareil n’est pas prévu pour être
utilisé par des personnes (y compris les
enfants) dont les capacités physiques,
sensorielles ou mentales sont réduites
ou des personnes dénuées d’expérience
ou de connaissance, sauf si elles ont
pu bénéficier, par l’intermédiaire d’une
personne responsable de leur sécurité,
d’une surveillance ou d’instructions
préalables concernant l’utilisation de
l’appareil. Il convient de surveiller les
enfants pour s’assurer qu’ils ne jouent
pas avec l’appareil.
• Maintenez votre appareil hors de portée
des enfants.
• Lors de l’utilisation de
l’appareil, certaines pièces
atteignent des tempéra-
tures élevées (paroi inox
du bol, entraîneur commun amovible, par-
ties transparentes du couvercle et du
bouchon, pièces métalliques sous le bol,
panier). Elles peuvent occasionner des
brûlures. Manipulez l’appareil par les pièces
plastiques froides (poignées, bloc moteur).
Le témoin lumineux de chauffe rouge in-
dique qu’il y a un risque de brûlure.
• La température des surfaces accessibles
peut être élevée lorsque l’appareil est
en fonctionnement.
• L’ appareil n’est pas destiné à être mis
en fonctionnement au moyen d’une mi-
nuterie extérieure ou par un système
de commande à distance séparé.
• N’utilisez pas votre appareil s’il ne fonc-
tionne pas correctement, s’il a été
endommagé ou si le câble d’alimenta-
tion ou la prise sont endommagés. Afin
d’éviter tout danger, faites obligatoi-
rement remplacer le cordon par un
centre service agréé (voir liste dans le
livret service).
• L’appareil ne doit pas être immergé. Ne
passez pas le bloc moteur (A) sous
l’eau courante.
• Cet appareil est exclusivement destiné
à un usage domestique à l'intérieur de
la maison et à une altitude inférieure
à 2000 m. Le fabricant décline toute
responsabilité et se réserve le droit de
résilier la garantie en cas d’utilisation
commerciale ou inadaptée, ou de non
respect des consignes.
CONS GNES DE SÉCUR TÉ :

3
FR
2
FR
• Cet appareil n’a pas été conçu pour être
utilisé dans les cas suivants qui ne sont
pas couverts par la garantie :
- zone de travail de cuisine dans les
magasins, bureaux et autres environ-
nements de type travail.
- des coins cuisine réservés au person-
nel dans des magasins, bureaux et
autres environnements profession-
nels.
- des fermes.
- l’utilisation par les clients des hôtels,
motels et autres environnements à
caractère résidentiel.
- des environnements du type chambres
d’hôtes.
• Votre appareil émet de
la vapeur qui peut occa-
sionner des brûlures.
Manipulez avec précau-
tion le couvercle et le bouchon
(utilisez si nécessaire un gant, une
manique, etc). Manipulez le bouchon
par sa partie centrale.
• Ne faites pas fonctionner l’appareil
si le joint n’est pas positionné sur
le porte joint, si le porte joint n’est
pas assemblé dans le couvercle. l
est impératif de faire fonctionner
l’appareil avec le bouchon positionné
dans l’orifice du couvercle (sauf en
cas d’information spécifique recette).
AVERT SSEMENT : Atten-
tion aux risques de
blessure en cas de mau-
vaise utilisation de
l’appareil.
Prenez des précautions avec les lames
du couteau hachoir ultrablade (F1) et
du couteau pour pétrir/concasser (F4)
lorsque vous les nettoyez et lorsque
vous videz le bol, elles sont extrême-
ment coupantes.
Soyez vigilant si un liquide chaud est
versé dans le préparateur culinaire dans
la mesure où il peut être éjecté de l’ap-
pareil en raison d’une ébullition
soudaine.
Rangez le couteau hachoir ultrablade
(F1) dans le bol après chaque utilisa-
tion.
AVERT SSEMENT : Soyez prudent lors
de la manipulation de votre appareil
(nettoyage, remplissage et versage) :
éviter tout débordement de liquide sur
les connecteurs.
AVERT SSEMENT : Votre appareil émet
de la vapeur qui peut occasionner des
brûlures.
AVERT SSEMENT : La surface de l'élé-
ment chauffant présente une chaleur
résiduelle après utilisation.
Assurez vous de ne toucher que les
poignées de votre produit (gâchettes
D2, poignée du couvercle E2 et du
bouchon E1) pendant la chauffe et
jusqu'au refroidissement complet.
Reportez-vous au mode d'emploi pour le
réglage des vitesses et le temps de fonc-
tionnement de chaque accessoire et de
chaque programme.
Reportez-vous au mode d'emploi pour
l'assemblage et le montage des acces-
soires sur l'appareil.
Reportez-vous au mode d'emploi pour
le nettoyage et l'entretien de votre ap-
pareil.
Toujours suivre les instructions de net-
toyage pour nettoyer votre appareil:
• Débrancher l’appareil.
• Ne pas nettoyer l’appareil chaud.
• Nettoyer avec un chiffon ou une éponge
humide.
• Ne jamais mettre l’appareil dans l’eau
ou sous l’eau courante
MARCHES EUROPEENS SEULEMENT :
• Conserver l’appareil et son câble hors
de portée des enfants âgés de moins
de 8 ans.
Les enfants ne doivent pas utiliser l’ap-
pareil comme un jouet.
• Cet appareil peut être utilisé par des
personnes dont les capacités physiques,
sensorielles ou mentales sont réduites
ou dont l’expérience ou les connais-
sances ne sont pas suffisantes, à
condition qu’ils bénéficient d’une sur-
veillance ou qu’ils aient reçu des
instructions quant à l’utilisation de l’ap-
pareil en toute sécurité et en
comprennent bien les dangers poten-
tiels.
• Cet appareil peut être utilisé par des
enfants âgés d’au moins 8 ans, à condi-
tion qu’ils bénéficient d’une surveillance
ou qu’ils aient reçu des instructions
quant à l’utilisation de l’appareil en
toute sécurité et qu’ils comprennent
bien les dangers encourus. Le nettoyage
et l’entretien par l’utilisateur ne doivent
pas être effectués par des enfants sans
surveillance, à moins qu’ils ne soient
âgés de plus de 8 ans et qu’ils soient
sous la surveillance d’un adulte.
Vis-à-vis du raccordement électrique
• L’appareil doit être branché sur une prise
de courant électrique reliée à la terre.
• L’appareil est conçu pour fonctionner
uniquement en courant alternatif. Vé-
rifiez que la tension d’alimentation
indiquée sur la plaque signalétique de
l’appareil corresponde bien à celle de
votre installation électrique.
• Toute erreur de branchement annule la
garantie.
• Ne tirez jamais sur le câble d’alimen-
tation pour débrancher l’appareil.
• Ne mettez pas l’appareil, le câble d’ali-
mentation ou la prise dans du liquide.
• Ne laissez pas le câble d’alimentation

5
FR
4
FR
être à proximité ou en contact avec les
parties chaudes de l’appareil, près d’une
source de chaleur ou sur un angle vif.
Vis-à-vis d’une mauvaise utilisation
• Ne touchez pas au couvercle avant
l’arrêt complet de l’appareil (touche
stop), attendez que les aliments
mixés ne tournent plus.
• Versez toujours les ingrédients solides
en premier dans le bol avant d’ajouter
des ingrédients liquides (Cf. Fig. 11.1),
sans dépasser le repère 2,5 L MAX gravé
à l’intérieur du bol (Cf. Fig. 11.2). Si
le bol est trop rempli, de l’eau bouillante
peut-être éjectée.
• Attention dans le cadre du programme
cuisson vapeur, respectez le niveau de
0.7 litre d’eau (Cf. Fig. 4.2).
• Ne placez jamais vos doigts ou tout
objet dans le bol pendant le fonction-
nement de l’appareil.
• N’utilisez pas le bol comme récipient
(conservation, congélation, stérilisa-
tion).
• Placez l’appareil sur un plan de travail
stable, résistant à la chaleur, propre et
sec.
• Ne placez pas l’appareil près d’un mur
ou d’un placard, la vapeur produite pou-
vant endommager les éléments.
• Ne placez pas votre appareil près d’une
source de chaleur en fonctionnement
(plaque de cuisson, appareil électro-
ménager, etc…).
• Ne couvrez pas votre couvercle avec un
torchon ou autre, ne cherchez pas à
boucher l’orifice du couvercle, utilisez
le bouchon régulateur de vapeur.
• Ne laissez pas pendre vos cheveux, un
foulard, une cravate,… au dessus du
bol pendant le fonctionnement de l’ap-
pareil.
• Ne passez jamais les accessoires dans
un four à micro ondes.
• N’utilisez pas l’appareil en plein air.
• Ne dépassez jamais la quantité maxi-
mum indiquée dans la notice.
• Rangez l’appareil lorsqu’il est refroidi.
SAV
• Pour votre sécurité, n’utilisez pas d’ac-
cessoires ou de pièces de rechange,
autres que ceux fournis par les centres
de service après-vente agréés.
• Toute intervention autre que le net-
toyage et l’entretien usuel par le
client doit être effectuée par un centre
service agréé.
• Consultez le tableau “ Si votre appareil
ne fonctionne pas, que faire ? ” à la fin
du mode d’emploi.
En parcourant cette notice , vous découvrirez des conseils d’utilisation qui vous feront
entrevoir le potentiel de votre appareil : préparation de sauces, de soupes, de mijotés, de
cuissons vapeur, de pâtes et de desserts.
DESCR PT ON DE L’APPARE L :
ABloc moteur
BTableau de commandes
B1 : touches de sélection programmes
automatiques
B2 : sélecteur vitesse
B3 : sélecteur température de cuisson
et/ou témoin lumineux de
chauffe
B4 : sélecteur durée de
fonctionnement
B5 : sélecteur turbo/pulse
B6 : sélecteur +/-
B7 : bouton start/stop/reset
CEcran LCD
C1 : affichage vitesse
C2 : affichage température
C3 : affichage temps
C4 : affichage sélection programme
C5 : affichage témoin de sécurité
DEnsemble Bol
D1 : bol inox
D2 : gâchettes
D3 : entraîneur commun amovible
D4 : joint d’étanchéité
D5 : bague de verrouillage entraîneur
EEnsemble couvercle
E1 : bouchon régulateur vapeur
E2 : couvercle
E3 : porte joint
E4 : joint étanchéité
FAccessoires :
F1 : couteau hachoir ultrablade
F2 : mélangeur
F3 : batteur
F4 : couteau pour pétrir / concasser
F5 : panier vapeur
GSpatule
HInterrupteur 0/1 pour couper l’alimentation
électrique de votre appareil
DONNÉES TECHN QUES DE L’APPARE L :
Puissance : 1550W (1000W : résistance chauffante / 550W : moteur )
Plage de température : de 30° à 130°C
réglable par pas de 5°C.
Plage de durée de fonctionnement : de 5s à 2 heures
réglable par pas de 5s mini à 1min maxi.
Nombre de vitesses : 12 - 2 vitesses intermittentes :
vitesse 1 ( 5s On / 20s Off ).
vitesse 2 ( 10s On / 10s Off ).
- 10 vitesses continues progressives
(vitesses 3 à 12).

7
FR
6
FR
Sauces Cuisson vapeur
Soupes
(sous programme P1 velouté /
P2 mouliné)
Pâtes
(sous programme P1 pain /
P2 brioche / P3 cake)
Mijotés
(sous programme P1 étuvée de
légumes / P2 mijoté / P3 risotto)
Desserts
M SE EN SERV CE :
Votre appareil est équipé d’un interrupteur 0/1, basculez l’interrupteur sur 1. (Cf. Fig. 9)
Vous disposez avec votre appareil des accessoires suivants :
Couteau hachoirMélangeurBatteurCouteau pétrin/concasseurPanier vapeurBouchon
Mixer des soupes
Mixer des compotes
Hacher les légumes
Hacher de la viande
Hacher du poisson
Pétrir les pâtes à pain
blanc
Pétrir les pâtes brisées,
sablées, pains spéciaux
Pétrir les pâtes levées
(brioche, kouglof…)
Mélanger les pâtes légères
(cake…)
Pulvériser les fruits à coques
Hacher les produits durs
Piler la glace
Pâte à crêpes, gaufres
Il mélange les Plats cuisinés sans abimer les ingrédients,
Très utile pour les phases de rissolage en amont des préparations (risottos, soupes).
Cuisson vapeur de légumes,
de poissons ou de viandes
Soupes avec morceaux
Bouchon de régulation d’extraction de vapeur
Petite sortie vapeur (a) = cuisson vapeur.
Grande sortie vapeur (b) = Risotto, crèmes dessert, sauces…
Blancs en neige
Mayonnaises,
Crèmes fouettées
Sauces, Crèmes, Garnitures
(écrasé de pommes de terre,
polenta…)
Rissolés
Mijotés
Risottos
Ratatouilles, Chutneys, Légumineuses (réglages : voir livret recettes)
5min
45min
15s
30s
15s
40s
3min
V9 max
F3
F4
F5
E1
F2
F1
22min
500g
2,5L
1Kg
1Kg
1Kg
1Kg
2,5L
1,5Kg
5/10min
2/5min
2min 30s
2min 30s
à
1min
1min
1Kg
1Kg
1,2Kg
0,8Kg
0,6Kg
1min 0,6Kg
1min 1,5L
40/45min
20/40min 1Kg
ab
2,5L
6 à 10
1min 30s
2min
7
max
0,5L
1/20min 1L
40s
3min
maxmax
Ces accessoires sont également pourvus de zones de préhension pour en faciliter la manipulation
lors de leur utilisation au cours d’une préparation.
VOTRE APPARE L POSSÈDE 2 MODES DE
FONCT ONNEMENT :
• Mode programme automatique :
Vitesse, température de cuisson et durée sont pré-
programmées pour réaliser des sauces, des soupes,
des mijotés, des cuissons vapeur, des pâtes et des
desserts en automatique.
• Mode manuel :
Réglages personnalisés des paramètres vitesse,
température de cuisson et durée pour une
utilisation selon votre convenance.
M SE EN PLACE DU BOL, DE SES ACCESSO RES ET
DE L’ENSEMBLE COUVERCLE
• Avant la première utilisation, nettoyez tous les
éléments (D, E, F, G) à l’eau chaude savonneuse,
mais pas le bloc moteur (A). Votre bol (D) est
équipé d’un entraîneur démontable (D3) pour
faciliter le nettoyage.
• Assurez-vous que tout emballage soit retiré avant
utilisation, notamment la protection située entre
le bol (D) et le bloc moteur (A).
• Placez le joint d’étanchéité (E4) sur le porte joint
(E3) (Cf. Fig. 1), clipsez l’ensemble sur le
couvercle (E2) (Cf. Fig 2).
• Positionnez le joint d’étanchéité (D4) sur
l’entraîneur commun (D3). Verrouillez l’ensemble
sur le fond du bol avec la bague de verrouillage
(D5) (Cf. Fig. 3).
• Positionnez l’accessoire choisi dans le bol :
- les accessoires (F1, F2, F3, ou F4) sur l’entraîneur
commun au fond du bol (Cf. Fig. 4.1),
- le panier vapeur (F5) à l’intérieur du bol, (Cf.
Fig. 4.3 ), en ayant pris soin au préalable de
remplir la cuve de 0.7l de préparation liquide
(eau, sauce…) (Cf. Fig. 4.2 ).
• Incorporez les ingrédients à l’intérieur du bol ou
du panier vapeur.
• Positionnez le couvercle sur le bol (D) en alignant
les deux triangles (Cf. Fig. 5), verrouillez le
couvercle sans appuyer en le tournant dans le sens
de la flèche (Cf. Fig. 6).
• Positionnez le bouchon régulateur de vapeur (E1)
sur le couvercle, 2 positions sont possibles : petite
sortie vapeur (a) ou grande sortie vapeur (b).
Exemple : pour cuire à la vapeur, assemblez votre
bouchon, la petite sortie vapeur (a) positionnée
vers vous (cela permet d'avoir un maximum de
vapeur dans le bol).
• Positionnez le bol (D) sur le bloc moteur (A)
jusqu’à entendre un “ clic ” (Cf. Fig. 8).
• L’appareil démarre uniquement si le bol et le
couvercle sont correctement positionnés et
verrouillés sur le bloc moteur.
UT L SAT ON DU TABLEAU DE COMMANDE (B)
Sélection d’un programme automatique :
En cas de mauvais positionnement ou de
mauvais verrouillage de l’un ou de l’autre
(Cf. Fig. 10.1 et 10.2), le logo se met à
clignoter lorsque l’on active une fonction.

9
FR
8
FR Sélection paramètres personnalisés :
Sélection de la vitesse moteur.
2 vitesses intermittentes et 10
vitesses continues progressives.
Sélection de la température de
cuisson.
De 30° à 130°C.
Témoin lumineux de chauffe : il
s’allume au démarrage de la
cuisson et s’éteint lorsque la
température à l’intérieur du bol
passe en dessous des 50°C.
Sélection de la durée de
fonctionnement.
De 5s à 2 heures.
Sélection des fonctions turbo
(vitesse maximale en accès direct)
et pulse (marche intermittente)
sans recourir à d’autres réglages.
Augmentation de la vitesse,
de la température de cuisson
et de la durée.
Diminution de la vitesse, de
la température de cuisson et
de la durée.
Ce bouton a 3 fonctions :
- “ Validation ” du choix de
votre programme
automatique ou de vos
paramètres choisis dans le
cadre d’une utilisation
manuelle (vitesse,
température de cuisson,
temps).
- “ Pause ” au cours d’une
utilisation, une fois que
l’appareil est lancé.
- “ Réinitialisation ” des
paramètres sélectionnés de
l’appareil par une pression
de 2 secondes.
Conseil d’utilisation :
Votre appareil est équipé d’un micro processeur qui contrôle et analyse sa stabilité. En cas
d’instabilité, la vitesse de rotation du moteur sera automatiquement réduite, si cette instabilité
persiste, le moteur sera arrêté et un “ STOP ” s’affichera sur votre écran.
• Vérifiez que la quantité d’ingrédients ne soit pas trop importante et que la vitesse utilisée soit
adaptée.
• Vérifiez que vous utilisez l’accessoire recommandé.
• Puis redémarrez votre appareil normalement.
UT L SAT ON DE L’APPARE L
Branchez l’appareil, basculez l’interrupteur (H) sur 1, l’écran LCD (C) affiche tous les paramètres à
“ 0 ” (Cf. Fig. 9)
MODE PROGRAMME AUTOMAT QUE
1- Appuyez sur le programme de
votre choix (B1), sur l’écran ap-
paraît un triangle (C4) sous le
programme sélectionné. Dans le
cas des programmes soupes, mi-
jotés, pâtes, des appuis
successifs permettent de faire défiler les différents
sous-programmes.
2- Les paramètres pré-programmés
peuvent être modifiés le temps
d’une recette (selon la recette
choisie, les ingrédients, les quan-
tités préparées). Appuyez sur le
sélecteur vitesse
(B2) ou le sélecteur température de cuisson (B3)
ou le sélecteur temps (B4), le paramètre choisi cli-
gnote à l’écran (C1-C2-C3).
3- Réglez le(s) paramètre(s) à l’aide
du sélecteur +/- (B6).
4- Lorsque vous avez fini de mo-
difier tous vos paramètres,
appuyez sur le bouton “ start ”
(B7) pour démarrer le pro-
gramme. Lorsque votre appareil
utilise le mode cuisson,
le témoin lumineux rouge (B3) s’allume pour vous
informer que la cuisson a démarré.
5- Lorsque le programme est terminé, l’appareil émet
3 bips.
6- A la fin des programmes sauces, soupes, mijotés
P2 et P3, cuisson vapeur et dessert, l’appareil
passe automatiquement en maintien au chaud pen-
dant 45 minutes pour conserver la préparation
prête à être consommée. En programme sauces,
mijotés P2 et P3, dessert et en mode manuel, le
moteur de l'appareil fonctionne à une vitesse spé-
cifique, dans le but de préserver la préparation et
d'éviter que celle-ci n'adhère au fond du bol. Pour
stopper le maintien au chaud, il suffit d’appuyer
sur le bouton “ stop ” (B7). Si vous ouvrez le cou-
vercle, appuyez sur les gâchettes (D2) ou retirez
le bol , le maintien au chaud sera automatiquement
arrêté.
A la fin du pétrissage des programmes pâte P1 et P2,
l’appareil passe en mode “ levée de la pâte ” à 30°C
pendant 40 minutes pour donner un meilleur volume
à vos pâtes. Si vous ouvrez le couvercle, appuyez sur
les gâchettes (D2) ou retirez le bol , l’appareil passe
en mode pause, vous avez la possibilité de le relancer
en appuyant de nouveau sur “ start ”.
Si vous souhaitez stopper ce mode, appuyez pendant
2 secondes sur le bouton “ stop ”.
7- Appuyez sur les gâchettes (D2) puis soulevez l’en-
semble bol (D) (Cf. Fig. 12).
Lorsque le programme automatique est lancé, vous
avez la possibilité d’arrêter l’appareil à tout moment
en appuyant sur le bouton “ stop ”. Le programme
automatique est alors en mode pause, vous avez la
possibilité de le relancer en appuyant de nouveau sur
“ start ”. Si vous vous êtes trompé de programme et
si vous voulez annuler, appuyez pendant 2 secondes
sur le bouton “ stop ”.

11
FR
10
FR DÉCOUVREZ LES PROGRAMMES AUTOMAT QUES PROPOSÉS :
Sauce Soupe P1 Soupe P2 Mijoté P1 Mijoté P2 Mijoté P3
Programmes
automatiques
Vitesse
“ par défaut ”
(ajustable)
V6
(V2 à V8)
10 Pulses et
V12 pendant
2 min.
10 Pulses V3 V1 V2
Température
“ par défaut ”
(ajustable)
70°C
(50°C
à 100°C)
100°C
(90°C
à 100°C)
100°C
(90°C
à 100°C)
130°C
(non
ajustable)
95°C
(80°C
à 100°C)
95°C
(80°C
à 100°C)
Temps
“ par défaut ”
(ajustable)
8 min
(5 min
à 40 min)
40 min
(20min
à 60 min)
45 min
(20 min
à 60 min)
5 min
(2 min
à 15 min)
45 min
(10 min
à 2h)
20 min
(10 min
à 2h)
Cuisson
vapeur Pâte P1 Pâte P2 Pâte P3 Dessert
Programmes
automatiques
Vitesse
“ par défaut ”
(ajustable)
V5 pendant
2 min 30s
V5 pendant
1 min 30s puis V6
pendant 2 min
V3 pendant
40s puis V9
pendant 3 min
V4
(V2 à V8)
Température
“ par défaut ”
(ajustable)
100°C
(non
ajustable)
90°C
(50°C à
110°C)
Temps
“ par défaut ”
(ajustable)
30 min
(1 min
à 60 min)
2 min 30s
(30s à
2 min 30s)
3 min 30s
(30s à 3 min 30s)
3 min 40s
(1 min 40s
à 3 min 40s)
15 min
(5 min
à 60 min)
UT L SAT ON DU PAN ER VAPEUR
Les temps de cuisson sont donnés à titre
indicatif, ils permettent dans la plupart des cas
une cuisson satisfaisante.
Néanmoins, certaines conditions vont influer sur
le temps de cuisson :
- la taille des légumes (coupés ou non-coupés)
- la quantité des ingrédients dans le panier
- la variété des légumes, leur maturité
- la quantité d’eau dans le bol, qui doit
correspondre à la graduation (0.7L).
Bien penser à utiliser le bouchon vapeur dans le
sens « petite vapeur » vers vous, qu’il faut
comprendre dans le sens « petite sortie de
vapeur », donc plus de vapeur dans le bol , donc
plus efficace pour cuire.
La position « petite vapeur » permet
de gagner un maximum de
chaleur et de vapeur
dans le bol pour toutes les cuissons à la vapeur
(soupes, etc.)
Cette position évite également les éclaboussures
pendant le mixage.
La position « grande vapeur » permet
de laisser échapper un maximum de
condensation et ainsi obtenir des
plats ou des sauces avec une meilleure
consistance (Risotto, crèmes dessert, sauces,
etc.)
Si la cuisson est insuffisante, vous pouvez ajouter
un temps de cuisson supplémentaire.
Temps de cuisson vapeur
ngrédients Quantités (max) Temps de cuisson estimé
Pommes de terre 1 kg 30 min
Carottes 1 kg 30 min
Courgettes 800 g 20 min
Panais 800 g 25 min
Blancs de poireaux 800 g 25 min
Haricots verts 800 g 30 min
Brocolis 500 g 20 min
Poissons 600 g (avec papier cuisson) 15 min
Viandes blanches 600 g (avec papier cuisson) 20 min
Certaines recettes peuvent provoquer des débordements intempestifs, en raison de l’apparition
de bulles, en particulier lors de l’utilisation de légumes congelés. Dans ce cas, il vous appartient
de réduire les volumes en conséquence.
Vous pouvez aussi utiliser le mode manuel en sélectionnant la température de 130°C et le temps de
cuisson selon la quantité et le type d’ingrédients : voir tableau ci-dessous.
MODE MANUEL
1- Appuyez directement sur le sé-
lecteur représentant le paramètre
que vous avez choisi de régler,
c’est-à-dire le sélecteur vitesse
(B2) ou le sélecteur température
de cuisson (B3) ou le sélecteur
temps (B4), le paramètre choisi clignote à l’écran
(C1-C2-C3).
2- Ensuite réglez le(s) paramètre(s)
à l’aide du sélecteur +/- (B6).
Pour des raisons de sécurité, il
n’est pas possible de régler une
température sans régler un temps
de cuisson.
3- Lorsque vous avez fini de régler
tous vos paramètres, appuyez
sur le bouton “ start ” (B7).
Lorsque votre appareil utilise le
mode cuisson, le témoin lumi-
neux rouge (B3) s’allume pour
vous informer que la cuisson a démarré. Lorsque la
programmation est lancée, vous avez la possibilité
d’arrêter l’appareil à tout moment en appuyant sur le
bouton “ stop ”.
La programmation est alors en mode pause, vous avez
la possibilité de la relancer en appuyant de nouveau
sur “ start ”. Si vous vous êtes trompé de program-
mation et si vous voulez annuler, appuyez pendant 2
secondes sur le bouton “ stop ”.
4- Lorsque la programmation est terminée, l’appareil
émet 3 bips.
5- Appuyez sur les gâchettes (D2) puis soulevez l’en-
semble bol (D) (Cf. Fig. 12).
Fonctions Turbo / Pulse
1- Accédez directement depuis votre tableau de com-
mandes (B) aux fonctions “ turbo ” et “ pulse ”
(B5). Pour une utilisation en mode turbo (vitesse
maximale en accès direct), il vous suffit de maintenir
enfoncé le sélecteur “ turbo ”. L’écran LCD affiche
alors le temps d’utilisation (C3) pour vous assister.
Pour une utilisation du pulse (marche intermit-
tente), activez et arrêtez la fonction par simple
pression du sélecteur “ pulse ”. Ici également,
l’écran LCD vous assiste en vous indiquant le temps
d’utilisation. Lorsque la fonction est lancée, vous
avez la possibilité d’arrêter l’appareil à tout moment
en appuyant sur le bouton “ stop ”. La fonction est
alors en mode pause, vous avez la possibilité de
la relancer en appuyant de nouveau sur “ start ”.

13
FR
12
FR
Votre appareil est équipé,
de série, de protections
électroniques du moteur
afin d’en garantir sa longé-
vité. Cette sécurité
électronique vous garantit
contre toute utilisation
anormale ; ainsi votre moteur est parfaitement pro-
tégé.
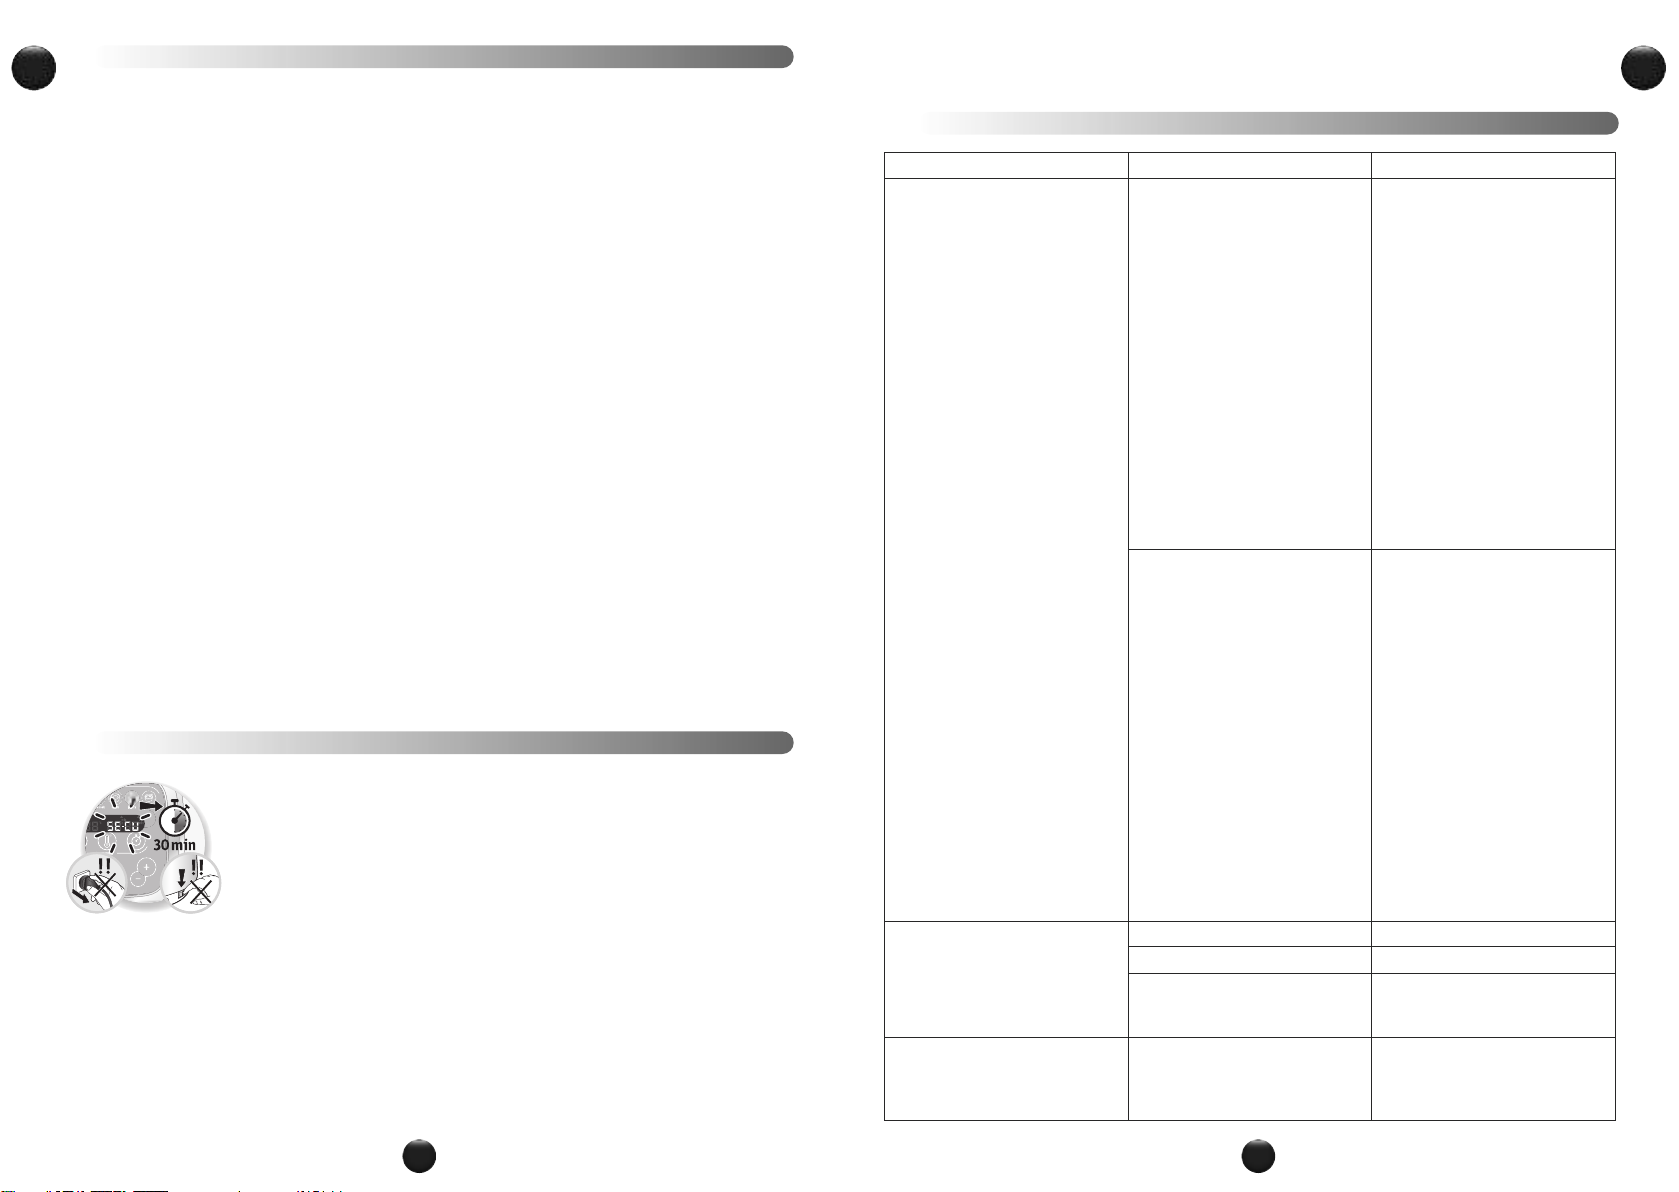
Dans certaines conditions d’utilisation très sévères, ne
respectant pas les recommandations de la notice (Cf.
paragraphe "MISE EN SERVICE" : quantités éventuel-
lement trop importantes et/ou une utilisation
anormalement longue et / ou un enchainement de re-
cettes trop rapprochées), la protection électronique se
déclenche pour préserver le moteur ; dans ce cas, l’ap-
pareil s’arrête et un affichage "SECU" apparait dans
l’écran LCD du tableau de commande pour indiquer que
l’appareil n’est momentanément plus opérationnel.
Si "SECU" s’affiche sur votre tableau de commandes
et que votre appareil s’arrête, procédez comme suit :
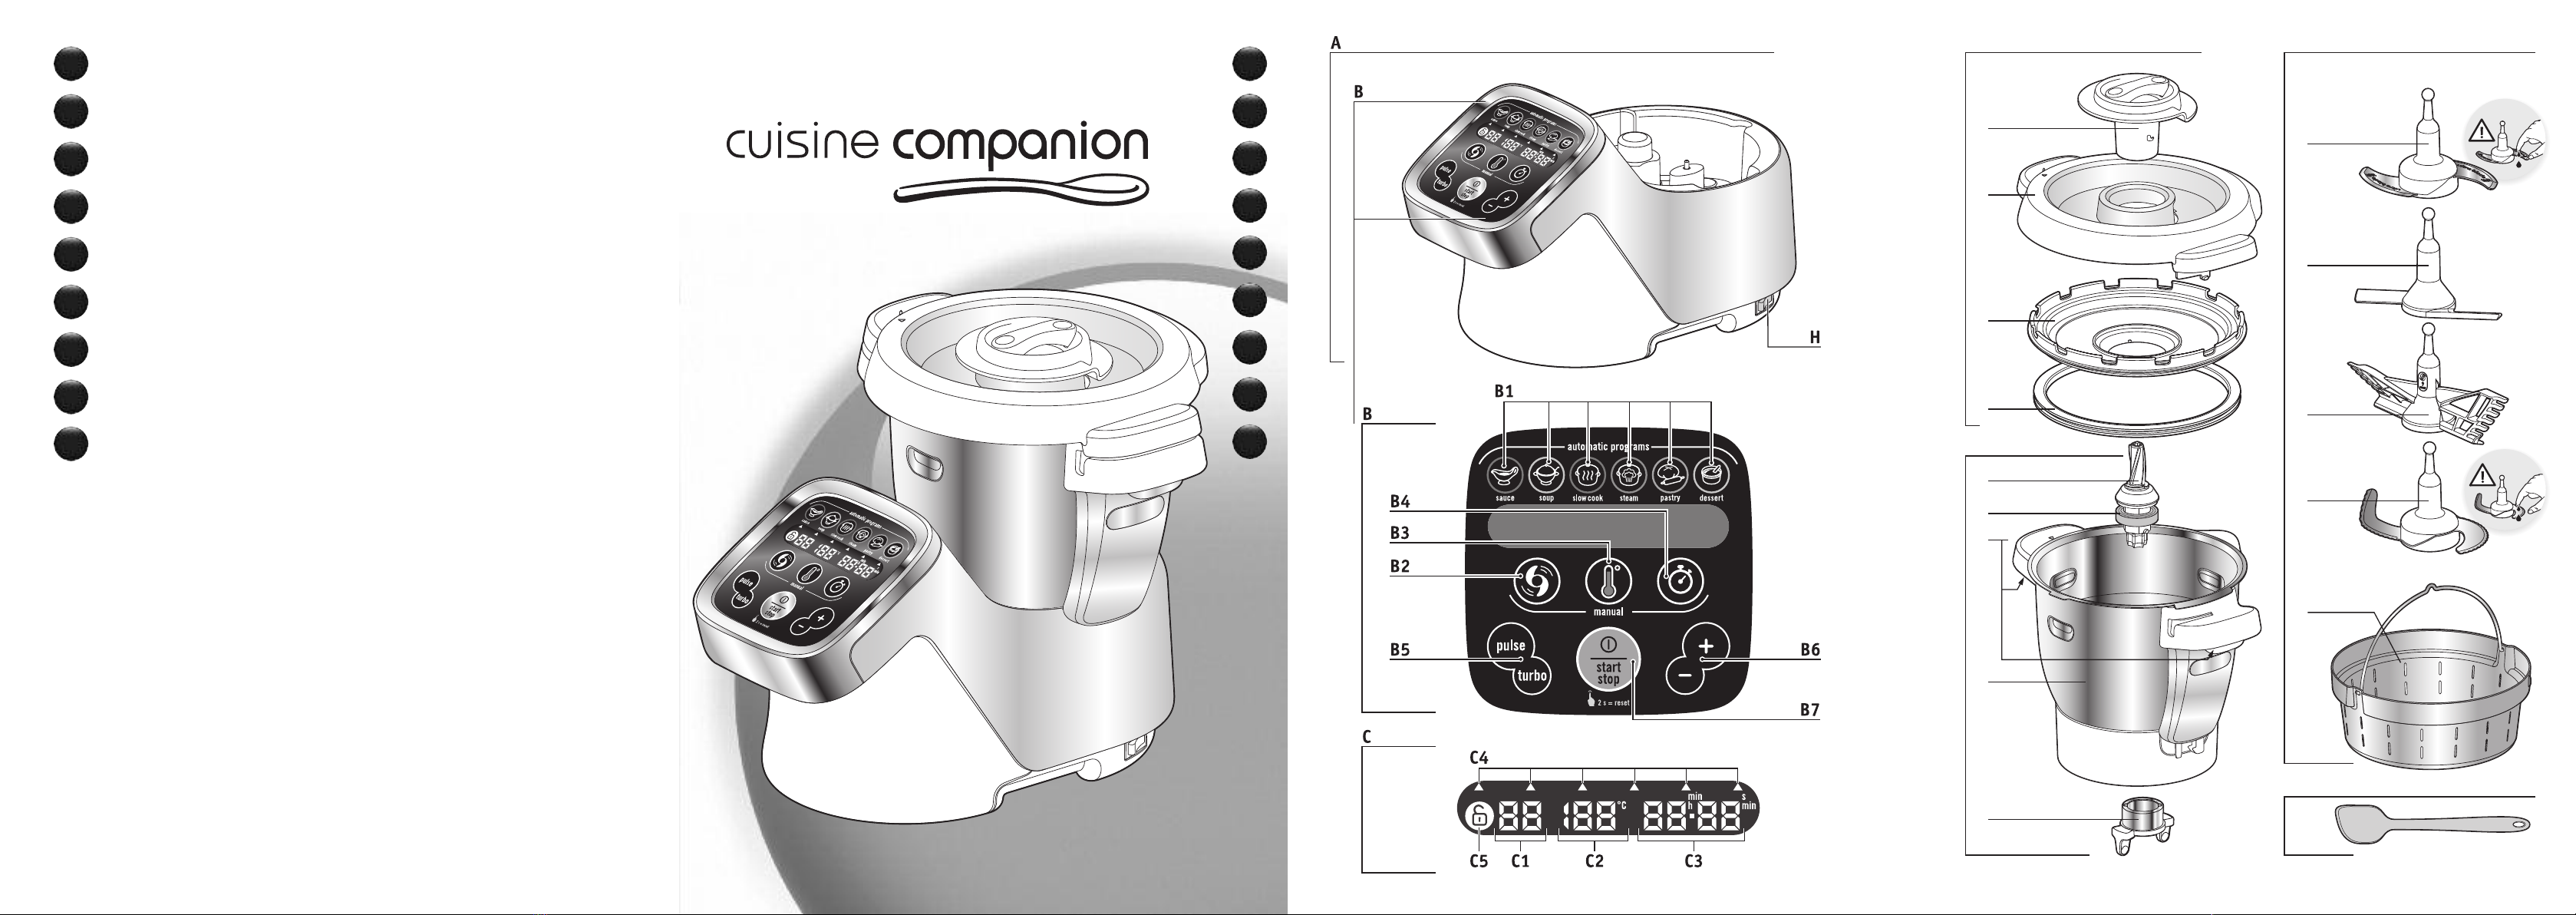
• Laissez votre appareil branché et l’interrupteur 0/1
sur la position 1 "ON" (interrupteur situé à l’arrière
de l’appareil - repère H dans la notice).
• Référez-vous aux recommandations de la notice pour
réadapter votre préparation (Cf. paragraphe "MISE
EN SERVICE" : quantités d’ingrédients / temps de la
recette / température / type accessoires).
• Attendez une demi-heure pour que le moteur refroi-
disse.
• Réinitialisez l’appareil en appuyant 2 secondes
sur le bouton "Start / Stop / Reset" (repère B7
dans la notice).
• L’appareil ne doit pas être immergé.
Ne passez pas le bloc moteur (A)
sous l’eau courante.
Une fois l’utilisation terminée, débranchez
l’appareil.
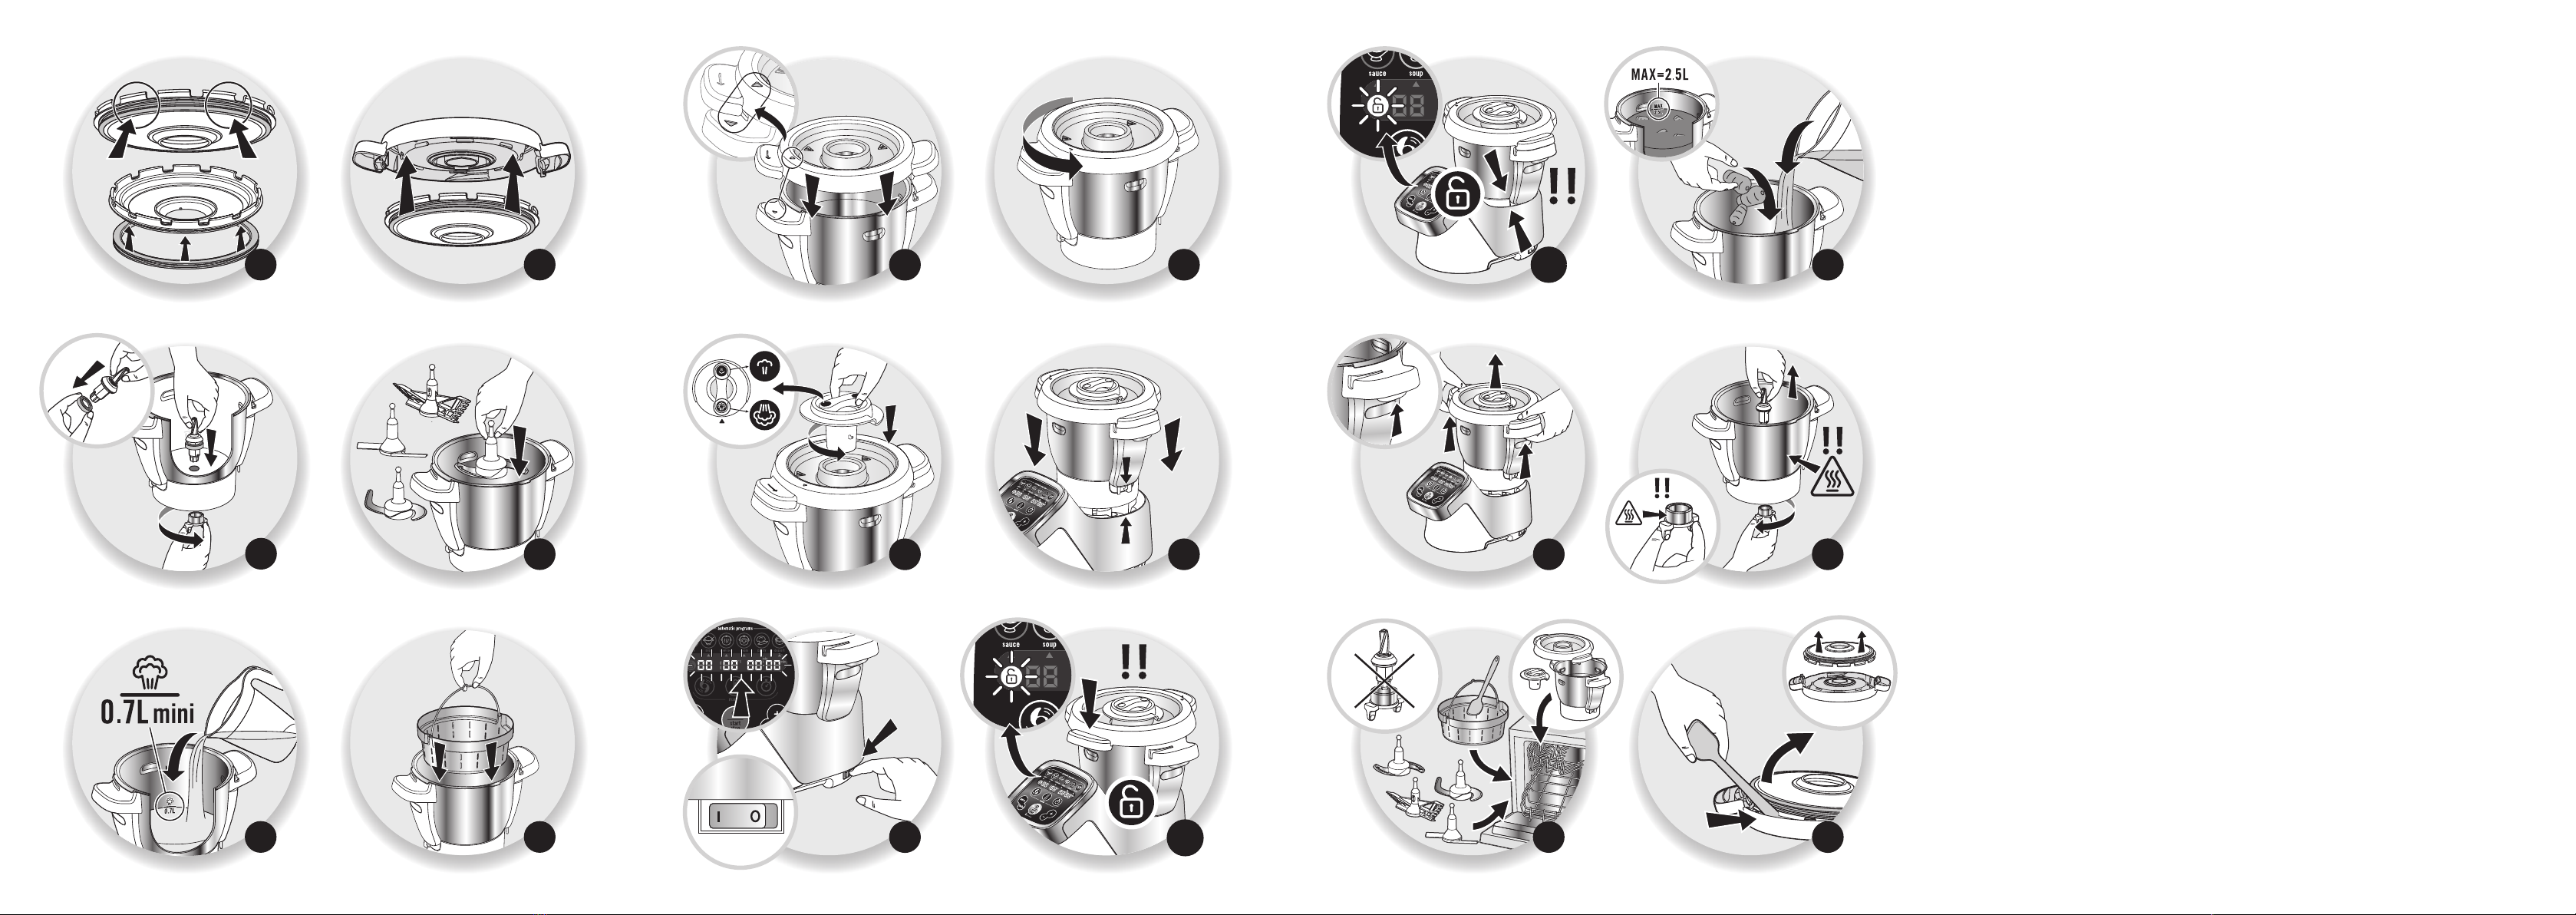
• Nettoyez immédiatement votre bol après
utilisation.
• Appuyez sur les gâchettes (D2) puis soulevez
l’ensemble bol (D).
• Placez le bol sur une surface plane.
• Déverrouillez le couvercle en le tournant d’un
quart de tour dans le sens des aiguilles d’une
montre. Retirez le couvercle avec précaution.
• Lorsque les pièces sont refroidies, déclipsez le
porte joint du couvercle à l’aide de la spatule
(G) (Cf. Fig. 15).
• Prenez des précautions avec les lames du
couteau hachoir ultrablade (F1) et du couteau
pour pétrir/concasser (F4) lorsque vous les
nettoyez et lorsque vous videz le bol, elles
sont extrêmement coupantes.
• Lorsque les pièces sont refroidies :
- démontez l’entraîneur commun (D3), le joint
(D4), la bague de verrouillage (D5) (Cf. Fig. 13).
- nettoyez le bol (D), l’entraîneur commun (D3),
le joint (D4), la bague de verrouillage (D5),
les accessoires (F1), (F2), (F3), (F4), (F5),
le bouchon régulateur de vapeur (E1), le cou-
vercle (E2), le porte joint (E3), le joint
d’étanchéité (E4), à l’aide d’une éponge et
d’eau chaude savonneuse.
• Rincez ces différents éléments sous l’eau cou-
rante.
• En cas d’encrassement prononcé, laissez tremper
pendant plusieurs heures avec de l’eau addition-
née de liquide vaisselle et grattez si besoin avec
la spatule (G) ou bien avec le coté grattoir d'une
éponge.
• En cas d’entartrage du bol, vous pouvez utiliser
le coté grattoir d’une éponge imbibée si néces-
saire de vinaigre blanc.
• Pour nettoyer le bloc moteur (A), utilisez un
chiffon humide. Séchez-le soigneusement.
• Pour vous faciliter le nettoyage, sachez que le
bol, l’ensemble couvercle et les accessoires pas-
sent au lave vaisselle à l’exception de l’entraîneur
commun (D3) et de sa bague de verrouillage
(D5) (Cf. Fig. 14).
• Les accessoires, l’entraineur commun amovible
et les éléments du couvercle, peuvent se colorer
légèrement avec certains ingrédients comme le
curry, le jus de carottes, etc… ; cela ne repré-
sente aucun danger pour votre santé, ni pour le
fonctionnement de votre appareil. Pour éviter
cela, nettoyez les éléments rapidement après
l’usage.
NETTOYAGE DE L APPARE L
MPORTANT : M SE EN SECUR TE DE L’APPARE L (“SECU”)
S VOTRE APPARE L NE FONCT ONNE PAS, QUE FA RE ?
Votre appareil est de nouveau totalement apte à l’emploi
Le service consommateur reste à votre disposition pour
toute question (voir coordonnées dans livret de ga-
rantie).
PROBLÈMES CAUSES SOLUT ONS
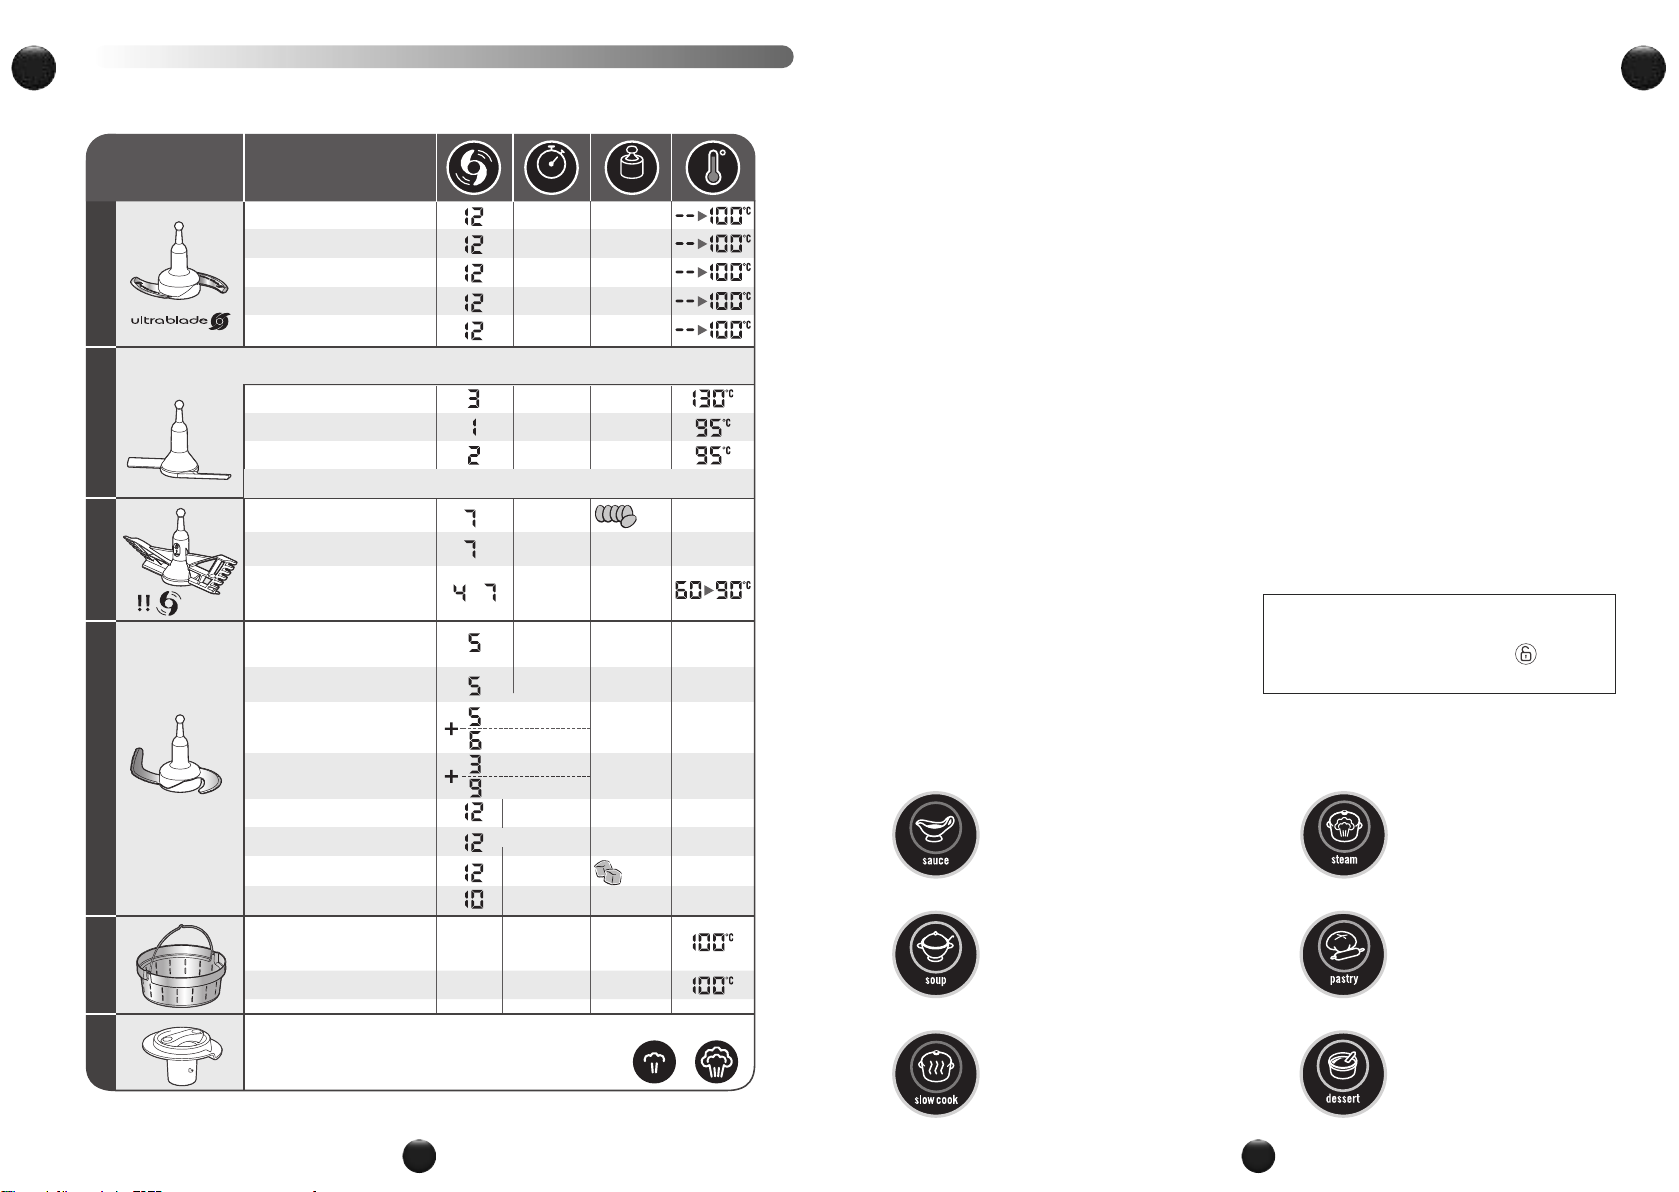
Difficultés pour cuire à la vapeur.
Bouchon régulateur vapeur mal
positionné
Positionnez le bouchon vapeur dans
le sens “petite vapeur” vers vous,
qu’il faut comprendre dans le sens
“petite sortie de vapeur”, donc plus
de vapeur dans le bol , donc plus
efficace pour cuire.
La position “petite vapeur” permet
de gagner un maximum de chaleur
et de vapeur dans le bol pour toutes
les cuissons à la vapeur (soupes,
etc.). Cette position évite
également les éclaboussures
pendant le mixage.
La position “grande vapeur” permet
de laisser échapper un maximum de
condensation et ainsi obtenir des
plats ou des sauces avec une
meilleure consistance (Risotto,
crèmes dessert, sauces, etc.)
Temps de cuisson insuffisant
Les temps de cuisson sont donnés à titre
indicatif, ils permettent dans la plupart
des cas une cuisson satisfaisante.
Néanmoins, certaines conditions vont
influer sur le temps de cuisson :
- la taille des légumes (coupés ou non-
coupés)
- la quantité des ingrédients dans le panier
- la variété des légumes, leur maturité
- la quantité d'eau dans le bol qui
correspondre à la graduation(0.7L)
Si la cuisson est insuffisante, vous pouvez
ajouter un temps de cuisson
supplémentaire.
Vous pouvez aussi utiliser le mode manuel
en sélectionnant la température de 130°C
et le temps de cuisson selon la quantité et
le type d'ingrédients.
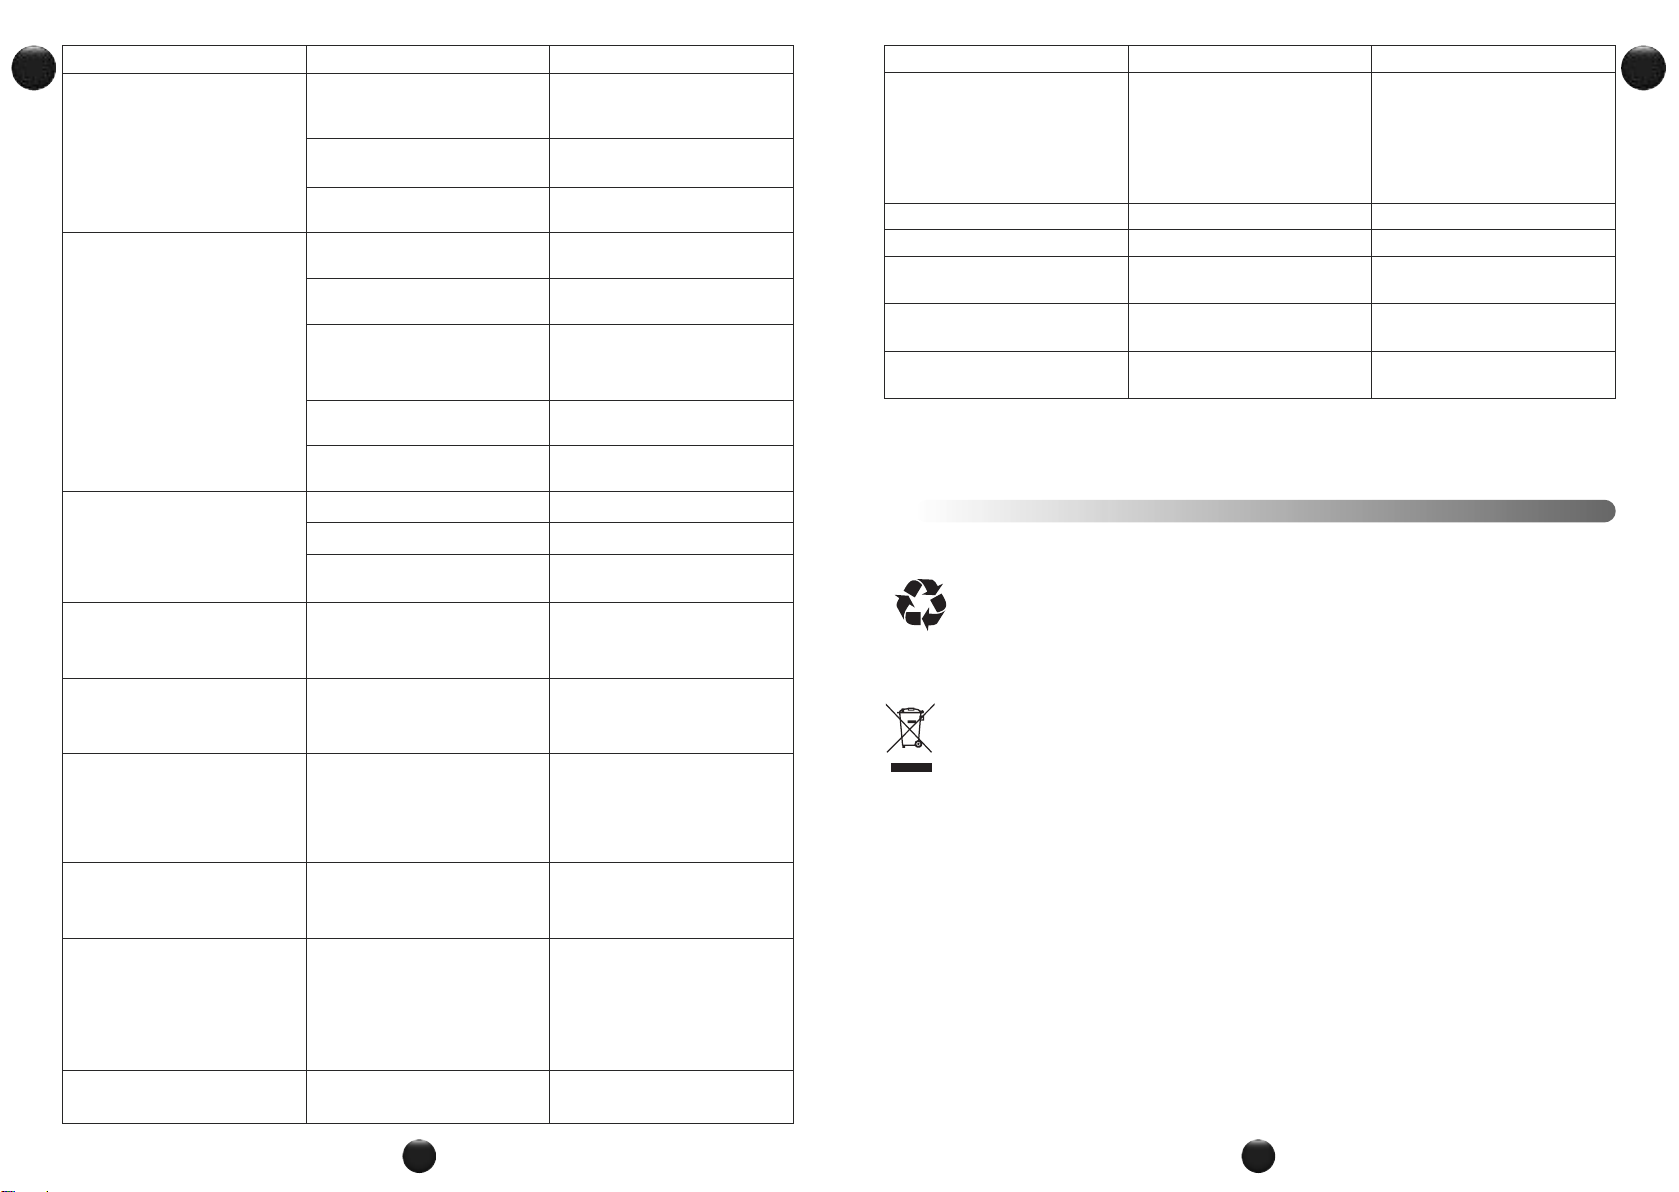
L’appareil ne fonctionne pas.
La prise n'est pas branchée. Branchez l'appareil sur une prise.
L’interrupteur (H) est en position 0. Basculez l’interrupteur en position 1.
Le bol ou le couvercle ne sont
pas correctement positionnés ou
verrouillés.
Vérifiez que le bol ou le couvercle
sont bien positionnés et verrouillés
suivant les schémas de la notice.
Le couvercle ne se verrouille pas. Le couvercle n’est pas complet.
Vérifiez que le joint est correctement
assemblé sur le porte joint et que le
porte joint est correctement assemblé
sur le couvercle.

15
FR
14
FR PROBLÈMES CAUSES SOLUT ONS
Affichage “ Err1 ”
+ témoin lumineux rouge clignote.
La résistance chauffante
ne fonctionne pas.
Vérifiez que les broches
d’alimentations sous le bol
ne sont pas encrassées. Si c’est le
cas, nettoyez-les et réessayez.
Si cela ne fonctionne toujours pas,
contactez un centre agréé.
Affichage “ Err2 ”. Défaut électronique. Contactez un centre agréé.
Affichage “ Err3 ”. Défaut vitesse. Contactez un centre agréé.
Affichage “ Err4 ”. Défaut communication avec carte
électronique chopper. Contactez un centre agréé.
Affichage “ ntc1 ”
+ témoin lumineux rouge clignote.
Le capteur 1 de température
ne fonctionne plus. Contactez un centre agréé.
Affichage “ ntc2 ”
+ témoin lumineux rouge clignote.
Le capteur 2 de température
ne fonctionne plus. Contactez un centre agréé.
Votre appareil ne fonctionne toujours pas ?
Adressez-vous à un centre service agréé (voir la liste dans le livret service).
• Elimination des matériaux d’emballage et de l’appareil
L'emballage comprend exclusivement des matériaux sans danger pour l'environnement,
pouvant être jetés conformément aux dispositions de recyclage en vigueur.
Pour la mise au rebut de l'appareil, se renseigner auprès du service approprié de votre
commune.
• Produits électroniques ou produits électriques en fin de vie :
Participons à la protection de l’environnement !
Votre appareil contient de nombreux matériaux valorisables ou recyclables.
Confiez celui-ci dans un point de collecte pour que son traitement soit effectué.
RECYCLAGE
PROBLÈMES CAUSES SOLUT ONS
Vibrations excessives.
L’appareil n'est pas posé sur une
surface plane, l’appareil n’est pas
stable.
Placez l’appareil sur une surface
plane.
Volume d'ingrédients
trop important.
Réduisez la quantité d'ingrédients
traités.
Erreur d’accessoires. Vérifiez que vous utilisez
l’accessoire préconisé.
Fuite par le couvercle.
Volume d'ingrédients trop important. Réduisez la quantité d'ingrédients
traités.
Le couvercle n'est pas bien
positionné ou verrouillé.
Verrouillez correctement le
couvercle sur le bol.
Le joint d’étanchéité
n’est pas présent.
Positionnez le joint d’étanchéité
sur le porte-joint et clipsez
l’ensemble sur le couvercle.
Le joint d’étanchéité est coupé,
détérioré.
Changez le joint, contactez
un centre service agréé.
Erreur d’accessoires. Vérifiez que vous utilisez
l’accessoire préconisé.
uite par l’entraîneur du bol.
Le joint n'est pas bien positionné. Positionnez correctement le joint.
Le joint est détérioré. Contactez un centre service agréé.
La bague de verrouillage (D5) est
mal verrouillée.
Vérrouillez correctement la bague
(D5).
Les lames ne tournent
pas facilement.
Morceaux d'aliments trop gros
ou trop durs.
Réduisez la taille ou la quantité
d'ingrédients traités.
Ajoutez du liquide.
Les lames ne tournent
pas facilement.
Morceaux d'aliments trop gros
ou trop durs.
Réduisez la taille ou la quantité
d'ingrédients traités.
Ajoutez du liquide.
Odeur moteur.
A la première utilisation de l’appareil,
ou bien en cas de surcharge moteur
provoquée par une quantité
d’ingrédients trop importante ou des
morceaux trop durs ou trop gros.
Laissez refroidir le moteur (environ
30 minutes) et réduisez la quantité
d’ingrédients dans le bol.
Affichage “ STOP ”.
L’appareil a détecté des vibrations
trop importantes et s’est placé en
position de sécurité.
Vérifiez que vous êtes à la vitesse
préconisée ou que vous utilisez
l’accessoire recommandé.
Affichage “ SECU ”.
Surcharge moteur provoquée par
une quantité d’ingrédients trop
importante ou des morceaux trop
durs ou trop gros ou une succession
de recettes sans suffisamment de
temps de refroidissement.
Laissez refroidir le moteur (environ
30 minutes) et réduisez la quantité
d’ingrédients dans le bol.
Affichage “ SECU ” + témoin
lumineux rouge clignote. Surchauffe capteurs de température. Contactez un centre agréé.

17
EN
16
EN
Personal safety
• Read the instructions for use
carefully before using your appliance
for the first time and keep them in a
safe place: the manufacturer shall
not accept any liability in the event
of any use that does not comply with
the instructions.
• Always disconnect the appliance
from the power supply if you are to
leave it unattended and before
assembly, dismantling or cleaning.
Do not allow children to use the
appliance without supervision.
• This appliance should not be used by
children. Keep the appliance and its
lead out of reach of children.
• This appliance is not intended for use
by persons (including children) with
reduced physical, sensory or mental
capabilities, or lack of experience
and knowledge, unless they have
been given supervision or instruction
concerning use of the appliance by a
person responsible for their safety.
Children should be supervised to
ensure that they do not play with the
appliance.
• Keep your appliance out of reach of
children.
• While your appliance is
in use, some parts may
reach high temperatures
(stainless steel wall of
bowl, detachable common spindle,
transparent parts of the lid and the
cap, metal parts below the bowl,
basket). They can cause burns. Handle
the appliance by the cool plastic parts
(handles, motor unit). The red heating
indicator light shows that there is a
risk of burning.
• The temperature of the accessible
surfaces may be high when the
appliance is in operation.
• The appliance is not intended to be
operated using an external timer or
by a separate remote control
system.
• Do not use your appliance if it is not
working properly, if it is damaged or
if the power cable or plug is
damaged. To avoid any danger have
the lead replaced by an approved
service centre (see list in the
warranty booklet).
• The appliance should not be
immersed in water. Never put the
motor unit (A) under running water.
SAFETY NSTRUCT ONS:
• This appliance is designed for indoor
household use only and at an
altitude below 2000 m. The
manufacturer shall not accept any
liability and reserves the right to
cancel the warranty in the event of
commercial or inappropriate use or
failure to follow the instructions.
• This appliance should not be used for
household and similar use (not covered
by the warranty) such as:
- In kitchen work areas in shops,
offices and other professional
environments.
- In kitchen areas reserved for staff
in shops, offices and other
professional environments.
- On farms.
- Use by clients of hotels, motels and
other residential environments.
- in guest room environments.
• Your appliance gives
off steam which can
cause burns. Handle
the lid and the cap
with caution (use a glove, potholder,
etc. if necessary). Handle the cap by
its central section.
• Never operate the appliance if the
seal is not positioned on the seal
holder or if the seal holder is not
assembled on the lid. t is
essential to operate the appliance
with the cap positioned in the
hole in the lid (unless specifically
stated in the recipe).
WARN NG: Be aware of
the risk of injury in the
event of incorrect use
of the appliance.
Take care with the knives of the
sharp chopping blade (F1)and the
serrated knife (F4) when you are
cleaning them and when you empty
the bowl, they are extremely sharp.
Be careful if a hot liquid is poured
into the food processor because it
could be ejected from the appliance
due to it suddenly boiling.
Place the Ultrablade chopper blade
(F1) in the bowl after us e.
WARN NG: Be careful to avoid any
spillage on the connector during
cleaning, filling or pouring.
WARN NG : Your appliance releases
steam which can cause burns.
WARN NG: The heating element
surface is subjected to residual heat
after use.
- Be sure to touch only the handles
of your product (locks D2, handle
of the lid E2 and handle of the cap
E1) during heating and until
complete cooling down.
• Refer to the instructions for
setting the operating times and
speed settings of each accessory
and each programme.

19
EN
18
EN
food being mixed is no longer
rotating.
• Always pour the solid ingredients
into the bowl first before adding the
liquid ingredients (See Fig. 11.1),
without exceeding the 2.5 L MAX
limit marked inside the bowl (See
Fig. 11.2). If the bowl is too full,
boiling water may be ejected.
• Please note, in the steam cooking
programme, keep the level of 0.7
litres water (See Fig. 4.2).
• Never put your fingers or any other
object in the bowl while the
appliance is in operation.
• Do not use the bowl as container
(storage, freezing, sterilisation).
• Place the appliance on a stable,
heatproof work surface.
• Do not place the appliance near a
wall or a cupboard: the steam
produced may damage the elements.
• Do not place your appliance near a
heat source in operation (hob,
household appliance, etc.).
• Do not cover the lid with a
dishcloth or other item, do not
attempt to block the hole in the lid,
use the steam regulator cap.
• Do not let hair, scarves, ties, etc.
over the bowl while the appliance is
in operation.
• Never put the accessories in a
microwave.
• Do not use the appliance outdoors.
• Never exceed the maximum quantity
indicated in the instructions.
• Store the appliance when it has
cooled down.
After-sales Service
• or your own safety, do not use
accessories or spare parts other
than those provided by the
approved after-sales centres.
• Any intervention other than
cleaning and usual maintenance by
the customer must be carried out by
an approved service centre.
• Consult the table “What to do if
your appliance does not work" at
the end of the instruction manual.
• Refer to the instructions for
assembly and mounting
accessories to the device.
• Refer to the instructions for
cleaning and maintenance of your
appliance.
• Always follow the cleaning
instructions on how to clean your
appliance :
- Unplug the appliance.
- Do not clean the appliance
while hot.
- Clean with a damp cloth or
sponge.
- Never immerse the appliance in
water or put it under running
water.
EUROPEAN MARKETS ONLY:
• Keep the appliance and its lead out
of reach of children under 8 years of
age.
Children should not use the
appliance as a toy.
• This appliance may be used by
persons with reduced physical,
sensory or mental capabilities or
whose experience or knowledge is
insufficient, as long as they have
the benefit of supervision or they
have received instructions regarding
safe use of the appliance and they
understand its potential dangers.
• This appliance may be used by
children of at least 8 years of age,
as long as they are supervised and
have been given instructions about
using the appliance safely and are
fully aware of the dangers involved.
Cleaning and maintenance by the
user should not be carried out by
children without supervision unless
they are at least 8 years of age and
are supervised by an adult.
Connection to the power supply
• The appliance should be plugged in
to an earthed electrical socket.
• The appliance is designed to work
with alternating current only. Check
that the supply voltage indicated on
the rating plate of the appliance
corresponds to that of your
electrical installation.
• Any connection error will cancel the
warranty.
• Never pull on the power lead to
unplug the appliance.
• Do not immerse the appliance,
power cable or plug in any liquid.
• The power lead must never be left
near or in contact with the hot parts
of your appliance, near a source of
heat or on a sharp edge.
ncorrect use
• Do not touch the lid before the
appliance comes to a complete
stop (stop button); wait until the

21
EN
20
EN
On reading this instruction manual, you will find recommendations for use, which will make
you see the potential of your appliance: preparation of sauces, soups, stews, steamed
dishes, pastries and desserts.
APPL ANCE DESCR PT ON:
AMotor unit
BControl panel
B1: automatic programme selection buttons
B2: speed selector
B3: cooking temperature selector and/or
heating light indicator
B4: operating time selector
B5: turbo/pulse selector
B6: +/- selector
B7: start/stop/reset button
CLCD screen
C1: speed display
C2: temperature display
C3: time display
C4: programme selection display
C5: safety indicator display
DBowl assembly
D1: stainless steel bowl
D2: locks
D3: detachable common spindle
D4: seal
D5: spindle locking ring
ELid assembly
E1: steam regulator cap
E2: lid
E3: seal holder
E4: seal
FAccessories:
F1: ultrablade chopper blade
F2: mixer
F3: whisk
F4: knife for kneading / crushing
F5: steam basket
GSpatula
HSwitch 0/1 for cutting off the power supply
to your appliance
APPL ANCE TECHN CAL DATA:
Power: 1550W (1000W: heating element / 550W: motor)
Temperature range: 30° to 130°C
adjustable in steps of 5°C.
Operating duration range: 5 sec to 2 hours
adjustable in steps of 5 sec min to 1 min max.
Number of speeds: 12 - 2 intermittent speeds:
speed 1 (5 sec On / 20 sec Off).
speed 2 (10 sec On / 10 sec Off).
- 10 progressive continuous speeds
(speeds 3 to 12).
SW TCH NG ON:
Your appliance is fitted with a 0/1 switch, set the switch to 1. (See Fig. 9)
You have the following accessories with your appliance:
Chopping bladeMixerBeaterKneading/crushing bladeSteam basketCap
Mixing soups
Mixing fruit purees
Chopping vegetables
Chopping meat
Chopping fish
Kneading white bread
dough
Kneading short crust pastry,
biscuit dough, special bread
Kneading risen dough
(brioche, kouglof. etc.)
Mixing light batters (cake
mixture, etc.)
Crushing nuts
Chopping hard products
Crushing ice
Pancake batter, waffle batter
IIt mixes Cooked dishes without damaging the ingredients
Very useful for browning phases before preparations (risottos, soups).
Steam cooking vegetables,
fish or meat
Soup with chunks
Cap for regulating steam extraction
- Low steam (a) = steam cooking.
- High steam (b) = Risotto, dessert creams, sauces, etc.
Wisking egg whites,
Mayonnaise,
Whipped cream
Sauces,Creams,Dressings
(mashed potatoes, polenta,
etc.)
Browned dishes
Stews
Risottos
Ratatouille, Chutney, Pulses (settings: check the recipe booklet)
5min
45min
15 sec
30 sec
15 sec
40 sec
3min
V9 max
F3
F4
F5
E1
F2
F1
22min
500g
2,5L
1Kg
1Kg
1Kg
1Kg
2,5L
1,5Kg
5/10min
2/5min
2min 30s
2min 30s
to
1min
1min
1Kg
1Kg
1,2Kg
0,8Kg
0,6Kg
1min 0,6Kg
1min 1,5L
40/45min
20/40min 1Kg
ab
2,5L
6 à 10
1min 30s
2min
7
max
0,5L
1/20min 1L
40 sec
3min
max
These accessories are also fitted with gripping areas to facilitate handling during use while making
a preparation.

23
EN
22
EN
YOUR APPL ANCE HAS 2 OPERAT NG MODES:
• Automatic programme mode:
Speed, cooking temperature and duration are
pre-programmed to make sauces, soups, stews,
steamed dishes, pastry and desserts
automatically.
• Manual mode:
Customised adjustments of speed parameters,
cooking temperature and duration for use at
your convenience.
NSTALL NG THE BOWL, TS ACCESSOR ES AND
THE L D ASSEMBLY
• Before using for the first time, wash all items
(D, E, F, G) in warm soapy water, but not the
motor unit (A). Your bowl (D) is fitted with a
detachable spindle (D3) to facilitate cleaning.
• Ensure that all packaging has been removed
before use, particularly the protection located
between the bowl (D) and the motor unit (A).
• Place the seal (E4) on the seal holder (E3)
(See Fig. 1), clip the assembly to the lid (E2)
(See Fig 2).
• Position the seal (D4) on the common spindle
(D3). Lock the assembly onto the base of the
bowl with the locking ring (D5) (See Fig. 3).
• Position the chosen accessory in the bowl:
- the accessories (F1, F2, F3, or F4) to
on the common spindle at the bottom of
the bowl (See Fig. 4.1),
- the steam basket inside the bowl (F5),
(See Fig. 4.3 ), having taken care
beforehand to fill the 0.7l tank with liquid
preparation (water, sauce…) (See Fig. 4.2).
• Incorporate the ingredients into the bowl or
steam basket.
• Position the lid on the bowl (D) lining up the
two triangles (See Fig. 5), lock the lid without
pressing by turning it clockwise (See Fig. 6).
• Position the steam regulator cap (E1) on the
lid; two positions are possible: low steam (a)
or high steam (b).
or example: for steam cooking, adjust the cap,
with the low steam part (a) facing towards you
(this allows the maximum amount of steam to be
dispersed into the bowl).
Position the bowl (D) on the motor unit (A) until
you hear a “click” (See Fig. 8).
• The appliance only starts up if the bowl and the
lid are correctly positioned and locked on the
motor unit.
US NG THE CONTROL PANEL (B)
Selecting an automatic programme:
Sauces Steam cooking
Soups
(to Read programme
P1 Smooth soup / P2 Soup with
small pieces.)
Pastry
(in programme P1 bread /
P2 brioche / P3 cake)
Stews
(in programme P1 vegetable
casserole / P2 stew / P3 risotto)
Desserts
n the event of incorrect positioning or
incorrect locking of either (See Fig. 10.1
and 10.2), the logo starts to flash when
a function is activated.
Selecting custom settings:
Selecting the motor speed.
2 intermittent speeds and 10
continuous progressive speeds.
Selecting cooking speed.
rom 30° to 130°C.
Heating indicator light: it lights up
when cooking starts and switches
off when the temperature inside
the bowl falls to below 50°C.
Selecting operating time.
rom 5 sec to 2 hours.
Selecting the turbo functions
(maximum speed in direct access)
and pulse (intermittent operation)
without using other settings.
Increase speed, cooking
temperature and duration.
Decrease speed, cooking
temperature and duration.
This button has 3 functions:
-“Validation” of the
choice of your automatic
programme or your
parameters chosen in
the context of manual
use (speed, cooking
temperature, time).
-“Pause” during use,
once the appliance has
been started up.
-“Reset” of the
parameters selected on
the appliance by
pressing for 2 seconds.
Tips for use:
Your appliance is fitted with a microprocessor that controls and analyses its stability. In the event
of instability, the motor rotation speed will be automatically reduced, if this instability continues,
the motor will be stopped and "STOP” will be displayed on the screen.
• Check that the quantity of ingredients is not too large and that the speed used is the correct
one.
• Check that you are using the recommended accessory.
• Then restart your appliance normally.

25
EN
24
EN
US NG THE APPL ANCE
Plug in the appliance, set the switch (H) to 1, and the LCD screen (C) displays all settings at “0”
(See Fig. 9)
AUTOMAT C PROGRAMME MODE
D SCOVER THE AUTOMAT C PROGRAMMES AVA LABLE:
Sauce Soup P1 Soup P2 Stew P1 Stew P2 Stew P3
Automatic
programmes
"Default"
speed
(adjustable)
V6
(V2 to V8)
10 Pulses
and V12 for
2 min.
10 Pulses V3 V1 V2
"Default"
temperature
(adjustable)
70°C
(50°C
to 100°C)
100°C
(90°C
to 100°C)
100°C
(90°C
to 100°C)
130°C
(non-
adjustable)
95°C
(80°C
to 100°C)
95°C
(80°C
to 100°C)
Time
speed
(adjustable)
8 min
(5 min
to 40 min)
40 min
(20min
to 60 min)
45 min
(20 min
to 60 min)
5 min
(2 min
to 15 min)
45 min
(10 min
to 2hr)
20 min
(10 min
to 2hr)
Steamed
dishes Pastry P1 Pastry P2 Pastry P3 Dessert
Automatic
programmes
"Default"
speed
(adjustable)
V5 for 2 min
30 sec
V5 for 1 min 30 sec
then V6 for 2 min
V3 for 40 sec
then V9 for 3 min
V4
(V2 to V8)
"Default"
temperature
(adjustable)
100°C
(non-
adjustable)
90°C
(50°C to
110°C)
Time
speed
(adjustable)
30 min
(1 min
to 60 min)
2 min 30 sec
(30 sec to
2 min 30sec)
3 min 30 sec
(30 sec to 3 min 30
sec)
3 min 40 sec
(1 min 40 sec
to 3 min 40 sec)
15 min
(5 min
to 60 min)
US NG THE STEAM BASKET
Cooking times are for information purposes
only; in most cases the food will be properly
cooked.
However, certain conditions may affect the coo-
king time:
- size of the vegetables (cut or uncut)
- quantity of ingredients in the basket
- type of vegetables, their ripeness
- quantity of water in the bowl, which corres-
ponds to the measurement (0.7l).
- When using the steam cap with 'low steam' fa-
cing towards you, remember that 'low steam'
means there will be more steam in the bowl
and the cooking process will be more efficient.
The 'low steam' position produces a
maximum amount of heat and steam
in the bowl when steam cooking
(soups, etc.).
This position also helps to avoid splashing du-
ring the mixing.
The 'high steam' position allows a
maximum amount of condensation to
escape and results in dishes and
sauces with a better consistency (risotto, des-
sert creams, sauces, etc.).
If the food is not properly cooked, you can set
an additional cooking time.
1- Press the programme of your
choice (B1), a triangle appears
on the screen (C4) in the
selected programme. In the
case of the soups, stews and
pastry programmes, successive
pressing takes you to the different sub-programmes.
2- The pre-programmed settings
can be modified for the time of
a recipe (depending on the
chosen recipe, ingredients and
quantities prepared). Press the
speed selector (B2) or the
cooking temperature selector (B3) or the time
selector (B4), the setting chosen will flash on the
screen (C1-C2-C3).
3- Adjust the setting(s) using
the +/- selector (B6).
4- When you have finished
modifying all your settings,
press the “start” button (B7)
to start the programme. When
your appliance is using cooking
mode, the red indicator light
(B3) lights up to inform you that cooking has
started.5- When the programme has ended, the
appliance emits 3 beeps.
6- At the end of the sauce, soup, stew
programmes P2 and P3, steam dishes and
desserts, the appliance automatically changes
to keep warm mode for 45 minutes to maintain
the preparation ready for consumption. In the
'sauces' programme, P2 and P3 stews, desserts
and manual mode, the appliance motor
functions at a specific speed, in order to
preserve the preparation and avoid it sticking
to the bottom of the bowl. To stop keep warm
mode, simply press the “stop” button (B7). If
you open the lid, press the locks (D2) or
remove the bowl and keep warm mode will be
automatically stopped.
At the end of kneading in the pastry
programmes P1 and P2, the appliance changes
to “dough rising” mode at 30°C for 40 minutes
to give your dough more volume. If you open
the lid, press the locks (D2) or remove the
bowl, the appliance changes to pause mode
and you have the possibility of restarting it by
pressing “start” again.
If you wish to stop this mode, press and hold
the “stop” button for 2 seconds.
7- Press the locks (D2) and then remove the bowl
assembly (D) (See Fig. 12).
When the automatic programme is started up, you
have the possibility of stopping the appliance at
any time by pressing the “stop” button. The
automatic programme is then in pause mode, you
have the possibility of restarting by pressing the
"start” button again. If you have chosen the
wrong programme and if you want to cancel it,
press and hold the "stop" button for 2 seconds.

27
EN
26
EN
MANUAL MODE
• The appliance should not be immersed. Never
put the motor unit (A) under running water.
Once you have finished using it, disconnect the
appliance.
• Clean the bowl immediately after use.
• Press the locks (D2) then lift the bowl
assembly (D).
• Place the bowl on a flat surface.
• Unlock the lid by rotating one quarter of a turn
clockwise. Carefully remove the lid.
• When the parts have cooled, unclip the seal
holder from the lid with help of the spatula (G)
(See Fig. 15).
• Take care with the knives of the ultrablade
chopping blade (F1) and the kneading /
crushing knife (F4) when you are cleaning
them and when you empty the bowl, they are
extremely sharp.
• When the parts have cooled down:
- dismantle the common spindle (D3), the seal
(D4) and the locking ring (D5) (See Fig. 13).
- clean the bowl (D), the common spindle
(D3), the seal (D4), the locking ring (D5),
the accessories (F1), (F2), (F3), (F4), (F5),
the steam regulator cap (E1), the lid (E2),
the seal holder (E3) and the seal (E4) using
a sponge and some soapy water.
• Rinse these different parts under running water.
• or baked-on food, let the bowl soak for several
hours in water and dishwashing detergent and
scrape, if necessary, with a spatula (G) or with
the abrasive side of a sponge.
• If there is a build up of limescale in the bowl,
use a damp sponge and, if necessary, white
vinegar.
• To clean the motor unit (A), use a damp cloth.
Dry carefully.
• To help you with cleaning, the bowl, lid
assembly and accessories are dishwasher safe,
with the exception of the common spindle (D3)
and its locking ring (D5) (See Fig. 14).
• The accessories, the detachable common
spindle and the parts of the lid may become
slightly discoloured with certain ingredients
such as curry, carrot juice, etc; this does not
represent any danger for your health or for the
operation of your appliance. To avoid this, clean
these parts immediately after use.
CLEAN NG YOUR APPL ANCE
Steam cooking time
ngredients Quantities (max) Estimated cooking times
Potatoes 1 kg 30 min
Carrots 1 kg 30 min
Courgettes 800 g 20 min
Parsnips 800 g 25 min
Leeks 800 g 25 min
Green beans 800 g 30 min
Broccoli 500 g 20 min
ish 600 g (with baking parchment) 15 min
White meat 600 g (with baking parchment) 20 min
You can also use the manual mode by selecting a temperature of 130°C and the cooking time according
to the quantity and type of ingredients: see table below.
Some recipes may cause unexpected overflow due to the appearance of bubbles, particularly
when using frozen vegetables. n this case, you should reduce the volumes accordingly.
Your appliance is equip-
ped, as standard, with
electronic motor protec-
tion to guarantee its lon-
gevity. This electronic
security safeguards
against incorrect use; in
this way, the motor is properly protected.
In cases of extreme use which disregard the re-
commendations in the instructions (see para-
graph ‘ IRST USE’: potentially excessively large
quantities and/or abnormally long use and/or
preparing different recipes at short intervals), the
electronic protection will be triggered to preserve
the motor; in this case, the appliance will stop
functioning and the message ‘SECU’ will be dis-
played on the LCD screen of the control panel to
indicate that the appliance is temporarily out of
service.
f ‘SECU’ is displayed on the control panel and
your appliance stops working, proceed accor-
dingly:
• Leave your appliance plugged in, do not press
the ‘0/1’ switch.
• Please refer to the recommendations in the ins-
tructions and readapt your use of the appliance
(see paragraph ‘ IRST USE’: amount of ingre-
dients/recipe preparation time/temperature/type
of accessories).
• Allow the motor to cool down for half an hour.
• Restart the appliance by clicking on the ‘Start
/Stop/Reset’ button for two seconds (see B7 in
the instructions).
Your appliance is now ready to be used again.
or further information, customer service depart-
ment is at your disposal (see details in the gua-
rantee booklet).
MPORTANT - ‘MAK NG YOUR APPL ANCE SECURE’ NSTRUCT ONS ( ‘SECU’ )
1- Press directly on the selector
representing the parameter
you have chosen to adjust,
i.e. the speed selector (B2)
or the cooking temperature
selector (B3) or the time
selector (B4), the chosen parameter flashes on
the screen (C1- C2-C3).
2- Then adjust the setting(s)
using the +/- selector (B6).
or safety reasons, it is not
possible to set a temperature
without setting a cooking
time.
3- When you have finished
entering all your parameters,
press the “start” button
(B7). When your appliance is
using cooking mode, the red
indicator light (B3) lights up
to inform you that cooking has started. When the
programme has started, you have the possibility
of stopping the appliance at any time by pressing
the “stop” button.
The programme is then in pause mode and you
have the possibility of restarting by pressing
“start” again. If you have chosen the wrong
programme and if you want to cancel it, press and
hold the "stop" button for 2 seconds.
4- When the programme has ended, the appliance
emits 3 beeps.
5- Press the locks (D2) and then remove the bowl
assembly (D) (See Fig. 12).
Turbo / Pulse functions
1- Use the control panel (B) to directly access
the “turbo” and “pulse” functions (B5). To use
in turbo mode (maximum speed in direct
access), simply press and hold the “turbo”
selector. The LCD screen then displays the time
in use (C3) to help you. To use the pulse
(intermittent operation), activate and stop the
function by simply pressing the “pulse”
selector. Here too, the LCD screen helps you by
indicating the time in use. When the function
has started up, you have the possibility of
stopping the appliance at any time by pressing
the “stop” button. The function is then in
pause mode, you have the possibility of
restarting by pressing the "start” button
again.

29
EN
28
EN
WHAT TO DO F YOUR APPL ANCE DOES NOT WORK PROBLEMS CAUSES SOLUT ONS
Leak through lid.
Volume of ingredients too high. Reduce the quantity of ingredients pro-
cessed.
The lid is not correctly positioned or locked. Lock the lid correctly on the bowl.
The seal is not present. Position the seal on the seal holder and
clip the assembly to the lid.
The seal is cut or damaged. Change the seal, contact an approved ser-
vice centre.
Accessory error. Check that you are using the recommen-
ded accessory.
Leak through the bowl
spindle.
The seal is not correctly positioned. Position the seal correctly.
The seal is damaged. Contact an approved service centre.
The locking ring (D5) is not locked correctly. Lock the ring correctly (D5).
The blades do not rotate
easily.
Pieces of food that are too big or too
hard.
Reduce the size or quantity of the ingre-
dients processed. Add some liquid.
Smell from motor.
On using the appliance for the first time, or
in the event of overload of the motor cau-
sed by too large a quantity of ingredients or
by pieces that are too hard or too big.
Allow the motor to cool down (about
30 minutes) and reduce the number of
ingredients in the bowl.
“STOP” is displayed.
The appliance has detected too many vi-
brations and has changed to the safety
position.
Check that you are at the right speed
and that you are using the recommended
accessory.
“SECU” is displayed.
Motor overload caused by too many in-
gredients or pieces which are too hard or
too large or overuse without sufficient
cooling down time.
Allow the motor to cool down (about
30 minutes) and reduce the number of
ingredients in the bowl.
“SECU” is displayed + red
indicator light is flashing. Overheating of temperature sensors. Contact an approved service centre.
“Err1” is displayed.
+ red indicator light is
flashing.
The heating element is not working.
Check that the power pins under the bowl
are not clogged. If this is the case, clean
them and try again.
If that still does not work, contact an ap-
proved service centre.
“Err2” is displayed. Electronic fault. Contact an approved service centre.
“Err3” is displayed. Speed fault. Contact an approved service centre.
“Err4” is displayed. Communication fault with chopper elec-
tronic card. Contact an approved service centre.
“ntc1” is displayed.
+ red indicator light is
flashing.
Temperature sensor 1 is no longer wor-
king. Contact an approved service centre.
“ntc2” is displayed.
+ red indicator light is
flashing.
Temperature sensor 2 is no longer wor-
king. Contact an approved service centre.
PROBLEMS CAUSES SOLUT ONS
Problems when steam
cooking.
The steam regulator cap is not properly
attached.
Position the steam cap with the 'low steam'
facing towards you;
"low steam" means "small steam extraction",
so there will be more steam in the bowl and
the cooking process will be more efficient.
The 'low steam' position allows a maximum
amount of heat and steam to be dispersed
into the bowl for all steam cooking (soups,
etc.). This position also helps to avoid
splashing during cooking.
The 'high steam' position allows a
maximum amount of condensation to
escape and results in dishes or sauces with
a better consistency (risotto, cream
desserts, sauces, etc.).
Insufficient cooking time
Cooking times are for information purposes only;
in most cases it ensures that the food is properly
cooked.
However, certain conditions may affect the
cooking time:
- size of the vegetables (cut or uncut)
- quantity of ingredients in the basket
- type of vegetables, their ripeness
- quantity of water in the bowl, which corresponds
to the measurement (0.7l).
If the food is not properly cooked, you can set an
additional cooking time.
You can also use the manual mode by selecting a
temperature of 130°C and the cooking time
according to the quantity and type of ingredients.
The appliance does not
work.
It is not plugged in. Plug the appliance into an electrical
socket.
The switch (H) is in position 0. Move the switch to position 1.
The bowl or the lid are not correctly po-
sitioned or locked.
Check that the bowl or the lid are correctly
positioned and locked according to the
diagrams in the instruction manual.
The lid does not lock. The lid is not fully assembled.
Check that the seal is correctly assembled on
the seal holder and that the seal holder is
correctly assembled on the lid.
Excessive vibration.
The appliance is not positioned on a flat
surface, the appliance is not stable. Place the appliance on a flat surface.
Volume of ingredients too high. Reduce the quantity of ingredients proces-
sed.
Accessory error. Check that you are using the recommended
accessory. s your appliance still not working?
Contact an approved service centre (see list in service booklet).

31
NL
30
EN
• Elimination of packaging and appliance materials.
The packaging exclusively contains materials that are not dangerous to the environment,
which can be disposed of in accordance with the recycling regulations in force.
To dispose of your appliance, ask the appropriate department of your local authority.
• End-of-life electronic or electrical appliances:
Environmental protection first!
Your appliance contains numerous materials that can be recovered or recycled.
Take it to a collection point for processing.
RECYCL NG
Ten aanzien van de persoonlijke
veiligheid
• Lees de gebruiksaanwijzing aandachtig
voor het eerste gebruik en bewaar ze
zorgvuldig: Niet-naleving ontheft de
fabrikant van alle aansprakelijkheid.
• Trek de stekker van het apparaat uit
het stopcontact wanneer u het
apparaat zonder toezicht laat en
voordat u het monteert,
demonteert, of schoonmaakt. Laat
kinderen dit apparaat niet zonder
toezicht gebruiken.
• Bewaar dit apparaat en het snoer
buiten het bereik van kinderen.
• Dit apparaat mag niet worden
gebruikt door personen (of
kinderen) met verminderde, fysieke,
zintuiglijke of mentale capaciteiten,
of personen die te weinig ervaring
of kennis hebben tenzij ze onder de
supervisie staan van een persoon
die voor hen verantwoordelijk is of
als ze genoeg richtlijnen gekregen
hebben om het apparaat correct te
hanteren.
Er moet toezicht op kinderen zijn,
zodat zij niet met het apparaat
kunnen spelen.
• Houd uw apparaat buiten het bereik
van kinderen.
• Tijdens het gebruik van
het apparaat kunnen
bepaalde onderdelen
zeer warm worden
(wand van de roestvrijstalen kom,
afneembare aandrijfas, doorzichtige
delen van het deksel en de dop,
metalen delen onder de kom, mand).
Ze kunnen brandwonden veroorzaken.
Houd het apparaat vast aan de koude,
plastic onderdelen (handvatten,
motorblok). Het rode controlelampje
geeft aan dat er gevaar voor
verbranding bestaat.
• De toegankelijke oppervlakken van
het apparaat kunnen zeer warm
worden tijdens het gebruik.
• Het apparaat is niet ontworpen om
met een externe timer of
afstandsbediening te worden
bestuurd.
• Gebruik uw apparaat niet als het niet
correct werkt of als het apparaat, het
netsnoer of de stekker is beschadigd.
Om gevaarlijke situaties te
voorkomen, dient u het netsnoer
door een erkend service center te
laten vervangen (zie bijgevoegde
lijst).
• Houd het apparaat nooit onder de
kraan. Houd het motorblok (A) niet
onder stromend water.
VE L GHE DSVOORSCHR FTEN:

33
NL
32
NL
WAARSCHUW NG: Het oppervlak van
het verwarmingselement blijft na
gebruik nog even warm.
Raak tijdens het opwarmen en tot
alles volledig is afgekoeld enkel de
handgrepen van uw product aan
(trekkers D2, handgreep van het
deksel E2 en van de stoomregeldop
E1) .
Raadpleeg de gebruiksaanwijzing
voor het instellen van de
werkingssnelheid en -tijd van elk
accessoire en elk programma.
Raadpleeg de gebruiksaanwijzing
voor het monteren en demonteren
van de accessoires op het apparaat.
Raadpleeg de gebruiksaanwijzing
voor het reinigen en onderhouden
van uw apparaat.
Volg voor de reiniging van uw apparaat
steeds de reinigingsinstructies:
• Het apparaat uitschakelen.
• Niet reinigen als het apparaat nog
warm is.
• Reinigen met een vochtige doek
of spons.
• Het apparaat nooit in water
onderdompelen of onder stromend
water houden.
U TSLU TEND VOOR DE EUROPESE
MARKT:
• Bewaar het apparaat en het snoer
buiten het bereik van kinderen
jonger dan 8 jaar.
Kinderen mogen niet met het
apparaat spelen.
• Dit apparaat mag worden gebruikt
door personen met verminderde
fysieke, mentale of zintuiglijke
capaciteiten of personen die te
weinig ervaring of kennis hebben als
ze onder toezicht staan of als ze
richtlijnen hebben gekregen om het
apparaat veilig te kunnen hanteren
en de risico's kennen.
• Dit apparaat mag worden gebruikt
door kinderen vanaf 8 jaar als ze
onder toezicht staan of als ze
richtlijnen hebben gekregen om het
apparaat veilig te kunnen hanteren
en de risico's kennen. De reinigings-
en onderhoudswerkzaamheden
mogen niet door kinderen zonder
toezicht worden uitgevoerd tenzij ze
ouder zijn dan 8 jaar en onder
toezicht staan van een volwassene.
Ten aanzien van de elektrische
aansluiting
• U moet de stekker van het apparaat
in een geaard stopcontact steken.
•
Het apparaat is uitsluitend geschikt om
op wisselstroom te werken.
Controleer
• Dit apparaat is uitsluitend geschikt voor
huishoudelijk gebruik binnenshuis en
op een hoogte van minder dan 2000 m.
De fabrikant is niet verantwoordelijk
en behoudt zich het recht voor de
garantie te annuleren in geval van
commercieel of oneigenlijk gebruik of
niet-naleving van de instructies.
• Dit apparaat is niet bedoeld voor
gebruik in huishoudelijke of analoge
toepassingen (gebruik dat niet onder
de garantie valt) zoals
- in keukens van winkels, kantoren
en andere werkomgevingen.
- in personeelskeukens van winkels,
kantoren en andere
werkomgevingen.
- door de gasten van hotels, motels
of andere verblijfsvormen.
• Uw apparaat geeft
hete stoom af die
brandwonden kan
veroorzaken. Ga
voorzichtig om met het deksel en de
dop (gebruik indien nodig een
handschoen, een pannenlap ... ).
Houd de dop vast aan het middelste
gedeelte.
• Gebruik het apparaat nooit als de
afdichtingsring niet op de
afdichtingsringhouder en de
afdichtingsringhouder niet op het
deksel is geplaatst. U moet de
dop op de opening in het deksel
plaatsen voor gebruik (tenzij
anders vermeld in het recept).
WAARSCHUW NG : let
op voor verwondingen
door slecht gebruik van
het apparaat.
Wees voorzichtig wanneer u de
messen van het
ultrablade
hakmes
(F1) en van het
mes
om te kneden/hakken
(F4)
schoonmaakt en de kom leegt. De
messen zijn zeer scherp.
Wees voorzichtig wanneer u een
warme vloeistof in de keukenmachine
giet. De vloeistof kan uit het
apparaat spuiten wanneer haar
kookpunt wordt bereikt.
Berg het ultrablade hakmes (F1) op
in de kom na elk gebruik.
WAARSCHUW NG: Ga voorzichtig te
werk als u het apparaat hanteert
(reinigen, vullen en uitgieten): zorg
ervoor dat er geen vloeistof op de
contacten terechtkomt.
WAARSCHUW NG: Uw apparaat geeft
stoom af die brandwonden kan
veroorzaken.

35
NL
34
NL
of de voedingsspanning op de
gegevensplaat van het apparaat
overeenkomt met de spanning van
uw elektrische installatie.
• Als u het apparaat niet correct
aansluit, vervalt de garantie.
• Trek nooit aan het snoer om de
stekker van het apparaat uit het
stopcontact te trekken.
• Dompel het apparaat, het snoer of
de stekker nooit in vloeistof.
• Laat het netsnoer niet in aanraking
komen met of in de buurt hangen
van de warme onderdelen van het
apparaat of van een warmtebron of
over scherpe randen hangen.
Ten aanzien van een slecht gebruik
• Raak het deksel niet aan voordat
het apparaat volledig tot stilstand
is gekomen ('stop'-knop), wacht
tot de gemixte ingrediënten tot
stilstand zijn gekomen.
• Doe altijd eerst de vaste
ingrediënten in de kom en voeg
daarna de vloeibare ingrediënten
toe (Cf. Fig. 11.1). Respecteer
altijd de aanduiding 2,5 L MAX aan
de binnenkant van de kom (Cf. Fig.
11.2). Als de kom te vol is, kan er
kokend water uit spuiten.
• Let op. Respecteer het niveau van
0,7 liter water dat wordt aangegeven
in het stoomkookprogramma (Cf.
Fig. 4.2).
• Steek nooit uw vingers of andere
voorwerpen in de kom wanneer het
apparaat in werking is.
• Gebruik de kom niet om
ingrediënten te bewaren, in te
vriezen, te steriliseren…
• Zet het apparaat op een stabiel,
hittebestendig, schoon en droog
werkvlak.
• Zet het apparaat niet naast een
muur of kast: de geproduceerde
stoom kan de elementen
beschadigen.
• Plaats uw apparaat niet in de buurt
van een ingeschakelde warmtebron
(kookplaat, huishoudapparaat ...).
• Bedek uw deksel niet met een doek
of een ander voorwerp, stop de
opening in het deksel niet dicht,
gebruik de stoomregelknop.
• Zorg ervoor dat er geen lang haar,
sjaals, stropdassen ... boven de kom
hangen wanneer het apparaat in
werking is.
• Plaats de accessoires nooit in de
magnetron.
• Het apparaat niet in de open lucht
gebruiken.
• Overschrijd nooit de maximale
hoeveelheid die wordt aangegeven
in de gebruiksaanwijzing.
• Berg het apparaat op wanneer het
is afgekoeld.
SAV
• Voor uw eigen veiligheid dient u
geen andere accessoires of
onderdelen te gebruiken dan die
door de erkende service centers
worden geleverd.
• Elke handeling anders dan gewone
onderhouds- of schoonmaakwerk-
zaamheden dient door een erkend
service center te worden uitgevoerd.
• Raadpleeg de tabel "Uw apparaat
werkt niet. Wat nu? ” aan het einde
van de gebruiksaanwijzing.
Other manuals for Cuisine Companion
1
Table of contents
Languages:
Other Moulinex Range manuals
Popular Range manuals by other brands

GE
GE JBP81TMWW owner's manual

Whirlpool
Whirlpool WFG114SVT0 installation instructions

Frigidaire
Frigidaire FGF318MXECA installation instructions

Frigidaire
Frigidaire FES300ASF installation instructions

Bosch
Bosch Electric Range with Magnetic Control Knob and European... use and care manual

Bosch
Bosch HEIP056U use and care manual