Mountfield ROWEN User manual

1
INSTRUCTION
FOR INSTALLATION AND USE
The pictures show in this handbook need not always correspond to the particular embodiment;
their purpose of to assist better understanding of the textual instruction.
The manufacturer and the supplier reserve the right for product changes
without the obligation to update this Instruction for Installation and Use.
Sauna: Discover the spell
of relaxation and health
Infrasauna
ROWEN
Before rst use of your sauna please read carefully all the instructions includ-
ed in this hand book and observe them.
Installation and use of this electrical equipment requires permanent compli-
ance with the related basic safety measures. Use a power socket for this ap-
pliance powering installed pursuant to applicable technical standards and
provided with a circuit breaker with the corresponding current value and charac-
teristics. It is also recommended to equip the power input with a current protector
with the permitted current not exceeding 30 mA, especially in cases of installation
in bathrooms or other wet rooms.
Do not use your sauna in a close proximity to water, such as close to a bathtub
or on a wet ground or near a pool etc.
The power cable should be laid to prevent stepping on or squeezing be-
tween elements placed on or against it. Assure proper protection of the
power cable, do not lay it straight on the ground, which is dangerous. When
unused, pull the sauna power cable out of the socket and wind it. Disconnect the
power cable by pulling the fork, not the rod. Otherwise the cable or the socket
might get damaged.
Before every star of the sauna check it for signs of damage and presence of
objects inside.
Warning: Do not touch the heating radiators while operating the sauna, their
surface temperature exceeds 70°C and contact with their surface may cause
burns. Do not over the heaters, risk of re.
In the case of the need for any part replacement, satisfy yourself that the
spares are speci ed by the manufacturer or have the same characteristics as
the original parts. Use of unauthorised spare part may cause re, electrical
shock or another hazard. After repair ask the service technician for safety checks
to assure correct operable condition of the sauna, only then you can use it again.
The equipment is not designed for the use by persons (including children)
with reduced physical, sensory or mental capacities, unless a supervision and
training by a quali ed person is provided; persons not familiar with the op-
eration in the scope of this manual; persons under the in uence of drugs, intoxicat-
ing substances etc., reducing the capability of quick reaction.
Do not use the sauna immediately after intensive physical exercise. Wait for
at least 30 minutes to permit your body cool down properly.
Risk of overheating. Normal body temperature should not rise above
39°C (103°F). Symptoms of body overheating include vertigo, lethargy,
drowsiness and faintness. Consequences of body overheating may in-
clude inability to perceive heat, physical impossibility to leave the sauna, un-
awareness of the pending risk, loss of conscience and damage to the foetus in
2
Safety Information
the case of pregnant women. Overheating increases temperature inside your
body, therefore high sauna temperature setting is not recommended.
Use of alcohol, narcotics or certain drugs before or during use of the sauna
may lead to loss of conscience.
Never fall asleep inside a working sauna.
Do not use steam cleaners, pressure cleaners or water sprays for cleaning
your sauna. Use cleaners speci ed for this use.
Do not place any objects on the top or inside walls of your sauna. Do not
take in pets and metal objects into the sauna. Sauna is not designed for
laundry drying.
If the power cable is damaged have it replaced immediately by the man-
ufacturer, its representative or another quali ed electrician. if the power
cable is found to be too hot there may be a problem in the electrical
equipment, ask the manufacturer or its representative for a check if you nd
this to prevent hazard.
Do not use sauna during storm to prevent electrical shock.
Do not switch on and o the power and the heating system to prevent damage
to the electrical equipment.
Place the cable in the socket or pull it out of the socket with dry hands only.
Never touch the cable with wet hands or feet, risk of electrical shock. Do not
touch the metal outlet parts or the power cable fork with your ngers.
Do not use your sauna if the power cable or the sauna itself is damaged or
operates incorrectly. Do not attempt at any repair yourself, in the case of a
problem contact your dealer or the manufacturer to prevent violation of the
applicable safety principles. Unauthorised intervention may invalidate manufac-
turer´s warranty.
Make sure the socket for sauna connection to the mains possesses su cient
parameters for the sauna operation, in the case of too low power input the
socket may get overheated and cause re.
In the case of some sauna models with roof lights the light temperature after
switching on the sauna and the lights is high. Do not touch the light to prevent
skin burns. Do not touch the lights for 20 minutes after the heating stop.
Do not pour water or other liquids onto the infra red heating units another
electrical equipment and avoid hitting them with hard objects to prevent
short circuit, re or power cut.
3

It is recommended not to use sauna in 24 hours from exposure to UV ra-
diation from arti cial sources or sun bath.
Prescription drugs: ask your doctor or pharmacist about potential inter-
action of the sauna with your medication. Some drugs, such as diuretics,
antihistamines, beta blockers and barbiturates may negatively a ect the natu-
ral heat regulating property of human body. This category includes both pre-
scription and some over-the-counter drugs.
Heart diseases: infra red therapy is not recommended to patients with
some heart diseases including hypertension or hypotension, chronic
heart failure or problems with coronary circulation. If you su er from any of
the above mentioned diseases, long exposure to increased temperatures may
be dangerous for direct e ects of the heat include increased heartbeat by about
10 pulses per minute (in some cases by up to 30 pulses per minute) per one
degree of raise body temperature. This contraindication also applies to pa-
tients taking drugs for their blood pressure control or using pacemaker - some
infra red saunas may contain magnets that may a ect pacemaker operation.
Children and seniors are the two age groups for which sauna use should
rst be consulted with a doctor. Although sauna use is generally safe and
healthy for both these age groups, body temperature rises much quicker in
children than in adults and their thermal regulation property by sweating is
not as developed as in the case of adults. Similarly the ability to keep the opti-
mum body temperature and the function of the sweat glands is reduced with
increasing age and that is why both these age groups require caution and con-
sultation with a doctor before use of infra red therapy.
Joint issues: acute joint injury should not be heated in the course of the
rst 48 hours or until the associated reddening or swell disappears.
Chronic joint swells may not react positively to sauna use.
Pregnancy: infra red sauna use during (suspected) pregnancy is not rec-
ommended. Increased body temperature may increase temperature of the
amniotic uid which in extreme cases may lead to damage to the foetus or in-
digenous defect development. Pregnant women may develop body overheating
leading to loss of conscience more easily. The heart and the vascular system
increase their performance in the case of pregnancy even under normal ambi-
ent conditions to be able to feed the developing foetus, and body overheating
further increases the demand for the heart and the vascular system. This re-
duces bloodstream to the internal anatomies including the heart and may lead
to loss of conscience.
Certain other diseases: increased body temperature may not be suitable
for individuals with multiple sclerosis, systemic lupus erythematodes,
diabetic neuropathy, Parkinson disease, tumours of the central nerve system or
When not tou use sauna
4
adrenalin insu ciency (for example in the case of Addison disease). People
su ering from haemophilia or bleeding episodes should also avoid sauna use
for heat widens the blood vessels.
Sauna is further not recommended to people su ering from fever or sen-
sitive to heat. Metal screws, joint replacements and other implants usu-
ally re ect long-wave infra red radiation and therefore do not heat up. On the
other hand, silicon implants absorb infra red radiation and may heat together
with the surrounding tissue, but as silicon melts at temperatures over 200°C,
infra red light should not have any negative e ect on therm. However, every
patient with an implant should consult sauna use with their surgeon. Like in
the case of massage sauna use is not recommended in the case of any infectious
disease, under the e ect of alcohol or narcotics. And like in the case of any
other similar activity: If you feel discomfort inside your sauna, or even pain or
worsening of your health state, leave the sauna immediately.
In the case of any health problems always consult sau-
na use with your attending physician!
Caution: If your skin reddening persists for more than
one day after sauna use, do not repeat sauna therapy
and consult your doctor.
5

6
Product Introduction
Infra red sauna (infrasauna) consists of a wooden cabin, ceramic or carbon
infra red heaters and a control system. The wooden cabin comprises a BOT-
TOM PLATE, A REAR PLATE, A LEFT PLATE, A RIGHT PLATE, A FRONT PLATE,
2 PLATES WITH HEATERS FOR THE BENCH, 2 BENCHES, A TOP PLATE AND A
TOP COVER.
6
PŘEDSTAVENÍ VÝROBKU
Vnější pohled Vnitřní pohled
1. Skleněně dveře
2. Madlo dveří
3. Kyslíkový ionizátor
4. Ovládací panel
5. MP3/rádio
6. Barevná terapie
7. Čtecí lampa
8. Reproduktor
9. Teplotní čidlo
10. Větrací mřížka
11. Karbonové topné těleso
12. Lavice
13. Deska pro topné těleso lavice
14. Deska pro podlahové topné těleso
15. Držák na nápoje
1
2
8
3
7
6
9
8
10
11
11
12
13
14
15
12
13
44
5
Infračervená sauna (infrasauna) je tvořena dřevěnou kabinou, infračervenými topnými keramickými
nebo karbonovými tělesy a ovládacím systémem. Dřevěná kabina obsahuje SPODNÍ DESKU,
ZADNÍ DESKU, LEVOU DESKU, PRAVOU DESKU, PŘEDNÍ DESKU, 2 DESKY PRO TOPNÉ
TĚLESO LAVICE, 2 LAVICE, HORNÍ DESKU, HORNÍ KRYT.
Exterior view Interior view
Door handle
Glass door
Oxygen ioniser
Control panel Control panel
Reading lamp
Loudspeaker
Loudspeaker
Temperature sensor
Ventilation grille
Bench Bench
Plate for
bench heater Plate for
bench heater
MP3/radio
Drink holder
Colour therapy
Carbon heater
Carbon heater
Plate for underoor
heating element

7
Control Cabinet
The control cabinet is the control cen-
tre of the sauna. The control cabinet
is pre-installed in the TOP PLATE and
only needs cable end connections.
Buckle
Standard buckles for the sauna body connection
7
OVLÁDACÍ SKŘÍŇKA
Ovládací skříňka je řídícím
centrem sauny. Je namontována
na HORNÍ DESCE, při montáži
je nutno pouze propojit příslušné
koncovky kabelů.
8
PŘEZKA
MONTÁŽNÍ POKYNY
Standardní přezky pro spojení tělesa sauny
Před montáží si pečlivě prostudujte návod k obsluze. Pro montáž sauny jsou požadovány
2 dospělé osoby.
Poznámka: Prostudujte si pečlivě všechny pokyny předtím, než přistoupíte k montáži sauny,
a mějte na paměti, že při jejím používání by měla být vždy dodržena základní bezpečnostní opatření.
Před samotnou instalací je důležité vybrat vhodné místo pro umístění sauny:
1) Umístění sauny je možné pouze v temperovaném prostoru s nízkou vzdušnou vlhkostí. Vyvarujte
se umístění sauny ve vlhkých prostorách se špatnou ventilací (cirkulací vzduchu). Zahříváním
sauny dochází ve vlhkých prostorách ke kondenzaci vzdušné vlhkosti, což může mít při
dlouhodobém používání negativní vliv na životnost především elektronických součástí sauny.
2) Doporučujeme umístit saunu v prostoru s teplotou vzduchu alespoň 15°C. Vnější okolní teplota
přímo ovlivňuje vnitřní teplotu sauny. Pokud umístíte saunu do chladného prostředí, nedosáhne
vnitřní teplota v sauně udávaných maximálních hodnot.
3) Sauna musí stát v rovině. Je nutné zajistit, aby podklad pod saunou byl pevný a vodorovný
a dostatečně únosný pro hmotnost sauny a saunujících se osob. Nerovné povrchy je nutné
vyrovnat.
4) Místo pro saunu musí být v bezpečné vzdálenosti od zdroje tekoucí vody (vany, sprchy,
umyvadla apod.).
5) V blízkosti sauny, tj. v dosahu jejího přívodního kabelu, musí být instalována zásuvka elektrického
napájecího přívodu 230V/50Hz s dostatečným proudovým jištěním, odpovídajícímu proudovému
odběru (příkonu) sauny - viz výrobní štítek sauny. Doporučujeme napájecí přívod osadit
i proudovým chráničem s vybavovacím proudem nepřesahujícím 30 mA, zejména při instalaci
v koupelnách nebo jiných vlhkých prostorech.
6) Přívodní kabel napájení musí být snadno přístupný, aby v případě nutnosti bylo možné rychle
odpojit přívodní kabel od zdroje elektrické energie.
8
Read the instruction for use carefully before assembly. The sauna assembly
requires two adult persons.
Note: Read all instructions carefully before starting the assembly and remem-
ber to observe all applicable basic safety measures.
Find the right place for the sauna installation rst.
Sauna should be placed in a tempered space with low air humidity. Avoid
sauna installation in wet spaces with poor ventilation (air circulation).
sauna heating leads to humidity condensation in wet areas which may
shorten life especially of electrical equipment of the sauna in the case of
long-term use.
Sauna is recommended to be installed in a space with ambient tempera-
ture of at least 15°C. Ambient temperature directly aects inside tem-
perature of the sauna. In the case of sauna installation in a cold room its
inside temperature will never reach the specied maximum values.
Sauna must be installed on even ground. The sauna base must be at and
rm and its load-bearing capacity must suit the weight of the sauna and
the persons inside it. Uneven base must be levelled.
The sauna location must be within a safe distance from any running wa-
ter source (bath tub, shower, wash basin, kitchen sink etc.).
Close to the sauna location, i.e. Within its pow-
er cable reach, there must be an electrical inlet
socket 230V/50Hz with sucient current pro-
tection corresponding to the sauna power in-
put - see the sauna production plate. It is also
recommended to equip the power input with a
current protector with the permitted current
not exceeding 30 mA, especially in cases of in-
stallation in bathrooms or other wet rooms.
The power cable must be easily accessible for
quick disconnection from power in case of need.
1) REQUIRED TOOLS
A screwdriver, steps
2) ASSEMBLY STEPS
THE BOTTOM PLATE THE REAR PLATE THE
LEFT PLATE THE RIGHT PLATE THE FRONT
PLATE 2 PLATES WITH HEATERS FOR THE BENCH
2 BENCHES THE TOP PLATE THE TOP COVER
Assembly Instructions
9
1) POŽADOVANÉ NÁSTROJE
Šroubovák, schůdky
2) POŘADÍ PRO MONTÁŽ
SPODNÍ DESKA ➙ ZADNÍ DESKA ➙ LEVÁ DESKA ➙ PRAVÁ DESKA ➙ DESKA PRO PODLAHOVÉ
TOPNÉ TĚLESO ➙ LAVICE ➙ PŘEDNÍ DESKA ➙ HORNÍ DESKA ➙ HORNÍ KRYT
Poznámka:
– Na dřevěných částech sauny, které jsou pohledově skryty, se mohou vyskytovat drobná
poškození vzniklá při výrobě (vrypy, škrábance aj.), které nemají vliv na funkci sauny ani
nesnižují její konečný vzhled.
– V průběhu užívání sauny mohou ve dřevě vznikat drobné trhliny. To není vadou výrobku, ale
běžnou vlastností použitého dřeva.
– Dveře sauny nejsou konstruovány pro hermetické uzavření sauny. Používáte-li saunu
na chladném místě, můžete dveře opatřit vhodným těsněním.
– Pro snadnou instalaci rozlišujte charakteristiky každé desky popsané níže.
9
Note:
The invisible wooden parts of the sauna may contain minor damage from
the manufacture (indentations, scratches etc.) not aecting the sauna
function or its outer appearance.
Hair tears may develop in the sauna wood in the course of use. This is not
product damage but natural property of the wood.
The sauna door is not constructed for hermetic seal of the sauna. In the
case of sauna use in a cold place you can provide the sauna door with
appropriate seal.
A. Install the BOTTOM PLATE
Place the bottom plate on the oor.
B. Install the REAR PLATE
Place the rear plate on the rear edge of
the bottom plate and have somebody
hold it.
C. Install the LEFT/RIGHT PLATE
Place the left plate on the edge of the
bottom plate and x it rmly with the
clasps. As soon as the left plate will be
xed in place, install the right plate in
the same manner.
10
MONTÁŽNÍ POKYNY
A. Umístěte SPODNÍ DESKU
Umístěte SPODNÍ DESKU na
podlahu.
B. Umístěte ZADNÍ DESKU
Umístěte ZADNÍ DESKU na zadní hranu SPODNÍ DESKY. Nyní je potřeba, aby ji druhá osoba
přidržela.
C. Nainstalujte LEVOU/PRAVOU DESKU
Umístěte LEVOU DESKU na hranu SPODNÍ DESKY a pevně ji zajistěte přezkami. Jakmile bude
LEVÁ DESKA upevněna, namontujte stejným způsobem PRAVOU DESKU.
10
D. Install the BENCH and the CABLE CON-
NECTIONS
Insert the Plate with the bench heating
elements into the appropriate vertical
grooves in the REAR PLATE. The grille of
the heating element should face outwards
(toward the center of the sauna). Push the
Board with the bench heating elements
along the full path downwards until the
entire board is in full contact with the
BOTTOM BOARD. Install the second plate
with bench heating elements in this way.
Connect the connectors of the bench heat-
ing elements and the oor to the opposite
connectors, which are on the LEFT and
RIGHT PLATE.
Place the BENCHES on the Board with the
bench heating elements and the ttings
on the LEFT and RIGHT PLATE.
E. Install the FRONT BOARD
Position the FRONT BOARD on the front
part of the BOTTOM BOARD. Align it with
the LEFT/RIGHT BOARD and secure it in
place with the clasps.
Assembly Instructions
11
D. Nainstalujte LAVICI a proveďte kabelové
propojení
DESKU S TOPNÝMI TĚLESY PRO LAVICI nasuňte
do příslušné vertikální drážky v ZADNÍ DESCE.
Mřížka topného tělesa směřuje ven (směrem
ke středu sauny). Zatlačte DESKU S TOPNÝMI
TĚLESY PRO LAVICI po celé dráze směrem
dolů, dokud se nebude po celé délce dotýkat
SPODNÍ DESKY. Takto nasaďte i druhou DESKU
S TOPNÝMI TĚLESY PRO LAVICI.
Zapojte konektory topných těles lavice a podlahy
do opačných konektorů, které se nachází na LEVÉ/
PRAVÉ DESCE.
LAVICE položte na DESKU S TOPNÝMI TĚLESY
PRO LAVICI a osazení na LEVÉ/PRAVÉ DESCE.
E. Nainstalujte PŘEDNÍ DESKU
Umístěte PŘEDNÍ DESKU na přední
část SPODNÍ DESKY. Vyrovnejte ji
s LEVOU/PRAVOU DESKOU a proveďte
její zajištění na daném místě upevněním
přezek.

11
F. Install the HANDLE
Install the two-piece handle in the door.
G. Install the TOP PLATE
The side with the CONTROL CABINET is the top side of
the TOP PLATE.
Note: Protect the conductors in the FRONT, REAR and
SIDE PLATES against damage when installing the TOP
PLATE. The holes in the TOP PLATE should be aligned
with the cables along the sauna perimeter for the con-
ductors to be pulled through the TOP plate. Otherwise
the conductors may get damaged.
Pull the conductors through the holes in the TOP
PLATE. As soon as all conductors are through lower the
TOP PLATE in its place and make sure all holes are lo-
cated correctly.
12
G. Umístěte HORNÍ DESKU
Strana s OVLÁDACÍ SKŘÍŇKOU je horní stranou
HORNÍ DESKY.
Poznámka: Postupujte opatrně v souvislosti
s vodiči v PŘEDNÍ DESCE, ZADNÍ DESCE
a BOČNÍCH DESKÁCH, když budete umísťovat
HORNÍ DESKU. Otvory v HORNÍ DESCE by
měly být vyrovnány s kabely po obvodu sauny,
aby bylo možno protáhnout vodiče skrze HORNÍ
desku. Pokud byste tak neučinili, mohlo by to vést
k poškození vodičů.
Protáhněte vodiče skrz otvory v HORNÍ DESCE.
Jakmile budou všechny vodiče protaženy, spusťte
HORNÍ DESKU dolů na místo a ujistěte se, že
všechny otvory jsou na odpovídajících místech.
F. Nainstalujte MADLO
Do DVEŘÍ namontujte dvoudílné MADLO.
Z vnitřní strany přiložte část opatřenou
závitem tak, že mezi sklem a madlem
umístíte dodané podložky (plastovou
ke sklu). Z vnější strany opět použijete
obě podložky (plastovou ke sklu)
a pomocí misky a šroubu madlo připevníte
(dbejte na to, aby otvory v miskách byly
ve vodorovné ose). Na misky nasaďte
vnější část madla a přišroubujte ho pomocí
4 šroubků.

12
H. Connecting TOP PLATE plugs
Connect all cables. In the case of identical connectors observe the conductor
colour code.
Note: Do not plug in the power cord of the TOP PLATE during installation.
I. Install the TOP COVER
Lift the TOP COVER to the sauna top.
Pull the power cord through the round
hole in the
TOP COVER and place the TOP COVER
on the TOP PLATE. Align the TOP COV-
ER with the TOP PLATE and screw with
the bolts in the places designed for that
purpose.
J. Install and connect the IONISER
Screw the IONISER in the right place in
the REAR RIGHT PLATE and connect the
power cable.
K. Screw on the DRINKS HOLDER
Use two screws to x the DRINKS HOLD-
ER at an appropriate place on the LEFT
or RIGHT PLATE beside the heater.
13
H. Zapojení zástrček na HORNÍ DESCE
Pospojujte všechny kabelové spojky. V případě shodných konektorů dodržujte barevné značení
vodičů.
Poznámka: Nezapojujte napájecí šňůru z HORNÍ DESKY do napájení v průběhu instalace.
J. Namontujte a připojte IONIZÁTOR
Na příslušné místo na LEVÉ DESCE přišroubujte
IONIZÁTOR a připojte k němu napájecí kabel.
K. Přišroubujte DRŽÁK NA NÁPOJE
Na vhodné místo v LEVÉ nebo PRAVÉ DESCE vedle topidla přišroubujte DRŽÁK NA NÁPOJE
pomocí dvou vrutů.
I. Nasaďte HORNÍ KRYT
Zvedněte HORNÍ KRYT na horní
část sauny. Prostrčte napájecí šňůru
kulatým otvorem v HORNÍM KRYTU
a umístěte HORNÍ KRYT na HORNÍ
DESKU. Srovnejte HORNÍ KRYT
na HORNÍ DESCE a přišroubujte
jej pevně šrouby na příslušných
místech.
Assembly Instructions

13
Note: Before switching the sauna on check and test connections of the CON-
TROL BOX, the HEATERS, the MP3 PLAYER/RADIO, the TEMPERATURE SEN-
SOR etc. and make sure the electrical power parameters and frequency cor-
respond to the value required for your sauna. Make sure you have sucient
power input available and then switch on the sauna.
Connection
Plug the fork into the appropriate socket.
Power up
Switch the sauna on with the POWER button in the control panel on the
inside or the outside wall of your sauna. The power LED control (POWER) be-
low the display will illuminate and the sauna will start heating to the present
temperature and for the preset time.
You can switch the sauna o again with the POWER button. The power will be
disconnected and all lights will go o.
Heating Time Settings
With the sauna on you can use the + and - (Time) buttons to increase or
decrease the sauna heating time. One depression of the button will increase/
decrease the time by 1 minute. Pressing and holding the button will change
the value in the quick mode. If the setting button is not pressed for the next 5
seconds the value will stop ashing and the set time will be saved.
The set time will be counted down by minute during sauna use. When the re-
maining countdown reaches 5 minutes the unit will release a warning acoustic
signal. Now you can set new sauna time. If you do not make a new time setting
the sauna will continue working and when the countdown reaches 0 minutes
the system will switch o automatically.
Temperature display switching between °C and °F
With the sauna on pressing this button will switch between °C/°F tem-
perature values on the TEMPERATURE DISPLAY.
Heating Temperature Settings
With the sauna on you can use the + and - (Temperature) buttons to in-
crease or decrease the sauna heating temperature. One depression of the but-
ton will increase/decrease the temperature by 1 degree. Pressing and holding
the button will change the value in the quick mode. This value will be the
sauna temperature setpoint. After 5 seconds of the setting button inactivity
the value will stop ashing, the set temperature will be saved and the display
will show the current temperature inside the sauna. Note: Ambient tempera-
Sauna Control and Operation
1
2
3
4
5

14
ture and the temperature sensor location may cause a dierence between the
actually measured temperature inside the sauna and the heating temperature
set on the control panel amounting up to 5 °C.
Heating Start/Stop
With the system on the POWER control below the display is illuminated
and if the temperature inside the sauna is lower than the setpoint the HEAT
control below the display will illuminate and the heating units will start work-
ing.
If you reduce the temperature setpoint by 2 °C below the temperature inside
the sauna the heaters will stop heating.
The recommended temperature is 50 °C, in low ambient temperature the heat-
ing time is longer.
when the temperature reaches the set value the heaters are switched o and
the control of the HEAT
FUNCTION ON THE CONTROL PANEL will go o. After the heater stop the set
temperature will be kept inside the sauna for some time. When it drops by 2 °C
the heaters will be started again to restore the set temperature.
Reading Lamp Switch Inside Sauna
Press the Inside light button once to switch the lamp on and again to
switch it o.
Roof light switch
Press the roof light switch on the TOP PLATE in front of the front door.
Use this switch again to turn it o.
6
7
8
Sauna Control and Operation

15
°C/°F: Switching between temperature units
Temperature +/-: Temperature adjustment up/down
Inside light: Reading lamp on/o
Outside light: Outside lighting on/o
Power: Power On/O
Time +/-: Heating time setting
On the left you will see the temperature value (with °C or °F indication next
to it), and on the right there is the heating time in minutes. The other three
controls signal power on (POWER), heating on (HEAT) and setting function on
(SET).
Control Panel Functions
15
zhasne. Když topné jednotky přestanou pracovat, bude se uvnitř sauny udržovat po určitou dobu
nastavená teplota, přičemž když vnitřní teplota klesne o 2 °C, dojde k opětnému spuštění topných
jednotek, jež budou pracovat, dokud nedojde k dosažení nastavené hodnoty.
7. Spínač čtecí lampy uvnitř sauny
Stiskněte jednou tlačítko lampy Inside light, pro zhasnutí lampy stiskněte znovu tlačítko lampy
Inside light.
8. Barevná terapie
Stiskněte a dlouze podržte tlačítko osvětlení Led light a následně po zaznění zvukového signálu
a zobrazení čísla na displeji můžete měnit barvy pomocí teplotních tlačítek plus a minus.
°C/°F: přepínání zobrazení jednotek teploty
Temperature + / -: nastavení teploty nahoru / dolů
Inside light: zapnutí / vypnutí čtecí lampy
Led light: zapnutí / vypnutí barevné terapie
Power: Zapnout / Vypnout napájení
Time + / -: nastavení doby topení
Vlevo se zobrazuje teplota (indikátor vedle ní
pak zvolenou stupnici °C nebo °F), vpravo se
zobrazuje doba topení v minutách.
Další 3 kontrolky zobrazují zapnuté napájení
(POWER), zapnuté topení (HEAT) a zapnutou
funkci nastavování (SET).

16
A. Description of MP3/Radio Con-
trol
on/o
selector of playing
source (radio, USB/SD
card, AUX or Bluetooth). If USB/SD
is not in the MODE button is used
for ending of calls via Bluetooth.
radio frequency
switch button / automatic saving. In the radio mode a short
pressing will change the FM/AM frequency band of the radio, and a pressing
longer than 2s will start automatic saving of the strongest stations into the
device memory - listening to them can be caused by pressing buttons 1–6 of
the controller. In the Bluetooth mode the button pressing will answer a call via
the connected phone
pressing this button will mute the sound, to switch the sound on
press this button again
replay start/stop. In the radio mode automatic replaying of the saved
stations will start, to end the replay press this button again. In the re-
playing mode you can start or interrupt replaying.
backward search (previous composition) / forward search (next
composition). In the radio mode a short depressing will start auto-
matic forward or backward search of a station, when you press and hold the
button for more than 2 seconds you enter the setting mode and can tune up the
station frequency by short up/down presses. In the replay mode a short press-
ing will move the replaying to the previous/next composition. Pressing for
more than 2 seconds will accelerate forward/backward move along the list of
compositions. Another pressing the button will accelerate the search speed
even further. To nish search in the list of compositions and start replaying
press the button.
these buttons are used for volume control. Minimum sound
volume is 0, and maximum volume is 40. The default vol-
ume after switching on is 16.
receiver of infra red signal from remote control
a 3.5mm slot for external device input
USB slot
SD card slot
MP3/RADIO REMOTE CONTROL
AUX
USB
IR
SD
VOL+/VOL-
POW
MODE
BAND/AMS
MUTE
16
OVLÁDÁNÍ MP3/RÁDIA S DÁLKOVÝM OVLÁDÁNÍM
A. Popis ovládání MP3/rádia
POW: zapnutí/vypnutí
MODE: tlačítko volby zdroje přehrávání (rádio,
USB/SD karta, AUX nebo Bluetooth).
Pokud není připojeno USB/SD, slouží
tlačítko MODE pro ukončení hovoru
přes Bluetooth.
BAND/AMS: tlačítko změny frekvence rádia
/ automatické ukládání. V režimu
rádia krátkým stiskem změníte
frekvenční písmo rádia FM/AM,
stiskem delším než 2s spustíte
automatické ukládání nejsilnějších
stanic do paměti - jejich poslech
vyvoláte stiskem tlačítek 1–6
na ovladači. V režimu Bluetooth
stiskem tlačítka přijmete hovor na
připojeném telefonu.,
MUTE: tiskem tlačítka vypnete zvuk, dalším
stiskem jej opět zapnete
: zastavení přehrávání / spuštění přehrávání.
V režimu rádio se spustí automatické
přehrávání uložených stanic, dalším
stiskem přehrávání stanic ukončíte.
V režimu přehrávání spustíte přehrávání
nebo jej přerušíte.
/ : vyhledávání stanice vzad (předchozí
skladba) / vyhledávání stanice vpřed
(další skladba). V režimu rádio se
krátkým stiskem spustí automatické
vyhledávání stanice dolů nebo
nahoru, stiskem delším než 2s
vstoupíte do režimu nastavení a pak
krátkými stisky nahoru a dolů doladíte
frekvenci stanice. V režimu přehrávání
krátkým stiskem posunete přehrávání
na předchozí nebo následující skladbu,
stiskem delším než 2s se posunete
v seznamu skladem rychleji vzad nebo
vpřed, dalším stiskem tlačítka rychlost
ještě zvýšíte. K ukončení vyhledávání
v seznamu skladeb a spuštění
přehrávání stiskněte tlačítko .
VOL+ / VOL-: tlačítka slouží pro zvýšení a snížení
hlasitosti. Minimální hlasitost je 0,
maximální 40. Při zapnutí je výchozí
hlasitost 16.
IR: přijímač infračerveného signálu dálkového
ovladače
AUX: zdířka 3,5mm pro vnější vstup z externího
zařízení
USB: zdířka pro USB
SD: zdířka pro SD kartu
17
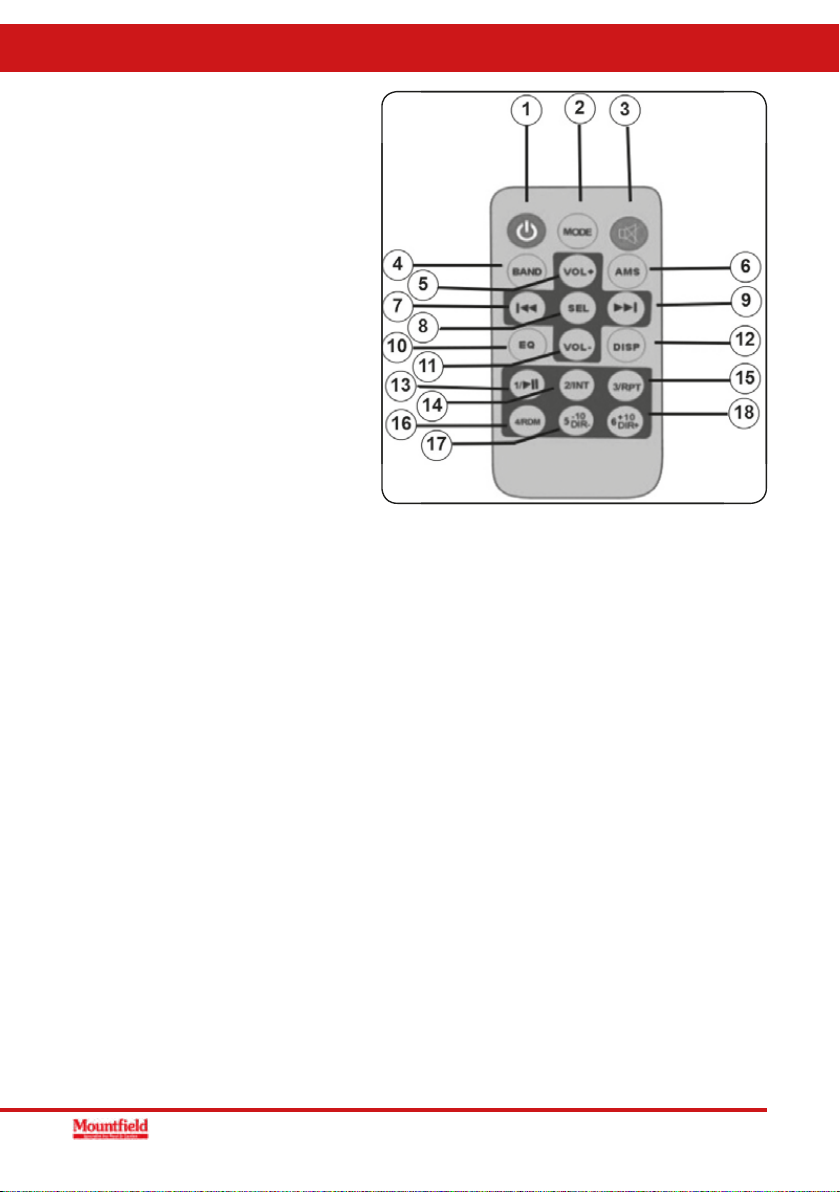
B. Remote control description
1: O/on
2: MODE
3: MUTE
4: BAND
5: VOL+: up key
6: AMS
7: backward station search / pre-
vious composition
8: SEL
9: forward station search / next
composition
10: EQ
11: VOL-: down key
12: DISP: display
13: replay start/stop
14: after pressing the button for
ca 2 seconds the composition
sampling mode will start – now each composition in the inserted medium will
play for about 10 seconds – by pressing this button again this mode will be
ended
15: after pressing the button for ca 2 seconds the composition repeat mode will
start – by pressing this button again this mode will be ended
16: after pressing the button for ca 2 seconds the random composition se-
lection mode will start – by pressing this button again this mode will be
ended
17: when listening to a composition pressing this button for ca 2 seconds will
return the composition listening by 10 back
18: when listening to a composition pressing this button for ca 2 seconds will
forward the composition listening by 10 forward
Note: The radio function, or the audio signal quality, may be negatively aected
by the simultaneously running ioniser.
17
B. Popis dálkového ovladače
1: Vypnutí / zapnutí
2: MODE
3: MUTE
4: BAND
5: VOL+: zvýšení hlasitosti
6: AMS
7: : vyhledávání stanice vzad /
předchozí skladba
8: SEL
9: : vyhledávání stanice vpřed / další
skladba
10: EQ
11: VOL-: snížení hlasitosti
12: DISP: displej
13: 1/: zastavení přehrávání / spuštění
přehrávání
14: 2 / INT: po stisknutí tlačítka na cca
2 vteřiny se spustí režim
ukázky skladeb – nyní bude
každá skladba na vloženém
médiu znít cca 10 vteřin –
režim ukončíte opětovným krátkým stiskem tohoto tlačítka
15: 3 / RPT: po stisknutí tlačítka na cca 2 vteřiny se spustí režim opakování skladby – režim ukončíte
opětovným krátkým stiskem tohoto tlačítka
16: 4 / RDM: po stisknutí tlačítka na cca 2 vteřiny se spustí režim náhodného výběru skladby – režim
ukončíte opětovným krátkým stiskem tohoto tlačítka
17: 5 / -10DIR: při poslechu skladeb, po stisknutí tlačítka na cca 2 vteřiny, přejdete na poslech
10. skladby zpět
18: 6 / +10DIR: při poslechu skladeb, po stisknutí tlačítka na cca 2 vteřiny, přejdete na poslech
10. skladby vpřed
Poznámka: Funkci rádia, resp. kvalitu příjmu signálu, může negativně ovlivnit souběžně zapnutý
ionizátor.

Infra red radiation is electromagnetic wave between the visible light and micro-
wave wavelengths. This radiation is similar to sun rays heating our skin by direct
IR radiation even in cold days. 95 % of the carbon bre energy is transformed to
long-wave IR waves with wavelength between 5 and 17 microns. The sun generates
long-wave infra red waves with the wavelength of 9.4 microns.
IFRA RED RADIATION IS SAFE Infra red radiation is vital for nearly all forms of life
on our planet. In addition to heating our bodies they can also improve health condi-
tion of the body on the cellular level. This technology is safe enough to be used for
years in delivery rooms of maternity hospitals where it helps the newborns reach
the desired body temperature.
THIS IS NOT THERMAL CHAMBER When people hear the word “sauna” they usually
imagine a steam sauna where high temperature and humidity try to force human
body to sweat. Steam sauna is similar to conventional stove which boils meals by
heating them to extreme temperatures. On the other hand, the infra red sauna
rather reminds of a microwave oven generating energy to heat the meal and excite
water molecules inside the meal to initiate its cooling. Infra red sauna generates
energy heating your body and causing the desired reactions without the need for
extreme (and uncomfortable) temperatures inside the cabin. Thanks to the action
of infra red rays on the human body sweating inside the infra red sauna starts at
much lower temperatures than in the steam sauna.
WHAT HAPPENS INSIDE You will feel the heat generated by the infra red radiators
immediately.
The wavelength of this heat lets the rays penetrate your skin and heat your body
under its surface. That causes excitation of water molecules in the subcutaneous
fat layers causing sweating. Most people tend to start sweating after ca 20 minutes.
This time may shorten with more frequent sauna use.
The sweat cause detoxication of the body for the toxic substances excreted by your
body from the bloodstream and stored in the fat tissue can get to the skin surface
with the sweat. Direct heat also causes widening of your blood vessels (with in-
creased circulation) and acceleration of your breathing and heart frequency. Your
body will also burn calories by producing sweat. It is recommended to drink water
before, during and after sauna use to prevent body dehydration. Pay attention to
what you take with you to your infra red sauna. Some metals absorb infra red radi-
ation and may reach extreme temperature during your stay in the sauna.
WHAT IS INFRA RED RADIATION (IR)
18
Wave (
μ
m) 0.2 0.4 0.75 1000
Gamma ray X-ray Ultraviolet Visible Infra red Microwave
Short-wave
infra red
Medium-wave
infra red
Long-wave
infra red
Microwave
0.75 1.5 5.5 1000
You can best use the potential of the infra red therapy when setting the
temperature to the top value.
Thus your body will use the full potential of the infra red radiation during your
stay in the sauna cabin. If you set the temperature to a lower value the heaters
will switch o and on to keep the set temperature. As direct action of the infra
red rays is much more e ective than the high temperature itself in some cases
you may deprive yourself of part of the therapeutic e ect of your sauna for some
periods of your stay in the cabin. Instead reduction of the set temperature you
can regulate the heat inside the sauna by the movable roof ventilation or by let-
ting the door ajar.
Take a shower and dry your body profoundly before entering the sauna
cabin.
Do not use the sauna immediately after intensive physical exercise. Wait
for at least 15 minutes to permit your body cool down properly.
Use at least 2-3 towels. Sit on one of the towels folded several times to
make a good bottom padding. Place another towel on the oor for sweat
absorption and place the third towel on your knees to wipe the sweat. Thus you
will support more sweating.
Take a face cloth with you to wipe your face when you start sweating. A
rough face cloth will remove dead face complexion cells and your com-
plexion will be rejuvenated and smoothed. You can do the same on the other
parts of your body with a towel, a brush or peeling salt.
Morning after bedtime is the best time for sauna if you can get up
30 minutes earlier. When you get up, take a few stretching exercises,
sweat out in your infra sauna, take a shower and drink a couple of glasses
of fresh water. You cannot nd a better source of energy for the day. If you
have problems with falling asleep use your sauna in the evening. The peace
and relaxation inside your sauna will help you fall asleep.
The best position in the sauna is seating, not lying.
The heaters are placed to provide maximum bene t to a seated person
with straight back and feet on the bench level.
The temperature inside the infra sauna on your entry is irrelevant. You
will start sweating after 15 minutes anyway. For that reason you need
not wait for the sauna to be fully heated up. The best way is to enter when
the sauna starts heating and heat your body together with the sauna cabin.
It is not recommended to take a shower immediately after exiting the
sauna cabin. As your body heated in the cabin you will continue sweat-
ing for some time after switching o the haters, even after leaving the sauna.
Sit down in the sauna with the cabin door open and let your body sweat to
cool. When you feel pleasant take a lukewarm (not cold) shower to wash the
sweat o your body. It is not recommended to use soap after sauna for your
19
HOW TO USE INFRASAUNA
1
2
3
4
5
6
7
8
9

pores will be open and the soap might obstruct them.
It is important to replenish liquids sweated out of your body during your
sauna stay. Fresh water is the ideal drink which will not return to the
body the calories burnt by sweating.
After leaving the sauna remove water and sweat from the cabin inside
with a wet cloth (see the following chapter TAKING CARE OF YOUR SAU-
NA) and leave the door open to ventilate the cabin inside.
Regular cleaning of your sauna is very important:
sweep or vacuum the oor, including the benches if needed
wipe the walls where you touch them - i.e. above the benches, around the
door and the control panels
use warm water with a ne soap cleaner and a clean cloth, then wipe with a
clean wet cloth
avoid strong cleaners that may stain the wood or even leave traces of chemi-
cals which may release to the air by heat. We recommend to stick to special
infra sauna cleaners, such as Saunareiniger
do not use too wet cloth to avoid wood darkening
when using your sauna always use a towel for sweat wiping, generally your
skin should not be in direct contact with the sauna surface, i.e. the benches,
the walls or the backrests
never use steam cleaners, pressure cleaners or water sprays for cleaning your
sauna.
never pour water or rinse the infra sauna inside or outside
never use dyes or other chemicals to paint the sauna inside, the heat may
cause release of vapours form the paint
for wood impregnation of its protection against humidity you can use para n
oil on the benches and other exposed wooden walls, which will in addition
make the natural wood patterns stand out more pronouncedly
10
11
WHAT IS INFRA RED RADIATION (IR)
TAKING CARE OF YOUR SAUNA
20
The bene ts of infra red therapy have been studied for several decades in Ja-
pan, Europe and since recently also in the United States. The following bene -
cial e ects have been observed in people using infra red sauna regularly:
blood pressure reduction
joint sti ness reduction
weight loss
positive e ect on the cardiovascular system
reduction of blood glucose levels
increase of blood circulation
reduction of cholesterol and triglyceride levels
relief from muscle spasms
pain relief
energy charging and stress relief
increase of body strength and vitality
increased extensibility of collagen tissue
sauna helped resolve problems of in ammatory in ltrates, oedemas and
exudate
sauna helped cure acne, eczema, psoriasis, burns, cuts and bruises of the
skin
sauna helped open wound healing leaving fewer scars
sauna improves skin colouration and elasticity
sauna helps treat cellulite
sauna strengthens the immune system
sauna helps reduce injury risk when used for muscle warm up before
stretching and exercise
sauna detoxicates the body
sauna helps treat bronchitis
sauna helps treat urticaria, gout, tissue damage and prostate hypertrophy
BENEFITS OF SAUNA
21
Table of contents
Other Mountfield Plumbing Product manuals


Popular Plumbing Product manuals by other brands

Showa Denko
Showa Denko Shodex IC I-524A Operation manual

holzhandlung raters
holzhandlung raters Patio S installation manual

IKEA
IKEA KATTSKAR AA-338731-2 Assembly instructions

Sloan
Sloan FLUSHMATE III 503 Series Owner's service manual

SFA
SFA SANIBROYEUR Silence SANI 1 installation instructions

PEERLESS
PEERLESS P99140LF manual


RIHO
RIHO NAUTIC 3000 N111 manual

Hans Grohe
Hans Grohe Finoris 230 76060 0 Series Instructions for use/assembly instructions

Karibu
Karibu 80910 Building instructions

Axor
Axor Citterio Select 230 2jet sBox 39862007 Installation

METHVEN
METHVEN PROMIX SHOWER MIXER installation guide

Kohler
Kohler STRAYT 45370T-B4 installation instructions