MP Speaker E5T User manual

Speaker System
Owner`s Manual
Nature Sound
Speaker
Installation Guide
Desiened and Engineered by MPspeaker

Introducation
Welcome to MPSpeaker
Congratulations on your purchase of a MP loudspeaker system. The MP range of products have been
painstakingly engineered in the United States to offer genuine state-of-the-art performance.
Partnered with suitable equipment, MP loudspeakers and subwoofers will provide audio performance
far beyond that of their competitors and will equal or better the performance of products costing many
times their purchase price.
A notable feature of all MP loudspeakers, is the unusually precise imaging, having a panorama and
depth rarely heard at any price. The total lack of 'hot seat' type imaging also means that many people
can enjoy the music simultaneously.
Don't just take our word for it, try listening to a well recorded piece at extreme listening positions...
Please read and follow this instruction manual, paying particular attention to the Connection,
Positioningand Product Care sections. Subwoofer customers should pay particular attention to the
Subwoofer Headroom, Placement and Setting Up sections. This manual has been written to enable
you to achieve the very best performance and maximum listening pleasure from your investment.
Your new MP loudspeakers require running-in before performing to their design brief.
We wish you many years of surprising listening... Move Your World!
With best regards
The MP Team.
VERY IMPORTANT
Before connecting your new MP speakers to your system, please ensure that your amplifier is
switched off and unplugged from the mains supply for safety.
1
Connection Options Glossary
2
Connections
Toconnectyourspeakertoyourreceiveryouwillneedstandard2conductor,strandedspeaker
wire.Forinstructionson installation,pleasereadbelow.
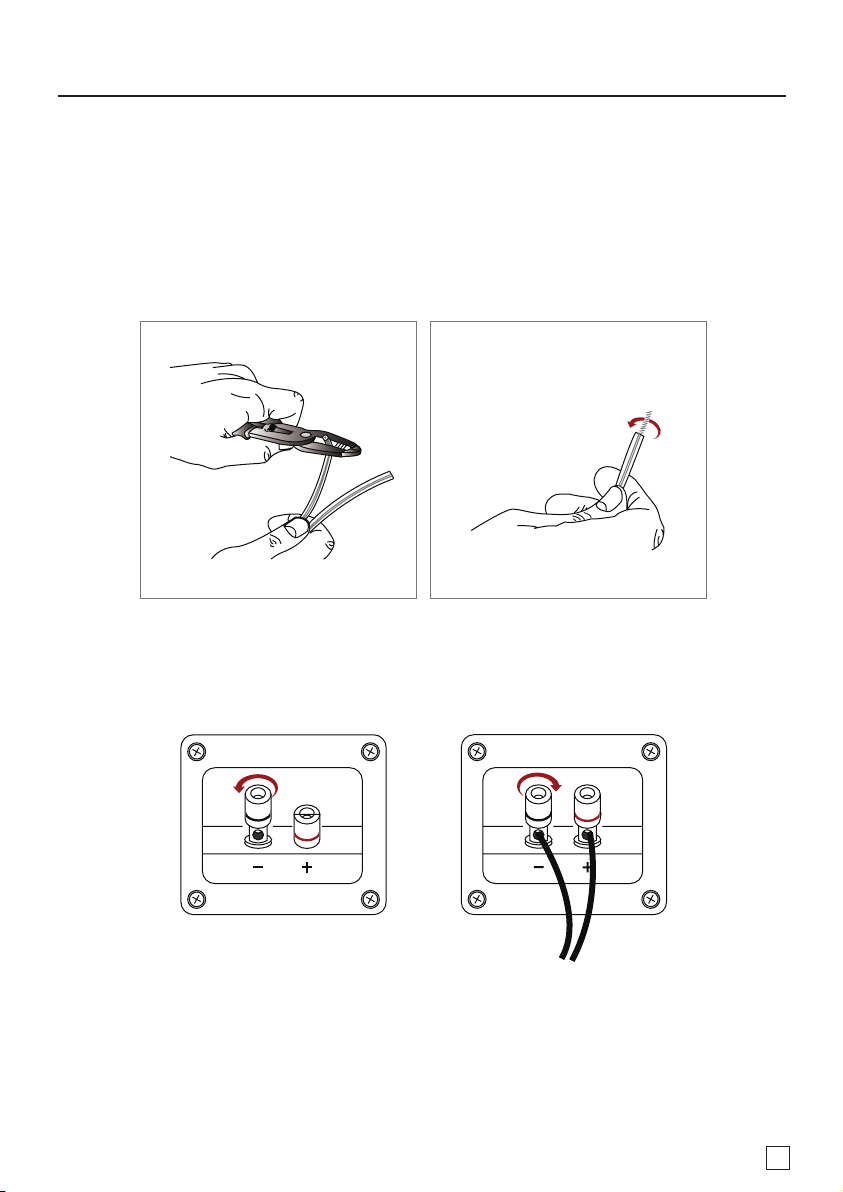
Preparing the Wire
1) Separate the last 4" of your speaker wire into two pieces.
2) Strip 1/2" off the shielding off of the end of each wire (see A below).
3) Twist the exposed copper strands with your fingers until they are tightly unified. Be sure
there are no “flyaway”strands (see B below).
B
A
If You’re Using Bare Wire
1) Unscrew the binding posts on the back of your speaker by turning counter-clockwise.
2) Insert the bare speaker wire into the hole in the binding post and tighten it securely by
turning clockwise
If You’re Using Banana Plugs
1) Be sure to follow the instructions on your banana plugs to attach them to the wire.
2) Screw the binding posts incompletely by turning clockwise.
3) Insert them into the open end of the binding post.

CA U TI O N
RISK OF ELECTRIC SHOCK
DO NOT OPEN
+
-
Connection Options Glossary
3
Note: As you make your connections, be sure to connect the positive terminals on your
receiver to the positive terminals on your speakers. Most two conductor wire has screen
printing on one side to help you differentiate between the two strands (see image below).
Bi-wiring
Bi-wiring is an increasingly popular and affordable system upgrade. This entails the use of two
separate runs of speaker cable from the amplifier to each speaker, one run for the woofer and
one for the tweeter.
If bi-wiring, connect one cable (as in single cabling above) to the woofer terminals, then
connect the second cable to the tweeter connections in the same way.
The links should be removed and stored safely for possible later use. It is crucial that the cable
polarities are carefully observed to ensure correct system performance.
If considering bi-wiring as an easy upgrade, bear in mind that, as a rule, you will get better
performance from a single run of high quality cable than bi-wiring with two runs of lesser
quality.
Bi-amping
The most expensive option is bi-amping. separate amplifiers are used for the woofer and the
tweeter. If using this method, run separate cables from each amplifier and connect to the
speakers as in bi-wiring. It is vital that the links are removed otherwise permanent damage will
occur to the amplifiers.

Speaker placement guidelines
4
MP Enclosure Systems are highly flexible in application and can be used in stereo pairs, 5.1
home theatre systems, or any variety of combinations for faithful sound reproduction. In
general, stereo speakers are placed approximately 12' from each other but room acoustics play
a large role in acoustic performance so we recommend experimenting if you have placement
options available. You may find an optimum placement that best suits your own satisfaction.
See more detailed instructions following.
The MP Bookshelf can be placed either in horizontal or vertical position but can also be
mounted on-wall for rear channel home theatre surround sound. As previously mentioned,
once you decide what position is best for you,apply the rubber feet. The LCR model can also be
used as bookshelf speakers or for left, Right and Center channels for your home theatre. In this
instance, the LCR model should be placed near your viewing screen (in the LCR positions) for
lifelike video source voicing. The LCR enclosures can also be mounted on-wall for rear channel
home theatre applications.
Tower speakers are obviously provided floor space, and again, if space allows, try a 12'
spacing for stereo separation but feel free to experiment with the inherent acoustic qualities.
Spacing from 6' to 15', angled toward the listener, will yield satisfactory results. Regardless of
where you finally position Aeries enclosures, you will be completely satisfied with a truly high
fidelity experience.
Placement Detailed
Home Theater System
The illustration below shows a typical home theater configuration for your reference. Please
note the rear channel speakers behind the listener are optional.
Any combination of MP enclosures may be used to create lifelike video sound reproduction,
whether bookshelf, LCR or Towers.
Place the Left, Center, Right enclosures parallel with the viewing screen. You may experiment
with final locations for best personal results.
Surround enclosures should each be placed adjacent and higher than the listener position. We
recommend these both be placed slightly behind the listener.
You may aim the rear speakers toward the listener to accentuate each rear channel.
Alternatively, directing each enclosure away from the listener will create a greater sense of
spaciousness.
Typical
Listening
Area
C
L R
AA
R R
S S

45 to 60
Left Front Right Front
Speaker placement guidelines
5
Stereo Separation
Place both left and right speakers with tweeters at ear height. If your installation requirements
are for surround channel, place them slightly higher.
If placed on a bookshelf or integrated into a cabinet, keep the cabinet front edge and bookshelf
or cabinet edge flush.
Arrange the speakers on the same plane with each other, equal distance from floor and to the
listener. If possible, keep the speakers the same distance from any adjacent walls. Bass output
is significantly influenced by positioning, so place them as close as possible to these
boundaries.
Wide coverage can be obtained by moving the speakers far apart from one another. In this
case, stereo separation will decrease but will result in well-balanced and spacious sound
reproduction.

Product Specification
6
Specification
Model: E5T
Tweeter Dome................................................. Silk composite material
Tweeter Diameter............................................. 1"(25mm)
Woofer Cone.................................................... Composite woven-fiberglass
Woofer Diameter.............................................. 5.25"(133mm)
Frequency Response........................................45----20KHz
Impedance........................................................4ohms
Power Handling.................................................5-120watts
Sensitivity.........................................................88dB
Diameter...........................................................927x160x200
Model: E5B
Tweeter Dome................................................. Silk composite material
Tweeter Diameter............................................. 1"(25mm)
Woofer Cone.................................................... Composite woven-fiberglass
Woofer Diameter.............................................. 5.25"(133mm)
Frequency Response........................................55----20KHz
Impedance........................................................8ohms
Power Handling.................................................5-80watts
Sensitivity.........................................................85dB
Diameter...........................................................305x170x200
Model: E5C
Tweeter Dome................................................. Silk composite material
Tweeter Diameter............................................. 1"(25mm)
Woofer Cone.................................................... Composite woven-fiberglass
Woofer Diameter.............................................. 5.25"(133mm)
Frequency Response........................................50----20KHz
Impedance........................................................8ohms
Power Handling.................................................5-100watts
Sensitivity.........................................................87dB
Diameter...........................................................490x186x200
Model: HT950-IWLCR-8
Tweeter Dome................................................. Silk composite material
Tweeter Diameter............................................. 1.1"(28mm)
Midrange Cone................................................. Paper composite material
Midrange Diameter........................................... 4"(101mm)
Woofer Cone.................................................... Composite PPM
Woofer Diameter...............................................8"(203mm)
Frequency Response........................................45----25KHz
Impedance........................................................4ohms
Power Handling.................................................5-200watts
Sensitivity.........................................................87dB
Diameter........................................................... 600x530x200/250mm

Desiened and Engineered by MPspeaker
This manual suits for next models
3
Table of contents


