Mr. Christmas DIGITAL PHOTO ORNAMENT SNOWFLAKE User manual

1
DIGITAL PHOTO ORNAMENT
SNOWFLAKE
This product is not a toy
Main Features
1. Stores up to 50 Photos (depending on file size)
2. Transfers photos from your PC
3. Automatic or manual scroll function
System Requirements
1. Windows XP/Vista and MAC OSX
2. 8 Mb Free Hard Drive
Buttons
There are three buttons on the back of your Digital Photo Ornament. They will be referred to below as LEFT,
MENU (middle button), and RIGHT.
Getting Started
(1) Charge your Digital Photo Ornament by connecting the USB plug of the
unit (see Fig. 1) to your PC with the provided cable.
(2) When the unit is fully charged the battery icon will stop blinking.
Battery will last for approximately 2.5 hours when the unit is fully charged.
(3) Turn on the unit by holding down MENU on the back of the ornament for
approximately 3 seconds.
(4) The “Mr. Christmas” logo will appear and three sample holiday-themed
photos will begin to scroll.
(5) To turn off, press & hold the MENU button for approximately 3 seconds.
(6) To turn on again, press & hold the MENU button for approximately 3
seconds.
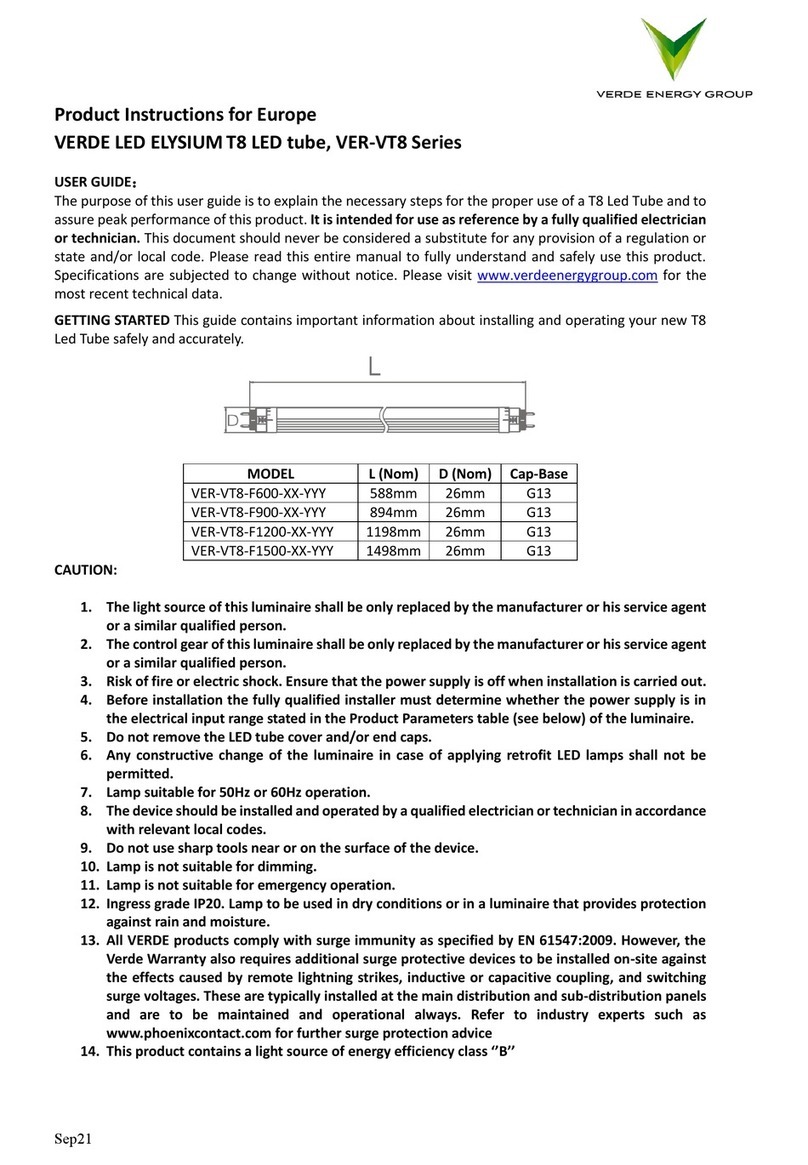
Connecting to PC / MAC Fig. 1
(1) Turn the ornament “ON” according to the above instructions.
(2) Attach the provided USB cable to the back of the ornament and plug the other end into your PC /
MAC.
(3) Press MENU to view the menu.
(4) Use “◄” / “►” to scroll through the menu.
(5) Scroll to USB CONNECT and press MENU to select.
(6) Scroll to YES and press MENU. (If you scroll to NO and press MENU, you will return to the main
menu)
(7) The display on the ornament will read “USB CONNECTED”.
USB Plug

2
Loading Photos from Your PC (FOR WINDOWS XP/ VISTA)
(1) Once the ornament has been connected to your PC, a program (DPFMate) will open automatically (or
you will be prompted to open it).
DPF Mate Viewer
(2) The DPFMate Program includes a window for browsing your hard drive (A), a Preview field (B), a
menu bar for altering photos (C) and a Pictures In Preview Album field on the far right (D).
[A]
[B]
[C] [D]

3
(3) Build Your Album:
(a) Before building your photo album, you will need to Save or Delete the photos in the preview
album. To Save, select Save All and select the folder into which you would like the preview
images to be saved. Alternatively, you can delete the preview album by selecting All (which will
highlight all the photos) and pressing Delete.
(b) SELECT PHOTOS: Now you can begin to build your own album. Select your photos either by
browsing your hard drive in the program window (in figure A above) or by dragging and dropping
an image from an open folder into the Preview field (figure B).
(c) EDIT/FORMAT PHOTOS: Once you have selected a photo, it will appear in the preview field
(figure B). A black frame will show how the image will be cropped to fit the ornament screen.
Use the [+] (zoom-in), [-] (zoom-out), [RotateL], [RotateR] buttons (see figure C) to adjust the
size or orientation of your photo. Use your cursor to move the frame over the image to “crop” a
certain section. When it is in a format that you are satisfied with, select Add to add the photo to
the album on the right. Repeat this process until you have completed your album.
(d) DOWNLOAD TO ORNAMENT: Once your album is selected, press the Download button to
load the photos onto the ornament. Do not disconnect the USB cable while the photos are loading.
(e) Once photos have completed loading it is fine to disconnect the ornament. Please note: The
computer program will only function when the ornament is connected.
FOR MACINTOSH OPERATING SYSTEMS
(1) Please confirm that the ornament is connected to your MAC, and the screen is read “USB CONNECTED”.
Once connected, you will see a new icon shown on your Desktop named “DPFMate” .
(2) Double click this icon to open a folder that contains the built-in software in the ornament. You will see the
following 5 files in the folder.
(3) Double click the file “PhotoViewer.zip” to install an application program called “PhotoViewer” on to your
MAC.
(4) After installed, you will see a new program icon on your Desktop, double click to start the
program.

4
PhotoViewer Layout
(5) Build Your Album
a) Choose a photo from the Directory List on the upper left of the screen, which shows the directory of
your hard drive, CD ROM & portable storage devices.
b) Press from the tool bar shown in the middle of screen, to add the photo into a Picture List.
c) Repeat the above processes to add more photos.
d) Once all photos are added into the Picture List, press shown on the upper right of the
screen, to download the photos to your ornament. Do not disconnect the USB cable while the photos
are loading.
e) Once photos have completed loading, it is fine to disconnect the ornament.
(6) There are 6 main buttons shown on the upper right of the screen, Save / Save All / Select All / Delete /
Synchronize / Exit.
a. Save – Save photos from the ornament to your computer. You can select one or multiple photos
in the Picture List.
b. Save All – Save all photos from the ornament to your computer.
c. Select All – Select all photos in the Picture List.
d. Delete – Erase the photo(s) you chose in the Picture List.
e. Synchronize – Download your photo album in the Picture List to your ornament.
f. Exit – Quit the program.
(7) This program also enables some editing tools on your photos as following:
a. Zoom in / out: Click or to adjust the zoom level on your selected photo, which you
can preview in the left of the screen.
b. Crop: Move the rectangular frame on the preview area, press to crop the portion of photo
to fit the ornament’s screen, and move it to the Picture List.
c. Rotate: Click or to rotate the photo to left or right.
<Directory List>
<Preview Field>
<Picture List>

5
Using the Ornament
(1) To turn on your Digital Photo Ornament, hold down MENU for approximately 3 seconds. The Mr.
Christmas logo will flash on the screen and the pre-loaded photos will begin to scroll.
(2) Main Menu: Press the MENU button to access the Main Menu. From here, you will be able to access
the various features of your Digital Photo Ornament.
(a) USB Connect: Use this function when you are connecting to the PC and downloading photos as
described above.
(b) Slide Show: Use this feature to activate the Slide Show which will automatically scroll through
the photos loaded on your ornament. When you select SLIDE SHOW > ON, you can use the
RIGHT/LEFT buttons to select how long each photo displays. Selecting SLIDE SHOW > OFF,
will turn off the Slide Show and allow you to scroll manually using the RIGHT/LEFT buttons.
Select CANCEL if you want to exit to main menu.
(c) Clock: Use the Clock function to set the time and date. Once the clock is, select DIGITAL or
ANALOG to view a clock display on the ornament. You may also select CALENDAR to view
the calendar of the current month.
(d) Auto Off: Use this feature to schedule an auto shut-off for your ornament to save power. Select
an auto shut-off from one to thirty minutes. Select CANCEL to exit to main menu.
(e) Back Light: Adjust the brightness of the images (values range from 1 to 21).
(f) Delete: Use this function to delete images without working on your computer.
Before entering the main menu, select an image using the RIGHT/LEFT buttons then press
MENU (recommend to disable slide show when selecting image). Choose DELETE > Delete
One. The image will be removed from the album. You can restore the image by connecting to
your PC and repeating the selection process.
(g) Power Off: Use this function to turn off your ornament.
(h) Exit: Select EXIT to return to the photo display.
Troubleshooting
1. No Display on the Ornament: Make sure battery is not exhausted. To recharge, connect the
unit to your PC with the provided USB cable.
2. No photos show on the screen: Ornament is off. Press and hold the MENU button for
approximately 3 seconds to turn the Ornament on.
3. Ornament doesn’t hold enough photos: Photo resolution is too high. Save your photos in
lower resolution format in your computer before loading them into the DPFMate (PC) /
PhotoViewer (MAC) program.
4. Program doesn’t pop up when Ornament is plugged in:
(a) Make sure that the USB cable is firmly inserted in both the Ornament and your PC.
(b) Make sure you have selected USB Connect on the Ornament and followed the above
instructions (see Connecting to PC / MAC on page 1).
(c) Make sure that you are using a PC that has the proper specifications (see System
Requirements on page 1).
(d) For Windows user, make sure the “Auto-play” feature is enabled.
For more information about this product, please call 1-800-4MR-XMAS or visit our website at:
http://www.mrchristmas.com.

6
Important Safety Instructions
This is not a toy. This product contains small parts which could cause choking if swallowed.
Warning
To prevent fire or shock hazard, do not expose this appliance to rain or moisture.
Do not access inner mechanism. No user serviceable parts inside. Refer servicing to qualified service
personnel.
Do not place the unit in direct sunlight or near heat sources such as radiators, heat registers, stoves or other
appliances (including television and stereos) that produce heat.
This product should not be used near water (for ex: a bathtub, washbowl, kitchen sink, laundry tub, web
basement, etc.) Take care to ensure that liquids do not enter any enclosure.
Read instructions before use and retain for future reference.
Heed all warnings on the appliance.
Federal Communications Commission Code, Part 15
This equipment has been tested and found to comply with the limits for a Class B digital device, pursuant to
Part 15 of the FCC Rules. These limits are designed to provide reasonable protection against harmful
interference in a residential installation. This equipment generates, uses and can radiate radio frequency energy
and, if not installed and used in accordance with the instructions, may cause harmful interference to radio
communications. However, there is no guarantee that interference will not occur in a particular installation. If
the equipment does cause harmful interference to radio or television reception, which can be determined by
turning the equipment off and on, the user is encouraged to correct the interference by one or more of the
following measures: (a) reorient or relocate the receiving antenna; (b) increase the separation between the
equipment and the receiver; (c) connect the equipment to an outlet on a circuit different from that to which the
receiver is connected; or (d) consult the dealer or an experienced radio/TV technician for help.
Modifications not approved by the party responsible for compliance could void user's authority to operate the
equipment.
Warranty
The following is applicable to the USA only:
Mr. Christmas warrants to the original consumer/purchaser of the Digital Photo Ornament Snowflake that it will
be free from defects in material and workmanship for a period of 90 days from date-of-purchase. Any liability
of Mr. Christmas under this warranty shall be limited to the replacement of defective parts without charge if the
item is returned with shipping charges prepaid together with proof of date-of-purchase, name, and mailing
address of the original customer/purchase and a description of the defect. Please call warranty service at 1-800-
4MR-XMAS for a claim number and instructions on how to return the item. Some states do not allow the
exclusion or limitation of incidental or consequential damages. Accordingly, any limitation or exclusion may
not be applicable to certain customers/purchasers. This warranty does not cover defects caused by damage in
transit, abuse, accident, negligence or repairs made by others. This warranty gives the consumer/purchase
specific legal rights. The consumer/purchaser may also have other rights which vary from state to state.
2009 MR. CHRISTMAS
Table of contents
Other Mr. Christmas Lighting Equipment manuals
