Mr Fothergill's HydroGarden Elite User manual
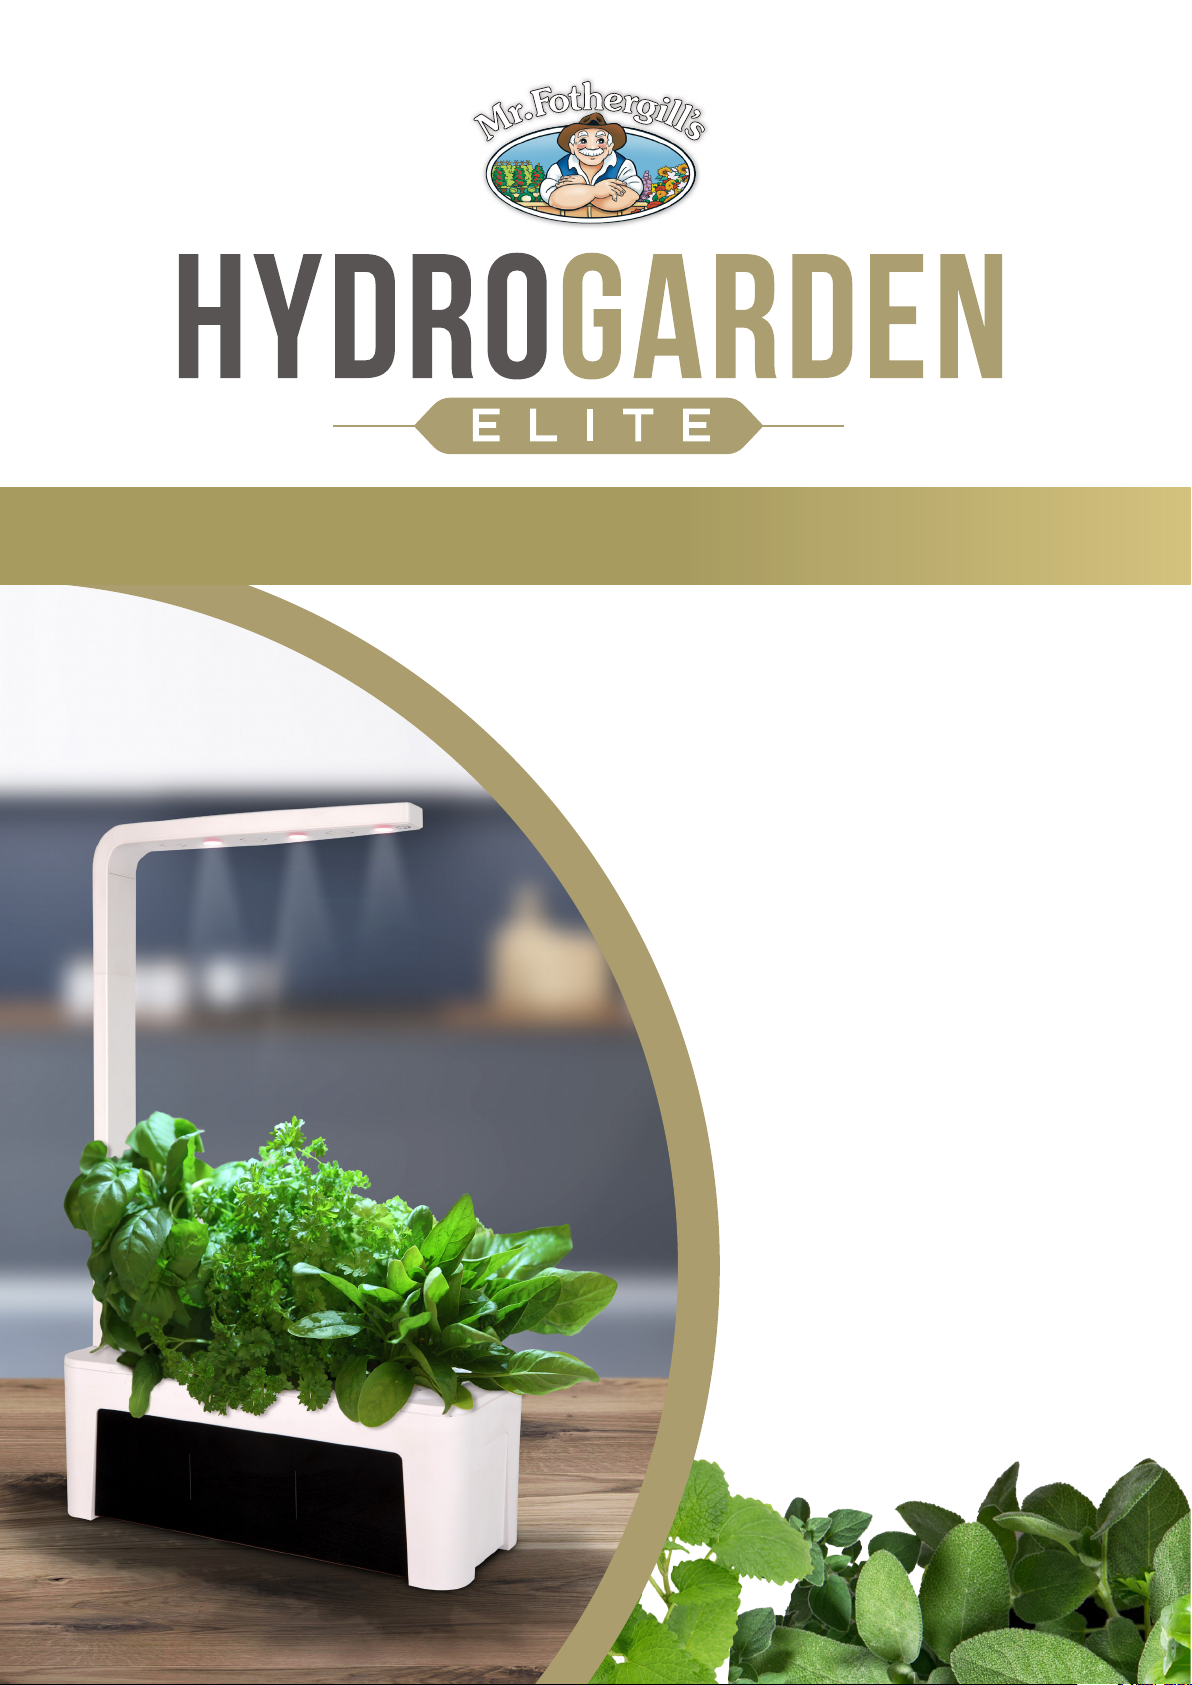
HydroGarden
ELITE
User Manual
SAA Approvals Pty Ltd
AS 61347.2.13:2018
AS/NZS 61347.1:2016
INDOOR GARDEN KITINDOOR GARDEN KIT
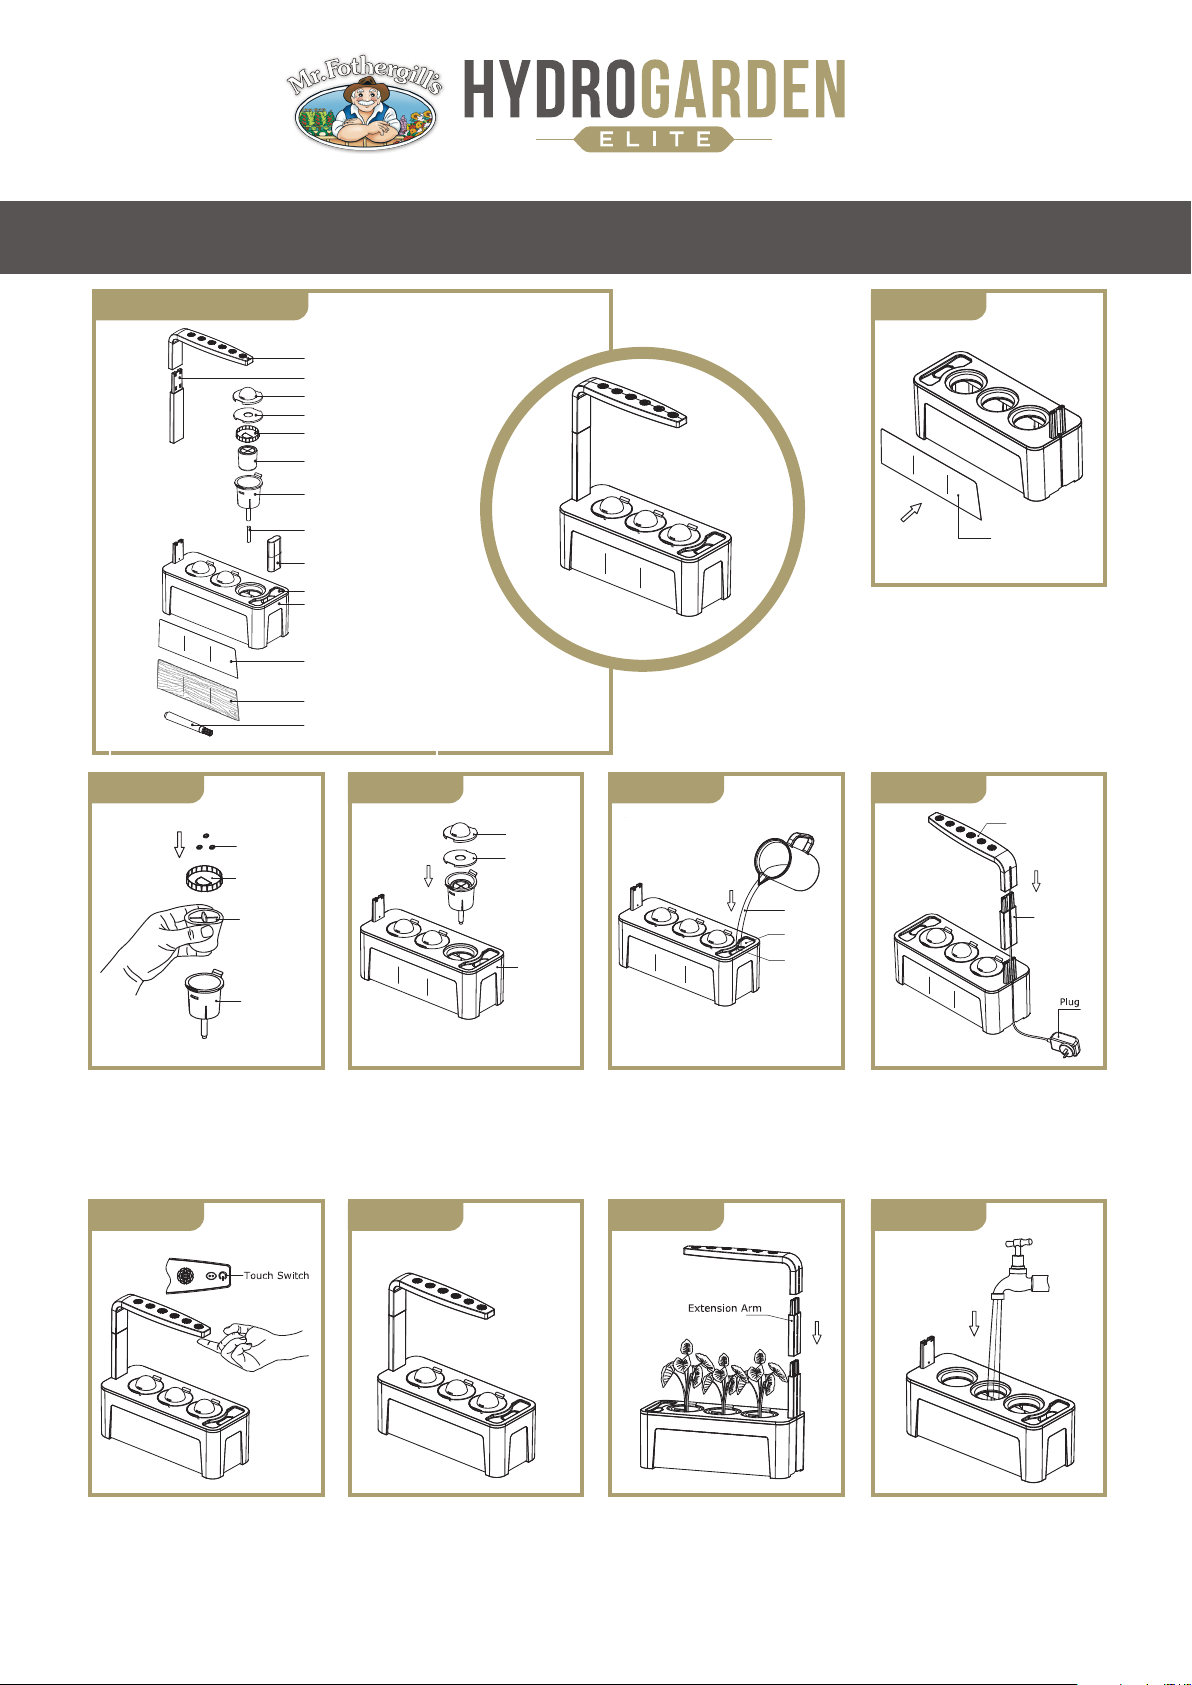
Using your HydroGarden Elite is easy - just follow these steps
Cloche Dome Cover x 3
HydroSoil Pod x 3
Growing Pot x 3
Chalkboard Panel x 2
Growing Pot Lid x 3
Chalk Pen
Woodgrain look Panel x 2
Grow Light
Extension Arm x 2
Wick x 3 (pre-installed)
Float
Water Tank
Protector
Recess Top
Cloche Dome Cover x 3
HydroSoil Pod x 3
Growing Pot x 3
Chalkboard Panel x 2
Growing Pot Lid x 3
Chalk Pen
Woodgrain look Panel x 2
Grow Light
Extension Arm x 2
Wick x 3 (pre-installed)
Float
Water Tank
Protector
Recess Top
INCLUSIONS
HydroSoil
Pod
Cloche Dome
Cover
Growing
Pot
Protector
Seeds
Growing
Pot Lid
Water Tank
Grow Light
Extension
Arm
Water
Recess Top
Float
Step 4
Chalkboard Panel
HydroSoil
Pod
Cloche Dome
Cover
Growing
Pot
Protector
Seeds Growing
Pot Lid
Water Tank
Grow Light
Extension
Arm
Water
Recess Top
Float
Step 4
Chalkboard Panel
HydroSoil
Pod
Cloche Dome
Cover
Growing
Pot
Protector
Seeds Growing
Pot Lid
Water Tank
Grow Light
Extension
Arm
Water
Recess Top
Float
Step 4
Chalkboard Panel
HydroSoil
Pod
Cloche Dome
Cover
Growing
Pot
Protector
Seeds Growing
Pot Lid
Water Tank
Grow Light
Extension
Arm
Water
Recess Top
Float
Step 4
Chalkboard Panel
HydroSoil
Pod
Cloche Dome
Cover
Growing
Pot
Protector
Seeds Growing
Pot Lid
Water Tank
Grow Light
Extension
Arm
Water
Recess Top
Float
Step 4
Chalkboard Panel
STEP 2
STEP 6
STEP 3
STEP 7
STEP 4
STEP 8
STEP 5
HydroSoil
Pod
Cloche Dome
Cover
Growing
Pot
Protector
Seeds Growing
Pot Lid
Water Tank
Grow Light
Extension
Arm
Water
Recess Top
Float
Step 4
Chalkboard Panel
STEP 1
Remove the protective lm from the back
of the chalkboard panel and carefully
adhere it to the recess provided on
both sides of the tank. Use your chalk
pen to label the panel below each
corresponding pot. Alternatively, use the
wood nish panel to suit your decor.
Remove and discard the protector.
Squeeze the HydroSoil Pod to widen
the slit and evenly distribute your seeds.
Gently place the HydroSoil Pod into the
growing pot.
To turn your grow light on, gently tap the
touch switch located on the underside of
the grow light. Tap once for germination
and general growing. Tap twice for the
red light to help owering and fruiting.
Insert the growing pot into the water tank.
Place the cloche covers over the pots to
assist with germination. Placing the pot
lid under the cloche cover is optional and
only recommended if seeds are sown in
the middle of the growing pot.
Once the unit is turned on, the automatic
inbuilt timer allows the grow light to
cycle through 16 hours of light and 8
hours of darkness, on both light settings.
Carefully pour water into the reservoir
until the oat is level with the recess
top. Do not overll as this will ood the
HydroSoil Pod. Note: The red marker
at the bottom of the oat chamber is an
indication of low water level.
When your seeds have germinated,
remove the cloche covers. As your plants
grow, you can use the second extension
arm to raise the height of the grow light.
Assemble the grow light and an
extension arm and click onto the base as
shown. Plug adapter into a power point.
Cleaning Instructions: Remove the grow
light, extension arms, growing pots and
oat for cleaning. Use warm tap water
and some mild washing liquid to clean
the water tank. Rinse thoroughly.
INDOOR GARDEN KITINDOOR GARDEN KIT
STEP 9

lThe HydroGarden Elite has a built-in timer which allows the light to turn itself off at the end of the day. To set the timer, simply turn the
light on by tapping the touch switch on the underside of the grow light. The light will stay on for 16 hours and then turn itself off automatically,
turning back on again after 8 hours. Then just leave the plants to grow! The unit features a red marker on the bottom of the oat chamber
to indicate low water level.
lThe HydroSoil Pod features pre-cut slits for easy insertion of seeds and also contains slow-release fertiliser granules. With NPK levels of
10:11:18, the fertiliser is ideal for hydroponic growing. When the HydroSoil Pod is inserted into the growing pot and inserted into the
HydroGarden Elite unit, water activates the slow-release fertiliser to ensure even and controlled nutrients.
lAdjust the height of the grow light as your plants get taller by adding the second extension arm. With some plants, such as basil, you can
maintain the short and bushy habit by snipping off the growing tips.
lWhen plants start to turn woody or stop producing fresh growth, it’s time to pull them out and start again. Simply remove the plant, root
system and HydroSoil Pod from the growing pot and discard. Clean the unit and growing pots with warm water and a mild washing liquid,
and rinse thoroughly. Rell with new HydroSoil Pods, seeds and water.
lThe full spectrum grow light has been optimised to effectively replace the sun with photosynthesised light suitable for most environments.
The grow light is built with two interchangeable modes.
- White light: suitable for plant germination, vegetative stages and making your plants grow stronger.
- Red light: used at the owering stage to encourage your plants to sprout buds, prolong owering and increase the amount of leaves.
lThe HydroGarden Elite is suitable for growing seeds of almost any compact size ower, vegetable or herb. For more ideas on what varieties
you can grow, visit our website - www.mrfothergills.com.au (Australia) or www.mrfothergills.co.nz (New Zealand).
GUARANTEE - All of our seeds come with a growing guarantee - if they don’t grow for whatever reason, we will replace them.
lA sturdy, level and water-tolerant surface.
lNear a standard electrical outlet.
lAway from children or pets.
lAway from direct source of heat (e.g. a stove) or cold draft during Winter.
lFar enough from wash basin or sink to avoid it falling in water.
lAway from direct sunlight, but ideally not in complete darkness either. Allowing some natural light in addition
to provided light source is benecial to your plant growth.
lNote that the ideal temperature for the plants to grow is 16-26°C. During Summer heat, move the unit to a cooler part
of the house, and during Winter chill, into a warmer location. The full spectrum grow light does not provide heat, only light.
lFor best results, change the reservoir water monthly. Rinse the unit and replace with clean water.
GROWING GUIDE
IDEAL GROWING LOCATION FOR HYDROGARDEN ELITE
SAFETY INSTRUCTIONS
Only use the HydroGarden Elite in indoor areas, connected to a properly installed AC 240V socket with an appropriate safety switch.
Any piggyback plug or ordinary plug should be tted with the appropriate safety switch. Fully unwind extension cords before use as
they may overheat. Ensure that you don’t stack plugs, as it can overload power points and cause a re.
USER MAINTENANCE
Doing electrical work yourself can be dangerous and people have been killed doing electrical work unsafely. By law, any electrical
installation work must be done by a licensed electrician. The work should be tested and you should be supplied with a uniquely
numbered Certicate of Compliance Electrical Work to ensure it complies with regulation.
DO NOT SUBMERGE
Do not immerse the cord or any of the electrical equipment in water or other liquid. Unplug the cord from any electrical outlet when not
in use. If liquid spills onto the HydroGarden Elite, unplug it and have it checked before using again.
RISK OF ELECTRIC SHOCK
Never touch the mains plug with damp hands. Never pull the mains plug out of the socket by the mains cord, always do so by taking
hold of the mains plug. Always switch the unit off and pull the mains plug out of the socket when you are not using the HydroGarden
Elite, cleaning it or in the event of a fault. Disconnect power before servicing or replacing lights. Only use the HydroGarden Elite as
described in this user manual. Any other use is deemed improper and may result in damage to property or even personal injury. The
HydroGarden Elite is not a children’s toy and children using it must be supervised by an adult at all times. Always treat a ‘tingle’ or
slight shock as a warning. Never touch an appliance which causes a ‘tingle’ or shock until it is repaired by an approved repairer.
FOR HOUSEHOLD USE ONLY
The HydroGarden Elite is not intended for commercial use and is for domestic and personal use only. Mr Fothergill’s Seeds Pty Ltd takes
no liability for damage caused by improper or incorrect use.
INDOOR GARDEN KITINDOOR GARDEN KIT

WARRANTY DETAILS
The HydroGarden Elite is guaranteed to be free from defects in workmanship and parts for a period of 12 months from the
date of purchase. Defects that occur within this warranty period, under normal use and care, will be repaired, replaced or
refunded at our discretion. The benets conferred by this warranty are in addition to all rights and remedies in respect of the
product that the consumer has under the Competition and Consumer Act 2010 and similar state and territory laws. Our goods
come with guarantees that cannot be excluded under the Australian Consumer Law. You are entitled to a replacement or refund
for a major failure. You are also entitled to have the goods repaired or replaced if the goods fail to be of acceptable quality
and the failure does not amount to a major failure.
PROOF OF PURCHASE – This warranty is valid for the original purchase and is not transferable. Please keep your purchase
docket, tax invoice or receipt as proof of purchase, and proof of date on which the purchase was made.
NORMAL WEAR AND TEAR – This warranty does not cover normal wear and tear to the products or parts.
EXCLUSIONS – This warranty does not cover:
• Any defects caused by an accident, misuse, abuse, improper installation or operations, lack of reasonable care,
unauthorised modication, loss of parts, tampering or attempted repair by a person not authorised by the distributor.
• Any product that has not been installed, operated or maintained in accordance to manufacturer’s operating instructions
provided with this product.
• Any product that has been used for purposes other than domestic use.
• Any damage caused by improper power input or improper cable connection.
TO MAKE A CLAIM:
Contact Mr Fothergill’s Seeds via phone, letter or website contact form.
When making a return, please ensure the product is properly packaged so as to ensure no additional damage occurs to the
product in transit. Please provide the original or a copy of the proof of purchase. Please also ensure you have included an
explanation of the problem as well as your contact details.
If you have any questions please feel free to contact our customer service representatives on 02 4571 6200 (Australia)
or 0800 663 740 (New Zealand).
For a full copy of our Warranty terms and conditions please go to: www.mrfothergills.com.au/hydrogardenelitewarranty
AUSTRALIA
Mr. Fothergill’s Seeds
PO Box 6065
South Windsor, NSW 2756
www.mrfothergills.com.au
NEW ZEALAND
Mr. Fothergill’s Seeds
PO Box 6174
Victoria Street West, Auckland 1142
www.mrfothergills.co.nz
INDOOR GARDEN KITINDOOR GARDEN KIT
This manual suits for next models
1
Popular Lawn And Garden Equipment manuals by other brands

Sunforce
Sunforce SOLAR user manual

GARDEN OF EDEN
GARDEN OF EDEN 55627 user manual

Goizper Group
Goizper Group MATABI POLMINOR instruction manual

Rain Bird
Rain Bird 11000 Series Operation & maintenance manual

Cub Cadet
Cub Cadet BB 230 brochure

EXTOL PREMIUM
EXTOL PREMIUM 8891590 Translation of the original user manual


Vertex
Vertex 1/3 HP Maintenance instructions

GHE
GHE AeroFlo 80 manual

Land Pride
Land Pride Post Hole Diggers HD25 Operator's manual

Yazoo/Kees
Yazoo/Kees Z9 Commercial Collection System Z9A Operator's & parts manual

Premier designs
Premier designs WindGarden 26829 Assembly instructions

Snapper
Snapper 1691351 installation instructions