MSI M510C User manual

1
Notice
Please note that the setting diagrams or values in this guide are FOR YOUR REFER-
ENCE ONLY. The model you bought may be slightly different from the illustrations
and descriptions in this guide. If you are not sure about these information, such as the
computer’s specification and equipment, please ask your local vendor for help.
Trademarks
* All trademarks are the properties of their respective owners.
* Microsoft is a registered trademark of Microsoft Corporation. Windows® 98/ME
2000/XP are registered trademarks of Microsoft Corporation.
* AMI® is a registered trademark of American Megatrends Inc.
* PCMCIA and CardBus are registered trademarks of the Personal Computer
Memory Card International Association.
Release History
Version Revision Note Date
1.0 First release February 2004
G52-B10003XO

2
Table of Contents
1 ENGLISH........................................... 3
2 FRANCAIS........................................ 11
3 DEUTSCH......................................... 19
4 NEDERLANDS................................. 27
5 ČEŠTINA........................................... 35
6 SVENSKA.......................................... 43
7 SRPSKI.............................................. 51

3
Thank you for purchasing your M510C Notebook PC. The M510C Notebook
PC is an Intel-based mobile platfrom, implementing the latest Centrino processor
to increase excellent performance and wireless Internet access. In addition, its
built-in 4-in-1 card reader, high-speed optical storage drive, IEEE 1394 and USB
2.0 ports, as well as its 15" high-brightness LCD monitor, make this computer
act as your media center to have you fully enjoy the modern digital life.
This Quick Guide provides you with a common instruction on using this
computer by the following sections:
Introduction
ENGLISH
1
The package should contain the following items:
One M510C Notebook PC.
One Software CD containing the drivers and utilities.
One Recovery CD (optional).
One User’s Guide and one Quick Guide.
One Warranty Card.
Accessories:
- High-capacity Li-ion battery pack.
- AC adapter and power cord.
- Phone cable/Phone jack (optional).
- Notebook PC carry bag (optional).
Unpacking
If you want to... refer to...
check the package contents page 3
glance at this computer page 4, 5
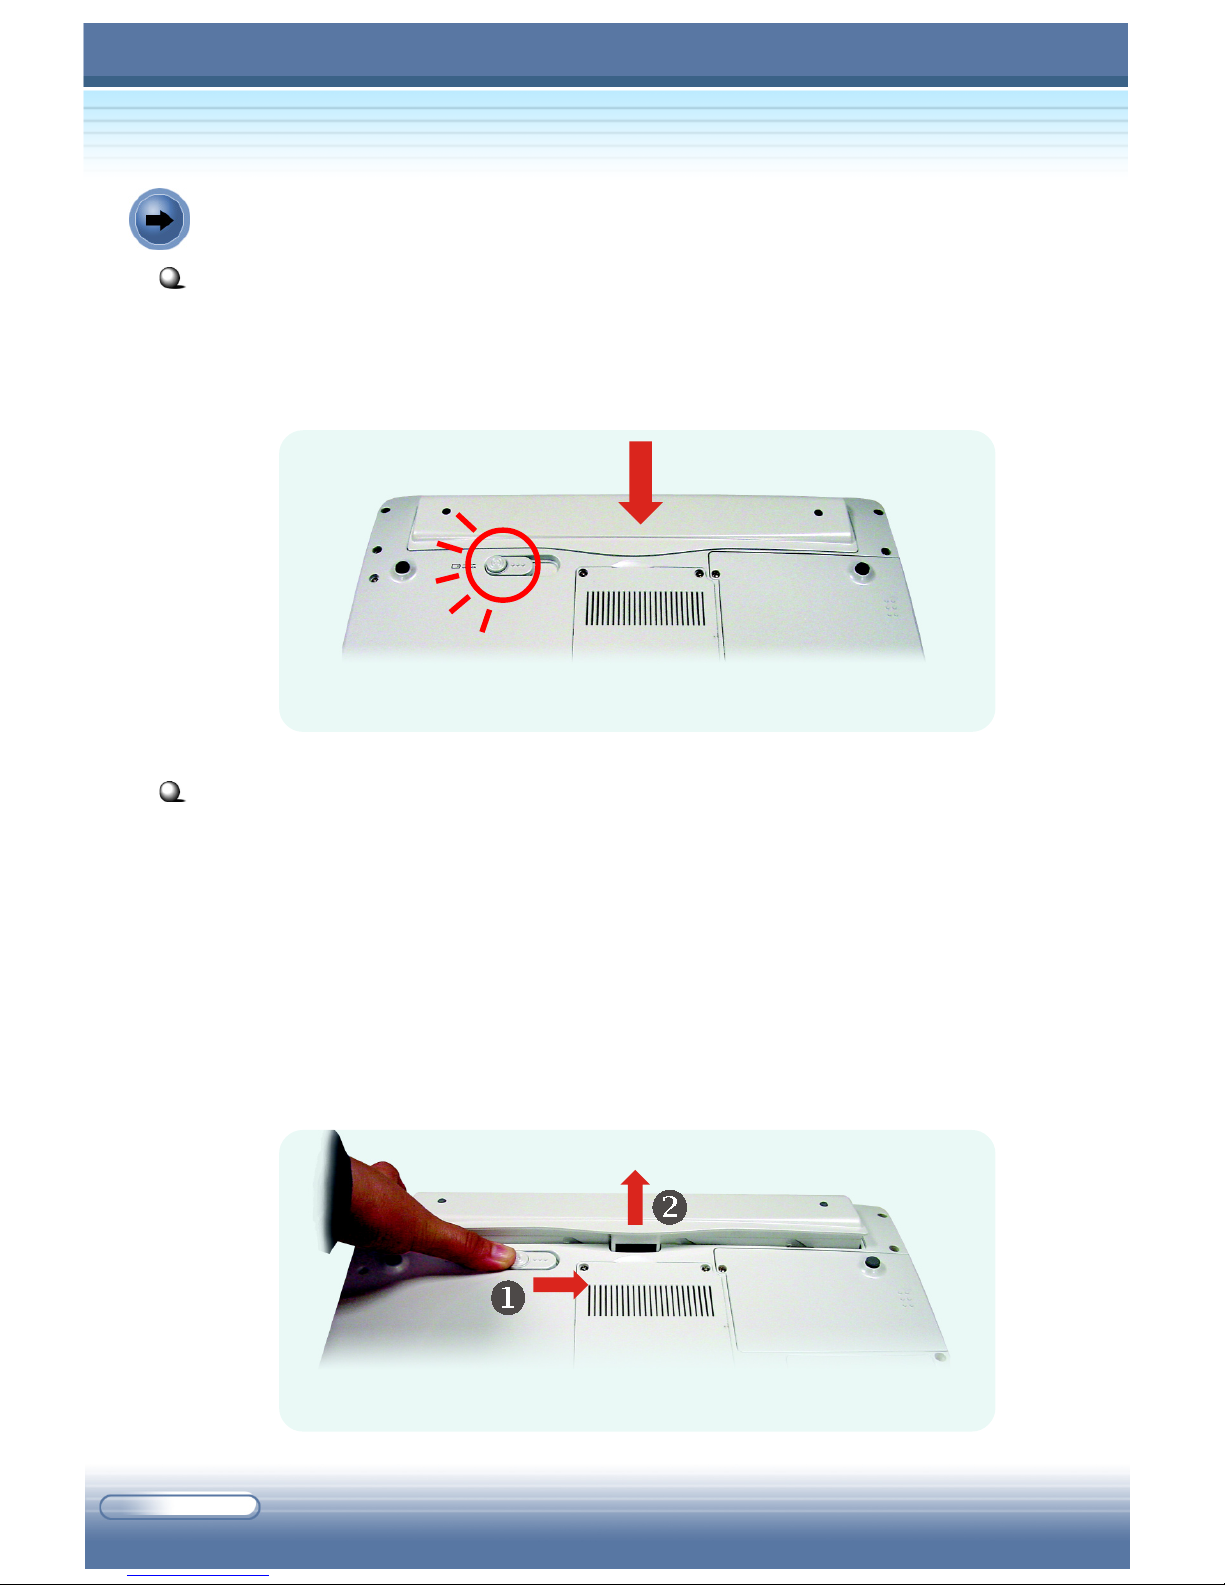
install the battery page 6
turn on the computer to work page 7

4
Product View
Touchpad
LCD Screen
Quick Launch Buttons
Keyboard
Speakers
LEDs
Power Button

5
Memory
MiniPCI Card
CPU
USB
IEEE1394
RJ-45
Audio
Power VGA
S-Video Printer
Mic
RJ-11
USB
LEDs
Cover Button
Card Reader
PC Card
Optical Device
Battery Battery Unlock ButtonHard Disk Drive
ENGLISH
1
Lock Hole

6
Removing the Battery Pack
1. Confirm that the computer is turned off.
2. Place the computer upside down gently.
3. Locate the Battery Unlock Button on the bottom side of the
computer.
4. Press and hold the button, and then push it outwards (). The
battery pack will bound upwards slightly ().
5. Remove the battery pack from the compartment.
Installing the battery pack
1. Place the battery pack into the compartment.
2. Press down the battery pack until a “click” sound. The battery pack
will be locked automatically.
Installing the Battery Pack
Replacing the Battery Pack
Removing the Battery Pack

7
Starting Up
Connecting/Disconnecting the AC Power
1. Unpack the package to find the AC adapter and power cord.
2. Attach the power cord to the connector of the AC adapter ().
3. Plug the DC end of the adapter to the computer (), and the male end
of the power cord to the electrical outlet ().
4. When the AC adapter is connected, the green LED on the AC adapter
will light up () to indicate that the computer is powered from the
electrical outlet.
Connecting the AC power
5. To disconnect the AC adapter, you should unplug the power cord
from the electrical outlet first, and then unplug the connector from the
computer. When unplugging the power cord, always hold the
connector part of the cord, never pull the cord.
Note: The AC adapter included in the package is correct for your Notebook
PC; using other adapter model may damage the computer or other devices on
the computer.
ENGLISH
1

8
Turning On the Computer
1. Make sure that the computer is connected to the AC power.
2. Open the top cover by pressing the Cover Button.
3. Press the Power Button.
Pressing the power button
Tip: Once pressed, the Power Button will light Blue to indicate that
the computer is turned on; meanwhile, the Power LED on the right
side of computer lights Green.
4. When the computer is turned on, it will first perform a series of
diagnostic tests that is called Power-On Self Test (POST). Then, the
operating system (such as Microsoft Windows XP in this manual)
should start, and you can start to work with your Notebook PC!

9
LEDs on the Computer
Status LEDs
Num Lock: glows Green when the Num Lock function is activated.
Caps Lock: glows Green when the Caps Lock function is activated.
Scroll Lock: glows Green when the Scroll Lock function is activated.
Hard Disk In-use: blinks Green when the computer is accessing the
hard disk drive.
System LEDs
Wireless LAN: glows Green when the wireless LAN function of the
computer is enabled.
Power On/Off/Suspend: glows Green when the computer is
turned on; blinks Green when the system is in suspend mode.
Battery Status: glows Green when the battery is being charged (with
AC adapter connected); glows Orange when low battery power (less
than 5%); blinks Orange when the battery failed.
Quick Launch Buttons
Email: to launch the E-mail application (such as Outlook Express)
to receive and send your E-mail.
Internet: to launch the web browser (such as Internet Explorer) to
surf the Internet.
Wireless LAN: to enable or disable the wireless LAN function of
your computer.
User-defined: allows you to define a software application to
launch.
ENGLISH
1

MS-XXXX Notebook
FRANCAISFRANCAIS
FRANCAISFRANCAIS
FRANCAIS

11
FRANCAIS
2
Introduction
Le package doit contenir les éléments suivants:
Un portable M510C.
Un CD contenant les drivers et utilitaires.
Un CD de récupération (optionnel).
Un gui de d’utilisation et un mini guide.
Une carte de garantie.
Accessoires:
- Batterie de grande capacité Li-ion.
- Adaptateur AC avec cordon d’alimentation.
- Câble téléphone/Prise de téléphone (optionnel).
- Sac de transport pour portable (optionnel).
Déballage
Merci d’avoir acheté le portable M510C. Le portable M510C est basé sur une
plateforme Intel mobile, équipé du dernier processeur Centrino permettant
d’obtenir d’excellentes performances ainsi qu’une connexion Internet sans fil.
De plus, le lecteur de carte 4 en 1, le disque de stockage ultra rapide, les ports
Fire Wire et USB 2.0 tout comme son écran 15" LCD, font de ce portable un outil
indispensable en phase avec les besoins actuels des utilisateurs.
Ce mini guide vous apporte des informations sur l’utilisation de votre portable
et ce à travers plusieurs chapitres:
Si vous voulez ... se référer à ...
vérifier le contenu de la boîte page 11
avoir une vue d’ensemble de votre ordinateur page 12, 13
installer la batterie page 14
allumer l’ordinateur pour travailler page 15

12
Vue de Produit
Touchpad
Ecran LCD
Quick Launch Buttons
Clavier
Speakers
LEDs
Bouton de démarrage

13
Mini carte PCI
Processeur
USB
IEEE1394
RJ-45
Audio
VGA
S-Video Imprimante
Mic
RJ-11
USB
LEDs
Lecteur de cartes
Cartes PC
Lecteur optique
BatterieDisque dur
Blocage
FRANCAIS
2
Alimentation
Mémoire
Déblocage batterie
Bouton d’ouverture

14
Retirer la batterie
1. Vérifier que le portable n’est pas allumé.
2. Retourner le portable délicatement.
3. Localiser le bouton de déblocage de la batterie sur le côté de
l’ordinateur.
4. Appuyer et maintenir ce bouton et le pousser vers la droite (). La
batterie va glisser légèrement vers le haut ().
5. Retirer la batterie de son logement.
Installation de la batterie
1. Placer la batterie dans le compartiment.
2. Appuyer sur la batterie jusqu’à entendre un son “click”. La batterie
se bloque automatiquement.
Installation de la Batterie
Installer la batterie
Retirer la batterie

15
Pour Commencer
Connecter/Déconnecter l’alimentation
1. Prendre dans la boîte l’adaptateur AC ainsi que le cordon
d’alimentation.
2. Relier le cordon d’alimentation à l’adaptateur AC ().
3. Brancher l’adaptateur DC sur l’ordinateur (), et le câble
d’alimentation sur la prise secteur ().
4. Quand l’adaptateur AC est connecté, la LED verte de celui-ci s’allume
() pour indiquer que le portable est bien alimenté par le secteur.
5. Pour déconnecter l’adaptateur AC, vous allez devoir en premier lieu
débrancher la prise secteur, puis débrancher le connecteur du
portable relié à l’ordinateur. Lorsque que vous débranchez le cordon
d’alimentation, il faut le maintenir et non tirer dessus.
A Noter: L’adaptateur AC compris dans ce package est prévu pour l’utilisa-
tion de votre portable; l’utilisation d’un autre adaptateur pourrait endom-
mager le portable ou d’autres composants.
Connecter l’alimentation
FRANCAIS
2

16
Allumer l’Ordinateur
1. Assurez-vous que le portable est bien connecté à l’alimentation.
2. Ouvrir le portable en appuyant sur le bouton prévu à cet usage.
3. Appuyer sur le bouton de démarrage.
Tip: Une fois que vous avez appuyé sur le bouton de démarrage, une
lumière Bleue indique que le portable s’allume; cependant, la diode
d’alimentation sur la droite du portable est de couleur Verte.
4. Quand le portable s’allume, il effectue une série de tests POST (Power-
On Self Test). Puis le système d’exploitation démarre (il est question de
Microsoft Windows XP dans ce manuel), après vous pouvez
commencer à travailler avec votre portable!
Bouton de démarrage

17
Diodes du Portable
Etat des Diodes
Diodes Système
Wireless LAN: Une lumière Verte apparaît lorsque la fonction
LAN (réseau) est activée.
Power On/Off/Suspend: Une lumière Verte apparaît lorsque
l’ordinateur est en fonction; la lumière Verte clignote lorsque
l’ordinateur est en « suspend mode ».
Battery Status: Une lumière Verte apparaît lorsque la batterie est
chargée (avec l’adaptateur AC connecté); la lumière est Orange
quand la batterie est faible (moins de 5%); la lumière Orange
clignote lorsque la batterie est déchargée.
Boutons de Démarrage Rapide
Email: Pour lancer l’application qui gère vos E-mail (comme Outlook
Express) et recevoir/envoyer vos messages (E-mail).
Internet: Pour lancer l’explorateur d’Internet (comme Internet Explorer)
afin de naviguer sur le web.
Wireless LAN: Pour activer/désactiver la fonction Wireless LAN
(réseau sans fil) de votre portable.
User-defined: Vous permet de lancer un logiciel ou une application.
FRANCAIS
2
Num Lock: Une lumière Verte apparaît lorsque la fonction est
activée.
Caps Lock: Une lumière Verte apparaît lorsque la fonction Caps
Lock est activée.
Scroll Lock: Une lumière Verte apparaît lorsque la fonction Scroll
Lock est activée.
Hard Disk In-use: Une lumière Verte clignote lorsque l’ordinateur
accède au disque dur.

MS-XXXX Notebook
DEUTSCHDEUTSCH
DEUTSCHDEUTSCH
DEUTSCH

19
Vielen Dank für den Kauf des M510C Notebooks. Das M510C Notebook ist
eine Intel basierte mobile Plattform, welche die neueste Centrino Prozessor
Technologie für exzellente Performance und drahtlosen Internetzugang
integriert. Zusätzlich macht diesen Computer der eingebaute 4-in-1 Kartenleser,
das optische Laufwerk, IEEE 1394 und USB 2.0 Anschlüsse und insbesondere
das sehr helle 15" TFT Display zu Ihrer Medienzentrale um das moderne Leben
zu genießen.
Diese Schnellanleitung gibt Ihnen eine Anleitung um diesen Computer zu
verwenden.
Einleitung
DEUTSCH
3
Die Packung sollte folgende Teile beinhalten:
Ein M510C Notebook
Eine Software CD mit Treibern und Software-Werkzeugen utilities.
Eine Recovery CD (Optional).
Ein Benutzerhandbuch und eine Schnellanleitung (Quick Guide).
Eine Garantiekarte.
Zubehör:
- Hochkapazitiver Li-ion Akku.
- Netzteil und Netzkabel.
- Modemkabel/Adapter (optional).
- Notebook Tragetasche (optional).
Auspacken
Sie möchten... Siehe...
Den verpackungsinhalt überprüfen Seite 19
Sich mit dem Computer vertraut machen Seite 20, 21
Den Akku einsetzen oder entfernen Seite 22
Den Computer starten Seite 23

20
Produktview
Touchpad
Tastatur
LEDs
TFT Bildschirm
Schnellstart-Tasten
Ein-/Aus-Taster
Lautsprecher
Table of contents
Languages:
Other MSI Laptop manuals

MSI
MSI VX600 User manual

MSI
MSI U270 User manual

MSI
MSI Gaming GP65 9SD-094IT Leopard User manual

MSI
MSI CR42 User manual

MSI
MSI Megabook S262 User manual

MSI
MSI Summit E16 Flip A12UCT-040IT User manual

MSI
MSI GT60 Installation instructions

MSI
MSI GL63 8SE-056IT User manual

MSI
MSI Whitebook MS-1242 User manual

MSI
MSI M522 User manual

MSI
MSI Megabook M655 User manual

MSI
MSI GS65 Stealth THIN-053 Instructions for use

MSI
MSI U210-006US - Wind - Athlon Neo 1.6 GHz User manual

MSI
MSI 10UG-234IT User manual

MSI
MSI Crosshair 17 User manual

MSI
MSI GT640 User manual

MSI
MSI A13VF-012US User manual

MSI
MSI B11MOL-423AU User manual

MSI
MSI L710 User manual

MSI
MSI CX61 Installation instructions