MSW IR-DRYER3000.2 User manual

USER MANUAL | MANUEL D´UTILISATION | ISTRUZIONI PER L‘USO | MANUAL DE INSTRUCCIONES | INSTRUKCJA OBSŁUGI | NÁVOD K POUŽITÍ | HASZNÁLATI ÚTMUTATÓ
IR-DRYER3000.2
IR-DRYER3000.1
IR-DRYER2000.1
IR-DRYER2000.2
IR-DRYER1000
Bedienungsanleitung
expondo.de
INFRARED
PAINT DRYER

INHALT | CONTENU | CONTENT | CONTENUTO | CONTENIDO | TREŚĆ | OBSAH | TARTALOM
3
9
15
21
27
33
39
45
NAZWA PRODUKTU PROMIENNIK PODCZERWIENI
PRODUKTNAME INFRAROT LACKTROCKNER
PRODUCT NAME INFRARED PAINT DRYER
NOM DU PRODUIT SÉCHEUR INFRAROUGE
NOME DEL PRODOTTO LAMPADA A INFRAROSSI PER ESSICAZIONE DI VERNICI
NOMBRE DEL PRODUCTO SECADOR DE INFRARROJOS PARA PINTURA
NÁZEV VÝROBKU
TERMÉK NÉV
MODEL PRODUKTU
MODELL
PRODUCT MODEL
MODÈLE
MODELLO
MODELO
MODEL VÝROBKU
TÍPUS
IMPORTER
IMPORTEUR
IMPORTER
IMPORTATEUR
IMPORTATORE
IMPORTADOR
DOVOZCE
ADRES IMPORTERA
ADRESSE VON IMPORTEUR
IMPORTER ADDRESS
ADRESSE DE L'IMPORTATEUR
INDIRIZZO DELL'IMPORTATORE
ADRESA DOVOZCE
Deutsch
English
Polski
Français
Italiano
Español
2Rev. 26.11.2018
Lesen Sie die Bedienungsanleitung sorgfältig.
Elektrische Geräte dürfen nicht mit dem Hausmüll entsorgt werden.
Das Produkt erfüllt die geltenden Sicherheitsnormen.
Achtung! Heiße Oberäche – Verbrennungsrisiko.
Achtung! Die Hand kann gequetscht werden.
Achtung! Schutzhandschuhe tragen.
Achtung! Brand – oder Explosionsrisiko.
Achtung! Unfallgefahr.
SYMBOLE
HINWEIS! In der vorliegenden Anleitung sind Beispielbilder vorhanden, die von dem tatsächlichen
Aussehen der Maschine abweichen können.
Die originale Anweisung ist die deutschsprachige Fassung. Sonstige Sprachfassungen sind Übersetzungen aus
der deutschen Sprache.
BEDIENUNGSANLEITUNG
SICHERHEITSHINWEISE
Allgemeine Sicherheitshinweise bei der Benutzung von Elektrogeräten: Um das Verletzungsrisiko durch Feuer
oder Stromschlag gering zu halten, bitten wir Sie, einige grundlegende Sicherheitsanweisungen zu beachten,
wenn Sie dieses Gerät verwenden. Bitte lesen Sie diese Bedienungsanleitung sorgfältig und vergewissern Sie sich,
dass keine Fragen offenbleiben. Bewahren Sie diese Betriebsanleitung bitte sorgfältig in der Nähe des Produktes
auf, um bei Fragen auch später noch einmal nachschlagen zu können. Verwenden Sie stets einen geerdeten
Stromanschluss mit der richtigen Netzspannung (siehe Anleitung oder Produktschild). Sollten Sie bezüglich
des Anschlusses Zweifel haben, lassen Sie ihn durch einen qualizierten Fachmann überprüfen. Benutzen Sie
niemals ein defektes Stromkabel! Öffnen Sie dieses Gerät nicht in feuchter oder nasser Umgebung, ebenso
nicht mit nassen oder feuchten Händen. Außerdem sollten Sie das Gerät vor direkter Sonneneinstrahlung
schützen. Betreiben Sie das Gerät nur an geschützten Orten, sodass niemand auf Kabel treten, über sie stürzen
und/oder sie beschädigen kann. Sorgen Sie darüber hinaus für ausreichende Luftzirkulation, wodurch die
Kühlung des Gerätes gewährleistet, und Wärmestaus vermieden werden. Ziehen Sie vor der Reinigung dieses
Gerätes den Netzstecker und benutzen Sie zur Reinigung ein feuchtes Tuch. Vermeiden Sie den Einsatz von
Putzmitteln und achten Sie darauf, dass keine Flüssigkeit in das Gerät eintritt, bzw. darin verbleibt. Das Innere
dieses Gerätes enthält keine für den Benutzer wartungspichtigen Teile. Überlassen Sie Wartung, Abgleich und
Reparatur qualiziertem Fachpersonal. Im Falle eines Fremdeingriffs verfällt der Gewährleistungsanspruch!
SICHERHEITSHINWEISE
1. Lesen Sie diese Gebrauchsanweisung vor Inbetriebnahme des Gerätes sorgfältig durch! Beachten Sie
alle Sicherheitshinweise, um Schäden durch falschen Gebrauch zu vermeiden!
2. Bewahren Sie die Gebrauchsanleitung für den weiteren Gebrauch auf. Sollte dieses Gerät an Dritte
weitergegeben werden, muss die Gebrauchsanleitung mit ausgehändigt werden.
3. Verwenden Sie das Gerät nur für den vorgesehenen Zweck und nur in Innenräumen.
4. Im Falle von unsachgemäßem Gebrauch oder falscher Handhabung kann keine Haftung für eventuell
auftretende Schäden übernommen werden.
5. Vor dem ersten Gebrauch prüfen Sie bitte, ob die Art des Stroms und die Netzspannung mit den
Angaben auf dem Produktschild kompatibel sind.
6. Dieses Gerät ist nicht dafür geeignet, durch Personen, einschließlich Kindern, mit eingeschränkten
physischen, sinnlichen oder geistigen Fähigkeiten, sowie mangelnder Erfahrung und/oder mangelndem
Wissen benutzt zu werden. Als Ausnahme gilt, wenn diese durch eine für ihre Sicherheit zuständige
Person beaufsichtigt werden, oder Gebrauchsanweisungen erhalten haben.
Rev. 26.11.2018 3
BEDIENUNGSANLEITUNG

7. STROMSCHLAGGEFAHR! Versuchen Sie niemals, das Gerät selbst zu reparieren. Lassen Sie
stattdessen das Gerät im Störungsfall nur von qualizierten Fachleuten reparieren.
8. Überprüfen Sie regelmäßig den Netzstecker und das Netzkabel. Sollte das Netzkabel beschädigt
werden, muss es durch den Hersteller, den Kundendienst oder eine ähnliche Person ersetzt werden,
um Gefährdungen zu vermeiden.
9. Verhindern Sie eine Beschädigung des Netzkabels durch Quetschen, Knicken oder Anschlagen an
scharfen Kanten und halten Sie es von heißen Oberächen und offenen Flammen fern.
10. ACHTUNG LEBENSGEFAHR! Tauchen und Halten Sie das Gerät während des Reinigens oder des
Betriebes nie in Wasser oder andere Flüssigkeiten.
11. Öffnen Sie unter keinen Umständen das Gehäuse.
12. Nicht in den eingeschalteten Strahler blicken.
13. Das Gerät erhitzt sich auf sehr hohe Temperaturen. Nach Abschluss der Arbeit bleibt das Gerät noch
für eine gewisse Zeit heiß. Berühren Sie nicht die heißen Maschinenteile
TECHNISCHE DETAILS
Produktname INFRAROT LACKTROCKNER
Modell IR-DRYER3000.2 IR-DRYER3000.1 IR-DRYER2000.1 IR-DRYER2000.2 IR-DRYER1000
Bemessungsversorgungsspannung [V]/
Frequenz [Hz]
230~/50
Nennleistung [W] 3 x 1100 3 x 1100 2 x 1100 2 x 1100 1100
Zeitbereich [min] 0-99 0-99 0-99 0-60 0-60
Temperaturbereich [°C] 40-100* 40-100 40-100* 40-100* 40-100*
Temperatureinstellung JA* JA JA* JA* JA*
Gewicht [kg] 47 48 39 15 14
ANWENDUNGSGEBIET
Der Infrarot-Strahler ist zum Trocknen aller Art von Materialien vorgesehen, die zu Reparaturarbeiten an
Karosserien verwendet werden.
Für alle Schäden bei nicht sachgemäßer Verwendung haftet allein der Betreiber.
VOR DER ERSTEN BENUTZUNG
Prüfen Sie bei Erhalt der Ware die Verpackung auf Mängel und öffnen Sie diese, falls keine vorhanden sind. Falls
die Verpackung Beschädigungen aufweist, setzen Sie sich innerhalb von 3 Tagen mit der Transportgesellschaft
und Ihrem Vertriebspartner in Verbindung. Dokumentieren Sie die Beschädigungen so gut wie möglich.
Stellen Sie das Paket mit Inhalt nicht über Kopf auf! Sollten Sie das Paket weiter transportieren, halten Sie
es aufrecht und stabil.
ENTSORGUNG DER VERPACKUNG
Es wird darum gebeten, das Verpackungsmaterial (Pappe, Plastikbänder und Styropor) zu behalten, um das
Gerät im Servicefall bestmöglich geschützt zurücksenden zu können!
AUFBAU DES GERÄTES
PLATZIERUNG DES GERÄTES
Das Gerät muss auf einer trockenen und stabilen Fläche in aufrechter Position aufgestellt werden, damit
es während des Betriebs zu keinen Verschiebungen kommt. Das Gerät muss auf einem achen und ebenen
Untergrund aufgestellt werden, der das Gewicht des Gerätes zusammen mit dem Inhalt trägt. Das Gerät
ist so anzubringen, dass der Zugang zum Trennen der Stromversorgung jederzeit möglich ist. Es ist daran
zu denken, dass die Stromversorgung den Vorgaben auf dem Typenschild entspricht! Vor der ersten
Inbetriebnahme sollten sämtliche Elemente demontiert und gründlich gereinigt werden.
* Die Temperatur ist vom Abstand des Infrarotstrahlers zu der zu bearbeitenden Fläche abhängig.
4
WIE FUNKTIONIERT DAS GERÄT? GRUNDREGELN
IR-DRYER3000.2 | IR-DRYER3000.1 | IR-DRYER2000.1
Beschreibung des Gerätes
1. Kassette
2. Kassettenstütze
3. Antrieb
4. Schalter
5. Zughebel
6. Standsäule
7. Unterer Rahmen
8. Räder
1. Zeitanzeige
2. Zeiteinstellung – „+”
3. Zeiteinstellung – „-”
4. Wahl der Lampen
5. Start
6. Stop
1. Zeitanzeige
2. Temperaturanzeige
3. Wahl des Betriebsmodus: pulsierend
4. Wahl des Betriebsmodus: konstant
5. Zeiteinstellung – „+” i „-”
6. Temperatureinstellung – „+” i „-”
7. Start
8. Stop
9. Auswahl der Strahler: Strahler 1
10. Auswahl der Strahler: Strahler 2
11. Auswahl der Strahler: Strahler 3
IR-DRYER3000.2
BESCHREIBUNG DER STEUERTAFEL
1. Voltmeter
2. Zeitanzeige
3. Zeiteinstellung – „+”
4. Zeiteinstellung – „-”
5/6. Wahl der Strahler
7. Funktionsauswahl: KORROSIONSSCHUTZ – GRUNDIERUNG (RUST
PROOF PRIMER)
8. Funktionsauswahl: GRUNDIERUNG (GRUNDIERUNGSSCHICHT) (PRIMER)
9. Funktionsauswahl: ERSTBESCHICHTUNG – GESPACHTELT (PRIMARY
FILLER)
10. Funktionsauswahl: AUSHÄRTEN DER DECKSCHICHT (TOP COAT)
11. Funktionsauswahl: SPACHTELSCHICHT (ABSCHLUSSARBEITEN)
(SECONDARY FILLER)
12. Funktionsauswahl: GLANZ
13. Start
14. Stop
IR-DRYER3000.1
IR-DRYER2000.1
5
5
3
2
4
6
7
8
1
1
2
4
5
3
6
1
2
3
9
11
5
5
7
4
6
6
8
10
1
2
3
5
7
9
11
13
4
6
8
10
12
14
Rev. 26.11.2018 Rev. 26.11.2018

6
FUNKTIONSPRINZIPIEN
1. Das Gerät ist entsprechend der Vorlage zusammenzusetzen und entsprechend zu platzieren.
2. Dann das Gerät an den Stromkreislauf anschließen und anschalten.
3. Danach mithilfe der Tasten die Betriebszeit des Gerätes einstellen.
4. Die Geräte IR-DRYER3000.1 und IR-DRYER2000.1 sind mit Temperaturregulierung ausgestattet. Bei
IR-DRYER3000.1 wird die Temperatur über die Tasten eingestellt, bei IR-DRYER2000.1 mithilfe der
Funktionstasten.
5. Wählen Sie dann den Strahler, den Sie verwenden wollen.
6. Wenn das Gerät korrekt eingestellt ist, wird dieses durch Bedienen der Taste Start in Gang gesetzt. Die
Taste Stop hält die Arbeit des Gerätes an. Nach abgeschlossener Arbeit muss das Gerät ausgeschaltet
und von der Stromverbindung genommen werden.
Um die Position der Kassette einzustellen wird der sich am Rahmen des Gerätes bendende Zughebel
gezogen. Um den Winkel des Strahlers einzustellen, müssen die Zughebel auf beiden Seiten gelöst werden.
Den gewünschten Winkel einstellen und wieder festdrehen.
IR-DRYER2000.2 | IR-DRYER1000
Beschreibung des Gerätes
1. Strahler
2. Standsäule
3. Unterer Rahmen
4. Räder
BESCHREIBUNG DER STEUERTAFEL
ON/OFF – Schalter Ein/Aus
TIMER – Zeiteinstellung
FUNKTIONSPRINZIPIEN
1. Das Gerät ist entsprechend der Vorlage zusammenzusetzen und entsprechend zu platzieren.
2. Dann das Gerät an den Stromkreislauf anschließen und anschalten.
3. Danach mithilfe der Tasten die Betriebszeit des Gerätes einstellen.
4. Nach abgeschlossener Arbeit muss das Gerät ausgeschaltet und von der Stromverbindung genommen
werden.
2
1
3
4
3
4
2
1
ON/OFF TIMER
7
MONTAGE DES GERÄTES
Das Gerät ist entsprechend der unten angegebenen Vorlage zu montieren.
NUMMER BESCHREIBUNG
1Vertikale Standsäule
2Obere Abdeckung
3Kunststofeiste
4Linkes Verbindungsstück
5Rahmen
6Klemmleiste
7 Kassette
8Kunststoffhebel zur Einstellung
des Winkels
9Verbindungsstück
10 Rechtes Verbindungsstück
11 Griff
12 Untere Verbindungsstange
NUMMER BESCHREIBUNG
13 Obere Verbindungsstange
14 Antrieb
15 Antriebshalterung
16 Vorderräder
17 Rahmen
18 Hinterräder mit Bremse
19 Flansch
20 Abdeckung
21 Steuerungstransormator
22 Schalter
23 Griff
24 Abdeckung
25 Schalttafel
AUSTAUSCH DER LAMPEN
1. Die Kassette abnehmen 2. Das Schutzgitter entfernen
8
7
6
5
4
9
10
11
12
13
14
15
16
17
18
19
20
21
22
23
24
25
1
2
3
Rev. 26.11.2018 Rev. 26.11.2018

3. Entfernen Sie die Abdeckung von
beiden Seiten der Kassette.
4. Die Platten von beiden Seiten
der Kassette entfernen.
5. Dann die Lampe herausziehen und eine
neue mit ähnlichen Parametern installieren.
6. Danach die Kassette und das Gerät wieder
zusammensetzen – analog zur Demontage.
TRANSPORT UND LAGERUNG
Beim Transport sollte die Maschine vor Schütteln und Stürzen, sowie vor dem Hinstellen auf das obere
Teil geschützt werden. Lagern Sie es in einer gut durchlüfteten Umgebung mit trockener Luft und ohne
korrosive Gase.
REINIGUNG UND WARTUNG
• Vor dem Reinigen oder bei Nichtbenutzung des Gerätes ist die Stromversorgung zu trennen.
• Verwenden Sie zum Reinigen der Oberäche ausschließlich Mittel ohne ätzende Inhaltsstoffe.
• Lassen Sie nach jeder Reinigung alle Teile gut trocknen, bevor das Gerät erneut verwendet wird.
• Bewahren Sie das Gerät an einem trockenen, kühlen, vor Feuchtigkeit und direkter Sonneneinstrahlung
geschütztem Ort auf.
• Es ist untersagt die Maschine mit Wasserstrahlen zu besprühen.
REGELMÄSSIGE PRÜFUNG DES GERÄTES
Prüfen Sie regelmäßig, ob Elemente des Gerätes eventuelle Beschädigungen aufweisen. Sollte dies der Fall
sein, darf das Gerät nicht mehr benutzt werden. Wenden Sie sich umgehend an Ihren Verkäufer, um das
Gerät reparieren zu lassen.
Was tun im Problemfall?
Kontaktieren Sie Ihren Verkäufer und bereiten Sie folgende Angaben vor:
• Rechnungs- und Seriennummer (letztere nden Sie auf dem Typenschild)
• Ggf. ein Foto des defekten Teils aufnehmen.
• Ihr Servicemitarbeiter kann besser eingrenzen worin das Problem besteht, wenn Sie es so präzise wie
möglich beschreiben. Je detaillierter Ihre Angaben sind, umso schneller kann Ihnen geholfen werden!
ACHTUNG: Öffnen Sie die Maschine niemals ohne Rücksprache mit dem Kundenservice. Dies kann Ihren
Gewährleistungsanspruch beeinträchtigen!
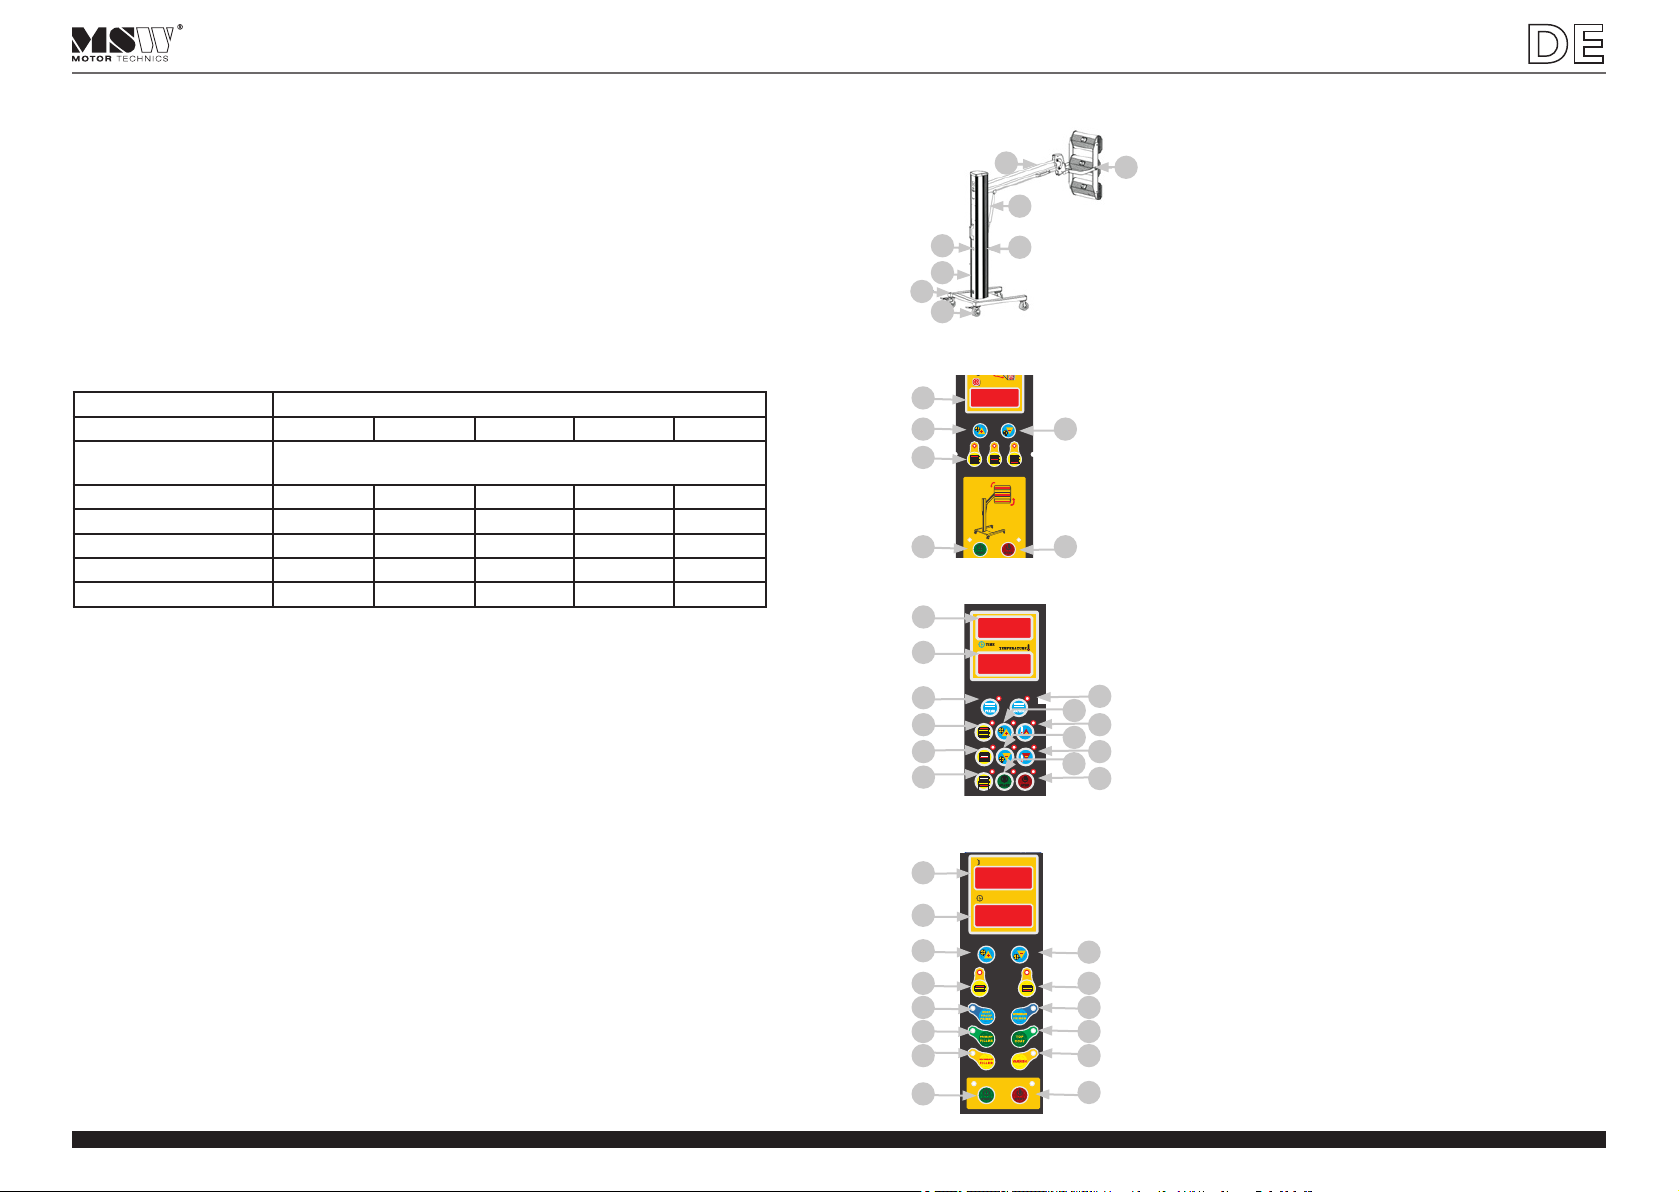
The operation manual must be reviewed.
Never dispose of electrical equipment together with household waste.
The product satises the relevant safety standards.
Attention! Hot surface may cause burns
Attention! The hand can be squeezed
Attention! Wear protective gloves.
Attention! Risk of re or explosion.
Attention! Risk of accident.
SYMBOLS
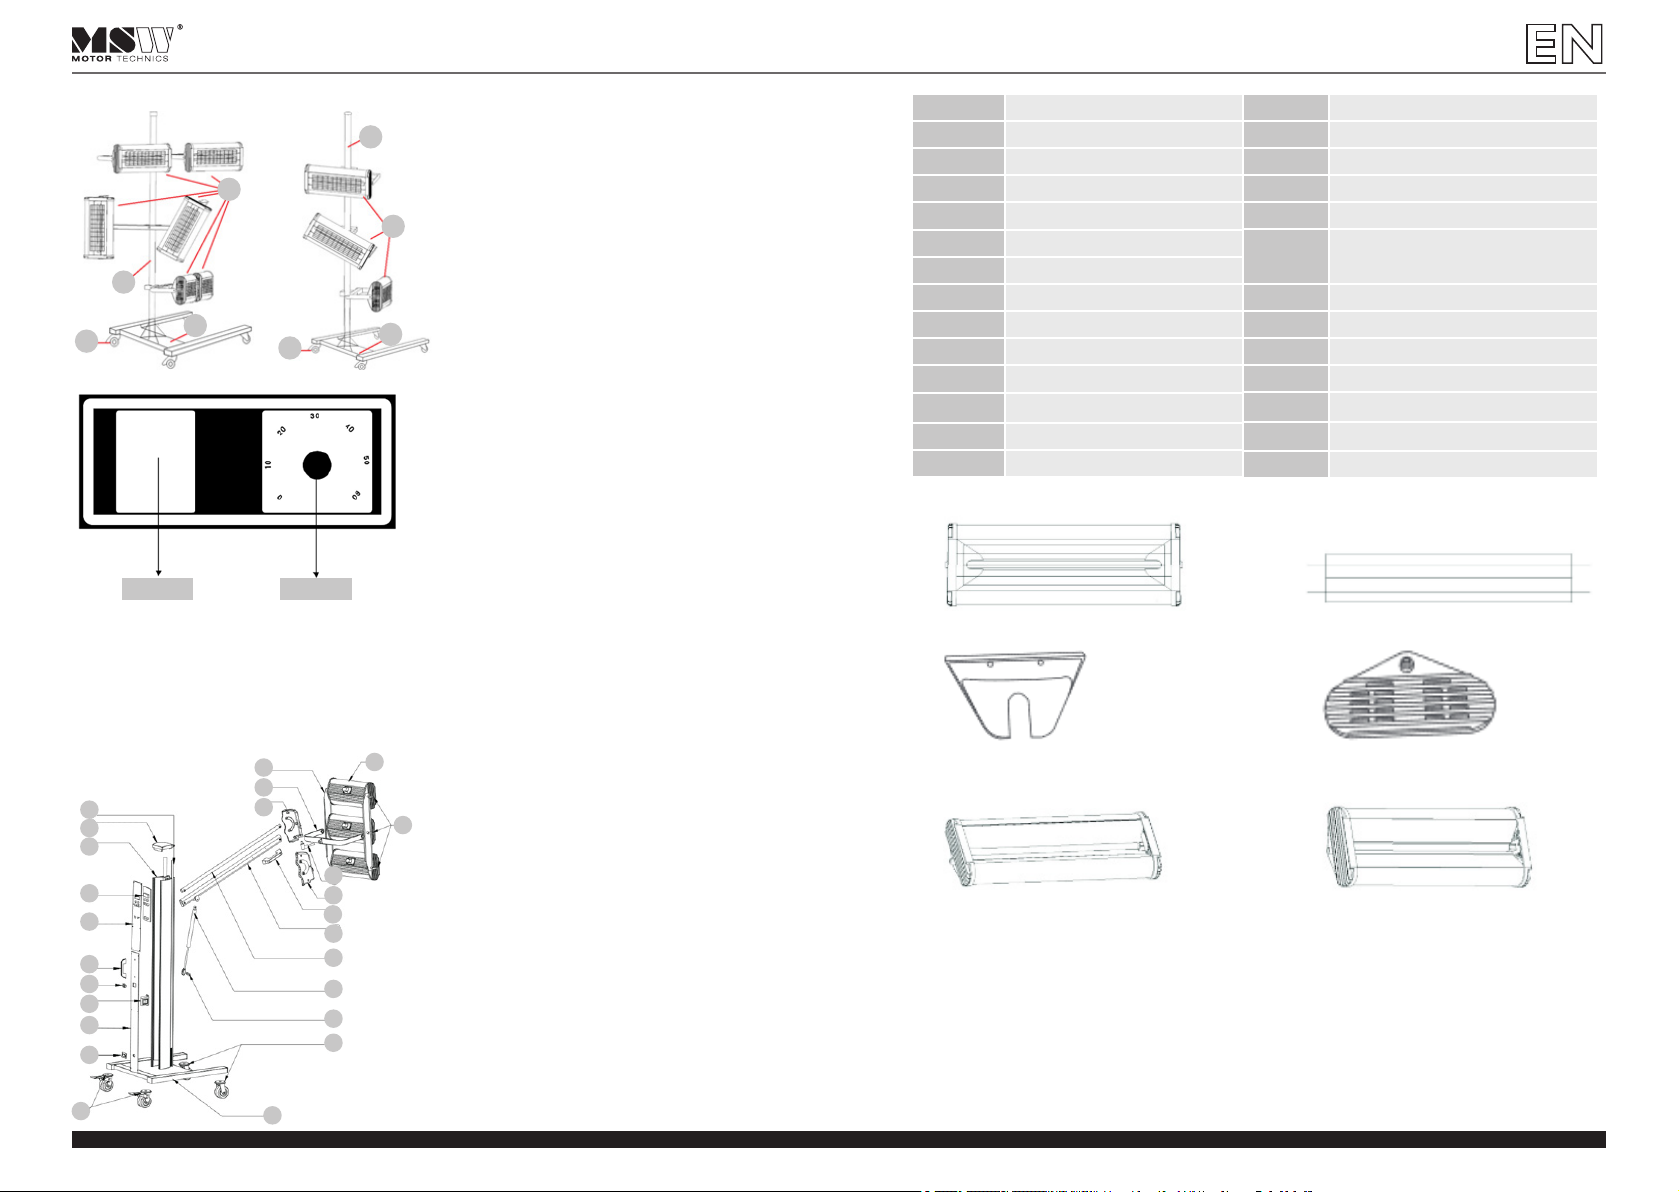
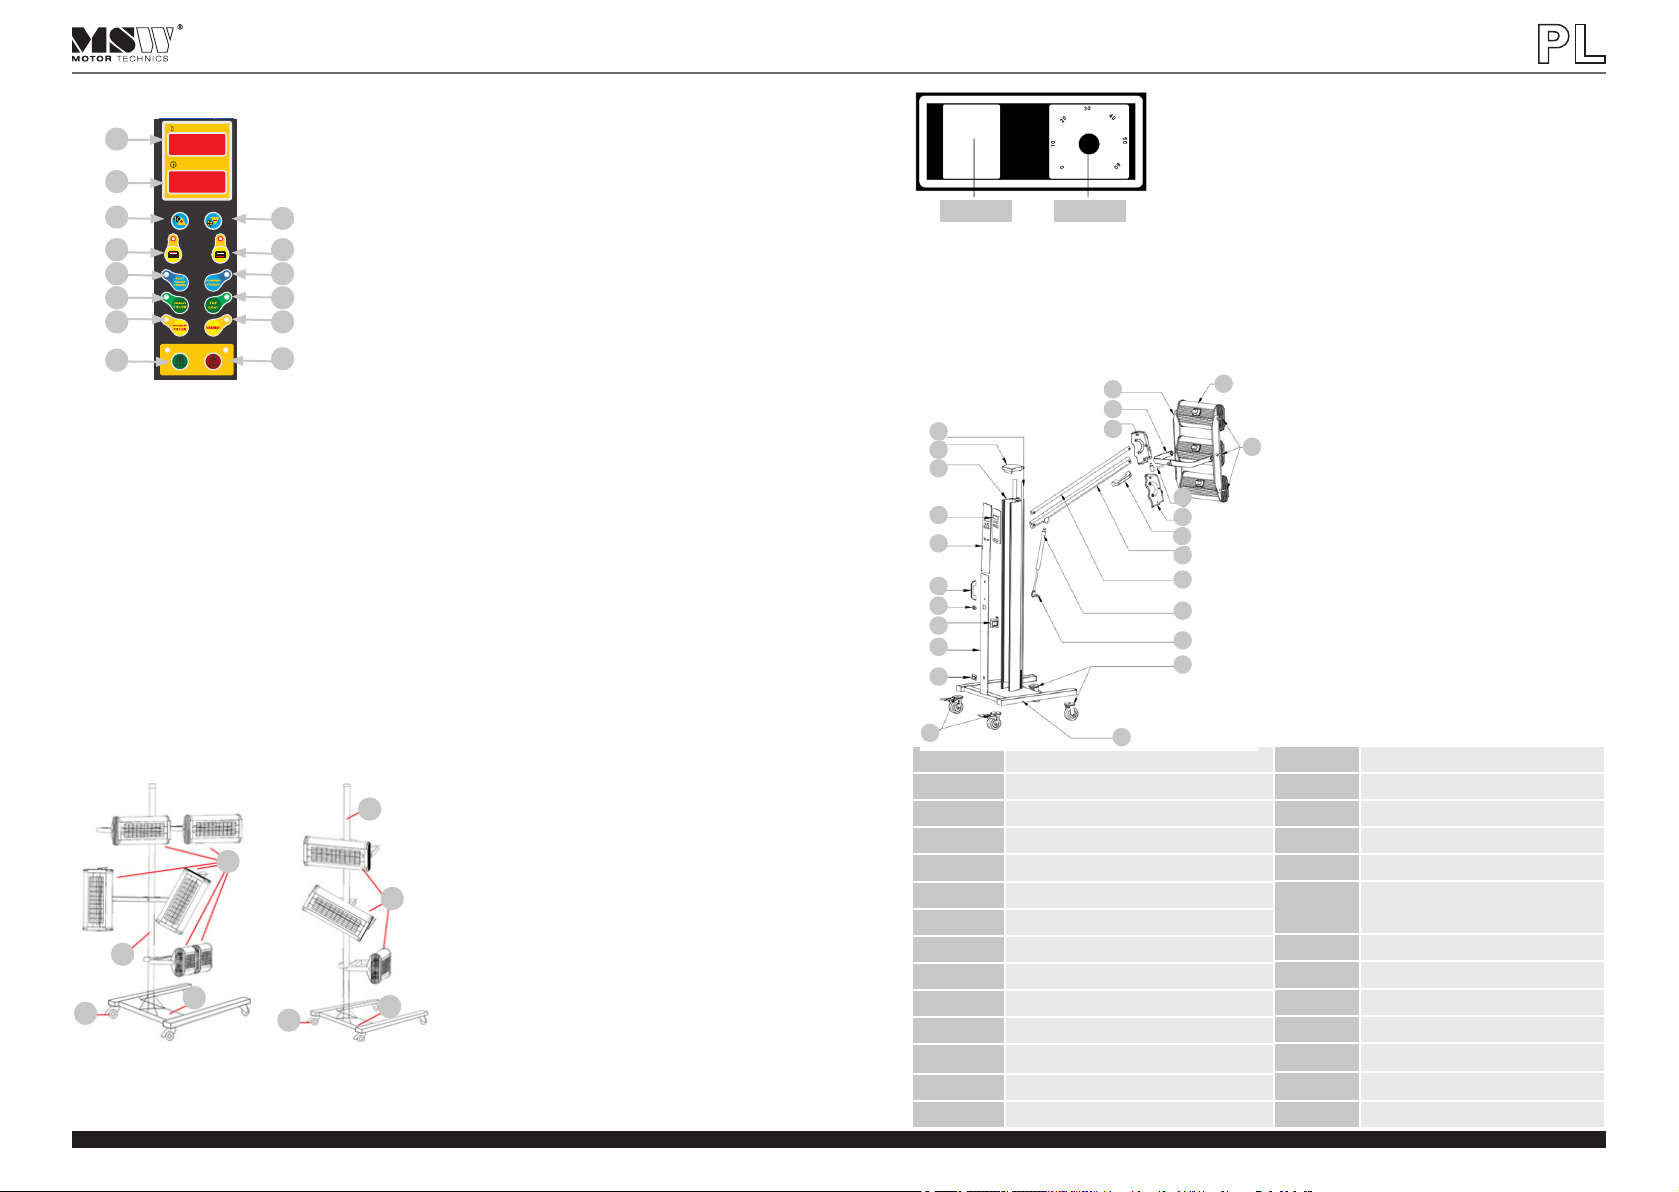
PLEASE NOTE! Drawings in this manual are for illustration purposes only and in some details it
may differ from the actual machine.
The original operation manual is in German. Other language versions are translations from German.
USER MANUAL
SAFETY INSTRUCTIONS
General safety information for the use of electrical devices:
To avoid any risk of injury from re or electric shock, please follow the basic safety instructions when using
this device. Please read the instructions carefully and make sure that you have understood them well. Keep
the manual near the equipment to be able to read it at any time. Always use current sources connected to
the ground that provide the correct voltage (indicated on the label on the device). If you have any doubts,
let an electrician check that the connection is properly grounded. Never use a defective power cable. Do
not open the unit in damp or wet environment, or if your hands or body are damp or wet. Protect the unit
from solar radiation. Use the device in a protected place to avoid damaging the equipment or putting at risk
others. Make sure the device is able to cool and avoid placing it too close to other devices that produce
heat. Before cleaning the machine, disconnect it from the power source. Use a soft damp cloth for cleaning.
Avoid using detergents and make sure that no liquid enters the unit. No internal element of this device
needs to be maintained by the user. Opening the device without our approval leads to a loss of warranty!
SAFETY GUIDELINES
1. Please read and understand these instructions carefully before using the device! Please observe the
safety guidelines carefully in order to prevent damages through improper use!
2. Please keep this manual available for future reference. If this device is passed on to third parties, the
manual must be passed on with it.
3. Only use this device indoors and for its intended use.
4. We do not offer any warranty for damages resulting from improper use or incorrect operation.
5. Before using this device for the rst time, please check whether the main voltage type and current
comply with the indicated data on the type plate.
6. This device is not intended to be used by persons (including children) with limited physical, sensory
or mental capabilities or lack of experience and/or knowledge, unless they are supervised by a person
responsible for their safety or have received instruction as to how the device is used.
7. ELECTRIC SHOCK HAZARD! Do not try to repair the unit yourself. In case of device failures, repairs
must be done by qualied experts.
8. Please check the main plug and power cable regularly. If the power cable for this device is damaged, it
has to be replaced by the manufacturer or its customer service or another qualied person in order
to prevent hazards.
9. Prevent damages to the power cable by avoiding squeezing or bending it or rubbing it on sharp edges.
Also keep the power cable away from hot surfaces and open ames.
Rev. 26.11.2018 Rev. 26.11.2018
USER MANUAL
8 9

10. ATTENTION! DANGER TO LIFE! While cleaning, never immerse the device in water or other liquids.
11. Under no circumstances should the housing be opened.
12. When in use do not look directly at the emitter.
13. The device heats up to extremely high temperatures. Even after work, the device may remain hot for
some time. Do not touch hot parts of the machine.
TECHNICAL DATA
Product name INFRARED PAINT DRYER
Model IR-DRYER3000.2 IR-DRYER3000.1 IR-DRYER2000.1 IR-DRYER2000.2 IR-DRYER1000
Nominal power supply [V]/
Frequency [Hz]
230~/50
Rated power [W] 3 x 1100 3 x 1100 2 x 1100 2 x 1100 1100
Time scope [min] 0-99 0-99 0-99 0-60 0-60
Temperature range [°C] 40-100* 40-100 40-100* 40-100* 40-100*
Temperature adjustment YES* YES YES* YES* YES*
Weight [kg] 47 48 39 15 14
SCOPE OF THE APPLICATION
The IR emitter is designed for drying all materials used in bodywork repairs.
The user is liable for any damage resulting from non-intended use of the device!
BERORE THE FIRST USE
Upon receipt of the goods, check the packaging for defects and open the packaging if there are no damages.
If the packaging is damaged, please contact your transport company and distributor within 3 days, and
document the damages as detailed as possible. Do not turn the package upside down! When transporting
the package, please ensure that it is kept horizontal and stable.
DISPOSING OF THE PACKAGING
Please keep all packaging materials (cardboard, plastic tapes and Styrofoam), so that in case of a problem, the
device can be sent back to the service centre in accurate condition!
INSTALLING THE APPLIANCE
POSITIONING THE MACHINE
The machine should be positioned on a dry and stable surface, vertically so as to prevent movement during
operation. The machine should be positioned on a at, level surface, with sufcient load capacity for the
machine and its contents. Ensure unobstructed access to the electricity plug at all times. Make sure the
power source reects the parameters on the rating plate! Prior to rst use remove and wash all elements
and wash the entire machine.
* Temperature depends on the distance between IR emitter and workpiece
MACHINE OPERATION – BASICS
IR-DRYER3000.2 | IR-DRYER3000.1 | IR-DRYER2000.1
Device description
1. IR unit
2. Unit support
3. Actuator
4. On/Off switch
5. Lever
6. Support post
7. Bottom frame
8. Wheels
5
3
2
4
6
7
8
1
1. Time display
2. Button for setting time "+"
3. Button for setting time "+"
4. Lamp selection
5. Start
6. Stop
1. Time display
2. Temperature display
3. Work mode selector: pulsating
4. Work mode selector: constant
5. Buttons for setting time" "+" and "-"
6. Buttons for setting temperature: "+" and "-"
7. Start
8. Stop
9. Emitter selector: emitter 1
10. Emitter selector: emitter 2
11. Emitter selector: emitter 3
IR-DRYER3000.2
CONTROL PANEL DESCRIPTION
1. Voltmeter
2. Time display
3. Button for setting time: "+"
4. Button for setting time: "-"
5/6. Emitter selector
7. Function: RUST PROOF PRIMER
8. Function: PRIMER
9. Function: PRIMARY FILLER
10. Function: TOP COAT
11. Function: SECONDARY FILLER
12. Function: VARNISH
13. Start
14. Stop
IR-DRYER3000.1
IR-DRYER2000.1
OPERATING PRINCIPLE
1. Assemble the device in accordance with the diagram and position it correctly.
2. Then connect to power supply and turn on.
3. Use the buttons to set the device operating time.
4. IR-DRYER3000.1 and IR-DRYER2000.1 models have a temperature adjustment feature. Use buttons to
set the temperature on the IR-DRYER3000.1 model, and use function buttons to set the temperature
on the IR-DRYER2000.1 model.
5. Then select the emitters to be switched on.
6. Once the device has been positioned correctly, activate it using the start button. To deactivate the
emitters, press the stop button. When not in use device off and disconnect it from the power source.
To adjust the position of the IR unit, pull the lever on the frame of the device. To adjust the angle of the
emitter, loosen the levers on the sides, align at the required angle and tighten.
1
2
4
5
3
6
1
2
3
9
11
5
5
7
4
6
6
8
10
1
2
3
5
7
9
11
13
4
6
8
10
12
14
Rev. 26.11.2018 Rev. 26.11.2018
10 11

IR-DRYER2000.2 | IR-DRYER1000
Device description
1. Emitters
2. Support post
3. Bottom support frame
4. Wheels
CONTROL PANEL DESCRIPTION
ON/OFF switch
TIMER – Time settings
OPERATING PRINCIPLE
1. Assemble the device in accordance with the diagram and position it correctly.
2. Then connect to power supply and turn on.
3. Use the knob to select the time foe which the device is to be active.
4. When not in use device off and disconnect it from the power source.
ON/OFF TIMER
ASSEMBLING THE DEVICE
Assemble the device in accordance with the overview diagram below.
2
1
3
4
3
4
2
1
8
7
6
5
4
9
10
11
12
13
14
15
16
17
18
19
20
21
22
23
24
25
1
2
3
NUMBER DESCRIPTION
1Vertical support post
2Upper cap
3Plastic trim
4Left clamp
5Support frame
6Terminal strip
7 IR unit
8Plastic lever for adjusting angles
9 Connector
10 Right clamp
11 Handle
12 Bottom support rod
13 Top support rod
NUMBER DESCRIPTION
14 Actuator
15 Actuator bracket
16 Front wheels
17 Support frame
18 Rear wheels
(with brake mechanism)
19 Flange
20 Cover
21 Control transformer
22 On/Off switch
23 Handle
24 Cover
25 Control panel
REPLACING LAMPS
1. Dismantle the IR unit 2. Remove the protective mesh
3. Remove the housing from both
sides of the IR unit.
4. Remove the covers from both
sides of the IR unit.
5. Then remove the bulb and install
a new one with similar parameters.
6. Then assemble the IT unit and the device
in reverse order to dismantling.
TRANSPORTATION AND STORAGE
During transport, the machine should be protected from shaking, crashing and turning upside down. Store it
in a properly ventilated place with dry air and without any corrosive gas.
Rev. 26.11.2018 Rev. 26.11.2018
12 13

CLEANING AND MAINTENANCE
• Disconnect the machine from the electricity when cleaning it.
• Use cleaner without corrosive substances to clean surface.
• After cleaning, all parts should be able to dry before the machine is to be reused
• Store the unit in a dry, cool place, free from moisture and direct exposure to sunlight.
• Never spray the device with water jets.
CHECK REGULARLY DEVICE
Check regularly whether the device is damaged. If it should be damaged, please stop using it immediately and
contact your customer service to solve the problem.
What to do in case of a problem?
Please contact your customer service and prepare the following information:
• Invoice number and serial number (the latter is to be found on the technical plate on the device).
• If relevant, take a picture of the damaged, broken or defective part.
• It will be easier for your customer service clerk to determine the source of the problem if you give
a detailed and precise description of the matter. The more detailed your information, the better the
customer service will be able to solve your problem rapidly and efciently!
CAUTION: Never open the device without the authorization of your customer service. This can lead to
a loss of warranty!
Należy zapoznać się z instrukcją obsługi.
Nie wolno wyrzucać urządzeń elektrycznych razem z odpadami gospodarstwa domowego.
Produkt spełnia wymagania odpowiednich norm bezpieczeństwa.
Uwaga! Gorąca powierzchnia może spowodować oparzenia.
Uwaga! Niebezpieczeństwo zgniecenia dłoni.
Uwaga! Załóż rękawice ochronne.
Uwaga! Ryzyko pożaru lub wybuchu.
Uwaga! Niebezpieczeństwo wypadku.
SYMBOLE
UWAGA! Ilustracje w niniejszej instrukcji obsługi mają charakter poglądowy i w niektórych
szczegółach mogą różnić się od rzeczywistego wyglądu produktu.
Instrukcją oryginalną jest niemiecka wersja instrukcji. Pozostałe wersje językowe są tłumaczeniami z języka
niemieckiego.
INSTRUKCJA OBSŁUGI
ZALECENIA ODNOŚNIE BEZPIECZEŃSTWA
Ogólne zalecenia odnośnie bezpieczeństwa podczas użytkowania urządzeń elektrycznych:
W celu zminimalizowania ryzyka obrażeń na skutek działania ognia lub porażenia prądem prosimy Państwa
o stałe przestrzeganie kilku podstawowych zasad bezpieczeństwa podczas użytkowania urządzenia. Prosimy
o staranne przeczytanie niniejszej instrukcji użytkowania i upewnienie się, że znaleźli Państwo odpowiedzi
na wszystkie pytania dotyczące tego urządzenia. Prosimy o staranne przechowywanie niniejszej instrukcji
użytkowania w pobliżu produktu, aby w razie pojawienia się pytań można było do niej jeszcze raz powrócić
również w późniejszym czasie. Prosimy zawsze stosować uziemione przyłącze prądu z prawidłowym
napięciem sieciowym (patrz instrukcja lub tabliczka znamionowa)! W razie wątpliwości w odniesieniu do
tego, czy przyłącze jest uziemione, prosimy zlecić sprawdzenie tego wykwalikowanemu specjaliście. Nigdy
nie należy stosować niesprawnego kabla zasilania! Urządzenia nie należy otwierać w wilgotnym lub mokrym
miejscu ani też mokrymi lub wilgotnymi rękoma. Poza tym urządzenie należy chronić przed bezpośrednim
promieniowaniem słonecznym. Urządzenie należy użytkować zawsze w bezpiecznym miejscu, tak aby nikt
nie mógł nadepnąć na kabel, przewrócić się o niego i/lub uszkodzić go. Przed przystąpieniem do czyszczenia
urządzenia należy wyciągnąć wtyczkę sieciową, a do czyszczenia używać jedynie wilgotnej ściereczki. Należy
unikać stosowania środków czyszczących i uważać, aby jakakolwiek ciecz nie dostała się do urządzenia i/lub
tam nie pozostała. Należy wyłączyć urządzenie natychmiast po zauważeniu nieprawidłowości w sposobie
jego funkcjonowania. Powinno się również wyciągnąć wtyczkę z gniazdka sieciowego, gdy urządzenie nie jest
używane. Wykonanie prac związanych z konserwacją, wyregulowaniem i naprawą urządzenia należy zlecić
wyspecjalizowanemu personelowi. W przypadku napraw dokonywanych przez osoby trzecie gwarancja wygasa!
WSKAZÓWKI BEZPIECZEŃSTWA
1. Przed przystąpieniem do uruchomienia prosimy o dokładne przeczytanie niniejszej instrukcji!
Należy przestrzegać wszystkich wskazówek bezpieczeństwa, aby unikać szkód powstałych na skutek
użytkowania niezgodnego z przeznaczeniem!
2. Zachowaj instrukcję użytkowania w celu jej późniejszego użycia. W razie gdyby urządzenie miało
zostać przekazane osobom trzecim, to wraz z nim należy przekazać również instrukcję użytkowania.
3. Urządzenie należy stosować wyłącznie zgodnie z przeznaczeniem i tylko wewnątrz pomieszczeń.
4. W przypadku użytkowania niezgodnego z przeznaczeniem lub nieprawidłowej obsługi wyklucza się
odpowiedzialność za powstałe ewentualnie szkody.
5. Przed pierwszym użyciem prosimy sprawdzić, czy rodzaj prądu i napięcie sieciowe odpowiadają danym
wskazanym na tabliczce znamionowej.
Rev. 26.11.2018 Rev. 26.11.2018
INSTRUKCJA OBSŁUGI
14 15

6. Urządzenie nie jest przeznaczone do tego, by było użytkowane przez osoby (w tym dzieci)
o ograniczonych funkcjach psychicznych, sensorycznych i umysłowych lub nieposiadające
odpowiedniego doświadczenia i/lub wiedzy, chyba że są one nadzorowane przez osobę odpowiedzialną
za ich bezpieczeństwo lub otrzymały od niej wskazówki dotyczące tego, jak należy obsługiwać
urządzenie.
7. NIEBEZPIECZEŃSTWO PORAŻENIA PRĄDEM! Nigdy nie próbuj samemu naprawiać urządzenia.
W razie awarii zleć naprawę urządzenia wyłącznie wykwalikowanym specjalistom.
8. Sprawdzaj regularnie wtyczkę sieciową i kabel zasilający. Jeżeli kabel zasilający urządzenia jest
uszkodzony, to, aby uniknąć zagrożenia, producent, jego serwis klienta lub osoba o podobnych
kwalikacjach musi go wymienić.
9. Należy zapobiegać uszkodzeniu kabla zasilającego na skutek jego zgniecenia, przełamania lub przetarcia
na ostrych krawędziach oraz trzymać go z dala od gorących powierzchni i otwartych źródeł ognia.
10. UWAGA – ZAGROŻENIE ŻYCIA! Podczas czyszczenia lub użytkowania urządzenia nigdy nie wolno
zanurzać go w wodzie lub innych cieczach. Urządzenia nigdy nie należy trzymać pod bieżącą wodą lub
polewać innymi cieczami.
11. Pod żadnym pozorem nie należy otwierać obudowy.
12. Nie należy kierować wzroku na włączone promienniki.
13. Urządzenie rozgrzewa się do bardzo wysokich temperatur. Po skończonej pracy urządzenie może być
gorące jeszcze przez jakiś czas. Nie należy dotykać rozgrzanych części maszyn.
DANE TECHNICZNE
Nazwa produktu PROMIENNIK PODCZERWIENI
Model IR-DRYER3000.2 IR-DRYER3000.1 IR-DRYER2000.1 IR-DRYER2000.2 IR-DRYER1000
Znamionowe napięcie zasilania [V]/
Częstotliwość [Hz]
230~/50
Moc [W] 3 x 1100 3 x 1100 2 x 1100 2 x 1100 1100
Zakres czasowy [min] 0-99 0-99 0-99 0-60 0-60
Zakres temperatur [°C] 40-100* 40-100 40-100* 40-100* 40-100*
Regulacja temperatury TAK* TAK TAK * TAK * TAK *
Waga [kg] 47 48 39 15 14
OBSZAR ZASTOSOWANIA
Promiennik podczerwieni przeznaczony jest do suszenia wszystkich materiałów stosowanych w naprawach
blacharskich.
Odpowiedzialność za wszelkie szkody powstałe w wyniku użytkowania niezgodnego
z przeznaczeniem ponosi użytkownik.
PRZED PIERWSZYM UŻYCIEM
W momencie otrzymania towaru należy sprawdzić opakowanie pod kątem występowania ewentualnych
uszkodzeń i otworzyć je. Jeżeli opakowanie jest uszkodzone prosimy o skontaktowanie się w przeciągu 3 dni
z przedsiębiorstwem transportowym lub Państwa dystrybutorem oraz o udokumentowanie uszkodzeń
w jak najlepszy sposób. Prosimy nie stawiać pełnego opakowania do góry nogami! Jeżeli opakowanie będzie
ponownie transportowane prosimy zadbać o to, by było ono przewożone w pozycji poziomej i by było
stabilnie ustawione.
UTYLIZACJA OPAKOWANIA
Prosimy o zachowanie elementów opakowania (tektury, plastykowych taśm oraz styropianu), aby w razie
konieczności oddania urządzenia do serwisu można go było jak najlepiej ochronić na czas przesyłki!
* Temperatura jest zależna od odległości promiennika od obrabianej powierzchni.
Rev. 26.11.2018
JAK FUNKCJONUJE URZĄDZENIE – PODSTAWOWA ZASADA
IR-DRYER3000.2 | IR-DRYER3000.1 | IR-DRYER2000.1
Opis urządzenia
1. Kaseta
2. Wspornik kasety
3. Siłownik
4. Włącznik
5. Dźwignia
6. Słupek
7. Rama dolna
8. Kółka
1. Wyświetlacz czasu
2. Ustawianie czasu – „+”
3. Ustawianie czasu – „-”
4. Wybór promienników
5. Start
6. Stop
1. Wyświetlacz czasu
2. Wyświetlacz temperatury
3. Wybór trybu pracy: tryb pulsacyjny
4. Wybór trybu pracy: tryb stały
5. Ustawianie czasu – „+” i „-”
6. Ustawianie temperatury – „+” i „-”
7. Start
8. Stop
9. Wybór promienników: promiennik 1
10. Wybór promienników: promiennik 2
11. Wybór promienników: promiennik 3
IR-DRYER3000.2
OPIS PANELI STEROWANIA
IR-DRYER3000.1
MONTAŻ URZĄDZENIA
UMIEJSCOWIENIE URZĄDZENIA
Urządzenie należy ustawić na suchej i stabilnej powierzchni, w pozycji pionowej tak, aby podczas pracy nie
przemieszczało się. Urządzenie należy ustawić na płaskim, wypoziomowanym podłożu, które wytrzyma ciężar
urządzenia wraz z zawartością. Urządzenie należy umiejscowić w taki sposób, by w dowolnej chwili można
się było dostać do wtyczki sieciowej. Należy pamiętać o tym, by zasilanie urządzenia energią odpowiadało
danym podanym na tabliczce znamionowej! Przed pierwszym użyciem zdemontować wszystkie elementy
i umyć je jak również umyć całe urządzenie.
5
3
2
4
6
7
8
1
1
2
4
5
3
6
1
2
3
9
11
5
5
7
4
6
6
8
10
Rev. 26.11.2018
16 17

ZASADA DZIAŁANIA
1. Należy złożyć urządzenie zgodnie z rysunkiem i odpowiednio umiejscowić urządzenie.
2. Następnie należy podłączyć zasilanie i włączyć urządzenie
3. Następnie za pomocą przycisków należy ustawić czas pracy urządzenia.
4. Urządzenia IR-DRYER3000.1 oraz IR-DRYER2000.1 wyposażone są w możliwość regulacji temperatury.
W przypadku IR-DRYER3000.1 temperaturę reguluje się za pomocą przycisków, w przypadku IR
-DRYER2000.1 za pomocą przycisków funkcyjnych.
5. Następnie należy wybrać, który z promienników ma zostać włączony.
6. Gdy urządzenie będzie już poprawnie ustawione należy je uruchomić poprzez naciśnięcie przycisku
start. Przycisk stop spowoduje zatrzymanie pracy urządzenia. Po skończonej pracy należy wyłączyć
urządzenie i odłączyć je od źródła zasilania.
Aby wyregulować położenie kasety należy pociągnąć dźwignię znajdującą się na ramie urządzenia. Aby
zmienić kąt ustawienia promiennika należy poluzować dźwignie znajdujące się po obu bokach, ustawić
żądany kąt i dokręcić.
IR-DRYER2000.2 | IR-DRYER1000
Opis urządzenia
1. Promienniki
2. Słupek
3. Rama dolna
4. Kółka
OPIS PANELU STEROWANIA
1. Woltomierz
2. Wyświetlacz czasu
3. Ustawianie czasu – „+”
4. Ustawianie czasu – „-”
5/6. Wybór promienników
7. Wybór funkcji: PODKŁAD GRUNTUJĄCY ANTYKOROZYJNY
(RUST PROOF PRIMER)
8. Wybór funkcji: PODKŁAD (POWŁOKA GRUNTUJĄCA)
(PRIMER)
9. Wybór funkcji: POWŁOKA SZPACHLOWA WSTĘPNA
(PRIMARY FILLER)
10. Wybór funkcji: UTWARDZANIE POWŁOKI
NAWIERZCHNIOWEJ (TOP COAT)
11. Wybór funkcji: POWŁOKA SZPACHLOWA (OSTATECZNE
WYKOŃCZENIE) (SECONDARY FILLER)
12. Wybór funkcji: POŁYSK (VARNISH)
13. Start
14. Stop
IR-DRYER2000.1
1
2
3
5
7
9
11
13
4
6
8
10
12
14
2
1
3
4
3
4
2
1
ZASADA DZIAŁANIA
1. Należy złożyć urządzenie zgodnie z rysunkiem i odpowiednio umiejscowić urządzenie.
2. Następnie należy podłączyć zasilanie i włączyć urządzenie.
3. Przy pomocy pokrętła należy wybrać czas, z jakim urządzenie ma pracować.
4. Po skończonej pracy należy wyłączyć urządzenie i odłączyć źródło zasilania.
MONTAŻ URZĄDZENIA
Urządzenie należy zmontować zgodnie z poniższym rysunkiem poglądowym.
NUMER OPIS
1Pionowy słupek
2Górna osłona
3Plastikowa listwa
4Łącznik lewy
5Rama
6Listwa zaciskowa
7 Kaseta
8Plastikowa dźwignia regulująca kąty
9Łącznik
10 Łącznik prawy
11 Uchwyt
12 Pręt łączący dolny
13 Pręt łączący górny
NUMER OPIS
14 Siłownik
15 Uchwyt siłownika
16 Przednie koła
17 Rama
18 Tylne koła wyposażone
w hamulec
19 Kołnierz
20 Osłona
21 Transformator sterujący
22 Włącznik
23 Uchwyt
24 Osłona
25 Panel sterowania
ON/OFF – Włącznik/wyłącznik
TIMER – Ustawienie czasu
ON/OFF TIMER
8
7
6
5
4
9
10
11
12
13
14
15
16
17
18
19
20
21
22
23
24
25
1
2
3
18 19
Rev. 26.11.2018 Rev. 26.11.2018

3. Należy usunąć obudowę
z obu stron kasety.
4. Należy zdemontować płytki
z obu stron kasety.
5. Następnie należy wyciągnąć żarówkę
i zamontować nową o podobnych parametrach. 6. Następnie należy zmontować kasetę
i urządzenie analogicznie do demontażu.
TRANSPORT I PRZECHOWYWANIE
Podczas transportu urządzenie należy zabezpieczyć przed wstrząsami i przewróceniem się oraz nie ustawiać
go „do góry nogami”. Urządzenie należy przechowywać w dobrze wentylowanym pomieszczeniu, w którym
obecne jest suche powietrze i nie występują gazy powodujące korozję.
CZYSZCZENIE I KONSERWACJA
• Przed każdym czyszczeniem, a także jeżeli urządzenie nie jest używane, należy wyciągnąć wtyczkę
sieciową.
• Do czyszczenia powierzchni należy stosować wyłącznie środki niezawierające substancji żrących.
• Po każdym czyszczeniu wszystkie elementy należy dobrze wysuszyć, zanim urządzenie zostanie
ponownie użyte.
• Urządzenie należy przechowywać w suchym i chłodnym miejscu chronionym przed wilgocią
i bezpośrednim promieniowaniem słonecznym.
• Zabrania się spryskiwania urządzenia strumieniem wody.
REGULARNA KONTROLA URZĄDZENIA
Należy regularnie sprawdzać, czy elementy urządzenia nie są uszkodzone. Jeżeli elementy te będą
uszkodzone, to należy zwrócić się do sprzedawcy z prośbą o ich naprawę.
Co należy zrobić w przypadku pojawienia się problemu?
Należy skontaktować się ze sprzedawcą i przygotować następujące dane:
• Numer faktury oraz numer seryjny (nr seryjny podany jest na tabliczce znamionowej).
• Ewentualnie zdjęcie niesprawnej części.
• Pracownik serwisu jest w stanie lepiej ocenić, na czym polega problem, jeżeli opiszą go Państwo w sposób
tak precyzyjny, jak jest to tylko możliwe. Sformułowania, takie jak np. „urządzenie nie grzeje” mogą być
dwuznaczne i oznaczają zarówno, że urządzenie grzeje za słabo lub w ogóle nie grzeje. Są to jednak dwie
różne przyczyny usterek! Im bardziej szczegółowe są dane, tym szybciej można Państwu pomóc!
UWAGA: Nigdy nie wolno otwierać urządzenia bez konsultacji z serwisem klienta. Może to prowadzić do
utraty gwarancji!
WYMIANA LAMPY
1. Należy zdemontować kasetę 2. Należy usunąć siatkę ochronną
SYMBOLE
POZOR!
NÁVOD K OBSLUZE
BEZPEČNOSTNÍ DOPORUČENÍ
BEZPEČNOSTNÍ POKYNY
Rev. 26.11.2018 Rev. 26.11.2018
NÁVOD K OBSLUZE
20 21

TECHNICKÉ ÚDAJE
Název produktu
°
ANO
47 48 39 15 14
OBLAST POUŽITÍ
Odpovědnost za veškeré škody vzniklé v důsledku použi zařízení v rozporu s určením nese uživatel.
PŘED PRVNÍM POUŽITÍM
UTILIZACE OBALU
MONTÁŽ ZAŘÍZENÍ
JAK ZAŘÍZENÍ FUNGUJE – ZÁKLADNÍ PRAVIDLO
Kazeta
Servomotor
Páka
Sloupek
Volba lamp
Start
Stop
Start
Stop
Voltmetr
Start
Stop
1
2
4
5
3
6
1
2
3
9
11
5
5
7
4
6
6
8
10
1
2
3
5
7
9
11
13
4
6
8
10
12
14
5
3
2
4
6
7
8
1
Rev. 26.11.2018 Rev. 26.11.2018
22 23

PRINCIP FUNKCE
Sloupek
POPIS OVLÁDACÍHO PANELU
PRINCIP FUNKCE
TIMER
2
1
3
4
3
4
2
1
MONTÁŽ ZAŘÍZENÍ
POPIS
1
2
3
4
5 Rám
7Kazeta
8
9
11
12
13
POPIS
14 Servomotor
15
17 Rám
18
19
21
22
23
24
25
VÝMĚNA LAMPY
8
7
6
5
4
9
10
11
12
13
14
15
16
17
18
19
20
21
22
23
24
25
1
2
3
Rev. 26.11.2018 Rev. 26.11.2018
24 25

PŘEPRAVA A USKLADNĚNÍ
ČIŠTĚNÍ A ÚDRŽBA
•
•
•
•
•
PRAVIDELNÁ KONTROLA ZAŘÍZENÍ
•
•
•
POZOR:
Veuillez lire attentivement ces instructions d'emploi.
Les appareils électriques ne doivent pas être jetés dans des poubelles ménagères.
Le produit est conforme aux normes de sécurité en vigueur.
Veuillez lire attentivement ces instructions d'emploi.
Les appareils électriques ne doivent pas être jetés dans des poubelles ménagères.
L'appareil est conforme aux directives européennes en vigueur.
Attention! Risque d'incendie ou d'explosion.
Attention! Risque d'accident.
SYMBOLES
ATTENTION! Certaines illustrations, présentes dans cette notice, peuvent différer de la
véritable apparence de l'appareil.
La version originale de ce manuel a été rédigée en allemand. Les autres versions sont des traductions de
l'allemand.
MANUEL D'UTILISATION
CONSIGNES DE SÉCURITÉ
Consignes de sécurité générales relatives à l'utilisation d'appareils électriques:
An de minimiser les risques de blessures dues au feu ou aux chocs électriques, veuillez constamment
prendre en considération les consignes et indications de sécurité, présentes dans ce manuel, lorsque vous
utilisez l'appareil. Veuillez lire attentivement ces instructions d'emploi et assurez-vous d'avoir trouvé réponse
à toutes vos questions. Conservez soigneusement cette notice à proximité de l'article an de pouvoir le
consulter plus tard en cas de besoin. Utilisez toujours une prise électrique reliée à la terre et avec la
bonne tension secteur (v. Guide ou plaque signalétique)! Dans le cas où vous auriez des doutes quant au
raccordement de votre appareil, veuillez faire vérier votre installation par un électricien qualié. N'utilisez
jamais de câble électrique défectueux! N'ouvrez pas l'appareil dans un environnement humide, et veillez à ce
que vos mains ne soient ni humides ni mouillées. De plus, protégez l'appareil des rayonnements directs du
soleil. Ne mettez l'appareil en marche que dans un espace protégé, de manière à ce que personne ne marche
sur les câbles, ne se prenne les pieds dedans, ni ne les abîme. Veillez également à ce que la pièce, dans laquelle
se trouve l'appareil, soit sufsamment aérée an d'éviter une concentration trop importante de chaleur
mais aussi pour faciliter le refroidissement de l'appareil. Pensez à toujours débrancher l'appareil avant de le
nettoyer et utilisez un chiffon humide pour le nettoyage. N'utilisez pas de produits de nettoyage et veillez
à ce qu'aucun uide ne s'inltre dans l'appareil ou ne reste à l'intérieur. L'intérieur de l'appareil ne doit pas
être nettoyé par l'utilisateur. Conez l'entretien, le réglage et les réparations à une personne qualiée. Le
droit à la garantie expire en cas d'intervention étrangère!
CONSIGNES DE SÉCURITÉ
1. Veuillez lire attentivement ces instructions d'emploi avant d'utiliser l'appareil. Veuillez respecter les
consignes de sécurité an d'éviter tout incident lié à une utilisation non conforme!
2. Conservez le mode d'emploi à disposition pour les utilisations à venir. Si cet appareil est utilisé par une
autre personne, celle-ci doit impérativement être informée des conditions d'utilisation et disposer du
manuel.
3. N'utilisez cet appareil que pour l'usage prescrit et seulement en intérieur.
4. Le constructeur décline toute responsabilité en cas de dommages résultant d'un usage inapproprié ou
d'une manipulation non conforme de l'appareil.
5. Avant la première utilisation, veuillez vérier que la tension électrique ainsi que le type de courant
utilisé soient compatibles avec les données présentes sur la plaque signalétique.
Rev. 26.11.2018 Rev. 26.11.2018
MANUEL D‘UTILISATION
26 27

6. Cet appareil ne doit pas être utilisé par des personnes (enfants compris) ayant des capacités physiques,
mentales ou sensorielles réduites. Sont considérées comme des exceptions les personnes ayant lu le
mode d'emploi ou étant complétement responsables de leur propre sécurité.
7. DANGERS D'ÉLECTROCUTION! N'essayez jamais de réparer l'appareil par vous-même. En cas de
dysfonctionnement, faites réparer l'appareil par un spécialiste qualié.
8. Contrôlez régulièrement la prise et le câble d'alimentation. Si le câble secteur de cet appareil est
endommagé, celui-ci doit être remplacé par le fabricant, le service client ou une personne qualiée
pour éviter tout danger.
9. Protégez le câble d'éventuelles pressions, coupures, frottements, en le tenant à l'abri de surfaces
pointues, tranchantes, chauffantes, et à l'abri des ammes.
10. ATTENTION DANGER DE MORT! Ne plongez jamais l'appareil dans l'eau ou dans tout autre liquide,
ni lors de son fonctionnement, ni lors du nettoyage.
11. N'ouvrez sous aucun prétexte le boîtier de l'appareil.
12. Ne pas regarder dans le projecteur lorsqu'il est en marche.
13. L'appareil se chauffe à des températures très élevées. Après utilisation, l'appareil reste encore chaud
pendant un certain temps. Ne touchez pas les pièces mécaniques chaudes.
DÉTAILS TECHNIQUES
Nom du produit SÈCHE-PEINTURE INFRAROUGE
Modèle IR-DRYER3000.2 IR-DRYER3000.1 IR-DRYER2000.1 IR-DRYER2000.2 IR-DRYER1000
Tension d'entrée [V]/Fréquence [Hz] 230~/50
Puissance nominale [W] 3 x 1100 3 x 1100 2 x 1100 2 x 1100 1100
Durée [min] 0-99 0-99 0-99 0-60 0-60
Plage de température [°C] 40-100* 40-100 40-100* 40-100* 40-100*
Réglage de la température OUI* OUI OUI* OUI* OUI*
Poids [kg] 47 48 39 15 14
DOMAINE D'UTILISATION
L'émetteur infrarouge est prévu pour le séchage de tout genre de matériaux qui sont utilisés pour des
réparations de carrosserie.
L'utilisateur assume toute responsabilité en cas de dommages liés à un usage inapproprié de
l'appareil.
AVANT LA PREMIÈRE UTILISATION
Dès réception de la marchandise, veuillez inspecter le colis et ouvrez-le an de s'assurer qu'aucun élément
ou composant du colis ne soit manquant. Si l'emballage est endommagé, prenez contact sous 3 jours avec
la société de transport ainsi qu'avec votre distributeur et fournissez un maximum d'indications et photos
des dégâts. Documentez les éventuels dégâts avec le plus de précision possible. Ne tenez jamais le colis
à l'envers! Si vous devez transporter ou manipuler le colis, assurez-vous qu'il soit maintenu droit et de
manière stable.
TRAITEMENT DES DÉCHETS
Veuillez garder l'emballage de l'appareil (carton, plastique, polystyrène) an de pouvoir le renvoyer dans les
meilleures conditions en cas de besoin.
* La température dépend de la distance entre l'émetteur infrarouge et la surface à travailler.
Rev. 26.11.2018
COMMENT FONCTIONNE L'APPAREIL? RÈGLES DE BASE
IR-DRYER3000.2 | IR-DRYER3000.1 | IR-DRYER2000.1
Description de l'appareil
1. Coffre
2. Protection du coffre
3. Moteur
4. Interrupteur
5. Manette
6. Colonne porteuse
7. Cadre inférieur
8. Roues
1. Afchage du temps
2. Paramétrage du temps – „+”
3. Paramétrage du temps – „-”
4. Choix des lampes
5. Marche
6. Arrêt
1. Afchage du temps
2. Afchage de la température
3. Choix du mode d'exploitation: pulsatif
4. Choix du mode d'exploitation: constant
5. Paramétrage du temps – „+” i „-”
6. Réglage de la température – „+” i „-”
7. Marche
8. Arrêt
9. Choix de l'émetteur: Émetteur 1
10. Choix de l'émetteur: Émetteur 2
11. Choix de l'émetteur: Émetteur 3
IR-DRYER3000.2
DESCRIPTION DU TABLEAU DE CONTRÔLE
IR-DRYER3000.1
MONTAGE DE L'APPAREIL
UTILISATION DE L'APPAREIL
L'appareil doit être positionné verticalement sur une surface sèche et solide pour qu'il ne puisse pas bouger
pendant son fonctionnement. L'appareil doit être installé sur une surface plane de même niveau, capable de
supporter le poids de l'appareil ainsi que son contenu. L'appareil doit être placé de sorte à ce que la prise
électrique soit accessible en permanence pour pouvoir débrancher l'appareil au besoin. Veuillez également
vous assurer que l'alimentation électrique corresponde aux caractéristiques techniques de la plaque
signalétique de l'appareil! Tous les éléments de l'appareil doivent avoir été démontés et soigneusement
nettoyés avant toute première utilisation.
1
2
4
5
3
6
1
2
3
9
11
5
5
7
4
6
6
8
10
5
3
2
4
6
7
8
1
Rev. 26.11.2018
28 29

PRINCIPES DE FONCTION
1. L'appareil doit être assemblé et mis en place conformément à la présentation.
2. Attacher ensuite et mettre l'appareil en marche.
3. Ajuster la durée de marche de l'appareil à l'aide des boutons de commande.
4. Les appareils IR-DRYER3000.1 et IR-DRYER2000.1 sont équipés d'un réglage de la température. La
température est ajustée sur les boutons de commande avec le modèle IR-DRYER3000.1 et pour le
modèle IR-DRYER2000.1 avec l'aide des touches de fonction.
5. Choisissez alors l'émetteur que vous voulez utiliser.
6. Lorsque l'appareil est correctement conguré, il peut être mis en marche par la touche Marche. La
touche Arrêt stoppe l'appareil. Après utilisation, l'appareil doit être mis hors circuit et débranché.
Pour modier la position du coffre, ajuster la manette se trouvant sur le cadre de l'appareil. Pour ajuster
l'angle des émetteurs, veuillez régler le levier. Ajuster l'angle souhaité et le serrer à nouveau.
IR-DRYER2000.2 | IR-DRYER1000
Description de l'appareil
1. Émetteur
2. Colonne porteuse
3. Cadre inférieur
4. Roues
DESCRIPTION DU TABLEAU DE CONTRÔLE
1. Voltmètre
2. Afchage du temps
3. Paramétrage du temps – „+”
4. Paramétrage du temps – „-”
5/6. Choix des émetteurs
7. Choix de fonction: PROTECTION CONTRE LA CORROSION
– APPLICATION DE LA PREMIÈRE COUCHE (RUST PROOF
PRIMER)
8. Choix de fonction: APPLICATION DE LA PREMIÈRE COUCHE
(PRIMER)
9. Choix de fonction: PREMIÈRE COUCHE - ENDUIT (PRIMARY
FILLER)
10. Choix de fonction: DURCIR LA COUCHE PROTECTRICE
(TOP COAT)
11. Choix de fonction: ENDUIT (FINITION) (SECONDARY
FILLER)
12. Choix de fonction: ECLAT
13. Marche
14. Arrêt
IR-DRYER2000.1
1
2
3
5
7
9
11
13
4
6
8
10
12
14
2
1
3
4
3
4
2
1
Rev. 26.11.2018
PRINCIPES DES FONCTIONS
1. L'appareil doit être assemblé et mis en place conformément à la présentation.
2. Attacher ensuite et mettre l'appareil en marche.
3. Ajuster la durée de marche de l'appareil à l'aide des boutons de commande.
4. Après utilisation, l'appareil doit être mis hors circuit et débrancher.
ASSEMBLAGE DE L'APPAREIL
L'appareil doit être installé conformément à la présentation indiquée vers le bas.
OFF/ON – Interrupteur allumé/éteint
MINUTERIE – réglage du temps
ON/OFF TIMER
8
7
6
5
4
9
10
11
12
13
14
15
16
17
18
19
20
21
22
23
24
25
1
2
3
NUMÉRO DESCRIPTION
1Colonne porteuse verticale
2Couverture supérieure
3Bord de matière plastique
4 Connecteur gauche
5 Cadre
6Bloc de raccordement
7 Coffre
8Levier de matière plastique permettant
de régler l'angle
9 Connecteur
10 Connecteur droit
11 Poignée
12 Barre de connexion inférieure
NUMÉRO DESCRIPTION
13 Barre de connexion supérieure
14 Engrenage
15 Appui de commande
16 Roues avant
17 Cadre
18 Roues arrière avec frein
19 Embout
20 Protection
21 Transformateur de commande
22 Emetteur
23 Poignée
24 Protection
25 Tableau de commande
Rev. 26.11.2018
30 31

3. Enlever le revêtement des
deux côtés du coffre.
4. Enlever les plaques des deux
côtés du coffre.
5. Retirer alors la lampe et installer une nouvelle
avec des paramètres semblables. 6. Assembler ensuite le coffre et l'appareil
ensemble – comme au démontage.
TRANSPORT ET STOCKAGE
Si vous transportez cet appareil, veuillez-le protéger des secousses et des chutes. Ne posez rien sur la partie
supérieure de l'appareil. Stockez-le dans un environnement sec et bien aéré, à l'abri des gaz corrosifs.
NETTOYAGE ET ENTRETIEN
• Débranchez la prise électrique de l'appareil avant de le nettoyer ou si vous ne l'utilisez pas.
• N'utilisez lors du nettoyage que des détergents doux sans substance corrosive.
• Après chaque nettoyage, laissez sécher soigneusement tous les éléments avant d'utiliser à nouveau
l'appareil.
• Conservez l'appareil dans un endroit frais, sec, à l'abri de l'humidité et des rayons directs du soleil.
• Il est prohibé d'asperger l'appareil d'eau ou de le mettre sous un jet d'eau.
EXAMEN RÉGULIER DE L'APPAREIL
Contrôlez régulièrement le bon état des différents éléments de l'appareil. Si l'un d'entre eux est endommagé,
l'appareil ne doit plus être utilisé. Adressez-vous immédiatement à votre vendeur pour faire réparer l'appareil.
Que faire en cas de problème?
Prenez contact avec votre revendeur muni des documents suivants:
• Vos numéros de facture et de série (vous trouverez ce dernier sur la plaque signalétique).
• Le cas échéant, une photo de l'élément endommagé.
• Une description précise du problème aidera votre conseiller à en identier la cause. Plus détaillées
seront vos indications, plus rapidement nous pourrons vous aider!
ATTENTION: N'ouvrez jamais l'appareil sans l'accord préalable du service client. Cela pourrait
compromettre votre droit à la garantie!
CHANGEMENT DES ECLAIRAGES
1. Enlever le coffre 2. Enlever la grille de protection
Leggere attentamente le istruzioni d'uso.
I dispositivi elettrici non devono essere smaltiti come riuti domestici.
Il prodotto soddisfa le attuali norme di sicurezza.
Attenzione! Supercie calda – rischio di scottature!
Questo dispositivo è conforme alle norme CE.
Attenzione! Supercie calda - rischio di scottature!
Attenzione! Pericolo di incendio o esplosione.
Attenzione! Rischio di incidenti.
SIMBOLI
IMPORTANTE! Le immagini nel seguente manuale hanno scopo puramente illustrativo e alcuni
dettagli del dispositivo potrebbero non corrispondere.
La versione originale di questo manuale è in lingua tedesca. Ulteriori versioni sono traduzioni dal tedesco.
ISTRUZIONI PER L'USO
NORME DI SICUREZZA
Norme di sicurezza generali per l'utilizzo di apparecchi elettrici:
Per minimizzare il rischio di ustioni o folgorazioni, rispettare rigorosamente le norme di sicurezza. Leggere
attentamente le istruzioni d'uso e assicurarsi di aver compreso il corretto funzionamento dell'apparecchio.
Conservare con cura il manuale d'uso vicino al prodotto per ogni ulteriore futura consultazione. Effettuare
sempre una corretta messa a terra dell'apparecchio (consultare il libretto di istruzioni o la targhetta posta sul
dispositivo). In caso di dubbi, afdare l'allacciamento dell'apparecchio a personale qualicato. Non utilizzare
mai cavi difettosi! Non aprire mai il dispositivo in ambienti umidi o bagnati. Non toccare mai l'apparecchio
con le mani bagnate. Proteggere l'apparecchio dall'esposizione diretta ai raggi solari. Utilizzare l'apparecchio
solo in ambienti protetti e assicurarsi che nessuno, inciampando sui cavi, possa cadere sull'apparecchiatura.
Assicurarsi che l'ambiente sia ben ventilato. Un ambiente ben ventilato favorisce il raffreddamento del
dispositivo e ne impedisce il surriscaldamento. Prima di pulire l'apparecchio assicurarsi di aver staccato il
cavo di alimentazione dalla presa. Per compiere le operazioni di pulizia utilizzare un panno umido. Evitare
l'utilizzo di detersivi e assicurarsi che nessun liquido penetri all'interno dell'apparecchio. Le componenti
interne non necessitano di manutenzione da parte dell'utente e dunque non devono essere manomesse. Le
operazioni di manutenzione e riparazione devono essere afdate esclusivamente a personale qualicato. In
caso di manomissione da parte di terzi, la garanzia decade.
NORME DI SICUREZZA
1. Leggere attentamente le istruzioni d'uso dell'apparecchio prima di utilizzarlo! Per evitare che si
verichino danni causati da un uso improprio dell'apparecchio, osservare attentamente tutte le norme
di sicurezza contenute in questo manuale!
2. Conservare il manuale per uso futuro. Qualora il dispositivo fosse afdato a terzi, assicurarsi di
consegnare anche questo manuale d'uso.
3. Utilizzare l'apparecchio soltanto per l'uso a cui è destinato ed esclusivamente in ambienti chiusi.
4. In caso di uso improprio e inadeguato la garanzia decade.
5. Prima del primo utilizzo vericare che il tipo di corrente e la tensione di rete siano compatibili con
i valori indicati sulla targhetta del prodotto.
6. Questo apparecchio non è progettato per essere utilizzato da persone (bambini compresi) con abilità
siche, sensoriali o mentali ridotte o senza esperienza e/o con scarse conoscenze. Fa eccezione il caso
in cui il dispositivo venga utilizzato sotto la supervisione di una persona esperta che abbia consultato
prima le seguenti istruzioni d'uso.
Rev. 26.11.2018 Rev. 26.11.2018
ISTRUZIONI PER L’USO
32 33

7. PERICOLO DI FOLGORAZIONE! Evitare di cimentarsi in riparazioni fai da te. Se l'apparecchio non
funziona correttamente, rivolgersi per la riparazione esclusivamente a personale qualicato.
8. Esaminare regolarmente la spina e il cavo d'alimentazione. Se il cavo di rete risulta danneggiato,
afdarne la sostituzione al produttore, al Servizio Clienti o a una persona con le stesse qualiche.
9. Non calpestare o piegare il cavo, non schiacciarlo contro spigoli taglienti e tenerlo lontano da superci
calde e amme.
10. ATTENZIONE: PERICOLO DI MORTE! Non immergere il dispositivo in acqua o altri liquidi durante
l'utilizzo o le operazioni di pulizia.
11. Non aprire in nessun caso l'alloggiamento.
12. Non guardare il radiatore quando è acceso.
13. Il dispositivo raggiunge temperature molto elevate. Dopo il funzionamento, il dispositivo necessita di
un certo periodo di tempo per raffreddarsi. Non toccare le parti calde del dispositivo.
DETTAGLI TECNICI
Nome del prodotto LAMPADA A INFRAROSSI PER L'ESSICCAZIONE DI VERNICI
Modello IR-DRYER3000.2 IR-DRYER3000.1 IR-DRYER2000.1 IR-DRYER2000.2 IR-DRYER1000
Tensione in entrata [V]/
Frequenza [Hz]
230~/50
Potenza nominale [W] 3 x 1100 3 x 1100 2 x 1100 2 x 1100 1100
Durata [min] 0-99 0-99 0-99 0-60 0-60
Temperatura [ºC] 40-100* 40-100 40-100* 40-100* 40-100*
Regolazione della temperatura SI* SI SI* SI* SI*
Peso [kg] 47 48 39 15 14
CAMPO DI APPLICAZIONE
La lampada a infrarossi serve a essiccare tutti i tipi di sostanze utilizzate per la riparazione di carrozzerie.
L'utente è il solo e unico responsabile dei danni causati da un utilizzo improprio del dispositivo.
OPERAZIONI DA EFFETTUARE PRIMA DEL PRIMO UTILIZZO
Al ricevimento della merce, aprire il pacco per controllare che tutti i componenti siano presenti. Nel caso
in cui l'imballaggio risultasse danneggiato, contattare entro tre giorni sia il corriere incaricato di effettuare la
spedizione, sia il venditore. Documentare quanto più dettagliatamente possibile gli eventuali danni riscontrati.
Non capovolgere il pacco e il suo contenuto! Qualora il pacco dovesse essere ulteriormente trasportato,
assicurarsi di mantenerlo dritto e stabile.
SMALTIMENTO DELL'IMBALLAGGIO
Conservare l'imballaggio (cartone, bande di plastica e polistirolo) per proteggere adeguatamente
l'attrezzatura nel caso in cui fosse necessario mandarla in assistenza!
MONTAGGIO DEL DISPOSITIVO
POSIZIONAMENTO DELL'APPARECCHIO
Il dispositivo deve essere posto su una supercie asciutta e stabile e in posizione eretta, in modo tale che
non si sposti durante l'utilizzo. Posizionare il dispositivo su una supercie in grado di sopportare sia il
suo peso, sia quello del suo contenuto. Posizionare l'apparecchio in maniera tale da poter interrompere in
qualsiasi momento il collegamento alla corrente. Assicurarsi che la fonte di corrente corrisponda ai requisiti
descritti sulla targa di identicazione del dispositivo. Prima di accendere il dispositivo, smontare tutti gli
elementi e pulirli.
* La temperatura dipende dalla distanza della lampada dalla supercie da lavorare.
COME FUNZIONA L'APPARECCHIO? REGOLE BASE
IR-DRYER3000.2 | IR-DRYER3000.1 | IR-DRYER2000.1
Descrizione del dispositivo
1. Lampada
2. Braccio
3. Sostegno telescopico
4. Interruttore
5. Leva
6. Asta di sostegno
7. Base
8. Ruote
1. Durata
2. Impostazione della durata – "+"
3. Impostazione della durata – "-"
4. Regolazione delle lampade
5. Start
6. Stop
1. Durata
2. Temperatura
3. Modalità pulsazione
4. Modalità costante
5. Impostazione della durata – "+", "-"
6. Impostazione della temperatura – "+", "-"
7. Start
8. Stop
9. Regolazione del radiatore: Radiatore 1
10. Regolazione del radiatore: Radiatore 2
11. Regolazione del radiatore: Radiatore 3
IR-DRYER3000.2
DESCRIZIONE DEL PANNELLO DI CONTROLLO
IR-DRYER3000.1
1. Voltmetro
2. Durata
3. Impostazione della durata – "+"
4. Impostazione della durata – "-"
5/6. Scelta del radiatore
7. Modalità di lavoro: ANTIRUGGINE - PRIMA MANO (RUST PROOF PRIMER)
8. Modalità di lavoro: PRIMA MANO (PRIMER)
9. Modalità di lavoro: PRIMO STRATO - STUCCO (PRIMARY FILLER)
10. Modalità di lavoro: INDURIMENTO DELLA FINITURA (TOP COAT)
11. Modalità di lavoro: STUCCO (SECONDA MANO) (SECONDARY FILLER)
12. Modalità di lavoro: SMALTO
13. Start
14. Stop
IR-DRYER2000.1
1
2
4
5
3
6
1
2
3
9
11
5
5
7
4
6
6
8
10
1
2
3
5
7
9
11
13
4
6
8
10
12
14
5
3
2
4
6
7
8
1
Rev. 26.11.2018 Rev. 26.11.2018
34 35

FUNZIONAMENTO
1. Montare e collocare il dispositivo come indicato.
2. Allacciare il dispositivo alla corrente e accenderlo.
3. Impostare la durata con i tasti.
4. Con i modelli IR-DRYER3000.1 e IR-DRYER2000.1 è possibile regolare la temperatura.
5. Scegliere il radiatore che si desidera utilizzare.
6. Una volta impostato correttamente il dispositivo, attivarlo premendo Start. Il tasto Stop arresta il
funzionamento. Alla ne dei lavori, spegnere il dispositivo e scollegarlo dalla corrente.
Per regolare la posizione delle lampade, utilizzare la leva. Per regolare l'angolazione delle lampade, allentare
le leve su entrambi i lati. Sistemare le lampade all'angolazione desiderata e riavvitare.
IR-DRYER2000.2 | IR-DRYER1000
Descrizione del dispositivo
1. Radiatore
2. Asta di sostegno
3. Base
4. Ruote
DESCRIZIONE DEL PANNELLO DI CONTROLLO
FUNZIONAMENTO
1. Montare e collocare il dispositivo come indicato.
2. Allacciare il dispositivo alla corrente e accenderlo.
3. Impostare la durata con i tasti.
4. Alla ne dei lavori, spegnere il dispositivo e scollegarlo dalla corrente.
OFF/ON – Acceso/Spento
TIMER – Durata
ON/OFF TIMER
2
1
3
4
3
4
2
1
MONTAGGIO DEL DISPOSITIVO
Montare il dispositivo come sotto indicato.
NUMERO DESCRIZIONE
1 Asta verticale
2Copertura superiore
3Assicella in plastica
4 Raccordo sinistro
5 Staffa
6 Morsettiera a listello
7Involucro della lampada
8Leva in plastica e regolazione
dell'angolatura
9 Raccordo
10 Raccordo destro
11 Impugnatura
12 Braccio inferiore
NUMERO DESCRIZIONE
13 Braccio superiore
14 Sostegno telescopico
15 Blocco del sostegno
16 Ruote anteriori
17 Base
18 Ruote posteriori con freno
19 Flangia
20 Copertura
21 Trasformatore
22 Interruttore
23 Maniglia
24 Copertura
25 Quadro di distribuzione
CAMBIO DELLE LAMPADE
1. Staccare l'involucro 2. Togliere la griglia di protezione
8
7
6
5
4
9
10
11
12
13
14
15
16
17
18
19
20
21
22
23
24
25
1
2
3
Rev. 26.11.2018 Rev. 26.11.2018
36 37

3. Rimuovere la copertura da
entrambi i lati dell'involucro.
4. Rimuovere gli elementi
laterali dell'involucro.
5. Estrarre la lampada e montarne una con
parametri simili. 6. Inne, riattaccare l'involucro al
corpo del dispositivo.
TRASPORTO E STOCCAGGIO
Durante il trasporto proteggere l'apparecchio da eventuali urti e possibili ribaltamenti, assicurandosi di
proteggere la parte superiore. Conservare l'apparecchio in un luogo ben ventilato, asciutto e privo di gas
corrosivi.
PULIZIA E MANUTENZIONE
• Scollegare il dispositivo dalla corrente prima delle operazioni di pulizia e quando non viene utilizzato.
• Per la pulizia delle superci, impiegare solo sostanze non corrosive.
• Dopo aver compiuto le operazioni di pulizia, lasciare asciugare tutti i componenti prima di utilizzare
nuovamente il dispositivo.
• Conservare l'apparecchio in un luogo fresco e asciutto, e lontano dall'esposizione diretta ai raggi solari.
• Non bagnare l'apparecchio!
REGOLARE MANUTENZIONE DEL DISPOSITIVO
Vericare regolarmente che le componenti del dispositivo non presentino danni. In tal caso non utilizzare il
dispositivo. Rivolgersi immediatamente al proprio rivenditore per la riparazione dell'apparecchiatura.
Cosa fare in caso di problemi?
Contattare il venditore, fornendo le seguenti informazioni:
• Numero di fattura e numero di serie (quest'ultimo viene riportato sulla targhetta del dispositivo)
• Se possibile, fornire una foto del pezzo difettoso.
• Per permettere al Servizio Clienti di individuare e risolvere il problema, descrivere nel modo più
preciso possibile il difetto riscontrato. Più dettagliate sono le informazioni fornite, maggiore è l'aiuto
che il Servizio Clienti può offrire!
ATTENZIONE: Non smontare mai l'apparecchio senza l'autorizzazione del Servizio Clienti. La
manomissione dell'apparecchio comporta la decadenza della garanzia.
Lea este manual de instrucciones con detenimiento.
Los dispositivos eléctricos no se pueden desechar con la basura doméstica.
El producto cumple con las normas de seguridad vigentes.
¡Atención! Supercie caliente – riesgo de quemaduras
¡Atención! Riesgo de aplastamiento de las manos
Utilice guantes de seguridad.
!Atención! Riesgo de explosión y fuego.
Riesgo de accidentes.
SÍMBOLOS
NOTA! En este manual se incluyen fotos ilustrativas, que podrían no coincidir exactamente con
la apariencia real del dispositivo.
El texto en alemán corresponde a la versión original. Los textos en otras lenguas son traducciones de las
instrucciones en alemán.
INSTRUCCIONES DE FUNCIONAMIENTO
MEDIDAS BÁSICAS DE SEGURIDAD
Medidas generales de seguridad para el uso de dispositivos eléctricos: Para reducir el riesgo de lesiones por
quemadura o electrocución, le rogamos que tome siempre ciertas medidas de seguridad cuando utilice este
aparato. Lea con detenimiento este manual de instrucciones y cerciórese de que no tiene dudas al respecto.
Guarde cuidadosamente este manual con el producto para poder consultarlo cuando lo necesite. Utilice
siempre una conexión con toma a tierra y voltaje adecuado (véase el manual o la placa de características del
producto). Si tiene dudas sobre la conexión a tierra de su instalación, permita que un técnico especializado la
revise. ¡Nunca utilice un adaptador defectuoso! No abra este equipo en un ambiente húmedo y menos con
las manos mojadas. Además, debe proteger el equipo contra la exposición solar directa. Ponga en marcha
el equipo siempre en un lugar seguro, donde nadie pueda pisar los cables, dañarlos o caerse. Garantice una
óptima ventilación en la zona de trabajo para ayudar a refrigerar el equipo y evitar la acumulación de calor.
Desenchufe el dispositivo antes de limpiarlo y utilice solo un trapo húmedo sin detergentes agresivos para
ese n. Evite que cualquier líquido penetre y se estanque en el interior del equipo. Este equipo contiene
piezas cuyo mantenimiento no debe ser efectuado por el usuario. Deje las tareas de mantenimiento y
reparación a personal autorizado. Cualquier intervención externa conllevará la pérdida de la garantía.
INFORMACIONES DE SEGURIDAD
1. Lea detenidamente este manual de instrucciones antes de poner en marcha el dispositivo y respete
todas las medidas de seguridad para evitar daños derivados de un uso inadecuado del equipo.
2. Conserve el manual de instrucciones para futuras consultas. Este manual debe ser entregado a toda
persona que vaya a hacer uso del dispositivo.
3. Utilice el equipo solamente para el propósito previsto y solamente en interiores.
4. No nos hacemos responsables de los daños ocasionados por un uso indebido del dispositivo.
5. Antes de utilizarlo por primera vez, verique que el tipo de corriente y voltaje del suministro eléctrico
coincidan con los datos indicados en la placa de información técnica del dispositivo.
6. Este aparato no debe ser utilizado por niños, ni tampoco por personas con capacidades físicas,
sensoriales o mentales reducidas o con falta de experiencia y/o conocimiento, a menos que sean
supervisadas por un responsable.
7. ¡PELIGRO DE ELECTROCUCIÓN! Nunca intente reparar el equipo usted mismo. En caso de avería, la
máquina debe ser reparada por personal técnico cualicado.
8. Examine regularmente el enchufe y el cable de alimentación. Si el cable estuviese deteriorado, deberá
ser reemplazado por un técnico autorizado.
Rev. 26.11.2018 Rev. 26.11.2018
MANUAL DE INSTRUCCIONES
38 39
This manual suits for next models
4
Table of contents
Other MSW Dryer manuals
Popular Dryer manuals by other brands

Electrolux
Electrolux EDE 425 M Installation and instruction manual

Siemens
Siemens WT43HVP6DN User manual and installation instructions

NEFF
NEFF R8580X3GB User manual and installation instructions

EMGA
EMGA Mo-El 505.315 Use and maintenance

Zanussi
Zanussi TD4100 Instruction booklet

Lamona
Lamona LAM8877 User instructions