PL
g) UWAGA – ZAGROŻENIE ŻYCIA! Podczas czyszczenia
lub użytkowania urządzenia nigdy nie wolno zanurzać
go w wodzie lub innych cieczach.
h) Nie należy używać urządzenia w pomieszczeniach o
bardzo dużej wilgotności / w bezpośrednim pobliżu
zbiorników z wodą!
i) Nie wolno dopuszczać do zamoczenia urządzenia.
Ryzyko porażenia prądem!
2.2. BEZPIECZEŃSTWO W MIEJSCU PRACY
a) Utrzymywać porządek w miejscu pracy i dobre
oświetlenie. Nieporządek lub złe oświetlenie może
prowadzić do wypadków. Należy być przewidującym,
obserwować co się robi i zachowywać rozsądek
podczas używania urządzenia.
b) Nie używać urządzenia w stree zagrożenia
wybuchem, na przykład w obecności łatwopalnych
cieczy, gazów lub pyłów. Urządzenie wytwarzają iskry,
mogące zapalić pył lub opary.
c) W razie stwierdzenia uszkodzenia lub nieprawidłowości
w pracy urządzenia należy je bezzwłocznie wyłączyć i
zgłosić to do osoby uprawnionej.
d) W razie wątpliwości czy urządzenia działa poprawnie,
należy skontaktować się z serwisem producenta.
e) Naprawy urządzenia może wykonać wyłącznie
serwis producenta. Nie wolno dokonywać napraw
samodzielnie!
f) W przypadku zaprószenia ognia lub pożaru, do
gaszenia urządzenia pod napięciem należy używać
wyłącznie gaśnic proszkowych lub śniegowych (CO2).
g) Na stanowisku pracy nie mogą przebywać dzieci
ani osoby nieupoważnione. (Nieuwaga może
spowodować utratę kontroli nad urządzeniem.)
h) Urządzenie używać w dobrze wentylowanej
przestrzeni.
i) Podczas pracy urządzeniem wytwarza się pył oraz
odłamki, zabezpieczyć osoby postronne przed ich
szkodliwym działaniem.
j) Zachować instrukcję użytkowania w celu jej
późniejszego użycia. W razie, gdyby urządzenie miało
zostać przekazane osobom trzecim, to wraz z nim
należy przekazać również instrukcję użytkowania.
k) Elementy opakowania oraz drobne elementy
montażowe należy przechowywać w miejscu
niedostępnym dla dzieci.
l) Urządzenie trzymać z dala od dzieci i zwierząt.
m) W trakcie użytkowania tego urządzenia wraz z innymi
urządzeniami należy zastosować się również do
pozostałych instrukcji użytkowania.
PAMIĘTAĆ! należy chronić dzieci i inne osoby
postronne podczas pracy urządzeniem.
2.3. BEZPIECZEŃSTWO OSOBISTE
a) Niedozwolone jest obsługiwanie urządzenia w
stanie zmęczenia, choroby, pod wpływem alkoholu,
narkotyków lub leków, które ograniczają w istotnym
stopniu zdolności obsługi urządzenia.
b) Maszynę mogą obsługiwać osoby sprawne zycznie,
zdolne do jej obsługi i odpowiednio wyszkolone,
które zapoznały się z niniejszą instrukcją oraz zostały
przeszkolone w zakresie bezpieczeństwa i higieny
pracy.
c) Maszyna nie jest przeznaczona do tego, by
była użytkowana przez osoby (w tym dzieci) o
ograniczonych funkcjach psychicznych, sensorycznych
i umysłowych lub nieposiadające odpowiedniego
doświadczenia i/lub wiedzy, chyba że są one
nadzorowane przez osobę odpowiedzialną za ich
bezpieczeństwo lub otrzymały od niej wskazówki
dotyczące tego, jak należy obsługiwać maszynę.
d) Należy być uważnym, kierować się zdrowym
rozsądkiem podczas pracy urządzeniem. Chwila
nieuwagi podczas pracy, może doprowadzić do
poważnych obrażeń ciała.
e) Należy używać środków ochrony osobistej
wymaganych przy pracy urządzeniem
wyszczególnionych w punkcie 1 objaśnienia symboli.
Stosowanie odpowiednich, atestowanych środków
ochrony osobistej zmniejsza ryzyko doznania urazu.
f) Nie należy przeceniać swoich możliwości. Utrzymywać
balans i równowagę ciała przez cały czas pracy.
Umożliwia to lepszą kontrolę nad urządzeniem w
nieoczekiwanych sytuacjach.
g) Urządzenie nie jest zabawką. Dzieci powinny być
pilnowane, aby nie bawiły się urządzeniem.
2.4. BEZPIECZNE STOSOWANIE URZĄDZENIA
a) Nie należy używać urządzenia, jeśli przełącznik ON/
OFF nie działa sprawnie (nie załącza i nie wyłącza
się). Urządzenia, które nie mogą być kontrolowane
za pomocą przełącznika są niebezpieczne, nie mogą
pracować i muszą zostać naprawione.
b) Przed przystąpieniem do regulacji, wymiany osprzętu
lub odłożeniem narzędzia należy wyciągnąć wtyczkę z
gniazda. Taki środek zapobiegawczy zmniejsza ryzyko
przypadkowego uruchomienia.
c) Nieużywane urządzenia należy przechowywać
w miejscu niedostępnym dla dzieci oraz osób
nieznających urządzenia lub tej instrukcji
obsługi. Urządzenia są niebezpieczne w rękach
niedoświadczonych użytkowników.
d) Utrzymywać urządzenie w dobrym stanie technicznym.
Sprawdzać przed każdą pracą czy nie posiada
uszkodzeń ogólnych lub związanych z elementami
ruchomymi (pęknięcia części i elementów lub wszelkie
inne warunki, które mogą mieć wpływ na bezpieczne
działanie urządzenia). W przypadku uszkodzenia,
oddać urządzenie do naprawy przed użyciem.
e) Urządzenie należy chronić przed dziećmi.
f) Naprawa oraz konserwacja urządzeń powinna być
wykonywana przez wykwalikowane osoby przy
użyciu wyłącznie oryginalnych części zamiennych.
Zapewni to bezpieczeństwo użytkowania.
g) Aby zapewnić zaprojektowaną integralność operacyjną
urządzenia, nie należy usuwać zainstalowanych
fabrycznie osłon lub odkręcać śrub.
h) Przy transportowaniu i przenoszeniu urządzenia z
miejsca magazynowania do miejsca użytkowania
należy uwzględnić zasady bezpieczeństwa i higieny
pracy przy ręcznych pracach transportowych
obowiązujących w kraju, w którym urządzenia są
użytkowane.
i) Nie należy pozostawiać włączonego urządzenia bez
nadzoru.
j) Nie wolno obrabiać dwóch przedmiotów jednocześnie.
k) Urządzenie nie jest zabawką. Czyszczenie i
konserwacja nie mogą być wykonywane przez dzieci
bez nadzoru osoby dorosłej.
l) Zabrania się ingerowania w konstrukcję urządzenia
celem zmiany jego parametrów lub budowy.
m) Trzymać urządzenia z dala od źródeł ognia i ciepła.
n) Nie wolno zasłaniać otworów wentylacyjnych
urządzenia!
3. ZASADY UŻYTKOWANIA
Blokada parkingowa składana służy do zabezpieczenia
miejsca parkingowego. Uniemożliwia zajmowanie miejsca
parkingowego nieupoważnionym samochodom.
Odpowiedzialność za wszelkie szkody powstałe w
wyniku użytkowania niezgodnego z przeznaczeniem
ponosi użytkownik.
3.1. PRACA Z URZĄDZENIEM
psychicznych, sensorycznych i umysłowych. Urządzenie
należy umiejscowić w taki sposób, by w dowolnej chwili
można się było dostać do wtyczki sieciowej. Należy pamiętać
o tym, by zasilanie urządzenia energią odpowiadało danym
podanym na tabliczce znamionowej!
MONTAŻ URZĄDZENIA
Poluzować pokrętła blokady końcówki grzewczej (3),
następnie wsunąć w otwory montażowe (4) odpowiednio
dobraną do danego zadania końcówkę (10-15) i na koniec
z powrotem dokręcić pokrętła blokady. Po upewnieniu
się, że dana końcówka grzewcza jest pewnie zamocowana
w urządzeniu, podłączyć je do źródła zasilania (wentylator
urządzenia zacznie pracować).
Demontaż końcówki w odwrotnej kolejności.
UWAGA: nigdy nie domontować nagrzanej końcówki!
Pozostawić urządzenie podłączone do gniazda zasilania
(wentylator pracuje), aż wentylator przestanie działać tj.
całkowicie schłodzi urządzenie (ok. 5 minut). Dopiero wtedy
odłączyć je od zasilania.
Używanie urządzenia przy zasilaniu z generatora lub
inwertera:
Niektóre generatory, szczególnie o mocy 4kW lub mniejszej,
są niestabilne i mogą wytworzyć momentalnie zbyt duże
napięcie (260V), co może skutkować uszkodzeniem
urządzenia.
W przypadku pracy z inwerterem, przetwornicą
(konwerterem) DC/DC należy upewnić się, że są to 3 kW lub
mocniejsze inwertery sinusoidalne.
3.3. PRACA Z URZĄDZENIEM
3.3.1 ZASADA DZIAŁANIA
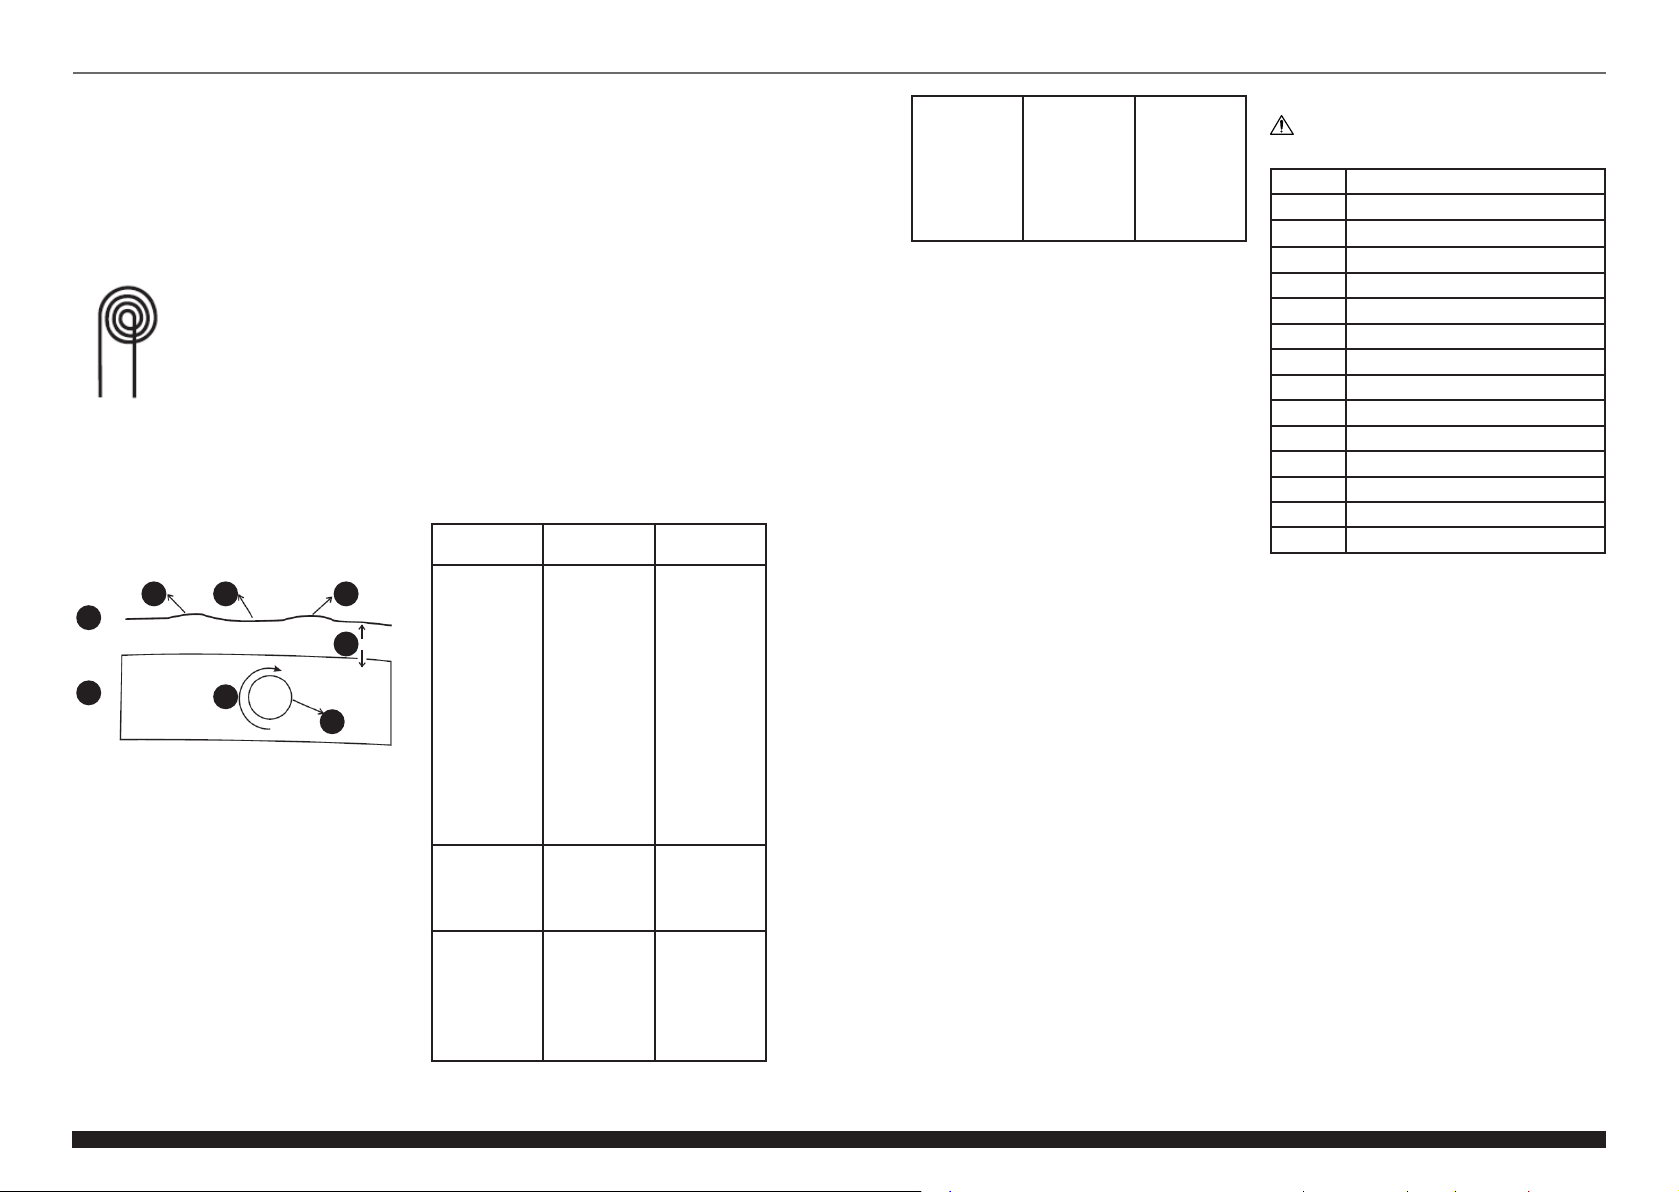
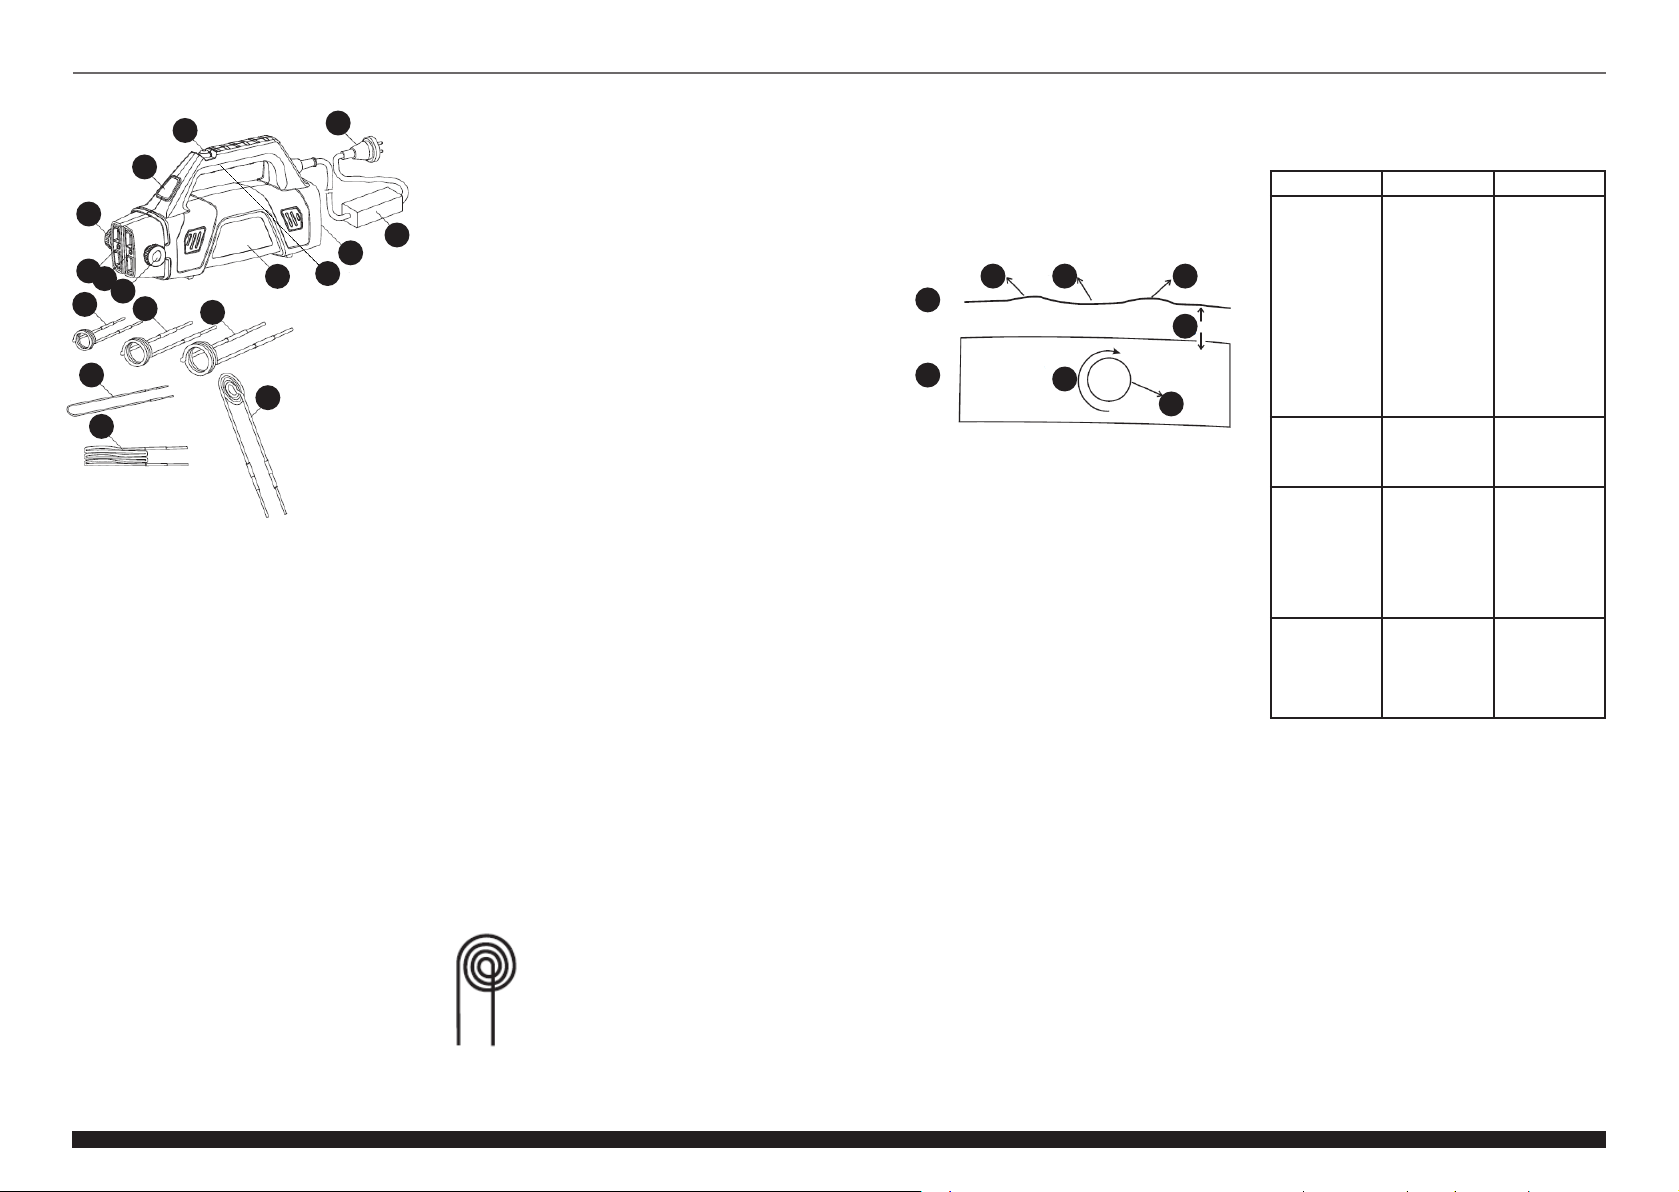
Urządzenia działa na zasadzie indukcji elektromagnetycznej.
Końcówka grzewcza generuje zmienne pole magnetyczne
o wysokiej częstotliwości. To pole przechodzi przez metal,
zaś powierzchnia przewodząca (np. zapieczona nakrętka)
generuje prąd na zasadzie naskórkowości, co przekształca
energię elektryczną w energię cieplną. Naciśniecie włącznika
grzania wyzwala i zamyka pole magnetyczne.
3.3.2 PODGRZEWANIE
Przyłożyć końcówkę grzewczą do danego elementu, który
ma być podgrzany, następnie wcisnąć włącznik grzania (1),
podświetlenie LED (2) się zaświeci, co oznacza rozpoczęcie
nagrzewania. Po wystarczającym podgrzaniu elementu
popuścić włącznik grzania (1), a podświetlenie LED (2) się
wyłączy i urządzenie przestanie grzać, lecz wbudowany
wentylator będzie pracować dalej studząc urządzenie.
Odłożyć urządzenie w pewne, stabilne i ognioodporne
miejsce. Przed odłączeniem urządzenia (wtyczki) od źródła
zasilania odczekać przynajmniej 5 minut, aby wentylator
wystudził je (wyłączył się).
UWAGA: nigdy nie dotykać żadną częścią ciała ani nie zbliżać
do ciała końcówki grzewczej w trakcie podgrzewania lub
zaraz po jego zakończeniu – ryzyko poważnych oparzeń!
• Podgrzewanie za pomocą cewki grzewczej
Cewki grzewcze (10-12) przeznaczone są do podgrzewania
śrub, nakrętek, spinek, usuwania uszczelnień, zapieczonych
zawiasów drzwi, śrub w kolektorach wydechowych,
ładowniach i pakach aut dostawczych lub ciężarowych, sond
lambda itp.
Aby przedłużyć żywotność cewki grzewczej, należy
podgrzewać element na tyle, by tylko dało się go
zdemontować, unikać nadmiernego nagrzewania elementu,
gdyż jego temperatura może doprowadzić do wypalenia
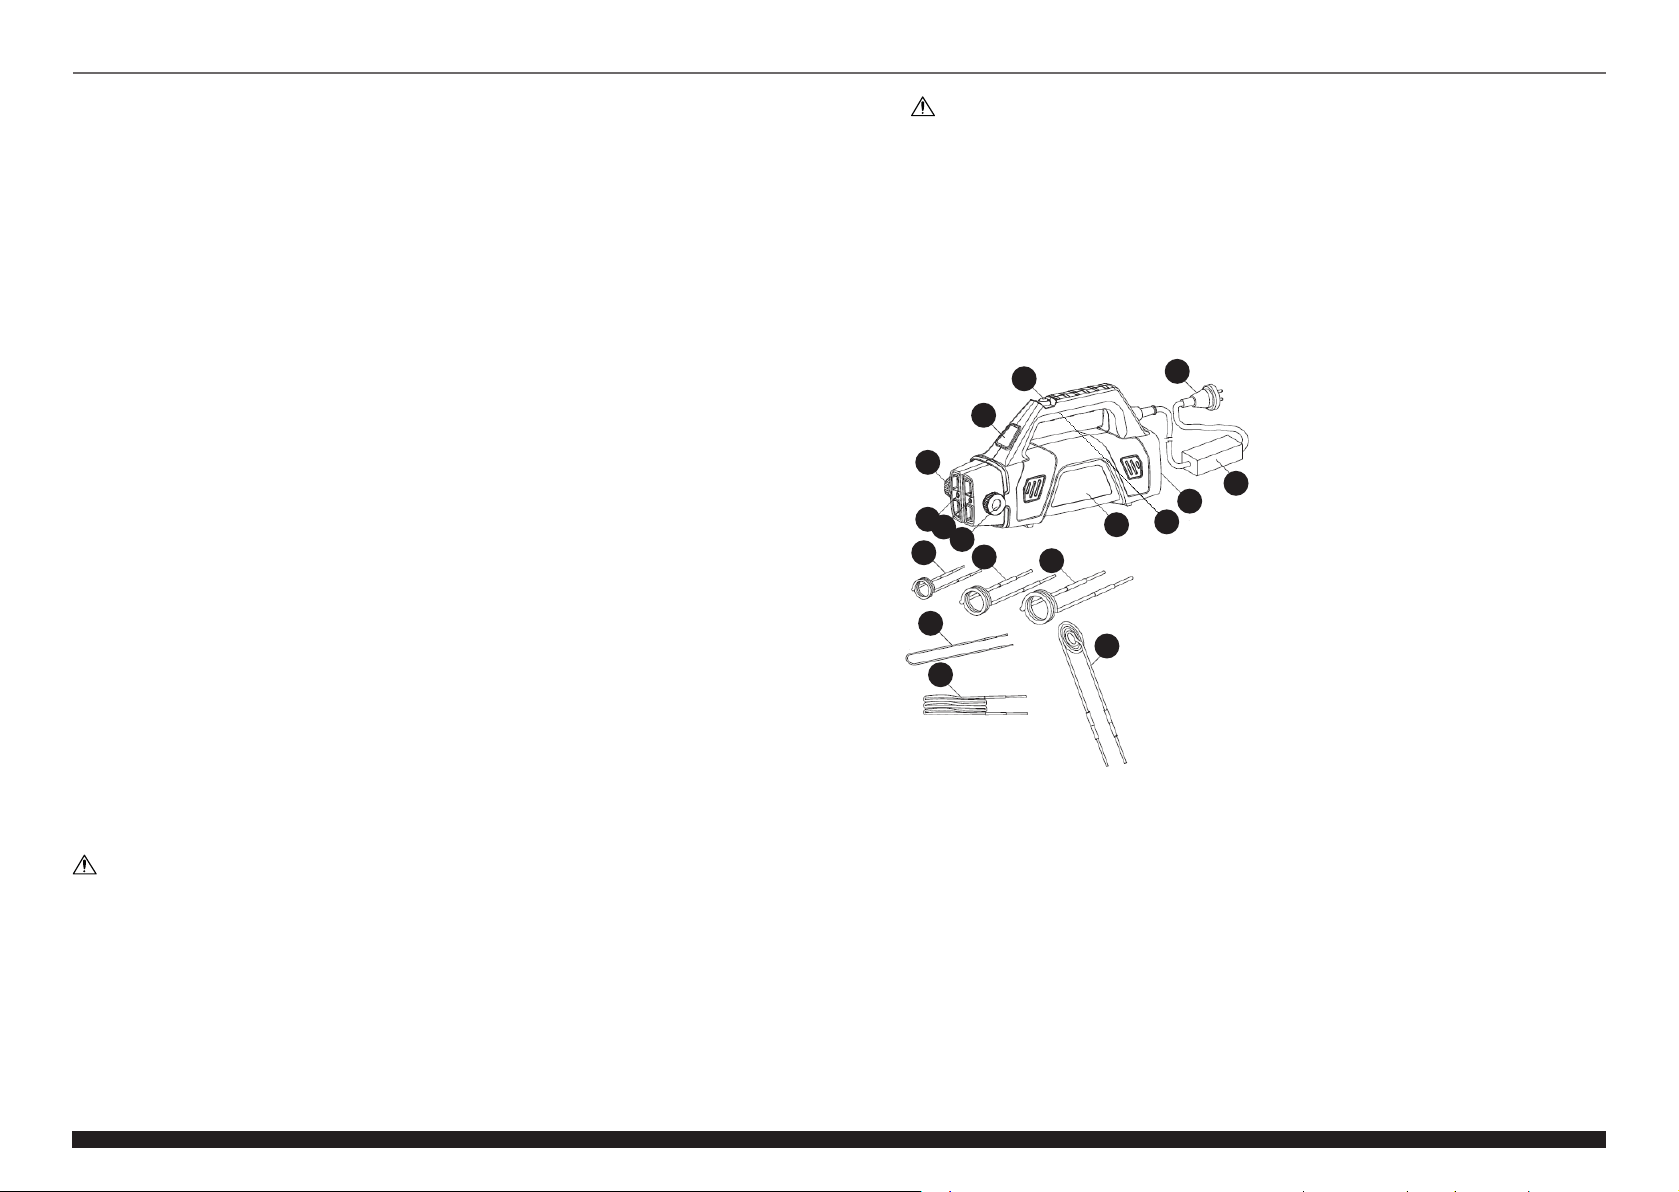
3
443
2
19
67
5
8
12
11
10
13
14
15
UWAGA! Pomimo iż urządzenie zostało
zaprojektowane tak aby było bezpieczne, posiadało
odpowiednie środki ochrony oraz pomimo użycia
dodatkowych elementów zabezpieczających
użytkownika, nadal istnieje niewielkie ryzyko wypadku
lub odniesienia obrażeń w trakcie pracy z urządzeniem.
Zaleca się zachowanie ostrożności i rozsądku podczas
jego użytkowania.
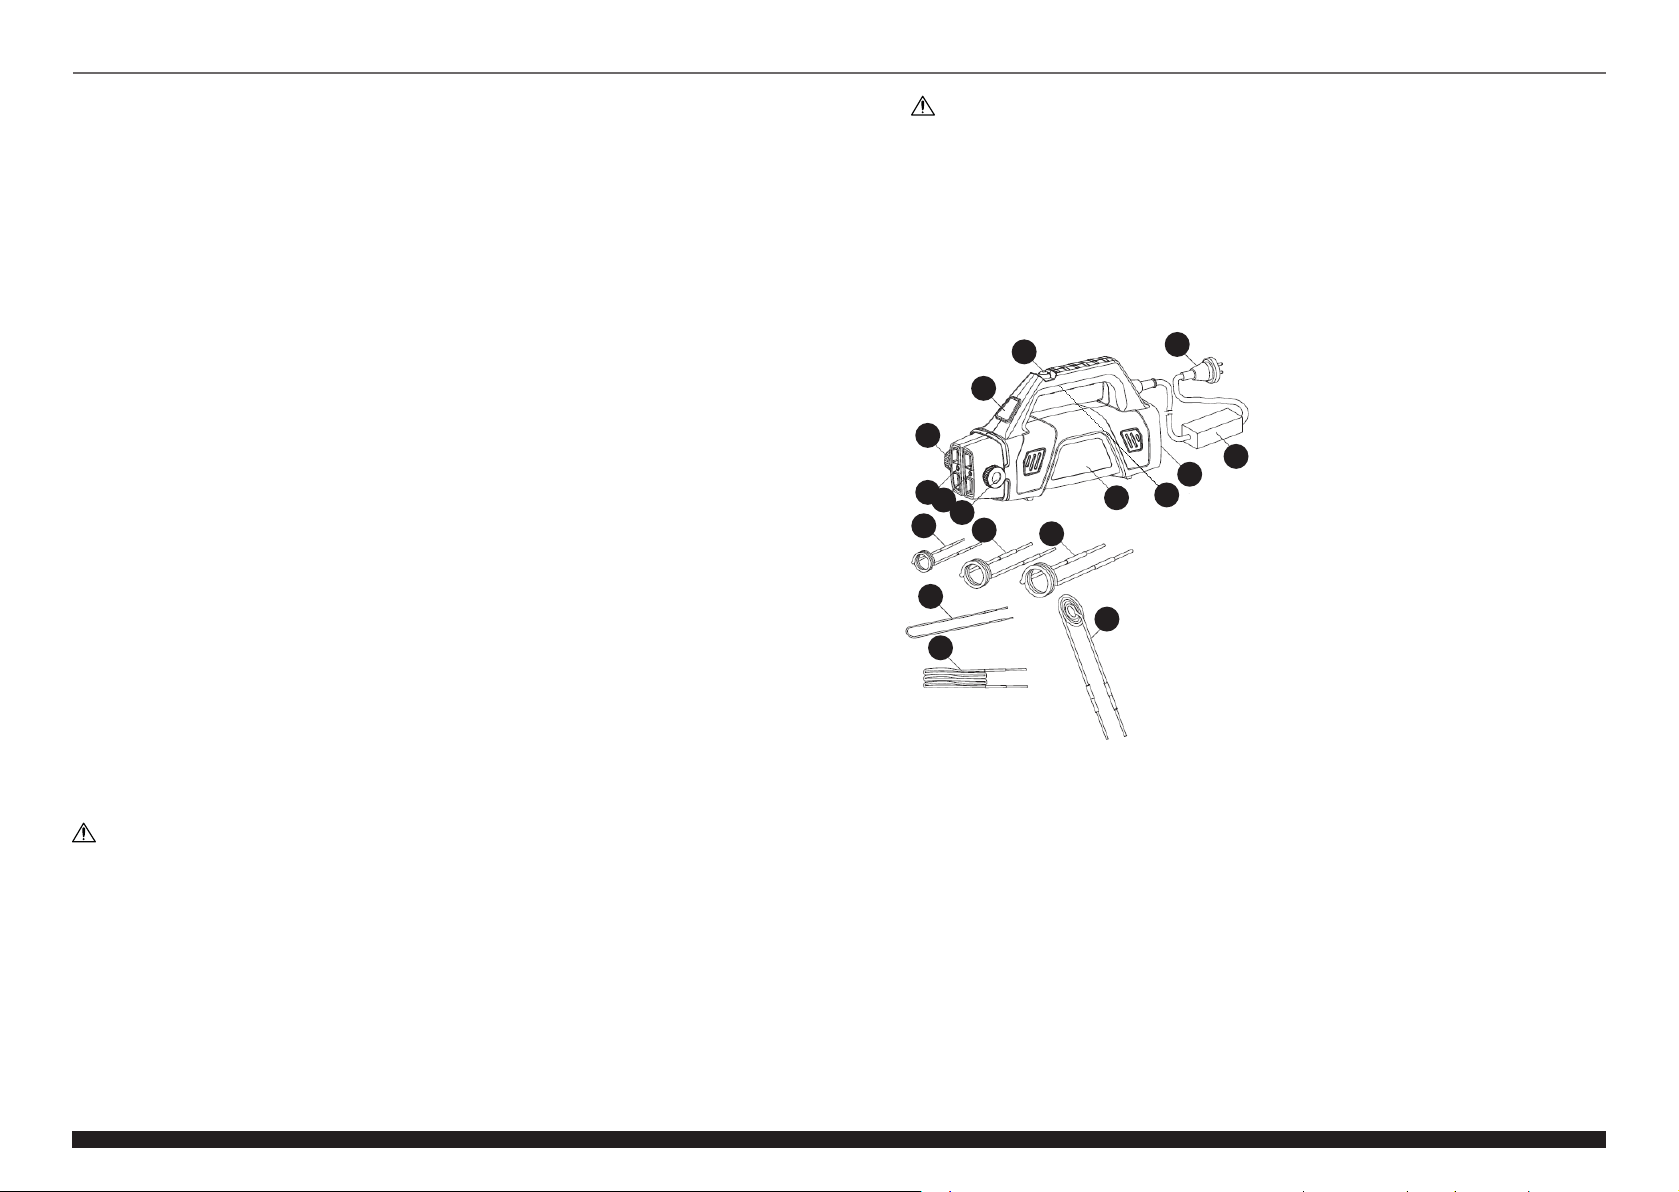
1. Włącznik grzania
2. Podświetlenie LED
3. Pokrętła blokady końcówki grzewczej
4. Otwory montażowe końcówki grzewczej
5. Otwory wentylacyjne
6. Obudowa
7. Uchwyt
8. Filtr przeciwzakłóceniowy
9. Wtyczka zasilania
10. Końcówka grzewcza – cewka 20 mm
11. Końcówka grzewcza – cewka 26 mm
12. Końcówka grzewcza – cewka 32 mm
13. Końcówka grzewcza – kształt „U”
14. Końcówka grzewcza do łożysk
15. Końcówka grzewcza płaska
3.2. PRZYGOTOWANIE DO PRACY
UMIEJSCOWIENIE URZĄDZENIA
Temperatura otoczenia nie może przekraczać -20 – 60oC
a wilgotność względna nie powinna przekraczać 95%.
Urządzenie należy trzymać z dala od wszelkich gorących
powierzchni. Urządzenie należy zawsze użytkować poza
zasięgiem dzieci oraz osób o ograniczonych funkcjach
PL
14 Rev. 18.10.2022 15
Rev. 18.10.2022