MTX X3-17-FS-U User manual

MTX.COM
X3-17-FS-U
CAN-AM®MAVERICK X3 FRONT UPPER SPEAKER PODS
OWNER’S MANUAL

MTX.COM
2
THANK YOU
Thank you for making the AWESOME decision to purchase our MTX Audio 4" weatherproof upper
dash speakers for your Can-Am®Maverick X3. With a few simple tools from your trusty toolbox
you’ll have these installed in no time. The rotationally molded enclosures are built as a single piece,
designed to take years of abuse without failure and they install quickly with only minor disassembly
of the vehicle. So, congratulations on your purchase, thanks for your support and most importantly,
enjoy the ultimate audio experience with MTX!
WE’RE HERE TO HELP
We’re here to help with any installation or technical support. Visit mtx.com to chat, call
1-800-225-5689 to speak with an MTX Technical Support representative, or visit
youtube.com/user/MTXAudioUSA to view product videos.
DON’T FORGET TO REGISTER YOUR PRODUCT
Don’t forget to register your new MTX Audio product. Visit mtx.com/productregistration or scan the
QR code to the right.
Model #
Serial #
Dealer’s Name
Date of Purchase
IMPORTANT NOTICE
Whenever working on the vehicle, it is recommended to disconnect the battery prior to starting work.
Failure to do so may lead to a risk of electric shock or equipment damage.
When connecting power and ground wires ensure that the red power wire is fused at the point
where it is connected to the vehicle’s battery. Failure to do so can result in damage to the vehicle if a
short circuit develops between the vehicle connection point and the product.

MTX.COM 3
FEATURES
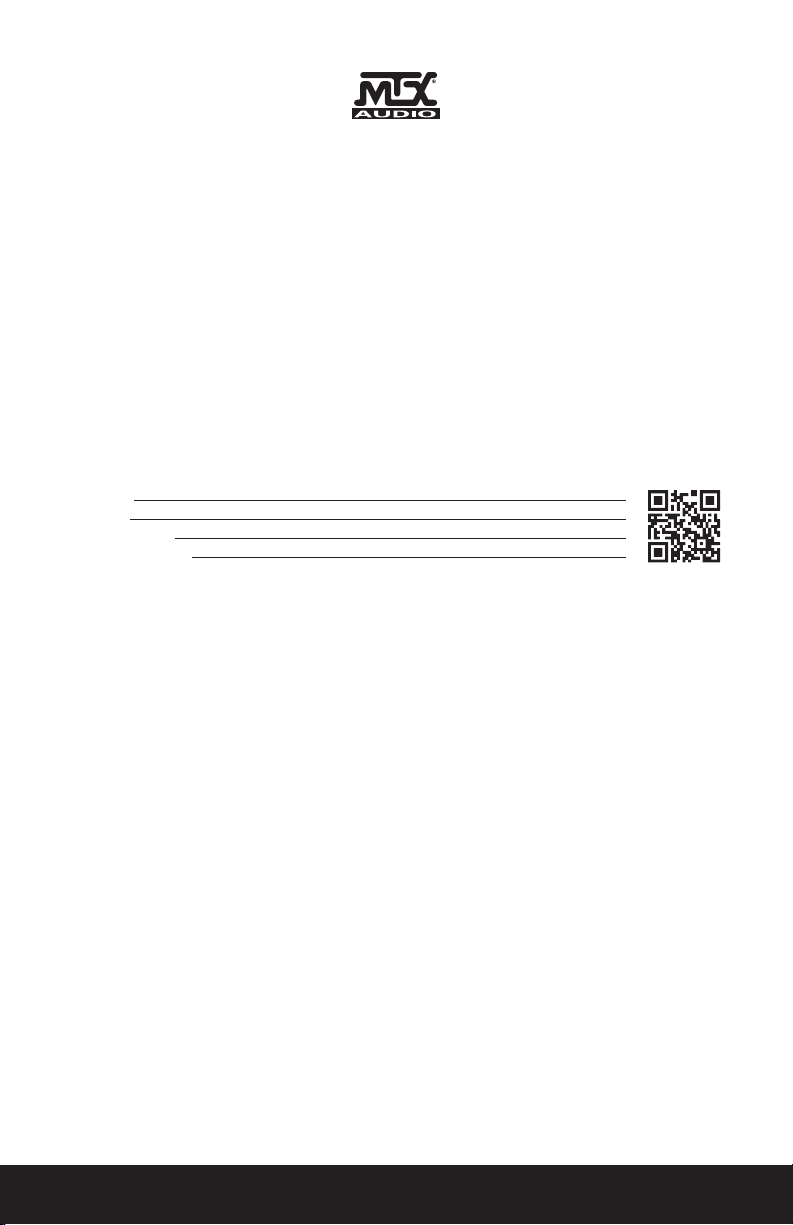
• Custom Fit for Maverick X3 Dash
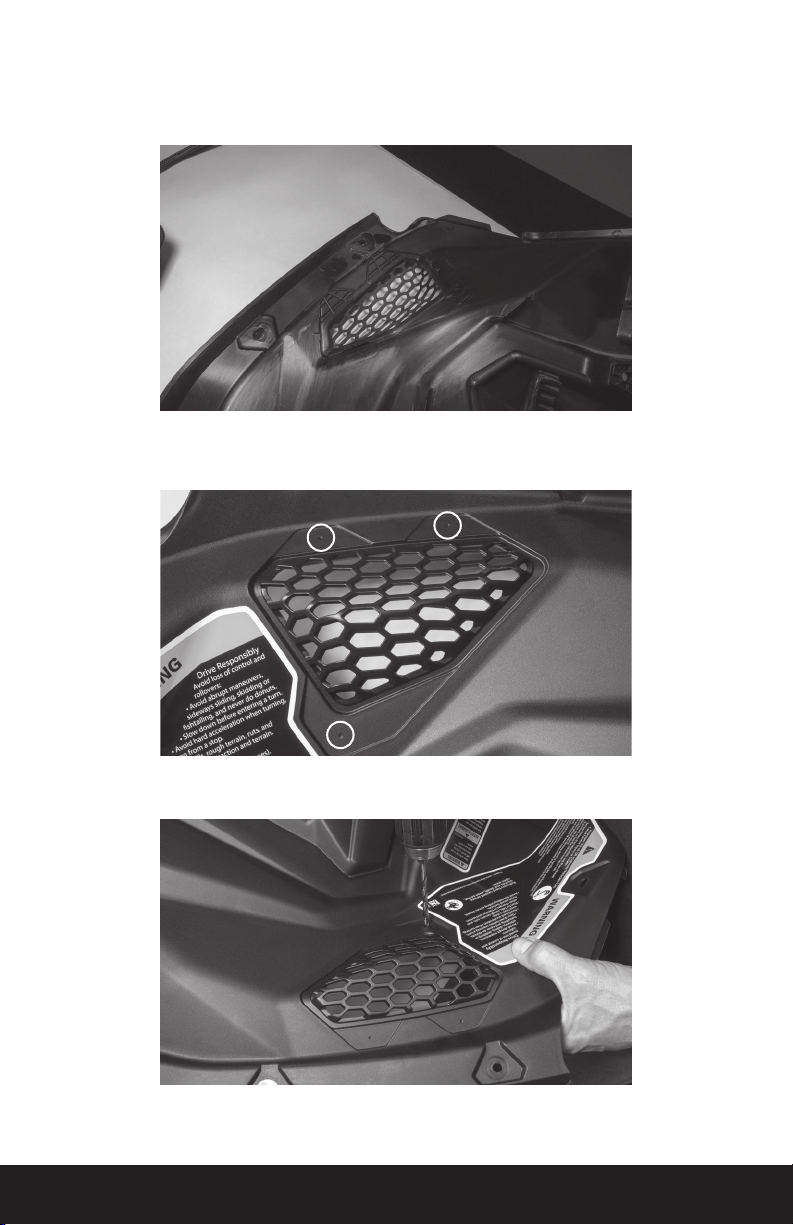
• Custom Quick Mount Bracket for Easy Installation
• Rotationally Molded Sealed Enclosure
• Factory Matched Texture
• Polypropylene Woofer and Mylar Dome Tweeter
• Installer Friendly Design
• Direct Fit, No Cutting Required
SPECIFICATIONS
• RMS Power Handling: 50-Watts
• Peak Power Handling: 100-Watts
• Sensitivity (2.83V/1m): 89.9dB
• Sensitivity (1W/1m): 85.6dB
• Frequency Response: 75Hz - 20kHz
• Impedance: 4Ω
FIT GUIDE
Turbo / Max Turbo..................................................................................................................................2018 - 2019
Turbo R / Max Turbo R...........................................................................................................................2017 - 2019
X-DS Turbo .........................................................................................................................................................2017
X-RS Turbo R / Max X-RS Turbo R.......................................................................................................2017 - 2019
X-DS Turbo R / Max X-DS Turbo R ......................................................................................................2018 - 2019
X-MR Turbo .............................................................................................................................................2019 - 2021
X-MR Turbo R..................................................................................................................................................... 2019
X-RC Turbo ..............................................................................................................................................2019 - 2021
X-MC Turbo R..................................................................................................................................................... 2019
DS Turbo / Max DS Turbo .....................................................................................................................2020 - 2021
RS Turbo .............................................................................................................................................................2020
DS Turbo R / Max DS Turbo R ..............................................................................................................2020 - 2021
Max DS Turbo RR ..............................................................................................................................................2020
RS Turbo R / Max RS Turbo R...............................................................................................................2020 - 2021
X-RC Turbo RR ........................................................................................................................................2020 - 2021
X-RS Turbo RR / Max X-RS Turbo RR..................................................................................................2020 - 2021
X-MR Turbo RR / Max X-MR Turbo RR ...............................................................................................2020 - 2021
X-MS Turbo RR ..................................................................................................................................................2020
X-DS Turbo RR / Max X-DS Turbo RR .................................................................................................2020 - 2021
IN THE BOX
• X3-17-FS-U Dash Speaker Pods (Left and Right Enclosures)
• Mounting Hardware
(4) T-20 Machine Screws
(2) T-20 Coarse Thread Screws

MTX.COM
4
INSTALLATION
Step 1 - On the driver side, locate and remove seven (7) T-30 Torx screws and two (2) pushpin rivets
from the driver’s side upper dash panel.
• Two (2) located to the left of the steering wheel.
• Three (3) located at the front along the windshield line.

MTX.COM 5
• Two (2) located on either side of the steering wheel.
• Two (2) pushpins located on the right side of the panel at top center tray.
Step 2 - Disconnect the light switch harness from the back of the switch. Note: If any additional
switches are mounted in this panel, disconnect at this time. If necessary, label harnesses to ensure
proper reconnection.

MTX.COM
6
Step 3 - Release and push the steering wheel to its lowest position for proper clearance.
Step 4 - Lift up on the dash panel releasing the harness clips from the bottom side as you do.
Step 5 - Once the panel is loose, disconnect the computer harness from the computer module
attached to the panel and remove the panel from the vehicle. Note: It is not necessary to remove the
computer module from the panel for installation of the speaker pod.

MTX.COM 7
Step 6 - On the passenger side, locate and remove ve (5) T-30 Torx screws, one with 10mm nut, and
two (2) pushpin rivets from the passenger’s side upper dash panel.
• Two (2) located on the right side upper dash, one has a 10mm nut located behind gas cap cover
panel.
• Three (3) located at the front along the windshield line.

MTX.COM
8
• Two (2) pushpins located on left side of the panel at top center tray.
Step 7 - With hardware removed, lift up on the dash panel releasing the harness clips from the
bottom side as you do.
Step 8 - Once the panel is free, remove the panel from the vehicle.
Step 9 - Prep the panels for installation by removing the speaker opening cover panel located on
the bottom side of each panel. Note: Your vehicle may not have these installed if panels have been
replaced or if audio equipment was previously installed. If missing, move on to the next step.

MTX.COM 9
Step 10 - Using side cutters or a razor knife, remove the four (4) mounting tabs on the bottom side
of the panel around the speaker opening to provide proper clearance for the pod installation. Note:
These DO NOT need to be perfectly ush with the back of the panel.
Step 11 - Turn the panel over and locate the three (3) dimples around the molded speaker grill. Two (2)
on top and one (1) on bottom of the grill area.
Step 12 - Using a 3⁄16" drill bit, drill though the panel at each dimple location.

MTX.COM
10
Step 13 - On the speaker pods, locate the single molded dimple at the bottom of the pod face.
Step 14 - Using a 1⁄8" drill bit, pre-drill the hole approximately 1⁄8" deep to allow the mounting screw to
be started by hand.
Step 15 - Align the appropriate speaker pod on the back of the panel with the drilled holes and begin
securing using two (2) machine screws through the front of the panel and into the threaded holes
located on the pod bracket.
Step 16 - Once started, install the coarse thread screw through the single bottom hole into the pod
and tighten.

MTX.COM 11
Step 17 - Tighten the machine screws securing the pod to the panel.
Step 18 - Repeat this process on the other panel.
Step 19 - With the panels back at the vehicle, route the pod speaker wire to its connection point.
Note: If installing as part of a kit, the upper pod plug will connect to the pigtail located as part of the
lower pod harness. If not installing as part of a kit, the plug will need to be removed and additional
speaker wire added.
Step 20 - It is recommended to test the system prior to full reassembly. Reinstall the dash panels
in reverse order as removed, remembering to reconnect the computer module and any switches
disconnected during disassembly.
Step 21 - Reassemble and go ride.

MTX.COM
12
NOTES

MTX.COM 13
NOTES

MTX.COM
14
NOTES

MTX.COM 15
WARRANTY PERIOD
At MTX Audio we engineer products that will stand up to the test of time. We also realize that from
time to time a problem may occur. That’s why our products carry a 2-year limited warranty that begins
at the time of sale to the end user.
Of course, we’re here to help. If you experience an issue with any of our products within the warranty
period, please contact our customer service technical line at 1-800-CALL-MTX to help troubleshoot
your issue. If, after speaking with our technical experts it is determined that a problem lies with the
product, the technician will provide you with a Return Authorization number and all relevant details
you’ll need to get the product taken care of.
MITEK WARRANTY
MiTek Mobile products (including, but not limited to: MTX, Coustic, Streetwires, Xtant, BassSlammer,
and Thunder Marine) purchased in the USA from an AUTHORIZED MITEK DEALER are guaranteed
against defects in material and workmanship for the period of time specied. The warranty period
begins the day the product is purchased by the end user, and this warranty is limited to the original
retail purchaser of product. Products found to be defective during the warranty period will be
repaired or replaced with equivalent product by MiTek at no charge. This warranty is void if it is
determined that unauthorized parties have attempted repairs or alterations of any nature, and the
warranty does not extend to cosmetics or nish. MiTek disclaims any liability for other incurred or
consequential damages resulting from product defects. MiTek’s total liability will not exceed the
purchase price of the product.

MTX.COM
16
© 2021 MiTek Corporation. All rights reserved. MTX is a trademark of MiTek Corporation. All other trademarks
are property of their respective owners. Designed and Engineered in the U.S.A.
Due to continual product development, all specications are subject to change without notice.
MTX Audio, 4545 East Baseline Rd. Phoenix, AZ 85042 U.S.A. 1-800-225-5689
MTX006224 RevA 1/21 • 21A10811 • AW0015866
Let’s Get Social
mtx.com
Like, Follow, & Subscribe
Table of contents
Other MTX Speakers manuals

MTX
MTX Blueprint 620CE User manual

MTX
MTX Thunder AXE TX6001 Instruction Manual

MTX
MTX MP41B User manual

MTX
MTX MUSICA SERIES User manual

MTX
MTX Thunder TR4512-04 Instruction Manual

MTX
MTX 512C User manual

MTX
MTX Blueprint 620WE User manual

MTX
MTX MONITOR5i User manual

MTX
MTX CD520C User manual

MTX
MTX CD520W Manual

MTX
MTX MP42B/ MP42W User manual

MTX
MTX Blueprint 622CM User manual

MTX
MTX THUNDER SPORTSMUD65P User manual

MTX
MTX Blueprint H615W User manual

MTX
MTX Blueprint 602W User manual

MTX
MTX Blueprint 512C User manual

MTX
MTX WET65T User manual

MTX
MTX Blueprint 502W User manual

MTX
MTX MP52W User manual

MTX
MTX Thunder AXE TX1000 Instruction Manual