MULTIFIT MULR Series User manual


Table of Contents
Safety Manual............................................................................................................................ 1
Robot Function...........................................................................................................................2
Robot Parts Function.................................................................................................................. 4
Work Preparation....................................................................................................................... 8
Robot Operation....................................................................................................................... 12
Alarming...................................................................................................................................14

Thank you for choosing Multifit Solar Panel Cleaning Robot (refer to as: G1
Robot Model No.MULR-***)
Please read the product manual and safety manual carefully before using this
product.
The person in charge of the robots should ensure that all users read and follow this
manual.
Release the Sensor Wheel by screw and extend the its length, then
screw the Sensor switch again.
The robot may fall from the solar panel if the Sensor wheel does not
be released
!

1
Safety Manual
This equipment is only used for cleaning solar panels.
Use Restrictions
Multifit Solar Panel Cleaning Robot is designed to be used in an environment suitable for human
survival, and cannot be used in a corrosive or explosive environment.
!
Caution
Obviously potential bad or dangerous use, if not avoided, it will
cause serious personal injury.
Note
•Obviously potential undesirable or dangerous use, if not avoided, it
will cause certain personnel injury or certain material and
environmental damage.
•User manual to help users operate and use technically correctly and
effectively !
Warning
• Start the robot without reading this manual
• Use outside the designated use range of the robot
• Destroy the safety system, remove instructions or danger signs
• Open the robot with a tool (such as a screwdriver)
• Update or modify this robot
• Use accessories from other manufacturers that are not approved by
Guangdong Multifit Solar Co., Ltd.
• Use to clean other products beyond solar panels.
Forbidden

2
TO : USER
Limitation of Liability
Guangdong Multifit Solar Co., Ltd. as the original manufacture, is responsible for providing safe
products including manuals and original accessories.
Responsibilities of Non-originating manufacturers (Non-Multifit Solar Co.,Ltd)
For accessories of Multifit robot produced by Non-originating manufacturers (Non-Multifit), the
manufacturer shall be responsible for the development of its products and provide safe accessory
products !
Responsibilities of robot operators:
The person in charge of the robot must ensure that it is operated in accordance with the instructions.
The person in charge should also ensure that other users use the robot in accordance with the
instructions.
The person in charge of the robot has the following responsibilities:
• Must understand the product safety instructions and instructions in the user manual.
• Must be familiar with local safe working rules.
• Once the robot has a safety problem, immediately contact Guangdong Multifit solar Co., Ltd.
Guangdong Multifit Solar Co., Ltd.

3
Robot Function
The functions of the robot are introduced here.
Slow Start
Robot protection mechanism. When the robot starts, it runs slowly for the first 3 seconds, about 5
meters per minute, to protect the equipment from falling off the solar panel.
Manual Cleaning Mode
The specified position of the solar panel can be manually cleaned, and the direction and speed of
manual cleaning can be adjusted.
Automatic Cleaning Mode
Automatic cleaning of solar panels, with customized cleaning time and frequency.
Raindrop Induction Automatic Cleaning Mode
The robot is equipped with a raindrop sensor. When the rainfall reaches the specified value, it will
start an automatic cleaning round.
Self-Charging
The Top of the robot is equipped with a solar panel to continuously charge the battery of the robot.

4
Robot Parts Function
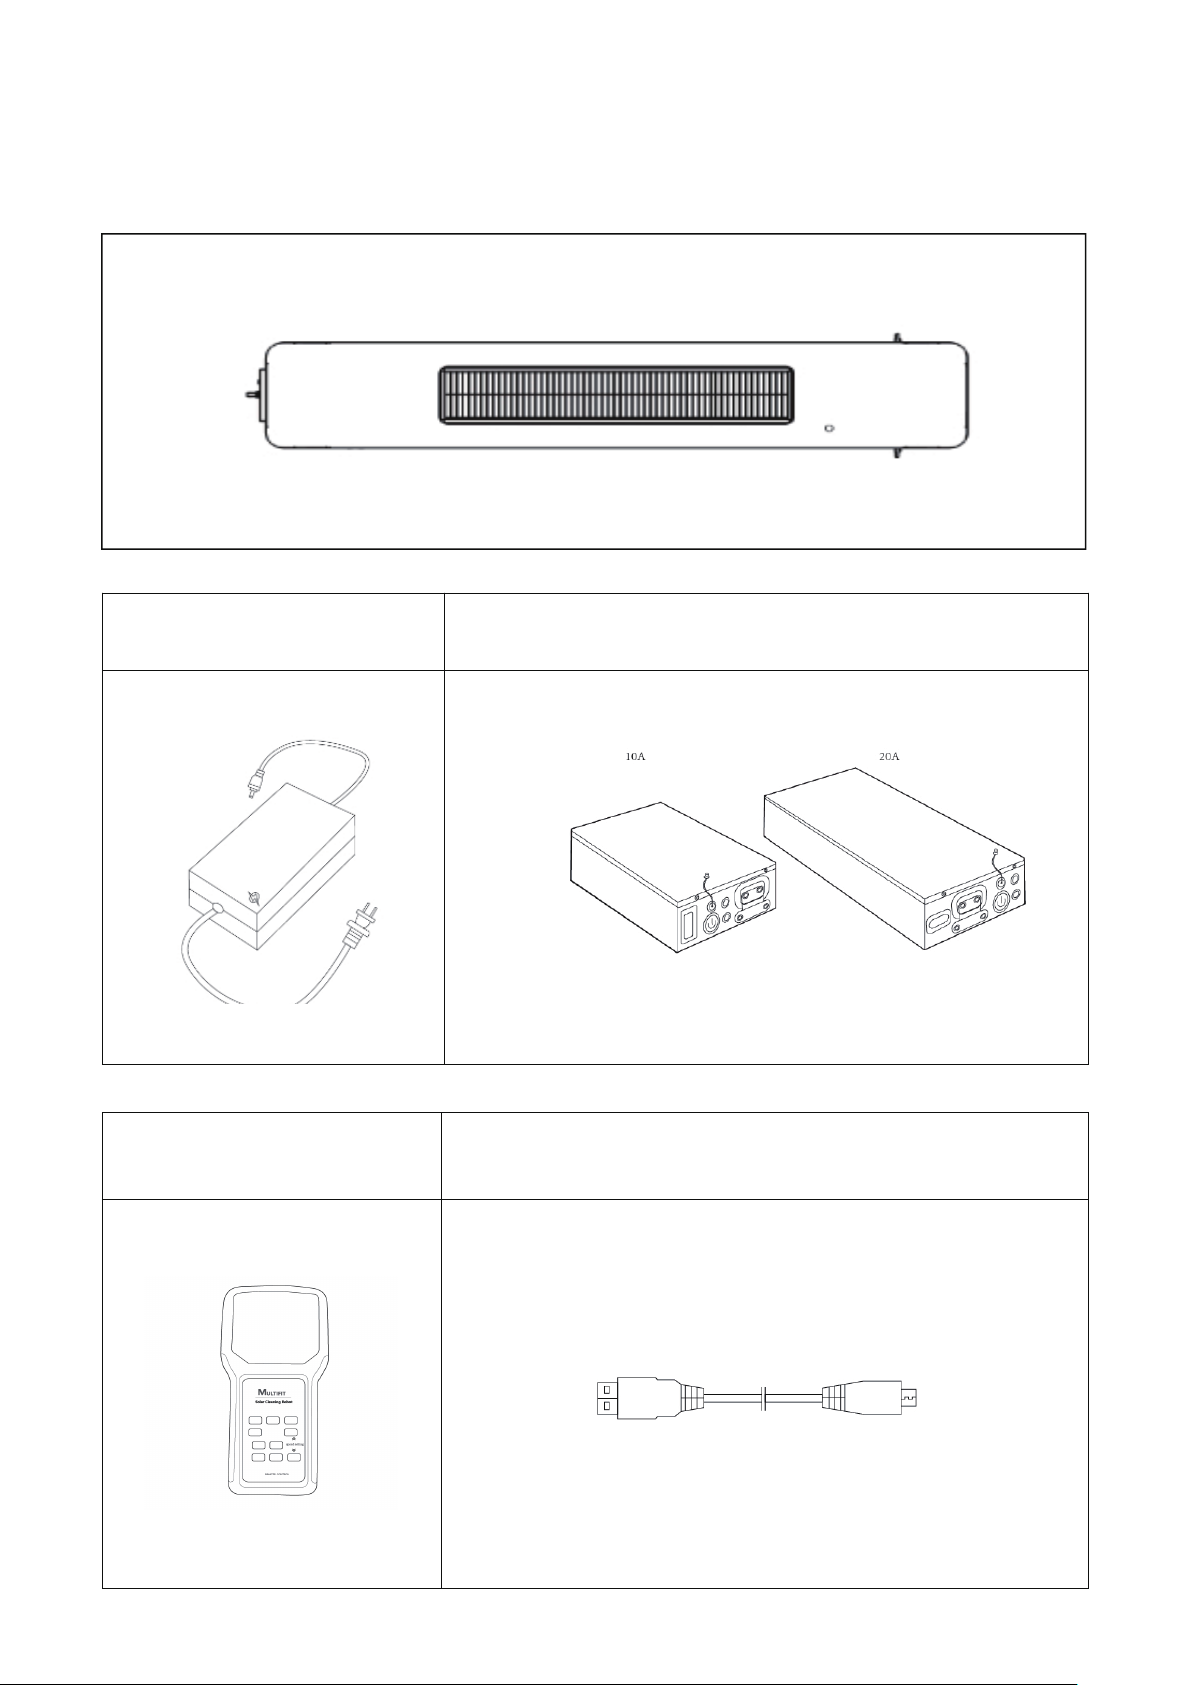
Check the accessories,the quantity of each part is shown on ( ).
Battery Charger ( ×1 ) Lithium Battery 24V-10AH/20AH ( ×1 )
Remote Control ( ×1 ) Micro USB Cable ( ×1 )
Robot ( ×1 ) User Manual ( ×1 )
Power Adapter ( ×1 ) The power adapter varies depending on the country/region.

5
Product Inspection
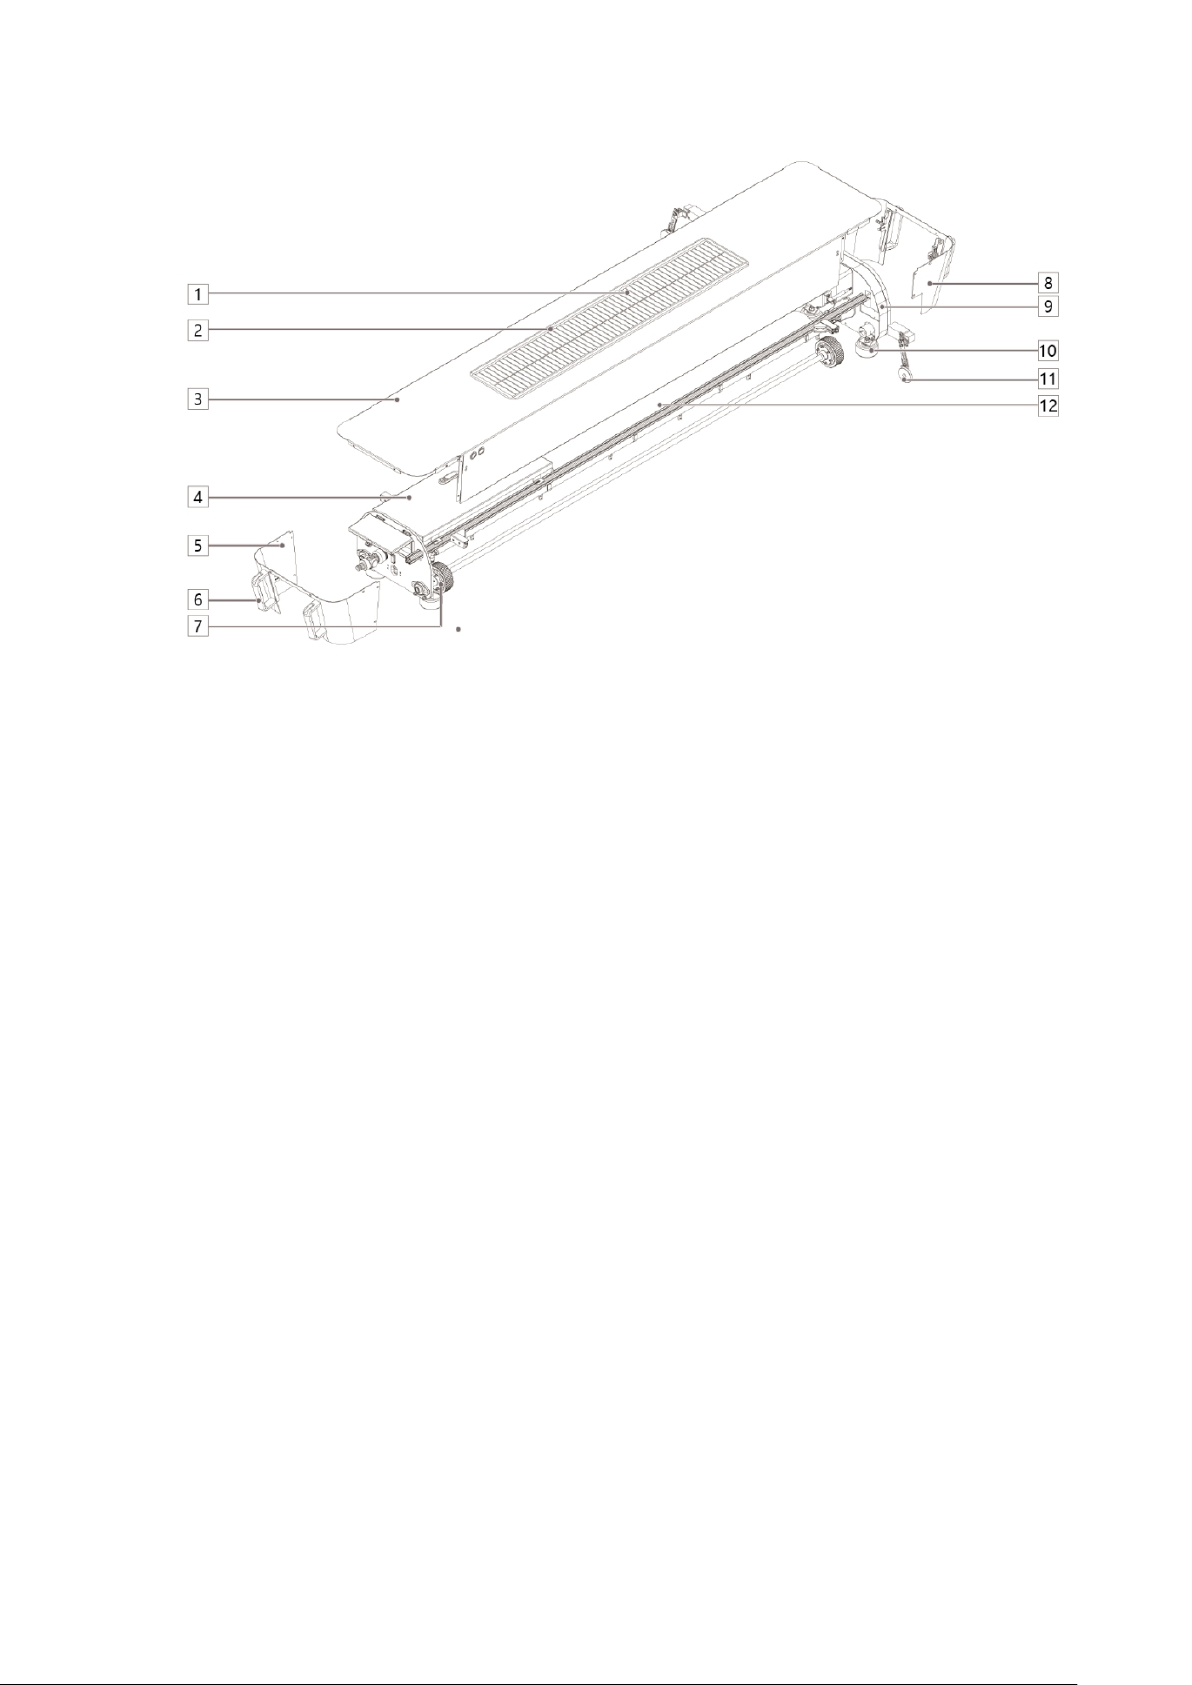
1. Robot Internal View
1. Self-charging Solar Panel
2. Raindrop Sensor
3. Outer Top Shell
4. Power Control Box (1)
(Including circuit boards, batteries,integrated circuits and solar controller)
5. Side Shell
6. Carrying Handles
7. Walking wheel
8. Side Shell
9. Gearbox
(The mechanical gearbox serves the robot transmission system and integrates the brush disassembly
structure.)
10. Support Wheel
11. Sensor Wheel
(The cleaning robot is restricted to move on the solar panel, and the cleaning robot can be controlled
to automatically move in the reverse direction.)
12. Rolling Brush

6
2. Robot External View
Power Switch
Start Switch
Press the start switch to start
the robot
Power Control
Box Lock
Power Control
Box Cover
Water Connector
Rotating Shaft
7
6
8
6
Self-Charging Solar Panel
Raindrop Sensor

7
Remote Control & Charger
Battery & Charger
Battery details
Battery Charger
1.Charger Cover
2.Charger Port
3.Battery Cable
4.Battery Switch/Battery Power Button
5.Battery Power Indicator
6.Handle
7.Battery Power Display, The percentage of remaining
battery power is displayed
[Pause] Button
[Start] Button
[Scrubbing] Button
[Left] Button
[Right] Button
[Mode] Button
[Settings] Button
[Stop] Button
] Button
[Speed Up] Button
[Slow Down] Button

8
Work Preparation
Install/Replace SIM Card
SIM card installation method:
1. Take off the lock of Power Control Box;
2. Unplug the battery cable and take out the battery from box;
3. Press the bottom holder switch to the middle, then take out the 4G Module. Do not unplug
power cable!
4. Touch the card hole with the pin as picture 1, and the SIM card slot will pop up
automatically;
5. Put the SIM card into the card slot and insert to the 4G Module as picture 2;
6. Press the bottom switch of 4G Module,then insert and fix the 4G Module in the power
control box;
7. Insert the battery and connect the battery cable;
8. Close and lock the cover.
Note:
Do not take out the cable of 4G module! The 4G module can not work if SIM card is install
incorrectly!

9
Install/Replace Battery
The battery of robot should be charging at the first use. Battery can be charging even there is still
electricity left.
Battery can be used in condition of unfinished charging.
The full-powered battery would be consumed even if it is not working.
1. Take off the lock of Power
Control Box;
2. Unplug the battery cable;
3. Take out/Insert the battery as picture 2;
4. Plug the battery cable correctly. Press
the switch button and make sure the
installation is finished.
figure 2
5. Close and lock the cover
figure 1
figure 3
!
Note:
(1) Battery has automatic power off function. You can unplug the
battery cable without turning off the battery!
(2) Red wire is the positive pole,Black wire is the negative pole of the
battery.

10
Battery Power Display
1. Press the switch button and the battery power percentage will be showed on the screen.
2. Suggest to charging the battery once power is less than 20%.
Note: Battery power may deviate when in different condition and environment.
Battery Charging
Note:
(1) Above charging time is applicable to temperature at -10~25℃.
(2) It may take longer time for charging when in different condition and environment.
Charge On/Off
Press on button and the indicator light is on and the battery power is on the screen. The battery is
ready.
Note: Turn off the battery by pressing battery button again, the light and display screen are off.
Remote Controller Charging
Note:
(1) Please do not charge many times that has just finished charging or has not been used.It will affect
battery performance.
(2) Please remember take off the charger after charging.
(3) Above charging time is applicable to temperature at-10~ 25℃.
(4) It may take longer time for charging when in different condition and environment.
(5) Make sure to use 5V1A/2A Charger! Or the mismatched voltage will damage the remote control.
1. Use Soft-pack type lithium battery and can be cycling charging
and discharging safely.
2. Please use the Micro USB wire and adapter when charging.
3. When the remote control starts charging, the indicator will on.
4. When the remote control is fully charged, the indicator will off.
5. Charging time: It takes 90 minutes for charging.
1. Battery capacity is 24V 10Ah/20Ah lithium battery and
can be cycling charging and discharging safely.
2. Please use the assigned charger when charging.
3. Charging time: It takes 5 hours(10Ah)/10 hours(20Ah) for
charging.

11
Robot & Remote Control
1. Start Robot
2. Aim remote controller at Robot.
3. Remote control is connected with the robot automatically.
Robot & Phone Apps
1. Start Robot
2. Scan the QR code or search the mini program “Multifit Robot”.
3. Register and login on the mini program.
4. Click the [Add Device] button to add Robot.

12
Robot Operation
Please check the following precautions before starting the robot
1.Put on the corresponding solar panel array refer to the robot model and so
lar panel size.
The walking wheel should be fitted to the solar panel frame.
2.Check the position of robot,whether it is placed in the right position.
3.Check the position of robot,the support wheel should be close to the solar
panel frame.(Figure 1)
4.Release the Sensor Wheel by screw and extend the its length, then screw
the Sensor switch again.(Figure2)
The robot may fall from the solar panel if the Sensor wheel does not be
released.
5.Turn on the battery in the Power Control Box and then lock the cover.
The cover cannot be opened during the robot running!
Robot Power Button
1.Power on the robot by pressing the [Power] on the robot side.
2.Start the robot by the follow 3 ways:
(1) Press the [ON] on the robot side;
(2) Press the [ON] on the remote control;
(3) Press the [ON] in the Apps.
Manual Cleaning Mode-Remote Control
Note:
(1) Cleaning Cycle: robot is cleaning forward on the solar panel frame, when the limit switch is
triggered,the robot will be suspended. Then it go to wash to the opposite direction,when the limit
switch is triggered again then robot will stop.
This process is a cleaning cycle.
(2) According to different conditions of use and environment,the running speed of robot is subject to
actual measurement.
1. Press the [ON] Button, the robot starts cleaning at an
initial speed of 18 m/min.
Press the [OFF] Button, the robot will stop.
2. During the cleaning,press the [Scrubbing] button, the
robot repeatedly cleans within 30cm of the current position
to the left/right. Press the [OFF] Button, robot finish the
positioning clean.
3. During the cleaning process, press the [Speed Up]
button, robot speed increased by 1 m/min, the maximum
speed is 23 m/min.
Press the [Speed Down] button, robot speed reduced
by 1 m/min, the minimum speed is 15 m/min.
During the cleaning process, press the [Left] button, robot
turn to the left.
Press the [Right] button, robot turn to the right.
(Figure 1)
(Figure 2)

13
Phone Apps Control
1. Press the [ON] Button, the robot starts cleaning at an initial speed of 18 m/min.
2. Press the [OFF] Button, the robot will stop.
3. During the cleaning,press the [Scrubbing] button, robot repeatedly cleans within 30cm of the
current position to the left/right. Press the [OFF] button, robot finish the positioning clean.
4. Press the [Manual] button to see the manual operation diagram.
5. During the cleaning process, press the [Speed Up] button, robot speed increased by 1 m/min,
the maximum speed is 23 m/min.
6. Press the [Speed Down] button, robot speed reduced by 1 m/min, the minimum speed is 15
m/min.
7. During the cleaning process, press the [To Left] button, robot turn to the left.
8. Press the [To Right] button, robot turn to the right.
Note:
(1) Cleaning Cycle: Robot is cleaning forward on the solar panel frame, when the limit
switch is triggered, the robot will be suspended. Then it go to wash to the opposite direction,
when the limit switch is triggered again then robot will stop.
This process is a cleaning cycle.
(2) According to different conditions of use and environment, the running speed of robot is
subject to actual measurement.

14
Automatic Cleaning Mode
Phone Apps Control
1. Press the [ON] Button and [Automatic] button to see the automatic operation diagram.
2. You can select [mode 1], [mode 2], [mode 3], [mode 4] and [customized mode].
3. Select the required automatic mode and click the [Save] button to save.
4. Auto back to the home page, the [Automatic] button lights up, and the display starts to count down
the automatic cleaning time.
Note:
Mode 1: Robot auto stops after 2 cycles cleaning, then go to automatic cleaning again every 3 days
(72 hours).
Mode 2: Robot auto stops after 3 cycles cleaning, then go to automatic cleaning again every 7 days
(168 hours).
Mode 3: Robot auto stops after 3 cycles cleaning, then go to automatic cleaning again every 10 days
(240 hours).
Mode 4: Robot auto stops after 3 cycles cleaning, then go to automatic cleaning again every 15 days
(360 hours).
Customized Mode: the cleaning frequency and cleaning time of robot can be customized.
Caution: If you do not click [Save] button, you will lose the automatic mode setting!
Alarming
1. When the robot low power alarm, the robot [on] button indicator flashes quickly.

Table of contents