Muratec MFX-2500 User manual

Information Server Kit
IS-100
User’s Guide
for
MFX-2500
MFX-2530

Muratec America, Inc.
6400 International Parkway, Suite 1500
Plano, Texas 75093-8218
http://www.muratec.com
Muratec (UK), Ltd.
Tempus Court Onslow Street
Guildford, Surrey GU1 4SS
http://www.muratec.co.uk
MAI ItemMasterNo:OMIS100KIT
© 2001 Murata Machinery, Ltd.
Printed in Japan
D90-90120-60

i
Introduction
Thank you for purchasing Muratec’s Information Server Kit IS-100.
This manual describes the operation procedures of the fax main unit, as well as the
procedures for registration and adjusting the settings on your PC. Please read this
manual carefully before starting the operation. For details of the fax main unit
operations, please refer to the operation manual that comes with the fax main unit.
This manual presupposes that its reader understands the basic operation and
concepts of PC’s, operating systems, networks and application software. Please refer
to each manual respectively for details of operation.
Warning
Only your authorized Muratec dealer should install the IS-100 main
unit.
Do not perform this installation yourself. Otherwise electric shock
or machine failure may result.
Registered trademarks and trademarks
Windows®95, Windows®98, Windows NT®, Windows®Millennium Edition and Windows®
2000 are the registered trademarks of Microsoft Corporation, USA, in the U.S. and other
countries.
Screen copies in this manual are shown under permission of Microsoft Corporation, USA.
IBM, OS/2, NuOffice are the registered trademarks of IBM Corp., USA, in the U.S. and
other countries.
Salutation is the registered trademark of Salutation Consortium, Inc.
All other brand names and product names used in this manual are trade names,
trademarks or registered trademarks of their respective owners.

ii
Major features of IS-100
Internet fax transmission
Paper documents, such as hand-written letters, can be transmitted by e-mail using
the existing e-mail environment just like sending a fax. All you have to do is load the
original and designate the recipient’s e-mail address using a one-touch key or speed
dialing.
Scanned data from the original is sent by e-mail as an image data attachment.
Internet fax reception
E-mail messages are received from a POP server or SMTP server after checking the
mailbox, with preset time intervals for automatic printout.
PC-FAX transmission
When the recipient’s e-mail environment is unavailable, a document prepared by
Windows applications (quotation or chart) can be sent to the recipient’s fax machine
directly from a PC.
PC-FAX reception
The received fax document can be transferred to a PC and stored as electronic data to
save labors in filing or stocking. Hardcopy output can be made only for necessary
documents to save paper. It is also possible to order individual transfer to a PC
designated by a key with F-code or the sender’s number.
Data
Fax
PC
Data
Fax
PC
Incoming e-mail
P
r
i
n
t
o
u
t
Outgoing e-mail
Original
document

iii
Network scanner function
Up to A3 size original and book original can be scanned at high-speed by simple
operation.
Scanned document data is saved in the designated folder on a PC, efficiently
converting paper-based information into electronic data. A data file can be shared in
any work place for effective utilization, promoting the fusion of conventional paper-
based information with electronic documents.
Network printer function
With its network capability, the printer can be used as a shared printer for PCs on the
LAN without the need for a printer server. Any document prepared by application
software can be printed out with high quality 600 dpi resolution.
Network management tools
With the use of a Web browser, a PC can perform such operations as Information
Server settings,display of transmission/reception history of e-mails and faxes, as well
as registration of one-touch dial.
PC E-mail transmission/
reception history
Fax transmission/
reception history
One-touch dial setting
Speed dial setting
P
r
i
n
t
o
u
t
Data
PC
Data
PC
Original
document

iv
Fax main unit operation panel
FAX key
Numeric keys
One-touch keys
Cursor keys
MENU key
STOP key
NEXT key
START key

v
Contents
Introduction.......................................................................................................................i
Major features of IS-100 .................................................................................................ii
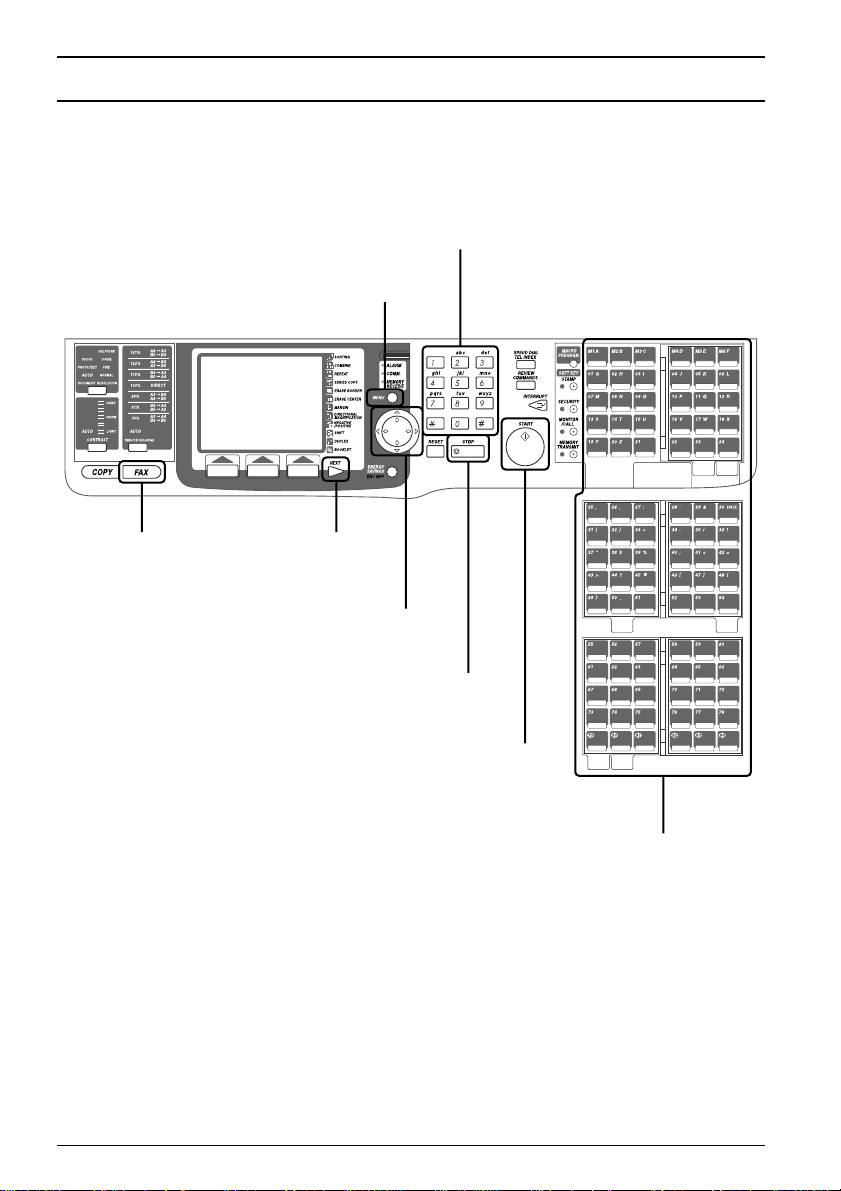
Fax main unit operation panel ......................................................................................iv
Contents ...........................................................................................................................v
Chapter 1 Before use
Safety precautions ................................................................................................2
Functional expansion ...........................................................................................3
Time zone ..................................................................................................3
Functional expansion ...............................................................................3
Fax main unit setup .............................................................................................4
Time zone setting ......................................................................................4
IP address setting .....................................................................................5
IP address check .......................................................................................8
‘Web Manager’setup ..........................................................................................10
What is ‘Web Manager’? .........................................................................10
Startup of ‘Web Manager’.......................................................................10
Descriptions of ‘Web Manager’...............................................................12
Chapter 2 System configuration
Registration procedures .....................................................................................18
Administrator registration ................................................................................19
What is administrator registration? ......................................................19
Registration of administrator information ............................................20
Installation information registration ................................................................23
What is installation information registration? .....................................23
Installation information registration ....................................................23
Network setting ..................................................................................................25
What is network setting? .......................................................................25
Network setting ......................................................................................25
E-mail environment setting ...............................................................................28
What is E-mail environment setting? ...................................................28
E-mail environment setting ...................................................................28
User registration ................................................................................................33
What is User registration? .....................................................................33
User registration .....................................................................................33

vi
Chapter 3 Useful functions
One-touch dial setting ........................................................................................40
What is One-touch dial setting? ............................................................40
One-touch dial registration ....................................................................40
Speed dial registration .......................................................................................44
What is Speed dial registration? ............................................................44
Speed dial registration ...........................................................................44
Received fax forwarding ....................................................................................47
What is Received fax forwarding? .........................................................47
Setting of Received fax forwarding ........................................................48
Exceptions Handling ..............................................................................51
Individual fax forwarding ..................................................................................54
What is Individual fax forwarding? .......................................................54
Setting of Individual fax forwarding .....................................................55
Chapter 4 Device management
Device information check ...................................................................................60
Device information check .......................................................................60
Fax communication log check ............................................................................63
Fax transmission (reception) history check ..........................................63
Mail communication history check ...................................................................65
Mail transmission history check ............................................................65
Mail reception history check ..................................................................67
Scheduled communication check .......................................................................69
Scheduled communication check ...........................................................69
Print job check ....................................................................................................71
Print job check ........................................................................................71
Chapter 5 Troubleshooting guide
Troubleshooting guide .......................................................................................74
Printed message.......................................................................................74
Error message display.............................................................................76
Others.......................................................................................................76

vii
Chapter 6 Linkage with other systems
SNMP Agent .......................................................................................................80
Outline of SNMP .....................................................................................80
SNMP agent setting ...............................................................................81
Salutation commands list ..................................................................................84
‘Fax Data’-related commands..................................................................84
‘Print’-related commands.........................................................................86
Main specifications ........................................................................................................87
Index ...............................................................................................................................89
If problems arise ............................................................................................................91

viii

Chapter 1
Before use
Safety precautions...................................................................2
Functional expansion..............................................................3
Fax main unit setup................................................................4
‘Web Manager’ setup.............................................................10

Do not place anything on the
equipment that contains water or
chemical drugs.
Do not place articles on the equipment
such as flower vases, potted plants,
beverage cups, cosmetics, containers of
chemical drugs or water, or small
metallic articles. These substances,
once overturned and dropped inside of
the equipment, may cause fire or
electric shock.
Chapter 1 Before use
2
Safety precautions
●Please read “Safety precautions” in the operation manual of the fax main unit.
●The following notations are used to alert the user to harm or damage that could result from
mishandling due to negligence of precautions.
Warning This notation alerts the user to the potential for serious injury or
death.
Caution This notation alerts the user to the potential for bodily harm or
damage to hardware.
●The following symbols are used to distinguish the types of alerts. (Shown below are the
examples.)
This symbol indicates warning or caution. The illustration will give a
concrete description.
This symbol indicates the prohibition in handling. The illustration will give
a concrete description.
This symbol indicates the mandatory handling. The illustration will give a
concrete description.
Never attempt to disassemble,
repair or modify the equipment.
It may cause electric shock or machine
failure. Request repairs from the
Customer Information Center.
When any of the following occurs,
stop operation immediately,
unplug the power cable of the fax
main unit from the power outlet,
and call our Information Center.
◆Smoke generation or unusually
heated machine housing
◆Abnormal noise
Never attempt anything other
than what is specified in this
manual.
It may cause unexpected accidents or
machine failure.
Warning
Caution

Chapter 1 Before use
3
1
Functional expansion
Functions added to the fax main unit by IS-100.
Time zone
‘Time Zone’ setting is added to the ‘Initial setting’ by pressingMENU,I.
The time zone is required as part of the E-mail header information when sending
Internet faxes.
Functional expansion
‘Net Func’ is additionally shown.
Settings for the network environment and scanning are enabled.
‘Net Func’ setting includes the following three items.
‘A. Server Settings’
‘B. User Settings’
‘C. Mail priority setup’

Chapter 1 Before use
4
Fax main unit setup
Time zone and IP address settings are needed to operate this equipment over the
network.
Time zone setting
1Press the FAX key to call the fax screen.
2Press the MENU key, One-touch key I, and then the [Enter] key, in that order.
3Press [Enter] key twice.
The machine asks you to enter your time zone.
4Enter your Time Zone using the numeric keys.
Example of Time Zonesin United States and Canada
:
GMT +10:00 Guam
GMT --11:00 Midway Island
GMT --10:00 Hawaii
GMT --09:00 Alaska
GMT --08:00 Pacific Time (US & Canada)
GMT --07:00 Mountain Time (US & Canada)
GMT --06:00 Central Time (US & Canada)
GMT --05:00 Eastern Time (US & Canada)
GMT --04:00 Atlantic Time (Canada)
GMT --03:30 Newfoundland
I.UserInstall
Entertimezone
‑06:00
Enter
+--
I.UserInstall
Entertimezone
‑06:00
Enter
+--
I.UserInstall
Entercurrenttime.
200108/1017:30
Enter

Chapter 1 Before use
5
1
5Press [Enter] key to save the setting.
6Press the RESET key to exit the User Install mode.
IP address setting
1On the copier standby screen or fax standby screen, press the NEXT key
continually until the following screens appear.
Copier standby screen Fax standby screen
2Press [Net Func] key, and then the MENU key.
AdvancedScan
Usecursortoselect
item.
B.UserSettings
C.Mailprioritysetup
Enter
A.ServerSettings
FaxReady
Aug30200117:00
NetFuncMailAdr#OfPages
FaxReadyMemory100%
CopyReady
NetFuncChg.Ppr.
1
Set
100%Ppr.Auto
I.UserInstall
Enteryourfaxnumber.
123‑456‑7890
ClearEnter
--

Chapter 1 Before use
6
3Select “A. Server Settings” using cursor key. Then press [Enter] key.
4Select “01. IP Address Setting” using cursor key. Then press [Enter] key.
5Select “IP Address” using cursor key. Then press [Enter] key.
6Enter the IP Address using the numeric keypad. Then press [Enter] key.
* Entry is allowed to be up to 12 digits.
* To enter numbers less than 2 digits between the dots, use the cursor key to
move the entry point.
* To correct a wrong number entry, move the cursor with the cursor key and press
[Clear] key to correct, or overwrite it.
IPAddressSetting
Usecursortoselect
item.
SubnetMask:255.255.255.0
ExitEnter
IPAddress:192.168.1.13
IPAddressSetting
EnterIPaddress.
192.168.1.13
SubnetMask:255.255.255.0
ClearEnter
IPAddressSetting
Usecursortoselect
item.
SubnetMask:255.255.255.0
ExitEnter
IPAddress:192.168.1.13
ServerSettings
Usecursortoselect
item.
02.MACaddressdisplay
Enter
01.IPAddressSetting

Chapter 1 Before use
7
1
7Set the “SubnetMask” in the same procedure as the “IP Address Setting”.
8Press the [Exit] key, the RESET key.Then power OFF/ON to reflect the settings.
IPAddressSetting
Usecursortoselect
item.
SubnetMask:255.255.255.0
ExitEnter
IPAddress:192.168.1.13

Chapter 1 Before use
8
IP address check
It is possible to check the settings made in ‘IP Address Setting’ (p.5).
1Start ‘Internet Explorer’ (4.0 or later) or ‘Netscape Communicator’ (4.5 or
later).
* Use the latest browser version possible.
Some old versions may not produce the correct display.
2Enter the IP address in the address box, and press the <Enter> key.
* The ‘Web Manager’ startup screen appears followed by the ‘Web Manager’
initial screen.
If the ‘Web Manager’ screen does not appear
Double-check the IP address in ‘IP Address Setting’ (p.5), and carry out power
OFF/ON of the fax main unit to restart.
A while later …

Chapter 1 Before use
9
1
3Click [Network environment] under [Setup].
4Check if the IP address shown is correct.
* If the IP address shown is not correct, double-check the IP address in ‘IP
Address Setting’(p.5), and carry out power OFF/ON of the fax main unit to
restart.

Chapter 1 Before use
10
‘Web Manager’ setup
What is ‘Web Manager’?
‘Web Manager’is the program that enables adjustment of settings and registration
of this device with a Web browser.
In addition to adjusting settings and registration, ‘Web Manager’enables the
management and browsing of the device information.
Startup of ‘Web Manager’
1Start ‘Internet Explorer’(4.0 or later) or ‘Netscape Communicator’(4.5 or
later).
* Use the latest browser version possible.
Some old versions may not produce the correct display.
2Enter the IP address in the address box, and press the <Enter> key.
Other manuals for MFX-2500
5
This manual suits for next models
3
Table of contents
Other Muratec Printer Accessories manuals