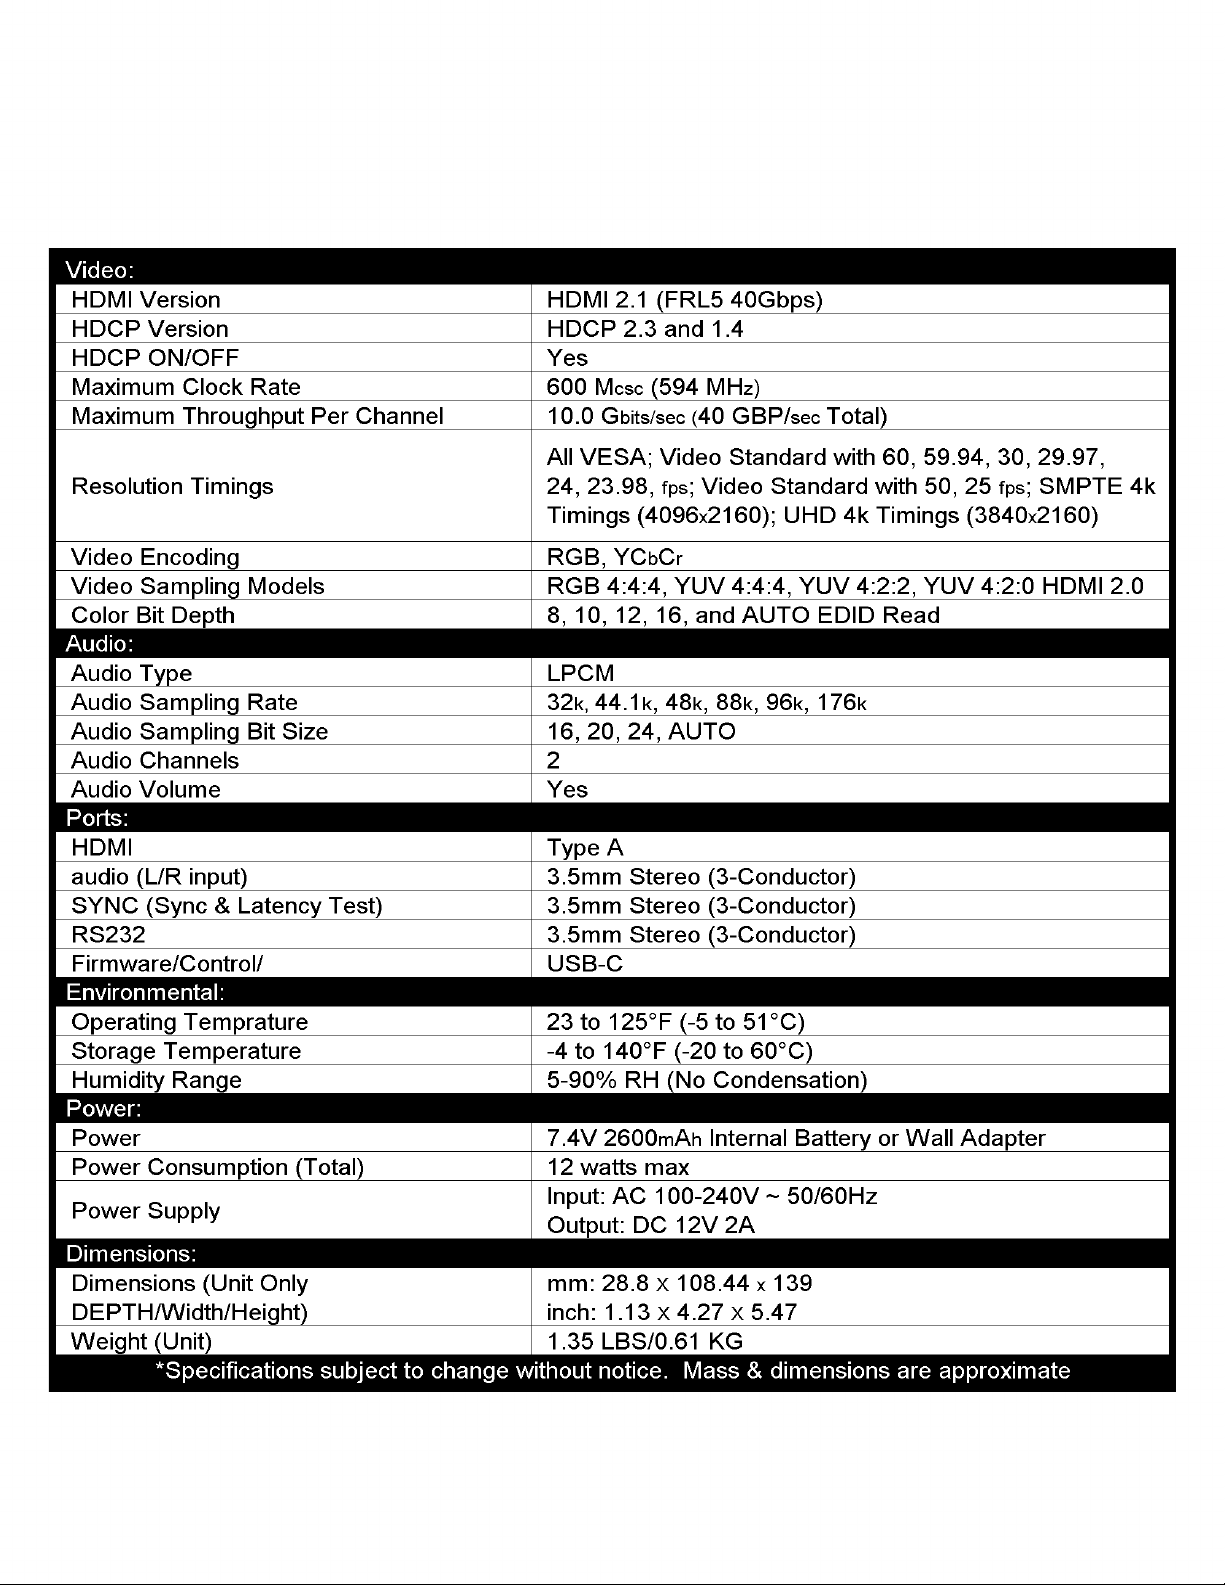
Murideo PRELIMINARY MU-GEN2-SIX-A-8K User manual

1
MU-GEN2-SIX-A-8K
HDMI 2.1 40Gbps Test Pattern Analyzer
PRELIMINARY

INTRODUCTION .................................................................................. 3
FEATURES.......................................................................................... 3
WHAT’S IN THE BOX ............................................................................ 4
FRONT PANEL OVERVIEW ...................................................................... 6
CONNECTION OVERVIEW: ...................................................................... 6
VIDEO ANALYZER: MAIN MENU .............................................................. 7
VIDEO ANALYZER: SHORTCUT HPD SETUP ................................................ 7
SIGNAL INFO: .................................................................................... 8
PIXEL COLOR CHECKER: ........................................................................ 9
SIGNAL MONITOR: .............................................................................. 10
SIGNAL MONITOR CONTINUED: ............................................................. 11
VU METER: ....................................................................................... 12
AUDIO FREQUENCY CHECKER: ............................................................... 13
CABLE TEST: ..................................................................................... 14
CEC TEST: ........................................................................................ 15
AUDIO VOLUME: ................................................................................. 16
AUTO POWER OFF: ............................................................................. 17
INPUT STANDBY: ................................................................................ 17
EDID SETUP: ..................................................................................... 18
COPY EDID: ...................................................................................... 19
HPD SETUP: ...................................................................................... 20
HDCP SETUP: .................................................................................... 21
BATTERY STATS: ................................................................................ 22
CHARGING LED .................................................................................. 22
WARRANTY AND GETTING HELP ............................................................. 23
OBTAINING THE WARRANTY SERVICE ...................................................... 24
DISCLAIMER OF WARRANTY .................................................................. 25
GETTING HELP ................................................................................... 26
LEGAL NOTICES ................................................................................. 26
2

Introduction
In today’s world of mixed systems and multiple avors of SD, HD, UHD and now 8K! The 8K
SIX-A Analyzer helps you solve manufacturing and installation issues. Use the 8K SIX-A for testing
basic and complex switching solutions for maximum capability and performance. This includes
complete high bandwidth HDMI cable testing, HDBaseT and HDIP link testing up to 40 Gbps. With
the ability to monitor a pesky system with intermittent issues the 8K SIX-A will capture the data
required to x the system.
Consultants will love the 8K SIX-A as a tool for system commissioning and validation and, when
paired the 8K SIX-G, the 8K SIX-A Analyzer becomes the most powerful (and aordable) HDMI
system troubleshooting system on the planet!
3
Features
· Analyze any HDMI/DVI signals up to 40Gbps (7680x4320P60)
· est HDMI/DVI Cables up to 40Gbps, full TMDS testing
· View up to 40 Gbps Video Content & Format Info - Anywhere
· Analyze & Report HDMI Distribution System over Time (minutes, hours, days) down to the Pixel Read & Analyze HDR
Signals & Metadata
· Report & Analyze InfoFrames
· Analyze & Report HDMI Distribution System over Time (minutes, hours, days) - Down to the pixel
· Advanced EDID Analysis & Tools
· Hot Plug Detect Setting
· HDCP Analyzer - 2.X, 1.X, Disable
· Audio Condence Tests (2-Channel & Multichannel)Audio VU Meter
· Pixel Color Checker
· Portable, Battery Operated
· CEC Test - CEC Pass/Fail test. Connect to an HDMI INPUT/OUTPUT to validate CEC functionality
· Sync & Latency Test. When using SIX-G-8K/SIX-A-8K Pair
· Printable Reports using the free PC software
NOTE: This document contains many technical terms and acronyms. If you are unsure of what these
mean we have a full GLOSSARY of Audio Video terms with denitions available at www.murideo.com

4
What’s in the box
· MU-GEN2-SIX-A-8K Analyzer
· 12V 2A DC/AC Power Supply / Charger (110-240 VAC)
· Rechargeable Battery Pack (Internal)
· Hard Case
· x1 USB-C to USB-A cable
· x1 3.5mm to DB9 (F) serial cable adapter

5

FRONT PANEL OVERVIEW
6
Connection Overview:

7
Video Analyzer: Main Menu
Pressing the OK button will bring up the Main Menu.
Use the up/down arrow keys to select a sub menu, press the OK button to enter.
01 - Signal Info
02 - EDID Setup
03 - EDID Copy
04 - HDCP Setup
05 - HPD Setup
06 - Signal Monitor
07 - Pixel Color Checker
08 - VU Meter
09 - Audio Frequency Checker
10 - Audio Volume
11 - Cable Test
12 - CEC Test
13 - System Setup
Video Analyzer: Shortcut HPD Setup
You can use the HPD Setup Shortcut button to enter the Hot Plug Detect Setup Menu.
Use the UP/DOWN arrow keys to highlight your desired selection, then the OK button to set.

8
Signal Info:
This menu provides the following information on the source/system under test.
·Timing – Horizontal & Vertical Pixel Count, Progressive or Interlaced Video info, and Refresh Rate
Example - 3840x2160P@60Hz
·Color Space – Provides Color Space and Chroma Subsampling information.
Example - YUV422 means that the color-space is YUV. 422 means that the chroma subsampling is 4:2:2.
·HDCP – Displays HDCP type.
Example - 1.x, or 2.x, or No HDCP.
·Color Depth – The SIX-A-8K will display the bit depth of the signal from 8 to 16 bits. Bit Depth, aka Color Depth, de-
scribes the amount of information stored in each pixel. As you increase bit depth, you also increase the number of colors
that can be represented. In the case of an 8-bit RGB image, each pixel has 8-bits of data per color (RGB). 8 bits of data
x3 channels (RGB) gives us a total of 24 bits. This means each pixel has a total of 256 possibilities. In the case of a 10-
bit RGB image, each pixel has 10 bits of data per color (RGB). 10 bits of data x3 channels (RGB) gives us a total of 30
bits. This means each pixel has a total of 1024 possibilities. Sometimes manufacturer documentation refers to 8-bit as
24 bit and 10-bit as 30 bit, etc. – they are both correct and mean the same thing.
·TMDS Bandwidth – Displays the total bandwidth of the source/system under test.
Example - A 720P signal requires about 2.2 GBPS of bandwidth, 1080P about 4.5 GBPS, and a 4K signal would require
between about 9 to 18 GBPS depending on refresh rate, chroma subsampling, and color depth/bit depth.
·HDR Metadata – This indicates whether HDR is present in the signal or not. If HDR metadata is present in the signal
HDR METADATA will say HDR10/Standard DV/Low-Latency (Dolby Vision Low-Latency). If HDR metadata is not present
in the signal HDR METADATA will say None.
·Audio Sampling Frequency – Displays the audio sampling frequency of the incoming signal(ex. 48K, 88K, 176K, etc.).
Sample rate is the number of samples of audio carried per second, measured in Hz or kHz (one kHz being 1000 Hz). For
example, 44,100 samples per second can be expressed as either 44,100 Hz, or 44.1 kHz.
·Audio Sampling Size – Displays the audio sample size (ex 16-bit, 24-bit, etc.). Higher bit depth means higher-resolu-
tion audio and a better representation of the original analog sound wave.
·Audio Channel Allocations – Displays which audio channels that are active in the HDMI stream.
Example - C, FR, FL (Center, Front Right, Front Left).
·Audio Coding Type – Displays the type of the incoming audio stream.
Example - LPCM (Linear Pulse Code Modulation).
Example - If the audio sampling size says “Refer to Stream Header” you must refer back to the source and conrm ex-
actly which type of audio signal is being output.
·ACR N/CTS - (Audio Clock Regeneration) The source
device sends N (Dividing ratio of video clock to TMDS
clock) and CTS (Cycle Time Stamp) values to the sink
device for regenerating the audio clock. See expected
values to the right for a 48K, 96K and 192K sampling
frequencies. Credit AES.

9
Pixel Color Checker:
Used to check the accuracy of an input video signal from any other device.
Example 1- You are wondering about the color accuracy of a Blu-ray player. Follow these steps to test:
1. Using an HDMI cable connect the Blu-ray player’s HDMI output to the SIX-A-8K.
2. Insert a reference test disc into the Blu-ray player.
3. Choose a test pattern that has a known RGB triplet value.
4. On the SIX-A-8K navigate to the PIXEL COLOR CHECKER menu.
5. Press the OK button.
6. Use the UP/DOWN/LEFT/RIGHT arrow buttons to choose a pixel. Use UP and DOWN to choose a specic row, then use
the LEFT and RIGHT buttons to choose a column.
7. Once you have a pixel chosen press the OK button on the SIX-A-8K to select.
8. You will now see (in yellow font at the bottom of the screen) the row and column of the pixel that you selected. Next to
that you will see the RGB triplet value of that pixel.
NOTE: Although you can use this tool using the front panel controls we HIGHLY recommend you use the
free PC Control Software available for download from www.murideo.com
Example 2 - The Pixel Color Test could also be used to test the color accuracy of a repeater device.

10
Signal Monitor:
This is an abbreviated test for signal loss and frame to frame dierence in an HDMI signal. This can be
used to diagnose intermittent issues in a system caused by a defective sink, source, or repeater. This can
also be used to identify the cause of any interruption of the signal.
Example - The picture on the display randomly ashes around the same time every day.
1. Using an HDMI cable connect the SIX-A-8K to the display and copy the EDID (see page 19 for instructions on how to copy
the EDID).
2. Install the SIX-A-8K in place of the display.
3. On the SIX-A-8K navigate to the SIGNAL MONITOR menu
4. The rst line on the SIGNAL MONITOR Menu is SETUP. There are 3 options -
New Start, Time Slot, and Read Status. Use the UP/DOWN arrow buttons to choose Time Slot and press the OK button
NOTE: This test requires a still or stationary image generated from the source. The test will fail 100% of
the time if the source is a moving image. The test is checking each pixel at the source and comparing it
to the same pixel at the end of the signal chain (the SIX-A-8K).
NOTE: The PC Software has the option to select “Loss of signal only” for
testing. This option will only look for a drop or loss in the signal. It is not
comparing pixel to pixel so will work with a moving image.

11
Signal Monitor Continued:
NOTE: One option on the “Setup” line says “Read Status”. This is meant to be used in conjunction with
the SIX-A-8K PC Software to read the total number of failures as the test is running.
5. Use the UP/DOWN arrow buttons to choose either 1 Second or 1 Minute the selection you make here determines how often
the test triggers. Once your selection is made press the OK button.
Example - Setting this to 1 second means the SIX-A-8K will look for frame image dierence and loss of signal every 1 sec-
ond. Setting it to 1 minute means the SIX-A-8K will look for frame image dierence and loss of signal every 1 minute.
6. Use the UP/DOWN arrow buttons to change the Setup to “New Start” and press the OK button to start the test. The Work-
ing Status will now say “Working”. You will now see two new lines labeled “Total Number” and “Trigger Number”.
7. “Total Number” is the number of times the SIX-A-8K has checked for “Frame image dierence and loss of signal” compared
to the original image.
Example - If set to 1 second you will see the “Total Number” increase every 1 second.
8. “Trigger Number” is the total number of failures the SIX-A-8K has detected.
Example - The Total Number reads 0100 and the Trigger Number reads 0002. This means there were 2 failures over 100
total tests. This could mean at least 1 (or any amount) of pixels were dierent (comparing the source to the SIX-A-8K).
This could also mean there was a complete loss of signal at some point during the test.

12
VU Meter:
In this menu you can verify that there is an audio signal in the HDMI stream. The SIX-A-8K will display
the number of active audio channels and each channel’s respective amplitude in decibels (dB). You will
see color bars for each channel indicating theres is an audio signal present for those channels. If the VU
Meter menu has no colored bars that means there is no audio present in the HDMI stream (see images
below).
Example - The system you are working on is in a commercial facility that also has an HVAC system. Af-
ter running the Signal Monitor test you discover that the signal is dropping every time the air conditioner
turns on. By using the results of the Signal Monitor test you can now compare when the dropouts occur
to the time(s) the air conditioner turns on. If the timing of the dropout is consistent with the timing of
the air conditioner, the culprit of the picture dropout is most likely caused by the HVAC system. Now you
can come up with a solution to remedy the problem.
NOTE: Although you can run this test from the front panel controls of the SIX-A-8K, we HIGHLY recom-
mend using the PC Software. If using the PC Software you have more freedom and can see more de-
tailed information on what is happening during the test. For example you can run the test for nearly 1
year if necessary (you are not limited to 1 second or 1 minute).

13
Audio Frequency Checker:
Use this menu to verify the frequency of the incoming audio signal per channel (up to 8 channels). This is
commonly used as an audio condence test.
Example - You are generating an audio test tone of 1KHz in a 2 channel (FL/FR) conguration from the
source. You would like to verify that the audio signal is unaltered throughout the signal chain.
1. Replace the device at the end of the signal chain with the SIX-A-8K.
2. Generate the 1KHz 2 channel test tone from the source.
3. On the SIX-A-8K navigate to the AUDIO FREQUENCY CHECKER menu.
4. You will now see channels 1-8 on the SIX-A-8K.
5. Use the UP/DOWN arrow buttons to select a channel (1-8).
6. Press the OK button on the channel you would like to verify.
7. You will now see the frequency of the audio signal (in red font) on the same line as the selected channel.
8. As long as the measured frequency is the same as the generated frequency the test is successful.
NOTE: The measure frequency may not be exactly the same as the generated frequency. For example the generated signal
is 1KHz while the measurement on the SIX-A-8K is 996Hz. There is a slight tolerance so this would still be considered a
successful test.

14
Cable Test:
The cable test is used to verify the capabilities and functionality of a passive, copper based HDMI cable.
You can test cables anywhere from 480P@60Hz (1Gbps) all the way up to FRL10G (40Gbps). After a suc-
cessful cable test you can condently install the cable into the system you are working on.
NOTE: This test is designed to work while using the SIX-G-8K as the source.
To run the test:
1. Connect the HDMI cable in question between the SIX-G-8K and the
SIX-A-8K
2. Navigate to the CABLE TEST menu on the SIX-A-8K.
3. Using the UP/DOWN arrow buttons, choose the format that you
would like to test the cable for. Example FRL 4L10G (40G)
4. Press the OK button.
5. Wait for test results (approximately 15 seconds).
FRL Pass FRL Fail
TMDS Pass TMDS Fail

15
CEC Test:
The CEC (Consumer Electronics Control) test is a simple pass/fail test to conrm CEC is functioning on the
device that is connected to the SIX-A-8K. This can be either a source, repeater, or sink (display). To run
the CEC test connect an HDMI Cable from the SIX-A-8K to the device you are testing. Navigate to the
CEC TEST menu and press the OK button. The test results will be either:
1. PASS
2. FAIL
NOTE: This test will fail 100% of the time if CEC is not ENABLED on the device you are testing. For
specic instructions on how to enable CEC on the device you are testing, see the owner’s manual of that
device.
1. PASS 2. FAIL

16
Audio Volume:
You can connect the SIX-A-8K to headphones or an external audio system using the 3.5mm L/R OUT on
the Connections panel. The audio volume can be INCREASED/DECREASED using the UP/DOWN arrow
buttons. If the audio volume is set to 0 (zero) this will mute the audio output of the SIX-A-8K.
NOTE: This only aects the audio output of the SIX-A-8K.

17
Auto Power O:
You can set your SIX-A-8K to power o automatically when not in use. This will help save battery life.
This menu contains the following options:
· DISABLE - The SIX-A-8K will remain powered on until
you power if o manually.
· ENABLE - The SIX-A-8K will automatically power down
after 10 minutes of inactivity.
NOTE: This setting is enabled by default.
Input Standby:
You can set your SIX-A-8K to go into sleep mode. If no HPD (Hot Plug Detect) is detected after 10 min-
utes, the SIX-A-8K will go to sleep. If the SIX-A-8K is sleeping press any button to wake it up.
This menu contains the following options:
· STANDBY OFF - The SIX-A-8K will never go to sleep
· STANDBY ON - The SIX-A-8K will go to sleep after 10
minutes of inactivity

18
EDID Setup:
Use this menu to emulate an EDID from any device that has an EDID. There are 6 commonly used EDIDs
included in the SIX-A-8K, or you can emulate a display by copying its EDID. See page 19 for more details.
To choose an EDID navigate to the EDID SETUP menu on the SIX-A-8K. Using the UP/DOWN buttons
choose the EDID that you would like to use, then press the OK button to select.
The SIX-A-8K is now emulating a sink device with the EDID you selected.

19
Copy EDID:
Use this menu to copy an EDID from any device that has an EDID. You can copy and save up to 10 USER
EDIDs into the SIX-A-8K. This is helpful if you need to verify a distribution system prior to actual deliv-
ery of the displays. Once you have saved an EDID it will be listed in the EDID SETUP menu after the six
included EDIDs. To copy and EDID:
1. Using an HDMI cable connect the SIX-A-8K to the device you would like to copy the EDID from.
2. Navigate to the COPY EDID menu.
3. Using the UP/DOWN buttons choose a memory slot to store the EDID (1-10).
4. Press the OK button
If the SIX-A-8K successfully saves the EDID you will see ”SUCCESS” next to the slot/memory.
If the SIX-A-8K was not able to save the EDID you will see “FAILURE” next to the slot/memory. If this
happens be sure the HDMI cable is fully inserted into the HDMI ports on both devices.
NOTE: You may need to power on the Display in order to successfully copy the EDID.

20
HPD Setup:
Use this menu to force a hot plug event while connected to an HDMI source. The HPD (Hot-Plug-Detect)
is a communication mechanism between a source and a sink device that makes the source device aware
that it has been connected/disconnected to/from the sink device. This menu contains the following op-
tions:
◦HPD AUTO
◦HPD LOW
To initiate a Hot Plug Event use the UP/DOWN arrow buttons and choose HPD LOW, then press the OK
button. Then use the UP/DOWN arrow button to choose HDP AUTO, then press the OK button. When
HPD AUTO is selected the hot plug sequence will work as intended.
Table of contents
Other Murideo Measuring Instrument manuals
Popular Measuring Instrument manuals by other brands

CAI
CAI 600 Series user manual

SENSIT Technologies
SENSIT Technologies HXG-3P Quick start instructions

National Instruments
National Instruments PXIe-5668R Getting started guide

Extech Instruments
Extech Instruments 451112 manual

dacell
dacell DN-330 user manual

BRUEL & KJAER
BRUEL & KJAER 2209 Instructions and applications

Agilent Technologies
Agilent Technologies EMC Series Programmer's guide

Teledyne
Teledyne PEM-9004 operating instructions

VERO
VERO LT R3 CE user manual

ATP Electronics
ATP Electronics AVM-81AM instruction manual

Agilent Technologies
Agilent Technologies 8753ET Manual supplement

Keysight Technologies
Keysight Technologies N9000B Configuration guide