Musikraft Nitro Series User manual

Audio MusiKraft, Quebec, Canada / audiomusikraft.com / info@audiomusikraft.com rev. 10/2019
Audio MusiKraft Nitro LOMC (low output moving coil) phono cartridges
Owner’s Manual
* Read this manual before handing the cartridge *
This manual is for general information and applies to all Audio MusiKraft Nitro Cartridges.
- The World’s First and Only “Tunable” and "Customizable" Phono Cartridge –

Audio MusiKraft, Quebec, Canada / audiomusikraft.com / info@audiomusikraft.com rev. 10/2019
Audio MusiKraft would like to thank you for purchasing this fine piece of audio equipment! We took a
lot of pride in manufacturing it from start to finish. Get ready for the dramatic change and to
- Take Control of your Sound -
INDEX
General Warnings
Limitation of Warranty
Introduction
Features and Innovations
Included in the Kit
How to Use
1. Mounting on tonearm
2. Adjusting stylus pressure
3. Output voltage
4. Motor removal and installation
5. Tone wood inserts
6. Tuning screws
7. Proposed voicing procedure
Specifications
Options
Wood Species Selection Chart
Downloads
Our Word

Audio MusiKraft, Quebec, Canada / audiomusikraft.com / info@audiomusikraft.com rev. 10/2019
General Warnings:
Always leave the cartridge guard on when the cartridge is not in use. We suggest you use it
as the MusiKraft cartridges are more manipulated than any other cartridge in relation to their
tuning capability.
The cartridge is equipped with a magnet, so always keep steel tools or parts far from it.
The Audio MusiKraft Nitro cartridge generator is factory adjusted in a very accurate way so be
careful not to drop it or touch its parts.
The cartridge is delicately constructed to maintain maximum performance. When the
cartridge is handled, make certain that no under force is applied to the stylus. Do not drop it or
move the stylus with a finger tip.
If there is dust on the stylus when a record is played, the stylus tip cannot accurately trace the
sound groove of the record, resulting in not only poor reproduction but also premature wear of
the stylus and records. Remove dust with the supplied soft brush, carefully working from the
root of the cantilever toward the stylus tip ie. from back to front like the normal record rotation
direction. Do not use liquid cleaners on the stylus.
Dust on the record surface should be wiped away with a high quality cleaner. If cleaner
containing moisture is used, allow the record surface to dry before playing.
Even though our metallic shells are very rugged, on the three micro-tuning setscrews, use
common sense when applying torque. So do not over tighten as a broken thread caused by
over tightening isn't covered by warranty.
Do not try to remove the wood inserts without in the first place removing the cartridge motor
from the shell as you may damage the sensitive wires or cantilever (refer to our video
tutorials page on how to add/remove these).
Be careful not to dent the wood surface with finger nails when mounting or removing the
inserts.
In the event you need to clean the Audio MusiKraft shell, only clean with very soft damped
cloth when the cartridge motor and the tone wood inserts are removed from its shell.
Treat this piece of equipment as if it was jewelry and it will last you a lifetime.
Limitation of Warranty:
Warranty: From the date of purchase Audio MusiKraft warrants their manufactured goods for one (1)
year against defect in materials and craftsmanship only. The warranty does not cover any damage by
the owner. Please handle your Nitro cartridge carefully.
Claims on defective products do not apply to products which have been subject to misuse (including
static discharge), neglect, accident, modification, or products which have been soldered or altered
during assembly or are not capable of being tested. For eligibility, the cartridge must return to the
manufacturer for inspection and approval.
Refer to our Terms & Conditions page for more details.

Audio MusiKraft, Quebec, Canada / audiomusikraft.com / info@audiomusikraft.com rev. 10/2019
Introduction:
The Audio MusiKraft Nitro high performance stereo phono cartridge is a - low output moving coil -
type. It is a fully modular and recyclable concept in a unique precisely-machined two (2) part housing
design –top plate and base- which at first sight allows for quick generator servicing or
interchangeability. The shell (body) assembly is built to accept three (3) small pieces of either wood
species or other upgradable material inserted within our numerous metalized structured shells of
varying weight and finishes. In addition, three (3) micro-setscrews –two (2) lateral and one (1) frontal –
to control mechanical resonance allowing delicate fine-tuning of the cartridges
interpretation
of certain
sonic parameters; in effect permitting personal voicing of the final system sound or
satisfaction
control. Thirdly, the top plate of the housing complies with EIA standards with ten (10) threaded holes
instead of the usual two (2), thus providing ample setup possibilities without the need of displacing the
tonearm for proper overhang. The sharp-edge squarish profile and face are also a deliberate decision
to ease the setup with strong visual cues, for proper visual VTA and azimuth alignment. The concept
is particularly well suited for unlimited aftermarket upgrades.
Features and Innovations:
Fully modular design for interchange between motor, shell, and wood at your will
Tonality and resonance controllable system
Three (3) voicing fine-tuning micro setscrews
Sharp perimeter edges for trouble-free cartridge installation and alignment
Five (5) different geometric positions for overhang adjustment
Straightforward to service: i.e. quick phono cartridge and wood insert installation (as for parts
renewal or simply for swapping)
Wide front clearance for stylus ease of view
Highly durable and recyclable cartridge and shell
All cartridge parts are very precisely machined (± 0.001″)
Upgradable part options (motor, many wood species, finish and more)
Almost infinite sonic tuning capability.
Included in the Kit:
One (1) Audio MusiKraft phono cartridge
One (1) 3D printed black plastic guard
One (1) Torrefied pine wood insert set (Beeswax patina on external face)
One (1) Maple wood insert set (3 coat lacquer on external face)
One (1) Ipe wood insert set (eco-oil treated)
One (1) Eco-friendly oil vial (1ml)
One (1) M0.7mm Allen hex key
One (1) M2.0mm Allen hex key
One (1) miniature Philips screwdriver
One (1) wooden pushrod tool for (wood insert removal)
One (1) stylus brush

Audio MusiKraft, Quebec, Canada / audiomusikraft.com / info@audiomusikraft.com rev. 10/2019
Six (6) pairs M2.5 x 3, 4, 5, 6, 8, 10mm, SS 304, Allen hex cap screws;
Two (2) pairs M2.5 x 6mm x 0.5mm thick, Stainless Steel 304, Flat washers
One (1) Baltic ply jewel box
Note: Each cartridge are electrically tested before leaving the factory
How to Use:
1. Mounting on tonearm
a) The MusiKraft can be mounted on any commercially available universal tonearm or headshell
built to ½” EIA standards. In order to obtain the best performance from the cartridge, it is
important to select a well constructed medium to high mass (10g or more) tonearm, and a
solid headshell which both offers good performance. Additionally, this tonearm will require the
ability to counterbalance at least 11g cartridges (refer to MusiKraft specifications for the exact
cartridge weight).
b) The overhang dimension of a tonearm differs from brand to brand. Adjust the position of the
stylus to the specified overhang dimension of your tonearm. For simplicity, the MusiKraft shell
cover offers five (5) different overhang positions. When the cartridge is mounted on the arm,
be careful to prevent misalignment.
c) The Audio MusiKraft shell cover measures 2.4mm thick and for a safe penetration, we
recommend using the mounting screws which will penetrate between 1mm to 2.2mm (no
less/no more) into the MusiKraft shell cover. Ignoring to follow proper length may cause
damage to the hole threads and/or the shell base. Choose accordingly from the screw kit. If
you need to compensate between lengths, the shims (flat washers) are 0.5mm thick. Fig. 1.
Figure 1 Screw depth requirements
d) To protect the stylus tip, ensure that the cartridge is mounted on the arm with the stylus guard
attached. Once mounted, you can remove the guard for ease of alignment.
e) Vertical Tracking Angle (VTA). Adjust the height of the tonearm so that the cartridge is parallel
to the record surface to be played. Fig. 2
Fig. 2 Vertical Tracking Angle (VTA)

Audio MusiKraft, Quebec, Canada / audiomusikraft.com / info@audiomusikraft.com rev. 10/2019
f) Adjust the horizontal inclination (azimuth) of the cartridge so that the shell’s cartridge sharp
side edges and their reflection on a record surface (or by using a mirror) form straight and
coincident lines or are perpendicular to the record surface. Fig.3
Fig. 3 Azimuth alignment (front view)
g) The output terminals are arranged as shown in Fig. 4. Insert the output terminals of the
cartridge in the lead tips of the head shell. The leads are colored or coded for identification.
Make the correct connections.
Caution: If the output terminals of the cartridge are heated with a soldering iron, internal open
circuit can result. Be sure to use lead tips.
Fig. 4 Arrangement of output terminals (rear view)
2. Adjusting stylus pressure
Also known as the Vertical Tracking Force (VTF). The optimum stylus pressure is 2.5 g. ± 0.3 g. In the
case of an unwarped record in good condition, the stylus pressure may be reduced to 2.2 gr. For a
record made at a high recording level or when played under a low ambient temperature, the stylus
pressure should be increased to 2.8 g. maximum. Generally, the individual characteristics of the
cartridge have been determined at an ambient temperature of 20°C or thereabouts. Of course, the
cartridge may be used over a wide temperature range, but you will obtain the best reproduction if you
use it at the standard temperature or its vicinity.
Caution: Note that if an iron turntable platter is used, an excessive stylus pressure might be applied
due to magnetic attraction.
3. Output voltage
The output voltages are 0.35 mV (Nitro1) and 0.30mV (Nitro2). Since these are low relative to an MM
type cartridge, your system must have a MC phono input or you will either need a MC head amp or a
step-up transformer (SUT).

Audio MusiKraft, Quebec, Canada / audiomusikraft.com / info@audiomusikraft.com rev. 10/2019
4. Motor removal and installation (click for a short animated video of the assembly)
Our cartridge design was well thought out for servicing and part swapping. We suggest you to view
our videos. Removing the motor from the shell is quite straightforward, installation also. Refer to Fig. 5
for an exploded view.
Fig. 5 Exploded view of cartridge
Caution: Be careful not to lay your fingers on the side of motor when retrieving it out of the shell or
during manipulations as the very fine wires are exposed.
Removing the motor: (video supported help)
a) Lay a white paper sheet on your flat working area (this serves as a clean and bright work
surface)
b) To free up the motor, first remove the tension on the lateral tuning-screws which could later
block the motor from being pulled out.
c) Unscrew and remove the four (4) flat headed Philips cover screws
d) By hand, remove the cover by pulling it upwards. The cover tongue and groove securely holds
it in place.
e) Flip the cartridge upside down on a flat surface (keep a finger on the motor’s back while doing
this so it doesn’t fall out of the shell)
f) Slide out the motor from the shell
Installing the motor: (video supported help)
a) Motor installation is the reversed procedure
5. Tone wood inserts
The modular Audio MusiKraft design renders the inserts interchangeable within all the Nitro cartridge
models. Each insert set contains (3) three pieces; one (1) piece for the cover and two (2) for the sides.
Our cartridge design was well thought out for servicing and part swapping. We strongly suggest you
to view our particular videos about this section as to familiarize yourself with our good practices.
Removing the inserts from the shell is quite straightforward, as is for their installation. They are
mechanically held in place by friction and are tight fitted from factory. The insert’s edges are taper
profiled so to eliminate the risk of chipping and for the ease of installation and removal.

Audio MusiKraft, Quebec, Canada / audiomusikraft.com / info@audiomusikraft.com rev. 10/2019
To cover a wide range sonic spectrum we have chosen and included in your kit three (3) tone wood
species with a desired finish which we found over the years perform very well and are versatile in
many situations. In the event that you would like to go deeper into your tonal explorations we offer
many more insert options as aftermarket parts which you can find in our web store. Or on special
order if you require more exotic woods or finish. If in need, we can guide you to make wise choices.
Wood species and their finish:
First of all, on all three (3) sets we have protected the external wood surfaces to help preserve the
wood
The Beeswax patina on the torrefied pine is used as surface preservation and to give color
richness to the appearance. Our beeswax treatment is insignificant to changing the sound.
We have chosen this wood so it slightly absorbs resonance feedback to the sensitive
cartridge generator. This is the most transparent sounding set in your kit. Pine is among
the smoothest woods which exist. To give you an idea, its density corresponds to
400kg/m3 on a scale which span approximately between 300 to 1150kg/m3 of all existing
woods.
Maple is considered a hard wood and widely used in musical instruments. Our numerous
listening tests showed us that its mechanical properties mixed with our lacquer coating are
more than favorable when the time comes to add a tad bit more edge, dryness and
impact to sound. Its density is 705kg/m3. Note: For sonic exploration, one can try the oil
treatment on any internal surface of the three (3) included sets but note that this test is
irreversible. The provided 1ml oil vial is to refresh the Ipe set factory treatment
(recommended once per year).
The thorough natural oil treatment on the Ipe tone woods serves as a wood resonance
dampener and adds a bit of tone in the sound. It also slightly darkens the background and
softens the Ipe top end. Ipe wood is very hard and is a proven species that works very well
when matched to our cartridges. Its corresponding density equals 1,100kg/m3
Caution: 1. - The motor must always be removed from the shell when doing such change. 2. - Be
careful not to lay your fingers on the side of motor when retrieving it out of the shell or during
manipulations as very fine wires are exposed. 3. - Be careful not to dent the external wood surface
with your finger nail.
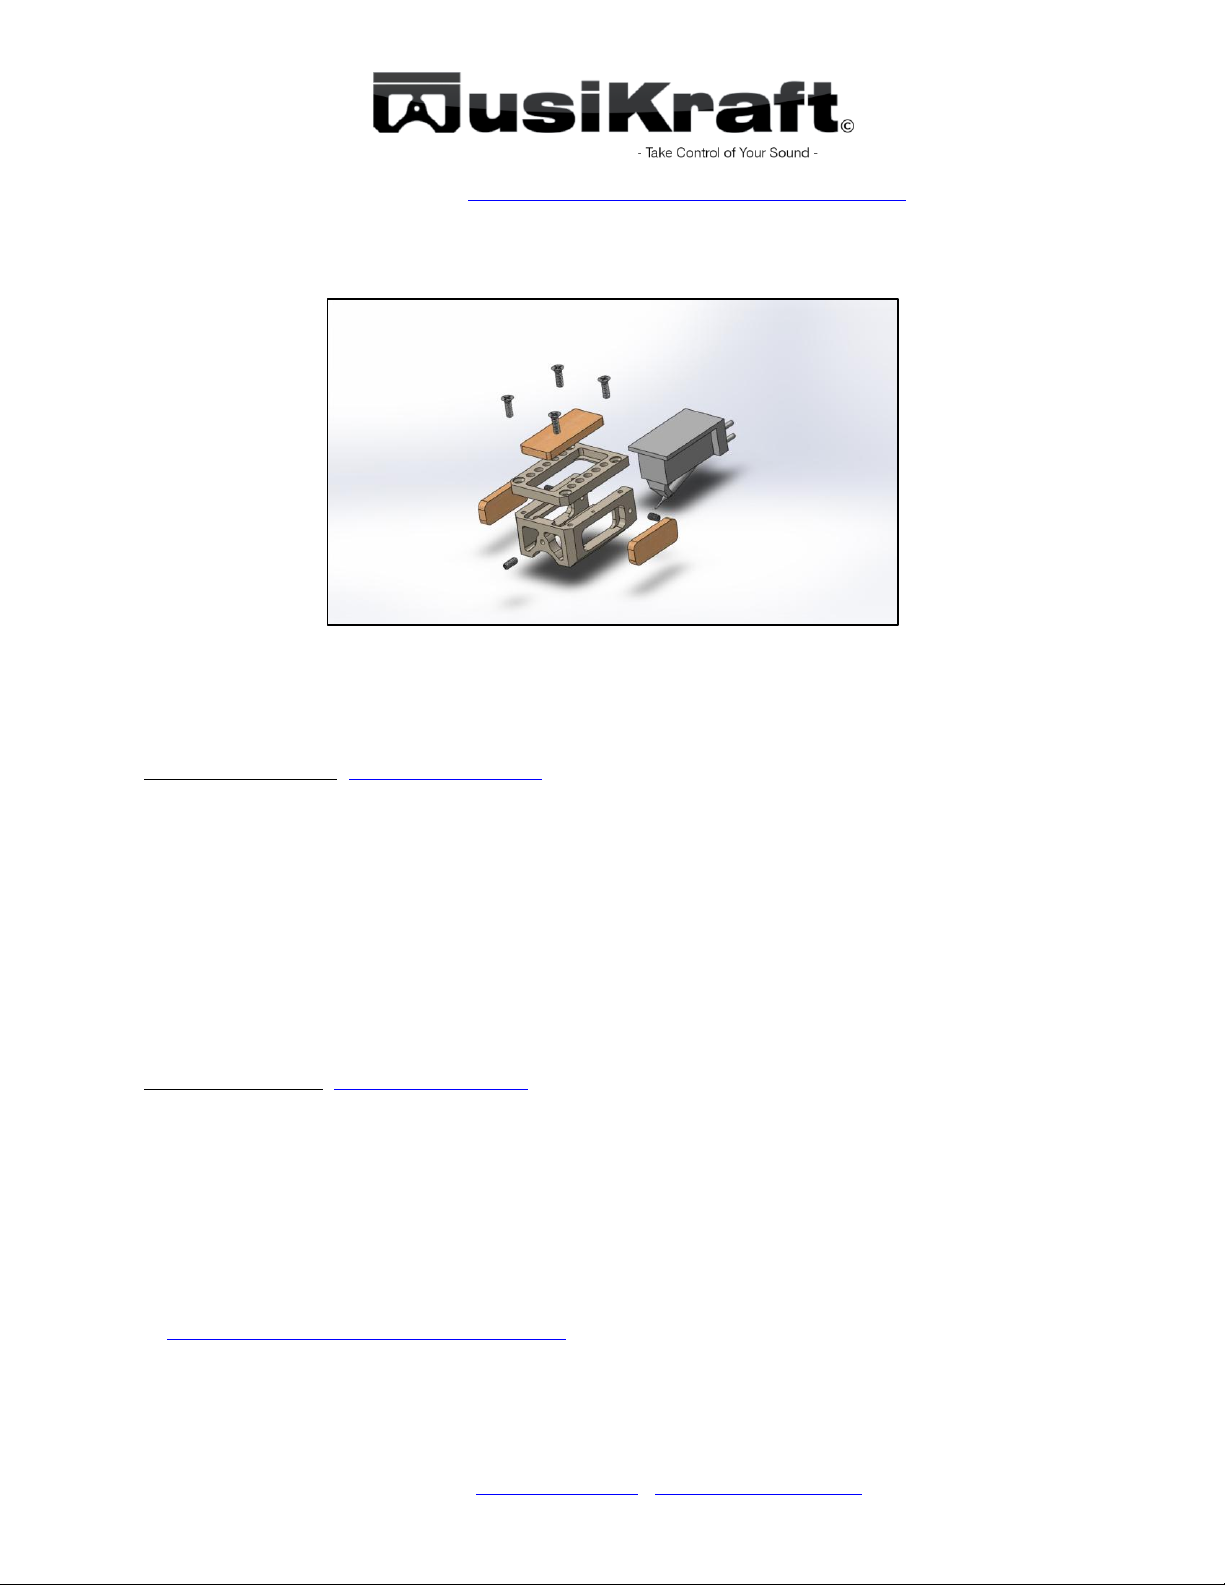
Removing the wood inserts: (video supported help)
a) To free up the motor, first remove the tension on the lateral tuning-screws which could later
block the motor from being pulled out.
b) Unscrew and remove the four (4) flat headed Philips cover screws
c) By hand, remove the cover by pulling it upwards. The cover tongue and groove securely holds
it in place.
d) Flip the cartridge upside down on a flat surface (keep a finger on the motor’s back while doing
this so it doesn’t fall out of the shell)
e) Slip out the motor
f) With the help of the wooden pushrod, apply pressure on the edge of the internal surface of the
top insert so it comes out.
g) Proceed with the sides.

Audio MusiKraft, Quebec, Canada / audiomusikraft.com / info@audiomusikraft.com rev. 10/2019
Installing the wood inserts:
a) Work with an empty shell (without the motor in place)
b) Lay the wood insert flat and parallel to the shell pocket
c) Apply even pressure with your thumb until the insert is all the way in and flush to the outer
surface (caution with your finger nails). Confirm that it is well seated on both its internal beds.
d) Proceed as well with the following two inserts.
e) To free up the motor, first remove the tension on the lateral tuning-screws which could later
block the motor from being pulled out.
6. Tuning Screws (video supported help)
There are three (3) strategically positioned micro-setscrews; two (2) laterals and one (1) frontal control
mechanical resonances by linking the shell at key areas on the motor. These allow delicate fine-tuning
of the cartridges interpretation
of certain sonic parameters. The sonic footprint is different between the
laterals and the front screw as for the applied torque. One can activate the screws independently or
vary the torque upon each. Caution: 1. - the purpose of these screws is not meant for maintaining the
motor in place. 2. - Observe maximum recommended torque below. 3. - Only adjust the setscrews
while your tonearm is in its rest position.
We suggest you to try three settings; no contact on motor, slightly in contact, and the suggested 1/8
turn (front) or ¼ turn (lateral) depending on the setscrew. Use the provided M0.7mm Allen hex key
(the small one) for adjusting.
Fig. 4 Tuning Screws max. settings
7. Proposed voicing procedure
Here is a simple four (4) step procedure on how we suggest you to proceed on finding the best
performance out of your cartridge. You are free to use it, i.e. it is not an absolute way to work.
Be rigorous, this is fine-tuning at its best. You will notice that the fine cartridge generator is very
sensitive to its surrounding Audio MusiKraft shell tuning combinations. During your A/B comparisons,
do not change the volume position, find a comfortable level from start and leave it as is. Changing it
will impact your perception. Try different records before assuming the change will mirror itself in every
type of music and recording. Use the same records for reliable conclusions. A good advice is to take
notes while doing each listening steps as many sonic changes will occur. It may be long, but very
rewarding at the end.

Audio MusiKraft, Quebec, Canada / audiomusikraft.com / info@audiomusikraft.com rev. 10/2019
1) Listen to the cartridge with the shell in a nude state:
a) Without wood inserts, nor tuning screws engaged
2) Listen to the cartridge in a nude state (without wood inserts, with screws engaged):
a) Engage rear screws with very slight contact with cartridge
b) Engage rear screws with slight pressure on the cartridge (1/4 turn max., once in slight contact)
c) Disengage rear screws
d) Engage front screw with very slight contact on pole piece
e) Engage front screw with slight pressure on the pole piece (1/8 turn max., once in slight
contact)
3) Listen to the cartridge with wood inserts (without any screws engaged):
a) Switch between the different wood species. (Caution: at each wood change (swap), the
cartridge must be removed from the shell).
If you opted for the oil treatment, here are two recommendations on how we proceed. In an
increasing order, step b) then c) can be considered as two tuning settings:
b) Slight oil test: In the bundle of wood insert sets you have tested; choose one that you found the
most desirable. (A double of the wood set is advised as you won’t be able to roll-back once
the treatment has been done). Spread one pass of oil on the inside portion of the three (3)
inserts covering the whole surface. Wait 1 hour. With a clean cotton rag, remove excess oil.
Let sit for 24 hours in ventilated area so the small portion of natural solvent evaporates.
Remove the remaining oil right before installation. Install the wood inserts on the shell and then
the cartridge motor. Listen. If you tend to like the oil effect, proceed with step
c) Saturated oil test: Still using this particular wood set, spread oil on all sides; immerse oil by
repeating three times the process during 2 hours. Again, with a cotton rag remove excess oil.
Let sit for 24 hours in ventilated area so the natural solvent evaporates. Remove the remaining
oil right before installation. Install the wood inserts on the shell and then the nude Denon cart.
Listen. Repeat if necessary to explore with other wood types.
Note: If you choose the oil treated version, we recommend refreshing the treatment each (1)
year by adding a small drop on each wood insert (inside face). Once again, do this process
with the cartridge motor removed from the shell.
4) Listen now to the cartridge with your preferred wood inserts (natural or with treatment / finish):
a) Choose preferred wood set and dial-in your preferred screw setting
b) Fine-tune screws to your sonic preference

Audio MusiKraft, Quebec, Canada / audiomusikraft.com / info@audiomusikraft.com rev. 10/2019
Specifications:
Series:
Aluminum (Al)
Lithium (Li)
Motor model:
Nitro1
Nitro2
Nitro1
Nitro2
Shell specifications:
Alloy material:
aluminum
lithium
Protective layer:
anodized
paste seal
Finish:
brushed, anodic oxide
mirror / hand polished
Color:
clear or champagne
natural
Shell weight (nude):
4.1g
3.9g
Headshell mount:
per EIA Standards, 1/2"
Shell cover threads:
10 - M2.5 x 0.45 (5 overhang positions)
Cover depth clearance:
2.2mm (max. screw length)
Tone wood Inserts (3 species incl.):
Beeswaxed torrefied pine, lacquered maple and oiled
ipé
Beeswaxed torrefied pine, lacquered maple and oiled
ipé
Cartridge specifications:
Generating system:
LOMC (low output moving coil)
Channels:
2, stereo
2, stereo
Cartridge size (LxWxH):
28.5 x 18.0 x 17.7mm
Cartridge weight (with wood inserts):
11.7g - 12.2g
11.5g - 12.0g
Coil conductor:
copper
6N pure copper
copper
6N pure copper
Diamond:
Stylus shape:
conical
conical
Tracking tip size:
0.65 mil
0.65 mil
Cantilever:
light alloy
light alloy
Measurements:
Playback frequency response:
20-45,000 Hz
20-45,000 Hz
Channel separation (1 kHz):
> 25 dB
> 25 dB
Channel sensitivity difference (1 kHz):
< 1 dB
< 1 dB
Output voltage (1 kHz, 50mm/sec).:
0.35 mV
0.30 mV
0.35 mV
0.30 mV
Stylus pressure (vertical tracking force):
2.5 ±0.3 g
2.5 ±0.3 g
Compliance (on disc):
5 x 10⁻⁶ cm/dyne
5 x 10⁻⁶ cm/dyne
Electrical impedance (1 kHz):
40Ω ± 20 %
14Ω ± 20 %
40Ω ± 20 %
14Ω ± 20 %
Recommended load resistance:
100Ω min. (40 Ω min. SUT)
100Ω min. (14Ω min. SUT)
100Ω min. (40 Ω min. SUT)
100Ω min. (14Ω min. SUT)

Audio MusiKraft, Quebec, Canada / audiomusikraft.com / info@audiomusikraft.com rev. 10/2019
Series:
Magnesium (Mg)
Bronze Gold (BrG)
Motor model:
Nitro1
Nitro2
Nitro1
Nitro2
Shell specifications:
Alloy material:
magnesium
bronze
Protective layer:
passivated coating
14k gold
Finish:
matte / iridescent
mirror / hand polished
Color:
olive green
gold
Shell weight (nude):
2.8g
13.1g
Headshell mount:
per EIA Standards, 1/2"
Shell cover threads:
10 - M2.5 x 0.45 (5 overhang positions)
Cover depth clearance:
2.2mm (max. screw length)
Tone wood Inserts (3 species incl.):
Beeswaxed torrefied pine, lacquered maple and oiled
ipé
Beeswaxed torrefied pine, lacquered maple and oiled
ipé
Cartridge specifications:
Generating system:
LOMC (low output moving coil)
Channels:
2, stereo
2, stereo
Cartridge size (LxWxH):
28.5 x 18.0 x 17.7mm
Cartridge weight (with wood inserts):
10.4g - 10.9g
20.6g - 21.1g
Coil conductor:
copper
6N pure copper
copper
6N pure copper
Diamond:
Stylus shape:
conical
conical
Tracking tip size:
0.65 mil
0.65 mil
Cantilever:
light alloy
light alloy
Measurements:
Playback frequency response:
20-45,000 Hz
20-45,000 Hz
Channel separation (1 kHz):
> 25 dB
> 25 dB
Channel sensitivity difference (1 kHz):
< 1 dB
< 1 dB
Output voltage (1 kHz, 50mm/sec).:
0.35 mV
0.30 mV
0.35 mV
0.30 mV
Stylus pressure (vertical tracking force):
2.5 ±0.3 g
2.5 ±0.3 g
Compliance (on disc):
5 x 10⁻⁶ cm/dyne
5 x 10⁻⁶ cm/dyne
Electrical impedance (1 kHz):
40Ω ± 20 %
14Ω ± 20 %
40Ω ± 20 %
14Ω ± 20 %
Recommended load resistance:
100Ω min. (40 Ω min.
SUT)
100Ω min. (14Ω min.
SUT)
100Ω min. (40 Ω min.
SUT)
100Ω min. (14Ω min.
SUT)

Audio MusiKraft, Quebec, Canada / audiomusikraft.com / info@audiomusikraft.com rev. 10/2019
Series:
Bronze Collector's (BrC)
Motor model:
Nitro1
Nitro2
Shell specifications:
Alloy material:
bronze
Protective layer:
micro-crystaline wax
Finish:
authentic patina
Color:
6 choices
Shell weight (nude):
13.1g
Headshell mount:
per EIA Standards, 1/2"
Shell cover threads:
10 - M2.5 x 0.45 (5 overhang positions)
Cover depth clearance:
2.2mm (max. screw length)
Tone wood Inserts (3 species incl.):
Beeswaxed torrefied pine, lacquered maple and oiled ipé
Cartridge specifications:
Generating system:
LOMC (low output moving coil)
Channels:
2, stereo
Cartridge size (LxWxH):
28.5 x 18.0 x 17.7mm
Cartridge weight (with wood inserts):
20.6g - 21.1g
Coil conductor:
copper
6N pure copper
Diamond:
Stylus shape:
conical
Tracking tip size:
0.65 mil
Cantilever:
light alloy
Measurements:
Playback frequency response:
20-45,000 Hz
Channel separation (1 kHz):
> 25 dB
Channel sensitivity difference (1 kHz):
< 1 dB
Output voltage (1 kHz, 50mm/sec).:
0.35 mV
0.30 mV
Stylus pressure (vertical tracking force):
2.5 ±0.3 g
Compliance (on disc):
5 x 10⁻⁶ cm/dyne
Electrical impedance (1 kHz):
40Ω ± 20 %
14Ω ± 20 %
Recommended load resistance:
100Ω min. (40 Ω min. SUT)
100Ω min. (14Ω min. SUT)

Audio MusiKraft, Quebec, Canada / audiomusikraft.com / info@audiomusikraft.com rev. 10/2019
Options:
Additional wood inserts or other accessories.
Wood Species Selection Chart (name/density/hardness):
*Take in consideration:
Due to the natural variations in wood grain, its aspect may vary and overall colors may vary
depending on your screen settings.
For best fitment, we suggest buying your extra wood sets at cartridge or shell's date
of purchase.
Downloads:
Common Wood Inserts List and Pictures (24 species) (PDF)
Complete Wood Inserts Pricelist and Density Chart (100 species) (PDF)

Audio MusiKraft, Quebec, Canada / audiomusikraft.com / info@audiomusikraft.com rev. 10/2019
Our Word:
In the event you have a question, we invite you to consult our FAQ’s page, or to contact us for more
specific questions.
We hope these instructions will help you get the best out of your cartridge.
We would greatly appreciate receiving your feedback and thanks in advance for sharing your
experience with other enthusiasts.
All the Best,
Audio MusiKraft
This manual suits for next models
5
Table of contents
Popular Accessories manuals by other brands

Extel
Extel WECR 61003 Installation and user guide

Omron
Omron SYSMAC FH Series Hardware setup manual

PCB Piezotronics
PCB Piezotronics 208C05 Installation and operating manual

Kindermann
Kindermann CablePort desk2 80 turn Mounting instructions

Telaire
Telaire T5100-LED Series User instructions

PCB Piezotronics
PCB Piezotronics IMI SENSORS EX640B61 Installation and operating manual

PHYWE
PHYWE Cobra SMARTsense operating instructions

Bühler technologies
Bühler technologies BKF Brief instructions

Limente
Limente MINI-2 quick start guide

LU-VE
LU-VE F30HC Installation and maintenance instructions

UDG
UDG Ultimate Trolley to go Assembly instruction

FINMASI
FINMASI Micro Detectors FC8 installation manual