Muto Denki MS Series User manual

Rev.1
Jan.2020
Muto Turbo Blower
MS Series
Instruction Manual
Muto Denki Corporation
Headquarters: 751,NishiHassaku-cho,Midori-ku,Yokohama,Kanagawa,Japan226-0024
TEL:81-45-932-2211, FAX:81-45-932-2219
OsakaBranch: 4-14, Toyosaki 3,Kita-ku,OsakaCity,Osaka,Japan531-0072
TEL:81-6-6372-1100, FAX:81-6-6372-1797
ChinoPlant: 11400-1107,Aza Harayama,Tamagawa, ChinoCity,Nagano,Japan391-0011
TEL:81-266-79-6071, FAX:81-266-79-6074
web: http://www.mutodenki.co.jp e-mail: sales@mutodeki.co.jp
Read thismanualcarefullybeforeusingtheproduct.
Wrongoperations deviating fromthismanual maylead to serious accidentsordamages.
Keep thismanualconvenientlocationforeasyaccess.
TMB-062E-03

2
Table of contents
1. Introduction·········································································· 3
2. Safety precautions·································································3
3. Receiving Checkups ····························································· 5
4. Transportation and Handling···················································· 5
5. Storage··············································································· 5
6. Installation············································································ 5
7. Piping·················································································· 5
8. Connection to Power andTest run ············································ 6
9. Precautions for Operation ······················································· 6
10.Maintenance ········································································ 6
11.Troubleshooting···································································· 7
12.Instruction for Disassembly and Reassembly······························ 8
13.Structural drawing·································································· 9
14.Motor·················································································· 10
15.Inquiry················································································· 10
16.Limited Warranty··································································· 10

3
1. Introduction
Thankyou forpurchasingtheMutoTurboBlower.
Thismanual contains theinformation you need forhandling,installing,operating and maintaining your
new equipment correctly, to ensure trouble-free operation and long service life. Please read it
thoroughly. Afterreading thismanual,keepitinconvenientplaceforeasyaccess.
Forheatresistantmodel,itsnamecontains “H”.
ex. standardmodel :MSH-10T →heat resistantmodel:MSHH-10T
2. Safety precautions
Before starting any work such as handling, installing, operating and maintaining, carefully read this
manual and all documents attached to the product for proper use. Use the product after thorough
understandingofall productinformation, safetyinformationandprecautions.
Inthismanual,safety precautionsareclassifiedas “Warning”and“Caution”.
Thistagindicates thatwrongoperationorusemayleadtofatallossorserious
injury.
This tag indicates that wrong operation or use may lead to human injury or
lossofproperty.
Eventheitemsunder mayleadtoseriousresultsdependingonthecircumstances.
Those precautions include very important information and it is strongly recommended to follow them
strictly.
(Placetoinstall )
⚫The product with non-explosion proof type motor shall not be installed in explosive or
inflammable atmospheres. Under those atmospheres, install the product with explosion proof
type motor conforming to the degree of danger in that place. Otherwise injuries, explosions or
firesmayoccur.
(Gas)
⚫Unless otherwise agreed separately, the product can handle only normal air. It is cannot be
handled any other gas (explosive, toxic, corrosive, high temperature and so on), liquid or solid
materials. Otherwiseinjuries,explosions or firesmayoccur.
(Wiring)
⚫Refer to the instruction manual of motor. Otherwise fires, electrical shocks or explosions may
occur.
⚫Do not touch the wiring. Shut off the power before checking the wiring. Otherwise electrical
shocksmayoccur.
(Operation )
⚫Do notgetclose to orlook into the openinlet or outlet manifold during the product is running asit
isverydangerous as follows.

4
Inlet : Clothing which you are wearing or a part of your body will be sucked in. As a result,
injuriesmayoccur.
Outlet:Astrongwindorflown thingsmaycauseinjuries.
⚫Do not insert finger(s) or hand(s) into the opening of the safety covers such as external fancover
and cooling fan cover. Do not remove the safety cover during the product is running. Otherwise
injuriesmayoccur.
⚫Shutoffthemainpowerswitch incaseofpowerfailure.Otherwiseinjuriesmayoccur.
(Safetycomponents)
⚫The productisshipped withmetalmesh attachedto the inletandoutletmanifold,orotherwise the
optional parts are included. If these parts are removed by some reason, take equivalent safety
measures. Otherwiseinjuriesmayoccur.
(DisassemblyandReassembly)
⚫Beforedisassemblyandreassembly,makesureto shutoff themainpower andprevent powerto
be turned on. Otherwiseinjuriesorelectrical shocksmay occur.
( Others)
⚫Followthelabelsattachedtotheproduct. Otherwiseseriousresultsmayoccur.
(Transportation )
⚫Check the weight of the product with the specifications, drawing or catalogue before
transportation, and be careful not to drop ortip over the product during transportation. Otherwise
injuriesor breakages may occur.
(Installation )
⚫Removealloftheinflammablefromtheproductanditsvicinity.Otherwisefiresmay occur.
⚫Ventilate the room to keep the ambient temperature below 40 deg. C. Otherwise burns, fires or
bearing-damagemay occur.
(Operation )
⚫If the product has high temperature label, do not touch the product with body or hand during the
product is running. Take safety measures such as enclosing by fence or net. Otherwise burns
may occur.
⚫Stop operating as soon as abnormality is found. Otherwise injuries, electrical shocks or burns
may occur.
⚫Operatetheblowerin correct direction forrotation. Otherwisebreakages may occur.
(DisassemblyandReassembly)
⚫Disassembly and reassembly should be done by experts. Otherwise injuries or breakages may
occur.
⚫Do not use the parts of the product on other equipment. Do not use unauthorized parts for the
product.Otherwise injuriesor breakages mayoccur.

5
3. Receiving Checkups
Check if the products you have received are what have been ordered by referring to the order sheet,
drawings,invoices,etc.
(1) Check the nameplates on the blower and themotor, and confirm if it matches what have been
ordered.
(2) Count the numberofproducts received,confirmifitagreeswithwhathavebeenordered.
(3) Checkwhetherthereisanybreakageduring transportation.
4. Transportation and Handling
When transporting the blower, lift the fan case, the motor and the base. Be careful not to giveshocks
toanypartsoftheblower.
5. Storage
Ifthebloweris storedbeforeinstallation,becareful asfollows:
(1) Store the blower in a room where ventilated, not humid nor dusty. Otherwise the blower may
havesometroubles.
(2) Beforeoperating the blower which has been stored forlongperiod of time,checkifthebearing
and the insulation of the motor have no problem. And carefully check if the blower has no
abnormality.
(3) While the blower is stored, rotate the blower shaft several times by hand every month. If this
procedureis notperformed, thelifeof the bearingmaybecomeshort.
6. Installation
The blower should be placed on the flat and rigid foundation with anchor bolt or vibration isolator. If
therearegapsbetween thebaseandfoundation,fill the gapswith thinsteelsheets (shimming).
Clearsome space around theblower for maintenance.
7. Piping
Turntheblowershaftbyhand toverify freerotationwithoutrubbingornoise.
Use rubbersleeves or flexible joints to connect to piping to avoidunnecessary force to theblower and
to isolate the vibration from the blower. If direct connection to piping is inevitable, do not give the
blower the forcebydimensional tolerances,weightofpiping, thermalexpansionofpiping,etc.

6
8. Connection to Power and Test run
(1) Check the nameplates ofblower and motorand confirm if they agree with the specification for
power supply, then connect to power line under instruction by electrical engineer and per
electric technicalstandardsandwiring regulation.
(2) Jog the blower and check the rotational direction is the same as the mark. If the rotational
direction is opposite, change the wiring connection. The direction can be reversed by
interchanging any two line leads. If the blower runs continuously with reverse rotational
direction,itcannotperformasspecifiedandmaylead to seriousaccident.
(3) Runtheblowerand measure the electriccurrent (averageof eachof3phase)ofthemotor. Ifit
exceeds the rated current, use at below the rated current by adjusting the air volume with
dumper and so on. After running for a while, if there is no abnormal vibration ornoise,test run
can be concluded. If any abnormality were found during test run, corrective action should be
takenreferringto“11. Troubleshooting”.
9. Precautions for Operation
Beforeoperating theblower, understand the following thoroughly.
(1) Continuoususeatsmallairvolumewillleadto fan durabilityproblem.
(2) The blower is designed to handle clean air. It cannot handle for air containing particulates and
dust, corrosive gases nor inflammable gases. A standard model can handle the air in the
rangeof -15 to 60 deg.C.
Pay attentionto following precautionincaseof thatheatresistantmodel operate.
(3) After starting the blower, temperature of the gas should be raised slowly. Otherwise the blower
may be strainedby heatexpansion.
(4) Whenstopping theblower,keeprunningituntilthetemperatureofthe blowerdescends nearly
roomtemperature.If the blower stops suddenly, the motormay be broken because the heatis
transmitted toit.
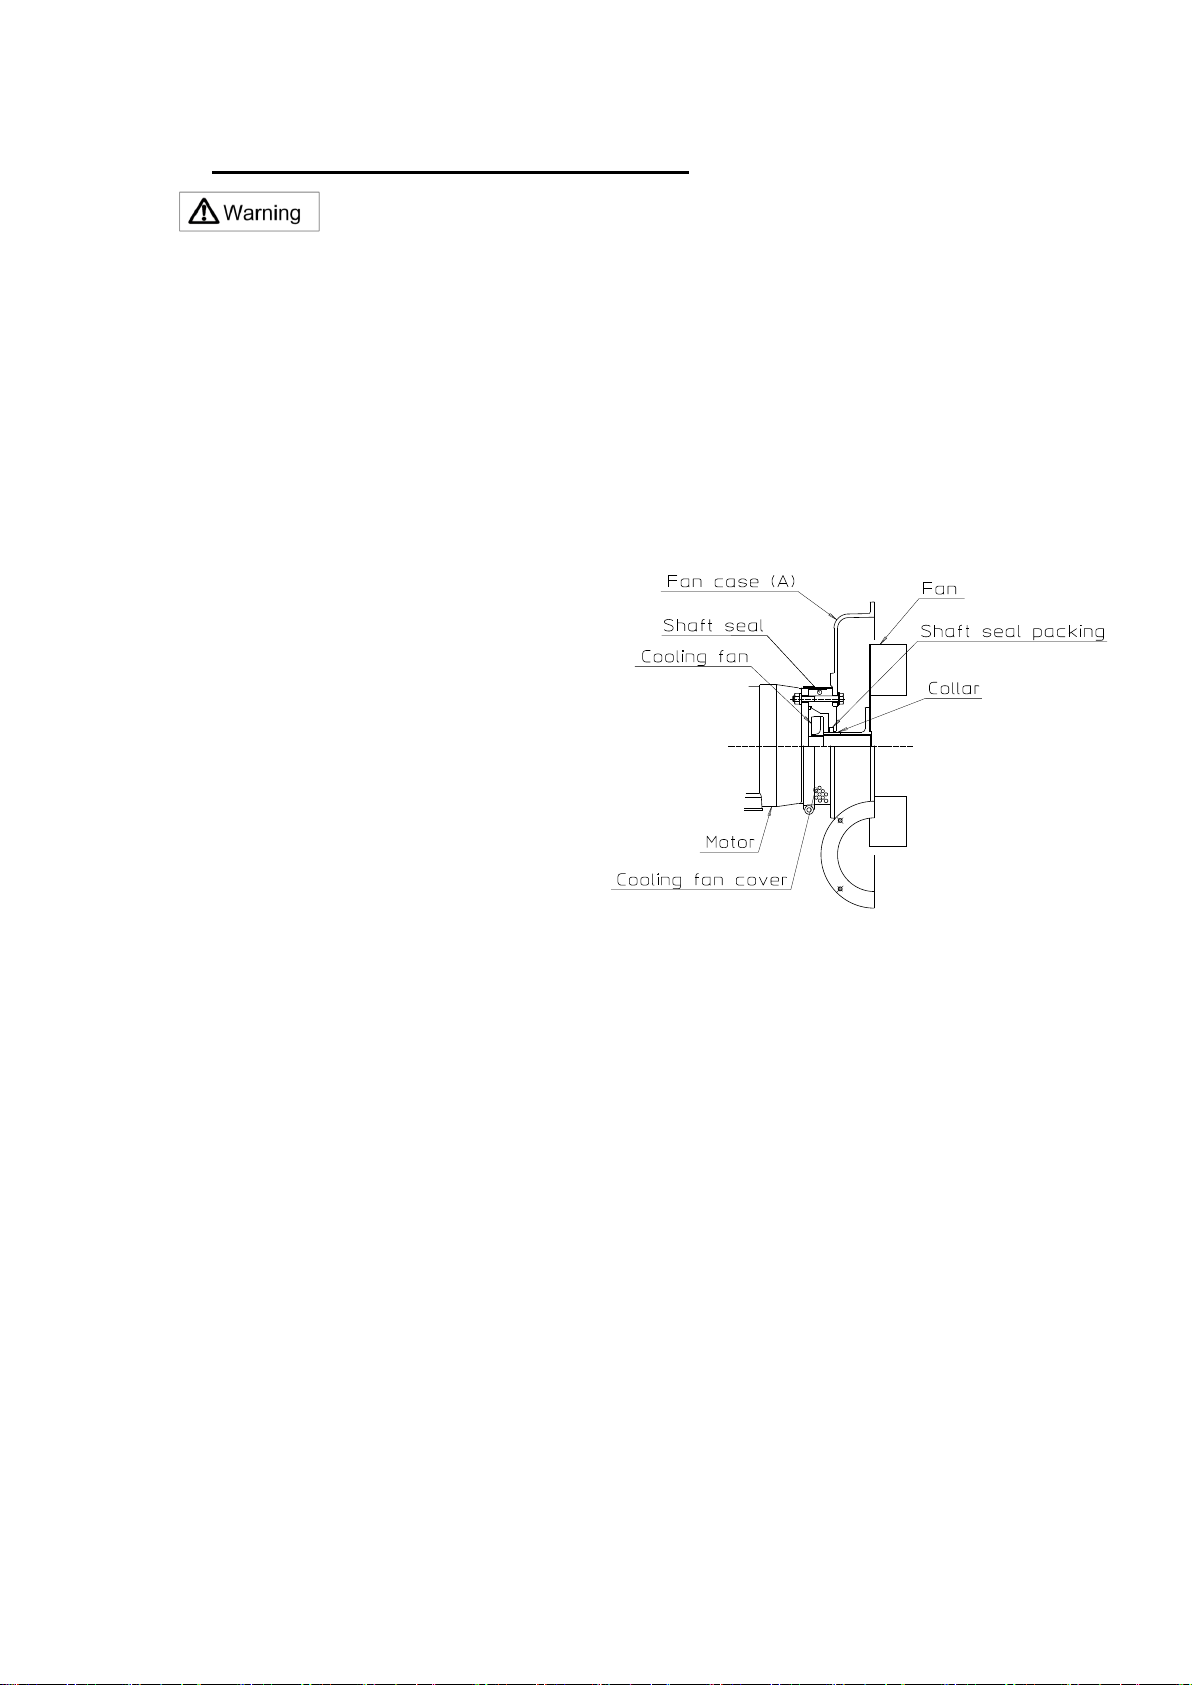
(5) Do not wrap the cooling fan cover in a heat insulator. Otherwise the life of the motor bearing
may be shortenedbecause the heatinsulatorpreventsheatloss.
10. Maintenance
Thefollowingmaintenanceis recommended tokeep thebloweringoodcondition.
(1) Payattentiontoventilation tokeeptheambienttemperatureintherangeof-15to 40deg.C.
(2) Pay attention to abnormal noise, abnormal vibration, abnormal temperature and air leakage. If
abnormalityis found,takeactions referringto“11.Troubleshooting”.
(3) The bearings that the motor only has are non-lubrication type. The life of the bearing is about
20,000hours,but thelifewill bedrasticallyshortenedifambienttemperatureis toohigh.
(4) If the blower has filter at the inlet, check the cleanliness of the filter periodically. Replace or
clean thefilter if and when the airfilter is notclean, as it causes pressure loss. The filter can be
washed by soaking into water or neutral detergents. (Wash it gently, do not rub or do not
squeeze it.)Lay thecleanerside upto dry. Itcanbecleanedforafew times with thismethod.

7
11. Troubleshooting
Thefollowingtableis fortroubleshootingduringtest runandoperation.
Trouble
Cause
Whattodo
Blownfuseor
Trippedcircuit
breaker
Abnormal voltageorfrequency
Consultwith powercompany.
Inappropriatecapacityofpower
sourceequipment
Replacewithappropriateone.
Missingphase
Checkwiring.
Imbalancedvoltageofphase
Consultwith powercompany.
Excessivevoltagedrop
Checkthethicknessandlengthof
wiring.
Excessive current
Reduceairvolumeby dumper.
Reversedrotation
Changewiring. (interchanginganytwolineleads)
Fantouch
Repairor replace.
Waterinthecasing
Drainand takesomepreventive
measure.
Abnormalityofbearing
Repairor replace.
Motoroverheat
Bad airventilationfor motor
Removewhatobstructs the ventilation
formotor.
Runningwithsinglephase
Checkwiring.
Abnormalityofbearing
Repairor replace.
Abnormal voltageorfrequency
Consultwith powercompany.
Insufficientair
pressureor
volume
Improperfrequency
Consultwith Muto.
Toohighambientair temp.
Improveairventilationoftheroom.
Leakage orcloggedpiping
Checkpiping.
Missingphase
Checkwiring.
Damaged fan,etc.
Repairor replace.
Reversedrotation
Changewiring. (interchanginganytwolineleads)
Dirty orcloggingairfilter
Clean or replace.
Lowered motorspeed
Consultwith Muto.
Foreign materialonthe fan
Clean up.
Abnormal noise
and/orvibration
Touchingorbrokenfan
Repairor replace.
Reversedrotation
Changewiring. (interchanginganytwolineleads)
Imbalanceof fan
Repairor replace.
Bad bearing
Repairor replace.
Foreign materialorwater
Clean upandprotect.
Imbalancedvoltagebetweenphase
Consultwith powercompany.
Missingphase
Checkwiring.
Airleakage
Checkpipingand repair.
Weightofpiping orforce inducedby
thermalexpansion
Getridofanyforce to the blower.

8
12. Instruction for Disassembly and Reassembly
Turn thepower off before disassembly andreassembly.
Following is instructive to disassemble and/or to reassemble the blower as referring to “13. Structural
drawing”. (It is very difficult to explain all of details of the work perfectly in writing and by sketches.
Therefore it is recommended to understand how the parts put together before disassembling and
recordthedirection andorder oftheparts whiledisassembling.)
12-1. Disassembly
(1) If thereisanoutletpart,removeit.
(2) Removefancasefastening bolt ①,andremove fancase(C) ③
(3) Removefanstopperbolt ④andfanstoppercollar ⑤.
(4) Removefan ⑥frommotor ⑦.
(5) Removefancase(A) ②frommotor ⑦.
・forHeatresistantmodel
From (1) to (4) procedures are the same as
the above.
(5') Removethecollar frommotor ⑦.
(6') Loosenthecooling fancover.
(7') Remove fan case (A) ②and the shaft seal
from motor ⑦, and remove the cooling fan
frommotor ⑦.
12-2. Cleaning
Clean thedisassembledparts.Visuallyinspecttheparts.
12-3. Reassembly
Reassemblyis basicallythereversedorderofdisassembly.
Rotatetheshaftbyhand and make surethat the fan isnot touching.
Heatresistantmodel,Motorconnection

9
13. Structural drawings
No.
Description
Qty.
MSD-3ST
MSD-4ST
MSD-3T
MSD-4T
MSF-6T
MSD-6P
MSF-8T
MSH-8T
MSF-8P
MSD-8R
MSH-10P
MSH-10T
MSF-12R
MSH-14R
MSH-14R5
1
Fancase fasteningbolt
7(MSD), 8(MSF), 10 (MSH)
2
Fancase (A)
1
1
1
1
3
Fancase (C)
1
1
1
1
4
Fanstopperbolt
1
1
1
1
5
Fanstoppercollar
1
1
1
1
6
Fan
1
1
1
1
7
Motor
1
1
1
1
8
Base
1
1
1
1
9
Fankey
1
1
1
1
10
Collar
1
1
1
-
11
Ubolt
2
2
-
-
Condenser
(fixed to base)
1
-
-
-

10
14. Motor
Regardingmotor, referto theinstructionmanual ofthemotor.
15. Inquiry
If you need to contact us regarding this product, please kindly inform us the information on the
nameplate such as CAT. No. , PROD. No. , DATE. In case of troubles, additionally inform us the
brokenportion,running time(days)and condition used and others.
16. Limited Warranty
The warranty period of this product is one year from the day of shipment unless otherwise specially
agreed. Within the period, the malfunctions induced by defects of material or technical reasons will be
repaired freeofcharge.Butunder followingsituation,this warrantywillnotapplyto anyproducts.
(1) Malfunctionsthatoccurpastthewarrantyperiod
(2) Malfunctionsthatoccurduetoinappropriateusage
(3) Malfunctions or breakage due to inevitable event such as fire, severe weather, earthquake or
such
(4) By exceptus,theproducthasbeen repairedor modified.
We shallnotbe responsibleforanyincidentalor consequentialdamages.
Thiswarrantyisvalidonlyforthe productusedwithinJapan.

11
-MEMO -

12
⚫Muto Wide Blower
⚫MutoTurbo Blower
⚫Muto Spencer Blower (Under technical license)
⚫Muto KF Blower
⚫Muto Scroll Blower
⚫Muto Central Vacuum System
Muto Products
This manual suits for next models
15
Table of contents
Other Muto Denki Blower manuals