MyFlyDream Crossbow AAT User manual

Crossbow AAT
Manual
V 1.1
2019-Aug-29
www.MyFlyDream.com

Precautions
Thank you for purchasing the MyFlyDream Crossbow AAT (Automatic Antenna Tracker,
hereafter referred to as Crossbow AAT).
Please familiarize yourself with this product and its operation method described in this
document. This product is a precision electromechanical device. Please read this document
carefully to prevent damage to the device and minimize the risks of damage to property or
people’s lives.
Please only use this device according to local laws, rules, and regulations. Its performance
may be affected by a number of factors such as but not only: Strong electromagnetic interference,
poor GPS status, etc. All these reasons can lead to unexpected results. All risks and consequences
resulting from the use of this product are borne by the user.
We reserve the right to continuously improve and improve the performance of our products,
so the content of this document does not necessarily match the specifications of your products.
Please download the latest version of this document from our website:
www.MyFlyDream.com/download/
1.Product Introduction
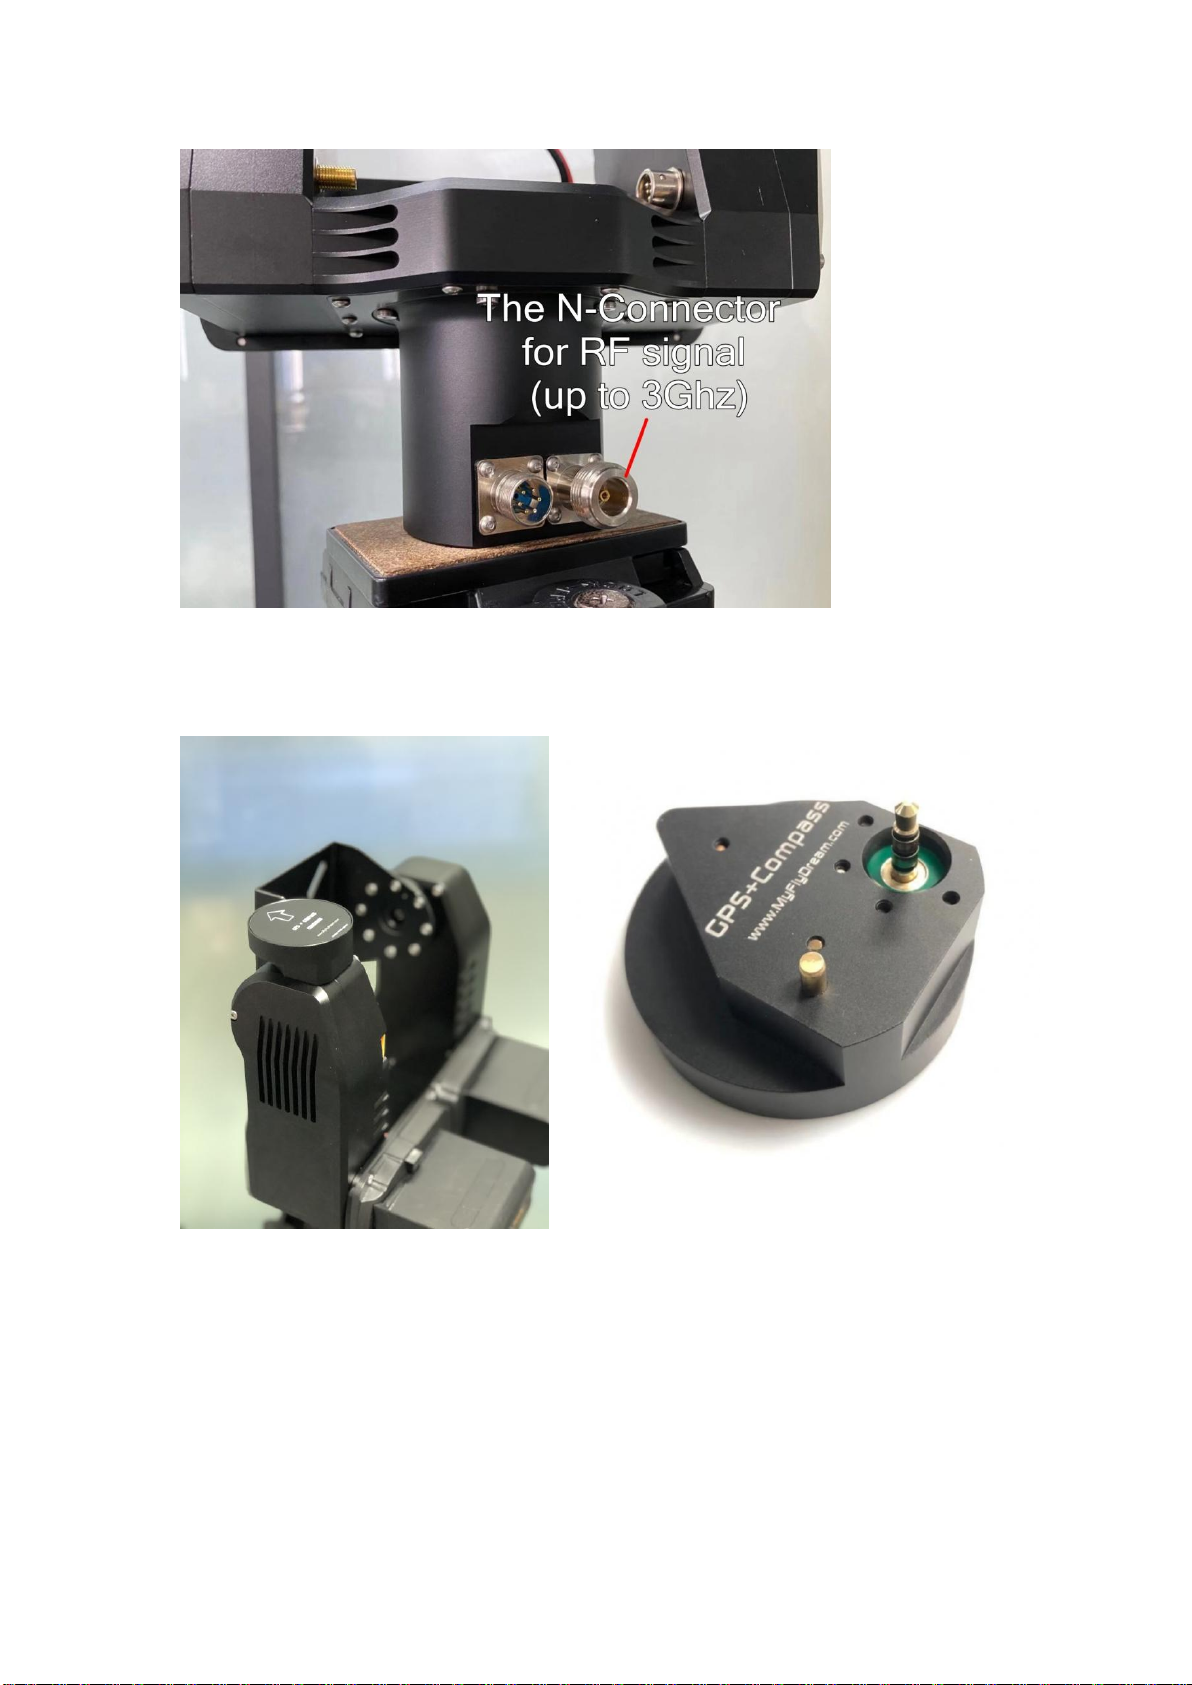
Crossbow AAT is designed for use with unmanned aerial vehicle (UAV) on-board antenna
system. Its purpose and objective is to point the antenna precisely in the current direction of the
aircraft thus allowing the video receiver to pick up the strongest signal possible at given distance
and other factors.
In order to obtain better signal reception quality, it is advised to use high-gain receiving
antennas. High-gain antennas are known for very narrow angles of effective reception.
For its successful operation, Crossbow AAT requires the flight data such as latitude and longitude
of the tracked target (UAV) at every given moment, as well as its altitude.
This is achieved by the following:
1. Transmitting information of the tracked target over a wireless analog video link from the
UAV to the ground station. For that, the UAV must be equipped either by a MFD Auto Pilot, or a
MFD Crosshair Auto Pilot, or in case a third party AP is used with a MFD TeleFlyTiny tracking
module.
ATTENTION: Using TeleFlyTiny module is possible with many third party flight controllers. MFD
does not guarantee that it works with any particular make or model of the autopilot, nor that it
will continue to work with any third party autopilot after its firmware or software is updated.
2. Transmitting information of the tracked target over a wireless High Definition video link
from the UAV to the ground station. For that, the UAV must be equipped either by a MFD Auto
Pilot, or a MFD Crosshair Auto Pilot, or a MAVLink-compatible Auto Pilot, or in case a third party
AP is used, an MFD TeleFlyTiny tracking module. The signal containing encoded tracking data

from the TeleFlyTiny module on the aircraft will be transmitted to the Crossbow AAT through the
serial port .
3. Transmitting information of the tracked target over a wireless digital data link from the
UAV to the ground station.
MAVLink protocol allows to transmit the information from the UAV through the digital radio link.
If the on-board system already includes the digital radio, and the flight controller that supports
MAVLink protocol, Crossbow AAT will be able to receive all flight information necessary to track
the UAV through the shared TXD line of the digital radio station.
4. For more specific applications requiring custom design of the signal transmission, please
contact MFD directly.
MyFlyDream Crossbow Specifications
Tracking Ability
MAX Pan-Speed
300deg/s
MAX Tilt-Speed
60deg/s
MAX Pan-Angle
Unlimited/450deg
MAX Tilt-Angle
-15deg~135deg
Mechanical/Electrical
specifications
Weight
2.6kg
MAX Tilt Torque
14kgf.cm
Operating
Voltage
12~16V DC
Power
Consumption
< 15W (Typical)
Protocol Interface
MFD VBI
All MFD Autopilots/TeleFlyPro/TeleFlyTiny
supported
MAVLink
MAVLink V1.0/V2.0 supported
2.Installation and wiring
1. The AAT can be fixed on the head of a regular camera/camcorder tripod by the means of a
standard 1/4-20 threaded interface at the bottom of the main unit. Make sure the tripod you use
is capable of supporting the size, weight, and leverage of the battery+AAT+Antenna assembly.
Correct choice of a tripod is the user’s responsibility. Please make sure that the quick release
plate of the tripod is compatible with the threaded interface on the bottom of the AAT main unit.
Appendix B. shows details of the mounting interface of the AAT.

Crossbow AAT requires =12V to 16V (3S~4S) DC power supply. The recommended power supply
solution is 2 x NP-F980 batteries (7.4V 6600mah).
The tracker is powered on by simply plugging the XT60 connector into the corresponding power
socket of the AAT, as shown in the picture:
2. The antenna has to be mounted on the Crossbow AAT with the use of a special bracket.In order
to prevent tampering with the normal operation of the compass built into the Crossbow AAT it is
recommended to avoid using antennas made with ferromagnetic materials. Wherever possible,
use non-magnetic stainless steel bolts, aluminum and other non-magnetic materials.

3. There is an aviation-socket on the main unit(the upper connector), and a cable with aviation-
plug and color coded wires.

Please connect it to your equipments(DataRadio, VideoRX... etc) using the following color coding
diagram:
Upper Connector Cable Color Definition
Pin#
Wiring Color
Definition
1
Red
12V~16V power supply (shared AAT power supply voltage)
2
Yellow
Analog video input
3
Gray
External GPS RX (U2 RX). This pin maybe not available in later version.
The UART2 has been move to the top of the LEFT ARM of Crossbow.
4
Orange
Telemetry Data TX(U3 TX)
(connected with RX of your DataRadio)
5
Blue
Telemetry Data RX (U3 RX)
(connected with TX of your DataRadio)
6
Black
Ground
If you wish to use MAVLink protocol to provide tracking data through digital radio link:
Fix the digital radio link on the antenna bracket.

Connect the black wire of the plug cable to the ground wire of the digital radio link. Connect the
red wire to the power wire of the digital radio link.
ATTENTION: Voltage supplied via the red wire(=12 to16V) may be different from the digital radio
needs. Please use a suitable power conversion module if the digital radio power voltage is
different from the above mentioned.
Connect the TX (data output line) of the digital radio link to the green line of the cable.
Power on the digital radio link.
Usually, the UAV ground station also needs to be connected to the digital radio link. Sharing the
TX line of the digital radio link with Crossbow AAT will not affect the normal ground station
operation.
4. The base of the AAT has 2 similar aviation-sockets for use with 2 matching cable with a
aviation-plugs and color coded wires. If the analog video signal is fed to the socket mentioned in
clause 3 (right above), this video signal can be obtained from the green line of the socket on the
base after passing through the internal slip ring.

Lower Left Connector Cable Color Definition
PIN#
Wiring Color
Definition
#1
Orange
Telemetry Data TX(U3 TX)
(connected with RX of your DataRadio)
#2
Blue
Telemetry Data TX(U3 RX)
(connected with TX of your DataRadio)
#3
Red
12V~16V power supply (shared AAT power
supply voltage)

#4
Gray
Not Connected
#5
Yellow
Analog video output
#6
Black
Ground
Lower Right Connector Cable Color Definition (Not RF version)
PIN#
Wiring Color
Definition
#1
Orange
Not Connected
#2
Blue
Not Connected
#3
Red
Not Connected
#4
Gray
Not Connected
#5
Yellow
Analog video output
#6
Black
Ground
There is also a Crossbow RF model which uses a RF-Slipring inside. With this RF version, users
can mount their antenna on the tracker and access the signal(Up to 3GHz) with the lower N-
Connector of the Crossbow. The RF model looks a little bit different:

5. Choose the GPS+Compass module to get better tracking performance:
The Crossbow will recognize the GPS+Compass module once it's plugged. The screen will display
something like GPS:12/L14 to show the number of satellites locked by remote GPS/ local GPS.
With this module, The tracker will start to track when it locks enough satellites without setting
home operation.

3. Test
Please make sure the tripod is securely set up, and its legs are well tightened. Then power on the
AAT.
Normally, the tilt angle will return to the horizontal 0 degrees (pointing to the horizon), and the
AAT will be rotate several times for initialization. The following information will be displayed on
the OLED screen of the Crossbow AAT:
GPS: 12 (Batt:12.1V)
DIST:N/A
Alt: N/A
AZim: N/A
VLink: 0%
Dir: 0
Main Screen Descriptions
Display Item
Description
GPS/LocalGPS
Batt
GPS Satellites locked. If an external GPS is connected, GPS/LocalGPS will
be displayed in 12/11 formation (GPS=12, Local=11)
Batt (Voltage of the main battery) will be displayed alternatively here.
Dist
Distance of the plane (Not Available before SetHome)
Alt
Altitude of the plane (Not Available before SetHome)
Azim
Azimuth of the plane (Not Available before SetHome)
VLink/DLink
Video/Data downlink quality. (in %, ref to the "Downlink" chapter)
Dir/EDir
Current heading diretion of the tracker.
If an external compass is connected, EDir will be displayed alternatively
When you get enough satellites locked (usually 8 or more), press the right button on the base to
SetHome for the tracker. With MFD AP/MFD Crosshair you can SetHome for your plane,
meanwhile the Home location of the tracker will also be set.
Once the plane flies to 10 meters away, the tracker will start to track.
Crossbow can work in 2 modes: Unlimited/450degrees.
In Unlimited mode the Crossbow AAT can rotate in one direction continuously.
In 450degrees mode, The tracker will rotate back 360 degrees when it reached its limits (to avoid
twisting cables between tracker upper rotating part and the ground devices. To use 450deg
mode, please turn the tracker manually to point to your favorite direction (the opposite direction
is rarely used in the flight). Then hold the right button of the tracker for 3 seconds or longer. The
heading direction of the tracker will be stored as the current favorite direction until power off.
The below diagram describes how 450deg mode works.
We assume that the plane is circling above the tracker in counterclockwise direction (Top view,
Look from the sky). The tracker starts from the point A. It rotates 360 degrees in CCW direction.

It won't rotate in opposite direction immediately now to avoid oscillating in this position. It keeps
rotating until it reaches the point B. To avoid twisting cables the Crossbow will quickly rotate 360
degrees clockwise and point to B again.
If the plane circles clockwise, something similar will happen in the opposite way. Mostly the
tracker can rotate 360+45+45=450degrees. That's why we call it "450degrees mode".
4. Downlink
The Crossbow AAT needs a downlink to get the information of the tracking plane.
Usually this is the most difficult part to get your system to work. Because you have to merge
several devices came from different manufactories.
We may extend this chapter in the future. Currently we discuss only VBI solution and dataradio
solution(Based on MAVLink).
1. VBI

VBI stands for "vertical blanking interval". It's a term of the analog video signal technology.
Many MFD products use VBI to carry flying information from the plane to the tracker.
The advantage of VBI is that you don't need an extra dataradio if you already have a video TX
and RX. These MFD products will encode the necessary data on your analog video signal
(usually comes from an onboard camera). Your VideoTX emits it. Once your Video Receiver
receives the video signal, and feeds the signal to a MFD tracker, the tracker will extra tracking
data from the analog video signal and use the data to track.
Early MFD AP / TeleFlyPro support our VBI protocol V1.
Our Crossbow supports V1. (Menu "VBIVersion=>V1")
Later MFD Crosshair / TeleFlyTiny support V1 and V2.
V2 works better in long range.
To use VBI for the tracker, please setup your plane correctly. Make sure your video RX outputs
clear videos (check with an AV monitor) . Feed the signal to PIN#2 of the upper socket (of course
you need a common Ground wire between your VideoRX and the tracker).
Note that you need to make sure the plane side and the tracker are using the same VBI version.
If the tracker decodes information from the video signal successfully, the main screen will display
like"VLink:90%".
2. DataRadio (MAVLink):
With a pair of DataRadio you can send data from the plane to your tracker. There are many
protocol can be use to establish a downlink, private ones, and open ones. MAVLink is one of the
most popular ones. It's not perfect but it's common. Many autopilots support it, including MFD
Crosshair AP.
If you use a Pixhawk/ArduPilot device, I assume you already connect your DataRadios and they
are working well. Now we are going to integrate the MFD Crossbow AAT to your system.
The DataRadio device can be mounted to the tracker and rotates together with the tracker. In
this case the tracker still has the ability to rotate continuously without any limitation.

But if the DataRadio is very heavy or you have some other reasons to keep it on the ground, you
have to connect a cable from your antenna to your DataRadio in this case. You need to set FavDir
(Favorite Direction) of your flight. The tracker will work in 450 degrees mode to avoid twisting
cables.
More and more HighDefinition Video devices are available on the market. Most of them also
support a built-in serial port datalink. (For example, the OpenHD project). If you are using this
kind of video link and running MAVLink protocol on it, you can simply consider it's serial port as a
DataRadio output. Feed data to the RX wire(blue) to the upper-connector of the tracker to
establish a downlink. In this case usually you also need a HDMI cable or Ethernet cable to get
video signal from the VideoRX on the tracker. These cables limits the tracker to rotate
continuously. You need to use the tracker in 450 degrees mode.
Finally you have this solution: The tracker pitch/yaw the antenna only. Your VideoRX and
DataRadio stay on the ground and connect with your antenna via feeder cables.
No matter where you install your DataRadio, you need to share its TX line to #5(Blue) wire to the
upper-connector of the tracker.
Note: About the MAVLink
The MAVLink protocol has been used/implemented in many Flight Controllers, Ground Control
Stations(GCS) and trackers. But actually many devices use the MAVLink in their own way. One of
the reasons is that MAVLink is not clear enough to define how to send some important data

between the Plane And GCS. There are so many different MAVLink messages which can be used
to send GPS Coordinates, Altitudes...
Crossbow AAT needs both these 2 MAVLink messages to track.
MAVLINK_MSG_ID_GPS_RAW_INT
MAVLINK_MSG_ID_GLOBAL_POSITION_INT
If the Crossbow AAT receives some correct MAVLink data packs (Heartbeat?) but not able to find
the above 2 messages, it will display "DLink:1% msg?" to remind you to check if the above 2
messages are sent at 1Hz or a higher frequency.
In Crossbow AAT, If you choose menu "Protocol->ALT=BARO",
MAVLINK_MSG_ID_GLOBAL_POSITION_INT.relative_alt is used as the data source of the
altitude. This works for most ArduPilots. (APM), and MFD Crosshair AP.
You can check "FlightInfo-> ALT/BARO" to read the current GPS-ALT and Baro-Alt.
Crossbow uses "Baro" Alt to track.
Another option is "Protocol->ALT=GPS". In this case, MAVLINK_MSG_ID_GPS_RAW_INT will be
used as the data source of the altitude. This works for most PIX4 Flight Controllers.
In this case, "FlightInfo-> ALT/BARO" are both from MAVLINK_MSG_ID_GPS_RAW_INT message.
We recommend our users to set the update frequency of the above 2 messages higher to get
better tracking performance. The method varies from different Flight Controllers. Take the
ArduPilot Mega as an example, you can search for string"SR1_" in Mission Planner "All
parameters List" to get a table of MAVLink messages updating frequency for Telemetry1 port.
Please set SR1_POSITION to 5Hz or higher in this case. 0=Disable.
TroubleShooting:My DataRadio doesn't work with Crossbow. Only VLink:0% is displayed
1. Check if the tracker is receiving data from your date radio. Check Menu item
"Factory->CoreData->RX". This number will increase when the tracker receives any data from
U3RX (Datalink port) or U2RX(External GPS port). If the RX doesn't increate at all, please check
your cables again and make sure your DataRadio is sending out date on its TX wire.
2. Check menu "BaudRate" again to make sure you are using a proper baudrate, especially after
you apply a new firmware.
5. AAT menu operation guide
After power on the screen shows main parameters of the current status.

GPS: 12
DIST:N/A
Alt: N/A
AZim: N/A
VLink: 0%
Dir: 0
To enter/quit the menu system, hold the LEFT button for 2 seconds or longer.
You can also choose "Exit" in the menu to quit the menu system.
Please use the LEFT button to browse the menu.
Use the RIGHT button to enter sub-menu or change values.
MAIN MENU
YawTrim
HomePos
CalCompass
MotorCurr
CalPitch
CompassMod
BaudRate
FlightInfo
PayloadSel
OSDLevel
VBISetting
Protocol
TrackerID
SysInfo
Factory
Exit
YawTrim:
<<[-][+]>>
Yaw:0
Pitch:0
Exit
If the tracker is slightly tracking the plane left or right, you can apply some YawTrim to make it
more accurate. Use Negative values to trim the tracker to LEFT. Use Positive values to trim the
tracker to RIGHT.
You can also use the Pitch item to trim the tracker UP/DOWN.
The valid parameter range is [-20,20]

HomePos:
UsePreHome
H1:D:0
H2:D:0
H3:D:0
H4:D:0
H5:D:0
AutoLoad=N
Exit
H1~H5 is the Home Positions which you recently have used. H1 is the most recent home position.
H5 is the earliest one.
The distances between your plane and the H1~H5 stored home positions are displayed in a
D:XXXXX formation. Also the longitude and latitude of each home position will be displayed
alternatively to help the user to decide which Home Position should be load to use.
Click the right button to load a high-light (selected) home position.
If you forgot to Set Home before takeoff, this function will be helpful especially you have a proper
pre-saved home position in the tracker.
AutoLoad=N means the tracker will not load the most recent home position when it starts up.
Click the right button to set AutoLoad=Y to enable it.
CalCompass:
CalCompass
MAX:125
...
...
Exit
AutoLoad=N
Exit
Click the right button to execute a compass calibrate the compass of the tracker.
Before doing that please make sure the tracker is locked on the tripod well.
It takes about 20 seconds to finish the calibration. You can ignore the parameters showing on the
screen during the procedure.
MotorCurr:
MotorCurr
Pit:2000
Yaw:2000
AutoDetect
Exit
Use the right button to set the maximum current for the Pitch or Yaw motor. (in mA)
Valid range of these parameters are [0,4500] mA

You can also use "AutoDetect" to measure the proper settings of your setup. Remember to fasten
your tracker and clear all objects nearby before doing that. Because the tracker may yaw and
pitch to any direction during the procedure.
CalPitch:
MotorCurr
Pit:2000
Yaw:2000
AutoDetect
Exit
Use this function to calibrate the pitch sub-system of your tracker.
Tracker needs to know the horizontal position to work well.
Please follow these instructions to Cal. Pitch:
1. Use "Pitch UP" and "Pitch DOWN" to adjust the tracker until it points to horizon. (Imaging that
the plane is very far and low).
2. Use "Save L Pos" to save this Low Position.
3. Use "Pitch UP" and "Pitch DOWN" to adjust the tracker until it is about 110 degrees. (Not
restrict 110 degrees, but it must > 90 degrees.) That means the tracker reaches vertical position
and goes further.
4. Use "Save H Pos" to save this High Position.
5. Save & Exit.
CompassMod:
UseCompass
InitOnly
Always
Never
Exit
This setting is about how to use the compass of the tracker.
InitOnly: The tracker only reads the compass to know where is North when starting up. Later it
will use an internal optical-encoder to work smoothly without the compass. In this case you can't
rotate your tripod because the tracker is not able to sense that movement.
Always: The tracker use the compass all the time (Just like our 1st generation MFD AAT). With
this option you can even mount your tracker on a vehicle and keep tracking (with an external
Compass+GPS). But if you are using the built-in compass, this option is not recommended
because the internal compass is not very accurate when the motors work at high-payload status.
Never: The tracker doesn't use the compass at all. You are responsible to point the tracker to
North. (That means facing the AAT Screen to South). If you are going to fix the tracker on a
building you can use this option.
BaudRate:
Baud Rate
115200

57600
38400
19200
9600
4800
1200
Exit
Choose a downlink baudrate to match your dataradio setting.
FlightInfo:
FlightInfo
Lon:EAST
0.000000
Lat:NORTH
0.000000
ASL:0m
BARO:0m
Exit
This screen displays some useful information of the plane which is being tracked.
Lon/Lat is the GPS coordinates of the plane.
ASL: AboveSeaLevel altitude of the plane. Usually comes from the GPS data of the plane.
BARO: Barometer altitude of the plane. Usually comes from the barometer of the plane.
PayloadSel:
Payload
Light
Midium
Heavy
UltraHeavy
Exit
Choose the payload level of your setup.
Light: Light Weight antennas, high acceleration and fast movements.
UltraHeavy: Very Heavy antennas, low acceleration and slow movements.
OSDLevel:
Brightness
Level:90
Exit
Choose the OSD(OnScreenDisplay) brightness level of the tracker. The tracker is able to overlay
some graphics information on the analog video signal. Higher value will choose brighter OSD
images. With the CAN-BUS and our new "FlyTogether" feature, users now can connect up to 10
trackers. Everybody can see other's relative position/altitude on the screen.

Valid range of this parameter is [0,100].
VBISetting:
VBI Level
VER:V1
Exit
Choose V1 to work with old MFD products (MFD AP, MFD TeleFlyPro).
Choose V2 to work with new MFD products(MFD Crosshair AP, MFD TeleFlyTiny. You can also
choose V1 for Crosshair/TeleFlyTiny with their own menu).
This is about how to use the analog video to carry flying information.
MFD devices can encode information to the analog video signal.
The tracker will extract necessary information from it. V2 works better in long range.
Protocol:
Protocol
ALT=BARO
Exit
Choose ALT=BARO or ALT=GPS to determine what altitude data of the MAVLink data stream will
be used to track. We will discuss this in the chapter "5. Downlink".
TrackerID:
TrackerID
ID=1
Exit
Choose the numeral ID of the tracker. When you use "FlyTogether" function, your ID will be
displayed on other's OSD screen. You need a unique ID when you joining a "FlyTogether" CAN-Bus
network.
The valid range is [0,9]
SysInfo:
SysInfo
Ver.:1.83
2:21.8.23
12:40:22
Hw:1
Exit
This screen shows version number of the firmware (1.83) and Hardware (1)
Factory:
Test
YawTest
Table of contents
Other MyFlyDream GPS manuals
Popular GPS manuals by other brands

Tait
Tait TMAA05-01 installation instructions

Life Minder
Life Minder EV-07W Programming manual

NAVTELECOM
NAVTELECOM SIGNAL S-2654 manual

Renkforce
Renkforce GP-102 operating instructions

Garmin
Garmin Oregon 200 - Hiking GPS Receiver Declaration of conformity

Motorola
Motorola MOTONAV TN500 Series installation guide