N'Finity 274 02 40 User manual

INSTRUCTION MANUAL
42 BOTTLE BUILT-IN AND FREESTANDING WINE
CELLAR
MODEL
:274 02 40
BEFORE USE, PLEASE READ AND FOLLOW ALL SAFETY RULES AND
OPERATING INSTRUCTIONS.
1

TABLE OF CONTENTS
IMPORTANT SAFETY INSTRUCTIONS 3-4
COMPONENTS AND PARTS 5
IMPORTANT SAFETY PRECAUTIONS 6-7
INSTALLATION INSTRUCTIONS 8-9
OPERATING YOUR APPLIANCE 10-11
CARE AND MAINTENANCE 12
TROUBLESHOOTING GUIDE 13
WARRANTY INFORMATION 14
2

APPLIANCE SAFETY
Your safety and the safety of others are very important.
We have provided many important safety messages in this manual and on your appliance.
Always read and obey all safety messages.
This is the Safety Alert Symbol. This symbol alerts you to potential hazards that can kill
or injure you and others. All safety messages will follow the Safety Alert Symbol and
either the words “DANGER”, “WARNING” or “CAUTION”.
Danger means that failure to heed
this safety statement may result
in severe personal injury or death.
Warning means that failure to
heed this safety statement may
result in extensive product
damage, serious personal injury,
or death.
Caution means that failure to
heed this safety statement may
result in minor or moderate
personal injury, or property or
equipment damage.
All safety messages will alert you to what the potential hazard is, tell you how to reduce
the chance of injury, and let you know what can happen if the instructions are not
followed.
3

IMPORTANT SAFEGUARDS
Before the appliance is used, it must be properly positioned and installed as described in
this manual, so read the manual carefully. To reduce the risk of fire, electrical shock or
injury when using the appliance, follow basic precaution, including the following:
•Plug into a grounded 3-prong outlet, do not remove grounding prong, do not use an
adapter, and do not use an extension cord.
•Replace all panels before operating.
•It is recommended that a separate circuit, serving only your appliance be provided.
Use outlets that cannot be turned off by a switch or pull chain.
•Never clean appliance parts with flammable fluids. These fumes can create a fire
hazard or explosion. And do not store or use gasoline or other flammable vapors and
liquids in the vicinity of this or any other appliance. Before proceeding with cleaning
and maintenance operations, make sure the power line of the unit is disconnected.
•Do not connect or disconnect the electric plug when your hands are wet.
•Unplug the appliance or disconnect power before cleaning or servicing. Failure to do
so can result in electrical shock or death.
•Do not attempt to repair or replace any part of your appliance unless it is specifically
recommended in this material. All other servicing should be referred to a qualified
technician.
FOLLOW WARNING CALL OUTS BELOW ONLY WHEN APPLICABLE TO YOUR
MODEL
•Use two or more people to move and install appliance. Failure to do so can result in
back or other injury.
•To ensure proper ventilation for your appliance, the front of the unit must be
completely unobstructed. Choose a well-ventilated area with temperatures above
60°F (16°C) and below 90°F (32°C). This unit must be installed in an area protected
from the elements, such as wind, rain, water spray or drips.
•The appliance should not be located next to ovens, grills or other sources of high heat.
•The appliance must be installed with all electrical, water and drain connections in
accordance with state and local codes. A standard electrical supply (115 V AC only, 60
Hz), properly grounded in accordance with the National Electrical Code and local
codes and ordinances is required.
•Do not kink or pinch the power supply cord of appliance.
•The fuse (or circuit breaker) size should be 15 amperes.
•It is important for the appliance to be leveled in order to work properly. You may
need to make several adjustments to level it.
•Never allow children to operate, play with or crawl inside the appliance.
•Do not use solvent-based cleaning agents of abrasives on the interior. These cleaners
may damage or discolor the interior.
•Do not use this apparatus for other than its intended purpose.
•Replace all panels before operating.
4

C
OMPONENTS AND PARTS
1)
Temperature Control Panel (Not shown)
2) Circulation Fan
3) Interior Light
4) Cabinet
5) Wine Bottle shelf
6) Wine Bottle Storage
7) Beverage Shelf
2 3 4
5 6 7
5

IMPORTANT SAFETY INSTRUCTIONS
WARNING
To reduce the risk of fire, electrical shock,
or injury when using your appliance,
follow these basic precautions:
•Read all instructions before using the wine or beverage cooler.
•
DANGER or WARNING:
Risk of child entrapment.
•To avoid the possibility of child entrapment, please take the following precautions
before throwing out the appliance.
- Remove door from the unit.
- Leave the shelves in place so that children may not easily climb inside.
•Never allow children to operate, play with, or crawl inside the appliance.
•
Refrigerants:
All refrigeration products contain refrigerants, which under the
guidelines of federal law must be removed before disposal of product. It is the
consumer’s responsibility to comply with federal and local regulations when
disposing of this product.
•Never clean appliance parts with flammable fluids. The fumes can create a fire
hazard or explosion.
•Do not store or use gasoline or any other flammable vapors and liquids in the
vicinity of this or any other appliance. The fumes can create a fire hazard or an
explosion.
-Save these instructions-
Electrical Connection
This appliance should be properly grounded for your safety. The power cord of this
appliance is equipped with a three-prong plug which fits into standard three prong wall
outlets to minimize the possibility of electrical shock.
Do not, under any circumstances, cut or remove the third ground prong from the power
cord supplied.
This appliance requires a standard 115 Volt A.C. /60Hz electrical outlet with three-prong
ground(American)or 220-240 Volt A.C. /50Hz electrical outlet with three-prong ground
(European). Have the wall outlet and circuit checked by a qualified electrician to make
sure the outlet is properly grounded. When a standard 2-prong wall outlet is encountered,
it is your responsibility and obligation to have it replaced with a properly grounded 3-
prong wall outlet.
The cord should be secured behind the appliance and not left exposed or dangling to
prevent accidental injury.
WARNING
Improper use of the grounded plug can result in the risk of electrical shock. If the power cord is
damaged, have it replaced by an authorized service center.
6

The appliance should always be plugged into its own individual electrical outlet which
has a voltage rating that matches the rating label on the appliance. This provides the
best performance and also prevent overloading house wiring circuits that could cause a
fire hazard from overheating. Never unplug the appliance by pulling the power cord.
Always grip the plug firmly and pull straight out from the receptacle. Repair or replace
immediately all power cords that have become frayed or otherwise damaged. Do not use a
cord that shows cracks or abrasion damage along its length or at either end. When
moving the appliance, be careful not to damage the power cord.
Because of potential safety hazards under certain conditions, it is strongly recommended
that you do not use an extension cord with this appliance. However, if you must use an
extension cord it is absolutely necessary that it be a UL/ETL-Listed, 3-wire grounding
type appliance extension cord having a grounding type plug and outlet and that the
electrical rating of the cord be 115 volts and at least 10 amperes.
7
INSTALLATION INSTRUCTIONS
Before Using Your Appliance
•Remove the exterior and interior packing.
•Before connecting the appliance to the power source, let it stand upright for
approximately 4 hours. This will reduce the possibility of a malfunction in the cooling
system from improper handling during transportation.
•Clean the interior surface with lukewarm water using a soft cloth.
Free-Standing Installation
•This
appliance is designed to be
installed built-in or free standing
.
•Locate the appliance away from direct sunlight and sources of heat (stove, heater,
radiator, etc.). Direct sunlight may affect the acrylic coating and heat sources may
increase electrical consumption. Ambient temperature below 68°F (20°C) or above
90°F (32°C) will hinder the performance of this appliance.
This unit is not designed
for use in a garage or any other outside installation.
•Avoid locating the appliance in moist areas.
•Plug the appliance into a dedicated, properly installed-grounded wall outlet. Do not
under any circumstances cut or remove the third (ground) prong from the power cord.
Any questions concerning power and/or grounding should be directed toward a
certified electrician or an authorized service center.
This unit is not designed to be
installed in an RV or used with an inverter.
•After plugging the appliance into a wall outlet, allow the unit to cool down for 3 ~ 4
hours before placing wine bottles or beverage cans in the appliance.
Product Description
Stainless Steel Built-In Wine Cellar
Model No.
274 02 40
Unit Dimensions
( inches )/mm
Width
Height
Depth
23.4”/595mm
33.7”/856mm
24.5”/624mm
Net Weight ( lbs)/kg
99 lbs /45kg
8

Built-In Installation
The cutout dimension illustrated in figure (A) allows for door swing and access to the
pull-out shelves when installed as a built-in appliance. If installing between frameless
cabinets, a ½” wide filler strip or side panel may be needed on hinge side. The filler strip
will act as a spacer between the appliance case and adjacent cabinet door swing. The
width of the opening must include the filter panels.
The cutout depth must be 24”.
9
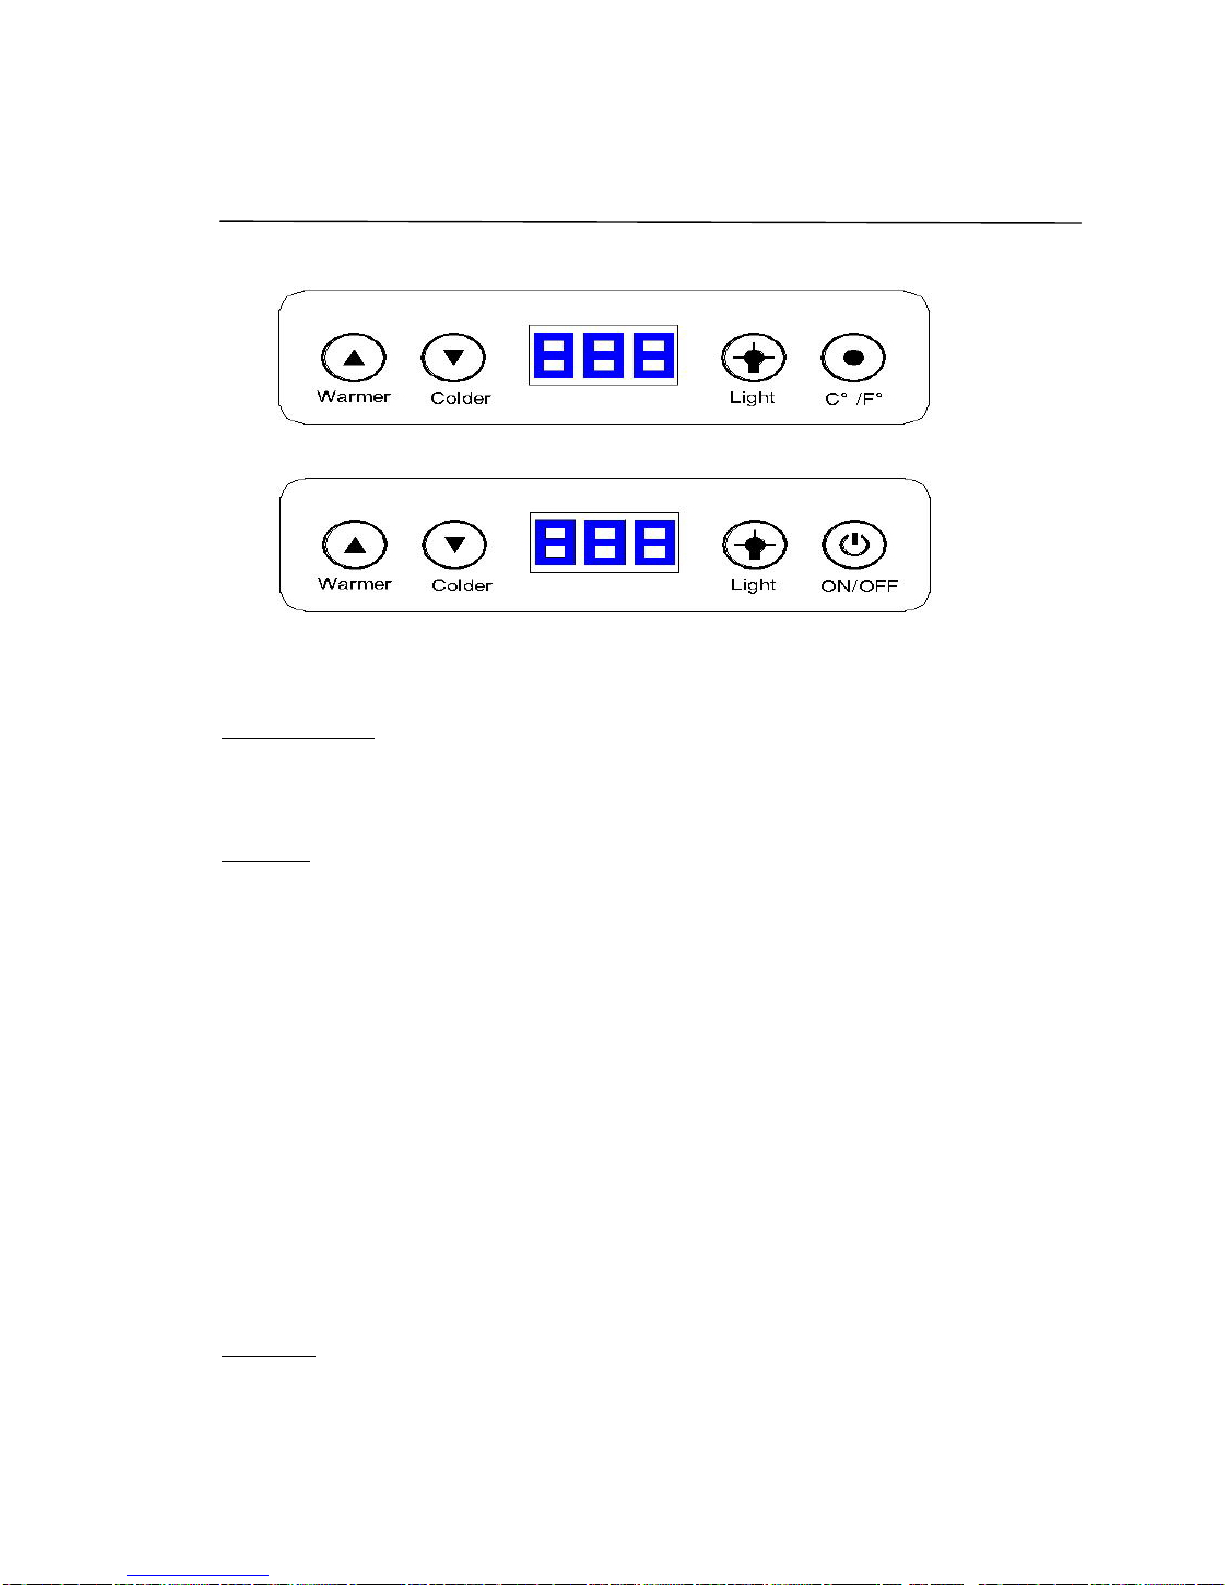
OPERATING YOUR APPLIANCE
ON/OFF POWER
To turn ON or OFF the appliance, press the ON/OFF button/mark and hold for 3
seconds.
SETTING
You can control the internal temperature of each side/zone independently by using the
control panel for that side.
You can press the left side
UP
and
DOWN
buttons/marks to control the internal
temperature of each respective side / zone.
The degrees indicators will appear in the display window.
•The set temperature will increase 1ºF or 1ºC if you push the
UP
button once, or will
decrease 1ºF or 1ºC if you push the
DOWN
button once.
NOTE:
•If the unit is unplugged, power lost, or turned off, you must wait 3 to 5 minutes
before restarting the unit. If you attempt to restart before this time delay, the wine
cellar will not start.
•When you use the wine cellar for the first time or restart the wine chiller after having
been shut off for a long time, there could be a few degrees variance between the
temperature you select and the one indicated on the LED readout. This is normal
and it is due to the length of the activation time. Once the wine cellar is running for
a few hours everything will be back to normal.
STORAGE
Many bottles may differ in size and dimensions. As such the actual number of bottles you
may be able to store may vary.
10

INTERIOR LIGHT
•Interior lights are available in both zones.
•You can turn the interior light on or off in each zone by pushing the button marked
with the “bulb” symbol
Light
.
CONTROL PANEL LOCK
•Your wine cellar is equipped with an automatic control panel lock function. This
function will prevent any unwanted changes to your temperature or power settings.
•The lock function will activate automatically 12 seconds after the last time a button
is pushed on the control panel.
•To unlock the control panel lock press and hold the
UP
and the
DOWN
buttons for
3 seconds the control panel will beep and blink once indicating that the control panel
is active and the settings can be changed.
DOOR LOCK
Your unit is provided with a lock and key. The keys are located inside the plastic bag
that contains the User’s Guide. Insert the key into the lock and turn it counterclockwise
to unlock the door. To lock the door do the reverse operation making sure metal pin is
engaged completely. Remove the key and place it in a secure place for safekeeping.
REMOVING ROLLING SHELVES
1. Remove all bottles.
2. Pull the shelf out as far as possible.
3. Push the left side lever downward while pulling right side lever upward (as illustrated
below).
4. Remove the shelf.
11

CARE AND MAINTENANCE
Automatic Defrost
•Any ice build-up on the inner back wall during operation will automatically defrost
during a compressor off cycle.
•When defrosting is in process, the circulation fans for both zones will continue to run.
•Water from the defrost operation will drain into the drip tray (on the compressor)
and the water will evaporate with the help of the compressor.
Cleaning Your Appliance
•Upon installation of your new appliance, it is recommended that it be cleaned
thoroughly.
•Unplug the unit from the wall outlet.
•Remove all contents.
•Wash the inside with a damp warm cloth soaked in lukewarm water and baking soda
solution. The solution should be about 2 tablespoons of baking soda to a quart of
water.
•Be sure to keep the door gasket (seal) clean to keep the unit running efficiently.
•The outside of the appliance should be cleaned with mild detergent and warm water.
•Dry the interior and exterior with a soft cloth.
•Dust or anything else blocking the vent may hinder the cooling efficiency of the
appliance. Vacuum the vent if necessary.
Vacation Time
•Unplug the unit from the wall outlet.
•Remove all the contents.
•Clean the appliance.
•Leave the door open slightly to avoid possible formation of condensation, mold, or
odors.
•
Short vacations
: Leave the appliance operating during vacations of less than three
weeks.
•
Long vacations
: If the appliance will not be used for several months, remove all
bottles and unplug the power cord. Clean and dry the interior thoroughly. To
prevent odor and mold growth, leave the door open slightly, blocking it open if
necessary.
Moving Your Appliance
•Unplug the unit from the wall outlet.
•Remove all bottles.
•Securely tape down all loose items inside your appliance.
•Tape the doors shut.
Energy Saving Tips
•The appliance should be located in the coolest area of the room, away from heat
producing appliances or heating ducts, and out of the way of direct sunlight.
•Ensure that door is closed when the appliance is plugged in.
12

TROUBLESHOOTING GUIDE
You can solve many common appliance problems easily, saving you the cost of a
possible service call. Try the suggestions below to see if you can solve the problem
before calling for service.
PROBLEM
POSSIBLE CAUSE
Wine cellar does not operate.
Not plugged in.
The appliance is turned off.
The circuit breaker has tripped or a fuse has
blown.
Wine cellar is not cold enough.
Check the temperature control setting.
External environment may require a higher
setting.
The door is opened too often.
The door is not closed completely.
The door gasket does not seal properly.
Turns on and off frequently.
The room temperature is hotter than normal.
A large amount of wine has been added to the
wine chiller.
The door is opened too often.
The door is not closed completely.
The temperature control is not set correctly.
The door gasket does not seal properly.
The light does not work.
Not plugged in.
The circuit breaker has tripped or a fuse has
blown.
The light button is “OFF”.
Vibrations.
Check to assure that the Wine cellar is level.
The wine cellar seems to make too much noise.
The rattling noise may come from the flow of
the refrigerant, which is normal.
As each cycle ends, you may hear gurgling
sounds caused by the flow of refrigerant in
your wine cellar
Contraction and expansion of the inside walls
may cause popping and crackling noises.
The wine cellar is not level.
The door will not close properly.
The wine cellar is not level.
The gasket is dirty.
The shelves are out of position.
Display flashes Error message “E0”
Connection failure – there is a wire or
component that is not connected correctly.
Display flashes Error message “E1”
Temperature sensor failure.
Display flashes Error message “E2”
Defrost sensor (Coil Sensor) failure.
13

Warranty Information
Please speak to your retailer before calling Wine Enthusiast if you did not purchase your
wine cellar directly from Wine Enthusiast.
Limited warranty
– 90 day replacement plan with a free 9 month upgrade, totaling 1 year,
on parts and labor from the date of shipment. For customer service, please contact Wine
Enthusiast by e-mail (custserv@WineEnthusiast.net) or by phone (800.648.6058).
The limited warranty does not cover: Damage due to such things as accident, misuse,
abuse, mishandling, neglect, unauthorized repair or any other cause beyond the control of
the seller whether similar or dissimilar to the foregoing. Purchaser understands and
acknowledges that the goods sold here are wine refrigerators, which house wine.
Purchaser assumes all the risk of using these units, including risk of spoilage, humidity
variations, temperature variations, leaks, fires, water damage, mold, mildew, dryness
and similar perils that may occur.
14
Table of contents
Other N'Finity Wine Cooler manuals


Popular Wine Cooler manuals by other brands

Friax
Friax Genesis & Vintage SPC EVPL installation manual

Vinotemp
Vinotemp 4500DS Installation, operation & care manual

Monogram
Monogram ZDWC240NBS installation instructions

Wolf
Wolf Sub-Zero ICB400 Series Service manual

Caple
Caple Wi6113 instruction manual

KitchenAid
KitchenAid KUWS24LSBS01 cabinet parts


