Nabco GYRO TECH GT-1175 User manual

1 of 62
Model GT1175 Standard and Pocketed Slide Doors Installaon Manual
**with Opus Controller**
P/N C-00370 Rev 11-12-20
NABCO Entrances Inc. S82 W18717 Gemini Drive Muskego, Wisconsin 53150
Phone: (877) 622-2694 Fax: (888) 679-3319 www.nabcoentrances.com
NABCO hours of Operaon: Monday to Friday 8:00 a.m.- 4:30 p.m. (Central Time)
Associated Manuals Part Numbers: OPUS Wiring and Programming Manual P/N C-00139
Automatic Sliding Door Owners Manual (P/N C-00109) for Decal Installation
NABCO Price Book P/N 16-9244-30 (for Sensors, Switches, and Accessories)
• Turn OFF all power to the Automatic Door if a Safety System is not working.
• Instruct the Owner to keep all power turned OFF until corrective action can be achieved
by a NABCO trained technician. Failure to follow these practices may result in serious
consequences.
• NEVER leave a Door operating without all Safety detection systems operational.
WARNING
Table of Contents
4
4
5
SECTION 3.1: To the Installer .......................................................................5
SECTION 3.2: Objecve ...........................................................................5
5
SECTION 4.1: Request a User Name/Password to gain access into the “myNABCO” portal . . . . . . . . . . . . . . . . . . . . 5
SECTION 4.2: Associated Video QR Code Link .........................................................5
SECTION 4.3: Types of Units .......................................................................5
SECTION 4.4: Feature Comparison between Controls ...................................................6
SECTION 4.5: Header Components ..................................................................6
6
7
8
SECTION 7.1: Secure Transom Vercals to Header .....................................................8
SECTION 7.2: Install the Glass Stops .................................................................9
SECTION 7.3: Secure Header and Transom to Pocketed Jamb Tubes ......................................11
SECTION 7.4: Assemble the Door Frame ............................................................11
SECTION 7.5: Install the Tie Rods ..................................................................12
SECTION 8.1: Anchor Placements ..................................................................13
SECTION 8.2: Complete the Tie Rod Installaon (For Transom Units only) .................................14

2 of 62
GT1175 Standard and Pocketed Slide Doors Installaon Manual; with Opus Controller www.NabcoEntrances.com
P/N C-00370 Rev 11-12-20
SECTION 10.1: Install the Surface Threshold .........................................................15
SECTION 10.2: Install the Recessed Threshold ........................................................17
SECTION 11.1: Install the Boom Pivot .............................................................18
SECTION 11.2: Install the Full Open Sidelite onto the Upper Pivot and Boom Pivot ........................18
SECTION 11.3: Install the Clip .....................................................................19
SECTION 12.1: Install the Boom Pivot .............................................................19
SECTION 12.2: Parally Install the Limit Arm .........................................................19
SECTION 12.3: Install the Full Open Sidelite onto the Upper Pivot and Boom Pivot ........................20
SECTION 12.4: Complete Installaon of the Limit Arm .................................................20
SECTION 12.5: Adjust the Ball Detents ..............................................................21
SECTION 13.1: Secure the Fixed Sidelite to the Door Frame .............................................22
SECTION 13.2: Install the Boom Guide inside Fixed Sidelite ...........................................22
SECTION 13.3: Install the Floor Bracket .............................................................23
SECTION 14.1: Secure Slide Door to Belt Clips ........................................................24
SECTION 14.2: Install Boom Guide to Slide Door .....................................................24
SECTION 14.3: Adjust Rollers ......................................................................25
SECTION 14.4: Adjust the Interlocks ................................................................26
SECTION 17.1: Door Panels .......................................................................28
SECTION 17.2: Door Frame .......................................................................28
SECTION 18.1: Door Panel ........................................................................29
SECTION 18.2: Complete the Transom Installaon ....................................................29
SECTION 18.3: Complete the 1/4” Glass Stop Flush Glazing .............................................30
SECTION 18.4: Dust Protector Hoods (Clean Room Oponal) ...........................................31
SECTION 18.5: Aluminum Hood ...................................................................31
SECTION 18.6: Stainless Steel Hood (Header) ........................................................31

3 of 62
www.NabcoEntrances.com GT1175StandardandPocketedSlideDoorsInstallaonManual;withOpusController
Rev.11-12-20 P/NC-00370
SECTION 19.1: Adjust Horizontal Posion of Carrier ...................................................32
SECTION 19.2: Balance Weight of Door Panel with Nose Caster .........................................32
SECTION 19.3: Adjust the Breakout Magnet .........................................................33
SECTION 19.4: Adjust Preload .....................................................................33
SECTION 19.5: Adjust the Ball Plunger ..............................................................34
SECTION 20.1: Full Open Pocketed Slide Door ........................................................35
SECTION 20.2: Fixed Sidelite Pocketed Slide Door .....................................................36
44
45
48
54
58

4 of 62
GT1175 Standard and Pocketed Slide Doors Installaon Manual; with Opus Controller www.NabcoEntrances.com
P/N C-00370 Rev 11-12-20
Warning labels are universal and used to alert an individual of potential harm to one’s self or to others. The following warning
high
some
may result in a minor injury
Note: Indicates important informaon that provides further instrucon.
DANGER
WARNING
CAUTION
WARNINGWARNINGWARNING
WARNING
WARNINGWARNING
WARNING
DANGER
DANGER
CAUTION
CAUTION

5 of 62
www.NabcoEntrances.com GT1175StandardandPocketedSlideDoorsInstallaonManual;withOpusController
Rev.11-12-20 P/NC-00370
The purpose of this manual is to familiarize the installer and purchaser with the proper installation and operation of this
system. It is essential that this equipment be properly installed and operational before the door is used by the public. It is the
installer’s responsibility to inspect the operation of the entrance system to be sure it complies with any applicable standards.
Instruct the building owners and operator on the essentials of the operation of the door and this device. The owner should
follow these instructions to determine whether the door is operating properly and should immediately call for service if there
offers step by step instructions.
1. Open the NABCO Website: www.nabcoentrances.com
2. Enter the “myNABCO” portal → Request Access → Fill out the Request Access Form → Click onto Register
a. A User Name and Password will be emailed back to the requestor.
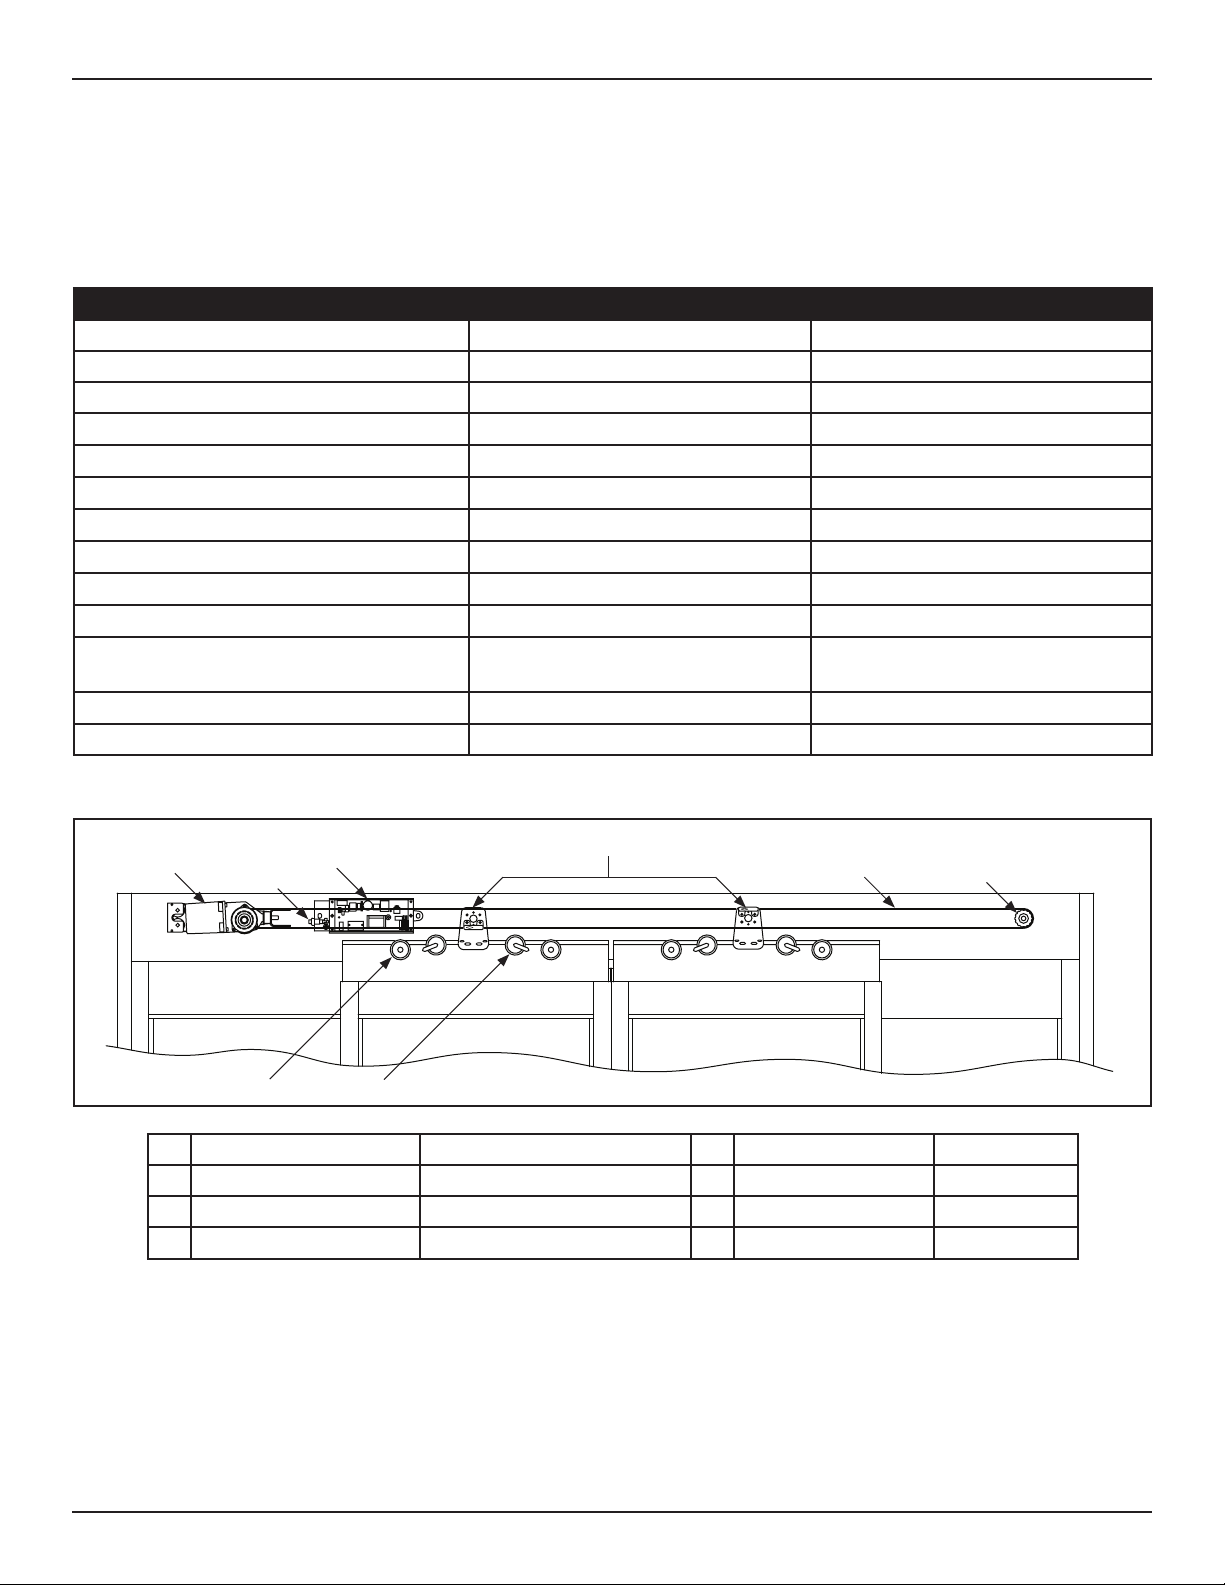
How to locate Service Parts Pages on the
NABCO website
Android Phone Instruction to Scan QR Code
Note: Scanning QR Links using an Android Phone may vary.
I-Phone Instruction to Scan QR Code
X
•
•
CAUTION

6 of 62
GT1175 Standard and Pocketed Slide Doors Installaon Manual; with Opus Controller www.NabcoEntrances.com
P/N C-00370 Rev 11-12-20
X
•
•
Feature GT1175 / Opus v27 GT1175 / U30
Operator VS-150 High Voltage Brushless Motor DC-150 Low Voltage Brushless Motor
Fully Programmable Open, Close, Check Speeds Yes Yes
Bluetooth Compable Yes No
Number of Auxiliary Outputs 3 (1 x Relay and 2 Transistors) 2 (1 x Relay and 2 Transistors)
Relay Output Rang 3A at 110VAC 3.2A (20 to 30V) 42V Peak
Transistor Output Rang 100mA 47 mA
Number of Programmable Inputs 3 inputs 1 input
Programmable door Handing Yes Yes
Requires Handy Terminal No Yes
12VDC available on Control Board 12VDC; 750mA 12VDC; 350mA
Compable with all acvang devices such as
Wall Switches, Card Readers, Keypads, etc.
Yes Yes
On board Programming Yes No
Opening speed (based on 500 pound door) Aer 1 second - 29 inches/second Aer 1 sec - 18 inches/second
DN 2261
①②③④
⑤⑥
⑦⑧
1VS 150 Operator V-00914 5Timing Belt 3/4” wide V-00917
2Power Cut O Switch N/A 6Idler Assembly A-01419
3 Opus Control Assembly A-01418 7 An Rise Roller A-00163
4 Belt Clip Assembly See Header Service Parts Page 8Hanger Roller A-00162
1. Ensure the Rough Opening is correct size.
XPACKAGE WIDTH +1/4 INCH ON EACH SIDE
XPACKAGE HEIGHT +1/4 INCH
Note: Make allowances for le or other exisng materials that may change the oor height.
2. Ensure the oor is level across the enre opening. If used, check recessed threshold across the door opening.

7 of 62
www.NabcoEntrances.com GT1175StandardandPocketedSlideDoorsInstallaonManual;withOpusController
Rev.11-12-20 P/NC-00370
DN 1740
R.O. WIDTH
90.0° 90.0°
1/4”
(6mm) 1/4”
(6mm)
1/4”
(6mm)
R.O.
HEIGHT
FINISHED FLOOR
1-3/4”
4-1/2”
Jamb Tube
RECESS
THRESHOLD
FLOOR
RECESS
THRESHOLD
1/2”
Figure 1 Masonry Opening
DN 0393
Cover in
Closed Posi on
Li UP to
Pull out
10-24 x .625”
Screw
Swing
UP
to Open
Figure 2
1. Remove (2) 10-24 x 0.625 inch screws. Remove Header Cover by liing it up and then pulling it out.
2. Unplug the Sensor (if equipped). Remove Parts boxes and/or Parts bags from inside Header.
DN 0768
SINGLE BIPART
1. Posion Jamb Tubes on either side of Header according to the instrucon scker located on each Jamb Tube, showing
proper locaon and orientaon. Ensure the removable cover side of Header is facing up.
Figure 3
DN 2263
FIXED SIDELITE UNITS:
ACCESS COVER TYPICALLY
FACES THE EXTERIOR
FULL OPEN UNITS:
ACCESS COVER TYPICALLY
FACES THE INTERIOR
NOTE: Header diagrams shown
with Access Cover removed.
1413121110
98
7654321
1413121110
98
7654321
Door
Opening
Door
Opening

8 of 62
GT1175 Standard and Pocketed Slide Doors Installaon Manual; with Opus Controller www.NabcoEntrances.com
P/N C-00370 Rev 11-12-20
2. Orientate the Frame in relaon to the building:
X
X
3. Secure the Header to each Jamb Tube with (6) 1/4-20 x .75 Whizlock screws.
a. If installed correctly there will be a 1/8 inch gap between the boom of Jamb Tubes and the at surface.
Jamb Tube
DN 1349
Header
1/4-20 x .75”
Whizlock Screw 1/8” gap
Figure 4
DN 0688
Fixed or Breakout Panel
Slide Door
Header
Transom Horizontal Transom Vercal
Glass or Panel
Jamb Tube
Figure 5
1. Place the Header on a at surface. Align the Transom clips to the pre-drilled holes on top.
2. Secure Transom Clips to Header with 10 x 1-3/4 inch Phillips Pan Head screws.
a. Please refer to the orientaon scker located on the Header for proper locaon and orientaon.
DN 0419
Top of Header
Orientaon Scker Vercal Transom Clip
10x1-3/4”
Pan Head Screw
HEADER COVER SIDE
Header Cover
3. Obtain Transom Vercals.
4. Secure (1) Transom Vercal to each Transom Clip with 1/4-20 x 1” Flat Head screws.
Figure 6

9 of 62
www.NabcoEntrances.com GT1175StandardandPocketedSlideDoorsInstallaonManual;withOpusController
Rev.11-12-20 P/NC-00370
5. Secure the Transom Horizontal onto the Transom Vercals with #8 x 1 inch Pan Head screw.
DN 2144
Horizontal Transom
#8 x 1”
Pan Head Screw
Top of Header
1/4-20 x 1”
Phillips Head Screw
Vercal
Transom
Figure 7
Note: Each Glass Stop is precut at the NABCO Factory according to placement and height of the Transom Vercal.
Note: Glass Panels can be installed before or aer the Door Frame is secured to the rough opening.
DN 2134
Example Shown:
Fixed Sidelite
1/4” Glass
Base Glass Stop
Exterior
1” Tall, 3/8” Glass
1” Tall, 5/8” Glass
1” Tall, 7/8” Glass
1” Tall, 1/4” Glass
1” Tall, 1/2” Glass
1” Tall, 3/4” Glass
1” Tall, 1” Glass
Header
Example Shown:
Full Open
1” Glass
Base Glass Stop
Exterior
Header
Figure 8
1. Go to the top of Header. Snap-In the Base Glass Stops between each Transom Vercal.
a. Ensure the tall back of Base Glass Stops face the Exterior side of building.
DN 2156
Measure full width of each Base Glass Stop
Transom Vercal
Top of Header
Base Glass Stop
Transom Horizontal
Figure 9

10 of 62
GT1175 Standard and Pocketed Slide Doors Installaon Manual; with Opus Controller www.NabcoEntrances.com
P/N C-00370 Rev 11-12-20
1. Go underneath the Transom Horizontal. Snap-In Base Glass Stops between the Transom Vercals.
a. Ensure the tall back of Base Glass Stops face the Exterior side of building.
2. Go to the Transom Vercal. Snap-In Base Glass Stops between the Transom Horizontal and Base Glass Stops located on top
of the Header.
a. Transom Vercals should be installed just above the Base Glass Stop installed on the Header.
DN 2153
1” Tall, 1/4” Glass
1” Tall, 3/8” Glass
1” Tall, 5/8” Glass
1” Tall, 7/8” Glass
1” Tall, 1/2” Glass
1” Tall, 3/4” Glass
1” Tall, 1” Glass
Pocketed Jamb Tube
Transom Horizontal
Transom Ver cal
1” Snap-In
Base Glass Stop
1” Snap-In
Base Glass Stop
EXTERIOR
EXTERIOR
Example Shown for Transom Ver cals and Jamb Tubes
-looking down- onto Header
Snap-In
Base Glass Stop
Snap-In
Base Glass Stop Top of
Header
Figure 10
1. Measure between the Boom of the Transom Horizontal and the Top of the Base Glass Stop located on the Header. Cut
strips of Vinyl to that length.
2. Measure the full width of each Base Glass Stop located on the Transom Horizontal. Cut strips of Vinyl to that length.
DN 2148
Measure full width of each Base Glass Stop
Measure between the Top
of Glass Stop and Boom of
Transom Horizontal to cut
Vinyl Strips
Transom Horizontal
Transom Vercal
End of Header
Base Glass Stop
End of Header
Figure 11
3. On the same side as the Glass Stop, roll or press Vinyl Strips into each Transom Pocket.
a. Using a Roller, or keeping the vinyl wet with plain or soapy water, can make vinyl installaon easier.
4. The other side of Vinyl Strips are installed aer the Glass Panel has been put in place. Please see “SECTION 17.1: Complete
the Transom Installaon”.

11 of 62
www.NabcoEntrances.com GT1175StandardandPocketedSlideDoorsInstallaonManual;withOpusController
Rev.11-12-20 P/NC-00370
Vinyl Vinyl
Base Glass Stop
Vinyl
DN 2146
Figure 12
Note: 1175 Slide Door Units installed with a Transom are shipped with Pocket Jamb Tubes only.
1. Place the Header between the Pocket Jamb Tubes so the removable cover side is facing up. Ensure the Frame is sll
orientated in relaon to the building.
2. Secure the Header to each Jamb Tube with (6) 1/4-20 x .75 Whizlock screws. If installed correctly there will be a 1/8 inch gap
between the boom of Jamb Tubes and the at surface.
Pocketed
Jamb Tube
DN 0949
1/4-20 x .75”
Whizlock Screw
1/8” gap
Flat Surface
Figure 13
Figure 14
DN 2263
FIXED SIDELITE UNITS:
ACCESS COVER TYPICALLY
FACES THE EXTERIOR
FULL OPEN UNITS:
ACCESS COVER TYPICALLY
FACES THE INTERIOR
NOTE: Header diagrams shown
with Access Cover removed.
1413121110
98
7654321
1413121110
98
7654321
Door
Opening
Door
Opening
1. Posion Jamb Tubes on either side of Header according to the instrucon scker located on each Jamb Tube, showing
proper locaon and orientaon. Ensure the removable cover side of Header is facing up.
2. Orientate the Frame in relaon to the building:
X
X

12 of 62
GT1175 Standard and Pocketed Slide Doors Installaon Manual; with Opus Controller www.NabcoEntrances.com
P/N C-00370 Rev 11-12-20
Note: Tie Rods are provided for Transom Units as required by NABCO Engineering.
1. Li to posion the assembled Frame into the rough opening.
2. Shim and Plumb Jamb Tubes in both planes to ensure the rough opening allows a 1/4 inch clearance.
3. Shim and plumb the Transom Horizontal at the top to ensure the rough opening allows a 1/4 inch clearance.
Figure 15
1/4” Shim and plumb
for proper clearance
DN 1348
Jamb Tube
Horizontal
Transom
1/4”
Header
4. Go to the side of Header that is closest to the Exterior side of Door Opening,
5. Mark the exact locaon of each Transom Vercal by drawing a horizontal line (the full width of the Transom Vercal); along
the outside edge of the Transom Horizontal; onto the ceiling of the Rough Opening.
a. Do not draw the line wider than the Transom Vercal. It is recommended to use a level for this step.
6. From the center of each Horizontal line, measure 1 inch deep (towards the interior side of building). Mark a Vercal line
onto the ceiling of the Rough Opening. It is recommended to use a level for this step.
Mark Line
Ceiling
DN 0411
Measure 1” deep from
center of Horizontal Line
1”
3/8-16 Concrete Anchor
hole end of 1” mark
Exterior side of
Door Opening
Figure 16
7. Carefully remove the Door Frame from the Rough Opening. Set aside.
8. At the end of each Vercal Line mark, drill (1) 3/8-16 Concrete Anchor hole into the ceiling of the Rough Opening.
9. Obtain all Tie Rods. (1) Tie Rod Parts box is shipped for each Transom Vercal.
10. Snap the Back Plate out from each Transom Vercal for easy access to the Tie Rod.
11. Transom Vercals are pocketed with (2) channels. Determine which channel is closest to the Exterior side of Door Opening.
12. Insert (1) Tie Rod into that channel.
Channel closet to
Exterior side of Door Opening
DN 1350
Figure 17
13. Go to the top of Header. Insert each Tie Rod down into the 1 inch, pre-drilled hole.
14. Once the Tie Rod is through the Header, loosely aach (1) Backing Plate, (1) 3/8 inch Washer, (1) 3/8 inch Lock Washer and
(1) 3/8-16 Hex Nut (in that order) to the boom of the Tie Rod.
a. Length of each Tie Rod equals the distance between the top of the Header, and top of Transom Horizontal, plus 2-5/8”.

13 of 62
www.NabcoEntrances.com GT1175StandardandPocketedSlideDoorsInstallaonManual;withOpusController
Rev.11-12-20 P/NC-00370
DN 1152
Transom Ver cal Tie Rod
3/4” Min
Backing Plate, 3/8” Flat Washer,
3/8” Lock Washer, and 3/8-16 Hex Nuts
Concrete Anchor Securely fasten Tie Rod to Anchor
with 3/4” minimum thread
engagement into building structure
Leg of
Roller Track
Header Cover
Horizontal Transom
Transom
Ver cal
Back Plate
Channel
Figure 18
15. Allow each Tie Rod to rest on the Roller Track “Leg” within the Header.
a. The Tie Rod must remain inside the Transom Vercal unl the Frame is fully secured into the Rough Opening.
b. Tie Rod Installaon is completed aer the Frame is installed.
Figure 19
Transom Horizontal
DN 0404
Vercal Transom
(Mullion)
Tie Rod
Top of
Header
Boom of Header
1. Li to posion the assembled Frame into the rough opening.
a. To prevent electrical interference for the 120 Vac Line, always route 120 Vac Power through the Header Endcap that is
opposite to the Control and motor/operator.
b. Please refer to “Model GT1175 Electrical Installaon Manual”; P/N C-00198 for detailed informaon.
2. Shim and Plumb Jamb Tubes in both planes to ensure the rough opening allows a 1/4 inch clearance. Shim and plumb the
Header or the Transom Horizontal at the top to ensure the rough opening allows a 1/4 inch clearance.
Figure 20
1/4” Shim and plumb
for proper clearance
DN 0760
Jamb Tube
Header
1/4” Shim and plumb
for proper clearance
Horizontal
Transom
1/4”
X
X

14 of 62
GT1175 Standard and Pocketed Slide Doors Installaon Manual; with Opus Controller www.NabcoEntrances.com
P/N C-00370 Rev 11-12-20
Figure 21
DN 0767
Y
48”
max
YY
YY
36”
max
48”
max
Y
SLIDE DOOR SLIDE DOOR w/TRANSOM
YY
36”
max 48”
max
Y
Y
48”
max
YY
Note: It is recommended to countersink holes as required to ush the surface.
Note: It is recommended to drill tap threads for 1/4 inch anchors in a steel or aluminum structure.
Note: Do not overghten anchors to prevent deforming Jamb Tubes.
Use 1/4 inch diameter anchors with a minimum of 3 per Jamb Tube, maximum is 48 inches on center. Drill 1/4 inch diameter holes
in the face of Jamb and then countersink each hole.
DN 0418
SLICK JAMB
1/4” Anchor 1/4” Anchor Hole(s)
POCKETED JAMB / VERTICAL TRANSOM
1/4” Anchor 1/4” Anchor Hole(s)
Figure 22
X
X
To prevent Header sag, use 1/4 inch diameter anchors or 3/8 inch threaded rods, with a maximum 48 inches on center. First
anchor maximum is 36 inches from each end of the Header. Drill 1/4 inch diameter holes inside the top of Header.
1. Aer the Frame has been installed, slide each Tie Rod up the Channel into each 3/8-16 Anchor located in the ceiling.
a. The 3/8-16 Anchor is used to securely fasten the Frame.
2. Go to the boom of each Tie Rod. Tighten the 3/8-16 Hex Nut and 3/8 inch Lock Washer to secure the Backing Plate.
3. Snap the Back Plate back into each Transom Vercal.
a. It may be necessary to use a rubber mallet to slightly tap the Back Plate into place.
b. Protect the surface of the Back Plate before hing it with a rubber mallet.
1. Go inside the Header. Locate the Pin wiring that is aached to the U30 Microprocessor Control, Main Harness.
2. Draw Pin wiring through a hole located at the side of Header and Jamb Tube. Connue to route wiring down the Jamb Tube.
3. Pull the Pin Wiring out, through the cut out.
4. Obtain (1) loose 5 Circuit Pin Housing from the Parts Box. Insert each Pin into the 5 Circuit Pin Housing accordingly:
a. 1 = Red, 2 = Orange/White, 3 = Blue, 4 = Green, 5 = Orange

15 of 62
www.NabcoEntrances.com GT1175StandardandPocketedSlideDoorsInstallaonManual;withOpusController
Rev.11-12-20 P/NC-00370
5. Obtain (1) Switch Assembly and (2) 10-32 x 1/2 inch Phillips Head Screws from the Parts Box.
6. Connect the Switch Harness from the back of the Switch Assembly to the Main Harness. Place extra wiring back inside the
Jamb Tube.
7. Insert the Switch Assembly into the Cut Out. Secure the Switch Assembly to the Jamb Tube with (2) 10-32 x 1/2 inch Screws.
DN 1002
Female Pin Housing
Jamb Tube
Wire Access Hole
Header Plate
Wire Access Hole
Key Switch
Rocker Switch
Male Pin Housing
Female Pin Wiring
Blue
Green
Orange
3
4
5
Red
Orange/White 2
1
Figure 23
Note: Thresholds are factory cut to be the same width as the door opening. However, extending the Threshold across the enre
door opening is oponal. To order addional track, please contact customer service at (877) 622-2694.
X
X
Figure 24
DN 2319
7”
SURFACE TRACK
RECESSED TRACK
4.5”
Bumpers
Bumpers
9.065”
SURFACE TRACK
RECESSED TRACK
6.565”
STANDARD SLIDE DOOR
POCKETED SLIDE DOOR
1. On the same side of Door Frame where the Sidelite will be installed, snap a chalk line on the oor from Jamb to Jamb.
Figure 25
DN 1027
Jamb Tube
Jamb Tube
Chalk Line
Chalk Line
EXTERIOR
FULL OPEN FIXED SIDELITE

16 of 62
GT1175 Standard and Pocketed Slide Doors Installaon Manual; with Opus Controller www.NabcoEntrances.com
P/N C-00370 Rev 11-12-20
2. Locate (2) screw splines on the exposed side(s) of the Threshold.
3. Secure (1) Threshold End Cap to the screw spline(s) with (2) 6 x 3/8 inch Phillips Head screws.
a. If the Threshold End Cap can not be properly secured with the screws provided, use a 1/8 inch diameter drill bit to
make the screw spline bigger.
4. Ensure the Threshold is centered to Jamb Tubes, and full length is ush with the chalk line.
Figure 26
DN 2320
Screw Spline
End Cap
6 x 3/8”
Phillips Head Screw
Ramp Threshold
6 x 3/8”
Phillips Head Screw
Screw Spline
End Cap
Ramp
Threshold
STANDARD SLIDE DOOR POCKETED SLIDE DOOR
5. Lay down the Threshold so the Bumper Channels are on same side of Slide Doors.
DN 1369
Jamb Tube
Example Shown:
Standard Bi-Part Slide Door
Bumpers
Filler Inserts
BUMPERS
(Used to Cushion Boom Guide Prongs)
FILLER INSERTS
(Used to Fill In areas
Boom Guide does not slide within)
Figure 27
6. Go to the Header on the Sidelite Side of Door Frame.
7. Plumb the Floor Track by hanging the Plumb Bob from the Header (Sidelite Side). There should be a 1/8 inch overhang.
8. Do not permanently install the Surface Threshold unl the Slide Doors are completely installed.
Jamb
Tube
4-1/2”
DN 2333
6-1/2”
Header
Ramp
Slide Door
4-1/2”
Threshold
1/8” gap between
Plumb Line and
edge of Track
Jamb
Tube
6-3/8”
6-1/2”
Header
Ramp
Slide Door
6-1/2”
Threshold
1/8” gap between
Plumb Line and
edge of Track
STANDARD
SLIDE DOOR
POCKETED
SLIDE DOOR
Figure 28

17 of 62
www.NabcoEntrances.com GT1175StandardandPocketedSlideDoorsInstallaonManual;withOpusController
Rev.11-12-20 P/NC-00370
Figure 29
Floor Surface Track
1/2”
DN 0761
1. On both the Exterior and the Interior side of Door Frame, snap a chalk line on the oor from Jamb to Jamb.
DN 2117
Jamb Tube
Chalk Line
Figure 30
2. Create a channel that is the full width of Jamb Tubes, and 1/2 inch deep.
3. Lay down the Threshold so the Bumper Channels are on same side of Slide Doors.
4. Center the Threshold inside the channel so the full length is ush with the chalk line.
5. Ensure the channel is plumb, square, and 1/2 inch deep throughout. Failure to do so may cause Slide door to malfuncon.
6. Go to each end of Threshold. Mark (1) drill hole approximately 4” from each edge. Connue to mark remaining drill holes to
be evenly spaced.
Figure 31
Drill Screw Holes in Metal Strip
DN 1047
Example Shown:
Standard Full Open
Slide Door
7. With a 1/4 inch masonry drill bit, drill through the Threshold and into the oor no less than 1-1/2 inch deep.
8. Do not permanently install the Surface Threshold unl the Slide Doors are completely installed.
Figure 32 Secure Threshold to Flat Surface
DN 2114
Fasteners not provide by NABCO
Metal Strip
RECESSED THRESHOLD
DN 2323
Swing Sidelite
EXTERIOR
INTERIOR
Swing Sidelite
Slide Door
POCKETED FIXED SIDELITE SLIDE DOOR
Figure 33

18 of 62
GT1175 Standard and Pocketed Slide Doors Installaon Manual; with Opus Controller www.NabcoEntrances.com
P/N C-00370 Rev 11-12-20
Figure 34
DN 1045
1/4-20 x 1/2”
Phillips Head Screw
Boom Pivot
1/4-20 x 1/2”
Phillips Head Screw
1/4 x 2-3/4”
Tapcon Screw
Bushing
1. Go to the boom of the Pivot Jamb Tube. Insert the Boom Pivot into the hole.
2. Secure the Boom Pivot to the Pivot Jamb Tube with (1) 1/4-20 x 1/2 inch Phillips Head screw.
3. Go to the screw hole located in front of the Barrel. Secure the Floor Pivot to the Threshold with (1) 1/4-20 x 1/2 inch Screw.
4. Insert (1) 1/4 x 2-3/4 inch Phillips Head Screw inside the Barrel. Tighten. Cap the Barrel with (1) Bushing.
1. Posion the Swing Sidelite Panel over the Boom Pivot at 90° angle.
2. Locate the Boom Pivot inside the Pivot Sle (at the boom). Slide Boom Pivot on top of Barrel.
Figure 35
DN 1046
Bo om Pivot
Jamb Tube
Barrel
3. Go to the Top Pivot that is pre-installed inside the Pivot Sle. Push the Top Pivot down by pressing on the Spring Pin.
4. Align the Top Pivot with the Pivot Hole located at the boom of Header.
5. Release the Spring Pin to allow the Top Pivot to snap up into the hole. Ensure the Top Pivot fully engages the hole.
a. If necessary, use a athead screwdriver to li up on the Spring pin unl the Pivot Pin is fully seated within the hole.
b. Ensure not to pinch Cable Wiring.
DN 2160
Top Pivot
Cable Wiring from
Main Harness (Inside Header)
Break Out
Direcon
Pivot Sle
Spring Pin
Hole
Spring Pin
Figure 36

19 of 62
www.NabcoEntrances.com GT1175StandardandPocketedSlideDoorsInstallaonManual;withOpusController
Rev.11-12-20 P/NC-00370
1. Go to the boom of the Strike Sle. Align the screw hole located on the upper poron of Clip to the Strike Sle.
2. Use the boom poron of the Clip as a template to mark and drill (2) 1/4 inch diameter screw holes into the oor.
3. Secure the Clip to the Strike Sle with (1) 1/4-20 x 1 inch Screw, and to the Floor with (2) 1/4-20 x 1/2 inch Screws.
DN 2334
1/4-20 x 1”L
Screw
Strike Sle
1/4-20 x 1/2”L
Screw
Clip
Figure 37
DN 2321
Exterior
Swing Sidelite
STANDARD FULL OPEN SLIDE DOOR POCKETED FULL OPEN SLIDE DOOR
EXTERIOR
INTERIOR
EXTERIOR
Exterior
Swing Sidelite
Interior
Swing Sidelite
Figure 38
Figure 39
DN 1045
1/4-20 x 1/2”
Phillips Head Screw
Boom Pivot
1/4-20 x 1/2”
Phillips Head Screw
1/4 x 2-3/4”
Tapcon Screw
Bushing
1. Go to the boom of the Pivot Jamb Tube. Insert the Boom Pivot into the hole.
2. Secure the Boom Pivot to the Pivot Jamb Tube with (1) 1/4-20 x 1/2 inch Phillips Head screw.
3. Go to the screw hole located in front of the Barrel. Secure the Floor Pivot to the Threshold with (1) 1/4-20 x 1/2 inch Screw.
4. Insert (1) 1/4 x 2-3/4 inch Phillips Head Screw inside the Barrel. Tighten. Cap the Barrel with (1) Bushing.
1. Slide (1) .255 ID x .900 OD x .125 THK Nylon Washer onto (1) 1/4-20 x 1 inch Phillips Head Screw.
2. Go underneath the Limit Arm. Insert the Washer and Screw up into the screw hole.

20 of 62
GT1175 Standard and Pocketed Slide Doors Installaon Manual; with Opus Controller www.NabcoEntrances.com
P/N C-00370 Rev 11-12-20
3. Go to the pre-drilled screw hole located at the boom of Header (on the Pivot Side of Sidelite).
4. Secure the Limit Arm to the Header by ghtening the Screw.
a. Loosely ghten (just enough to keep the Screw assembly from falling out of the hole).
b. Limit Arm installaon is completed aer the Swing Sidelite is fully installed.
Figure 40
DN 0771
Limit Arm
Limit Arm Wheel 1/4-20 x 1”
Phillips Head Screw
.255 x .900 x .125 THK
Nylon Washer
Boom of Header
Pivot Hole
1. Locate the Boom Pivot inside the Pivot Sle (at the boom). Insert the Boom Pivot into the Floor Pivot Barrel.
2. Go to the Top Pivot that is pre-installed inside the Pivot Sle. Push the Top Pivot down by pressing on the Spring Pin.
Figure 41
DN 1046
Bo om Pivot
Jamb Tube
Barrel
3. Align the Top Pivot with the Pivot Hole located at the boom of Header.
4. Release the Spring Pin to allow the Top Pivot to snap up into the hole. Ensure the Top Pivot fully engages the hole.
a. If necessary, use a athead screwdriver to li up on the Spring pin unl the Pivot Pin is fully seated within the hole.
b. Ensure not to pinch Cable Wiring.
DN 2160
Top Pivot
Cable Wiring from
Main Harness (Inside Header)
Break Out
Direcon
Pivot Sle
Spring Pin
Hole
Spring Pin
Figure 42
1. Swing open the Swing Sidelite 90 degrees. Align and then rest the Limit Arm inside the Top Rail.
2. Open the Swing Sidelite all the way. Tighten (1) 1/4-20 x 1 inch Phillips Head screw to secure the Limit Arm to the Header.
Other manuals for GYRO TECH GT-1175
5
Table of contents
Popular Indoor Furnishing manuals by other brands

Tripp Lite
Tripp Lite WorkWise owner's manual

LuxenHome
LuxenHome WHIF1157 instruction manual

home star
home star LEGACY HOME FURNISHINGS & DECOR C1930030 Assembly instructions

HAMPTON BAY
HAMPTON BAY Lounge 65-518333B Use and care guide

SUNFLEX
SUNFLEX EASYDESK ELITE 610703 Assembly manual

Links
Links TILL 20 90 01 62 Assembling Instruction

Simpli Home
Simpli Home brooklyn+max WynclenHall AXCACA39-LGB quick start guide

EUROSTYLE
EUROSTYLE BODIE-48 Assembly instructions

SouthShore
SouthShore 4257B Assembly instructions

Home Styles
Home Styles Kitchen Cart Assembly instruction

Twin Star Home
Twin Star Home 36BV478 quick start guide

Elite
Elite BAKEWELL Assembly guide