Nanfone NF-910 User manual

CONTENTS
Introduction…………………………............................................................…….….......……….01
Included………………………………..…........................................................……...….....……..01
Main Features………………………………..…........................................................……...….....02
Technical Information…………………………............................................................…….…...03
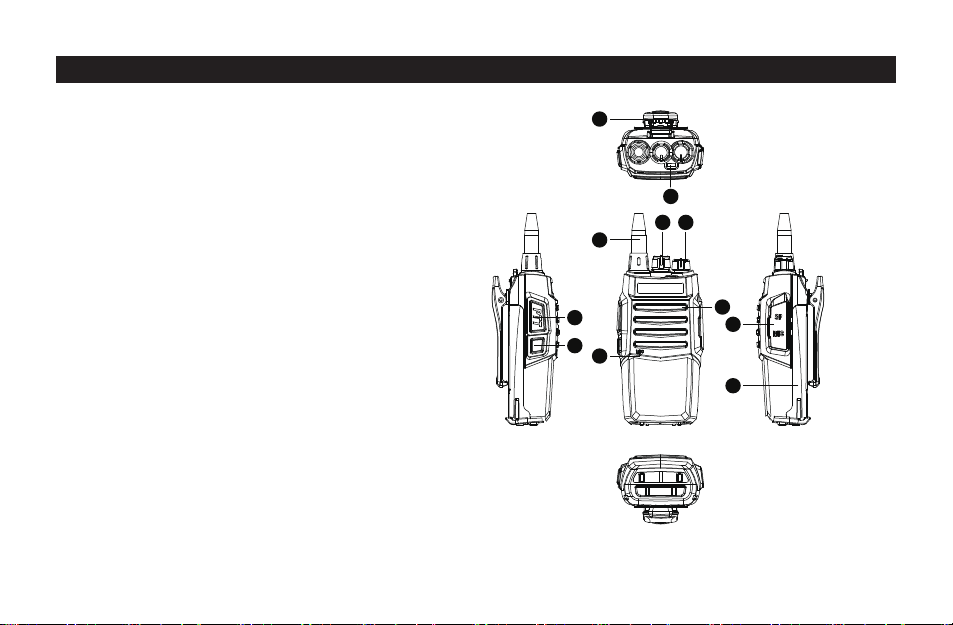
Know the Radio………………………………..…........................................................……...…..05
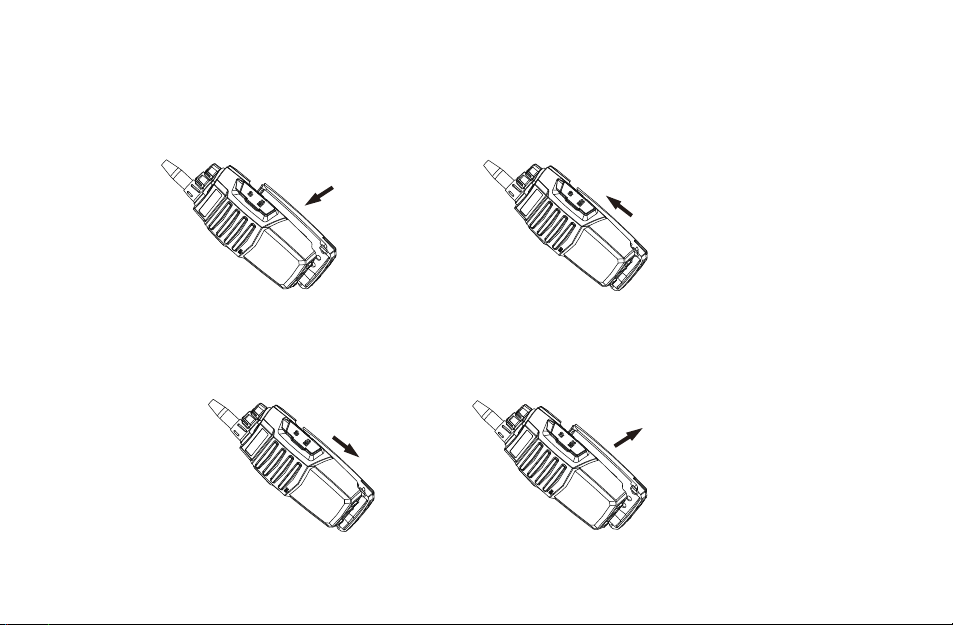
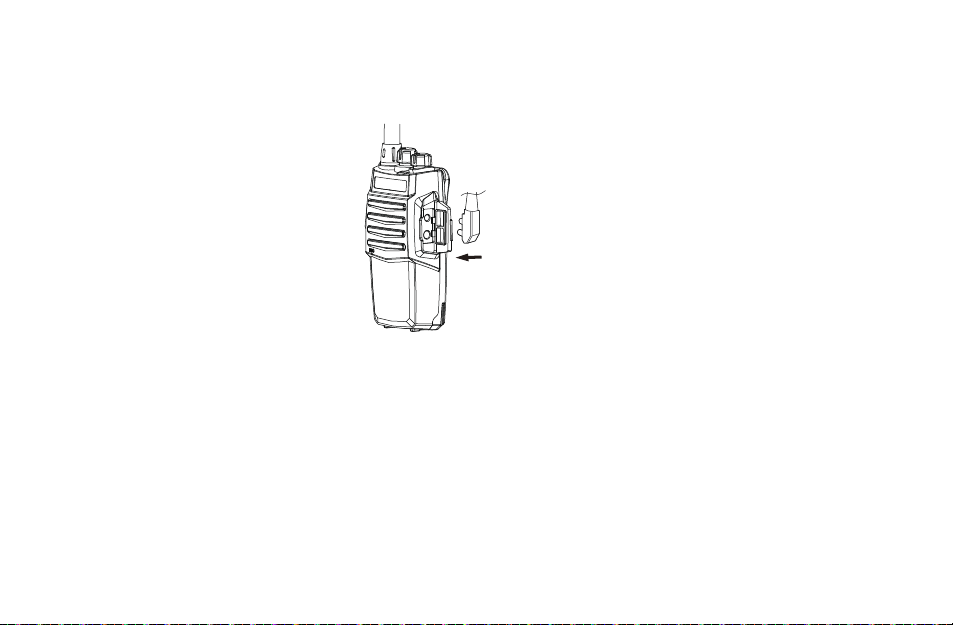
Preparation before using………………………………..…........................................................06
Basic Functions………………………..........................................................................……......11
Function Setting……….............................................................................….....….....…….......15
Care& Maintenance…………………..............................................……….........…......….....….19
Trouble Shooting ……………………………................................................…..….....….....…...20
Appendix: CTCSS and DCS chart……………...........................................................….....…..21
Warranty Card…………………………………………………………………………….....………...22

Introduction
Thanks for purchasing NANFONE transceiver NF-910.Please read this manual carefully to learn its
latest functions and operations before using. NF-910 is with mini compact size, easy to use feature
and stable performance, which is developed for satisfying customers demand.
No matter you are in the countryside, forest area, pastoral area or the sea, it still can have high
quality conversation .Meanwhile, the fashion casing can also meet your personality.
Thanks you again for choosing us!
Included
Please unpack the transceiver carefully and make sure the contents match with the packing list as
bellow. Should any items have been missed or damaged during shipment , please file a claim to
the distributor immediately.
Accessories list:
01

Main Features:
Description Unit Quantity
Antenna pc 1
Belt clip pc 1
Lithium battery pack pc 1
Power adapter pc 1
Desktop charger pc 1
QC passed card pc 1
pc 1
User manual
(warranty card)
1.Frequency range: 400MHz-470MHz
2.Voice reported in both English and Chinese(optional).
3.High/Low Power
4.Wide/Narrow Bandwidth: 25K/12.5K selective.
5.CTCSS 50/ DCS 83 is to avoid interference from other radios.
6.VOX Function. Release your hands for convenient use.
7.TOT Function .Avoid damage due to the long -term transmit.
8.BCL Function. Release your hands to end the talking.
02

9.Scan Function. San and receive all the conversation channel.
10.FM Radio . Know more about latest news.
11.Battery Save and Long Standby.
All the above functions can be programmed by PC. In addition, it has the below functions:
1.SQL Setting. Eliminate background noise when conversation is ended.
2.BCL Function. Busy Channel Lockout.
Technical Information
General
Frequency range: 400-470Mhz
Number of channel: 16
Channel space: 12.5kHz or 25kHz selectable
Modulation: Frequency Modulation (FM)
Operating temperatures range: -10℃--- +55℃
Voltage: 7.4V
Standby currency: about 25mA
Size: 100(H)×58(W)×36(D) mm
Weight: around 210.6g
03

Transmitting
Frequency distortion: ±3ppm
Power output: ≥5W
Emission current ≤2.3A
Maximum deviation: ≤±5kHz or ≤±2.5kHz selectable
Audio frequency distortion: <5%
Adjacent frequency: <60dB
Residual radiation <-60dB
Receiving
Receiving sensitivity: <-122 dbm (12dB SINAD)
Squelch sensitivity: <-122 dbm
Audio output power: ≥500mW
Receiving current: ≤500mA
Audio frequency distortion: <5%
Voltage: 7.4V
Adjacent channel selectivity: ≥ 60dB
Intermediation rejection: ≥60dB
04

1. Antenna
2. Knob channel
3 .Knob volume
4. PTT
5. Monitor
6. Microphone
7. Speaker
8. MIC
9. Battery pack
10. Indicator
11. Belt Clip
Know the radio
1
11
8
9
6
47
5
2 3
10
05

Preparation Before Using
Install the Antenna
Install the antenna as picture shows and rotate it clockwise till tight. (antenna appearance is for
reference only)
Note:
Don’t hold the antenna or hang the keys or external MIC on the Antenna ,in case of destroying the
performance of radio .
06

Install the battery
Install the battery along the rear case of radio properly.
as following pictures show:
Disassembling of battery
Press the fixed buckle of the battery(P1),then push down the battery off the transceiver(P2)
P1 P2
07

Install and take off the belt clip
If necessary ,fix the belt clip with two screws (3*6) as picture shows:
Note:
1. When installing the belt clip , do not use any glue to fix screws, otherwise, it will damage the
housing.
2. Take off the belt clip before taking off the battery.
08

Install external microphone
Install the microphone as picture shows, plug the headset into the directly jack and press on.
Charging
The battery pack is not fully charged , and please charge it before using.
When used for the first time after purchased or stored over two months, the capacity of battery
pack is less than normal. However, it will return normal after charged and discharged for three to
five times.
Charging steps as below:
1. Insert the AC adaptor line to the charging hole of desk-top.
2. Connect the power with AC adaptor.
3. Put Li-ion battery or Radio with battery on the desk- top.
As following pictures show:
09

Note:
1.Please make sure the battery connect with the touching piece of the charging terminal.
2. Green light indicates power on or the battery is full. Red light indicates the charging just
beginning. Charge in power-off mode, the indicate red light is on, and it is off when finish charging.
3. Do not short-circuit the battery terminals or dispose of batteries in fire.
4. Do not disassemble the housing of the battery.
5. It will take about 6 hours for full charge.
10

Basic Functions
Power on
Turn the power switch clockwise/volume control knob to turn on the radio.
The sound "beep", if the voice function turning on, and reports the current channel number.
Channel Selection
Switch the channel rotator to the demanded channel .If turning on channel report (programmed by
PC) ,then hear the channel No.
VOX Adjust
Press [MONI] and rotating the VOX to adjust the suitable at same time.
Transmitting
Press 【PTT】and Red Indicator flashes, then transmitting the information and release.
Monitor
Short press (FM/Monitor/FM+) to turn on the Squelch Function, press gain to turn off.
Call Function
Press (PTT) and (FM/Monitor/FM+) simultaneously to call and transmit, release (FM/Monitor/FM+)
to quit.
FM Operation
1.Long press Keys SK1(FM/Monitor/FM+) for more than 2 seconds and hear the sound “beep” ,
turning on the FM .The radio can scan automatically by short pressing the (FM/Monitor/FM+) Keys
11

SK1 or Keys SK2 .Stop scanning when get a signal If want to receive another radios, short press
(FM/Monitor/FM+) or Keys SK2 again.
2. Long press (FM/Monitor/FM+) for more than 2 seconds and hear the sound” beep ,beep” means
to quit the FM.
3. Closing the FM function can be programmed by PC.
Note:
The radio can return automatically to be ready for transmitting when receiving the same
frequency signal .If set on it, radio can return and go on receiving FM after communication for 5
seconds. If not, the radio can not return automatically.
Scan Function
When activate the scan function by PC program, and turn to the Channel 16, then radio tips the
sound of “scanning”. If report “16”, it means to turn off the scan function.
Turning on the scan function and being standby ,radio would scan the signal one by one from the
present channel.
When match with same signal ,LED light would flash green and receive signals .Then you can
transmit the information by PTT .If there is no operation on the radio for 10 seconds ,it would
return to scan .
Example: When activate the scanning of Channel 3,5,7 ,radio would scan automatically when get
to Channel 16 .Once receiving the signal from anyone of channel 3,5,7,16 ,scanning would stop
and ready for transmitting .
12

Channel Lock Out
Radio with channel lock out function avoids not transmitting by some improper operation on the
radio at some specific occasions.
Steps: Press Keys SK1(FM/Monitor/FM +) and Key SK2(FM-) at the same time to turn the radio on ,
and “beep” tips sound . It means changing present status.
It is only allowed to use one channel and can not be changed by Channel Selector when active
Channel lock out function .
Do again the above steps to turn to Channel 16.
Low Battery Alert
1. Working in Voltage higher 6.5 V
2. Transmit and receive working ,but red indicator flashes when voltage lower than 6.3V ,but
higher than 5.8V (Battery shows 1 Grid) alarm every 20 seconds.
3. Voltage lower than 5.8V, receive working , alarm every 2 0 seconds ,but can not transmitting.
Wired Cloning (Mutual clone between two transceivers)
1. Well connected the transmission lines to the both transceivers, and then power on the
subsidiary transceiver.
2. Rotate the channel selector on the base transceiver to channel 8, then hold and Press Keys SK1
“Radio/Monitor/FM+” key to power on, (3 seconds later) until the orange light (red light and green
light flash simultaneously) flashes which indicates the base transceiver is in cloning state, then
13

release the button.
3. When the orange light on the base transceiver flashes, press the PTT key, the green light on
base transceiver flashes, and the red light on subsidiary transceiver flashes, which indicates the
base transceiver is in cloning state. The mutual clone is successful when the light on base
transceiver flashes orange again.
4. If indicator lights of both two transceivers flashes abnormally in the process of data transmit,
it means replication fail. In that case, please check and make sure the transmission line is well
connected. And please press the PTT button again to resume cloning when the indicator light of
the base transceiver shines orange.
5. If need to clone with more than one transceiver, please turn off the subsidiary device after
cloning finished and then pull out the transmission cable. And then clone to next transceiver
following steps by press PTT again.
6. Please reboot the transceiver to make it work properly after cloning.
14

Function Setting
PC Software Programming Setting
Please login in http://www.nanfone.com to download to NF-910 software. Or ask for the local
distributors.
SQL Setting
1. Open the PC software to select the squelch level you require on the right corner
Squelch level is from 1-9. The higher the squelch level, the lower chance of interference, but it
may affect the communication distance.
2.Squelch system can eliminate background noise when there is no signal received, which not
only make it more comfortable at standby mode, but also significantly reduces the standby power
consumption.
VOX Function
1. Open the PC software, you can select the squelch you require, like the picture .
The level of VOX is from level 1 to level 10. The higher the lever is, the higher the sensitivity will be.
2. VOX Postponement: If the transceiver returns to receiving mode immediately after launch, the
end part of the call may not be transmitted correctly. Such kind of problem can be avoided by
setting VOX Postponement.
15

TOT
1. Open the PC software programming to select the times . The purpose of the
Time-out Timer is to prevent any single person from using a channel for an extended period of time.
2. The overtime can be set by PC software programming ( the time can set as 30 seconds, 60
seconds, 90 seconds、120 seconds、150 seconds、180 seconds or OFF ). If the continuous
launching time is over the preset timer, the launching will be stopped and a “Beep” tone sounds.
To stop the “Bi” tone, please release the PTT button. You can press the PTT button again to
resume launching.
Oral Channel Indicator Function
Open the PC software to select the language. When the oral channel indicator
function is programmed to be off, then the transceiver will not report the channel. When the oral
channel indicator function is programmed to be in English or in Chinese, then the transceiver will
report the channel accordingly.
Scan Function
1. Open the PC software to select the scan should be turned on or not.
2. There’re scan function options behind each channel if the function is selected. When the scan
function is set to be ON, the channel can be scanned automatically in standby state, and you can
talk on this channel while there’s signal. Rotate the channel selector to channel 16 to activate the
16

scan function, and then those channels which set automatic scan will be activated by it-self. For
instance, if the scan function of channel 3,5,7 was activated by PC software programming, when
you rotate the channel selector to channel 16, the transceiver will scan channel 3,5,7,16, when
receive signal from one of these four channels, it will stop scanning, and talk on this channel.
It’s normal that it will be delayed when you open the speaker after activating the scan function,
the delay time is related to the number of channels which set scan function.
Note:
If the channel with CTCSS/DCS, if it is disturb by signal with CTCSS/DCS or not during scanning,
the radio light will bright green and quit scan. The speaker is also without sound. It must wait for
10 seconds after the interference, which is normal.
Busy Channel Lockout
1. Open the PC software to select the channel you require. NF-910 can be set to be OFF, carrier
wave and QT/DQT busy lockout
2. CTCSS Busy Lockout: The transceiver receives SQ, but not QT/DQT, and then transmitting is
allowed. The transceiver receives SQ, and QT/DQT and then transmitting is prohibited.
3. Carrier Wave busy lockout: The radio receives SQ and it is prohibited.
Power Save
Open the PC software to decide whether you select the power saves or not. When ”on” is chosen,
that means you the power save function being turned on.
17

FM Radio
Open the PC software to decide whether you will select the FM radio or not. When ”on” is chosen,
that means you the function being turned on.
Radio Return
Open the PC software to decide whether you will select the Radio return function or not. When
”on” is chosen, that means you the Radio return function being turned on. If not, the FM radio
exit automatically after receives a signal.
High and Low Power Selection
Open the PC software to select the high/low power in the corresponding channel you are in.
Broad Band and Narrow Band Selection
Open the PC software to select the Broad Band /Narrow Band in the corresponding channel you
are in.
QT/DQT
1.Open the program software, select the channel what you want and under the QT, and set it into
QT/DQT/off.
2.QT/DQT: The SQ can work and radio transmits information under the same QT/DQT. If both
radios with same channel but different QT/DQT then the SQ can not work and only bright green
light.
18

Care &Maintenance
Transceiver you purchased is an exactitude design electronic products and please use it carefully.
Following maintenance ways may help extend its lifetime.
1. Please don’t try to disassemble the transceiver since non-technicians’ processing may cause
damage to the device.
2. Do not use and charge under the easy explosive environment. (The air includes a large number
of fine sand, dust and chemicals)
3. Please turn off the transceiver when you are in gas station.
4. Please don’t put the transceiver in sun or hot place for long time, because the high temperature
will shorten use life of electronic parts and cause distortion to plastic parts.
5. Please keep the transceiver dry, because rain and moisture will erode the electronic circuits.
6. Please power off the transceiver and remove its battery pack immediately once it is peculiar
smell or smog emit from the device.
19
Table of contents
Popular Two-way Radio manuals by other brands

PRYME Radio Product
PRYME Radio Product PRYMEBLU BT-501-DIRECT user guide

Topcom
Topcom Twintalker 5010 user guide

Ritron
Ritron PATRIOT PLUS owner's manual

Motorola solutions
Motorola solutions DTR600 user guide

Uniden
Uniden GMR2238-3CK Manuel utilisateur

ALAN Electronics
ALAN Electronics Tectalk FM PMR 446 Service manual