Napoli NPL-U023 User manual


17
TABLE OF CONTENTS
IMPORTANT PRECAUTIONS---------------------------------------------------------------------------------1
SAFTETY HINTS AND HARDWARE PACKING LIST------------- -------------------------------------2
CHECK LIST--------------------------------------------------------------------------------------------------------2
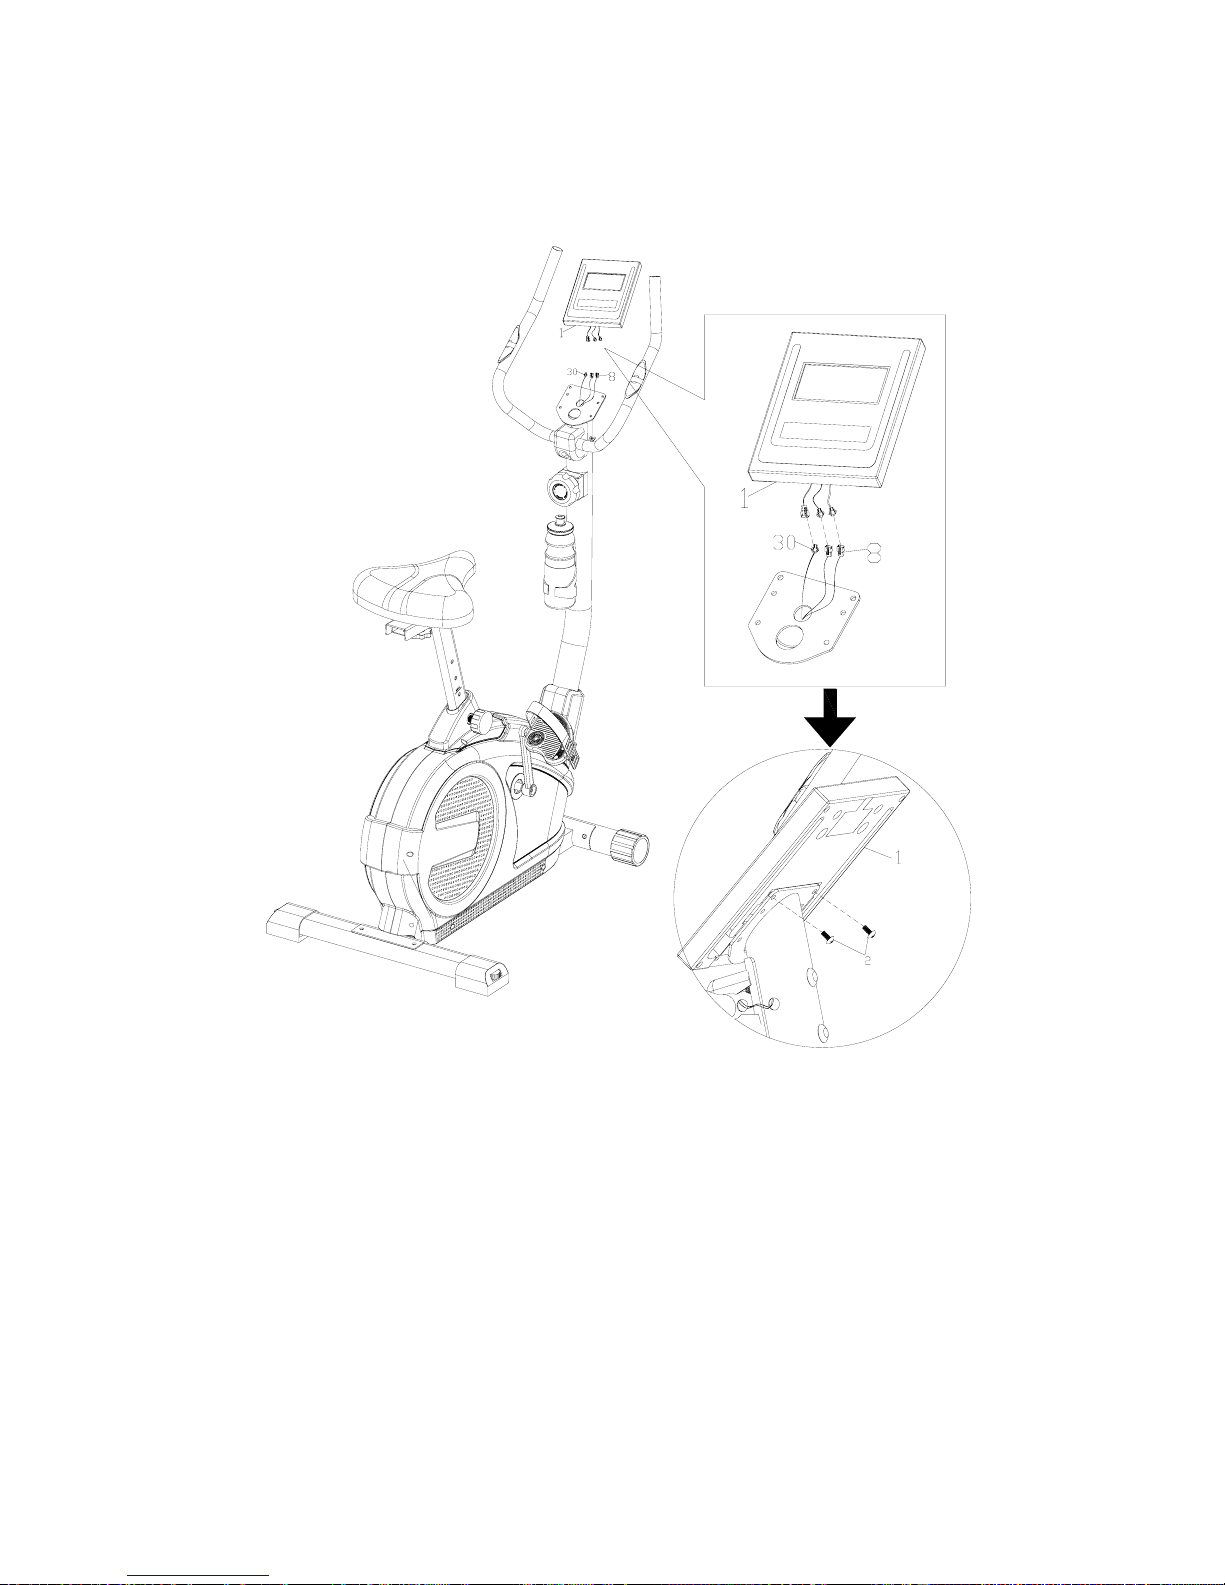
ASSEMBLY----------------------------------------------------------------------------------------------------------3
DIAGAM--------------------------------------------------------------------------------------------------------------9
PART LIST----------------------------------------------------------------------------------------------------------10
TRAINING PULSE RATE------------------------- -------------------------------------------------------------12
TRAINING INSTRUCTION-------------------------------------------------------------------------------------13
IMPORTANT PRECAUTIONS
WARNING: To reduce the risk of serious injury, read the following important precautions
before using this equipment.
Thank you for selecting our product. Even though we go to great efforts to ensure the quality of each
product we produce, occasional errors and /or omissions do occur. In any event should you find this
product to has either a defective or a missing part, Please contact us for a replacement.
This product has been designed for home use only. Product liability and guarantee conditions will
not be applicable to products being subjected to professional use or products being used in a gym
center.
This exercise equipment was designed and built for optimum safety. However, certain precautions
apply whenever you operate a piece of exercise equipment. Be sure to read the entire manual before
assembly and operation of this machine. Also, please note the following safety precautions:
1. Keep children and pets away from this equipment at all times. This is not a toy.
2. Only one person at a time should use this equipment.
3. If dizziness, nausea, chest pains, or any other abnormal symptoms are experienced while using
this equipment, STOP the workout at once. CONSULT A PHYSICIAN IMMEDIATELY.
4. Set up and use this equipment on a clear and level surface. Do not use outdoors or near water.
5. Keep hands and feet away from any moving parts.
6. Do not insert any object into any openings.
7. Read all instruction before assembly and operation.
8. Before using this equipment to exercise, always do stretching exercises to properly warm up.
9. Use this equipment only for its intended use as described in this manual.
10. Always wear appropriate workout clothing and shoes when exercising, do not wear robs or
other clothing that could become caught in the equipment.
11. Never adjust any part above the marked maximum position.

18
SAFETY HINTS
1. The high level of safety can be maintained only if it is examined regularly for damage and
abrasion, please pay special attention to components most susceptible to wear, e.g. rear
stabilizer cap, transportation wheels, pedals, foam grip and seat.
2. Damaged parts need to be replaced immediately and please only exercise again once
properly repaired.
3. Incorrect and excessive exercise can harm your health.
4. Any of the adjustment devices that could interfere with user’s movement should not be left
projecting.
USE AND FUNCTIONS
This magnetic bike is designed for home training.
The pedal crank training equipment is tested according to EN957-1/-5, class HB for home use with a
maximum user weight of 150 kgs and is NOT suitable for therapeutical use.
This item is speed-independent, you can adjust the load/intensity with the help of the adjusting
knob.
Equip. Size: L= 102cm, W=52cm, H=146cm
Equip. Weight: 26 kg
WARNING: BEFORE BEGINNING ANY EXERCISE PROGRAM CONSULT YOUR PHYSICIAN.
THIS IS ESPECIALLY IMPORTANT FOR INDIVIDUALS OVER THE AGE OF 35 OR
PERSON WITH PRE-EXISTING HEALTH PROBLEMS. READ ALL INSTRUCTIONS
BEFORE USING ANY FITNESS EQUIPMENT. WE ASSUME NO RESPONSIBILITY
FOR PERSONAL INJURY OR PROPERTY DAMAGE SUSTAINS BY OR THROUGH
THE USE OF THIS PRODUCT.
NOTE:
1. Above described parts are all the parts you need to assemble this machine. Before you
start to assemble, please check the hardware packing to make sure they are included.
2. All the other parts described on page 9-10(parts list) are pre-assembled at the factory.

CHECK LIST
PART DESCRIPTION QTY PART DESCRIPTION QTY
Main frame
/bolt/washer Seat post/ slid post
48/2/12 1set 60/17 1set
Rear stabilizer /cap
nut 1set 16/19/
18/57 Seat /bolt/ washer/knob
53/14 1set
Front stabilizer/pedal Front post /Tension knob
1set33/35 27/26 1set
Water jug/Handlebar
cover
Monitor /sensor
wire/pulse wire 1set 23/1/30/8 1
Handlebar Instruction manual
1set7 # 1
19

ASSEMBLY INSTRUCTION
GENERAL
REMOVE ALL THE PART OF YOUR CYCLE FROM THE CARTON AND PLACE THEM ON THE FLOOR
CAREFULLY.
ASSEMBLING YOUR CYCLE IS SIMPLE.
FOLLOW THESE INSTRUCTIONS CAREFULLY AND IT SHOULD TAKE YOU AROUND 15-20
MINUTES.
STEP1. ATTACH THE FRONT AND REAR STABILIZER
Attach the rear stabilizer (53) which is assembled with 2 caps (52 to main frame (48), using 2
carriage bolts (55), 2 curve washers (18), 2 spring washers (12) .and 2 cap nuts(14).
Attach the front stabilizer (33) with 2 transportation wheels (32) to main frame (48), using 2
carriage bolts (9), 2 curve washers (12), 2 spring washers (13) .and 2 cap nuts(14).
You can use adjustable cap (52) to level the bike.
NOTE: Make sure you fasten the bolts securely to avoid shaking and discomfort when cycling.
20

STEP2. ATTACH THE SEAT AND SEAT POST
Attach the seat (16) to top seat bracket of seat slide tube(17) and tighten with washers (18) and
nylon locknuts (19) securely.
After that, then attach the seat slide tube (17) to seat post (60) and tighten with
washerΦ32×Φ10.5×2(21)and turn the Seat Knob (22) clockwise until it is tight.
Insert the seat post (60) to seat post mounting tube of main frame (48) and secure in position with
the seat post triangle knob (57).
After assembling seat post you can move the hole of seat slide post (17) to Adjust your desired
position.
NOTE: Make sure you fasten the bolts securely to avoid shaking and discomfort when
cycling.
21

STEP3. ATTACH THE FRONT POST
Remove the pre-assembled 4 allen head bolt (29), 4 curve washers (13) and 4 spring
washers (12) from mainframe (48).
Connect the socket of middle section sensor wire (30) to plug of middle section sensor wire (44).
Connect the lead head of middle section tension cable (26) to the bracket of the bottom section
tension cable (56).(See figure A1-A4)
Insert the front post (27) to main frame (48) , using 4 allen head bolts (29), 4 spring washers (13)
and 4 curve washers (12).
22

STEP4. ATTACH THE HANDLEBAR AND WATER JUG
■Attach the handlebar (7) to front post (27) with two Carriage bolt M8*75mm(9) two Curve washer
M8(12) two Spring washer M8(13) and two Cap nut(14), clamp decoration cover (15) .
23

■ Attach the water Jug(23) to front post (27) with two Flat pan head screw M5×15
(24) and one jug holder(25) .
Step 6. ATTACH THE COMPUTER
1. Connect the plug of Middle Section Sensor Wire (30) to the socket of Top Section Sensor
Wire which come from Monitor.
2. Connect the two sockets of Hand Pulse Wire (8) to the two plugs which come from
Monitor .
3. Slide the Monitor (1) to the bracket of Front Post (27).
24

Step 7. ATTACH THE PEDAL AND PEDAL STRAP
1. Identify the Left Pedal(35), which is marked with an "L".Using an 13×15 spanner, firmly
tighten the Left Pedal counterclockwise into the left arm of the Crank(37). Tighten the Right
Pedal(35) clockwise into the right arm of the Crank(37).
Important: Tighten both Pedals as firmly as possible. After using the exercise cycle
for one week, retighten the Pedals. For best performance, the Pedals must be kept
tightened.
25

26
Table of contents
Popular Exercise Bike manuals by other brands

Sunny Health & Fitness
Sunny Health & Fitness SF-B121021 user manual

American Fitness
American Fitness SPR-BK1072A owner's manual

KIDSFIT
KIDSFIT Cardio Kids 661 owner's manual

Christopeit Sport
Christopeit Sport AL 2 Assembly and operating instructions

Precor
Precor EC 850 owner's manual

Taurus
Taurus IC90 Pro Assembly and operating instructions