Nash DIVX-251DSS User manual

DIVX-251DSS
DIVXD I V X
DVD PLAYER
Downloaded From DvDPlayer-Manual.com Nash Manuals

Table of contents
1
Getting Started:
Basic Operation:
Contents.......................................1
Features.......................................2
Important notice............................3
Remote control unit preparation...4
Control reference guide................5
..........................6
Basic connection..........................7
Optional audio connection...........9
Karaoke function
Basic play....................................11
Preparations................................11
Basic play....................................11
Stopping play...............................12
Skipping ahead or back...............12
Rapid advance (Repid reverse)...12
Pause or step play.......................12
Zoom play....................................12
Slow-motion play (DVD/VCD).....13
MP3 playback.............................13
Basic play....................................13
Play mode...................................13
Kodak Picture CD/JPEG CD......14
Play mode..................................14
Skip to next/previous picture......14
Enjoying Video CDs with playback
control.........................................15
ON Screen display information...15
Advanced Operation:
Initial Settings:
For Reference:
Repeat play..............................16
Repeat viewing (listening)........16
A-B repeat play.........................16
Changing subtitle language
(DVD only)................................17
Changing subtitle language
(DVD/VCD disc).......................17
Viewing from different angle
(DVD only)...............................17
General setup........................18
Audio setup............................18
Dolby setup............................19
Video setup............................19
Preference.............................20
Definition of terms..................21
Specifications.........................24
Trouble shooting....................25
Disc handling and
maintenance......................... 23
Disc formats supported by
this player..................................22
Downloaded From DvDPlayer-Manual.com Nash Manuals

Features
Important notice
3
2
HIGH QUALITY SOUND AND PICTURE
96 KHz/24 bit audio D/A converter
This player enables 96 KHz/24 bit linear PCM signals, which constitute the highest specifications
in the DVD standards to be reproduced faithfully. To support 96 KHz sampling/24 bit of D/A
converter is kept flat up to 44 KHz, thus preventing the important audio signals from being affected
in any way. In terms of the bottom line,the sound in all of its various modes is reproduced faithfully.
12 bit video D/A converter
With its 12 bit capability, this D/A converter reproduces images faithfully.
Component video output connectors
These connectors are provided to support the kind of top-of-the-line monitors whose specifications
cater to professionals. A frequency band for the colour signals up to 3 MHZ is sup-ported so that
vividly defined colours are reproduced faithfully.
MULTI TV SYSTEM COMPATIBLE
The player can play back discs with signal system of PAL and NTSC.
GRAPHICAL USER INTERFACE SCREEN
Simply by pressing the DISPLAY button on the remote control unit, information on the player and
disc can be displayed on the TV screen for easy identification, The player s operations and
settings can easily be performed by operating the remote control while monitoring the TV screen.
MULTI-AUDIO FUNCTION
The audio soundtrack can be heard in up to 8 languages. (The number of audio sound languages
depends on the software.)
MULTI-SUBTITLES FUNCTION
Subtitles may be displayed in one of a maximum of 32 languages depends on the software.
.
MULTI-ANGLE FUNCTION
This function allows you to choose the viewing angle of scenes which were shot from a number of
different angles. (Limited to DVD recorded with multiple camera angles.)
PARENTAL LOCK FUNCTION
This can prevent play of DVD unsuitable for children.
DISC FORMATS SUPPORTED BY PLAYER
The player can play back discs bearing any of the following marks:
May we take this opportunity to thank you for purchasing this DVD/VCD/CD Player.
We strongly recommend that you carefully study the operating instruction before attempting
to operate the player and that you note the listed precaution.
Dear Customers
Features
RISK OF ELECTRIC SHOCK
DO NOT PRODUCT
Downloaded From DvDPlayer-Manual.com Nash Manuals

Remote control unit preparation
Control reference guide
5
REMOTE CONTROL:
REMOTE CONTROL OPERATION:
CARE OF REMOTE CONTROL:
-30
+30
within
7 metres
1. Remove battery cover
2. Insert batteries
3. Close the battery cover
Aim remote control at remote sensor on DVD.
Do not drop the unit from a height or subject it to high impact
Do not locate the remote control in very hot or moist environments
Do not splash water or any other liquid on remote control
point remote control directly at the remote sensor
Distance:
the remote control works best within 7 metres from the DVD player
Do not expose the remote control sensor directly to a heat source or it will be
malfunction
4
1.
2. POWER(STANDBY): power on or off.
3.
4. CLEAR: clear function
5.
6.
7. STEP: Step play.
8.
9.
10.
11.
12.
13.
14.
15.
16.
17.
18. P
19.
20.
21.
22.
23.
24.
25. R/L:
26.
27.
28.
29.
30.
31.
32. OPEN/CLOESE: open or close
disc tray.
33. STOP: stop play
34.
TIME: press TIME, type in the desired
starting time of and press ENTER
Number keys (0-9) (+10) (10/0)
PROG: arrange program (VCD)
ZOOM: zoom in or out the current picture
DISPLAY: time indication, title indication,
chapter indication
RETURN: return to disc menu playback
(VCD)
SETUP: menu setup
DIRECTION KEY: cursor direction
ECHO+/-: increase echo/decrease echo
TITLE: title playback
N/P: Select PAL, NTSC or MULTI
VOL+: Increase volume
PS/IS: VIDEO: select video output mode.
VOL-: Decrease volume
ause: Press to pause
PREV/NEXT: previous or next
chapter/song
Play: Press to play
REV/FWD: fast backward/fast
forward
MENU: enter to menu playback
ENTER: confirm key
PBC: Switch on PBC status (VCD)
Select the mono or stereo when
playing SVCD / VCD
AUDIO: choose output language
SLOW: slow motion
A-B: setup repeat play segment
REPEAT: repeat play of current chapter
ANGLE: select camera angle.
SUBTITLE: select subtitle or cancel
subtitle.
REM: remaining time
MUTE: turn off sound.
Downloaded From DvDPlayer-Manual.com Nash Manuals

Connecting to a monaural TV set
Red or white
yellow
yellow
To video input connector (yellow)
To audio input connectors(red or white)
Video cable
Audio cable
Red or white to ML or MR
TV set
To power
outlet
Basic connection
Control reference guide
1. POWER: Power on/off
2. :Disc tray
3. : Receiver window
4. : Open/Close key
5. : Play/Pause key
6. : Previous/Next key
7. : Fast backward/Fast forward
8. : Stop play key
9. L/R : Select the mono or stereo when
playing SVCD / VCD
1.
2. Component Video (Y) Output
3. Component Video (Pb/Cb) Output
4. Component Video (Pr/Cr) Output
5. Composite Video Output
6. Digital Optical Audio Output
SCART Output
7. Left Audio Output
7
6
It is recommended to connect a multi-system TV.
Ensure that this player and other equipment to be connected are set to the standby mode or
off and disconnect the AC power cords before commencing connection.
Do not block ventilation holes of any of the equipment and arrange them so that air can
circulate freely. Read through the instructions before connecting other equipment.
Ensure that you observe the color coding when connecting audio and video cables.
Note:
During DVD play, the TV volume may be at a lower level than during TV broadcasts, etc. lf this
is the case, adjust the volume to the desired level.
If the DVD/VCD/CD Player is connected to the TV through a video cassette recorder, the
picture may not be played back normally with some DVDs. lf this is the case, do not connect
the player via the VCR.
FRONT PANEL:
REAR PANEL:
Connecting to a stereo TV set
8. Right Audio Output
9. Digital Coaxial Output
10. S-Video Output
11. Power cord
12.
13.
POWER: Power on/off
Microphone input jack
Before playing KARAOK song, please carries on the following preparatory work first:
1. Make sure output audio Signal with ML/MR or FR/FL ports.
2. Press SETUP button in remote control and enter the system, press the button to choose
AUDIO SETUP \ Karaoke Setup item, setting MIC Setup into ON, setting MIC VOL in 2-15
scope. (This machine has tacitly approved in appropriate position)
3. Insert MIC plug into inlets of MIC 1/MIC 2 in the front panel, turn on the MIC switch.
4. Put Karaoke Disc into the CD-tray
5. Choose the Songs to play
6. Press R/L button in the remote control to delete the original singer's voice.
7. Turn MIC VOL to control the MIC's volume
8. Press the button ECHO+/- in the remote control to control echo, Press the button VOL+/- in the
remote the control to adjustment sound accompaniment and singing sound volume proportion.
Attention: When has the grating sound, please test the following solution:
1) Avoids MIC to be near the television or the speaker
2) Lower the television or amplifier' s volume.
3) Lower MIC's volume
KARAOKE FUNCTION
white
red
yellow
To video input connector (yellow)
To audio input connectors(red,white)
Audio cable
Video cable
white red
yellow
AC power
cord
TV set
Downloaded From DvDPlayer-Manual.com Nash Manuals

Basic connection
Connecting to audio equipment
Connecting to a TV set or monitor with YCbCr video output connectors
Red
Red
Blue
Blue
To S-Video input connector
To Video input connectors (YCbCr)
YCbCr Cable
(optional)
Luminance
Luminance
TV set or monitor
SCART Cable
Audio equipment
Audio cable
To audio input connectors(red,white)
Red
Red
White
White
Optional audio connections
9
8
S-video output connectors
The S (separate) video output connector separates the color(C) and luminance (Y)
signals before transmitting them to the TV set in order to achieve a sharper picture.
Use the S-video cable when connecting the player to a TV set equipped with an S-
Video input connector for the best picture clarity possible.
Component video output
The YcbCr connector outputs the color signals (luminance, red, blue colour difference
primary) in order to achieve high fidelity in reproducing colors.
The description of the component video input connectors may differ depending on the
TV set or monitor. Refer to the instruction manual of your TV set for details.
SCART Output
Connect the special scart cable to scart output on the unit and scart input on TV.
TV SCART
input
L
R
SR
SW
SL
C
Connecting to a decoder with Dolby Digital (AC-3/DTS) Processing
TV set
Video/audio cable
S-video cable or
video cable
Coaxial digital audio cable
or
Optical digital audio cable
To optical digital audio
input connector
To coaxial digital audio
input connector
Decoder or Amplifier with Dolby
digital (AC-3/DTS) processing
(All sold separately)
Front speaker
(Right)
Subwoofer
Surround speaker
(Right)
Front speaker
(Left)
Surround speaker
(Left)
Center speaker
Optical or coaxial can be selected at
your option while connecting.
If you have DTS decoder or processor,
you can enjoy the DVD disc or CD sound
decoded by 5.1 channel DTS.
When DVD recorded in Dolby Digital/DTS are played, Dolby digital/DTS bit stream is output from
the player's OPTICAL digital audio output connector or COAXIAL digital audio output connector.
When the player is connected to a Dolby Digital/DTS decoder, you can enjoy theater-quality audio
in your home. [An optical digital audio cable or coaxial audio cable (both optional) is required when
an optional Dolby digital/DTS decoder is used.]
Downloaded From DvDPlayer-Manual.com Nash Manuals

Notes when connecting the optical digital audio cable(optional)
Disc
Sound
recording
format
Optical/coaxial digital audio
output from connector
DVD
Dolby Digital
(AC-3)
Dolby Digital bitsream
(2-5.1ch) or PCM (2ch)
(48 KHz/16 bit)*1
Linear PCM
(48/96 KHz
16/20/24 bit)
Linear PCM (2ch)
(48KHz sampling/16 bit only)*2
or no output*1
Video
CD
MPEG 1 PCM
(44.1
KHz sampling)
CD Linear PCM
Linear PCM
(44.1KHz sampling)
For your reference:
Dust protection cap
Optional audio connections
11
10
Remove the dust protection cap from the optical digital audio output and connect the cable
firmly so that the configurations of both the cable and the connector match.
Keep the dust protection cap and to protect against dust, always reattach the cap when not
using the connector.
Concerning the audio output from the player's optical/coaxial digital audio output connector
* 1 The type of audio output from the connector can be selected by the initial settings.
* 2 Sound having 96 KHz sampling is converted into 48 KHz or 96 KHz sampling when it is output
from the player s optical/coaxial digital audio output connector.
Dolby Digital (AC-3)is a digital sound compression technique developed by the Dolby
Laboratories Licensing Corporation.
Linear PCM is signal recording format used in a CD. While a CD is recorded in 44.1 KHz/16
bit, a DVD is recorded in 48KHz /16 bit up to 96KHz/24 bit.
If you have a DOLBY Pro Logic Surround decoder, you will obtain the full benefit of Pro Logic
from the same DVD movies that provide full 5.1-channel Dolby Digital soundtracks, as well as
from titles with the Dolby Surround mark.
Caution for speaker setup
Turn off the amplifier before you connect or disconnect the DVD video player's power cord. lf
you have the amplifier power on, the speakers may be damaged.
The output sound of the DVD video player has a wide dynamic range Be sure to adjust the
receiver's volume to a moderate listening level. Otherwise, the speakers may be damaged by
a sudden high volume sound.
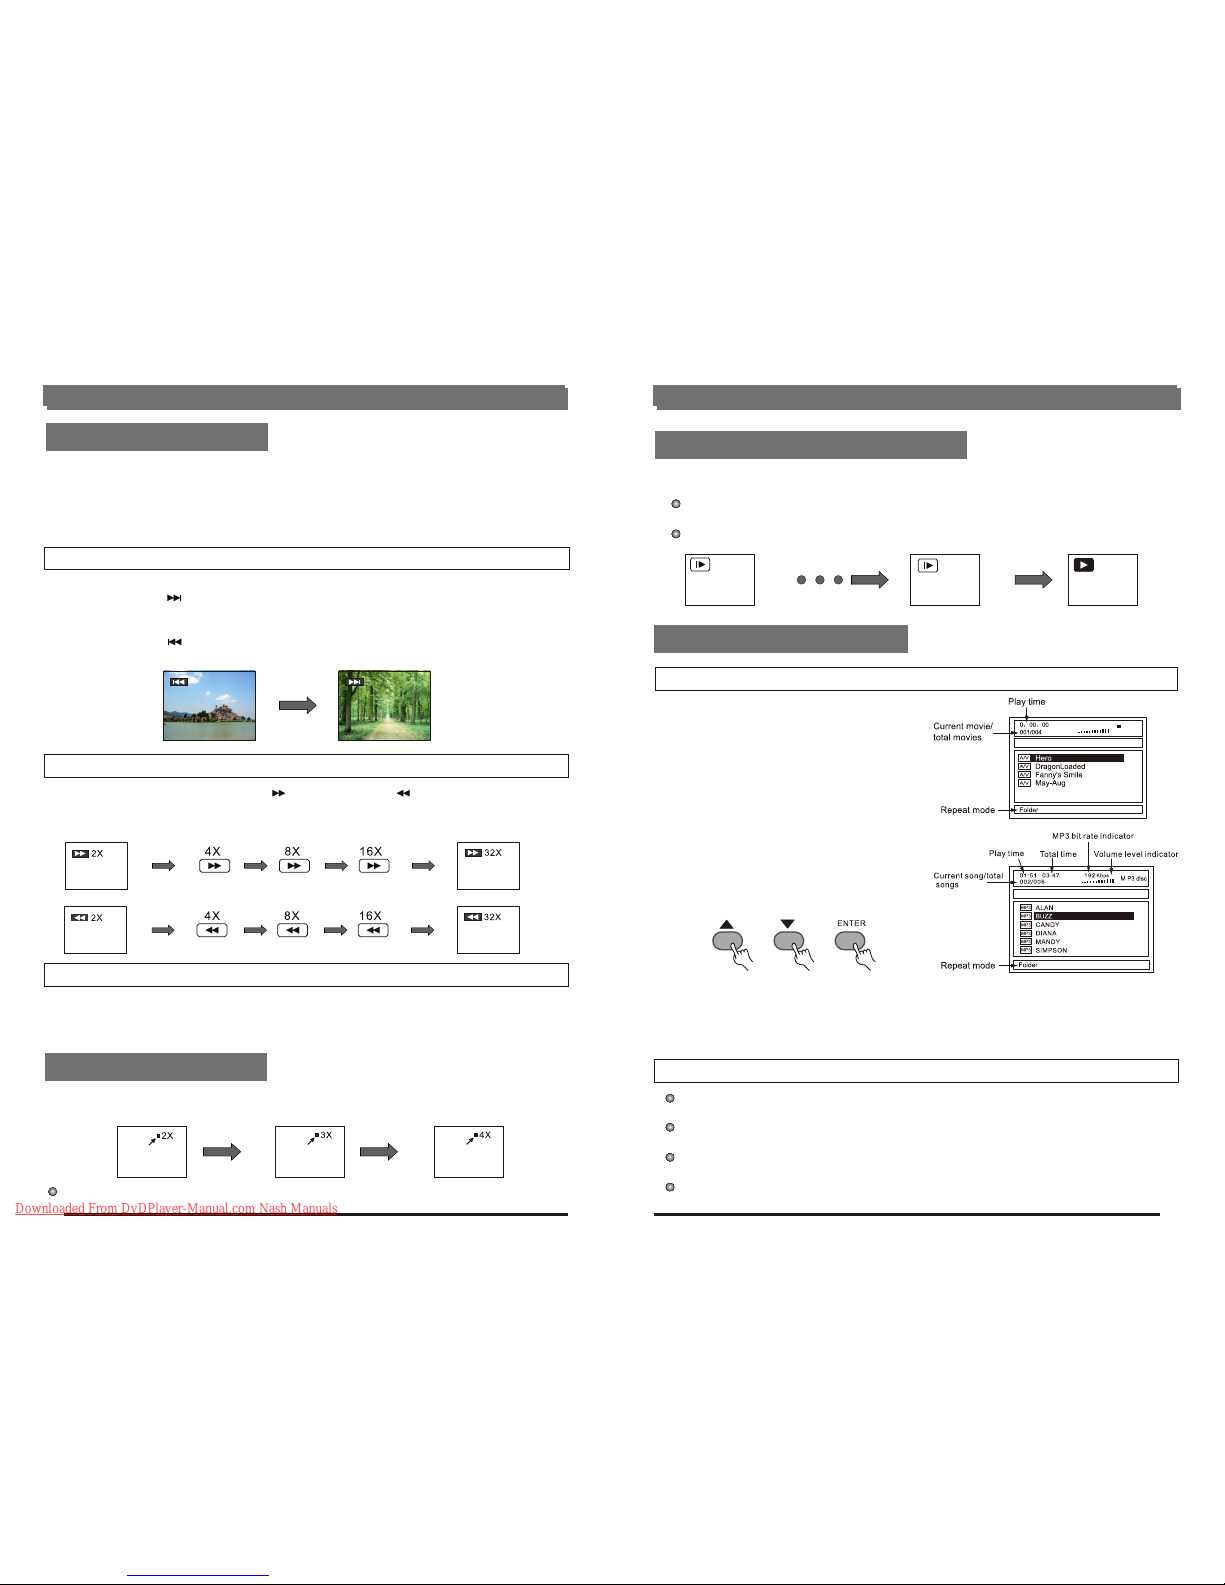
Before enjoying MPEG4/DVD/Video CD/CD
BASIC PLAY
Preparations:
Basic play
The On-Screen menu language of your player has been factory pre-set to English.
If you would like to change the menu language to other Language, please refer to "Selecting
language of On-Screen Display menu".
In the explanation given below it is assumed that English has been selected as the menu
language.
1. Switch the TV on and select "Video" as the TV input.
2. Switch on the stereo system s power if the player has been connected to a stereo system.
1. Press POWER to switch on the power.
2. Press OPEN button to open the disc tray.
3. Place a disc onto the disc tray and press OPEN/CLOSE again. Hold the disc without touching
either of its surfaces, position it with the printed title side facing up, align it with the guides,
and place it in its proper position.
The disc tray is automatically closed and play begins. When the disc tray is closed by pressing
OPEN/CLOSE, the player will start to read the disc immediately.
4. When a menu screen appears on the TV, move the navigation buttons or press the numeric
buttons to select preferred track number, then press ENTER button to confirm.
5. When the menu continues onto another screen, press NEXT SKIP button to view the next
screen, or press PREV SKIP button to skip to previous screen.
NOTE: Due to the different design of some software titles, NEXT button may not always work.
6. To stop play and return to the menu screen, press TITLE button, or MENU button(which button
is pressed depend on which kind disc used):
DVD: Press TITLE, MENU or RETURN;
VCD/SVCD : Press RETURN or PBC Button.
Basic Operation
Downloaded From DvDPlayer-Manual.com Nash Manuals

Basic Operation Basic Operation
STOPPING PLAY
Skipping ahead or back
Rapid advance(Rapid reverse)
Fast forward
Fast backward
Pause or step play
ZOOM PLAY
Press NAVIGATION button to scroll across the enlarged picture.
Press stop
For your convenience:
When player is stopped, the player records the point where STOP was pressed (RESUME
function). Press PLAY again, playback will resume from this point. When the tray is Opened of
STOP is pressed again, the RESUME function will be cleared.
Skipping ahead
Press NEXT SKIP button during play
A chapter (DVD) or a track (Video CD/CD) is skipped each time the button is pressed.
Skipping back
Press PREV SKIP button during play
A chapter (DVD) or a track (Video CD/CD) is skipped each time the button is pressed.
During playback, press F.FWD button or F.BWD button to fast forward/rewind.
Press PLAY button to resume normal play.
During playback, press PAUSE button, the play will be paused, and in this mode, each time the
PAUSE button is pressed, the player will only play one picture, to resume normal play, press PLAY
button.
This function allow you to enjoy a motion or motionless picture.
Press ZOOM button when playing, the screen shows:
13
12
SIOW-MOTION PLAY (DVD/VCD)
1/1 1/4
MPEG4/MP3 PLAYBACK
Basic play
Play mode
On the remote control unit
Press SLOW button during playback.
Plays the disc at a 1/1 of normal speed at first. Each time The button is pressed, the play
speed becomes slow at 1/1, 1/2,1/3,1/4times.
Press PLAY button, normal play will resume.
1. Insert the disc containing the files in
MPEG4 or MP3 format to be Played.
After a few seconds, the TV screen
will show all folders on the disc.
2. Select the folder you want to play by the
navigation buttons and press ENTER
button to confirm.
3. The files in this folder are displayed and
select your favourable song by using the
up/down navigation buttons and press
ENTER button to start playback.
Note: Maximum 14 characters including space can be displayed for the filename.
Non-English file name will not be displayed correctly.
4. Press NEXT button to see the next page or PREV button to see the previous page.
5. Press REPEAT button to change the play mode.
Single-play one file only.
Repeat One-repeat one file.
Repeat Folder-all the files in the folder will be Played repeatedly.
Folder-all the files in the folder will be played.
MPEG4 Disc
Downloaded From DvDPlayer-Manual.com Nash Manuals

Basic Operation Basic Operation
KODAK PICTURE CD/JPEG CD
Play mode
Skip to next/previous picture
If Kodak picture CD is inserted, slide show is begins automatically.
For JPEG picture CD, select the folder you want to play by the navigation buttons and press
"ENTER" button to confirm.
The files in this folder are displayed and select your favourable pictures by using the up/down
navigation buttons and press "ENTER" button to start playback.
Thumbnail of picture will be displayed while you scrolling across the file name.
Single - play one file only.
Repeat One repeat one file.
Repeat Folder-all the files in the folder will be played repeatedly.
Folder-all the files in the folder will be played.
Once a folder and file is selected, the picture is load onto the TV screen.
Note: The time of loading and display depends on the file size of the pictures.
During playback, press MENU button to return to folder selection or STOP button to enter preview
mode.
Press NEXT button to skip to the next picture or PREV button to skip to the previous picture.
Note: lf no key is pressed for 5 seconds, if will skip to next picture automatically.
15
14
Enjoying video CDs with playback control
After a few seconds, a menu will appear on the screen.
ON Screen display information
TITLE ELAPSED
TT 02/03 CH 07/28 0:19:20
TITLE REMAIN
TT 02/03 CH 07/28 1:17:00
CHAPTER ELAPSED
TT 02/03 CH 07/28 0:01:53
CHAPTER REMAIN
TT 02/03 CH 07/28 0:01:34
DISPLAY OFF
TT=TITLE NO.
CH=CHAPTER NO.
Press "DISPLAY" button again, the screen display will be cleared.
When playing VCD 2.0/3.0 with PBC, the player will show the VCD version and PBC status
on the screen.
Press numeric buttons to select corresponding track, if the track number is under 10,
choose one of the numeric buttons 0~9.
If the track number is exceed 10, press+10 button firstly, then press numeric buttons0~9.
During playback, press "RETURN" button to return to main menu.
Press NEXT SKIP button or PREV SKIP button, the player will play in the scheduled
sequence on the disc.
When the player is under operation, press DISPLAY button continuously on the remote control,
the screen will display sequently parts of information, all information and clear information..
Downloaded From DvDPlayer-Manual.com Nash Manuals

Advanced Operation
Advanced Operation
Repeat viewing(listening)
DVD DISC
VCD/SVCD/CD DISC (In the PBC off mode)
Repeat chapter Repeat title Repeat all
Repeat track Repeat disc
A-B repeat play
Repeating sectione between two specific points(A-Brepeat)
Press REPEAT button during play, it will repeat Play one chapter or one title (for DVD disc), or
repeat play track (for VCD/SVCD/CD).
1. Press A-B button during play at the point where repeat play is to be started (A).
2. Press A-B button at the point where repeat play is to be ended (B). Repeat play of the selection
between points A and B starts.
3. Press A-B button to return to normal play.
17
16
REPEAT PLAY Changing subtitle language(DVD only)
CHANGING SUBTITLE LANGUAGE
Changing audio soundtrack Language (DVD /VCD disc)
Viewing from different angle (DVD/only)
CHANGING ANGLE
It is possible to change the subtitle language to a different language from the one selected at the
initial settings. (This operation works only with discs on which multiple subtitle languages are
recorded)
1. Press SUBTITLE button during play, the screen will display the current language.
2. Press SUBTITLE button again to change language or turn off.
NOTE: When no subtitles are recorded, press this button will not work.
It is possible to change the audio soundtrack language to a different language from the one
selected at the initial settings (This operation works only with discs on which multiple audio
soundtrack languages are recorded)
Press "AUDIO" button during playing DVD disc, the screen will display the number of current
soundtrack language, press the button again will change the language.
Pressing "AUDIO" button during playing VCD disc will change audio output mode:
L audio soundtrack, R audio soundtrack and stereo (VCD disc only).
NOTE: When no soundtrack languages are recorded, press this button will not work.
NOTE: When the power is turned on or the disc is re-moved, the language heard is the
one selected at the initial settings.
Some DVDs may contain scenes which have been shot simultaneously from a number of different
angles. For these discs, the same scene can be views from each of these different angles using
the ANGLE button.
Press ANGLE during playing number of angle being playback will be displayed on
the screen. Press this button will change to different angles.
Downloaded From DvDPlayer-Manual.com Nash Manuals

Initial Settings
Initial Settings
Initial Settings
1. General Setup
2. Audio Setup
General Audio Dolby Video Preference
-- General SetupPage --
Tv Display
Angle Mark
Osd Lang
Captions
Screen Saver
Hdcd
Set Osd language
19
18
Once the initial programming is entered it is retained in memory until changed, the player
can always be operated under the same conditions.
The settings will be retained in the memory until the settings are changed even after
setting the player to the standby mode.
Common procedure for initial settings
1. Press SETUP button.
2. Use the navigation buttons to select preferred item, then press ENTER button, each screen
for setting the value is displayed.
3. Press SETUP button to close setup menu in any mode.
4. Use right navigation button to switch to another main setup items
1.1 TV DISPLAY - it is used to select the TV output mode.
Options: Normal/Ps: pan & scan mode
Normal/Lb: Letter box mode
Wide: 16: 9 wide screen mode
1.2 ANGLE MARK- it is used to select whether or not the multi-angle icon is display on the
screen when a multi-angle DVD disc is playing.
Options: On: Icon will be displayed
Off: Icon will be turned off
1.3 OSD . LANG - it is used to select different On Screen display language for different user.
1.4 Captions - This function is ineffective if no caption record in the disc. If the caption is closed,
press the caption key on the remote control to open captions function to select
captions language.
1.5 Screen Saver - when the player is not in used for 2 minutes, a running DVD logo will move
across the TV screen to protect the TV CRT.
Options: On: Screen saver is enabled
Off: Screen saver is disabled
1.6 HDCD - This setup can change output sample rate when playing HDCD disc. Setup for
44.1KHz, the system can output all signals of the disc sample rate from 0 to 44.1 KHz, the
signal over 44.1KHz being cut. Setup for 88.2KHz, the system can output all signal of the
disc sample rate from 0 to 88.2KHz, the signal over 88.2KHz being cut. Setup for off, the
system will output all signals without any limit.
2.1 Speaker Setup it is used to set the speaker outputs levels.
Downmix mode
Options: Lt/Rt-Left/Right mix mode
General Dolby Video PreferenceAudio
-- Audio SetupPage --
Speaker Setup
Spdif Setup
Karaoke Setup
Go to Audiosetup page
General Audio Video PreferenceDolby
-- Dolby Digital Setup --
Dual Mono
Dynamic
Go to Dolby digital setup page
General Audio Dolby PreferenceVideo
-- Video Setup Page --
Component
Tv mode
Sharpness
Brightness
Contrast
Go to Video setup page
3. Dolby Setup
4. Video Setup
3.1 Dual Mono - If you play a Dual sound disc. you
can configure the audio type with this option.
3.2 Dynamic - If watching large dynamic scope
movie program at night, select this mode to
reduce the volume, meantime keep the little
minutia EQ high level, thus it can avoid troubl-
ing neighbors without detracting from sound
quality.
4.1 Component - Setup the TV output
Options: CVBS
YCbCr / YPbPr
4.2 TV Mode - If you have an interlaced image
TV, choose the interlaced option, otherwise,
if you have a TV with progressive scan mode,
we recommend to select the progressive
option.
4.3 Sharpness - Setup this item to control the
sharpness of image, available range as high
- medium - low.
Stereo-Select this option if you don't
Have a 5.1 channels amplifier.
Off-Select Off when you want a real
5.1channels output
Front Speaker - set front speaker s volume.
Options: Large/Small
Center Speaker - set center speaker s volume.
Options: Large/Small/Off
Rear Speaker - set rear speaker s volume.
Options: Large/Small/Off
Sub woofer - select on to open sub woofer.
Options: On/Off
2.2Spdif Setup
2.2.1 Spdif output - digital outputs code format
Options: Off/Raw / Pcm
Recommended settings:
Spdif output: Spdif off
(If you are not connecting to an amplifier via Digital output)
Spdif output: Spdif / Raw
(Used in general home theater, select this can output 5.1 channel)
Spdif output: Spdif / Pcm
(select this it can only output 2channel,but you will get high quality audio)
2.2.2 Lpcm out - set bit - rate of coaxial and optical output
Options:96K/48K
(If you are connecting to an amplifier via digital output please reference your digital
amplifier manual before you select this option)
Downloaded From DvDPlayer-Manual.com Nash Manuals

Initial Settings
General Audio Dolby Video Preference
-- Preference Page --
Tv Type
Audio
Subtitle
Disc Menu
Parental
Password
Default
Go to Preference page
5. Preference Page
The first power on this set by press power button on the front plane without placing any disc on this
tray, press setup button, then you can enter the preference page by pressing navigate button.
5.1 TV Type - Select the TV output mode.
Options: PAL/PAL-M/NTSC
5.2 Audio - select preferred audio language.
(DVD only-need disc software support)
5.3 Subtitle - select preferred subtitle language.
(DVD only need disc software support)
5.4 Disc Menu - select preferred disc menu language.
(DVD only need disc software support)
5.5 Parental - select rating levels. You must set
PASSWORD MODE OFF to enable this selection.
(DVD only- need disc software support)
5.6 Password
Option: Change
Select to change password
5.5.1 OLD PASSWORD
5.5.2 NEW PASSWORD
5.5.3 CONFIRM PWD
Procedure to change password:
1) Enter old password in the OLD PASSWORD row
2) Enter new password in the NEW PASSWORD row
3) Enter the new password again in the CONFIRM PWD Row.
You may reset the password if you forget the old password by using the
supervisor password: 138900
5.7DEFAULT-Reset to factory settings
21
20
4.4 Brightness - Setup this item to control the
brightness of image, available range from -20 to +20.
4.5 Contrast - Setup this item to control the contrast of image, available range from -16
to +16.
For Reference
Angle
Recorded onto some DVD discs are scenes which have been simultaneously shot
from a number of different angles (the same scene is shot from the front, from the left
side, from the right side, etc.) With such discs, the ANGLE button can be used to view
the scene from different angles.
Chapter number
These numbers are recorded on DVD discs A title is sub-divided into many sections,
each of which is numbered, and specific parts of video presentations can be searched
quickly using these numbers.
DVD
This refers to a high-density optical disc on which high-quality pictures and sound
have been obtained by means of digital signals. incorporation a new video compression
technology (MPEG II) and high-density recording technology, DVD enables esthetically
pleasing full-motion video to be recorded over long periods of time (for instance, a whole
movie can be recorded).
DVD has a structure consisting of two 0.6 mm thin discs which are adhered to each other.
Since the thinner the disc the higher the density at which the information can be recorded,
a DVD disc has a greater capacity than a single 1.2 mm thick disc. Since the two thin
discs are adhered to each other, there is the potential to achieve double-sided play
sometime in the future for even longer duration play.
Playback control (PBC)
This is recorded on a Video CD (version2.0). The scenes or information to be viewed
(or listened to) can be selected interactively with the TV monitor by looking at the menu
shown on the TV monitor.
Subtitles
This is the appearance of the dialogue at the bottom of the screen which are
prerecorded on some DVD discs.
Time number
This indicates the play time which has elapsed from the start of a disc or a title. It can
be used to find a specific scene quickly. (It may not work with some discs.)
Title number
These numbers are recorded on DVD discs. When a disc contains two or more
movies, these movies are numbered as title 1, title2, etc.
Track number
These numbers are assigned to the tracks which are recorded on Video CDs and CDs.
They enable specific tracks to be located quickly.
Video CD
This contains recordings of pictures and sound whose quality is on a par with that of
videotape. This player also supports Video CDs with playback control (version 2.0).
Definition of terms
Downloaded From DvDPlayer-Manual.com Nash Manuals

For Reference For Reference
23
22
Disc formats supported by this player: Disc handling and maintenance
Care of disc:
Do not touch the signal surface.
Do not add labels or adhesive tapes on the discs.
Cleaning of discs:
Finger prints or stains on the surface of the disc
will directly affect signal recording and result in a poorer picture quality. Therefore, please use a
soft cloth and wipe in a radiating manner from the centre to the outer rims when cleaning the disc.
If the surface of your disc is very dirty, wipe the disc with a moist cloth. Finally use a dry soft cloth
to remove all the water stains.
Never use electrostatic prevention products as well as sloutions which contain benzene, thinner
or any other vaporizing substances, as they may damage the disc surface.
Storage of disc:
Do not keep the disc in the direct sunlight, near the heat source, in the dusty places or moisture
(kitchen, bathroom). Keep the disc vertically in the disc storage case. Heavy objects on the disc
case will cause deformation to the disc.
Copyright Attention:
Copy, broadcast, play or rent the disc is forbidden without legal permission.
TV System:
Please connect the unit to the TV compatible with
PAL/NTSC/PAL-M/MULTI.
About this manual:
This manual explains the basic specifications of this unit. Some DVD disc may have special
requirement and the unit may not play such discs. Please refer to the disc instruction.
Downloaded From DvDPlayer-Manual.com Nash Manuals

For Reference
24
For Reference
25
Specifications
Discs played:
(1) DVD-VIDEO disc
12 cm single-sided, single-layer
12 cm single-sided, dual-layer
12cm double-sided, single-layer
8 cm single-sided, single-layer
8 cm single-sided, dual-layer
8 cm double sided, single-layer
(2) Compact disc(VIDEO CD)
12 cm disc
8 cm dis.
S-video output:
Y output level: l Vp-p (75)
C output level: 0.286 V p-p(75)
Video output level: 1 v p-p
Audio output level: 2Vp-p (1 KHz, 0dB)
Audio signal output characteristics:
DVD (linear audio):
(1) Frequency response:
20Hv-20KHz (48KHz sampling)
20Hz 20KHz (96KHz sampling)
(2) S/N ratio: >65dBb
(3) Dynamic range: 90dB
(4) Wow and flutter: below measurable level
CD audio:
(1) Frequency response: 20Hz-20KHz
(2) S/N ratio: >65ddB
(3) Dynamic range: 90dB
(4) Wow and flutter: below measurable level
Pickup: wave length: 655nm
Laser power: CLASS1
Specifications are subject to change without notice.
Weight and dimensions are approximate.
Model
Power Source ~110-240V 50/60Hz
Power
Consumption 20W approx.25W when set
to the standby mode either by
the power button or the remote
control unit).
Signal system: PAL/MULT/NTSC
Operating temperature range: +5 to +35 C
Operating humidity range: 5 to 90% (no condensation)
Symptom(common) Remedy
No power. Insert the AC power plug securely into the power outlet.
The player is automatically
set to the standby mode.
No picture.
No key operation (by the main
unit and /or the remote control
unit) is effective.
No operations can be
performed with the
remote control unit.
No rapid advance or rapid
reverse play.
Picture is distorted during
rapid advance or rapid
reverse.
No sound.
Distorted sound.
Play fails to start even when
PLAY is pressed.
Play starts but then stops
immediately.
The player is automatically set to the standby mode after
approx. 30minutes in the stop mode (auto power-off fun-
ction). turn the power on again.
Condensation has formed: wait about l to 2 hours to allow
the player to dry out.
This player cannot play a disc other than DVD, Video CD,
SVCD and CD.
The disc may be dirty and may require cleaning.
Ensure that the disc is installed with the label side up.
Ensure that the equipment is connected properly.
Ensure that the input setting for the TV is "video".
Ensure that the equipment is connected properly.
Ensure that the input setting for the TV and stereo system
are correct.
Adjust the master volume using the GUl screen for player
information
The picture will be somewhat distorted at times: this is
normal.
Some discs may have sections which prohibit rapid adv-
ance (or rapid reverse.)
Check the batteries are installed with the correct
polarities (+ and -).
The batteries are exhausted: replace them with new ones.
Point the remote control unit at the remote control sensor
and operate.
Operate the remote control unit at a distance of not more
than 7 m from the remote control sensor.
Remove the obstacles between the remote control unit
and remote control sensor.
Press POWER to set the player to the standby mode and
then back to ON.
Alternatively, press POWER to set the player to the standby
mode, disconnect the.
Power plug and then reconnect it (The player may not be
operating properly due.
To lightning, static electricity or some other external factor.)
Troubleshooting
Before requesting service for this player check the chart below for a possible cause of the
problem you are experiencing.
Some simple checks or a adjustment on your part may eliminate the problem and restore
proper operation.
Downloaded From DvDPlayer-Manual.com Nash Manuals

For Reference
Symptom(DVD)
Symptom(Video CD)
Remedy
Remedy
Play does not start even
when title is selected Confirm the Ratings setting.
Audio soundtrack and/or
subtitle language is not
the initial settings.
If the audio soundtrack and/or subtitle language does
not exist on the disc, the language selected at the initial
settings will not be seen / heard.
No subtitles
Subtitles appear only with discs which contain them.
Subtitles are cleared from the TV monitor, perform the
steps on page 28 to display the subtitles
Alternative audio soundtrack
(or subtitle) languages fail to
be selected.
An alternative language is not selected with discs which
do not contain more than one language.
In the case of some discs, the alternative language cannot
be selected by operating the AUDIO or SUB TITLE button.
Try selecting it from the DVD menu if one is available.
Angle cannot be changed.
This function is dependent on software availability. Even
if a disc has a number of
Angles recorded, these angles may be recorded for
specific scenes only.
The password for rating
level has been forgotten. Please contact your local sales dealer.
NO MENU PLAY. This function works only for Video CDs with playback
control.
26
Downloaded From DvDPlayer-Manual.com Nash Manuals
Table of contents