National Geographic Bresser 9676202 User manual

Art.No. 9676202
TrueView NG
10X42 Binoculars
Instruction Manual
EN

2
+0
+0
OBOHOH
OCOC
OG
OE
OF
OE
OF
Oj
OD
+0C

3
4
1)
8
LEFT EYE RIGHT EYE
g
D
+0
www.bresser.de/download/9676202
MANUAL DOWNLOAD:
www.bresser.de/guide
BINOCULARS GUIDE:
i
www.bresser.de/faq
BINOCULARS FAQ:
www.bresser.de/downloads
DOWNLOADS:

4
General Warning
Risk of blindness
Never use this device to look directly at the sun or in the direct proximity of the sun.
Doing so may result in a risk of blindness.
• Do not place the device, particularly the lenses, in direct sunlight.
Theconcentrationoflightcouldcauseare.
• Do not disassemble the device. In the event of a defect, please contact your dealer.
The dealer will contact the Service Centre and can send the device in to be repaired, if necessary.
• Do not expose the device to high temperatures.
Privacy Protection
The binoculars are intended only for private use. Please heed the privacy of other people. Do
not use them to look into apartments, for example.
Scope of delivery
Binoculars, Dust protection caps, Instruction Manual
List of Parts
BCentre axle
CTwist-up eyecups
DDioptre adjustment
EBody of the binoculars
FLens tube
GCentral focussing wheel
HEyepiece
IObjective lens
JThreaded tripod connection
1) Image circle with correctly set eye distance
Eyepieces for spectacle wearers
Screw in the twist-up eyecups (2) to use the binoculars while wearing glasses. If you are not wearing glass-
es, unscrew the eyecups to achieve the required distance from your pupils.
Adjusting the eyepiece distance
The distance between your eyes differs between individuals. To achieve perfect interaction between your
eyes and the eyepieces of your binoculars, set the angle at the centre of the binoculars (1) so that you see
a circular image (10). Note this setting for later use.

5
Adjusting the focus
Look through your binoculars with your right eye closed. Now adjust the image for your left eye by turning
the centre wheel (6) until it is sharp and clear. Close your left eye and adjust the image for your right eye by
turning the dioptre ring (3) until it is also sharp and clear.
Mounting the binoculars on a tripod
Your binoculars have a threaded tripod connection (9) built in. The required tripod adapter is available as
an optional accessory (Art. No. 1916001). With this accessory, you are able to mount your binoculars on all
BRESSER tripods with a DIN mounting thread (e.g. Art. No. 4922100).
Binoculars ABC
MAGNIFICATION
Themagnicationvaluealwaysismentionedrstinthemodelname(e.g.10x42).Withamagnicationof
10x, the observed object appears one-tenth of the distance away that it really is.
OBJECTIVE DIAMETER
The lens pointing towards the object is called the objective lens. In the model name (e.g. 10x42), the sec-
ond number stands for the objective diameter in millimeters. The objective lens diameter is an indicator of
the amount of light that can enter the binoculars.
Anobjectivediameterof20mmissufcientforobservationsduringtheday.Intwilightconditions,anob-
jective diameter of 50 mm or larger is recommended, as the lenses can gather much more of the remaining
light.
TRANSMISSION
The value of the ability to let light pass through optical systems is called transmission.
OCULAR
The ocular is on the side of a pair of binoculars pointing towards the eye and is often composed of three
to six single lenses that form an achromat. The ocular is one of the factors that determines optical quality
(i.e.colordelity,sharpnessandimagedistortion).
EYEPIECE FOR SPECTACLE WEARERS
Aneyepieceforspectaclewearersallowsforafulleldofviewwithandwithouteyeglasses.Itsmainaim
is the adjustment of the distance from the eye to the ocular (eye relief). When an observer sees a circular
image through the binoculars, the eye relief is set correctly.
BINOCULAR
Optical systems with two oculars are called binocular (hence the name binoculars).
MONOCULAR
Optical systems with one ocular are called monocular.

6
TWILIGHT OUTPUT
Thetwilightoutputnumberquantiesbinocularvisualperformanceanddetailvisibilityintwilightcondi-
tions.
Formula:
√Lensdiameterxmagnication
The result is evaluated purely mathematically and is only of interest when comparing differing types of
binocular (e.g. 8x30, 7x50 and 10x50). The number calculated disregards binocular performance increase
due to optical treatment, top-quality glass types and the like. See luminous intensity for more information.
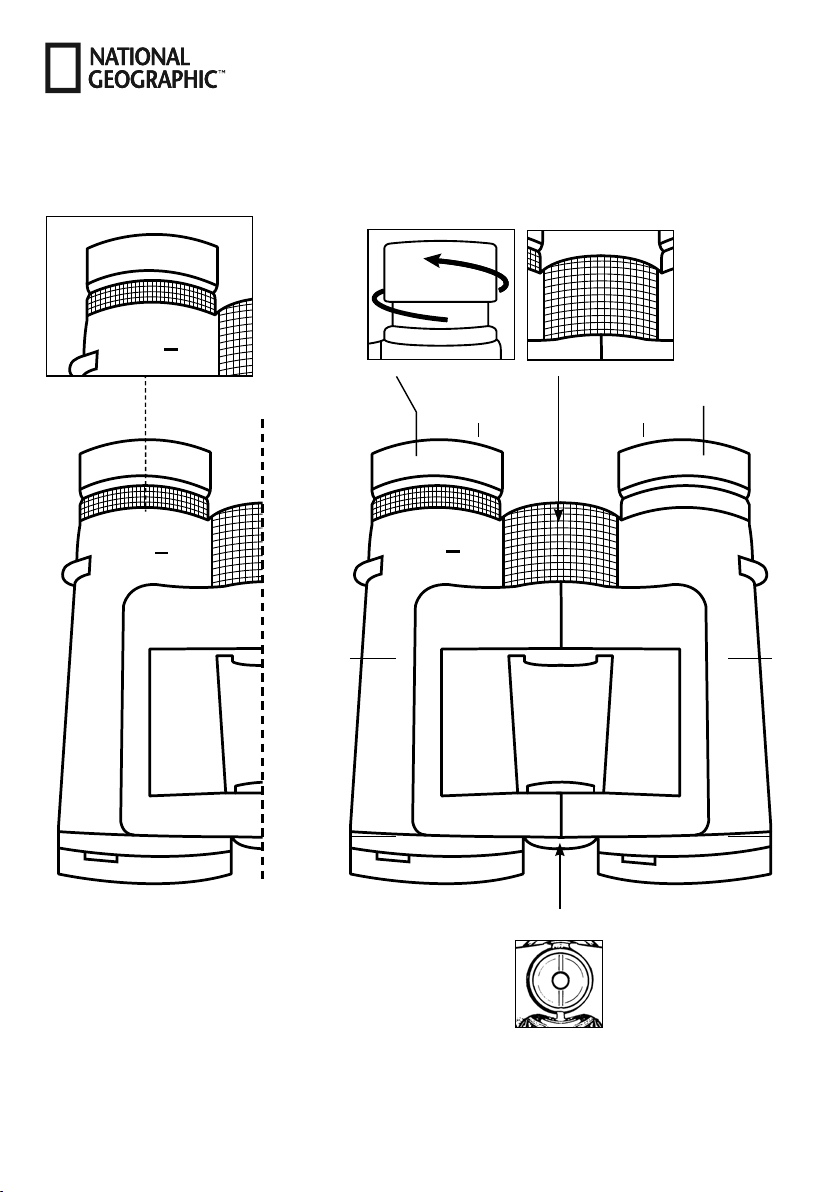
DIOPTRIC COMPENSATION
In binoculars with centre wheel focusing, the right eyepiece can be adjusted. This compensates for the
user’seyesightdeciencies.Inmodelswithsingleeyepieceadjustment,botheyepiecescanbeturned,as
they also serve to adjust the focus.
RUBBER ARMOUR
Binoculars with rubber armour are advisable for rugged, professional uses. The black or olive green rubber
armour protects the instrument against splashing, dropping and impacts. The armour on our instruments
has fast colouring and is proof against sunlight.
COLLIMATION (double image)
This term means the parallel alignment of both halves of a pair of binoculars. If an instrument is subjected
to any major impact or dropped, the prisms may become misaligned, making the instrument out of collima-
tion. Observation through such an instrument yields double images, as the contours seem to the observer
to be displaced.
Readjusting for eyesight can compensate minor maladjustment of this kind. However, a headache may result
if such an instrument is used for any length of time. Such instruments should always be sent in for repair.
LUMINOUS INTENSITY (general information)
Theluminousintensity(LI)quantiesthebrightnessofapairofbinoculars.Undernormalcircumstances,
a 7x50 pair (LI 51) yields much greater intensity than a 10x50 pair (LI 25). To exploit the greater intensity
of 7x50s, the user’s pupils must be dilated to the size of the instrument’s exit pupil [EP] (in 7x50: 50/7 = EP
7.14). In people over age 50, the pupil often doesn’t fully dilate. In such cases, the higher luminosity cannot
be exploited.
LUMINOUS INTENSITY (geometric)
The geometric luminous intensity is the mathematical brightness value of a pair of binoculars. Models with
higher luminous intensity are especially suited to observation at twilight.
Formula for calculating luminous intensity:
(Lensdiameter/magnication)2
e.g. (50/10)2= 5 x 5 = 25
This calculation disregards any features improving performance, such as BaK-4 prisms, multicoating or
optical glass quality.

7
FIELD OF VIEW
This is understood to mean the visible image at a distance of 1,000 metres from the object being observed.
This measurement is usually given in metres.
If given as an angle, 1° = 17.5 m.
Aninstrumentwithaeldofvisionover120m/1,000miscalled‘largeeld’,andonewithaeldofvision
over140/1,000mis‘wideangle’.Wideangleinstrumentsareparticularlysuitableforviewingmovingob-
jects such as footballs or horses.
TRIPOD CONNECTION
Many binoculars have a tripod thread built in. These binoculars can be screwed onto a tripod using an
adaptor, which guarantees a static image.
COATING
Normalopticallensesreectpartofthelightfallingonthem.
This causes a loss of light and a reduction in contrast due to light scatter.
Coatingthelensesbysteamingareection-reducingminerallayerontothemgreatlyreducesreectionand
increases light transmission (permeability).
NOTES on cleaning
•Cleantheeyepiecesandlensesonlywithasoft,lint-freecloth,likeamicrobrecloth.Toavoidscratching
the lenses, use only gentle pressure with the cleaning cloth.
• To remove more stubborn dirt, moisten the cleaning cloth with an eyeglass-cleaning solution and wipe
the lenses gently.
• Protect the device from dust and moisture. After use, particularly in high humidity, let the device accli-
matize for a short period of time, so that the residual moisture can dissipate before storing. Remove the
dust cover and store it in the included bag during use.
DISPOSAL
• Dispose of the packaging materials properly, according to their type, such as paper or cardboard. Contact
your local waste-disposal service or environmental authority for information on the proper disposal.
• Please take the current legal regulations into account when disposing of your device. You can get more
information on the proper disposal from your local waste-disposal service or environmental authority.
WARRANTY & SERVICE
The regular guarantee period is 10 years and begins on the day of purchase. You can consult the full
guarantee terms and details of our services at: www.bresser.de/warranty_terms.

Errors and technical changes reserved.
Bresser GmbH
Gutenbergstr. 2
DE-46414 Rhede
www.bresser.de · info@bresser.de
© National Geographic Partners LLC. All rights reserved.
NATIONAL GEOGRAPHIC and Yellow Border Design are trademarks
of National Geographic Society, used under license.
Visit our website: www.nationalgeographic.com
Manual_9676202_TrueView-NG-10x42_en_NATGEO_v122020a
Table of contents
Other National Geographic Binoculars manuals

National Geographic
National Geographic 80-00430 User manual

National Geographic
National Geographic 80-10621 User manual

National Geographic
National Geographic Bresser 90-77000 User manual

National Geographic
National Geographic JOURNEY Series User manual

National Geographic
National Geographic Binoculars User manual

National Geographic
National Geographic FERNGLASS BINOCULARS ROOF User manual

National Geographic
National Geographic 80-21042WP User manual

National Geographic
National Geographic 80-10621 User manual