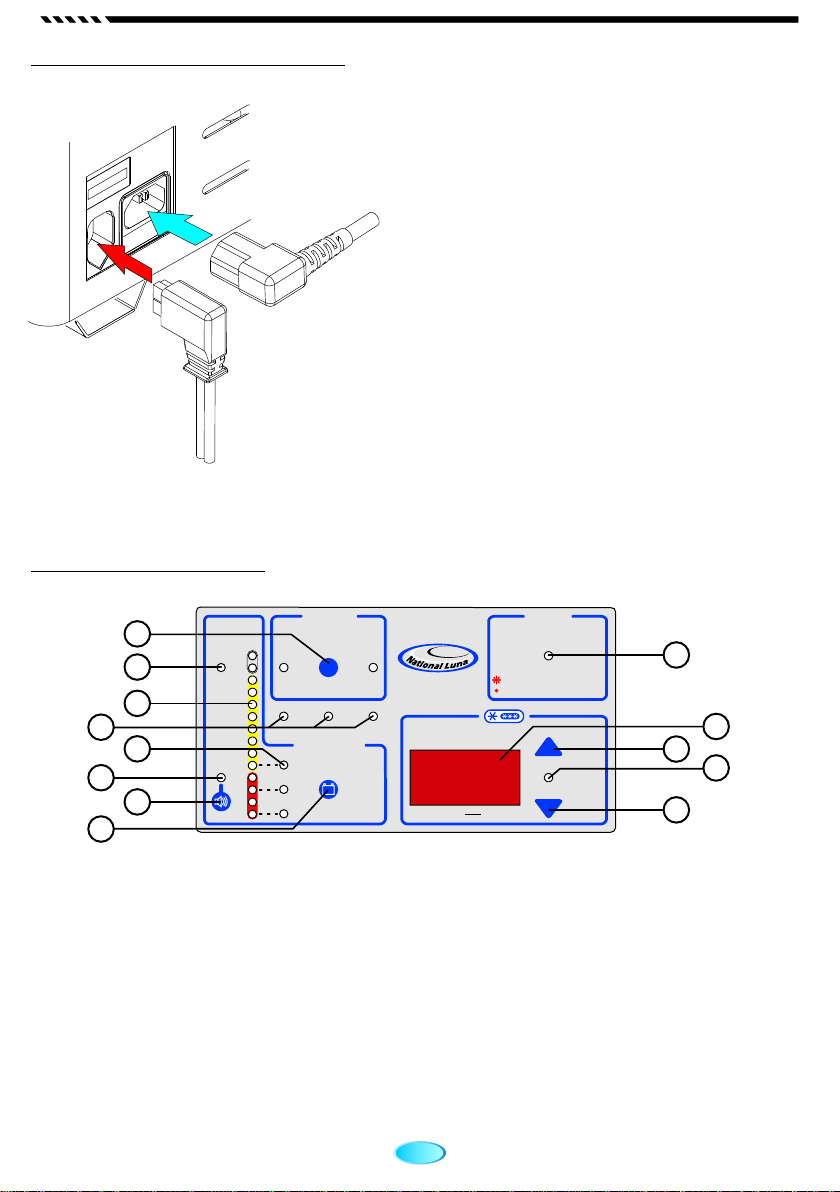
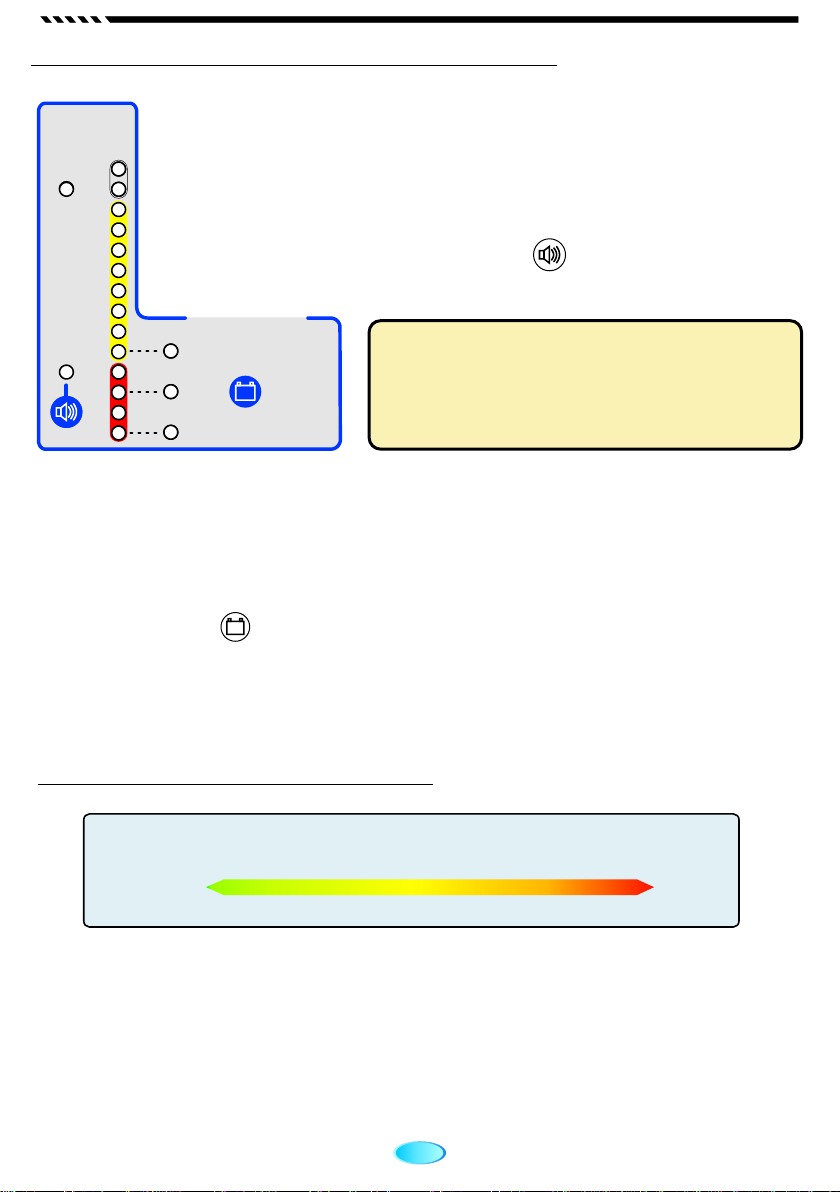
National Luna Weekender-52 User manual

52-litre
Advanced Control
Unique Hinge Design

1
Introduction
The National Luna Weekender-52 litre is a high-performance, low-power portable
refrigerator designed primarily for use in mobile applications.
The Weekender is capable of running from 220-voltAC or 12-volt DC battery power
with the added feature of automatic speed control. This, combined with superior
insulation and cooling surface make the Weekender the ultimate portable fridge /
freezer.
The Weekender 52 is a single compartment refrigerator with a volume of 52 litres. A
digital thermostat allows the Weekender to operate at any temperature between 20°C
and -30°C with an accuracy of ±2°C.
Superior efficiency allow the Weekender to operate in extreme environments while still
conserving battery power.
The Weekender features selectable low-battery protection, speed control, battery
monitor with low-voltage warning and fault indicators.
Before use
Unpacking the Weekender 52
The Weekender is supplied with the following parts: Please check that none of these
parts are missing.
Precautions during use
!When the Weekender is used in an automotive application, ensure that it is
appropriately secured to prevent accidental movement. The fridge carry handles
can be used with straps or tie-downs if necessary.
A base-mounting plate is available as an optional extra for the Weekender
!Allow a 50mm air gap around the back and sides of the Weekender for ventilation.
!Ensure that the connected power lead (DC or AC) is fitted securely and does not
pull loose unintentionally.
DC supply cable (2m long)
AC supply cable (3m long)
DC female socket (for vehicle installation)
Terminals (for use with DC socket)
Stainless steel basket
Spare hinge cover plate set
Instruction booklet (this manual)
1
1
1
2
1
1
1

2
Getting to know your Weekender
1. Lid (shown in front-opening configuration).
2. Lid handle.
3. Interior light.
4. Refrigerated bin.
5. Lid locking latch.
6. Insulated outer body.
7. Control panel.
8. Alternative lid handle position.
9. Alternative lid latch position.
10. Spring-loaded carry handle.
11. Compressor area.
12. Electronics cooling fan.
13. DC fuse. (15A automotive type)
14. AC input socket (with internal fuse)
15. DC input socket.
1
2
3
4
5
6
7
8
910
11
12
13 14
15

3
HIGH
MANUAL
MED
LOW
AUTO
POLARITY
REVERSE
AC
MAINS RUN FAULT ID
SPEED CONTROL
BATTERY
VOLTAGE
THE FRIDGE WILL AUTOMATICALLY
CUT-OUTAT THE SELECTED
BATTERY PROTECTION LEVEL.
LOW WILL ALLOW THE BATTERY
TO BE COMPLETELY DRAINED.
THE FRIDGE WILL OPERATE AT LOW-SPEED
WHEN BATTERY VOLTAGE IS BELOW 12.6V.
TO SELECT HIGH-SPEED AT VOLTAGES
BELOW 13.2V, PRESS THE TURBO BUTTON
THE FRIDGE AUTOMATICALLY SELECTS
HIGH-SPEED FOR VOLTAGES ABOVE 13.2V.
12.3
12.2
12.1
11.8
11.5
11.0
10.5
10.0
9.5
12.0
13.8
13.2
12.5
12.4
TURBO
BATTERY PROTECTION
POWERPACK
ALARM
ON
DOWN
UP
SET MODE
“SET MODE” - PRESS DOWN FOR 3 SECONDS
TEMPERATURE
FLASHING
OVER
TEMPERATURE
SOLID
TEMPERATURE PROTECTION
WARNING
- COMPRESSOR SHUT DOWN
- COMPRESSOR LOW SPEED
Connecting power
Control Panel
1. Manual turbo mode button.
2. DC supply reversed polarity indicator.
3. Battery monitor.
4. Status indicators.
5. Battery protection level indicators.
6. Audible alarm ON indicator.
7. Alarm ON / OFF selector button.
The Weekender is equipped with both 12-volt DC
input as well as 230-volt AC mains input. Both power
inputs are fuse-protected and are located on the side
of the refrigerator.
Use the cables supplied in order to connect
the Weekender to an appropriate power
source.
If both the AC supply and DC supply are connected
simultaneously, the Weekender will automatically use the
AC supply.
If the AC power is interrupted, the Weekender will use the
DC supply instead.
When fitting either power cable, ensure that the plug is
pressed in firmly and does not pull loose easily.
DC
8. Battery protection level selector button.
9. Over-temperature warning indicator.
10. Temperature display.
11. Temperature UP button.
12. Temperature "set mode" indicator.
13. Temperature down / set mode button.
1
2
3
9
45
67
8
10
11 12
13

4
Setting the temperature
Speed Control
Recommended Food storage guide
MANUAL
AUTO
SPEED CONTROL
THE FRIDGE WILL OPERATE AT LOW-SPEED
WHEN BATTERY VOLTAGE IS BELOW 12.6V.
TO SELECT HIGH-SPEED AT VOLTAGES
BELOW 13.2V, PRESS THE TURBO BUTTON
THE FRIDGE AUTOMATICALLY SELECTS
HIGH-SPEED FOR VOLTAGESABOVE 13.2V.
TURBO
DOWN
UP
SET MODE
“SET MODE” - PRESS DOWN FOR 3 SECONDS
TEMPERATURE
During normal operation, the Weekender cooling speed is
automatically controlled to optimise power consumption.
When operating on battery power, the Weekender will run
at low speed. If additional power is available (when the
battery is being recharged), the Weekender will
automatically run at high speed.
To force high-speed operation (Turbo mode) when running on battery power, press and
hold the button until the "MANUAL" indicator is illuminated.
Note that the Weekender will always run at high speed when mains power is connected.
The digital thermostat fitted to the Weekender
allows accurate setting of the desired cooling
temperature.
The thermostat can operate in a range of
20°C to -30°C in 1°C steps.
To change the thermostat setting, press and hold the button until the "SET
MODE" indicator is illuminated. Now press or to choose the desired
temperature.
When the desired setting is reached, release all buttons and the display will return
to the current temperature after 10 seconds.
Fresh produce Frozen meats
Cold beverages Ice cream
3°C ~ 8°C
Cooked meats Ice2°C ~ 5°C
0°C ~ 3°C
1°C ~ 6°C
Chilled seafood
Non-frozen dairy 1°C ~ 5°C
TURBO
DOWN
DOWN
UP
-6°C ~ -18°C
-12°C
-18°C
Pack the Weekender and run with mains power the night before
departing on a journey. This ensures that the contents of the
Weekender are pre-cooled and the refrigerator requires
minimum battery power to maintain the internal temperatures
Tip

HIGH
MED
LOW
POLARITY
REVERSE
BATTERY
VOLTAGE
THE FRIDGE WILLAUTOMATICALLY
CUT-OUTAT THE SELECTED
BATTERY PROTECTION LEVEL.
LOW WILL ALLOW THE BATTERY
TO BE COMPLETELY DRAINED.
12.3
12.2
12.1
11.8
11.5
11.0
10.5
10.0
9.5
12.0
13.8
13.2
12.5
12.4
BATTERY PROTECTION
ALARM
ON
5
Battery Monitor and protection
Battery voltage compared to capacity. (@ 25°C)
1V
2.0
1.4V
2
12. V
6
1V
3.7
10%50%75%100%
CHARGE
35%
FLAT
V
11.4
Battery is being
charged. Battery is
flat.
Battery voltage compared to capacity
The Weekender is equipped with a battery monitor and low-battery
protection circuit. The battery monitor is intended to give an estimate
of the available remaining energy in a 12-volt lead-acid battery.
The battery monitor has a built-in low voltage alarm which provides
audible warning of a low-battery condition.
To activate the alarm, press and hold the button until the "ALARM
ON" indicator is illuminated.
Combined with the battery monitor is a 3-stage battery protection control. This feature
is used to prevent the connected battery from being excessively discharged.
The user has the choice of 3 protection levels. These are linked to the voltages
indicated on the battery monitor, and indicate at which voltage the fridge will cut-out.
Press and hold the button until the desired level is obtained.
The "MED" and "LOW" settings allow a deep discharge of the battery. However, due
to possible wiring loss in the application vehicle, the voltage detected by the
Weekender may be lower than the actual battery voltage.
The Low battery warning will sound when the
voltage measured by the Weekender is below
11.5 volts. It is recommended to re-charge a
battery that has been discharged to this level
as soon as possible.
The voltage of a lead-acid battery can be an indication of its state-of-charge.
By measuring the voltage, we can estimate the amount of energy remaining in the
battery.
Changes in temperature, battery age and general battery health can influence this
relationship and therefore result in inaccurate capacity measurement.
The voltage-capacity relationship is most accurate when the battery is at 25°C.

6
Status Indicators
MAINS - This light will be illuminated when 240VAC mains power is applied.
In this mode, the refrigerator will operate at high-speed.
RUN - This indicator will be illuminated whenever the refrigerator compressor is
running. (either on mains or battery power)
FAULT ID. - This indicator is used to identify common faults. The light will flash a
sequence of pulses and then pause before repeating the code.
Refer to the Troubleshooting section Pg 8 for more details.
REVERSE POLARITY - This indicator identifies that the power applied to the 12V input has the
incorrect polarity. Check all wiring connections for correct polarity.
POWER PACK OVER-TEMPERATURE - In the event that the fridge electronics overheat, a
cooling fan will be activated. If the fan cooling is insufficient to correct the error, the refrigerators'
compressor will automatically slow-down (over-temperature light will flash).
If temperatures continue to increase, the refrigerator will be shut-down as a protection feature
(over-temperature light will be permanently illuminated)
This error is self-correcting and normal operation will resume when electronic temperatures
return to normal.
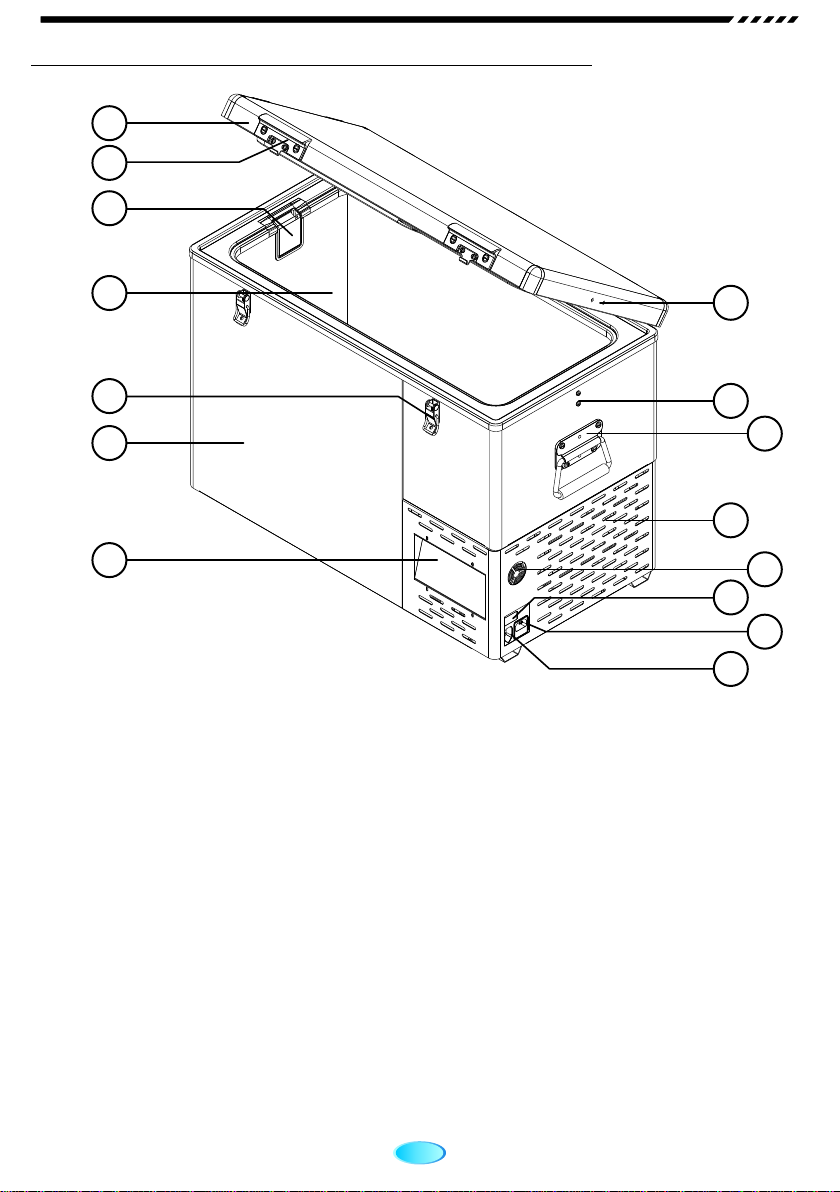
The National Luna Weekender is equipped with status indicators which show the
operation of the refrigerator and help to identify faults that may occur.
A brief description of the status indicators is shown below :
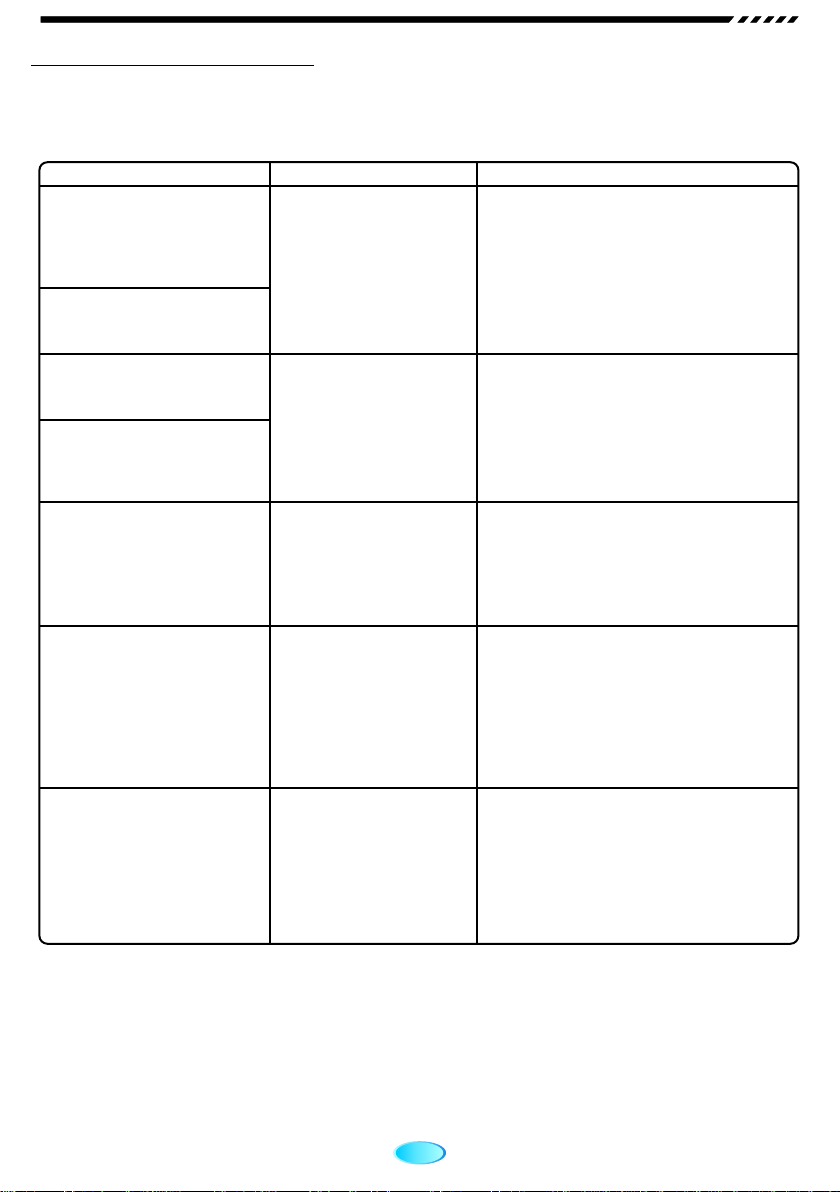
# of
flashes Fault description
2 Fan over-current cut-out. There is a problem with the ventilation fan.
3 Motor start error. The rotor is blocked or the system pressure is too high.
4 Minimum speed error. The motor cannot maintain a minimum speed of 1900 rpm.
5 Thermal cut-out. The electronic circuitry has over-heated.
1 Low voltage. Battery is flat, there is poor wiring or poor connections.
# of
flashes Fault description
wiring losses are too high or there is a poor connection to the power source.
2 Fan over-current cut-out. There is a problem with the ventilation fan. It is possible that
the ventilation fan is obstructed, blocked or damaged.
3 Motor start error. The compressor has not started successfully. This can happen in extreme
environments where the refrigerator is heavily loaded and temperature is very high.
4 Minimum speed error. The motor cannot maintain a minimum speed of 1900 rpm. This can
be the result of an internal electronics failure.
5 Thermal cut-out. The electronic circuitry has over-heated. This can occur in very hot
environments. The electronics will reset when the temperature has dropped.
1 Low voltage. This is shown when the supply voltage is low. The battery could be flat,

7
Dual-direction Lid
A special feature of the Weekender is the ability to
change the direction in which the lid opens.
The most common configuration is the front-opening
direction (shown).
If the application prevents the lid from opening fully or
the refrigerator is installed longways into a vehicle, it
may be advantageous to use the side-opening
configuration.
The Weekender is supplied in the front-opening
configuration. In order to change the lid direction,
follow these steps :
1. Close the lid. Remove both front latches and lid
handles.
2. Re-fit one of the latches and lid handles to the
alternative latch positions on the side of
the refrigerator. (Keep the spare parts safe)
3. Remove all three hinges from the rear of the
refrigerator. Also remove the hinge cover plates
from the alternative hinge locations.
4. Re-fit two of the hinges on the side of the
refrigerator.
5. Align the lid and ensure that it closes fully before
tightening the screws.
6. Keep the spare hinge and screws in a safe place.
The Weekender will now be in the side-opening
configuration.
Tip - The optional Weekender protection
jacket has a side pocket which is ideal for
keeping the spare hinge and latch parts.
Three hinge cover plates are supplied
(2 fitted) with the Weekender for covering
the unused hinge holes.

8
Troubleshooting
Problem Possible cause Remedial action
In the event of unusual or undesired operation, consult the table below before contacting a
service agent.
The battery is low.
The DC supply has
inadequate wiring.
The ventilation fan is
blocked or damaged.
The fridge will not run
when connected to 12V,
but only when connected
to 230V mains.
Fault ID light flahes once
every 5 seconds.
Recharge the battery.
2
Ensure supply socket has 4mm wire
or thicker and the vehicle body is not
used as an earth.
Ensure all connections are secure.
Check the ventilation fan for
obstructions.
If the fan is broken, return the
refrigerator to an authorised agent for
repair.
The ventilation fan is
noisy or not running.
The Fault ID light is
flashing twice every
5 seconds.
The compressor failed
to start correctly or run
at its minimum speed.
If the refrigerator continues to show
the error for an extended period of
time, contact an authorised service
agent.
The Fault ID light is
flashing 3 or 4 times every
5 seconds.
There are significant
cable or connection
losses.
Make sure the supply socket has
been installed with adequate wire
and good connections.
If another load (eg. spotlight) is
connected to the same supply, cable
losses are magnified.
The battery voltage monitor
is not showing the correct
battery voltage.
The button was not
pressed for long enough The button must be pressed for 3-
seconds.
The speed control will not
change when the button
is pressed and the fridge is
connected to a 12-volt
supply.

9
Installation guidelines
15
51
When installing the Weekender into a vehicle for the first time, ensure that the electrical
connections to the vehicle's battery are secure and the appropriate wiring is used.
The Weekender is supplied with a pre-made cable for use with a 12-volt supply.
This cable is terminated with a high-quality plug for connection into your vehicle.
2. Use a suitable cable to connect the
socket to the vehicle's battery.
2
A cable thickness of 4mm or greater
is recommended.
Fitting an in-line fuse.
Although the Weekender has a built-in fuse, it is
recommended to install an additional fuse on the
positive wire as close to the battery as possible.
(This will protect against short-circuits that may
occur along the length of the cable).
Ensure that all connections are properly
crimped and insulated.
An automotive fuse with a rating
of 15A is recommended.
To Ba ter (+)t y
To ri g
F d e
When installing electrical outlets in your vehicle, do not rely
on the vehicle's body for an electrical earth.
If you choose to change the attached plug on the DC cable for a different type, first ensure
that the cable is unplugged before cutting it.
Split and strip the wires as required for the new plug. Take care to ensure that the correct
polarity is used on the plug and crimp the connections where possible.
If the "Reverse Polarity" indicator on the Weekender control panel illuminates, reverse the
wiring in the plug to correct the problem.
1. Install the supplied
socket into your vehicle
in a convenient location.
Centre pin ( + )

National Luna Limited Warranty
This National Luna Warranty supercedes any other advertised Guarantee or Warranty
provided with this appliance by any wholesaler or retailer.
National Luna warrants this product to be free from defects in materials and / or workmanship
under normal use and service to the original purchaser subject to the following :
1. At any time within THREE YEARS from the date of purchase by the original purchaser, National Luna
will at its discretion replace or repair without cost to the owner, and if necessary through an authorised
service agent, any part found to be defective by National Luna.
2. This warranty does not apply to light bulbs, pilot lights, fuses, cooling fan or item where the length of life
depends on the amount of use and care given.
3. The Danfoss BD35F compressor has a 1-year manufacturers guarantee.
Correct completion and submission of the Guarantee registration card supplied with this booklet allows
for an additional 2-year warranty to be provided by National Luna on the compressor.
4. Removal of the serial number on the appliance will render this warranty void.
5. National Luna may consider a warranty void if modification have been made to this appliance which
may cause undesireable or hazardous operation or may be the cause of the malfunction of this product.
6. National Luna shall not be responsible for any damages of any kind resulting from incorrect voltages or
faults with regards to power supply which falls outside of the appliance operating parameters.
7. National Luna shall not be responsible for damage to the appliance caused by negligent use, storage
of hazardous chemicals, use of corrosive substances, fire, flood, civil-disturbances, lightning or any
other natural phenomenon.
8. It is a condition of this warranty that National Luna shall not be responsible for transportation or any
costs incurred in transporting this appliance. (Including costs incurred by damage, incorrect packaging
or theft).
9. National Luna will not accept any responsibility for the loss or damage caused by, or due to, the
malfunctioning of this appliance.
10. National Luna shall not be held responsible for any injuries to persons caused by the incorrect or
negligent usage of this appliance.
11. Repair work to be done in terms of this warranty must be referred to National Luna for written
authorisation before any work is carried out.
12. National Luna reserves the right to refuse repair or service under warranty if the Guarantee
registration card and original proof of purchase cannot be produced.
10
Serial No :
Model :
Date purchased :
Invoice No :
For tracking and warranty purposes, fill in the information below.
Dealer’s name / Stamp :

External dimentions
(lid closed)
External dimentions
(lid open)
Exterior finish
Interior finish
Refrigerant
AC power range
DC power range
Power consumption
710mm (L) x 385mm (W) x 506mm (H)
710mm (L) x 385mm (W) x 845mm (H)
23Kg Weekender 52
(without optional accessories)
Aluminium (Stucca metallic grey)
Aluminium (Smooth metallic grey)
R134a (CFC Free)
170V AC ~ 270V AC (0.40A)
9.6V DC ~ 15V DC (2.5A)
±31W - 2.5A average running current
at low speed.
710mm 385mm
* Lid in front-opening configuration
Weight
* with battery at 12.5V under normal conditions
506mm
Specifications
Weekender 52
Inside Dimentions - showing useable volume
587 mm
027 mm
389 mm
189 mm
392 mm
Tel : +27 (0)11 452-5438
Fax : +27 (0)11 452-5263
National Luna - South Africa
www.nationalluna.com
52l
Table of contents
Other National Luna Refrigerator manuals