National Luna LEGACY NL40 User manual

Owner’s Manual
PORTABLE
REFRIGERATION
National Luna
Legacy Single Dome
60mm x 30mm
Translucent blue
Black
White
Metallic silver background
Notes :
Silver foil backing provides metallic effect
on translucent blue.
LEGACY Single Compartment Models:NL40 / 52 / 55 / 65 / 80 /125
LEGACY Dual Control Models: NL50 / 60 / 72 / 90 / 110

National Luna LEGACY Fridge Manual 2
This Manual is a combined publication, for National Luna LEGACY
models manufactured from June 2019 & contains relevant information,
common to all Models.
The National Luna Range of products has been designed
and manufactured in South Africa since 1989.
Every product sold is of the highest possible quality, manufactured
with world-class technology, marketed and serviced by a knowledgeable
and dedicated team both Locally and Internationally.
National Luna Portable Refrigeration Models:
National Luna Single Compartment Models: NL40 / 52 / 55 / 65 / 80 /125
National Luna Dual Control Models: NL50 / 60 / 72 / 90 / 110
PORTABLE
REFRIGERATION
National Luna
Legacy Single Dome
60mm x 30mm
Translucent blue
Black
White
Metallic silver background
Notes :
Silver foil backing provides metallic effect
on translucent blue.
Please complete the tear-out return card to register your warranty or register online:
www.nationalluna.com

National Luna LEGACY Fridge Manual3
Precautions
Congratulations on the purchase of your
National Luna LEGACY Portable Fridge / Freezer.
The National Luna range of portable fridges and freezers are high-performance,
high eciency refrigerators ideal for harsh conditions and applications that are
limited to battery power such as o-road vehicles, caravans and solar installations.
The versatility of each of the National Luna models allows the use of a wide range
of AC supply voltage (85V DC - 265V AC) as well as 12-volt or 24-volt battery power
(9.6V AC - 31.5V DC).
The use of a custom-designed digital thermostat and smart control circuitry
ensures temperature stability and low power consumption.
All refrigerator models are built using high quality materials, unique assembly
techniques and strict testing procedures to ensure the highest level of quality and
performance.
When the refrigerator is used in an automotive application, ensure that it is secured
to prevent accidental movement. The carry handles can be used with straps or
tie-downs if necessary.
• A base mounting plate is optional and recommended for most applications.
• Ensure the correct type of cable and connectors are used for installation.
• Ensure that any power leads connected to the refrigerator will not be pulled or
damaged by any movement of the fridge - especially where slides or drawers are
used.
• Do not use a power lead that is damaged.
• Do not connect the refrigerator to a power source that does not comply with the
input power specications. (Displayed on the fridge’s rear panel)
• When storing the fridge, ensure that the lid is propped open to allow for
breathing. Disconnect the appliance from an electrical source.
(Note: When the fridge is switched o, the interior light will still function if the
unit is connected to a power source).
• Do not block or cover the ventilation holes. (During o-road
conditions items may become lodged around the cooling area).
Introduction

National Luna LEGACY Fridge Manual 4
Introduction 3
Getting to know your Portable Fridge
• Securing your Fridge - Base Mounting Plate 6
• Securing your Fridge - Tie-down Straps 6
• Air Flow 6
Installation Guidelines
• Electrical Connections 7
• Fitting an In-line Fuse 7
• Connecting Power 8
• Wiring Specications 8
Battery voltage vs capacity
• Low Voltage Battery Protection (cut-in / cut-out) 9
Operating your Fridge
• Dynamics of Temperature Settings 10
• Thermostat Control 10
• Temperature Guidelines 10
• Celsius / Fahrenheit Conversion Chart 10
Operating your Single Compartment Fridge
(Models: NL40 / 52 / 55 / 65 / 80 / 125)
• Getting to know your portable Fridge 11
• Main Control Panel 12
• On / Off Control 12
• Battery Protection Settings 12
• Smart Compressor Speed Control 13
• Speed Control Setting 13
• Setting the Temperature 14
• Indicator Lights 14
Index

National Luna LEGACY Fridge Manual5
Trouble Shooting
• Indicator Lights 20
• Fault Description 20
• Trouble Shooting 21
General Maintenance
• Removal of Side Cover 22
• Removal of Electronic Compressor Driver 22
• Replacing the DC fuse 22
• Replacing the AC Power Supply 22
• Replacing the Temperature Probe 23
• Cleaning the Condenser / Replacing the Fan 23
• Removing & Replacing the Interior LED Light 23
• Door Seal & Adjustment (Loose latch condition) 24
• Removing & Replacing Multi-cavity Door Seal 24
Care and Cleaning 25
National Luna Warranty
• South Africa Only - 3 Year Comprehensive 26
• International Warranty 27
• Compressor warranty - 8 Year Limited 27
• Safety Precautions 28
• Disposing of your Old Appliance 28
Operating your Dual Control Fridge
(Models: NL50 / 60 / 72 / 90 / 110)
• Single Door 15
• Double Door 15
• Main Control Panel 16
• On / Off Control 16
• Battery Protection Settings 16
• Smart Compressor Speed Control 17
• Speed Control Setting 17
• Setting the Temperature 18
• Minimum Temperature Settings 18
• Indicator Lights 18
Index
Dual-Direction Lid 19

National Luna LEGACY Fridge Manual 6
Air Flow
Spacing 100-200mm
Air Flow
Allow a 100-200 mm gap around the refrigerator
compressor area for ventilation (Airow). The
higher the ambient temperature, the more
ventilation space is required for ecient
airow and cooling. (In the case of restricted
airow, the compressor will automatically shut
down - see page 21 for Trouble Shooting).
Do not block or cover the ventilation holes.
(During o-road conditions items may
become lodged around the cooling area).
Getting to know your portable Fridge
The sturdy and functional carry handle
has a slot into which a
hold down strap can be tted
as indicated.
(Care must be taken not to
over-tighten the hold-down strap
when using a ratchet device.)
Securing your Fridge in a vehicle using Tie-Down Straps
A low-prole design with locking pin, this base oers a xed mounting position
with an easy to remove mechanism. The optional base mounting plate allows the
refrigerator to be securely fastened to the oor or body of the vehicle.
The unique locking design ensures that
the Fridge remains xed in position.
6mm lock nut
M6 x 20 Flat Washer
Securing your Fridge in a vehicle using a Base Mounting Plate

National Luna LEGACY Fridge Manual7
Electrical Connections
When installing the refrigerator into a vehicle for the rst time, ensure that the
electrical connections to the vehicle’s battery are secure and the specied wiring
is used. (See wiring guidelines on page 8)
The fridge is supplied with a power lead for use with a 12 Volt DC supply.
This power lead is terminated with a high-quality male plug for connection into
your vehicle.
1. Install the supplied female
socket into your vehicle
in a convenient location.
2. Use suitable cables to connect the
female socket to the vehicle’s battery.
(Cable thicknesses of 4mm2or greater
is recommended.)
Centre Pin (+)
• If you choose to change the male plug on the DC cable supplied for a dierent
type of plug, rst ensure that all power has been disconnected.
• Split and strip the wires as required for the new plug. Take care to ensure that the
correct polarity is used on the new plug and crimp the connections where possible.
Male Plug
Female Socket
Installation Guidelines
Fitting an in-line fuse
Although the fridge has a built-in fuse, it
is recommended to install an additional
fuse on the positive wire as close to
the battery as possible. This will protect
against short-circuits that may occur
along the length of the cable.
Ensure that all connections are
properly crimped and insulated.
An automotive fuse with a rating
of 15A is recommended
When installing electrical outlets in your vehicle, do not
rely on the vehicle’s body for an electrical earth path.
2x 4mm2
cables to Battery

National Luna LEGACY Fridge Manual 8
This Fridge can accept a DC voltage
ranging from 9.6V to 31.5V, as well as
an AC voltage range from 85V to 265V.
The 12Vdc power input is protected
with a 15A automotive blade fuse.
An AC and DC source can be connected
to the refrigerator simultaneously. Under
these conditions, the AC supply will be
chosen as the primary power source.
If the AC supply is interrupted, the DC
supply will be automatically selected
and operation will continue normally.
(After a 1 minute delay)
Suggested Wiring Specications / Guidelines
One of the most problematic issues with installing a 12 Volt refrigeration system
is incorrect wiring. Most users do not understand the importance of maintaining
battery voltage over the distance from the battery to the installed Fridge.
While most car cigarette lighter sockets appear to be adequate, in practise a
large voltage drop occurs between the socket and the car battery. This may
result in the fridge shutting down as a result of a low-voltage condition.
It is recommended the following table be used as a guide to establish what cable
thickness is to be used depending on the distance from the car battery to the
fridge. As a rule of thumb one should use a 1.0 mm2multi-strand copper wire
per meter of distance from the battery. (minimum 4mm2)
Note: Two wires (positive & negative) must be connected from the battery to the Fridge / plug point.
Cable Size Max Length between
battery & fridge
AWG
Approximate
Cross Section
mm2
12 Volt Operation
Meters
11 4 4
9 6 6
7 10 10
5 16 16
Connecting Power
Installation Guidelines

National Luna LEGACY Fridge Manual9
• Voltage of a battery can be an indication of its “state-of-charge”.
• The voltage-capacity relationship is most accurate when the
fridge is not running and the battery temperature is at 25°C.
• By measuring the voltage, we can estimate the amount of
energy remaining in the battery.
• Changes in temperature, battery age and general battery health
can inuence this relationship and therefore result in inaccurate
capacity measurement.
• Normal battery operation takes place between 12.0 and 12.6 volts.
• Depending on the manufacturer’s specications a normal car’s
alternator charges between 13.7 and 14.2 volts.
• A battery should not be discharged below 11.8 volts as a general
rule. A “deep-discharged” battery should be recharged as soon as
possible to prevent permanent damage.
Low Voltage Battery Protection
The Electronic Control Unit will cut-out at the LOW / MEDIUM / HIGH selected setting.
Once the compressor has cut-out, it will not restart (cut-in) until the voltage rises.
The table below reects the set points.
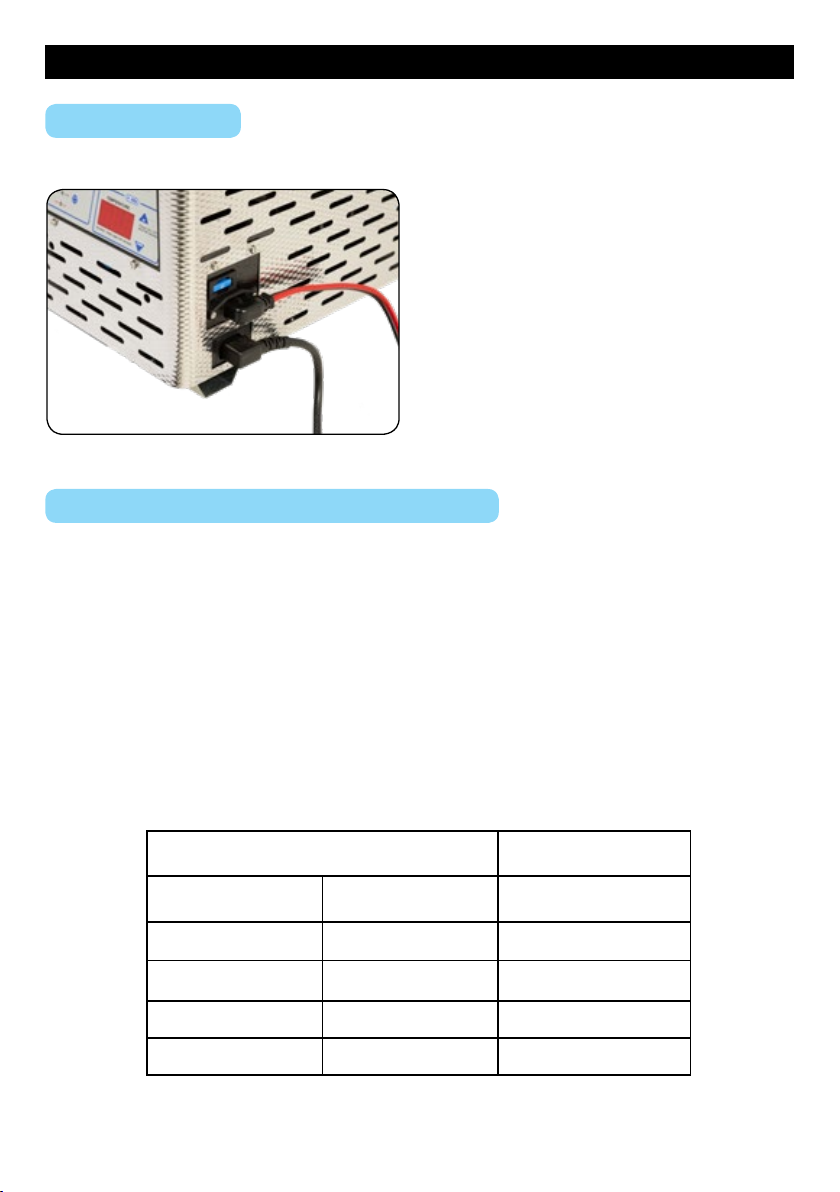
BATTERY
CAPACITY
BATTERY
VOLTAGE
When using the unit in a 24-volt application
do not select battery protection “LOW”
as this may completely drain the battery bank.
(Causing permanent damage to the batteries)
12 VOLT 24 VOLT
Battery
Protection Cut-out Cut-in Cut-out Cut-in
LOW 9.6 10.9
MED 10.4 11.7 22.8 24.2
HIGH 11.3 12.5 24.6 26.0
Note: these values are measured at the
Electronic Compressor Driver input. It is
important to note that poor / thin wiring
and bad connections to the battery can
cause a large voltage drop. When this
occurs the Fridge switches o and will
re-start again on a repeat cycle “hunting”.
NOTE: When connecting the fridge for the rst time, it will look at the cut-in voltage.
• If the battery protection is set on “High” the initial cut in voltage will be 12.5.
• If the battery is not fully charged the Fridge will not start. Simply select “Low” to start.
• When selecting “Low” the Fridge will operate within a voltage supply of 9.6-31.5Vdc.
Battery Voltage vs Capacity

National Luna LEGACY Fridge Manual 10
The compressor is controlled by the digital thermostat. It has a unique Multi - Speed (2,000 - 3,500 rpm)
capability which makes it ideal for use in all mobile applications up to an angle of 35 degrees. It can
function efciently in extreme conditions where it is not uncommon to have ambient temperatures
above 40ºC.
To control temperature, the thermostat sensor must be placed in a position in order to take an accurate
temperature reading.
For practical purposes National Luna has elected to place this temperature sensor behind the metal
surface forming the interior compartment of the Fridge/Freezer. Thus the switching on and off of the
compressor will be controlled by the compartment surface area temperature.
The inner volume of the cooling bin (i.e. core/centre temperature) will take time to “pull down” to
equalise the compartment temperature. (In practice it is common that the set temperature will be within
3ºC of the core temperature).
Ambient temperatures surrounding the Fridge must also be taken into consideration. Very high
ambient temperatures will affect the running time of the fridge. (e.g. The Fridge will run longer to
maintain or reach the target temperature setting.)
3°C to 6°C
0°C to 4°C
-6°C to -11°C
-18°C
Fresh fruits & vegetables
Dairy products
Smoked / prepared meats
Cold beverages
Short-term frozen meats
Frozen meats and sh
Ice cream / frozen desserts
Recommended choice of temperatures
The following table is a guideline to setting the
correct temperature range for different foodstuffs. 60
43
32
12
6
0
-6
-12
-18
-24
-30
140
109.4
89.6
53.6
42.8
32
21.2
10.4
-0.4
-11.2
-22.0
ºC ºF
Temperature Guidelines
Dynamics of Temperature Settings
Operating your Fridge
Celsius vs Fahrenheit
Inner Bin / Cooling Compartment / Thermostat Control
Conversion Chart

National Luna LEGACY Fridge Manual11
Developed for performance at high ambient temperatures, minimum power consumption
and high operating efciency, these single compartment fridges are recognised as the most
powerful in the world.
With the aid of an integrated electronic thermostat these units can be accurately set as a
fridge or as a freezer.
Getting to know your portable Fridge
Single Compartment
(NL40 / 52 / 55 / 65 / 80 / 125)
National Luna
Legacy Single Dome
60mm x 30mm
Translucent blue
Black
White
Metallic silver background
Notes :
Silver foil backing provides metallic effect
on translucent blue.
National Luna Single Compartment Range:
Models: NL40 / 52 / 55 / 65 / 80 /125
1. Lid
2. LED Interior light
3. Lid locking latches
4. Cabinet exterior
5. Control panel
6. Carry handles
7. Compressor area
8. AC input
9. DC input with fuse (15A)
10. Cooling Compartment
(Evaporator)
4
7
8
9
6
10
5
Operating your Single Compartment Fridge

National Luna LEGACY Fridge Manual 12
Battery Protection Settings
On / O Control
The refrigerator can be turned ON and OFF
via the control panel.
Press and hold the button for 3 seconds
to turn the fridge ON or OFF.
If power to the refrigerator is interrupted, it will default
to ON automatically.
Note: When the fridge is switched off, the interior light will
still function if the unit is connected to a power source.
The refrigerator is equipped with a multi-level battery
protection circuit.
The user has the choice of three voltage levels at
which the compressor will shut down to protect against
excessive battery discharge. (See page 9)
To change the protection level, press and hold
the button until the preferred level is reached.
Selecting the “Low” cut-out setting can cause excessive discharge resulting in damage to the battery.
Note: When changing the protection level the compressor will stop and restart 1 minute later (compressor
start delay). When powered by an AC source, the battery protection level can be changed, but will only
affect operation when the DC source is used.
Operating your Single Compartment Fridge
Main Control Panel
Automatic speed control
with TURBO over-ride
Battery protection control
Run status light
SET mode and
temperature DOWN control
Power ON/OFF and fridge
temperature UP control
Fault identier light

National Luna LEGACY Fridge Manual13
Selecting the “Turbo” mode will override the Smart Compressor
Speed Control function and the unit will run at maximum speed
For situations where maximum cooling power is
required, press and hold the “Turbo” button until the
indicator is illuminated.
This will bypass the automatic control and force
high speed operation.
This Fridge is tted with a Smart Compressor Speed Control function which will vary the speed of the
compressor in order to conserve power and optimise performance.
At the start of each cycle the Fridge will automatically run at low speed for 3 minutes to equalize gas
pressure in the system.
• Logic 1 (Setting the compartment temperature in a range of +20ºC to -11ºC).
The compressor will operate at 3 speeds: low 2,000 rpm, medium 2,750 rpm and high 3,500 rpm.
When the inner compartment temperature is warm, the Fridge will automatically run at full speed
to bring the inner compartment temperature down as fast as possible. It will then step down to medium
speed to reach the set temperature point where the fridge will then switch off. The temperature will then be
maintained at low speed.
This logic makes the Fridge operate and maintain the desired compartment temperature under all
ambient temperature conditions optimising performance and efciency.
Should the temperature of the fridge contents change, such as when fresh foodstuffs are added, the
compressor will automatically speed up to cool the new contents.
• Logic 2 (Setting the compartment temperature in a range of -12ºC to -30ºC).
When temperatures are set below -11ºC, the Smart Compressor Control will operate at high speed to
bring temperature down as fast as possible to the desired set point. Thereafter the temperature will be
maintained at medium speed.
Using the TURBO function may increase power consumption
On initial plug-in, the compressor will have a one minute time delay before starting.
Speed Control Setting
Operating your Single Compartment Fridge
Smart Compressor Speed Control

National Luna LEGACY Fridge Manual 14
Setting the Temperature
The digital thermostat tted to this
refrigerator allows accurate setting of the
desired cooling temperatures.
Temperatures can be selected between
+20°C and -30°C in 1°C increments.
When powering up the fridge the rst time, the temperature inside the fridge will be reected on
the display. (NOTE: the previously set temperature will be in memory)
To select the new cooling temperature, press and hold the button until the display starts to
ash. (The previous set temperature will be displayed).
Press or to raise or lower the desired temperature. The thermostat will accept the
new setting and exit the setting mode 10 seconds after the last button was pressed. (It will now
remember the new set temperature).
The temperature display will reect the inner compartment temperature prior to the new setting.
Provided the new setting is colder, the compressor will then switch on and cool the fridge further
to the set point. (During this time the run indicator light will be displayed).
Operating your Single Compartment Fridge
RUN - This indicator will be illuminated whenever the fridge Compressor is running and the
compartment is being cooled.
The Compressor is running.
½ second on, ½ second off... Compressor start up delay. There is a 1 minute delay
before the compressor starts
1 second on, 1 second off... Compressor slow down cycle.The Compressor slows
down to low speed before stopping (30 seconds)
FAULT ID - This indicator is used to identify fault conditions that may occur with the refrigerator
such as low power supply. This indicator will ash a pre-determined number of times
every 4 seconds when a particular fault occurs (see page 20).
Indicator Lights
Status indicators will identify the
current operation of the refrigerator.
i
i
i
i
i
i
i
i
i
i
i
i
i
i
i
i
i
i
i
i
i
i
i
i
i
i
i
i
i
i
i
i
i
i
i
i
i
i
i
i
i
i
i
i
i
i
i
i
i
i
i
i
i
i
i
i
i
i
i
i
i
i
i
i
SOLID -
FLASH -
FLASH -

National Luna LEGACY Fridge Manual15
The Single door / Double door fridges in this Legacy range have only one compressor, but
due to National Luna’s unique Dual Control technology, the fridge and freezer compartments
can be set independently. This is like having two fridges in one.
National Luna
Legacy Dual Dome
60mm x 35mm
Translucent blue
Translucent red
Black
White
Metallic silver / grey
Notes :
Silver foil backing provides metallic effect
on translucent blue & red.
National Luna Dual Control Range:
Models: NL50 / 60 / 72 / 90 / 110
By reducing the fridge side insulation to 42mm thickness, National Luna offers a fridge/freezer
to meet the demand for maximum fridge capacity where space is limited.
The freezer compartment has a separate internal lid. This prevents cold air escaping from the
freezer when the main lid is opened, adding to the efciency & ensuring stable temperatures within.
Although the compartment temperatures can be independantly set, it is recommended for the
efcient functioning of the unit that the compartment with the thicker insulation (with internal
freezer lid) be set as the colder freezer compartment.
Single Door Range (NL50 / 60 / 90)
Single Door (NL50 / 60 / 90)
Double Door Range (NL72 / 110)
This has two lids, one for each compartment.
This has one lid covering both compartments
and an internal freezer lid.
1. Lid
2. LED Interior light
3. Lid locking latches
4. Cabinet exterior
5. Control panel
6. Carry handles
7. Compressor area
8. AC input
9. DC input with fuse (15A)
10. Left Compartment
11. Right Compartment
12. Internal Freezer Lid
Double Door (NL72 / 110)
The double door fridges have 2 independant lids to ensure that the minimum amount of energy
is lost when opening a door. Both compartments have 60mm insulation to aid energy efciency
and this allows the compartments to be set independantly without any efciency restraints.
3
4
5
6
1
7
8
9
10
11
3
4
5
6
1
7
8
9
10
11
12
Operating your Dual Control Fridge

National Luna LEGACY Fridge Manual 16
The refrigerator can be turned ON and OFF via the
control panel.
Press and hold the button for 3 seconds
to turn the fridge ON or OFF.
If power to the refrigerator is interrupted, it will default
to ON automatically.
Note: When the fridge is switched off, the interior light
will still function if unit connected to a power source.
The user has the choice of three voltage levels
at which the compressor will shut down to
protect against excessive battery discharge.
To change the protection level, press and hold
the button until the preferred level is reached.
(Refer to page 9).
Battery Protection Settings
On / O Control
Whenever the battery protection setting is changed,
the compressor will stop and the 1 minute compressor
start delay will be active.
Automatic speed control
with TURBO over-ride
Main Control Panel
Battery protection control
Fault identier light
Individual run status lights
Left temperature display
Left SET mode and temperature UP / DOWN
Right SET mode and
temperature DOWN control
Power ON/OFF and fridge
temperature UP control
Right temperature display
Operating your Dual Control Fridge

National Luna LEGACY Fridge Manual17
Selecting the “Turbo” mode will override the Smart Compressor
Speed Control function and the unit will run at maximum speed
For situations where maximum cooling power is
required, press and hold the “Turbo” button until the
indicator is illuminated.
This will bypass the automatic control and force
high speed operation.
This Fridge is tted with a Smart Compressor Speed Control function which will vary the speed of the
compressor in order to conserve power and optimise performance.
On initial plug-in, the compressor will have a one minute time delay before starting.
Operating your Dual Control Fridge
Smart Compressor Speed Control
Speed Control Setting
Using the TURBO function may increase power consumption
At the start of each cycle the Fridge will automatically run at low speed for 3 minutes to equalize gas
pressure in the system.
LOW Speed:
If both compartments are set to above 0 degrees.
The compartment temperatures are within 7 degrees of set temperature.
MEDIUM Speed:
If the compartment with the coldest setting is set between 0 and -10 degrees.
The compartment temperatures are within 7 degrees of set temperature.
HIGH Speed:
If any compartment is set to below -10 degrees.
The compartment temperature is more than 7 degrees higher than the set temperature.

National Luna LEGACY Fridge Manual 18
Setting the Temperature
Minimum Temperature Settings
To select the cooling temperature, press and hold the button until the display starts to ash.
Press or to raise or lower the desired temperature. The thermostat will accept the new
setting and exit the setting mode 10 seconds after the last button was pressed. The same procedure
is used on both thermostat controls. (NOTE: You can only set one thermostat at a time).
NB - Set one thermostat at a time
National Luna
Model
Left
Compartment
Right
Compartment
50 -18 -24
60 -24 -18
72 -24 -24
90 -24 -18
110 -24 -24
Dual Control Refrigerators have two thermostats allowing
individual temperatures to be selected for each of the cooling compartments.
Operating your Dual Control Fridge
Indicator Lights Status indicators will identify the current operation of the refrigerator.
(see main control panel on page 16)
RUN - This indicator will be illuminated whenever the fridge Compressor is running and the
compartment is being cooled.
The Compressor is running.
½ second on, ½ second off... Compressor start up delay. There is a 1 minute delay
before the compressor starts
1 second on, 1 second off... Compressor slow down cycle.The Compressor slows
down to low speed before stopping (30 seconds)
FAULT ID - This indicator is used to identify fault conditions that may occur with the refrigerator
such as low power supply. This indicator will ash a pre-determined number of times
every 4 seconds when a particular fault occurs (see page 20).
i
i
i
i
i
i
i
i
i
i
i
i
i
i
i
i
i
i
i
i
i
i
i
i
i
i
i
i
i
i
i
i
i
i
i
i
i
i
i
i
i
i
i
i
i
i
i
i
SOLID -
FLASH -
FLASH -

National Luna LEGACY Fridge Manual19
A special feature of the NL50 and NL52 is the ability
to change the direction in which the lid opens.
The most common conguration is the
front-opening direction (shown on the right).
If the application prevents the lid from opening fully or
the refrigerator is installed long ways into a vehicle, it may
be advantageous to use the side-opening conguration.
The Fridge is supplied in the front-opening conguration.
In order to change the lid direction, follow these steps :
1. Close the lid. Remove both front latches and
lid handles.
2. Re-t one of the latches and lid handles to the
alternative latch positions on the side of
the refrigerator. (Keep the spare parts safe)
3. Remove all three hinges from the rear of the
refrigerator. Also remove the hinge cover plates from
the alternative hinge locations.
4. Re-t two of the hinges on the side of the refrigerator.
5. Align the lid and ensure that it closes fully before
tightening the screws.
6. Keep the spare hinge and screws in a safe place.
The Fridge will now be in the side-opening conguration
NOTE: Take care not to apply excessive pressure when
locating the screws to the inside retaining nuts.
(They can be pushed too far back or incorrectly
angled).
Tip - The optional protection jacket has a side pocket
which is ideal for keeping the spare hinge and latch
parts.
Dual-direction Lid (Models: NL50 & NL52 only)

National Luna LEGACY Fridge Manual 20
1Low voltage. This is shown when the DC supply voltage is low. The battery could be
at, wiring losses are too high or there is a poor connection to the power source.
2Fan over-current cut-out. There is a problem with the ventilation fan. It is possible that
the ventilation fan is damaged.
3Motor start error. The compressor has not started successfully. This can happen in
extreme environments where the refrigerator is heavily loaded & temperature is very high.
4Minimum speed error. The motor cannot maintain a minimum speed of 1900 rpm.
This can be the result of an Electronic Compressor Driver failure.
5Thermal cut-out. The electronic circuitry has over-heated. This happens in very hot
environments. This can occur when the fridge is over-loaded with warm contents and
the ambient temperature is high. The electronics will re-set when the temperature
has dropped.
6Electronic Compressor Driver hardware failure.
NUMBER OF FLASHES
FAULT DESCRIPTION
i
i
i
i
i
i
i
i
i
i
i
i
i
i
i
i
i
i
i
i
i
i
i
i
i
i
i
i
i
i
i
i
i
i
i
i
i
i
i
i
i
i
i
i
i
i
i
i
i
i
i
i
i
i
i
i
i
i
i
i
i
i
i
i
i
i
i
i
i
i
i
i
i
i
i
i
i
i
i
i
i
i
i
i
i
i
i
i
i
i
i
i
i
i
i
i
Trouble Shooting
Indicator Lights Status indicators will identify the current operation of the refrigerator.
RUN - This indicator will be illuminated whenever the fridge Compressor is running and the
compartment is being cooled.
The Compressor is running.
½ second on, ½ second off... Compressor start up delay. There is a 1 minute delay
before the compressor starts
1 second on, 1 second off... Compressor slow down cycle.The Compressor slows
down to low speed before stopping (30 seconds)
FAULT ID - This indicator is used to identify fault conditions that may occur with the refrigerator
such as low power supply. This indicator will ash a pre-determined number of times
every 4 seconds when a particular fault occurs.
i
i
i
i
i
i
i
i
i
i
i
i
i
i
i
i
i
i
i
i
i
i
i
i
i
i
i
i
i
i
i
i
i
i
i
i
i
i
i
i
i
i
i
i
i
i
i
i
SOLID -
FLASH -
FLASH -
This manual suits for next models
10
Table of contents
Other National Luna Refrigerator manuals