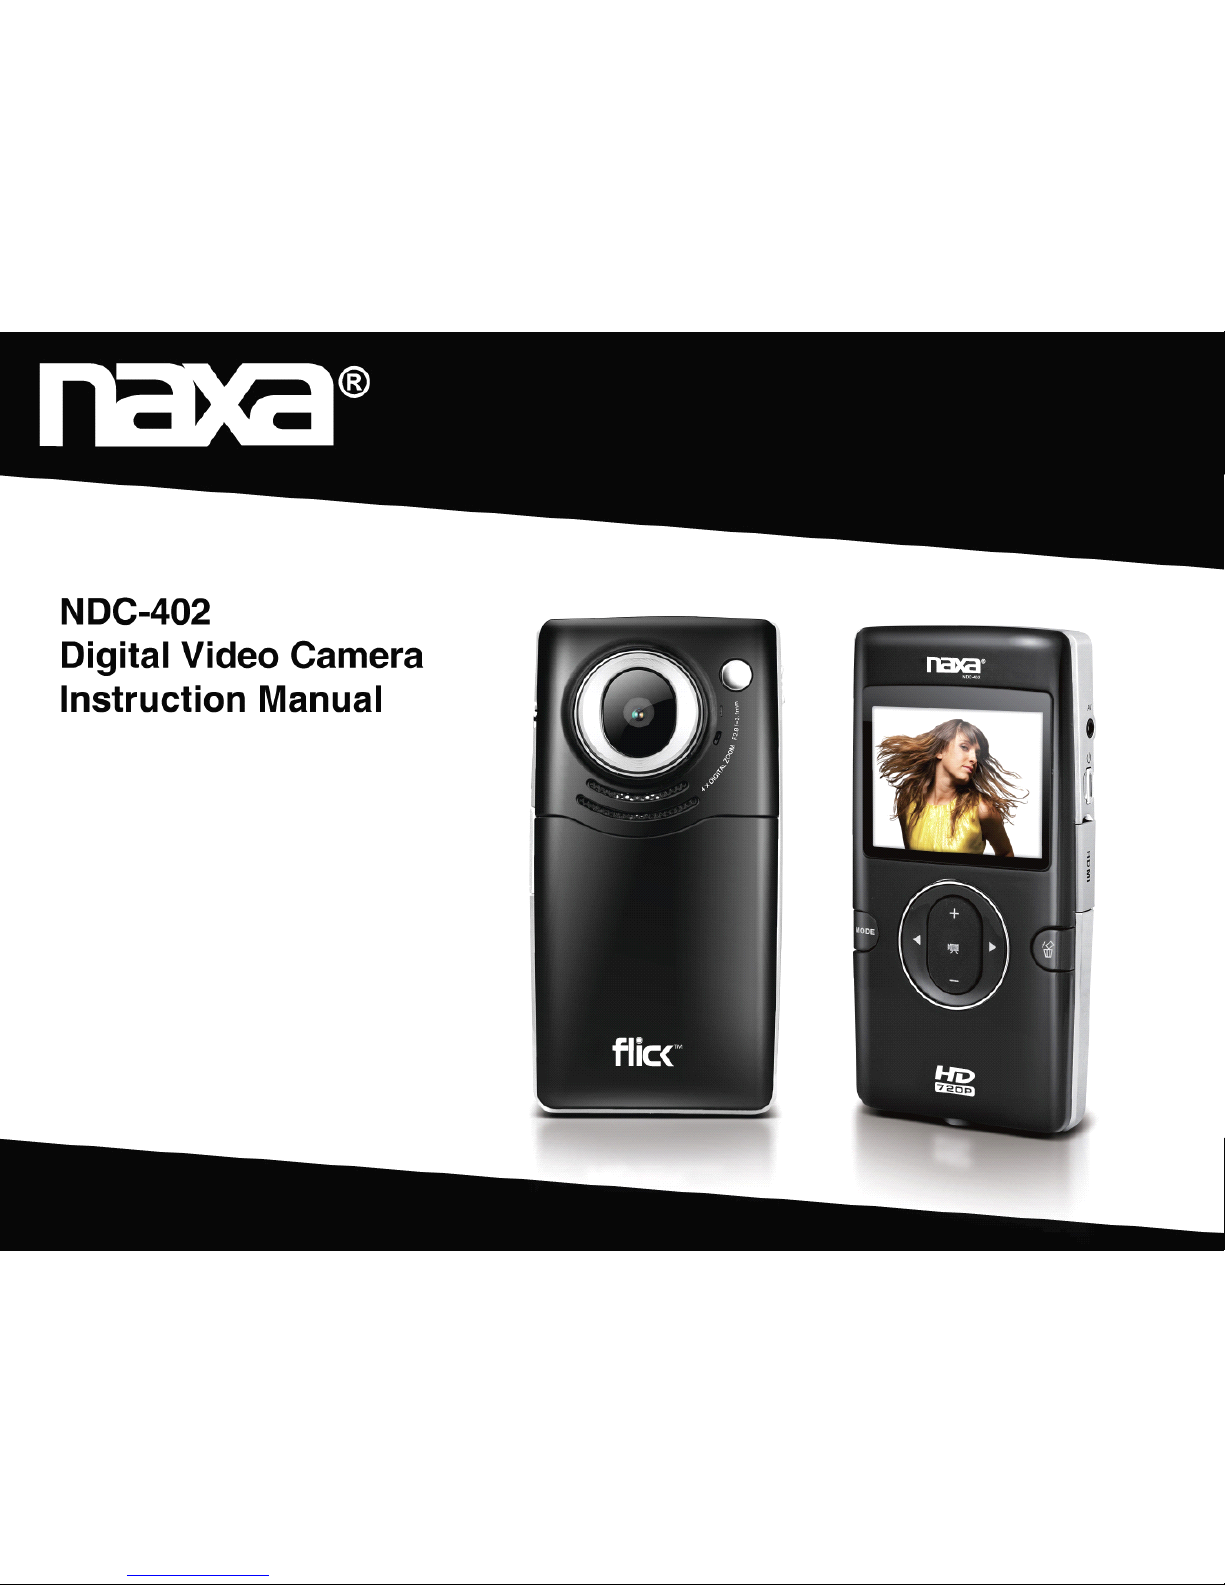
Naxa NDC-402 User manual

0

1
Contents Contents Contents Contents
Contents Contents Contents Contents……………………………………………………………………………………………………….1
Function Function Function FunctionDescription: Description: Description: Description:……………………………………………………………………………………….2
Notice Notice Notice Noticefor for for foruse: use: use: use:………………………………………………………………………………………………..2
System System System Systemrequirements: requirements: requirements: requirements:………………………………………………………………………………………4
Start Start Start Startto to to touse: use: use: use:…………………………………………………………………………………………………5
1.AppearanceandButtons……………………………………………………………………….5
2.Basicoperation…………………………………………………………………………………7
Introductioninterfaceforsoftwareinstallation………………………………………………….14
XvidcodecInstallation:…………………………………………………………………………15
MediaImpressionInstallationandUse:………………………………………………………17
Product Product Product Productspecifications: specifications: specifications: specifications:……………………………………………………………………………………23
Standard Standard Standard Standardaccessories: accessories: accessories: accessories:……………………………………………………………………………………24

2
Function Function Function FunctionDescription Description Description Description
Welcometopurchaseandusethisdigitalvideocamera.Beforeuse,pleasereadthisuser
manualcarefully.
Withthisdigitalvideocamera,youcantakevideoclipsandstillphoto.Withtheplayback
function,youcanplaybackthetakenvideowiththisdigitalvideocamera;inaddition,youcan
downloadthevideofromthedigitalvideocameraintoyourPC.Whenprepared,thisuser
manualreferstothelatestinformation.Thescreensandillustrationsetcinthisusermanual
aretoparticularlyandvisuallydetailtheoperationofthedigitalvideocamera.Dueto
technologydevelopmentanddifferentproductionbatches,thedigitalvideocamerahereinmay
bedifferentfromthatyoubuyanduse.
Notice Notice Notice Noticefor for for foruse use use use
General: General: General: General:
1.Neveropenthehousingofthedigitalvideocamera;otherwise,somepartsmaycause
electricshock.
2.Damp,pressure,collisionandoverheatmaydamagethisdigitalvideocamera.
Memory Memory Memory Memoryand and and andstorage: storage: storage: storage:
1.SD/MMC/SDHCcanbeused(butnotincludedinthepackinglistandmaximalcapacity
16GB).
2.WhenbuyingSD/MMC/SDHCcard,besuretotakethedigitalvideocamerawithyousoas
toensurecompatibility.
3.WhenSD/MMC/SDHCcardisinserted,thememoryofthedigitalvideocamerawillnot
function.
4.SDcardhasawrite-protectswitch,whichcanbeusedtopreventwrongdeletionofdata.
Whenthisswitchispushedtothebottomandlocked,thedatainthecardwillbeprotected.

3
However,whenthecardisinwrite-protectstate,itcannotbeusedforshootingordeletionetc.
5.Thesememorycardscannotbeusedforpermanentstorageofdata.Youmustcopythe
documentsinthedigitalvideocameraintheproperstorageposition.
6.Whenstoringdocumentsintothememoryorthememorycard,makesurethatthesizeof
thedocumentsdoesnotexceedthecapacityofthememory.
Maintenance Maintenance Maintenance Maintenanceand and and andcare: care: care: care:
1.Inuse,alwayswearthewristbandsoastopreventslip.
2.Useproperprotectionsheathtoavoidscratchingthelensandscreen.
3.
To
cleanthelens,firstlyblowawaythedustonitssurface,thenuseproperclothortissuefor
opticaldevicestocleanthelens.Ifnecessary,uselenscleanser.Neveruseorganiccleanser
tocleanthedigitalvideocamera.
4.Nevertouchthelenswithfingers.
5.Whenleftidleforlong,keepthedigitalvideocamerawiththebatterytakenoutindryand
darkplace.
Other Other Other Othernotices: notices: notices: notices:
1.WhenswitchingvideooutputbetweenLCDdisplayandvideodevices,besuretoexitfrom
theplayorrecordstate.
2.Thisdigitalvideocameraissuitabletheenvironmentbetween0℃-40℃(32℉-104℉).
Neverkeepthedigitalvideocameraintheplaceatextremelyhightemperature,suchasinthe
carparkingundertheburningsun,orwithmuchdamp.Inordertopreventthedigitalvideo
camerafromcondensation,whenmovingfromacoldplacetoawarmplace,besuretokeepit
insealedplasticbag,andopenthebagandtakeitoutwhenthedigitalvideocamerareaches
theindoortemperature.
3.TVprograms,movies,music,imagesandotherresourcesmaybeprotectedbycopyright;
therefore,withoutpriorpermission,theshooting/useoftheseresourcesmayviolatecopyright

4
lawsandregulationsrelated.Pleasenotethattheresourcesundertheprotectionofcopyright
canbeusedwithinthepermissionofrelatedlawsandregulations.
System System System Systemrequirements requirements requirements requirements
Whenoperatingandusingthisdigitalvideocamera,besuretomeettherequirementsonthe
basicsystemforcomputer.Itisstronglyrecommendedtousethebestcomputerunitsto
operatethecamerasoastobringitsfunctionsintofullplay.Belowaretherequirementsonthe
basicsystem:
OperationSystemMicrosoftWindows2000,XP ,vista,Windows7
CPUAboveIntelPIII667orCPUofequalperformance
MemoryAbove128MB
SoundcardanddisplaycardDirectX8orabove.
CD-ROM4×speedorabove
HardDisk1GBspaceaboveuseable
OtherOnestandardUSB1.1orUSB2.0port

5
Start Start Start Startto to to touse use use use
1.AppearanceandButtons
LCD
Deletekey Modekey
Upkey
Rightkey Leftkey
Shutter/OKkey
Downkey

6
USBConnector
PowerKey
TVOutPort
HDMIOutPort
SD/MMC
CardSlot
Speaker
StrapHolder
Microphone
BusyLED
Lens
BatteryCover
Tripod
USBSwitch

7
2.Basicoperation
2.1 2.1 2.1 2.1Install Install Install Installbattery battery battery battery
Press/slidedowntheBatteryCoverandinsertlithiumbattery.Alignwithcorrectpolarityof
batteryterminals.ClosetheBatteryCover.
2.2 2.2 2.2 2.2Charge Charge Charge ChargeBattery Battery Battery Battery
1.Poweroffthecamera.
2.ConnectthecameratothecomputerUSBportorthepoweradapterwithUSBcableto
chargethebattery.
3.Duringcharging,Busylightisonandwillbeoffwhenthebatteryisfullycharged.
2.3 2.3 2.3 2.3Use Use Use UseSD/MMC SD/MMC SD/MMC SD/MMC/SDHC /SDHC /SDHC /SDHCcard card card card
InserttheSDMemorycardintotheSD/MCC/SDHCCardSlot.Pushitdownuntilthecard
stayslatched.Donotforce–checkcard
’
spositionaccordingtothepositionmarkonthe

8
camera.
Pushandreleaseinsertedcardifyouwishtoremoveorreplacethe
card.
TurnyourcamcorderOFFbeforeinserting/removingtheSDCard.
-NotethattheSDCardhasatinyLOCKswitchontheside.Setthe
switchtoun-LOCKpositiontobeabletostorerecordedvideos,still
picturesoninsertedSDMemoryCard.
2.4 2.4 2.4 2.4Power Power Power Poweron/off on/off on/off on/off
Inpower-offstate,pressandholdthepowerkeytopoweronthecamera.
Inpower-onstate,pressthepowerkeytopoweroffthecamera.
Inpower-onstate,letthecameraidlefor1minute(default)topoweroffthecamera
automatically.
Inpower-onstate,whenbatterylevelisverylow,thecamerawillturnoffafterseveral
seconds.Youmustreplacethebatteries.
2.5 2.5 2.5 2.5Setup Setup Setup Setupmenu menu menu menu
Inpower-onstate,pressDELETEkeytoenterthemenu,Therewillbesomeoptionsto
setuporselectforyou:Language、Format、TVMode、Frequency、Date/Time、AutoPower

9
Off、BeepSound、DefaultSetting,etcetera.
2.6 2.6 2.6 2.6Change Change Change Changemode mode mode mode
Afterpoweron,itwillentervideorecordmode,pressMODEkeytochangemodebetween
videorecord,Stillphotorecord,Playback;
2.7 2.7 2.7 2.7Video Video Video Videorecord record record record
InVideorecordmode,pressshutterkeytostartvideorecording,Whilerecording,pressthe
shutterkeyagaintostoprecording.
Atpreviewmode,pressLeftorRightkeycanchangethevideosizebetweenHD(1280x720),
VGA(640x480);Pressupkeyordownkeycanzoominorzoomouttheimage.
2.8 2.8 2.8 2.8Still Still Still Stillphoto photo photo photorecord record record record
InStillphotorecordmode,PressShutterkeycansnaponephoto,Atpreviewmode,press
LeftorRightkeycanchangethevideosizebetween5M(2592X1944),3M(2048x1536),
1.3M(1280x960);Pressupkeyordownkeycanzoominorzoomouttheimage.

10
Note:
�WhilethememoryisfullortheSDcardwaslocked,whenyoupresstheShutterkey,
thecamerawillcannotrecording.
�Beforeinsertorremovethecard,pleaseturnoffthecamerafirst.
2.9 2.9 2.9 2.9Playback Playback Playback Playbackvideos videos videos videosor or or orphotos photos photos photos
Pressmodekeycontinuouslytochangetoplaybackmode,press◄keyor►keytoselect
anotherfile.
Well,youselectonevideofile,PressOKkeytobeginplayvideo,duringplayingthevideo,
pressandhold►or◄keytofastforwardorbackwardsplayingvideo,pressOKkey
pause/resumeplaying,presstheMODEkeytostopplayvideo.
Well,youselectonevideofile,Pressupkeyordownkeycanzoominorzoomouttheimage;
atzoominmode,pressOKkeycanenterpanmode,atthistimeyoucanpressdirection
keytomovethephototoviewinLCD.

11
2.10 2.10 2.10 2.10TV TV TV TVoutput output output output
Afterthecameraispoweredon,inserttheterminaloftheTV
cableintotheTVoutputportofthecamera,theyellowportof
theotherterminalshouldbeconnectedtoVIDEOINportof
TV,red(orwhite)portoftheotherterminalshouldbe
connectedtoAUDIOINportofTV.
2.11 2.11 2.11 2.11HDMI HDMI HDMI HDMIoutput output output output
IfyouwanttooutputtheimageandsoundinvideocameratoHDTV,
pleaseinserttheHDMIcable(Optional)totheHDMIinterfaceofthe
videocamera,connecttheotherterminaloftheHDMIcabletotheHD
TV.
Note:DuringtheperiodofHDMIoutput,thevideocameracanonlyenter
playbackmode.

12
3
3
3
3 Delete
Delete
Delete
Delete files
files
files
files
When in preview or playback mode. Press the Delete key will
enter Delete menu mode , use direction key of Right or Left to
select “ Delete current ” or “ Delete all ” .
Select “ Delete current ” then press OK key will delete current image; if select “ Delete all ” the
press OK key will delete all images, if press Delete key will exit deletion.
4
4
4
4 Connect
Connect
Connect
Connect to
to
to
to PC
PC
PC
PC
1. Slide the USB Switch UP to extend the USB connector. And t urn the camcorder ON.
2. Inser t camcorder USB connector into computer
’
s USB port, or use supplied USB extension
cable to make connection.
5
5
5
5 Download
Download
Download
Download files
files
files
files from
from
from
from camera
camera
camera
camera to
to
to
to PC
PC
PC
PC
1. After connecting to computer, go to "My Computer ” and open the "Removable Dis k ." The
videos will be saved in the \DCIM\ 100MEDIA folder in the removable dis k. Choose the desired
video in the 100MEDIA folder and copy (drag with mouse) it into the target folder in the HD of

13
the computer.
2. You can use ArcSoft MediaImpression to edit videos.
3. ArcSoft MediaImpression can be installed from CD attached.
▲ Open USB port ▲ Connect camera to PC ( 1 )
▲Connect camera to PC (2)

14
Application
Application
Application
Application of
of
of
of Attached
Attached
Attached
Attached ArcSoft
ArcSoft
ArcSoft
ArcSoft MediaImpression
MediaImpression
MediaImpression
MediaImpression
There are two software in CD provided for image processing : Xvid codec, Media Impression
Introduction
Introduction
Introduction
Introduction interface
interface
interface
interface for
for
for
for software
software
software
software installation
installation
installation
installation
Put the CD attached into the CD-ROM of the computer, then the following menu will occur:
�If the CD driver does not automatically carry out or close such function, please click autorun.exe
autorun.exe
autorun.exe
autorun.exe
program under the root directory of the CD.

15
Xvid
Xvid
Xvid
Xvid codec
codec
codec
codec Installation
Installation
Installation
Installation
Instal Xvid codec:
Click
”
Install Xvid codec “ button and
complete the installation as per the tips.

16

17
N otice :
This software can be find in attached CD,
If you want to play recorded video on your computer, please install Xvid codec , if your
computer have install Xvide codec, this operation may do not it .
MediaImpression
MediaImpression
MediaImpression
MediaImpression Installation
Installation
Installation
Installation and
and
and
and Use:
Use:
Use:
Use:
Install Mediainpression:
Click “ Install MediaImpression ” button and complete the installation as per the tips.

18

19
After installation, please restart the computer.
Run Media Impression :
Double click the icon on the desktop or follow “ Start → Programs ” to open:
MediaImpression
After starting MediaImpression ,
,
,
,click the “ Import ” to import the media.
Other manuals for NDC-402
2
Table of contents
Other Naxa Camcorder manuals