Naxa NT-1400 User manual

NT-1400

Table of Contents
Warnings and Cautions........................................... 3
...................................................................... TV Menu Operation...................................................16~20
Channel ............................................................................................. 16
In the Box 4 Picture ............................................................................................... 18
Sound................................................................................................. 18
Time ................................................................................................... 19
Option.................................................................................................
19
At a Glance ...................................................................... 5~13
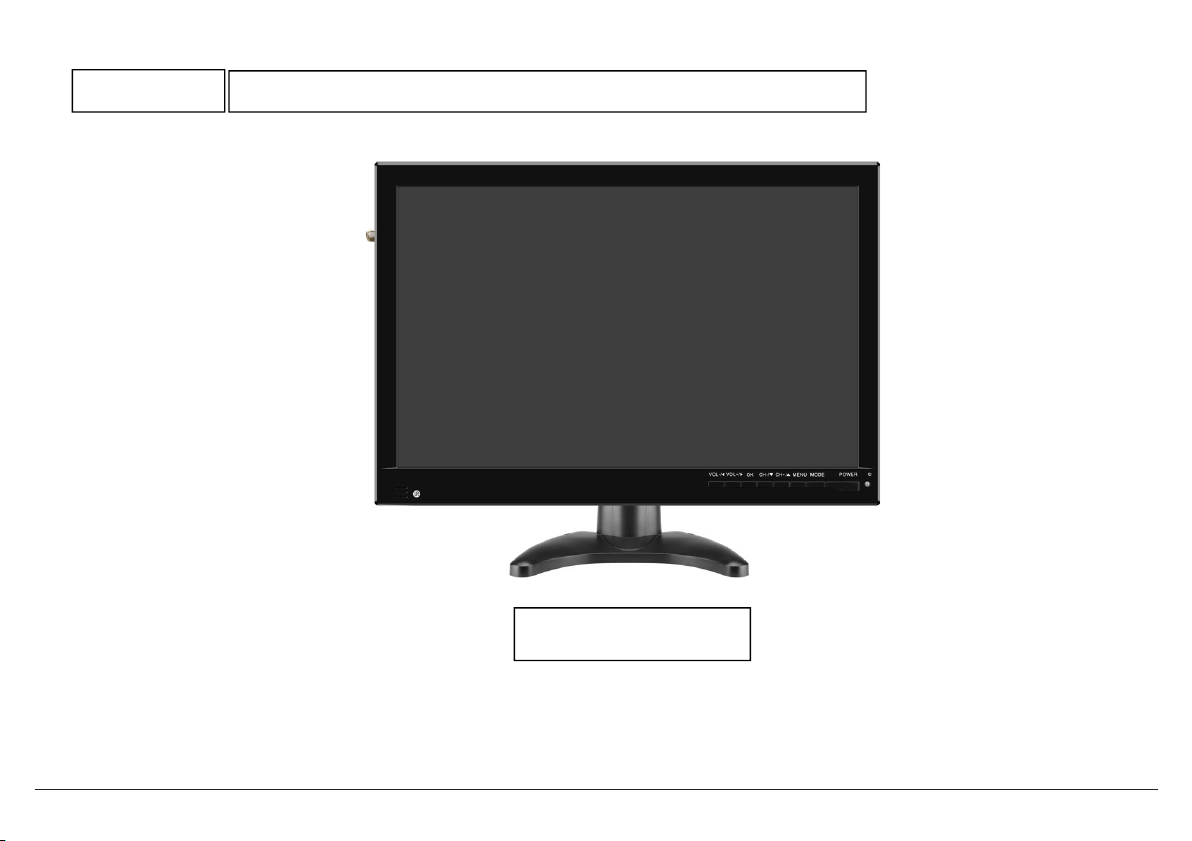
Main Unit..................................................................................................5,6
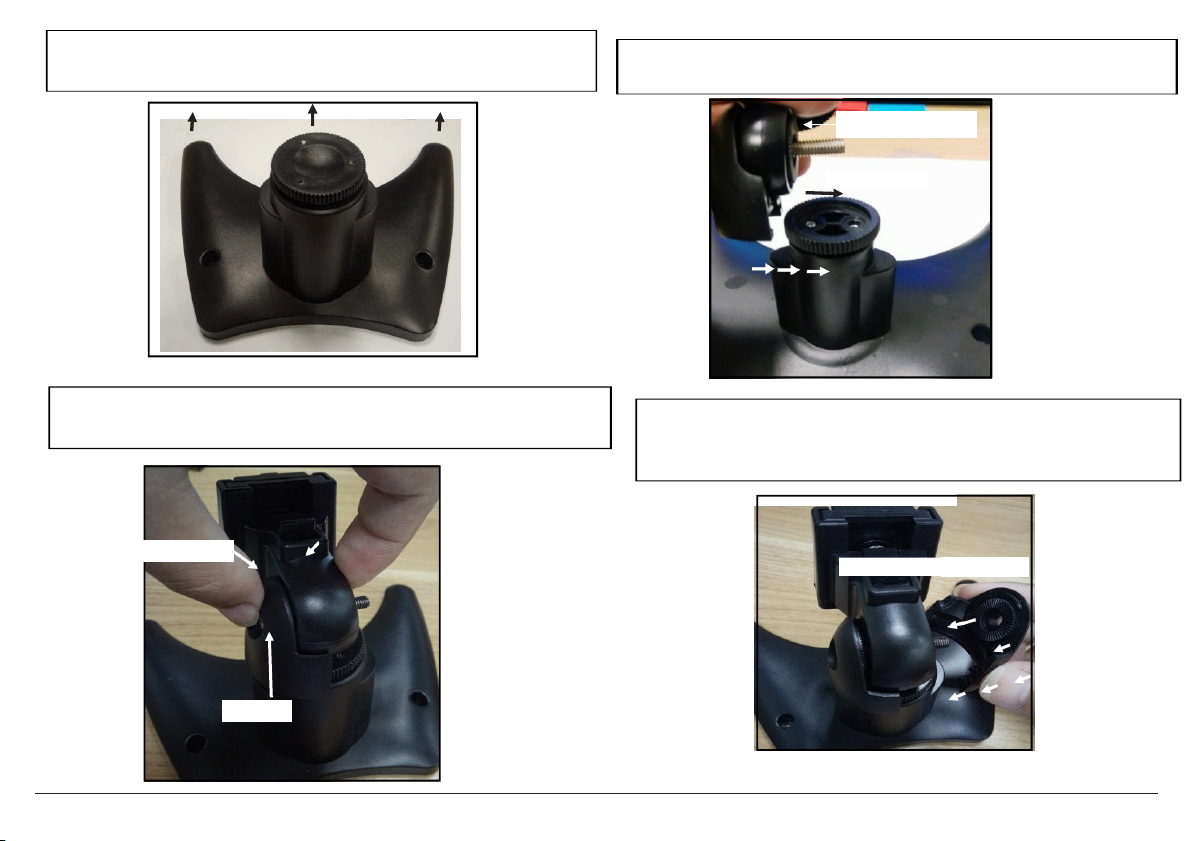
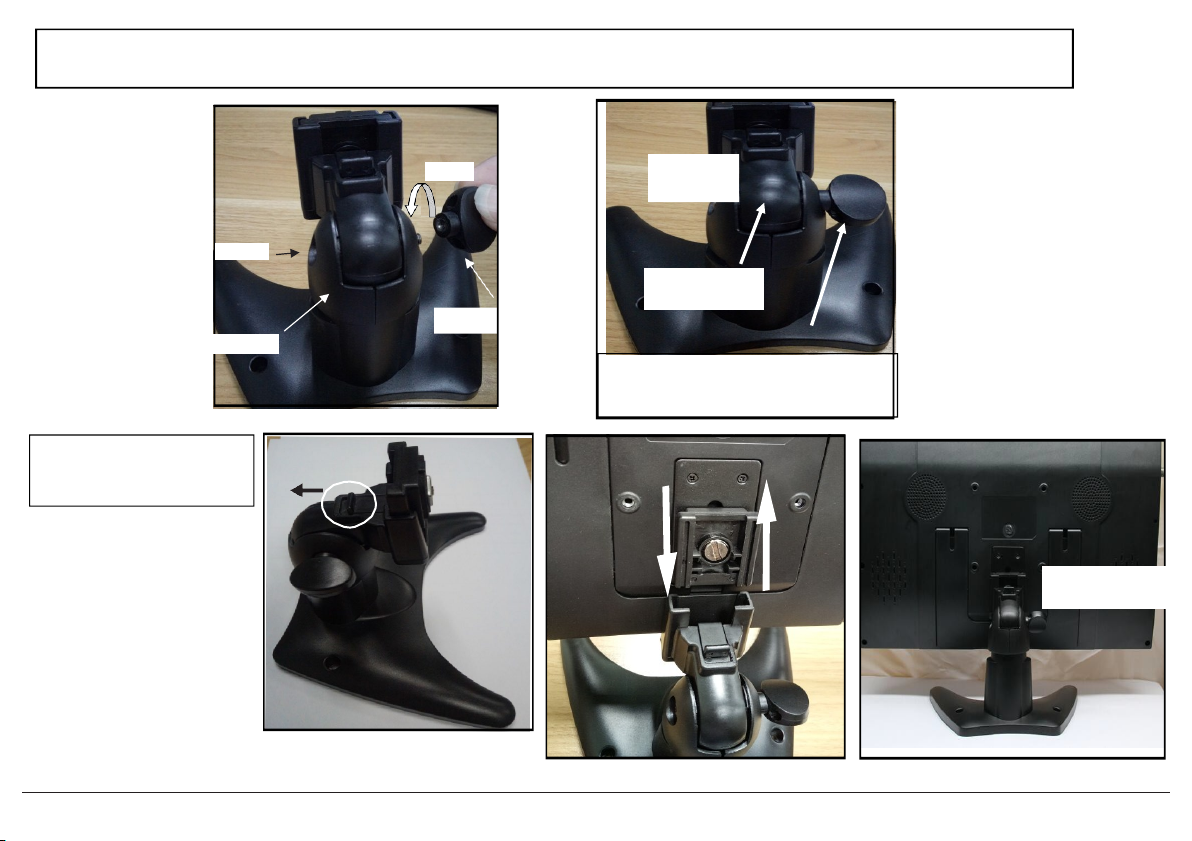
TV stand assemble instruction............................................................
7~10
Remote Control...................................................................................... 11~13
Basic Operation...............................................................14,15
Connect the Power Supply ...................................................................
14
Connect the Antenna.............................................................................14
Using the Number Keypad....................................................................15
Using the Built-in battery ............................................................. 15
Setting the Input Source ....................................................................... 15
Lock......................................................................................................
20
FM Radio Receiving......................................................
20,21
Multimedia Interface ................................................. 22,23
Photo Playback....................................................................................
22
Music Playback ....................................................................................
22
Video Playback ....................................................................................
22
Text Playback....................................................................................... 22
.............................................................
23
Limited Warranty .......................................................... 24
Page 2

WARNING:
TO REDUCE THE RISK OF FIRE OR
ELECTRICAL SHOCK, DO NOT EXPOSE THIS PRODUCT
TO RAIN OR MOISTURE.
This product should not be exposed to dripping or splashing.
No objects filled with liquids (vases, cups, etc.) should be placed
on or near this product.
CAUTION (GROUNDING OR POLARIZATION):
The wider blade
of the AC plug must match the slot in the "wall socket" receptacle
to ensure proper electrical grounding.
CAUTION:
Batteries and the battery compartment should not be
exposed to excessive heat, such as sunshine or fire.
WARNING:
There is a danger of explosion if batteries are
incorrectly placed. Replace batteries only with the same or
equivalent type.
NOTE:
Under the influence of electrostatic phenomenon, this
product may malfunction and cause the power to reset.
NOTE:
Caution symbols are printed on the bottom of the product.
Please refer to the instruction manual for more information.
Page 3

Page 4
In the Box
Please take a moment to make sure that you have everything in the list below.
Although we make every effort to ensure that each device is securely packed and sealed,
we know a lot can happen in between us and you. If anything is missing, check back with
your local retailer to get immediate assistance. If they can not help you, please contact our Support team.
•NT-1400 Portable TV
•AC power adapter
•DC car power cord
•External Magnetic Sucker Antenna
•A/V cable
•Remote control
•User's Manual
•Batteries for Remote control
•Stand

Page
press to confirm a selection in the system
menu.
10 9 87 6 5 43 2
At a Glance
1.
Main Unit
11
1
1Remote
sensor
Detects IR signals from the included remot e
control.
2Power indicator; Lights green when the TV is
connected to the power and stand by;
Lights red when TV is charging; The indicator
will darken the TV is fully charged.
3POWER Power/Standby. Press to turn the TV on or to
place it in standby mode.
4MODE Change the active source mode. Press to view
the Mode menu; press CH+/CH- to browse
the list of modes; then press OK to select
and change the mode.
5MENU Access the system menu to adjust the TV’s
options.
6CH+/ Channel up/browse up when navigating a
menu
7CH-/ Channel down/browse down when
navigating a menu
8 OK
9VOL+/ Volume up/browse right when navigating a
menu
10 VOL–/ Volume down/browse left when navigating
a menu
11 TV display Color TFT LCD screen
5

media files, then set the active source mode
Page
6
12
13
14
15
6
17
18
19
1
12 Antenna
input jack 75 ohm coaxial connector for TV antennas.
13 HD-IN jack
14 VGA input jack
15 AV-IN jack Watch video files from an external media player
through the AV IN jack with the supplied A/V
cable and setting source mode to AV.
16 Head-
phone jack
and AV-OUT
jack
3.5 mm ster eo audio output.
Audio and Video output function in
ATV and AV source only.
17 USB port Load a USB memory stick with compatible
to MEDIA.
18 DC input Use with the included AC power adapter or
DC power cord.
19 Master
Power
Switch
Set to ON to use the TV. If you will not be
using the TV for an extended period of time,
set the switch to OFF to turn the unit off
completely. (The TV will use a little bit of
power when the switch is set to ON and the
TV is placed in Standby mode.)

Page 7
Step 1.
Take out the Swivel Knob holder and put it in straight forward
position. Unlock the Swive. l Knob Brace holder
Step 2.
Remove and place it close to you.
unlock
(R)Brace
(L)Brace
Screw
Remove
Step 3.
Hold down the left side (L) Brace Holder and remove the (R)Brace Holder only and pull it out completely.
pull Out slowly
(L)Brace
(R)Brace pull Out >> (R)Brace
2. How to Connect Swivel Knob Brace holder to TV stand

Page
8
Slide in >>>
HOLD together
Step 5.
Place the (L)Brace holder on left side and slide it in forward till it lick in.
Step 4.
Position TV Stand straight forward position to align the Brace holders.
Step 7.
Slide in and connect the (R) Brace holder, match the hole screw,
andmove forward till it locks in.
<<<< Slide in (R)Brace
(L)Brace
HOLD Tight
Step 6.
HOLD down (L)Brace holder till it stays fit.

Page 9
(R)Brace
(L)Brace
Screw
Lock
NOTE: Loose the Wingnut brace holder
to swivel TV up or down. Then lock till
desire position.
IS READY
TV STAND
Swivel up or
down
Step 9.
Connect Base Stand to TV
Flip the buckle
backwards
Insert completely
Step 8.
Mount the Screw wing knob and Screw in till tight.

Page
10
Congratulations!
Base stand is now
set.
Final Step. Step 10.
TV stand is ready and set to watch TV.

Confirm a selection.
Page
11
3.
Remote Control
1Power Power Switching Key. Turn the TV on or off.
2MUTE Enable/disable the sound output.
3P.MODE change the picture preset mode.
4FREEZE Temporarily pause the video.
5AUDIO
6TTS
7Return
8Channel
Keys
9/
/
10 CH+/CH–
11 VOL+/ VOL-
12 OK
13 MENU
14 EXIT
change the sound preset mode.
Voice prompt function On/Off
Go to the last viewed channel.
Use the number keypad to change the
channel.
Browse up/down in menu lists.
Browse left/right or adjust an option in menu
lists.
Change
the
channel
up
or
down,
respectively.
Increase/decrease the volume level,
respectively.
View the system menu.
Exit the system menu.

Page
12
19 MTS
20 CC
21 EPG
22 ZOOM
23 SLEEP
Change the default audio language.
Change the closed-caption display modes.
If available, view program guide information
from over-the-air ATSC TV broadcasts.
Picture modes
Set a sleep timer (max 240 minutes).
The following keys only work when playing music/videos
in MEDIA mode.
the repeat mode.when play a music or a video,
24 REP
25
26
27
28
29
30
press " REP" key to let this music or thisvideo
repeatly.
Start, pause, or resume playback.
Stop playback.
Go to the previous track.
Skip to the next track.
Scan in reverse quickly.
Scan forward quickly.
To adjust the volume when playing an MP3
key on the
TV to hide the system menu, then press
VOL or VOL
to adjust the volume. To
return to the system menu, press OK.
15 FAV View the channels in your favorites list.
16 LIST View all the available channels.
17 INFO View program information.
18 MODE Change the active input source mode (TV, VGA, HDMI,
AV, FM Radio,MEDIA)

Within 6
6 feet
Page
13
Notes:
1. Keep within distance when using the remote
control to work TV.
2. Keep about 45° angle or the obverse angle to aim
IR sensor location on TV.
The remote control operates with 2 pcs “AAA” batteries
(included. To turn on the remote control, place the “AAA”
batteries inside the battery compartment on the back.
Before throwing any batteries away, consult your distributor who
who may be able to take them back for specific recycling.
Remote Batteries Type: AAA x 2
feet

Page
14
Basic Operation
1.
Connect the Power Supply
Use the supplied power adapter to connect the DC
Input jack [1 9] on the TV to a power supply. The AC
power adapter works with AC 100-240V outlets; the
DC car adapter works with the power socket found in
most motor vehicles.
2.
Connect the Antenna
Use the supplied external antenna for improved TV
reception. Connect one end of the External Magnetic
Sucker Antenna to the Antenna Input jack [12] of the TV.
External Magnetic Sucker Antenna
antenna for improved reception.
3.
Using the Number Keypad
Use the number keypad (0-9) on the remote to tune
directly to a channel or to input a value when
promptedon a menu or option screen.

2.5
6.5
Page
15
To tune to channel 15-1, for instance:
1. Press the “1” key, then press the “5” key.
2. Press the “--/-” key.
3. Press the OK key.
To go to track 15, for instance:
1. Press the “1” key, then press the “5” key.
2. Press the OK key.
4.
Using the Built-in battery
The TV has a built-in rechargeable lithium battery.
Charge the built-in battery before using it for the
first time. The charging indicator will change from
red to darken when the battery becomes fully
charged.
Notes: About hours to be fully charged; And the
battery working time is up to hours.
Warnings:
* To charge the battery, just connect the AC adapter.
* Recharge the built-in battery when you are ready
to use it again.
* To get the longest service life of the built-in battery,
charge at indoor temperature.
* While using the built-in battery, the environment
temperature should be 5°C (41°F) to 35°C (95°F).
5.
Setting the Input Source
Set the input source to choose which connection is active
and displayed on the TV screen.
Press MODE to access the input source
menu, then press or to change the
input source. Press OK to confirm the selection.

Page
16
TV Menu Operation
Press the MENU key on remote to access the menu list and then press the OK key to enter the list. Press the
Press / and / key to move within the Menu, and then press the OK key to cofirm the change.
To exit the menu, press the MENU key to back out of all menu options.
Channel
1. Air/Cable: Set to Air if you are using an antenna
like the ones provided to receive over-the-air TV
broadcasts. Set to cable if you are connecting to a
Cable TV system.
2.
a signal and saves them to the channel list. Note:
use this Auto Scan feature whenever you move the
TV to a different geographic location.
3. Favorite: Add channels to the Favorites list. Press /
and / to browsethe channel list, then press OK to
mark/unmark a channel as aFavorite.
4. Show/Hide: Choose whether a channel will be
selectable when tuning with the CH+/CH- keys.
Press / and / to browse the channel list, then
press OK to mark/unmark a channel as hidden.
You can still tune to a hidden channel directly
with the numeric keypad.
5. Software Update (USB): Used to perform software
updates via USB.
6. DTV Signal: Displays the signal quality of the
current channel.

Page 17
Troubleshooting Tip
1. Missing Channels or Channels not: Found
Channel selection is based on signal strength at the time of an auto-scan. If you are missing a channel
you expect to find, first research the location of broadcast towers in your area. Aiming the antenna in the
direction of the broadcast towers will significantly increase its signal strength.
Always run an auto-scan after changing the antenna's setup.
2. For best reception:
Place the antenna by a window with a clear view of the sky.
Place the antenna as high as possible.
Aim the antenna in the direction of broadcast towers in your area.
The included antennas have a maximum range of 15 miles. If the
broadcast towers in your area are at a distance greater than 15 miles,
you may require an amplified antenna to obtain reception. The
following websites are great resources for viewing coverage maps:
FCC DTV Map (Lists signal strength-assuming outdoor antenna):
https://www.fcc.gov/media/engineering/dtvmaps
No Cable.org (Lists broadcast tower location and distance):
https://nocable.org/

Page 18
Picture
1. Picture mode: Select a picture preset that looks
best (Standard, Soft, user, and Vivid).
2. Color Temperature: Press “OK” then the Left/Right
arrow keys to adjust color to Warm, User or Cold.
3. Aspect Ratio: Adjust the screen width by pressing
“OK” then UP/DOWN arrows to select Auto, 4:3, 16:9,
Zoom1, Zoom2 and Panorma.
4. Noise Reduction: Press “OK” then the Up/Down
arrow keys to select, “close, low, middle, or high.”
Sound
1. Sound mode: Set a preset equalizer to match the
type of program you are watching from; standard,
music, movie, sports, and user setting.
2. Balance: Press “OK” then the Left/Right arrow
keys to adjust the audio level from -50 to 50.
3. Auto Volume: Press the “OK” key to enter the
menu and select Open or Close to set Auto Vol.
4. Surround Mode: Press “OK” then the Up/Down
arrow keys to select, “open or close surround.”
5. Audio Only: Press the “OK” key to enter the menu
to select, “close the image signal.” Only audio will
be heard as the image will disappear.

Page 19
Time
1. Clock: Press the “OK” key to enter the menu,
then the / to select; then press the /
keys to adjust the current date and time.
2. Off Time: Press the “OK” key to enter the menu,
then / arrow keys to set a day and time
to auto shut off the TV.
3. On Time: Press the “OK” key to enter the menu,
then / arrow keys to set a day and time
to auto turn on the TV.
4. Sleep Timer: Set a timer. the TV will turn off
automatically at the end of the timer.
5.
Auto Sync: Set the system time to match the time
carried by the antenna signal (cable or air). This
option is not adjustable. The TV must be connected
to an antenna or cable system for Auto Sync to work
6. Time Zone: Set the time zone adjustment to match
your location.
Option
1. OSD Language: Set the display language of the
onscreen menus.
2. Closed Caption: When closed caption is available
for a TV program, a synchronized transcript of the
program can be displayed on screen.
•Select Off to never display the closed caption
information.
•Select On to always display the closed caption
information.
•Select CC on Mute to only display the closed
caption information when MUTE is enabled.
3. Setup Wizard: An on-screen guide that will help
you get your TV up and running. Set the menu
language, time zone, DST, and time format. Then,
it scans all the channels to find all stations within
broadcast range.
4. Restore Factory Default: Return all options to their
factory setting
5. TTS (Text to Speech): Converts normal language
text to speech.

Page
20
Lock
Use the remote control to enter the default password
(0000) to access the Lock options.
1. Lock System: Enter the default password of (0000)
to access the Lock Options to enable or disable.
2. Set Password: Set a new password. When you
change the password, write it down and store it
in a safe place. Resetting the factory options will
not reset the password.
3. Input Block: Completely block the TV mode or the
AV modes.
4. US: Prevent programs from being viewed based on
US TV or MPAA rating guidelines.
5. Canada: Prevent programs from being viewed
based on Canadian English or French guidelines.
6. Reset RRT: Refresh the Rating Region Table if you
are having problems with the US or Canada rating
guidelines.
7. Unrated: Enable or disable the ability to watch un-
rated programs.
FM Radio Receiving:
1. Press "MODE" to select " FM Radio" mode, and then
press the RED key on remote to scan and save the
FM frequency channels automatically.
2. Press / to switch the FM channels.
Press the GREEN key on remote to close or open
the display screen, and this operation won't take
effect on the radio receiving.
Table of contents
Other Naxa Portable TV manuals