Naya PNI-HT2100 User manual

User’s manual of
wireless intercom handheld
PNI-HT2100
Please keep the manual for reference

Focus on R&D Stable and reliable
Content
1.Check the items in the package.................................................................................3
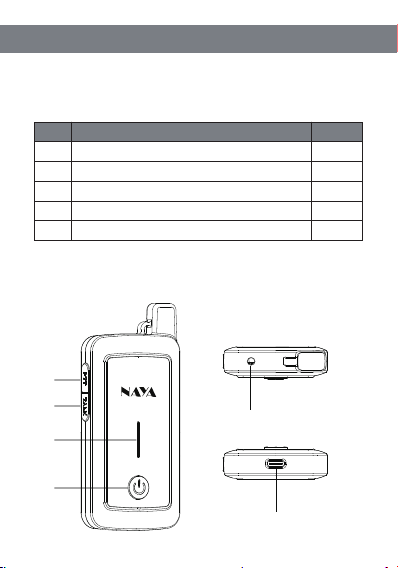
2.Parts introduction.......................................................................................................3
3.Preparation before using............................................................................................4
3.1 Charge the battery.............................................................................................4
3.2 Plug the headset................................................................................................4
4.Basic operation...........................................................................................................4
4.1 Basic operation...................................................................................................4
4.2 Volume adjustment.............................................................................................4
5.Call process................................................................................................................5
5.1 PTT mode call....................................................................................................5
5.2 TALK mode call..................................................................................................5
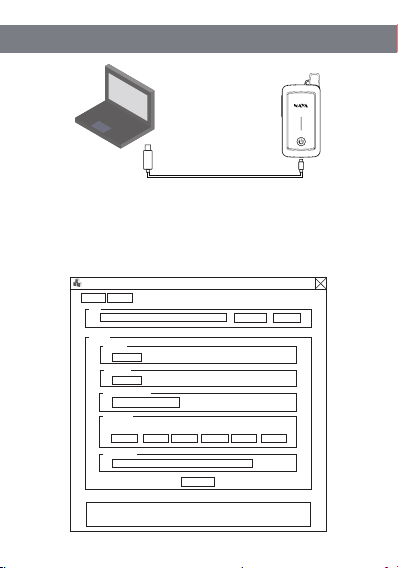
6.Software installation and connection.......................................................................5
6.1 Software download.............................................................................................5
6.2 Driver and software download...........................................................................5
6.2 Connection hints.................................................................................................5
7.Software usage............................................................................................................6
7.1 Open the software..............................................................................................6
7.2 Fixed channel setting.........................................................................................7
7.3 Communication password..................................................................................7
7.4 Networking mode...............................................................................................7
8.Maintenance and Cleaning.......................................................................................7
8.1 Maintenance........................................................................................................7
8.2 Cleaning..............................................................................................................7
9.Warranty and Maintenance Terms.............................................................................8
9.1 Scope and duration of warranty........................................................................8
9.2 Warranty application...........................................................................................8
10.Warranty card............................................................................................................8
2

1.Check the items in the package
Item Q’tyNo.
①
1
1
1
1
②
③
④
⑤
1
Earphone
USB charger
USB charging cable
Manual
Handheld
◆The package contains the following items, if any damage or loss, please contact Naya
or the dealer you purchased from.
2.Parts introduction
Focus on R&D Stable and reliable
①
②
③
④
⑤
⑥
3

Items DescriptionNo.
①
Built-in battery remaining power indicator
Press and keep holding to speak, release to finish.
Click to speak, click again to finish.
②
③
④
⑤
⑥
For power on/off and volume adjustment
Power display
PTT button
TALK button
3.5mmHeadset port
Type-CCharging port
Switch/volume
3.Preparation before using
3.1 Preparation before using
◆Insert the plug of power adapter into power outlet;
Insert the other end of the power adapter into the charging port of the handheld.
The charging indicator light flashes when the device is charging, and when fully charged,
all lights up and stops flashing.
3.2 Plug the headset
◆Align the plug of the special earphone with the earphone port and press to insert; if
you need to remove the earphone, just pull it out directly.
Focus on R&D Stable and reliable
4
4.Basic operation
4.1 Switch
◆While the device is off, press and hold the switch button for 3 seconds, the power
indicator and the power button will light up, and the boot is completed;
◆While the device is on, press and hold the switch button for 3 seconds, the power
indicator and the power button are off, and the shutdown is completed.
4.2 Volume adjustment
◆After powering on, press the Switch/Volume button, a prompt tone about the current
volume will be heard, and continue to press the button to adjust the volume.
◆If there is a volume adjustment button on the headphone wire control, you can also
use the headphone wire control to adjust the volume.

5.Call process
◆PNI series supports 2 call modes: PTT call and TALK call
5.1 PTT mode call
◆Keep pressing the [PTT] button to initiate an internal call to other devices in the
current channel, and release the button to end the call.
5.2 TALK mode call
◆Press the [TALK] button once, and you can initiate an internal call to other devices in
the current channel without pressing it all the time. Press the button again to end the call.
◆When the device does not initiate a call, if another phone initiates a call, the device
will hear and play the sound.
6.Software installation and connetion
6.1 Software download
◆Log in to www.nayatec.com website, find the corresponding product model in the
technical support, and download the corresponding driver and configuration software
according to the tutorial.
6.2 Driver and software download
◆Install the downloaded driver file “PL2303_64bit_Installer.exe”.
After the installation is successful, plug the data cable into the computer and check the
port number in the device manager.
◆Install the downloaded configuration software, following the installation steps
(Windows 7 system is recommended)
6.3 Connection hints
◆After the driver and software are installed, connect the handheld to the computer as
shown below. The data cable is a specially customized cable and cannot be replaced by
a charging cable.
Focus on R&D Stable and reliable
5

Please read the manual carefully before using the product
Website: http://www.nayatec.com
Manufacturer: Shanghai Naya intelligence Technology. Co.,Ltd
Address: No.7001 Zhongchun RD., Minhang district, Shanghai, 201101, China
version:20220608

Focus on R&D Stable and reliable
6
Dedicated data able
7.Software usage
7.1 Open the software
◆After the installation is complete, run the PniHtCfg.exe file. After opening the software,
the following figure is shown. The setting interface is all gray and cannot be edited before
selecting and opening the port.
Base Import
Link
Open Refresh
Setting
Channel
0
0
Password
Networking mode
Roam List
The password is an integer ranging from 1 to 999999999.
CH1: CH2: CH3: CH4: CH5: CH6:
0 0 0 0 0 0
Power Level
Info:
Set
PCIe to High Speed Serial Port (COM9)
PniHtUserCfgEN

Focus on R&D Stable and reliable
7
◆After the setting software is opened, select the corresponding serial port number, and
then click to open the port, the software interface becomes editable condition.
◆Turn on the handheld at this time (if it is already turned on, simply turn it off, and then
turn it on again). After the handheld is turned on, "connection successful" appears in the
software information bar, indicating that the connection is successful.
◆After the handset is successfully connected, it will automatically obtain the parameter
information currently set. Modify the parameters according to the needs.
◆After that, click “SET” to complete the setting operation.
7.2 Fixed channel setting
◆The fixed channel parameter corresponds to the channel setting of the handheld.
Only handheld or repeaters under the same channel can communicate with each other.
7.3 Communication password
◆Under the same channel, the communication password is required to be the same.
Under the same channel but with different communication passwords, you cannot
communicate with each other. Modifying the communication password of all handhelds
and repeaters for communication. This function is often used to prevent eavesdropping
with same frequency
7.4 Networking mode
◆Fixed channel and roaming switching mode are optional as networking mode. For
specific function descriptions, please refer to the handheld network mode setting.
8.Maintenance and Cleaning
◆In order to ensure the good performance of this device and prolong its service life,
please be familiar with the following contents for better maintenance and cleaning.
8.1 Maintenance
◆Do not puncture or scratch the device with hard objects.
◆Do not store the device in an environment that contains corrosive electronic circuits.
8.2 Cleaning
◆Please clean the device regularly, and use a clean and dry towel or brush to remove
the dust on the surface of the equipment.

Focus on R&D Stable and reliable
8
9.Warranty and Maintenance Terms
◆Naya promises that defects in material or workmanship under normal operating and
maintenance conditions of all devices produced by our company, are covered by the
warranty service specified below from the date of purchase.
9.1 Scope and duration of warranty
◆Handheld:12 months
◆Earphone: 6 months
9.2 Warranty application
◆If you apply for product maintenance, please be sure to provide the warranty card or
valid purchase invoice as a certificate. During the period, the relevant signs of the
products shall be kept clean and complete and shall not be torn up.
◆If the device casing is dirty, it can be cleaned with neutral detergent and non-woven
fabric. Do not use detergent, alcohol or spray which will damage the device, make sure
the device is completely dry, otherwise do not use it.

Focus on R&D Stable and reliable
9
10.Warranty card
◆ In order to protect your rights and interests, please fill in it carefully and keep it
properly as a certificate for maintenance.
Reseller information
User information
Model
Reseller
User
Address
Sales date
Contact telephone
or E-mail
Contact telephone
E-mail
Table of contents