NEC NDT-42 User manual

DVD PLAYER/
VIDEO CASSETTE
RECORDER
OWNER’S MANUAL
MODEL : NDT-42
Before connecting, operating or adjusting this product,
please read this instruction booklet carefully and
completely.
PAL

Safety Precautions/
Important notes on controlling this unit
This lightning flash with arrowhead symbol within an
equilateral triangle is intended to alert the user to
the presence of uninsulated dangerous voltage
within the product’s enclosure that may be of
sufficient magnitude to constitute a risk of electric
shock to persons.
The exclamation mark within an equilateral triangle
is intended to alert the user to the presence of
important operating and maintenance (servicing)
instructions in the literature accompanying the
product.
WARNING: Do not install this equipment in a confined space
such as a book case or similar unit.
CAUTION:
This Digital Video Disc Player employs a Laser System.
To ensure proper use of this product, please read this owner’s
manual carefully and retain for future reference, should the unit
require maintenance, contact an authorized service location-
see service procedure.
Use of controls, adjustments or the performance of procedures
other than those specified herein may result in hazardous
radiation exposure.
To prevent direct exposure to laser beam, do not try to open
the enclosure. Visible laser radiation when open. DO NOT
STARE INTO BEAM.
CAUTION: VISIBLE AND INVISIBLE LASER RADIATION
WHEN OPEN AND INTERLOCKS DEFEATED.
CAUTION: The apparatus shall not be exposed to water,
dripping or splashing and that no objects filled with liquids,
such as vases, shall be placed on the apparatus.
Notes on copyrights:
It is forbidden by law to copy, broadcast, show, broadcast
via cable, play in public, or rent copyright material without
permission.
This product features the copy protection function developed
by Macrovision. Copy protection signals are recorded on some
discs.
This product incorporates copyright protection technology that
is protected by method claims of certain U.S. patents and other
intellectual property rights owned by Macrovision Corporation
and other rights owners. Use of this copyright protection tech-
nology must be authorized by Macrovision Corporation, and is
intended for home and other limited viewing uses only unless
otherwise authorized by Macrovision Corporation. Reverse
engineering or disassembly is prohibited.
CONSUMERS SHOULD NOTE THAT NOT ALL HIGH
DEFINITION TELEVISION SETS ARE FULLY COMPATIBLE
WITH THIS PRODUCT AND MAY CAUSE ARTIFACTS TO BE
DISPLAYED IN THE PICTURE. IN CASE OF 625 PROGRES-
SIVE SCAN PICTURE PROBLEMS, IT IS RECOMMENDED
THAT THE USER SWITCH THE CONNECTION TO THE
‘STANDARD DEFINITION’ OUTPUT. IF THERE ARE QUES-
TIONS REGARDING OUR TV SET COMPATIBILITY WITH
THIS MODEL 625p DVD PLAYER, PLEASE CONTACT OUR
CUSTOMER SERVICE CENTER.
SERIAL NUMBER: The serial number is found on the back of
this unit. This number is unique to this unit and not available to
others. You should record requested information here and
retain this guide as a permanent record of your purchase.
Model No. ___________________________________
Serial No. ___________________________________
CAUTION concerning the Power Cord
Most appliances recommend they be placed upon a
dedicated circuit;
That is,a single outlet circuit which powers only that
appliance and has no additional outlets or branch
circuits.Check the specification page of this owner's
manual to be certain.
Do not overload wall outlets.Overloaded wall outlets,
loose or damaged wall outlets,extension cords, frayed
power cords,or damaged or cracked wire insulation are
dangerous.Any of these conditions could result in elec-
tric shock or fire.Periodically examine the cord of your
appliance,and if its appearance indicates damage or
deterioration,unplug it,discontinue use of the appli-
ance,and have the cord replaced with an exact replace-
ment part by an authorized servicer.
Protect the power cord from physical or mechanical
abuse,such as being twisted,kinked,pinched,closed
in a door,or walked upon.Pay particular attention to
plugs,wall outlets,and the point where the cord
exits the appliance.
2
WARNING: TO REDUCE THE RISK OF FIRE OR ELEC-
TRIC SHOCK, DO NOT EXPOSE THIS PRODUCT TO
RAIN OR MOISTURE.
CAUTION
RISK OF ELECTRIC SHOCK
DO NOT OPEN
CAUTION: TO REDUCE THE RISK
OF ELECTRIC SHOCK
DO NOT REMOVE COVER (OR BACK)
NO USER-SERVICEABLE PARTS INSIDE
REFER SERVICING TO QUALIFIED SERVICE
PERSONNEL.
•The appliance is not intended for use by young children or
infirm persons without supervision
•Young children should be supervised to ensure that they
do not play with the appliance.

INTRODUCTION
3
Table of Contents
Introduction
Safety Precautions . . . . . . . . . . . . . . . . . . . . . . . . . 2
Important notes on controlling this unit. . . . . . . . . 2
Table of Contents . . . . . . . . . . . . . . . . . . . . . . . . . . 3
About the symbols for instructions . . . . . . . . . . . . 3
Before Use . . . . . . . . . . . . . . . . . . . . . . . . . . . . . . 4-5
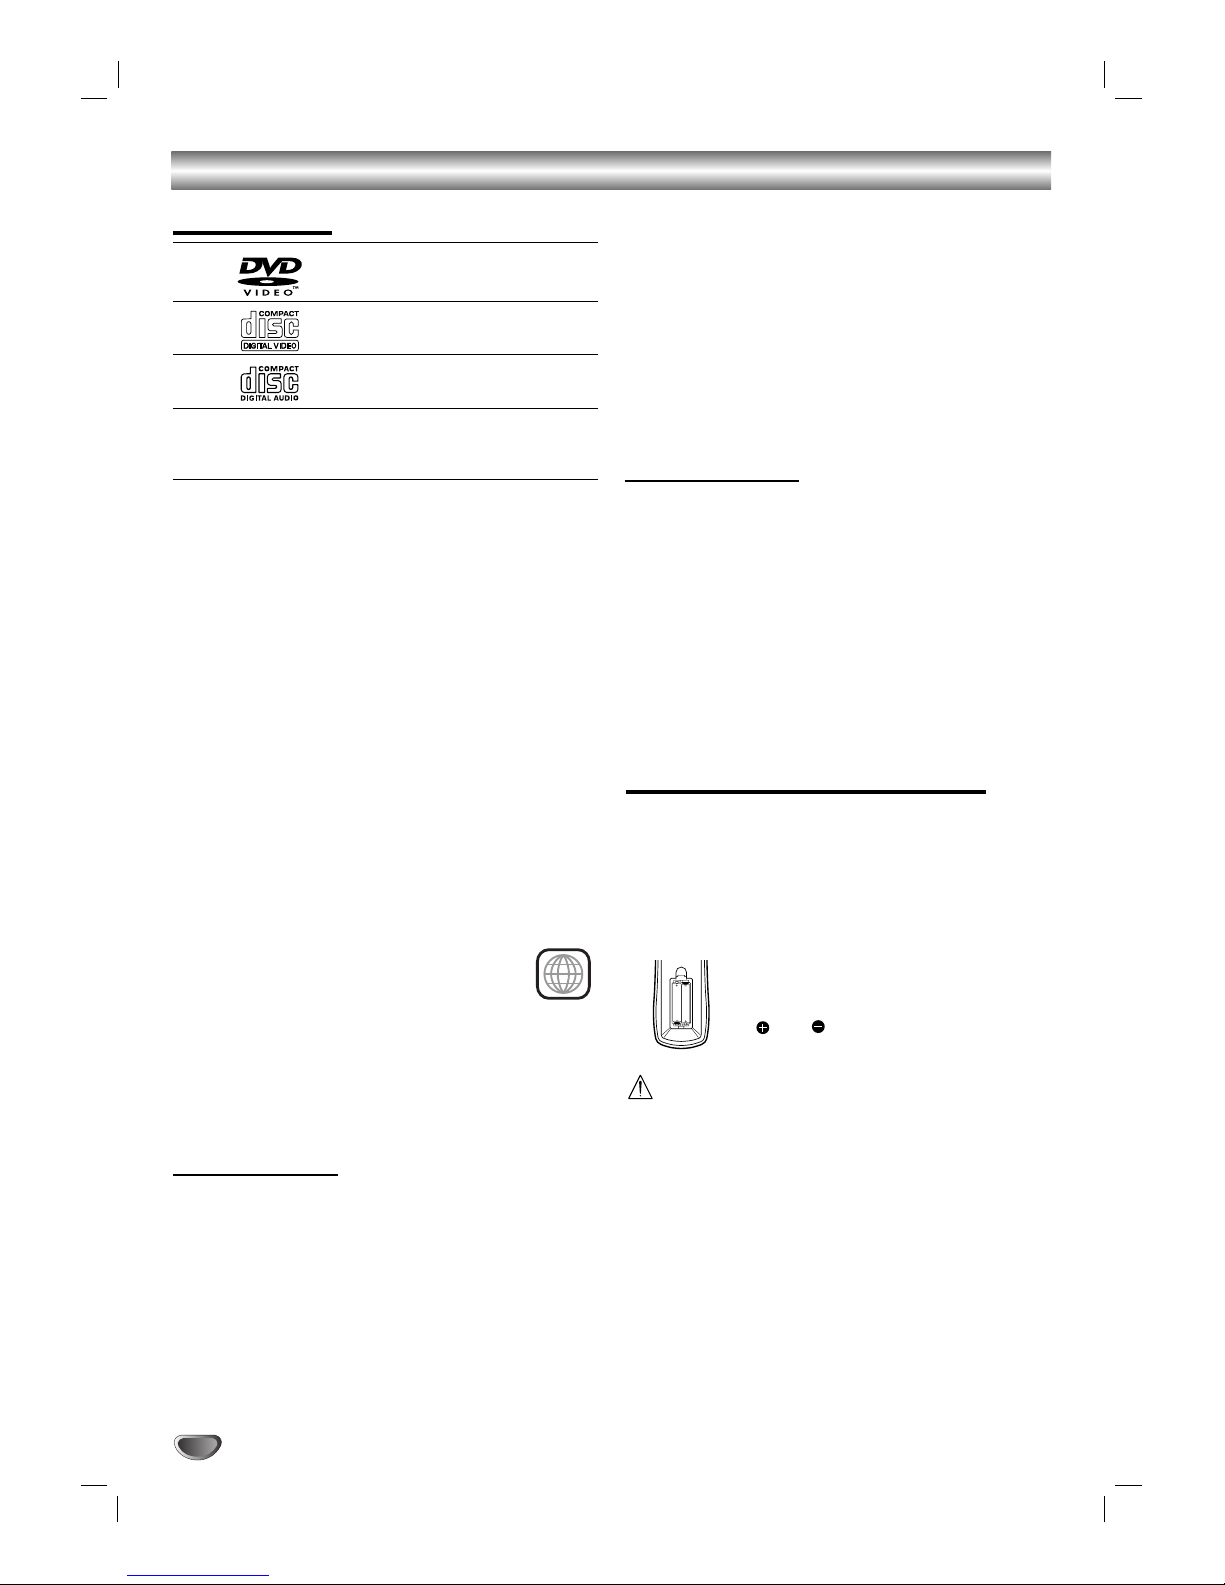
Playable Discs . . . . . . . . . . . . . . . . . . . . . . . . . . . 4
Moisture Condensation . . . . . . . . . . . . . . . . . . . . 4
Remote Control Operation Range . . . . . . . . . . . . 4
Precautions . . . . . . . . . . . . . . . . . . . . . . . . . . . . . 5
Notes on Discs . . . . . . . . . . . . . . . . . . . . . . . . . . 5
About Symbols . . . . . . . . . . . . . . . . . . . . . . . . . . 5
Selecting the Viewing Source. . . . . . . . . . . . . . . . 5
Front Panel . . . . . . . . . . . . . . . . . . . . . . . . . . . . . . . 6
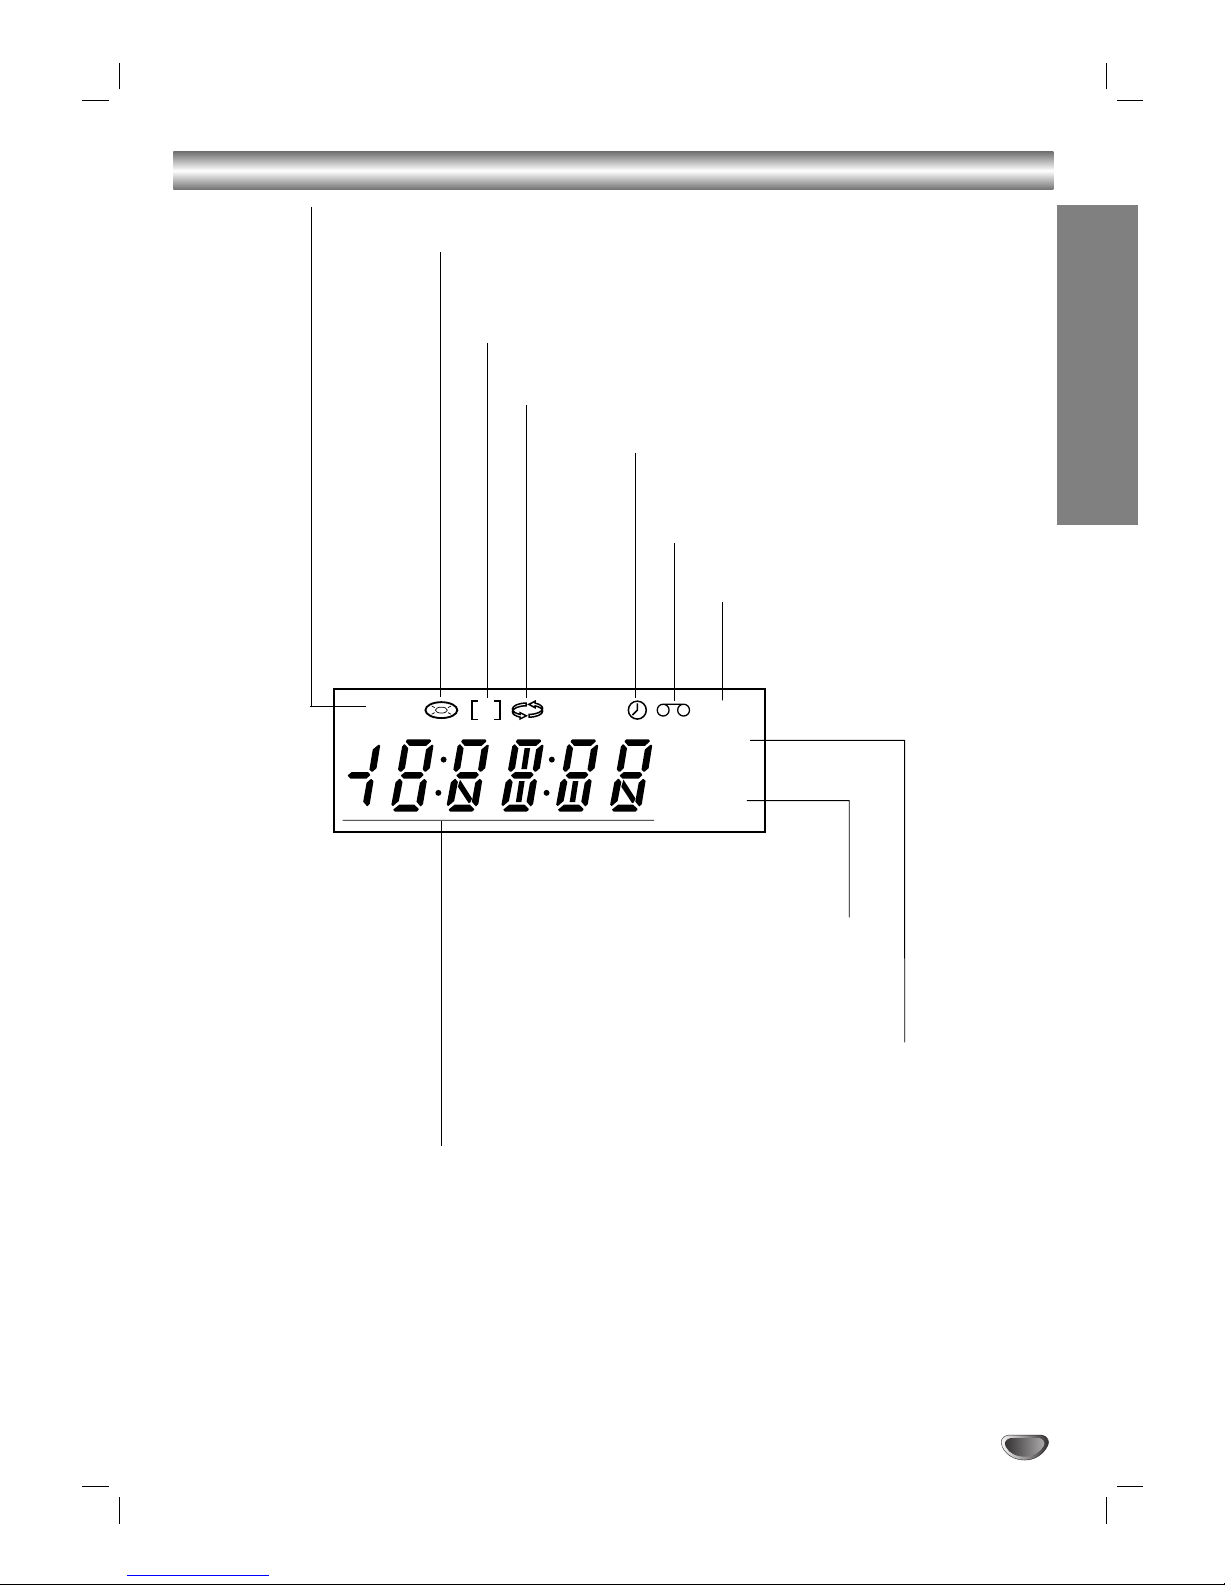
Display Window. . . . . . . . . . . . . . . . . . . . . . . . . . . . 7
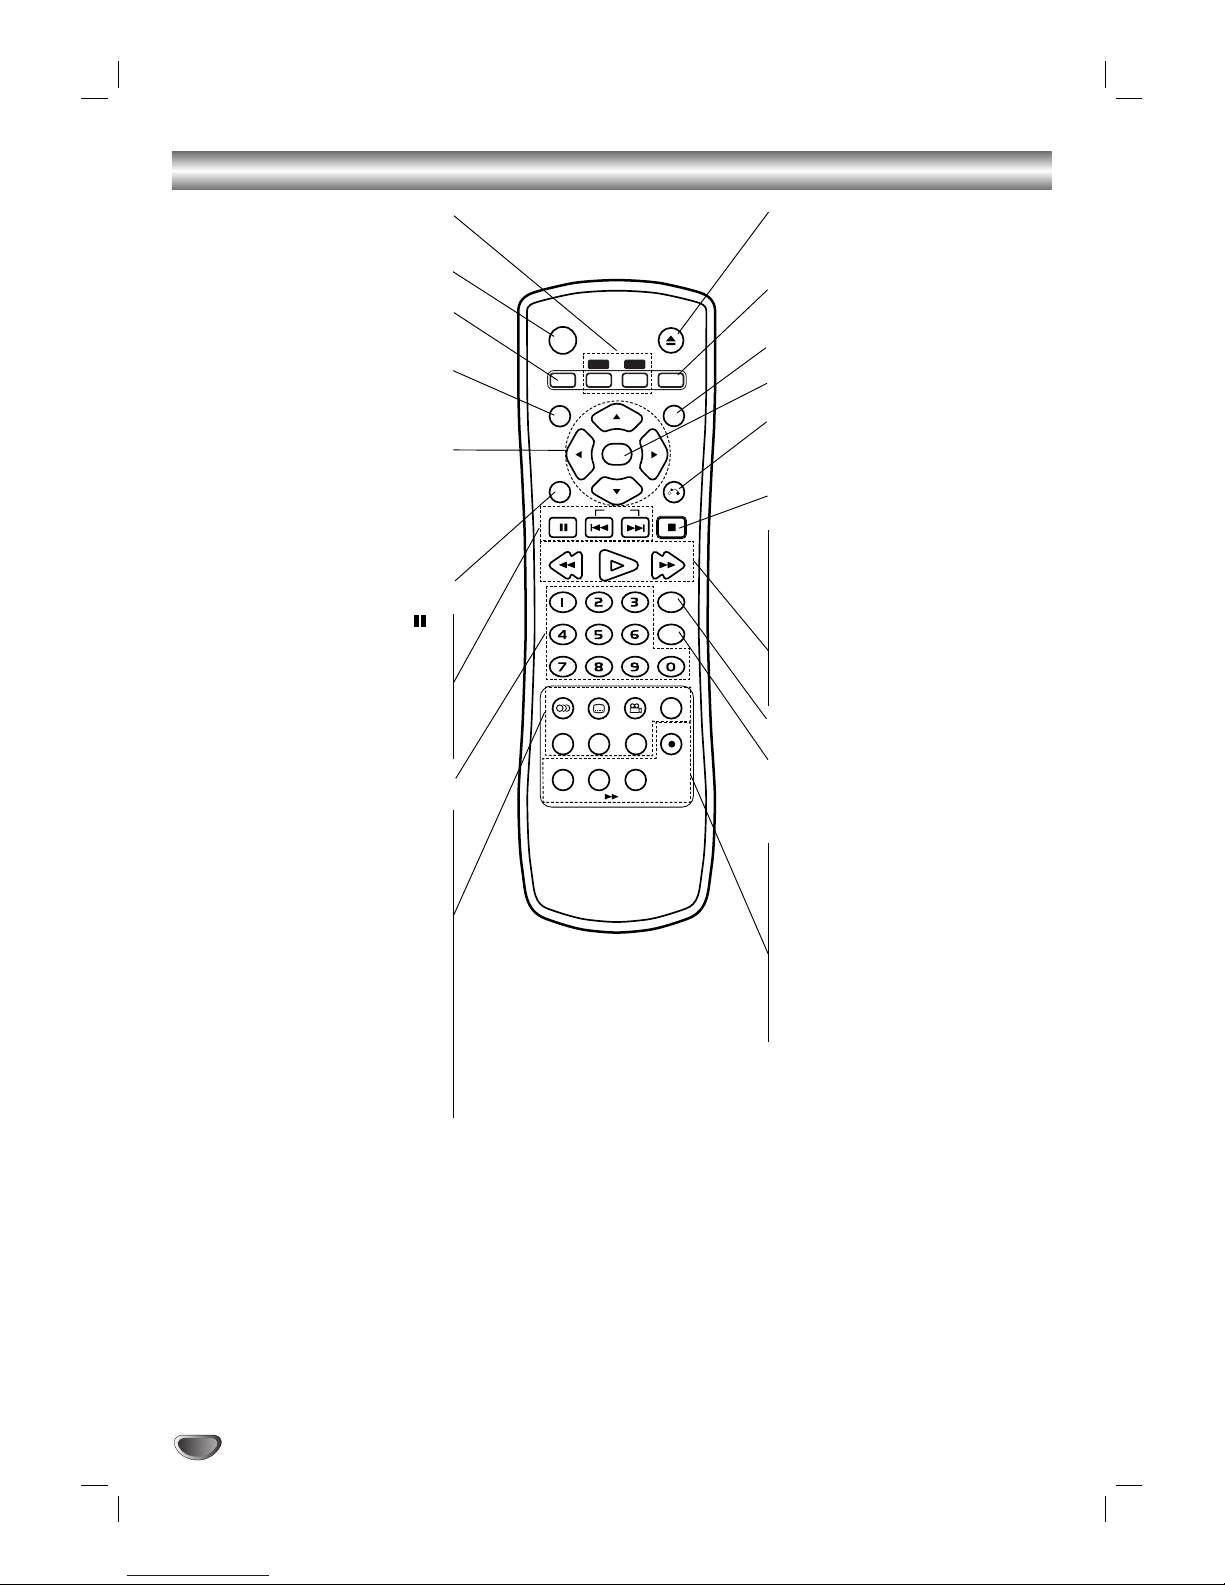
Remote Control . . . . . . . . . . . . . . . . . . . . . . . . . . . . 8
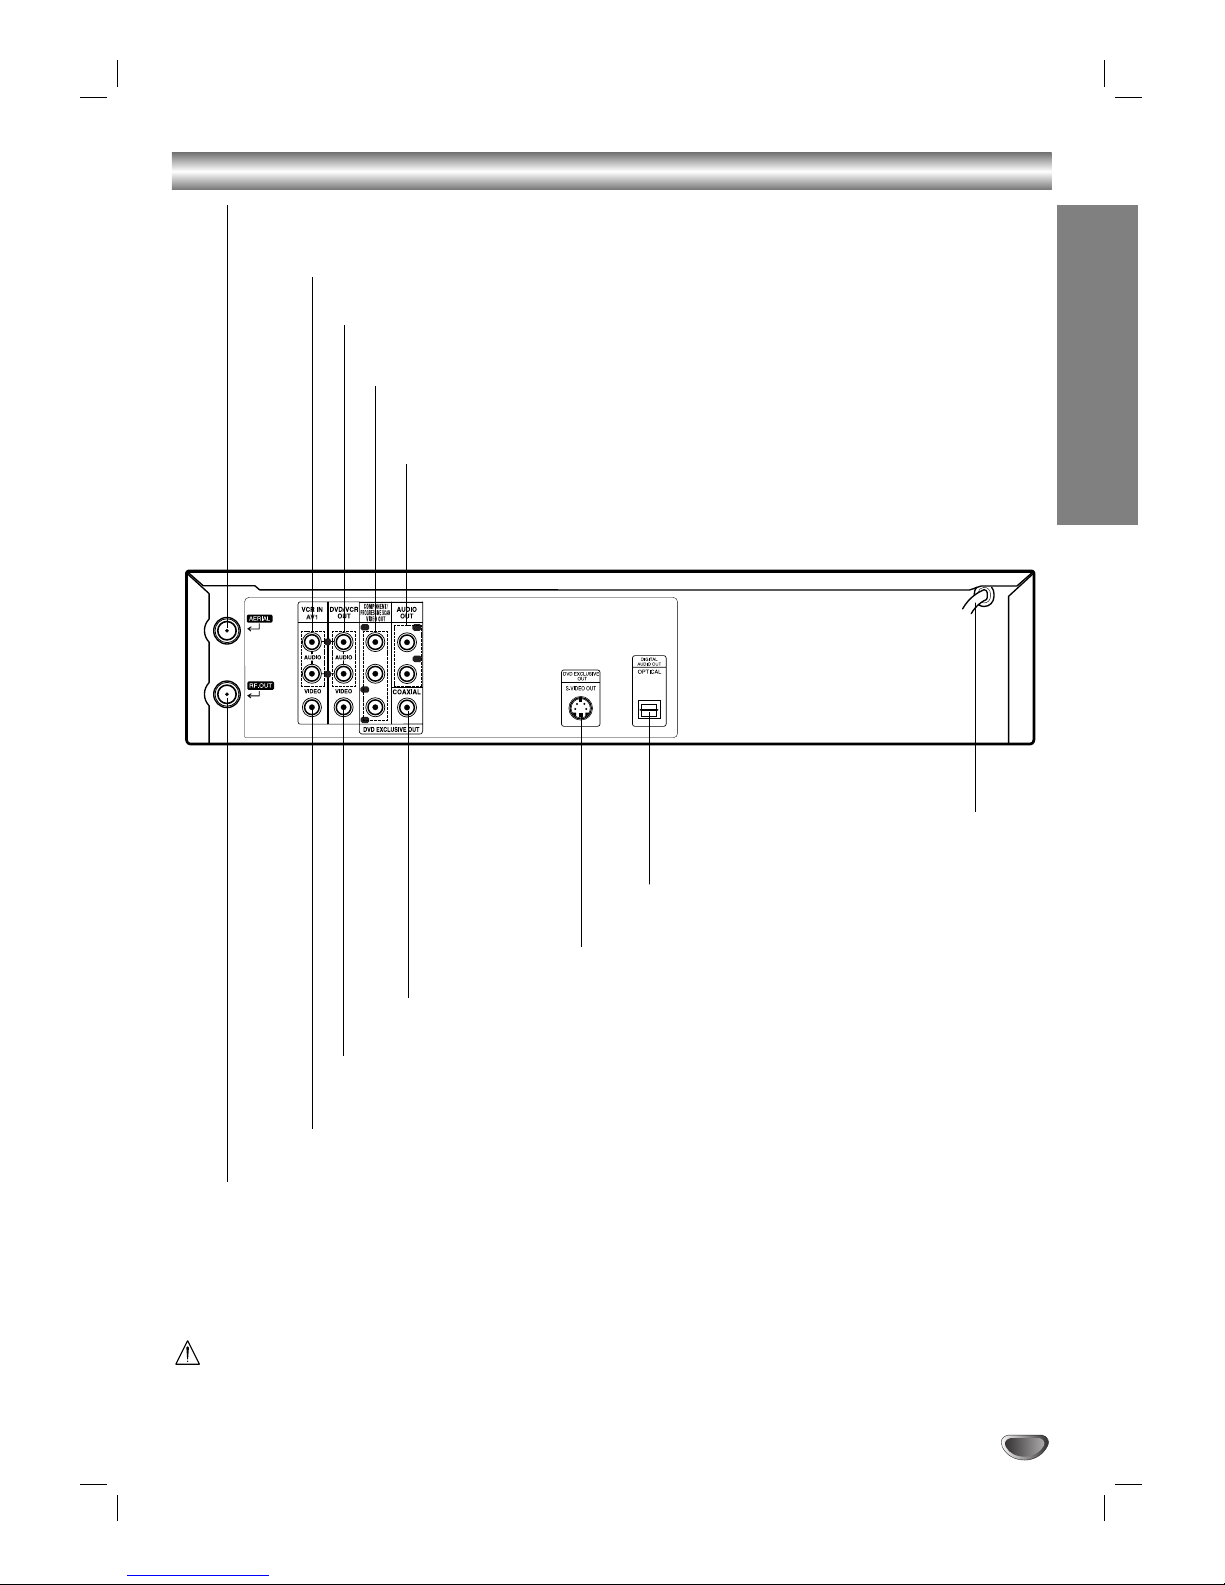
Rear Panel . . . . . . . . . . . . . . . . . . . . . . . . . . . . . . . . 9
Preparation
Connections . . . . . . . . . . . . . . . . . . . . . . . . . . . 10-11
Connecting to a TV & Decoder(or Satellite) . . . . 10
Connecting to Optional Equipment . . . . . . . . . . . 11
Before Operation-VCR part . . . . . . . . . . . . . . . 12-16
Tuning in a video channel on your TV . . . . . . . . 12
Initial preset . . . . . . . . . . . . . . . . . . . . . . . . . . . . 12
Setting the clock Manually . . . . . . . . . . . . . . . . . 13
To set the colour system . . . . . . . . . . . . . . . . . . 13
How to use the main menu . . . . . . . . . . . . . . . . 14
Tuning in TV Stations Automatically . . . . . . . . . . 14
Tuning in TV Stations Manually . . . . . . . . . . . . . 15
Changing the order of TV Stations . . . . . . . . . . . 16
Deleting TV Stations . . . . . . . . . . . . . . . . . . . . . 16
Before Operation-DVD part . . . . . . . . . . . . . . . 17-19
General Operation . . . . . . . . . . . . . . . . . . . . . . . 17
LANGUAGE. . . . . . . . . . . . . . . . . . . . . . . . . . . . 17
Menu Language. . . . . . . . . . . . . . . . . . . . . . 17
Disc Audio / Subtitle / Menu . . . . . . . . . . . . . 17
DISPLAY . . . . . . . . . . . . . . . . . . . . . . . . . . . . . . 17
TV Aspect . . . . . . . . . . . . . . . . . . . . . . . . . . 18
Display Mode. . . . . . . . . . . . . . . . . . . . . . . . 18
Progressive Scan . . . . . . . . . . . . . . . . . . . . 18
TV Output Select . . . . . . . . . . . . . . . . . . . . . 18
AUDIO. . . . . . . . . . . . . . . . . . . . . . . . . . . . . . . . 19
Dolby Digital / DTS / MPEG . . . . . . . . . . . . . 19
Sample Freq. (Frequency) . . . . . . . . . . . . . . 19
DRC (Dynamic Range Control) . . . . . . . . . . 19
OTHERS . . . . . . . . . . . . . . . . . . . . . . . . . . . . . . 19
PBC . . . . . . . . . . . . . . . . . . . . . . . . . . . . . . 19
Auto Play. . . . . . . . . . . . . . . . . . . . . . . . . . . 19
LOCK (Parental Control) . . . . . . . . . . . . . . . . . . 20
Rating . . . . . . . . . . . . . . . . . . . . . . . . . . . . . 20
Password (Security Code) . . . . . . . . . . . . . . 20
Area Code . . . . . . . . . . . . . . . . . . . . . . . . . . 20
Operation
Operation with tape . . . . . . . . . . . . . . . . . . . . . 21-24
Playing a tape . . . . . . . . . . . . . . . . . . . . . . . . . . 21
CM (Commercial Message) Skip . . . . . . . . . 21
OPR (Optimum Picture Response). . . . . . . . 21
Quick Set Recording (QSR) . . . . . . . . . . . . . . . . 22
Timer recording using On Screen Display . . . 23-24
Additional Operation with tape . . . . . . . . . . . . . 25-27
On Screen Display (F.OSD) . . . . . . . . . . . . . . 25
Tape Counter Memory Stop . . . . . . . . . . . . . . 25
Video Doctor (Self-Diagnosis) . . . . . . . . . . . . . 25
Copying from DVD To VCR. . . . . . . . . . . . . . . 26
Recording from another video recorder . . . . . . 26
Operation with DVD and Video CD . . . . . . . . . 27-29
Playback Setup . . . . . . . . . . . . . . . . . . . . . . . . . 27
General Features . . . . . . . . . . . . . . . . . . . . . . . . 27
Moving to another TITLE . . . . . . . . . . . . . . . 27
Moving to another CHAPTER / TRACK . . . . 27
Slow Motion. . . . . . . . . . . . . . . . . . . . . . . . . 27
Still Picture and Frame-by-Frame Playback . 28
Search. . . . . . . . . . . . . . . . . . . . . . . . . . . . . 28
Time Search . . . . . . . . . . . . . . . . . . . . . . . . 28
Maker Search . . . . . . . . . . . . . . . . . . . . . . . 28
Repeat . . . . . . . . . . . . . . . . . . . . . . . . . . . . 28
Repeat A-B . . . . . . . . . . . . . . . . . . . . . . . . . 28
Zoom. . . . . . . . . . . . . . . . . . . . . . . . . . . . . . 28
Changing the Audio Channel . . . . . . . . . . . . 29
Last Scene Memory. . . . . . . . . . . . . . . . . . . 29
Instant Replay . . . . . . . . . . . . . . . . . . . . . . . 29
Screen Saver. . . . . . . . . . . . . . . . . . . . . . . . 29
Video Mode Setting . . . . . . . . . . . . . . . . . . . . . . 29
Special DVD Features . . . . . . . . . . . . . . . . . . . . 29
Title Menu . . . . . . . . . . . . . . . . . . . . . . . . . . 29
Disc Menu . . . . . . . . . . . . . . . . . . . . . . . . . . 29
Camera Angle . . . . . . . . . . . . . . . . . . . . . . . 29
Changing the Audio Language . . . . . . . . . . . 29
Subtitles . . . . . . . . . . . . . . . . . . . . . . . . . . . 29
Additional Operation . . . . . . . . . . . . . . . . . . . . . . .30
On-Screen Display - DVD . . . . . . . . . . . . . . . . . 30
Maintenance and Service. . . . . . . . . . . . . . . . . . 30
Playing an Audio CD or MP3/WMA Disc . . . . . 31-33
Audio CD and MP3/WMA Disc Features. . . . . . . 32
Pause . . . . . . . . . . . . . . . . . . . . . . . . . . . . . 32
Moving to another Track . . . . . . . . . . . . . . . 32
Repeat Track / All / Off. . . . . . . . . . . . . . . . . 32
Search. . . . . . . . . . . . . . . . . . . . . . . . . . . . . 32
Random . . . . . . . . . . . . . . . . . . . . . . . . . . . 32
Repeat A-B . . . . . . . . . . . . . . . . . . . . . . . . . 32
Programmed Playback . . . . . . . . . . . . . . . . . . . . 33
Repeat Programmed Tracks . . . . . . . . . . . . 33
Erasing a Track from “Program” List. . . . . . . 33
Erasing the Complete Program List . . . . . . . 33
Viewing a JPEG Disc. . . . . . . . . . . . . . . . . . . . . . . 34
Slide Show . . . . . . . . . . . . . . . . . . . . . . . . . . . . 34
Still Picture . . . . . . . . . . . . . . . . . . . . . . . . . . . . 34
Moving to another File . . . . . . . . . . . . . . . . . . . . 34
Zoom . . . . . . . . . . . . . . . . . . . . . . . . . . . . . . . . . 34
To rotate picture . . . . . . . . . . . . . . . . . . . . . . . . . 34
Reference
Language and Area Code List . . . . . . . . . . . . . . . 35
Language Code List. . . . . . . . . . . . . . . . . . . . . . 35
Area Code List. . . . . . . . . . . . . . . . . . . . . . . . . . 35
Troubleshooting . . . . . . . . . . . . . . . . . . . . . . . . . . 36
Specification . . . . . . . . . . . . . . . . . . . . . . . . . . . . . 37
About the symbols for instructions
Indicates hazards likely to cause harm to the unit
itself or other material damage.
Note: Indicates special operating features of this unit.
Tip:Indicates tips and hints for making the task easier.

Before Use
Playable Discs
DVD
(8 cm / 12 cm disc)
Video CD (VCD)
(8 cm / 12 cm disc)
Audio CD
(8 cm / 12 cm disc)
In addition, this unit can play SVCD, DVD±R/RW and
CD-R/RW that contains audio titles, MP3, WMA or
JPEG files.
Notes:
Depending on the conditions of the recording
equipment or the CD-R/RW (or DVD±R/RW) disc
itself, some CD-R/RW (or DVD±R/RW) discs cannot
be played on the unit.
Do not attach any seal or label to either side (the
labeled side or the recorded side) of a disc.
Do not use irregular shaped CDs (e.g., heart-shaped
or octagonal). It may result in malfunctions.
Notes on DVDs and Video CDs
Some playback operations of DVDs and Video CDs
may be intentionally programmed by software
manufacturers. This unit plays DVDs and Video CDs
according to disc content designed by the software
manufacturer, therefore some playback features may
not be available or other functions may be added.
Regional code of the DVD player and DVDs
This DVD player is designed and manufactured
for playback of region “4” encoded DVD soft-
ware. The region code on the labels of some
DVD discs indicates which type of player can
play those discs. This unit can play only DVD discs
labeled “4” or “ALL”. If you try to play any other discs, the
message “Check Regional Code” will appear on the TV
screen. Some DVD discs may not have a region code
label even though their playback is prohibited by area
limits.
Disc-related terms
Title (DVD only)
The main film content or accompanying feature content
or additional feature content, or music album. Each title
is assigned a title reference number enabling you to
locate it easily.
Chapter (DVD only)
Sections of a picture or a musical piece that are smaller
than titles. A title is composed of one or several chap-
ters. Each chapter is assigned a chapter number,
enable you to locate the chapter you want. Depending
on the disc, chapters may not be recorded.
Track (Video CD and audio CD only)
Sections of a picture or a musical piece on a video CD
or an audio CD. Each track is assigned a track number,
enabling you to locate the track you want.
Scene
On a video CD with PBC (Playback control) functions,
moving pictures and still pictures are divided into
sections called “Scenes”. Each scene is displayed in the
menu screen and assigned a scene number, enabling
you to locate the scene you want.
Ascene is composed of one or several tracks.
Types of video CDs
There are two types of video CDs:
Video CDs equipped with PBC (Version 2.0)
PBC (Playback control) functions allow you to interact
with the system via menus, search functions, or other
typical computer-like operations. Moreover, still pictures
of high resolution can be played if they are included in
the disc.
Video CDs not equipped with PBC (Version 1.1)
Operated in the same way as audio CDs, these discs
allow playback of video pictures as well as sound, but
they are not equipped with PBC.
4
Remote Control Operation Range
Point the remote control at the remote sensor and
press the buttons.
Distance: About 23 ft (7 m) from the front of the
remote sensor
Angle: About 30° in each direction of the front of the
remote sensor
Remote control battery installation
Detach the battery cover on the rear of
the remote control, and insert two
(R03/AAA) size batteries with
and aligned correctly.
Caution
Do not mix old and new batteries. Never mix different
types of batteries (standard, alkaline, etc.).
4
AAA
AAA

INTRODUCTION
5
Before Use (Continued)
Precautions
Handling the unit
When shipping the unit
The original shipping carton and packing materials
come in handy. For maximum protection, re-pack the
unit as it was originally packed at the factory.
When setting the unit
The picture and sound of a nearby TV or radio may be
distorted during playback. In this case, position the unit
away from the TV or radio, or turn off the unit after
removing the disc.
To keep the surface clean
Do not use volatile liquids, such as insecticide spray,
near the unit. Do not leave rubber of plastic products in
contact with the unit for a long period of time. They will
leave marks on the surface.
Cleaning the unit
To clean the cabinet
Use a soft, dry cloth. If the surfaces are extremely dirty,
use a soft cloth lightly moistened with a mild detergent
solution. Do not use strong solvents, such as alcohol,
benzine, or thinner, as these might damage the surface
of the unit.
To obtain a clear picture
The DVD player is a high-tech, precision device. If the
optical pick-up lens and disc drive parts are dirty or
worn down, the picture quality will be poor.
Regular inspection and maintenance are recommended
after every 1,000 hours of use. (This depends on the
operating environment.)
For details, please contact your nearest dealer.
Notes on Discs
Handling discs
Do not touch the playback side of the disc.
Hold the disc by the edges so that fingerprints will not
get on the surface.
Do not stick paper or tape on the disc.
Storing discs
After playing, store the disc in its case.
Do not expose the disc to direct sunlight or sources of
heat, or leave it in a parked car exposed to direct sun-
light, as there may be a considerable temperature
increase inside the car.
Cleaning discs
Fingerprints and dust on the disc can cause poor pic-
ture quality and sound distortion. Before playing, clean
the disc with a clean cloth. Wipe the disc from the cen-
ter out.
Do not use strong solvents such as alcohol, benzine,
thinner, commercially available cleaners, or anti-static
spray intended for older vinyl records.
About Symbols
About the symbol display
“ ” may appear on the TV screen during operation.
This icon means the function explained in this owner’s
manual is not permitted by the DVD+VCR or is not
available on that specific DVD video disc.
About the disc symbols for instructions
Asection whose title has one of the following symbol is
applicable only to the disc represented by the symbol.
DVD
Video CDs.
Audio CDs.
MP3 disc.
WMA Discs
JPEG disc.
JPEG
WMA
MP3
CD
VCD
DVD
Notes:
•If you insert a disc while the DVD+VCR is in the VCR
mode, the DVD+VCR will switch to DVD mode
automatically.
•If you insert a cassette tape without prevention tab
while the DVD+VCR is in the DVD mode, the
DVD+VCR will switch to VCR mode automatically.
Selecting the Viewing Source
You must select one of your output sources (DVD or
VCR) to view on the TV screen.
•If you want to view DVD deck output source:
Press DVD until DVD indicator in the display window lights
and output source of DVD deck is viewed on the TV screen.
•If you want to view VCR deck output source:
Press VCR until VCR indicator in the display window lights
and output source of VCR deck is viewed on the TV screen.

Front Panel
6
PROG.
POWER
Forward Skip/Scan, Fast-Forward ( )
Go to NEXT chapter/track.
Press and hold for two seconds for a fast forward search.
Winds the tape forwards.
Reverse Skip/Scan, Rewind ( )
Go to beginning of current chapter/track or to PREVIOUS chapter/track.
Press and hold for two seconds for a fast reverse search.
Rewinds the tape.
STOP ( ÁÁ)
Stops playback.
Tape Compartment
PLAY ( G) Starts playback.
OPEN/CLOSE ( )
Opens or closes the
disc tray.
Remote Sensor
Point the remote control here.
Display window
Shows the current status of the unit.
DVD/VCR Selector
Video IN Jack
Tape Eject
Audio IN
(L/R) Jacks
POWER
Switches the unit to
ON or OFF.
Channel Programme Selectors
.
Disc Tray Insert a disc here.

INTRODUCTION
7
Display Window
DVD
VCR
REC
TV
P
DVD+VCR is in timer recording or a timer
recording is programmed.
ACassette is in the VCR deck.
VCR deck is selected.
VCR recording is engaged.
DVD to VHS copy is in progress.
Indicates TV mode.
(See Notes on page 21.)
Adisc is in the DVD deck.
(Lights when a disc is in the DVD deck and Flashes when no disc.)
Indicates total playing time, elapsed time, remaining time or
current deck status (Playback, Pause, etc).
The DVD deck is selected.
Indicates the Progressive Scan is set to On mode.
Indicates repeat mode.

Remote Control
8
Note:
This remote control uses the same buttons for VCR and DVD
functions (ex. PLAY).
When using a VCR, first press the VCR button.
When using a DVD, first press the DVD button.
OPEN/CLOSE
EJECT
OPERATE
TV/VCR
AV
DISPLAY
CLK/CTR
DISC MENU
RETURN
SETUP
i
BACKWARD
PLAY
FORWARD
PROGRAM
CLEAR
PAUSE/STEP
STOPSKIP
OK
ENTER
CH/TRK
CH/TRK
AUDIO SUBTITLE
ANGLE
ZOOM
MARKER - SEARCH
REC/QSR
REPEAT
RANDOM
SKIP
LONG PLAY
A-B
DVD VCR
TITLE
DVD/VCR select button
Selects operational mode of remote
control.
OPERATE
Switch this unit ON or OFF.
TV/VCR
Switch between your TV’s tuner and
the VCR’s internal tuner.
DISPLAY
CLK/CTR
Access the On-Screen Display.
Shows you the current time or counter.
FGDE(left/right/up/down)
Select an item in the menu
CH/TRK(D/E)
-Select channel programme of VCR.
-To adjust tracking.
-To control vertical tremble during
picture still.
SETUP/ i
Access or remove setup menu.
PAUSE/STEP ( ) •
Pause playback temporarily / press
repeatedly for frame-by-frame
playback.
SKIP (./ >) •
Go to next chapter or track. Returns to
beginning of current chapter or track
or go to previous chapter or track.
0-9 numerical buttons
Select numbered items in a menu.
AUDIO •
Select an audio language (DVD) or
an audio channel (CD).
SUBTITLE •
Select a subtitle language.
ANGLE •
Select DVD camera angle if available
ZOOM •
Enlarge video image.
MARKER •
Mark any point during playback.
SEARCH •
Display MARKER SEARCH menu.
TITLE •
Display the title menu of the disc if
available.
OPEN/CLOSE
EJECT
- Open or close the the disc tray.
- Tape Eject.
AV
Select input source for recording into
tape.
DISC MENU
Access menu of a DVD disc.
ENTER/OK
Acknowledge menu selection.
RETURN
- Remove the setup menu.
-Displays the menu of a video CD
with PBC.
STOP ( ÁÁ)
Stops playback.
•
BACKWARD / FORWARD
(m/ M)
-DVD: Search backward or forward.
-VCR: Rewinds the tape during the
STOP mode, for fast reverse picture
search and Advances the tape
during the STOP mode, fast forward
picture search.
• PLAY (G)
Starts playback.
PROGRAM
Access or remove program menu.
CLEAR
- Clear a track number on the
program menu or a mark on the
MARKER SEARCH menu.
- Reset tape counter to zero.
• REC/QSR
Record your input sources into tape.
• REPEAT
Repeat chapter, track, title, all.
• RANDOM/SKIP GG
- Play tracks in random order.
- CM SKIP
• A-B/LONG PLAY
- Repeat sequence.
- Select the recording speed of the
tape.

INTRODUCTION
9
Rear Panel
Do not touch the inner pins of the jacks on the rear panel.
Electrostatic discharge may cause permanent damage to the unit.
Y
Pb
Pr
L
R
L
R
OPTICAL (Digital audio out jack)
(DVD EXCLUSIVE OUT)
Connect to digital (optical) audio equipment.
AUDIO OUT (Left/Right)
(DVD EXCLUSIVE OUT)
Connect to an amplifier, receiver or stereo system.
AUDIO OUT (Left/Right)
(DVD/VCR OUT)
Connect to an amplifier, receiver or stereo system.
AERIAL
Connect the aerial using
this jack.
COAXIAL (Digital audio out jack) (DVD EXCLUSIVE OUT)
Connect to digital (coaxial) audio equipment.
RF.OUT
Connect to your TV using this jack.
S-VIDEO OUT (DVD EXCLUSIVE OUT)
Connect to a TV with S-Video input.
VIDEO IN (VCR IN AV1)
Receive the video signals from an external source to VCR.
VIDEO OUT (DVD/VCR OUT)
Connect to a TV with video inputs.
AC Power Cord
Connect to a power source.
COMPONENT/PROGRESSIVE SCAN VIDEO OUT (Y Pb Pr)
(DVD EXCLUSIVE OUT)
Connect to a TV with Y Pb Pr inputs.
AUDIO IN (Left/Right) (VCR IN AV1)
Receive the audio signals from an external source to VCR.

Connections
Tips:
Depending on your TV and other equipment you wish
to connect, there are various ways you could connect
the unit.
Please refer to the manuals of your TV, Stereo
System or other devices as necessary to make the
best connections.
For better sound reproduction, connect this unit’s
AUDIO OUT jacks to the audio in jacks of your amplifi-
er, receiver, stereo or audio/video equipment. See
“Connecting to optional equipment” on page 11.
Caution:
Make sure this unit is connected directly to the TV.
Set the TV to the correct video input channel.
Do not connect this unit’s AUDIO OUT jack to the
phono in jack (record deck) of your audio system.
Connecting to a TV & Decoder
Make one of the following connections, depending on
the capabilities of your existing equipment.
When using the COMPONENT/PROGRESSIVE
SCAN VIDEO OUT jacks, set TV’s input to COMPO-
NENT VIDEO.
When using the S-VIDEO OUT jack, set the TV’ s
input to S-VIDEO.
Basic connection (AV)
1. Connect the VIDEO jack on this unit’s DVD/VCR
OUT to the video in jack on the TV using the video
cable.
2. Connect the Left and Right AUDIO jacks of this
unit’s DVD/VCR OUT to the audio left/right in jacks
on the TV using the audio cables.
Basic connection (RF)
1. Connect the RF antenna cable from your indoor/
outdoor antenna to AERIAL jack on the rear panel of
this unit.
2. Connect the supplied RF antenna cable from the
RF.OUT jack on the rear panel of this unit to your
television’s Antenna Input.
DVD exclusive out connection
Component Video (Color Stream®) connection
1. Connect the COMPONENT/PROGRESSIVE SCAN
VIDEO OUT jacks on the DVD Player to the corre-
sponding in jacks on the TV using the
YPb Pr cable.
2. Connect the Left and Right AUDIO OUT jacks of the
DVD Player to the audio left/right in jacks on the TV
using the audio cables.
S-Video connection
1. Connect the S-VIDEO OUT jack on this unit to the
S-Video input jack on the TV using the S-Video
cable.
2. Connect the Left and Right AUDIO OUT jacks of the
DVD Player to the audio left/right in jacks on the TV
using the audio cables.
Progressive Scan connection
If your television is a high-definition or “digital ready” tel-
evision, you may take advantage of the DVD Player’s
progressive scan output for the highest video resolution
possible.
If your TV does not accept the Progressive Scan
format, the picture will appear scrambled if you try
Progressive Scan on the DVD Player.
1. Connect the COMPONENT/ PROGRESSIVE SCAN
VIDEO OUT jacks on the DVD Player to the correspon-
ding in jacks on the TV using the Y Pb Pr cable.
2. Connect the Left and Right AUDIO OUT jacks of the
DVD Player to the audio left/right in jacks on the TV
using the audio cables.
Notes:
Set the Progressive to “On” on the setup menu for
progressive signal, see page 18.
Progressive scan does not work with the analog video
connections (yellow VIDEO OUT jack) or S-VIDEO con-
nection.
Note:
If the TV has an S-video input, connect the DVD player
with the S-video cable. When using an S-video cable, do
not connect the yellow video cable.
10
Y
Pb
Pr
L
R
L
R
Y
Pb
Pr
L
R
L
R
VIDEO
INPUT S-VIDEO INPUT
AUDIO INPUT
AERIAL
Rear of TV
Rear of this unit (DVD exclusive out connection)
Rear of this unit (Basic connection)
COMPONENT VIDEO INPUT
/PROGRESSIVE SCAN
Pr
Pb Y
L
R

PREPARATION
11
Connections (Continued)
Connecting to Optional Equipment
Connecting to an amplifier equipped with two chan-
nel analog stereo or Dolby Pro Logic II/Pro Logic
Connect the Left and Right DVD/VCR AUDIO OUT or
AUDIO OUT (DVD EXCLUSIVE OUT) jacks on this unit
to the audio left and right in jacks on your amplifier,
receiver or stereo system, using the audio cables.
Connecting to an amplifier equipped with two
channel digital stereo (PCM) or to an Audio/
Video receiver equipped with a multi-channel
decoder (Dolby Digital™, MPEG 2 or DTS)
1. Connect one of this unit’s DIGITAL AUDIO OUT jack
(COAXIAL or OPTICAL) to the corresponding in jack
on your amplifier. Use an optional digital (coaxial or
optical) audio cable.
2. You will need to activate this unit’s digital output.
(See “AUDIO” on page 19).
Digital Multi-channel sound
Adigital multi-channel connection provides the best
sound quality. For this you need a multi-channel
Audio/Video receiver that supports one or more of the
audio formats supported by your unit (MPEG 2, Dolby
Digital and DTS). Check the receiver manual and the
logos on the front of the receiver.
Warning:
Due to the DTS Licensing agreement, the digital output
will be in DTS digital out when DTS audio stream is
selected.
Notes:
If the audio format of the digital output does not match
the capabilities of your receiver, the receiver will
produce a strong, distorted sound or no sound at all.
To see the audio format of the current DVD in the
On-Screen Display, press AUDIO.
Y
Pb
Pr
L
R
L
R
Amplifier (Receiver)
2 channel analog stereo or Dolby Pro Logic II / Pro Logic connection
DVD exclusive out
Rear of this unit
Both DVD and
VCR out
L
R
AUDIO INPUT
DIGITAL INPUT
COAXIAL
DIGITAL INPUT
OPTICAL
Digital
multi-channel
connection
(DVD exclusive
out connection)

Before Operation-VCR part
Tuning in a video channel on your TV
Notes:
The output frequency of this video recorder
(VCR) is set at UHF channel 68. If channel 68
is already used by another TV station, or if the
picture is distorted, you can change the
transmitter channel of your VCR. Stages 5 ~ 8
will show you how to change the output
frequency of your VCR.
Your TV receives signals from the video
recorder (VCR) like another TV station. You
have to select a channel number on your TV
and tune it in so that you may watch video
tapes. If you have used AUDIO and VIDEO
cables then your TV should already have a
dedicated video channel built into it, usually
called AV.
1. Make sure that you have correctly installed your
VCR as described earlier in this book.
Press OPERATE to turn on your VCR.
Turn on your TV.
2. Insert a pre-recorded video tape into your VCR and
press PLAY on the remote control.
Select a TV channel number on which you wish to
watch video’s.
Don’t worry if you don’t have a video-tape to play at
this stage! If you switch your VCR on and continue
stages 3 ~ 4, instead of seeing video playback tune
your TV until you see a bright blue screen.
3. Tune this channel until the video picture is sharp
and the sound is clear.
If you have used a AUDIO and VIDEO cables you
will not have to tune your TV, simply select the AV
channel. The AV channel is already pre-tuned for
optimum video playback on your TV.
4. Store this channel on your TV.
You will need to look at the TV instruction book if
you do not know how to do this.
5. Only carry out stages 5 ~ 8 if you cannot obtain
clear video playback as described in stages 1 ~ 4.
Select a TV channel number on which you wish to
watch video’s.
Make sure that your VCR is in standby pressing
OPERATE on the remote control (only the clock will
be displayed).
6. Press PROG. 3or 4on the front of your VCR for
more than 4 seconds.
RF68 will appear in the display window.
The following picture will be displayed on the TV
screen.
7. Press PROG 3or 4to select another video channel.
You may select any channel number between 28 and
68 which is not occupied by any local station in your
area.
8. Select a TV channel number on which you wish to
watch video’s.
Press OPERATE on the front of your VCR when you
have finished.
Tune this channel so that a bright blue screen
appears.
Store this channel on your TV.
Note:
Make sure that you have correctly installed your VCR
and successfully tuned in a dedicated video channel on
your TV. If you do not tune in a dedicated video channel
on your TV you will be unable to view and record video
tapes!
Using your VCR for the very first
time
Following picture will display on the TV screen
when you have just connected your video recorder
for the very first time.
To make tuning TV stations, please follow stages
3 to 4 as shown "ACMS" (see p.14).
12
OK
i
Pr-12
ACMS
ACMS
RF CHANNEL 68

Before Operation-VCR part
PREPARATION
13
Setting the clock Manually
The clock in your DVD+VCR controls time and
date settings for your DVD+VCR.
1. Press i.
Press bbor BBto select SET.
Press OK.
The ACSS mode can be set to “OFF” by pressing
OK if you want to set the time manually.
2. Use the vvor VVon the remote control to alter the
HOURS, MINUTES, DAY, MONTH and YEAR.
Please note your DVD+VCR uses a 24 hour clock.
e.g. 1pm will be displayed as 13:00.
The day of the week will appear automatically when
you enter the year.
3. If you make a mistake press bbor BBand enter the
correct details.
4. Press ito return to a TV picture.
To set the colour system
1. Press i.
2. The main menu will appear on the TV screen.
3. Press 1or 2to select the SYS and press OK.
4. Press 3or 4to select according to the COLOUR
system used.
5. Press 1or 2to select the RF AUDIO.
Press 3or 4to select according to the RF AUDIO
used.
6. Press ito remove the menus from the TV screen.
HH MM DD MM YY
:..- -
- - - - - - - - - - -
i
OK
12
SET
HH MM DD MM YY
:..00 1 01 05 SAT8
i
OK
12
SET
SYS
12
SET
OSD
ON
OFF
OSD
f
i
SYS
SYS
12
SET
OSD
ON
OFF
OSD
f
i
SYS

14
Before Operation-VCR part
How to use the main menu
This DVD+VCR can easily be programmed by
using the menus displayed on screen.
The menus are controlled by the Remote Control
Handset.
1. Switch on your TV set and DVD+VCR by pressing the
OPERATE button.
2. Press ibutton.
The main menu will appear on the TV screen.
REC - Timer recording setting (see p. 23).
PR SET - Manual tuning setting (see p. 15).
ACMS - ACMS (Automatic Channel Memory
System) (see p. 14).
SET - Date & clock setting (see p. 13).
SYS - To set the Colour TV System (see p. 13).
(Dr.) - To check a problem with your VCR
(see p. 25).
F.OSD ON/OFF - To display the operational
mode of your VCR
(see p. 25).
(OPR) - To improve the playback picture
(see p. 21).
Tip:
You can change the menu language on the DVD setup
menu. (See the Menu Language on page 17.)
3. Press 1and 2to select the desired menu.
Press OK and use 3or 4to select.
4. Press ito return to a TV picture.
Tuning in TV Stations Automatically
If the TV broadcast signal is weak your DVD+VCR
may not detect the necessary information and will
not be able to store them correctly. To overcome this
problem please turn to the MANUAL TUNING
section on page 15.
1. Press OPERATE to turn on your DVD+VCR.
2. Press ibutton.
The main menu will appear on the TV screen.
Press 1or 2to select the ACMS.
Press OK.
3. Press OK again to start the automatic tuning
process.
4. The TV STATION TABLE will appear when tuning is
completed.
Press ito save your settings.
SYS
12
SET
OSD
ON
OFF
OSD
f
SYS
12
SET
OSD
ON
OFF
OSD
f
ACMS
Pr-12
ACMS
Pr-12
OK
i
OK
i
Pr-12
ACMS
ACMS
OK
i
,DELETE :
MOVE :
PSET
R
02 C03 00
03 C04 00
04 C05 00
05 C06 00
06 C07 00
07 C08 00
08 C09 00
01 C02 00
PR-02
PR-03
PR-04
PR-05
PR-06
PR-07
PR-08
PR-01
01 C02 00
02 C03 00
03 C04 00
ES
i
Pr-12
ACMS
PR-01
PR-02
PR-03

PREPARATION
15
Before Operation-VCR part
Tuning in TV Stations Manually
In certain areas of the country broadcast signals may
be too weak for your DVD+VCR’s automatic tuning
process to find or assign TV stations correctly.
You must tune in these weaker broadcast stations
manually in order for your DVD+VCR to store them.
1. Press i.
The main menu will appear on the TV screen.
Press 1or 2to select the PR SET.
Press OK.
2. Press i.
The station table will appear.
3. Press 3or 4to select the programme number that
you want to tune (for example, PR 04).
4. Press OK.
Press AV to select C(Standard stations) or S(Cable
stations):
C02 - C69, S01 - S41.
Enter the channel number of station that you want to
tune, use 3or 4to find the required station.
5. Searching will stop when it locates a stations.
Press 2to select MFT.
Control the fine tuning of the station by using 3or 4
.
6. Press 2to select STATION so that you may name
your TV station.
Press OK.
7. Use 3or 4to select letters and numbers for the
station name.
Use 1or 2to move back and forth between
characters.
Press OK.
8. Press i, confirm the station placement.
If you wish to manually tune other stations repeat
stages 3 - 8.
9. Press i again.
Your new TV station has now been tuned into your
DVD+VCR.
SYS
12
SET
OSD
ON
OFF
OSD
f
ACMS
Pr-12
PSET
R
PSET
R
PR CH MFT STATION
01 00
CHANNEL/CABLE : AV
C03
PSET
R
i
PR-03
02 C02 00 PR-02
03 C03 00 PR-03
04 - - - - - - - - -
05 - - - - - - - - -
06 - - - - - - - - -
07 - - - - - - - - -
08 - - - - - - - - -
01 C01 00 PR-01
OK
i
,DELETE :
MOVE :
PSET
R
PR CH STATION
04 - - - - - -
MFT
PSET
R
C - -
i
CHANNEL/CABLE : AV
PR CH MFT
04 00C04
i
OK
STATION
PSET
R
-
PR CH MFT STATION
04 00
C04 PR-04
i
OK
PSET
R
02 C02 00 PR-02
03 C03 00 PR-03
04 C04 00 PR-04
05 - - - - - - - - -
06 - - - - - - - - -
07 - - - - - - - - -
08 - - - - - - - - -
01 C01 00 PR-01
OK
i
,DELETE :
MOVE :
PSET
R
PR CH STATION
04 00
C04
MFT
CHANNEL/CABLE : AV
i
PSET
R
i

Before Operation-VCR part
Changing the order of TV Stations
After tuning TV stations into your DVD+VCR you
may wish to change the order in which they are
stored without having to retune them again. The
instructions given on this page will show you how you
can simply move them into your desired order.
1. Press i.
The main menu will appear on the TV screen.
Press 1or 2to select the PR SET.
Press OK.
2. Press i.
Press 3or 4to select the programme number you
want to move (for example, PR-03).
Press 2.
3. Press 3or 4to select the programme number you
want to move to (for example, PR-05).
4. Press OK.
The selected programme will be moved to the new
programme number.
If you wish to move other TV stations repeat stages
1 - 4.
5. Press ito remove the menus from the TV screen.
Deleting TV Stations
After tuning TV stations into your DVD+VCR you
may wish to delete a station.
The instructions given on this page will show you
how you can easily delete any unwanted TV
stations.
1. Press i.
The main menu will appear on the TV screen.
Use 1or 2to select the PR SET.
Press OK.
2. Press i.
3. Press 3or 4to select the programme number you
want to delete. (for example, PR-01)
4. Press 1.
After a short while, the selected station will be
deleted.
If you wish to delete other TV stations repeat stages
3 - 4.
5. Press ito remove the menus from the TV screen.
16
SYS
12
SET
OSD
ON
OFF
OSD
f
ACMS
Pr-12
PSET
R
PSET
R
PR CH MFT STATION
01 00 PR-03
CHANNEL/CABLE : AV
C03
i
PSET
R
02 C02 00 PR-02
03 C03 00 PR-03
04 C04 00 PR-04
05 - - - - - - - - -
06 - - - - - - - - -
07 - - - - - - - - -
08 - - - - - - - - -
01 C01 00 PR-01
OK
i
,DELETE :
MOVE :
PSET
R
02 C02 00 PR-02
03 C03 00 PR-03
04 C04 00 PR-04
05 - - - - - - - - -
06 - - - - - - - - -
07 - - - - - - - - -
08 - - - - - - - - -
01 C01 00 PR-01
PSET
R
OK
i
02 C02 00 PR-02
03 C04 00 PR-04
04 - - - - - - - - -
05 C03 00 PR-03
06 - - - - - - - - -
07 - - - - - - - - -
08 - - - - - - - - -
01 C01 00 PR-01
PSET
R
OK
i
SYS
12
SET
OSD
ON
OFF
OSD
f
ACMS
Pr-12
PSET
R
PSET
R
PR CH MFT STATION
01 00 PR-03
CHANNEL/CABLE : AV
C03
i
PSET
R
02 C02 00 PR-02
03 C04 00 PR-04
04 - - - - - - - - -
05 C03 00 PR-03
06 - - - - - - - - -
07 - - - - - - - - -
08 - - - - - - - - -
01 C01 00 PR-01
PSET
R
OK
i
,DELETE :
MOVE :
02 C02 00 PR-04
03 - - - - - - - - -
04 C03 00 PR-03
05
06 - - - - - - - - -
- - - - - - - - -
07 - - - - - - - - -
08 - - - - - - - - -
01 C01 00 PR-02
PSET
R
OK
i
,DELETE :
MOVE :
02 C02 00 PR-02
03 C04 00 PR-04
04 - - - - - - - - -
05 C03 00 PR-03
06 - - - - - - - - -
07 - - - - - - - - -
08 - - - - - - - - -
01 C01 00 PR-01
PSET
R
OK
i
,DELETE :
MOVE :

PREPARATION
17
Before Operation-DVD part
By using the DVD Setup menu, you can make various
adjustments to items such as picture and sound. You
can also set a language for the subtitles and the Setup
menu, among other things. For details on each Setup
menu item, see pages 17 to 20.
To display and exit the Menu:
Press SETUP to display the menu. A second press of
SETUP will take you back to initial screen.
To go to the next level:
Press Bon the remote control.
To go back to the previous level:
Press bon the remote control.
General Operation
1. Press DVD on the remote control.
2. Press SETUP.
The Setup menu appears.
3. Use v/Vto select the desired option then press B
to move to the second level. The screen shows the
current setting for the selected item, as well as
alternate setting(s).
4. Use v/Vto select the second desired option then
press Bto move to the third level.
5. Use v/Vto select the desired setting then press
ENTER to confirm your selection. Some items
require additional steps.
6. Press SETUP or NNexit the Setup menu.
LANGUAGE
Menu Language
Select a language for the VCR and DVD’s setup menu
and information display.
Disc Audio / Subtitle / Menu
Select the language you prefer for the audio track
(disc audio), subtitles, and the disc menu.
Original: Refers to the original language in which the
disc was recorded.
Other: To select another language, press number but-
tons then ENTER to enter the corresponding 4-digit
number according to the language code list in the
reference chapter (see page 35). If you enter the wrong
language code, press CLEAR.
Off (for Disc Subtitle) : Turn off Subtitle.
DVD
Menu Language
Original
English
Off
Original
Disc Audio
Disc Subtitle
Disc Menu
Move
Select
LANGUAGE

18
DISPLAY
TV Aspect
4:3 :
Select when a standard 4:3 TV is connected.
16:9 : Select when a 16:9 wide TV is connected.
Display Mode
Display Mode setting works only when the TV Aspect
mode is set to “4:3”.
Letterbox: Displays a wide picture with bands on the
upper and lower portions of the screen.
Panscan:
Automatically displays the wide picture on the
entire screen and cuts off the portions that do not fit.
Progressive Scan
Progressive Scan Video provides the highest quality
pictures with less flickering.
If you are using the Component Video jacks for connec-
tion to a TV or monitor that is compatible with a pro-
gressive scan signal, set Progressive Scan to On.
To turn On progressive scan:
Connect component out of this unit to the input of your
monitor/television, set your television or monitor to
Component Input.
1. Select “Progressive Scan” on the DISPLAY menu
then press B.
2. Select “On” using the v/Vbuttons.
3. Press ENTER to confirm your selection.
The confirm menu will appear.
Note:
If your TV does not accept the Progressive Scan format,
the picture will appear scrambled if you try Progressive
Scan on the DVD Player.
4. When the confirm menu appears on your screen
Cancel is highlighted as default. Use the bbutton to
highlight Enter.
5. Pressing ENTER will set this unit to Progressive
scan mode.
Caution:
Once the setting for progressive scan output is entered, an
image will only be visible on a progressive scan
compatible TV or monitor. If you set Progressive Scan to
On in error, you must reset the unit.
1) Remove any disc from the unit and close the disc tray.
See that “DISC” is displayed on the display window.
2) Press STOP and hold it for five seconds before
releasing it. The video output will be restored to the
standard setting and a picture will once again be
visible on a conventional analog TV or monitor.
DVD
DVD
DISPLAY
TV Aspect
Widescreen
16 : 9 Wide
Display Mode
OffProgressive Scan
Move
Select
TV Output Select YPbPr
DISPLAY
TV Aspect
TV Output Select
Display Mode
Move
EnterPrev.
OnProgressive Scan
Off

PREPARATION
19
Before Operation - DVD part
AUDIO
Each DVD disc has a variety of audio output options.
Set this unit’s AUDIO options according to the type of
audio system you use.
Dolby Digital / DTS / MPEG
Bitstream: Select “Bitstream” if you connect the
DVD+VCR’s DIGITAL AUDIO OUT jack to an ampli-
fier or other equipment with a Dolby Digital, DTS or
MPEG decoder.
PCM (for Dolby Digital / MPEG): Select when con-
nected to a two-channel digital stereo amplifier.
DVDs encoded in Dolby Digital or MPEG will be
automatically downmixed to two-channel PCM
audio.
Off (for DTS): If you select “Off”, the DTS signal is
not output through the DIGITAL AUDIO OUT jack.
Sample Freq. (Frequency)
If your receiver or amplifier is NOT capable of handling
96 kHz signals, select 48 kHz. When this choice is
made, this unit automatically converts any 96 kHz sig-
nals to 48 kHz so your system can decode them.
If your receiver or amplifier is capable of handling 96
kHz signals, select 96 kHz. When this choice is made,
this unit passes each type of signal through without any
further processing.
Check the documentation for your amplifier to verify its
capabilities.
DRC (Dynamic Range Control)
With the DVD format, you can hear a program’s sound-
track in the most accurate and realistic presentation
possible, thanks to digital audio technology. However,
you may wish to compress the dynamic range of the
audio output (the difference between the loudest sounds
and the quietest ones). This allows you to listen to a
movie at a lower volume without losing clarity of sound.
Set DRC to On for this effect.
OTHERS
The PBC and Auto Play settings can be changed.
PBC
Set Playback Control (PBC) to On or Off.
On: Video CDs with PBC are played according to the
PBC.
Off: Video CDs with PBC are played the same way as
Audio CDs.
Auto Play
You can set up the DVD+VCR so a DVD disc automati-
cally starts playing whenever the DVD is inserted.
If Auto Play mode is set to On, this DVD player will
search for title that has the longest playback time and
then play back the title automatically.
On: Auto Play function is active.
Off: Auto Play function is not active.
Note:
The Auto Play function may not work for some DVDs.
DVD
VCD
DVD
DVD
DVD
Dolby Digital
Bitstream
PCM
48KHz
On
Bitstream
DTS
MPEG
Sample Freq.
DRC
Move
Select
AUDIO
PBC
Off
Move
Auto Play
OTHERS
On
Select
OffB.L.E

20
Before Operation-DVD part
LOCK (Parental Control)
Rating
Some movies contain scenes that may not be suitable
for children to view. Many of these discs contain
parental control information that applies to the complete
disc or to certain scenes on the disc. Movies and
scenes are rated from 1 to 8, depending on the area.
DVD video discs may or may not respond to the
parental control setting if the Area code of the disc is
set wrongly. Some discs offer more suitable scenes as
an alternative. Ratings are area dependent.
The parental control feature allows you to block access
to scenes below the rating you input, there by
preventing your children from being able to view materi-
al you believe is unsuitable.
1. Select “Rating” on the LOCK menu then
press B.
2. To access the Rating, Password and Area Code fea-
tures, you must input the 4-digit security code you
created.
If you have not yet entered a security code you are
prompted to do so. Input a 4-digit code and press
ENTER. Enter it again and press ENTER to verify. If
you make a mistake before pressing ENTER, press
CLEAR.
3. Select a rating from 1 to 8 using the v/Vbuttons.
1-8: Rating one (1) has the most restrictions and rat-
ing eight (8) has the least restrictive.
Unlock : If you select unlock, parental control is not
active and the disc plays in full.
4. Press ENTER to confirm your rating selection, then
press SETUP to exit the menu.
5. Press OPEN/CLOSE (/)to activate parental
control.
Note:
If you set a rating for the player, all disc scenes with the same
rating or lower are played. Higher rated scenes are not played
unless an alternate scene is available on the disc. The alterna-
tive must have the same rating or a lower one. If no suitable
alternative is found, playback stops. You must enter the 4-digit
password or change the rating level in order to play the disc.
Password (Security Code)
You can enter or change password.
1. Select “Password” on the LOCK menu then press B.
2. Follow step 2 as shown left column (Rating).
To change the password, select the “Change”, press
ENTER and input the new 4-digit code then press
ENTER. Input it again to verify.
3. Press SETUP to exit the menu.
If you forget your Security Code
If you forget your security code you can clear it using
the following steps:
1. Press SETUP to display the Setup menu.
2. Input the 6-digit number “210499”
and the security code is cleared.
3. Enter a new code as described above.
Area Code
Enter the Area Code whose standards were used to
rate the DVD video disc, based on the list in the
reference chapter (see page 35).
1. Select “Area Code” on the LOCK menu then press
B.
2. Follow step 2 as shown left (Rating).
3. Select the first character using v/Vbuttons.
4. Press Band select the second character using
v/Vbuttons.
5. Press ENTER to confirm your area code
selection.
DVD
DVD
LOCK
Rating
New
DG
Unlock
Password
Area Code
Move
Select
A U
Table of contents
Other NEC DVD Player manuals