Neets EasyConnect User manual

Neets EasyConnect
- for Neets Control Keypad
Installation Manual

Page 2 of 12
Foreword
Neets EasyConnect solves one of the most common and frustrating problems encountered in AV presentations.
When a guest presenter wants to connect a laptop computer, all too often the proper cables cannot be found, or
they have the wrong length, or the connection point is hidden away in a floor pocket or wall panel.
Cables are terminated at both ends for easy disconnection and re-connection, allowing use in podiums that occa-
sionally must be relocated or removed for storage.
The EasyConnect enclosure also incorporates space for seamless integration of Neets Control EcHo or SieRRa II.
With integrated control, starting a presentation is quick and frustration-free. Simply plug in the required cables,
press the corresponding control buttons, and your
presentation is running in a matter of seconds!
COPYRIGHT - All information contained in this manual is the intellectual property and copyrighted material of
Neets. All rights are reserved. You may not allow any third party access to content, information or data in this man-
ual without Neets’ express written consent.
CHANGES - Neets reserve the right to change the specification and functions of this product without any notice.
Questions, AFTER reading this manual, can be addressed to your local dealer or:
Neets
Langballe 4
8700 Horsens
Denmark

Page 3 of 12
Important Safety Instructions
Caution:
Read these instructions:
Read and understand all safety and operating instructions before using the equipment.
Keep these Instructions:
The safety instructions should be kept for future reference.
Heed all Warnings:
Follow all warnings and instructions marked on the equipment or in the user information.
Avoid Attachments:
Do not use tools or attachments that are not recommended, because they may be hazardous
Warning!:
• This equipment should be operated only from the included power supply.
• To remove power from the equipment safely, remove all power cords from the rear of the equipment, or the
desktop power module (if detachable), or from the power source receptacle (wall plug).
• Power cords should be routed so that they are not likely to be stepped on or pinched by items placed upon or against them.
• Do not defeat the safety purpose of a polarized or grounding-type plug. A polarized plug has two blades with one wider than the
other. A grounding-type plug has two blades and a third grounding prong. The wide blade or the third prong is provided for your safety.
If the provided plug does not fit into your outlet, consult an electrician for replacement of the obsolete outlet.
• Unplug this apparatus during lightning storms or when unused for long periods of time.
• Refer all servicing to qualified service personnel. There are no user-serviceable parts inside. To prevent the risk of shock, do not at-
tempt to service this equipment yourself because opening or removing covers may expose you to dangerous voltage or other hazards.
Contact your local Neets reseller or distributor.
• If the equipment has slots or holes in the enclosure, these are provided to prevent overheating of sensitive
components inside. These openings must never be blocked by other objects.
• Do not use this equipment near water.
• To reduce the risk of fire or electric shock, do not expose this apparatus to rain or moisture and objects filled with liquids.
• Unplug the product before cleaning. Clean only with a dry cloth and not cleaning fluid or aerosols. Such products could enter the unit
and cause damage, fire, or electric shock. Some substances may also mar the finish of the product.
FCC Class A Notice:
This equipment has been tested and found to comply with the limits for a Class A digital device, pursuant to part 15 of the FCC Rules.
Operation is subject to the following two conditions:
1. This device may not cause harmful interference.
2. This device must accept any interference received, including interference that may cause undesired operation.
The Class A limits are designed to provide reasonable protection against harmful interference when the
equipment is operated in a commercial environment. This equipment generates, uses, and can radiate radio frequency energy and, if
not installed and used in accordance with the instruction manual, may cause harmful interference to radio communications. Opera-
tion of this equipment in a residential area is likely to cause harmful interference, in which case the user will be required to correct the
interference at his own expense.
FCC regulations state that any unauthorized changes or modifications to this equipment, not expressly approved by the manufacturer,
could void the user’s authority to operate this equipment.
The lightning bolt triangle is used to alert the user to the presence of uninsulated “dangerous
voltages” within the unit’s chassis that may be of sufficient magnitude to constitute a risk of electric shock to humans.
The exclamation point triangle is used to alert the user to presence of important operating and
service instructions in the literature accompanying the product.
The exclamation point triangle is used to alert the user to presence of important operating and
service instructions in the literature accompanying the product.
!

Page 4 of 12
Routing and connecting cables:
Caution:
Risk of electric shock
Max power output 10A
• Check with local and state regulations before starting the installation
• Check all parts and equipment before installation
Neets EasyConnect - for Neets Control Keypad
Neets EasyConnect - Power

Page 5 of 12
Contents
Foreword ..................................................................................................2
Important Safty Instructions................................................................................3
Contents ..................................................................................................5
Description . . . . . . . . . . . . . . . . . . . . . . . . . . . . . . . . . . . . . . . . . . . . . . . . . . . . . . . . . . . . . . . . . . . . . . . . . . . . . . . . . . . . . . . . . . . . . . . . 6
EasyConnect Components..................................................................................7
Installation Procedure...................................................................................... 8
Step 1: Prepare opening ....................................................................................8
Step 2: Adjust depth of connector plate......................................................................8
Step 3: Evaluate cable connection procedure / connect cables ................................................9
Step 4: Insert the unit ......................................................................................9
Step 5: Secure the unit .....................................................................................9
Step 6: Complete cable terminations and connections ........................................................9
Step 7: Install Neets Control - EcHo, EcHo Plus or SieRRa II control module ....................................10
Specifications..............................................................................................11
Page 6 of 12
Description
Neets EasyConnect is a high-quality cable housing box designed for recessed mounting in a tabletop, podium or
other furniture surface in classrooms, board rooms and conference rooms. It contains six connector cables that pull
out smoothly for quick connectivity and then disappear below the box for uncluttered storage. The top cover plate
slides into its own recessed slot to hide out of the way when cables are in use.
EasyConnect is constructed from black anodized aluminum for years of reliable service. It includes a built-in AC line
outlet (with proper socket connector for country of delivery) for powering an external computer or other device, and
is CE certified.
The depth of the connector collar panel is adjustable, allowing optimum depth to suit various connector types and
sizes.
EasyConnect is delivered with the following cables:
1 x HDMI
1 x 3.5mm audio
1 x VGA
2 x Cat-6 RJ45
1 x USB-A
All cables are 1,7 m long with identical terminations at each end.
EasyConnect is available in 4 versions:
prepared for Neets Control Keypads (EcHo, EcHo Plus, SieRRa II)
5009-005 Neets EasyConnect -for Neets Control Keypad - EU Power Outlet
5009-006 Neets EasyConnect -for Neets Control Keypad - UNI Power Outlet
5009-007 Neets EasyConnect -for Neets Control Keypad - DK Power Outlet
5009-020 Neets EasyConnect -for Neets Control Keypad - CH Power Outlet
Accessories:
305-0299 Neets - EasyConnect Cable Bag Black Canvas
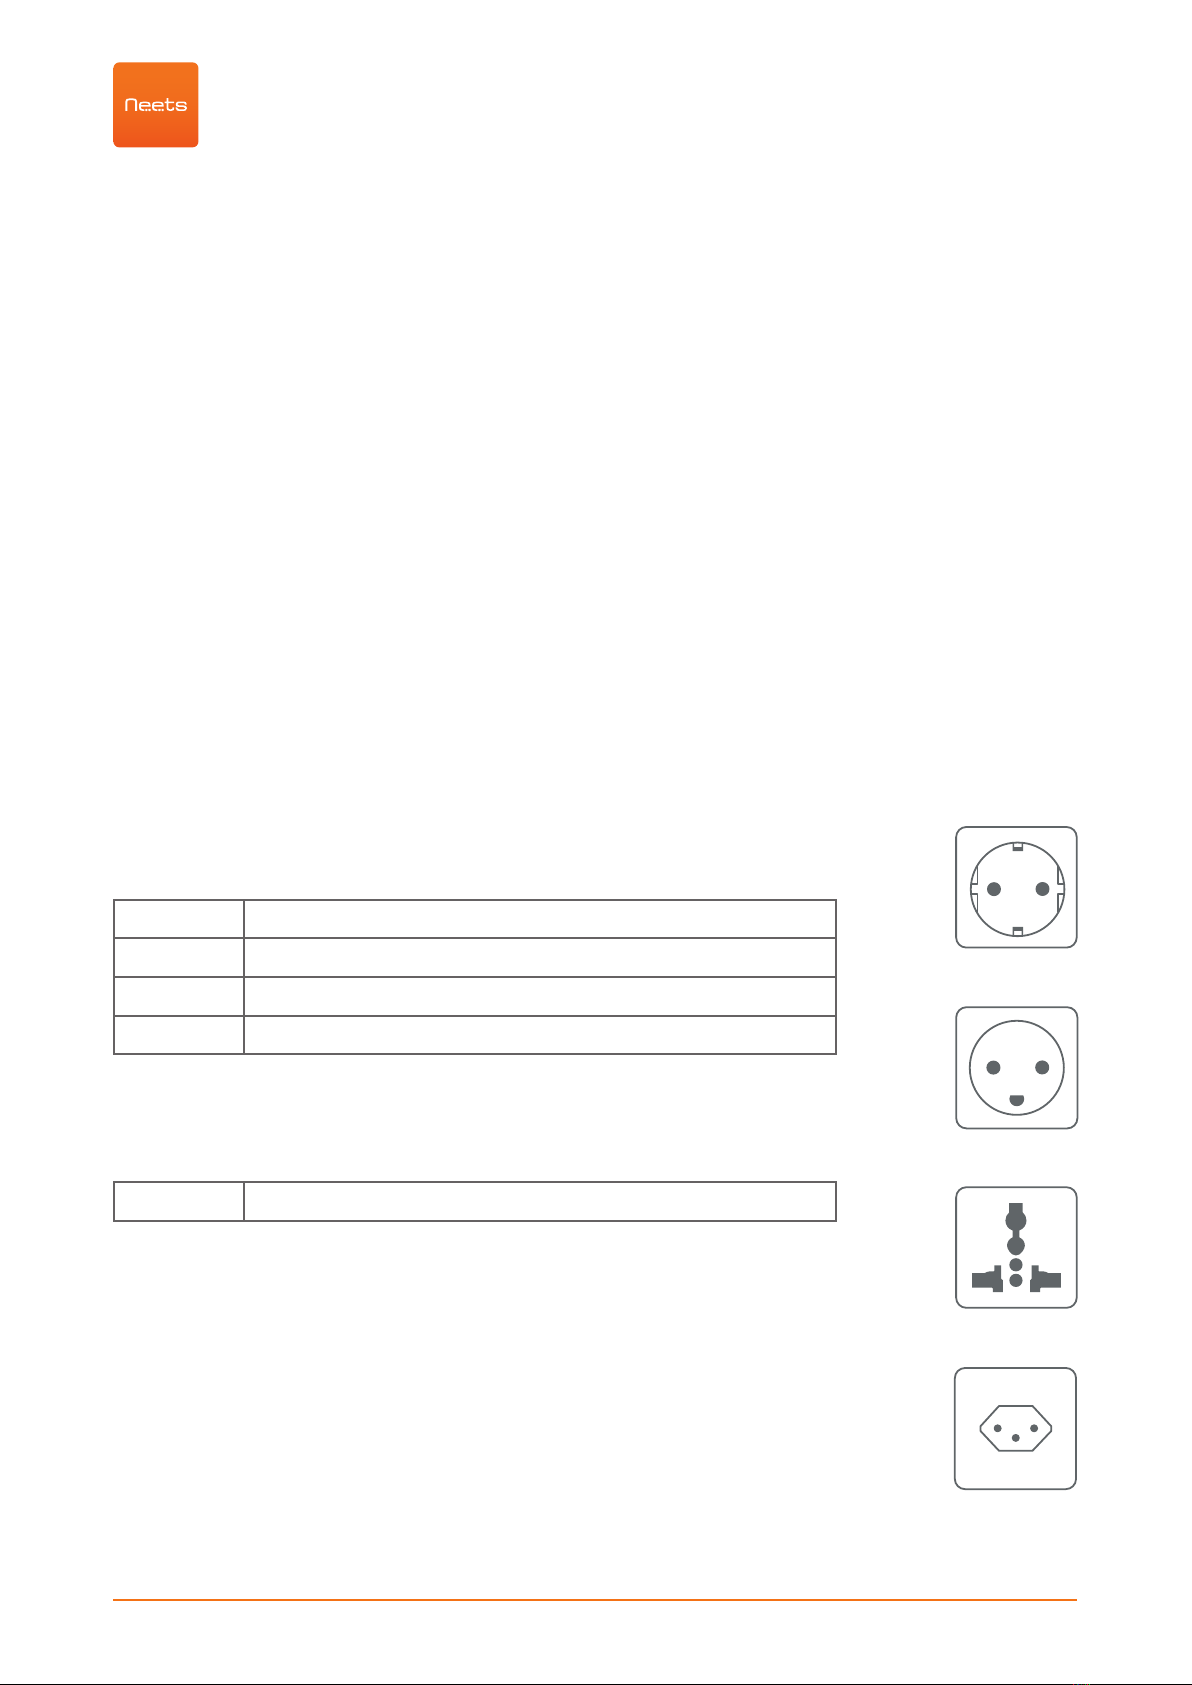
EU ”schuko”
power socket
Danish
power socket
Universal
power socket
Swiss
power socket

Page 7 of 12
EasyConnect Components
There are 3 different groups of EasyConnect. One prepared for Neeets control keypads (EcHo, EcHo Plus and
SieRRa II), and one with two power plugs.
Number: Description
1 Sturdy retractable lid - Opens and closes manually. All connectors are covered when closed,
leaving a solid flat surface with only a small opening for lifting the cover
2 Outer flange - Fits over mounting surface for clean appearance
3 Height adjustment screws – Adjusts height of internal connector plate
4 Connector box - Provides space for up to six AV connectors
5 Frame for Neets Control – EcHo, Echo Plus or SieRRa II (EU control system)
6 Built-in AC line Outlet with either EU, DK, UNI, or CN power socket
3
3
4
5
2
2
6
6
6
3
3
1
1
4
Neets EasyConnect - for Neets Control Keypad
Neets EasyConnect - Power

Page 8 of 12
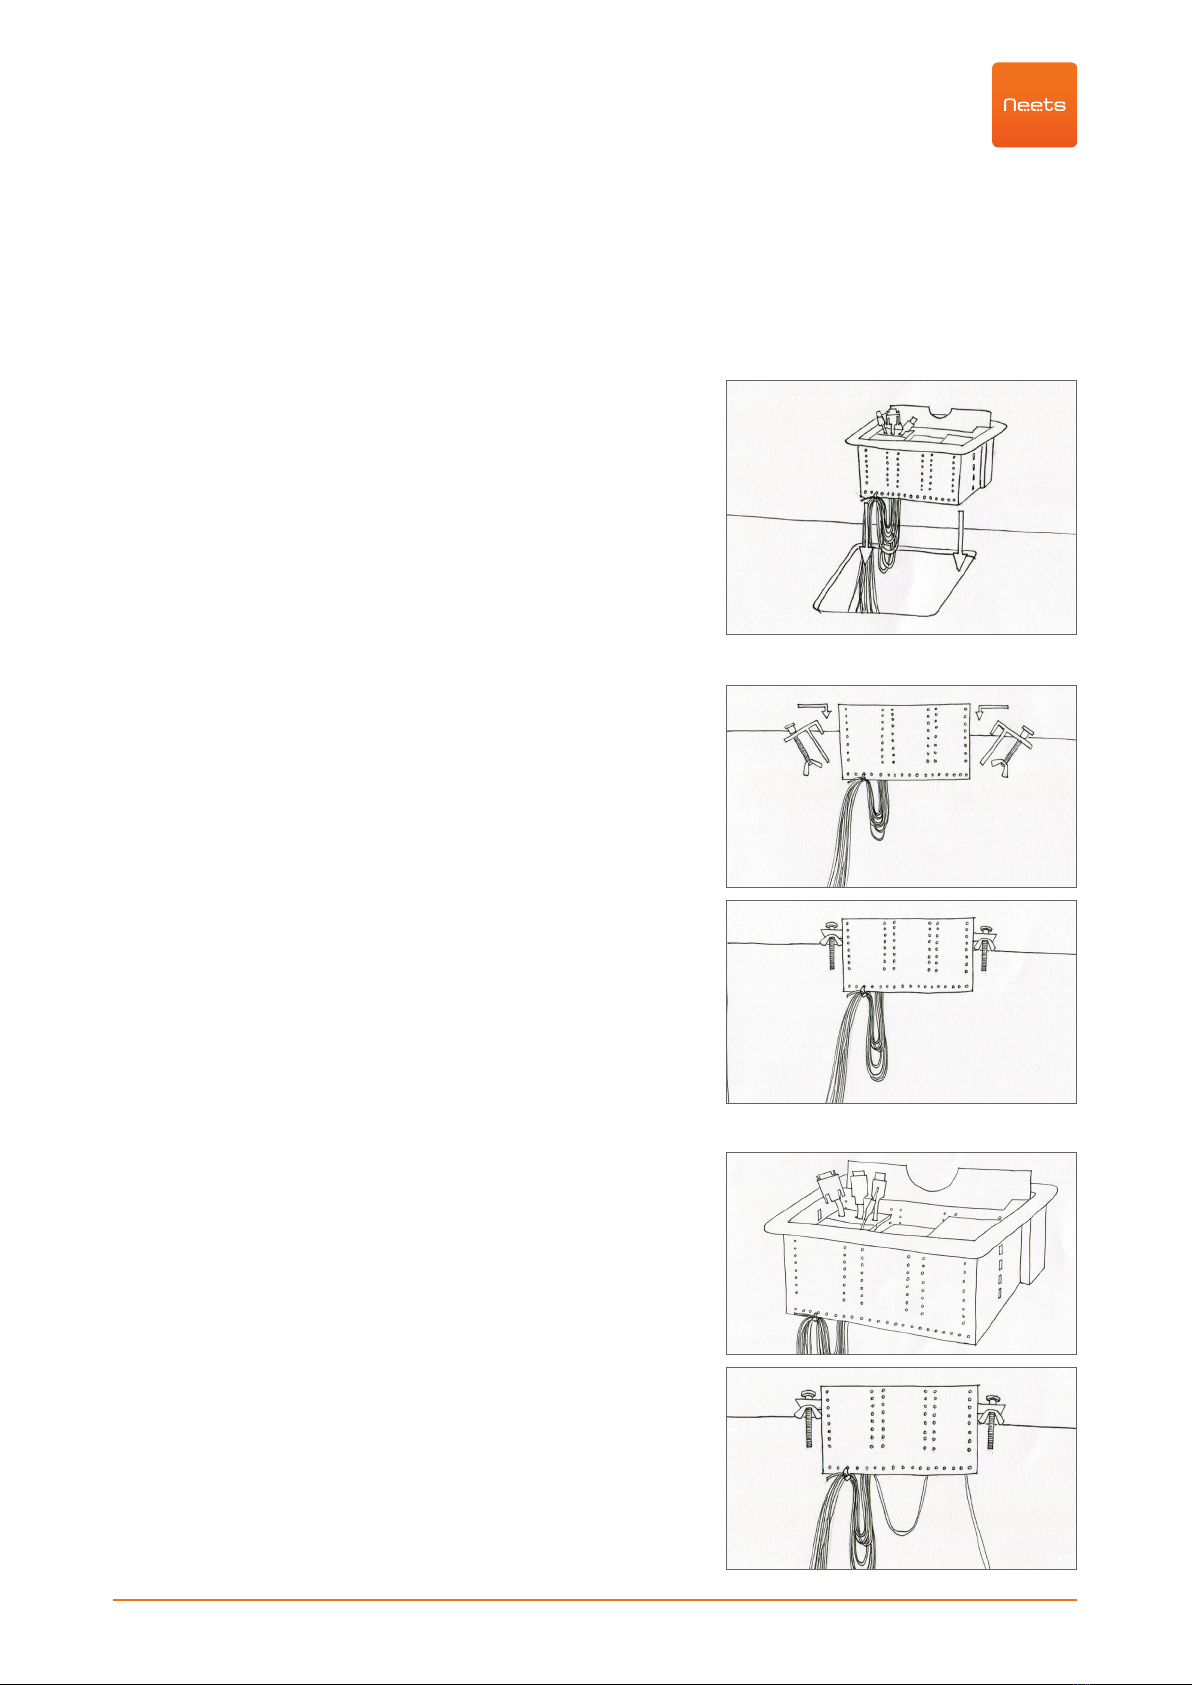
Installation Procedure
Step 1: Prepare opening
Using appropriate tools, cut an opening in the mounting surface
with the dimensions shown on the supplied
cutout template. The template is found in the cardboard box.
Remove the back of the template and stick it on the mounting
surface (also used to protect when cutting).
Cut according to markings using appropriate tools, e.g. a jigsaw.
Step 2: Adjust depth of connector plate
If you need a different depth of the plates inside the box you can
adjust them as here bellow.
Remove the height adjustment screws.
Turn the unit and then remove back cover and the height adjust-
ment screws.
Supporting the connector plate from underneath with your
fingers, bring the connector plate to the required position. Then
replace and tighten the height adjustment screws.
Page 9 of 12
Step 3: Evaluate cable connection procedure/ connect cables
Will it be easier to connect cables to the Neets EasyConnect before mounting it into the tabletop?
YES - then make some or all cable connections before mounting EasyConnect do step 6 and 7 first and then con-
tinue with step 4. NO - then continue with step 4.
Step 4: Insert the unit
Carefully slide the EasyConnect unit into the opening in the
mounting surface.
Step 5: Secure the unit
Working underneath the table surface, place the
mounting brackets into the slots on each side of the unit. Verify
proper alignment before tightening the mounting screws. Turn
screws until the top nut
contacts the mounting surface. Tighten firmly.
NOTICE: maximum thickness of table plate 60 mm
Step 6: Complete cable terminations and connec-
tions
Complete any terminations and connections not done in step 3
above. You can tighten the cables with strips to the lower part of
the EasyConnect.
Page 10 of 12
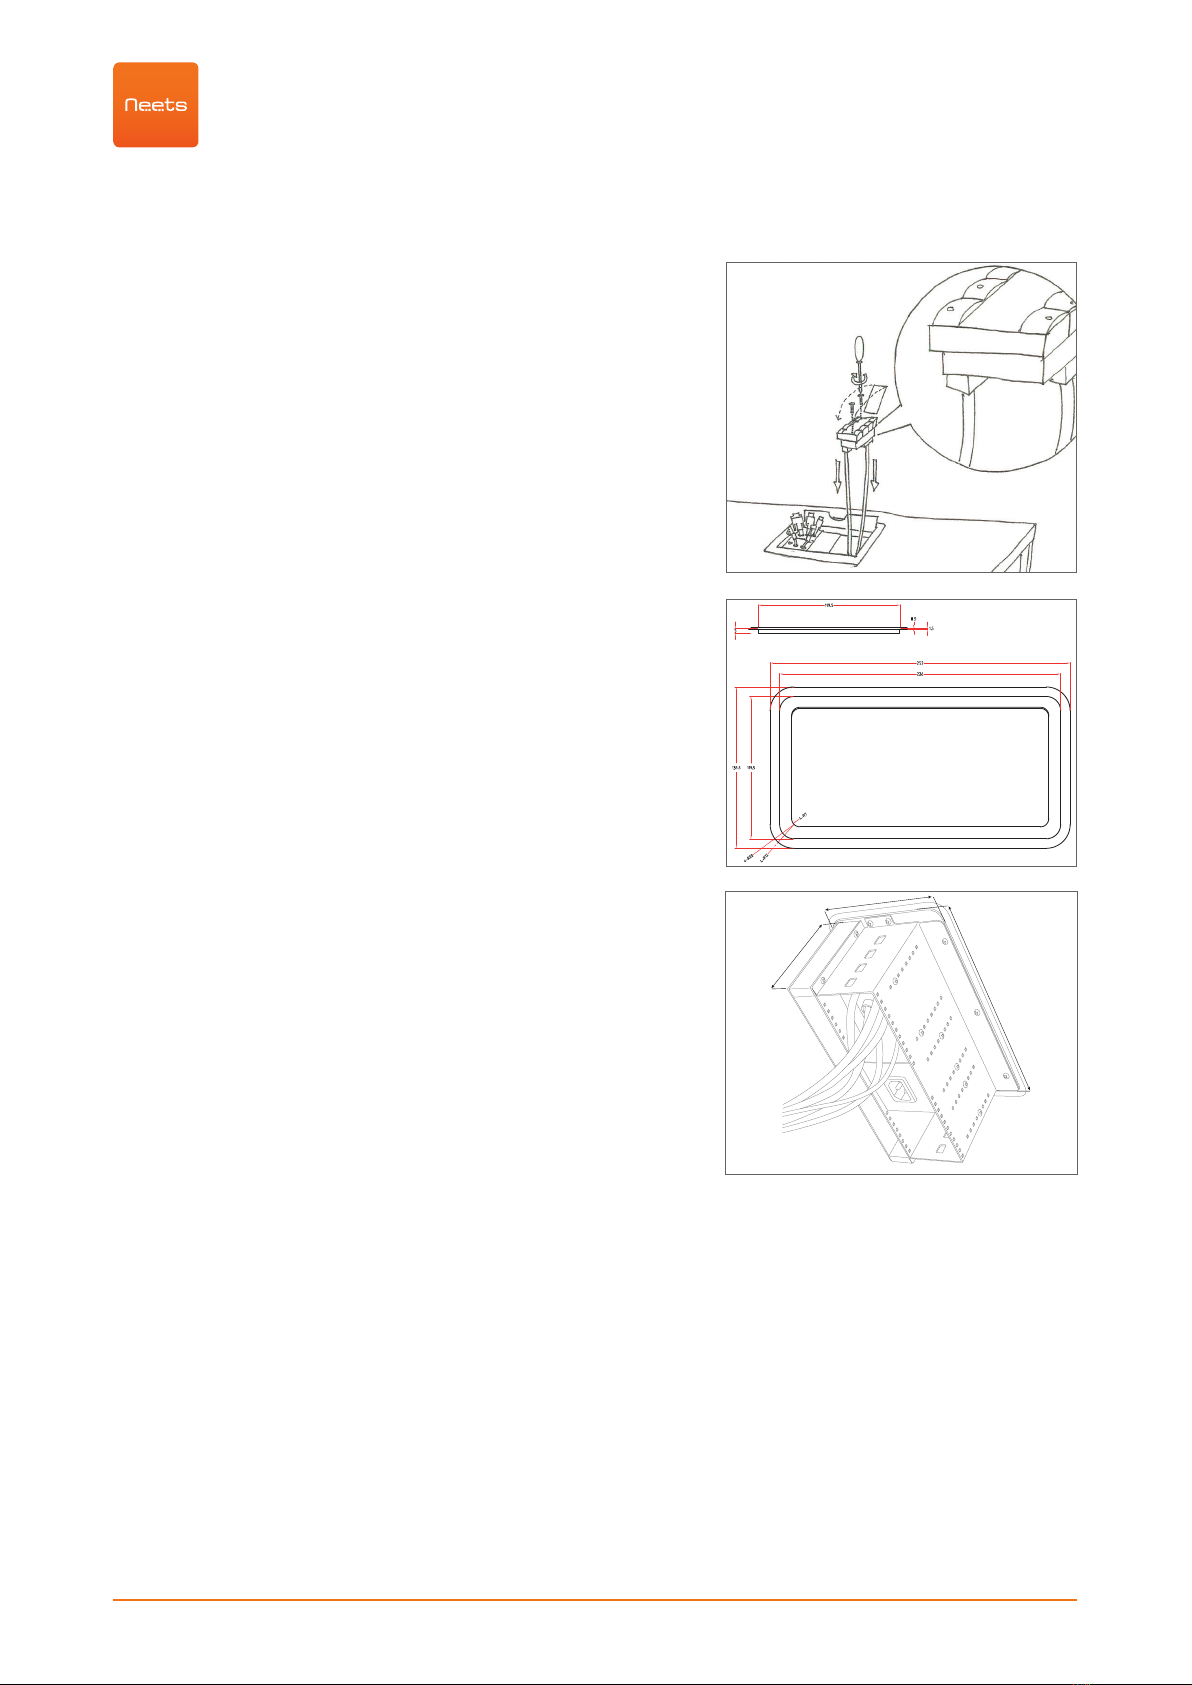
Step 7: Install Neets Control - EcHo or SieRRa II control module
(Power version: skip this step)
Please connect all cables to the used control system (Neets Con-
trol - EcHo, Neets Control - EcHo Plus or Neets Control - SieRRa II)
the 12 Volt DC for the control system is supplied from the Neets
EasyConnect unit. Remember the included (in the cardboard box)
frame for the control system.
Top plate dimensions:
Recessed box dimensions:
Depth: 125 mm
Recessed box dimensions:
Height: 97 mm
Width: 238 mm

Page 11 of 12
Specifications
All Units:
Enclosure type: Metal (steel box with
cast aluminum top and
lid Sliding cover with
cable
pass-through
Default cables: HDMI, VGA, 3,5 mm
audio, USB-A, Cat-5 type
(RJ45)
AC power connector: EU, Universal or DK pow-
er connector
Max power output 10A
Dimensions:
Recessed box:
Width: 235 mm/ 9,25 inches
Depth: 89,5 mm/ 3,52 inches
Height: 103 mm/ 4,05 inches
Top plate:
Width: 252 mm/ 20,7 inches
Depth: 135,5 mm/ 5,3 inches
Height: 1,5 mm/ 0,06 inches
Weight: 2,15 kg
Neets EasyConnect - Power:
Two EU, Universal, DK, or CH power socket
Neets EasyConnect - Control:
Direct access to AV control functions w/ Neets Control
EcHo, Echo Plus or SieRRa II integration.
Direct-out 12V power supply.
Product item numbers:
5009-005 EasyConnect - for Neets Control Keypad,
EU Power Outlet
5009-006 EasyConnect - for Neets Control Keypad,
UNI Power Outlet
5009-007 EasyConnect - for Neets Control Keypad,
DK Power Outlet
5009-020 EasyConnect - for Neets Control Keypad,
CH Power Outlet

Page 12 of 12
Learn more at neets.io
Visit our website neets.io for additional information about the product and the latest firmware.
This manual suits for next models
4
Table of contents


