NEFF B 1342 Series User manual

de Gebrauchsanleitung
en Instructions for use
fr Mode d’emploi
de
en
fr
B 1342 . .

39
Table of contents
Important Information . . . . . . . . . . 40
Packaging and old appliances . . . . . 40
Before installation . . . . . . . . . . . . . . 40
Safety information . . . . . . . . . . . . . . 41
Reasons for damage . . . . . . . . . . . . 42
Your new cooker . . . . . . . . . . . . . . 43
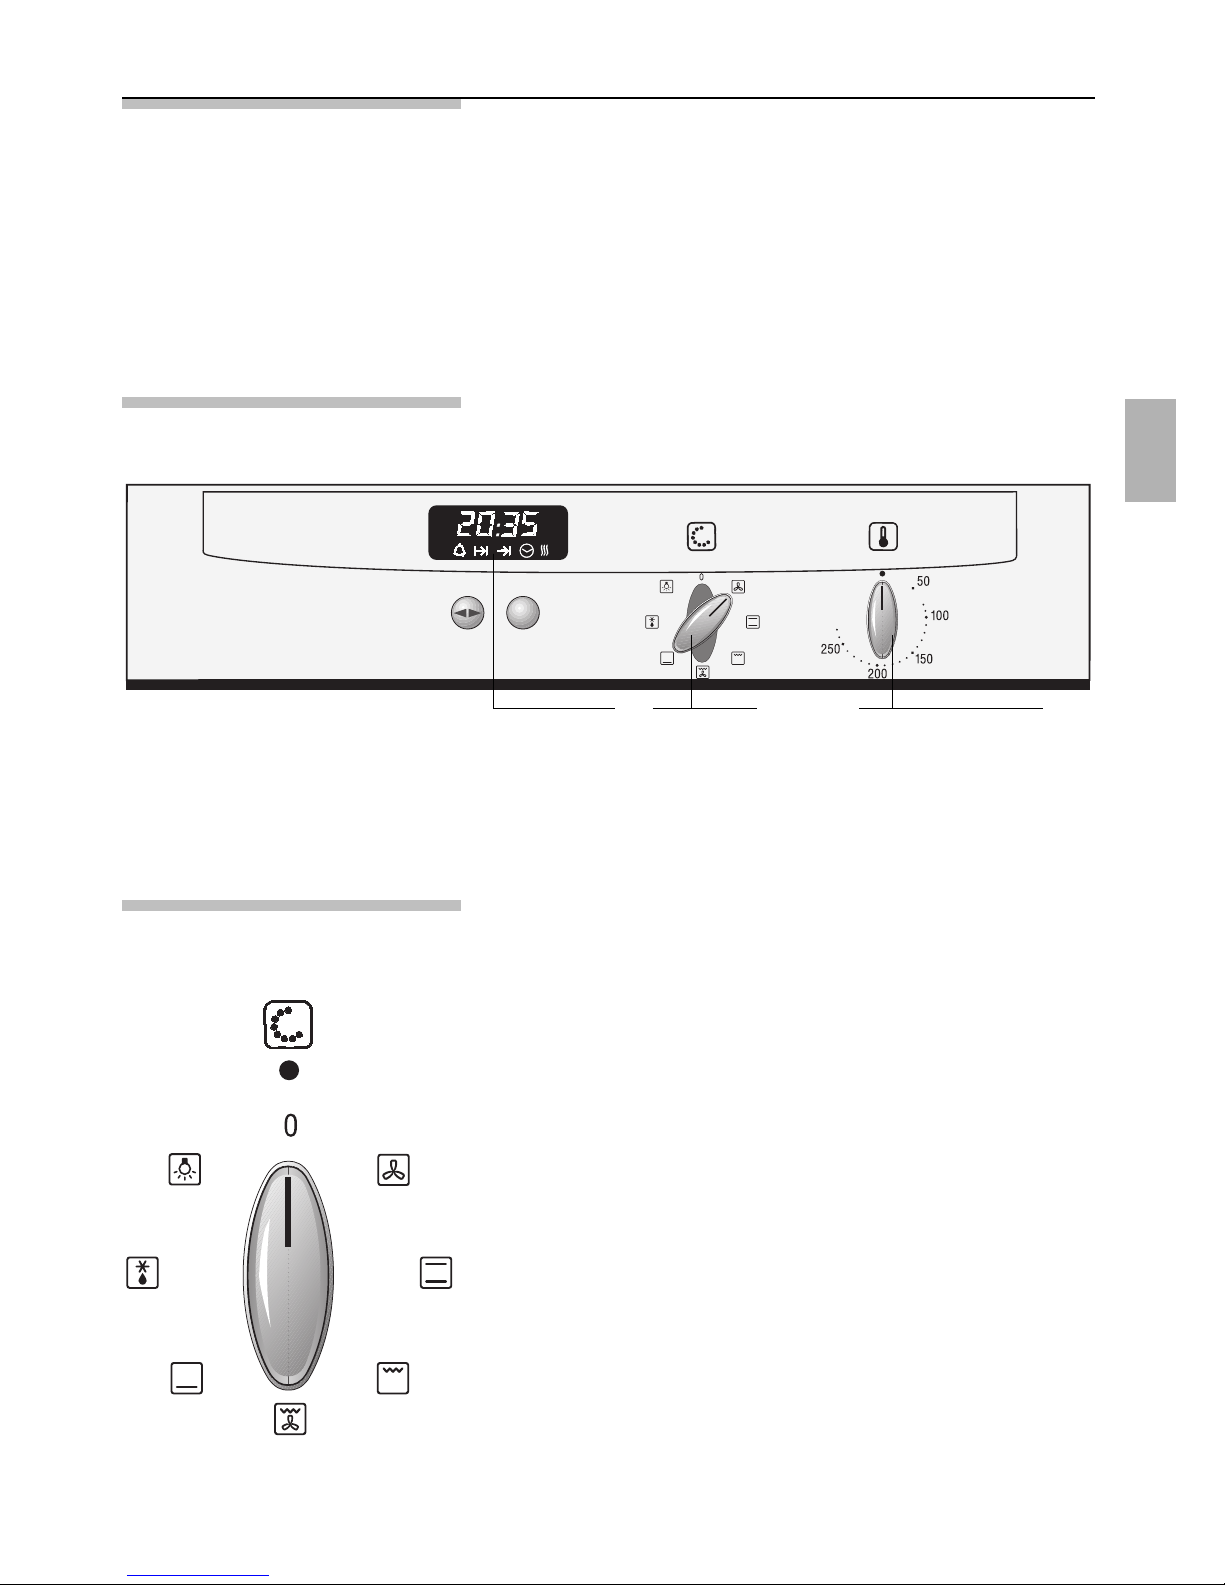
The control panel . . . . . . . . . . . . . . . 43
Function selector . . . . . . . . . . . . . . . 43
Temperature selector . . . . . . . . . . . . 44
Press-down switches . . . . . . . . . . . 44
Slide-in levels . . . . . . . . . . . . . . . . . . 44
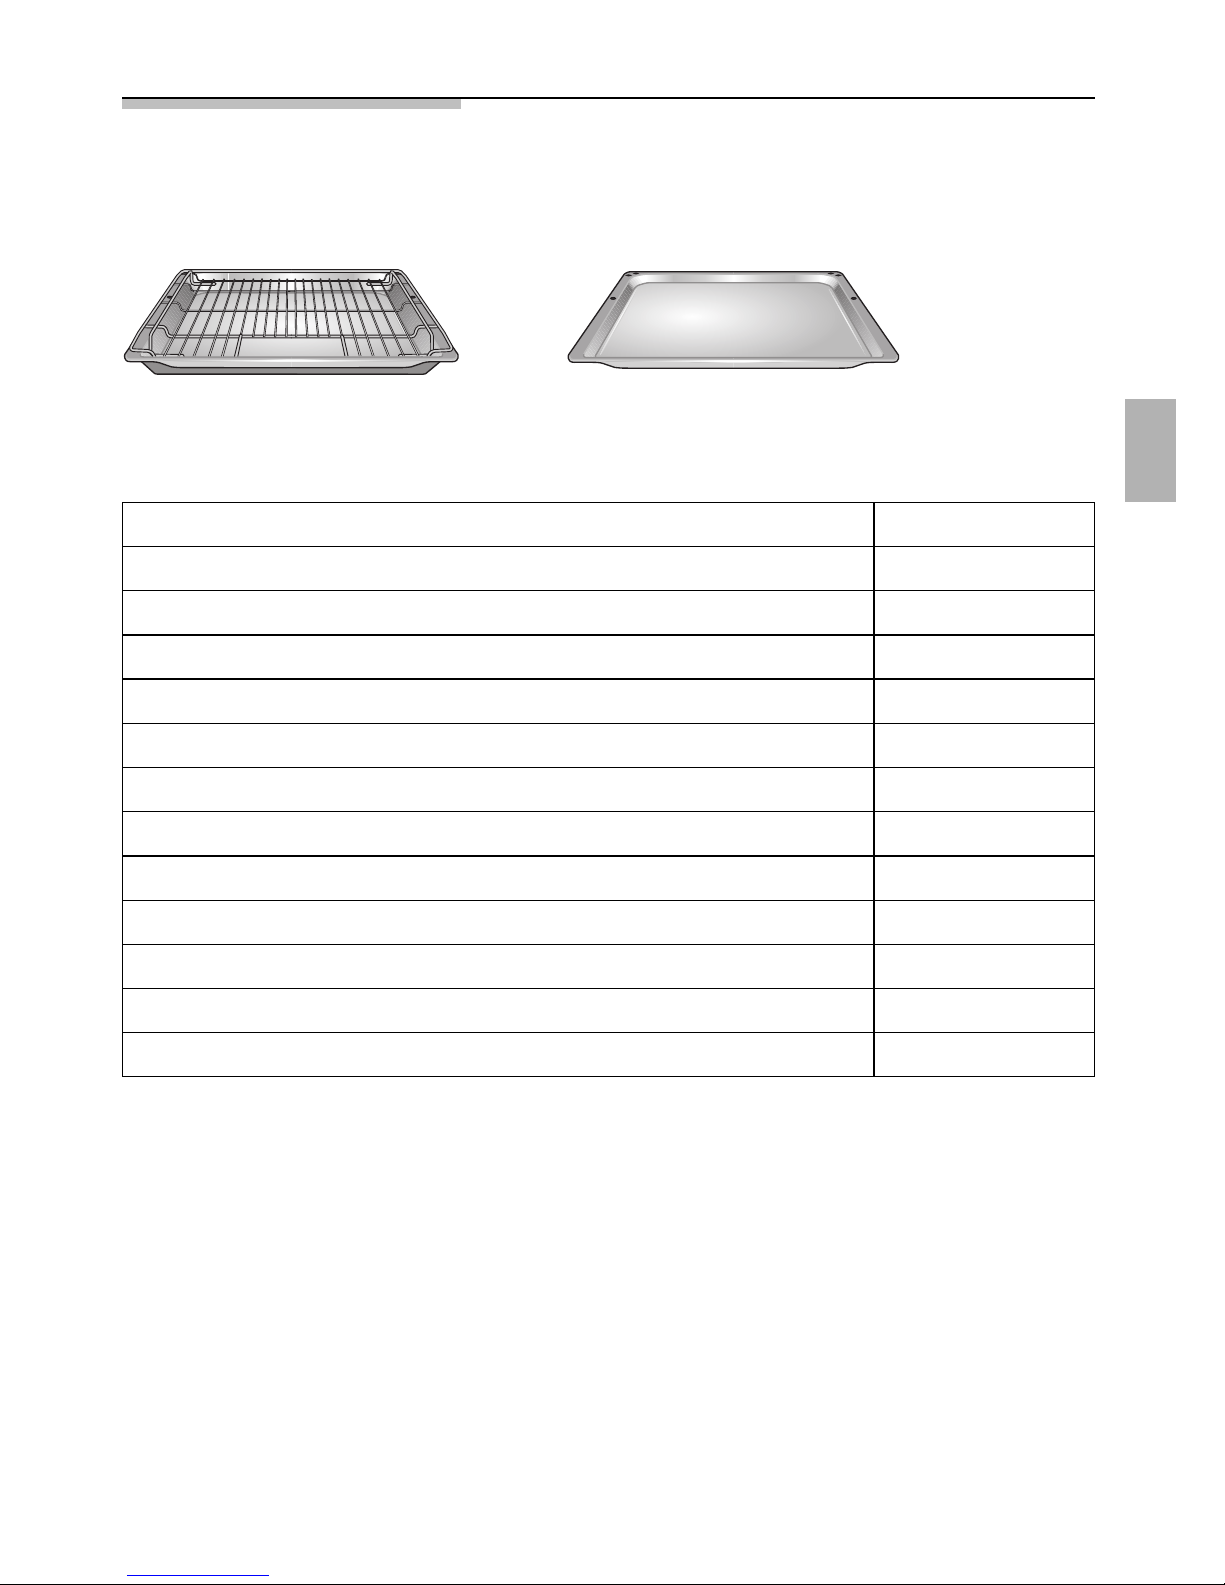
Accessories . . . . . . . . . . . . . . . . . . 45
Before using your Appliance
for the first time . . . . . . . . . . . . . . . 46
Preliminary cleaning . . . . . . . . . . . . . 46
Initial burn-in . . . . . . . . . . . . . . . . . . 46
Time of day . . . . . . . . . . . . . . . . . . . 46
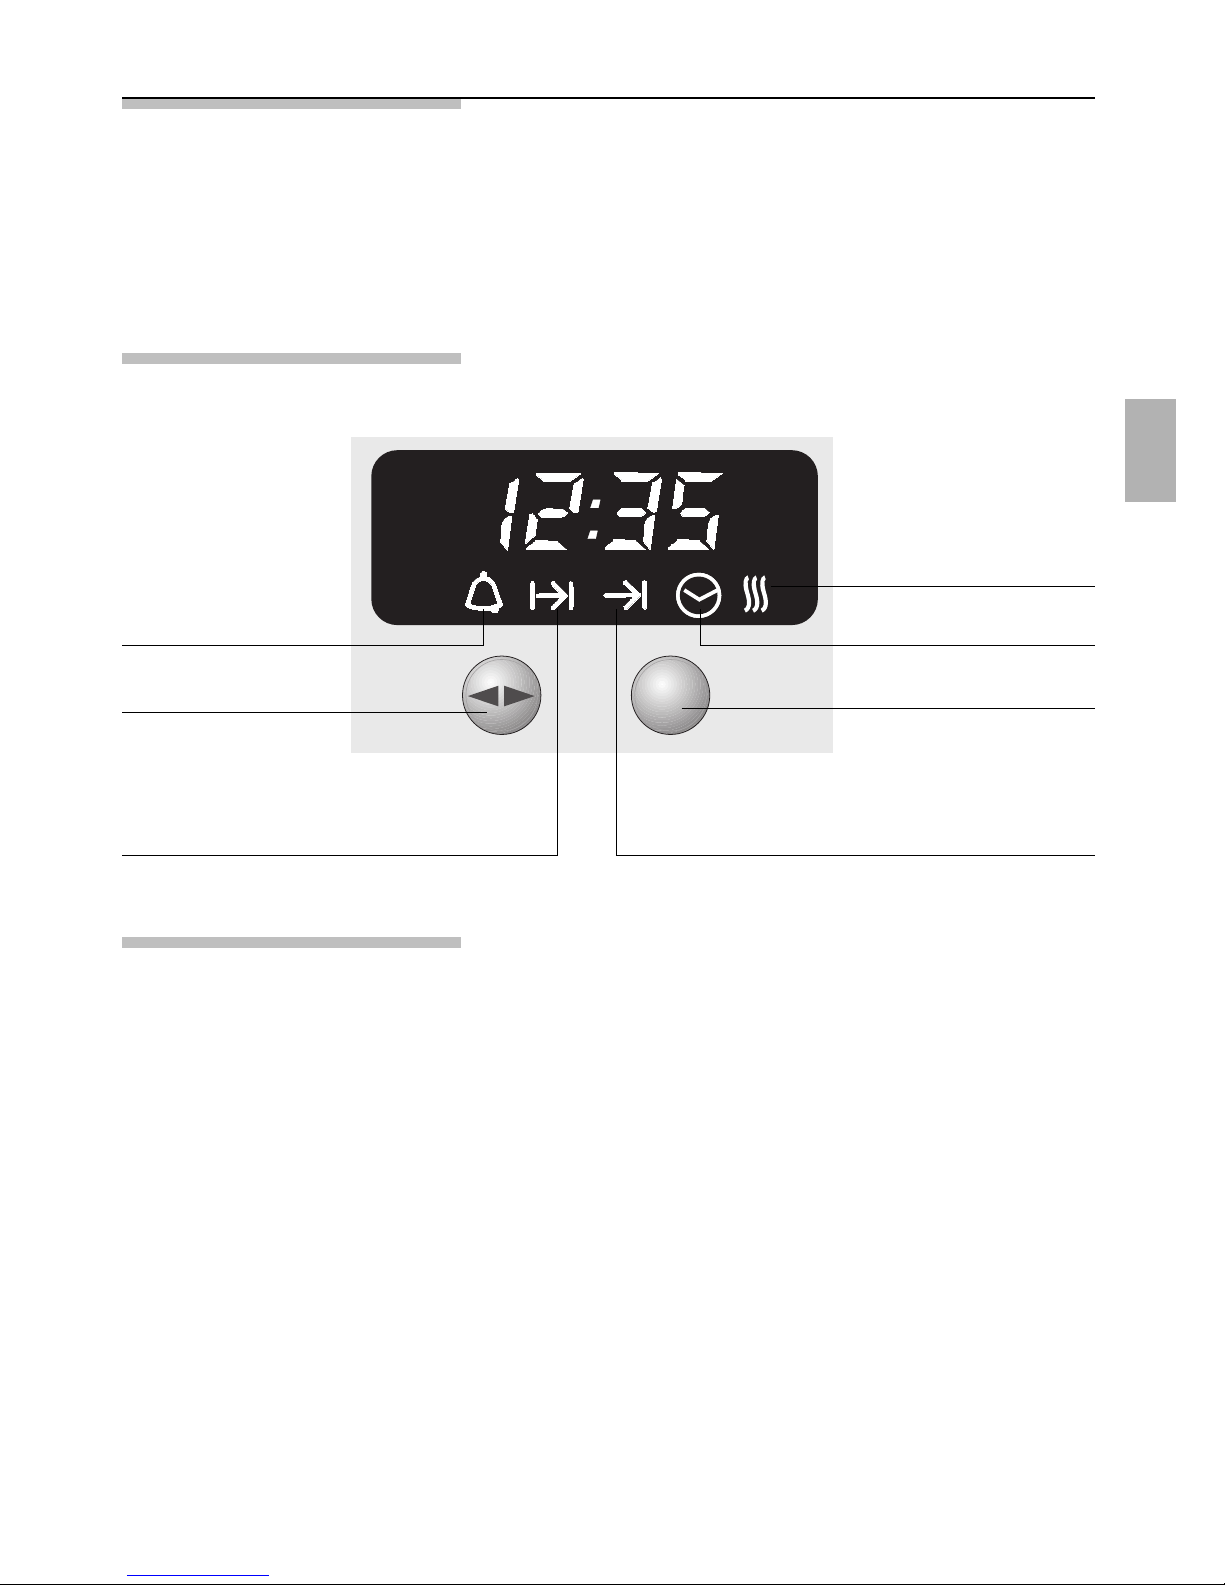
Electronic clock . . . . . . . . . . . . . . . 47
The control panel . . . . . . . . . . . . . . . 47
Special functions . . . . . . . . . . . . . . . 47
Minute timer . . . . . . . . . . . . . . . . . . 48
Automatic timer . . . . . . . . . . . . . . . . 48
Inhaltsverzeichnis
Description of Oven Features . . . . 50
Switching the oven ON and OFF . 52
Rapid heat up . . . . . . . . . . . . . . . . . 52
Baking . . . . . . . . . . . . . . . . . . . . . . 53
Cooking Tips and Helpful Hints . . 54
Roasting . . . . . . . . . . . . . . . . . . . . . 55
Grilling . . . . . . . . . . . . . . . . . . . . . . 57
Combination hot-air/surface grilling . 58
Surface grilling . . . . . . . . . . . . . . . . . 58
Defrosting and Cooking . . . . . . . . 59
Cleaning and Care . . . . . . . . . . . . . 61
Important cleaning basics . . . . . . . . 61
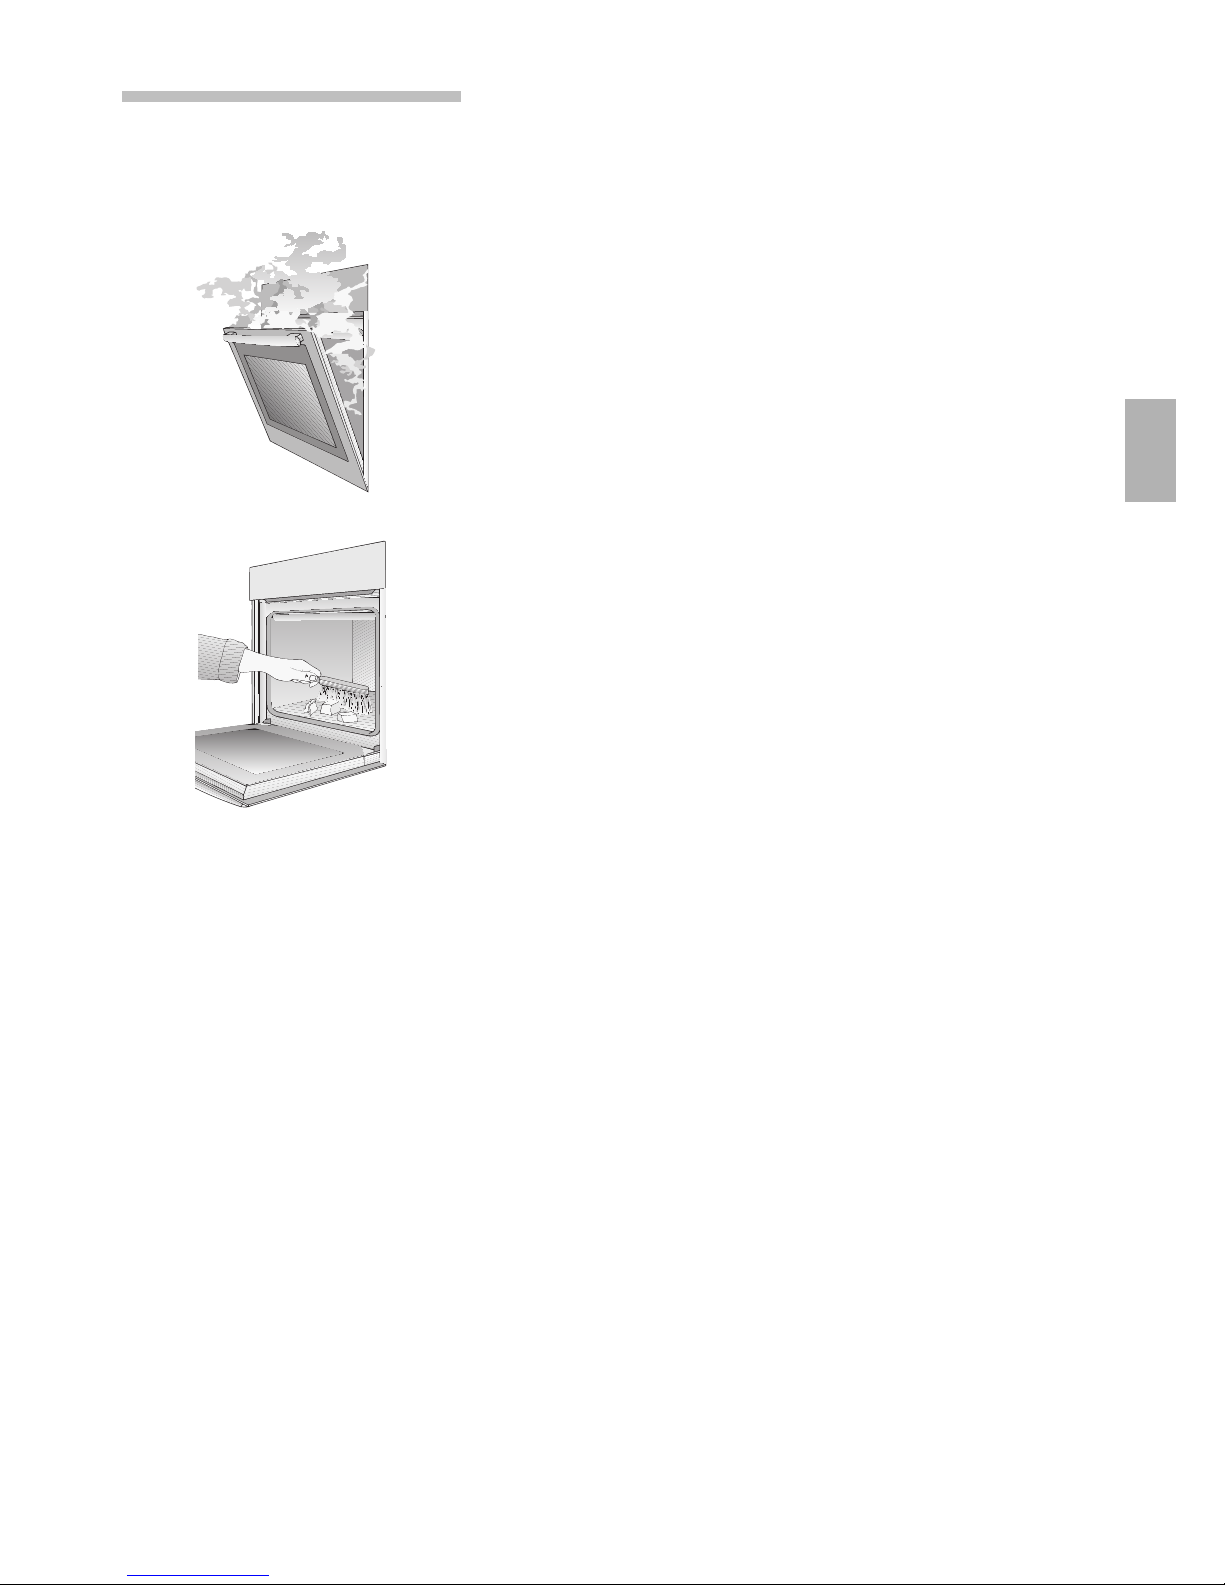
Removing/installing
the oven door . . . . . . . . . . . . . . . . . 63
Inset rack . . . . . . . . . . . . . . . . . . . . 64
Service and Repair information . . 65
Trouble-shooting Guide . . . . . . . . . 66

40
Important information
Before using your new appliance, please read these
Instructions for Use carefully. They contain important
information concerning your Personal safety as well
as on use and care of the appliance.
The Instructions for Use apply to several versions of
this appliance. Accordingly, you may find
descriptions of individual features that do not apply
to your specific appliance.
Please keep the operating and installation
instructions in a safe place; this important
documentation may also be of use to a possible
subsequent owner.
Packaging and Your new appliance was protected by suitable
old appliances packaging while it was on its way to you. All materials
used for this purpose are environmentally friendly and
can be recycled. Please make a contribution to
protecting the environment by disposing of the
packaging appropriately.
Old appliances are not worthless rubbish.
Environmentally-conscious recycling can reclaim
valuable raw materials.
Before disposing of your old appliance, please make
sure that it is unusable, or label it with a sticker
stating „Caution, scrap”.
Up-to-date information on how to dispose of your
old appliance and the packaging from the new one
can be obtained from your retailer or local authority.
Before installation
Transport damage Check the appliance after unpacking it. Do not
connect the appliance if it has been damaged in
transport.
Electrical connection The cooker may only be connected by an approved
specialist. Losses resulting from damage caused by
incorrect connection will invalidate warranty claimes.

41
Safety information This appliance is intended for domestic use only.
Only use the cooker for food preparation.
Hot oven Open the oven door carefully. Hot steam may escape.
Never touch the internal surfaces of the oven or the
heating elements. There is a risk of burning.
Children must be kept at a safe distance from the
appliance.
Never store combustible items in the oven.
Risk of fire. Never place flammable objects onto the
hot plates. Fire hazard!
Never place cables of electronic devices onto the hot
plates.
Never clamp leads of electrical appliances in the hot
oven door. The insulation on the leads could melt.
There is a risk of short-circuiting.
Remove all packaging remnants, e.g. polystyrene
parts, from the oven.
Repairs Incorrectly done repairs are dangerous. There is a
risk of electrocution.
Repairs may only be carried out by after-sales
service technicians who have been fully trained by
BSH.
If there is a fault, switch off the oven fuse at the fuse
box.
Call the after-sales service.

42
Reasons for
damage
Baking sheet or aluminium Do not place baking sheets on the oven floor. Do not
foil on the oven floor line the oven floor with aluminium foil.
This causes heat to accumulate. Baking and roasting
times will no longer be correct and the enamel will be
damaged.
Baking paper If using hot air *, do not place greaseproof paper
loosely in the oven (e.g. when heating the oven).
The hot-air fan could draw in the paper which may
damage the heater and fan.
Water in the oven Never pour water directly into a hot oven.
This could damage the enamel.
Fruit juice When baking very moist fruit cakes, do not put too
much on the baking sheet. Fruit juice dripping from
the baking sheet leaves stains that cannot be
removed.
It is recommended that you use the deeper universal
pan.
Cooling with the oven door Only leave the oven to cool with the door closed. Do
not allow anything to become trapped in the oven
door. Even if you only leave the oven door open
slightly, the fronts of adjacent units may become
damaged over time.
Very dirty oven seal If the oven seal is very dirty, the oven door will no
longer close properly when the oven is in use.
The fronts of adjacent units could be damaged.
Keep the oven seal clean.
Using the oven door as a Do not stand or sit on the oven door.
seat
Care and cleaning Do not use high-pressure cleaners or steam jets.
Hotplates Keep an eye on pressure cookers during the heat-up
phase. As soon as the proper cooking pressure is
reached, reduce the heat setting.
Please observe the separate operating instructions
that came with your hob.

43
Your new cooker
Here you will learn more about your new oven. The
control panel and its switches and indicators are
explained here. The heating modes and the
accessories included with your oven will be
explained here.
The control panel
Function selector Use the function selector to select the type of
heating for the oven.
Settings
*
Hot-air
/
Top/bottom heat (conventional heating system)
)
Surface grilling
,
Combination hot-air/surface grilling
.
Bottom heat
e
Defrosting position
$
Oven light
Function
selector
Temperature selector
with control lamp
Electronic
clock

44
Temperature selector
Settings
50 –275
Temperature in °C.
Press-down To engage and disengage, depress the switch,
switches making sure that it is in OFF position.
Slide-in levels Your oven features 4 slide-in levels. The slide-in
levels are counted from bottom to top.
The numbers are marked in the oven.
When usung hot-air baking *or roasting, do not
use slide-in level »2«, in order not to block air
circulation.

45
Accessories Your appliance is supplied with:
Universal pan with grid Baking tray, aluminium
The following accessories can be obtained from a
specialist dealer: Order no.
Note:
The baking tray or universal pan may distort while the oven is operating. This is cau-
sed by major temperature differences on the utensil. These differences may occur if
only one part of the utensil was covered or if deep-frozen food, e.g. pizza, was placed
on the utensil.
The distortion will already subside again during baking, roasting or grilling.
Universal pan, non-stick
Soufflé pan
Baking tray, aluminium
Baking tray, enamelled
Baking tray, non-stick
Wire shelf, high/low
Wire shelf, dose mesh
Roasting tray
Upgrade set Clou, 3 pieces
Upgrade set Clou, 4 pieces
System steamer
Pizza stone
Universal pan Z 1232 X0
Z 1233 X0
Z 1272 X0
Z 1332 X0
Z 1342 X0
Z 1343 X0
Z 1432 X0
Z 1442 X0
Z 1512 X0
Z 1742 X0
Z 1752 X0
N 8642 X0
Z 1912 X0

46
Before using your appliance
for the first time
Preliminary Ta ke the accessories out of the oven.
cleaning Remove all packaging remnants, e.g. polystyrene
parts, from the oven.
1. Clean the appliance exterior with a soft
moistened cloth.
2. Clean the oven and the accessories with a hot
detergent solution.
Please observe the operating instructions
furnished with the hob.
Initial burn-in Heat the empty oven for approx. 30 minutes.
Select top and bottom heat at a setting of 240° C.
During the initial burn-in phase, please open the
kitchen windows to dissipate unpleasant odours.
Time of day Before using the appliance for the first time, you
must set the current time on the electronic clock.
Setting the time After connecting to the mains, or after a power
failure, the display 0:00 will blink.
Press the >button and set the current time with
the rotary knob (e.g. 15:00 Uhr).
To correct the time, press the >button until the
symbol flashes.
Then set the time.
Note: The time cannot be corrected if an automatic
function has been set (see Electronic clock for
cancelling automatic function).

47
Electronic clock
The electronic clock can be operated with one hand;
after pressing the button, set the time with the rotary
knob. Settings can be made for as long as the
function display flashes (~4 seconds).
The control panel
Minute timer
ON time OFF time
Rotary knob
To engage and
disengage, depress
gently
Time of day
Rapid heat up
Function selector
Special functions
Masking out the display 1. Press the >button for 7 seconds.
The display then goes blank and the time
continues running in the background.
2. To switch on the display, briefly press the
>button.
Rapid heating Rapid heating scan be set with the clock
(see section ”Switching the oven on and off”).
Setting the time See section ”Before using your appliance for the first
time”.
Dimming the display Between 22.00 and 6.00 the display is automatically
dimmed.

48
Automatic timer You can switch the oven on and off via the electronic
clock.
Automatic switch off If you wish to bake or roast food immediately, it is
only necessary to set the ON time.
1. Select the heating system and the oven
temperature.
2. Press the >button until the ?
symbol flashes and set the ON time with the
rotary knob (example: 1hour and 30 minutes).
When the setting has been made, the current
time is displayed after approx. 4 seconds.
The ?symbol signals automatic mode.
3. When the time has elapsed (example: 1hour and
30 minutes), a signal is emitted and the !
display flashes.
The oven switches off automatically.
To stop the signal, press the >button.
4. Switch the oven off.
5. To end automatic mode, press the >button
again.
Minute timer 1. Press the >button and set the cooking time
(e.g. 5minutes).
When the timer switches on, the remaining time
is displayed.
2. When the time has elapsed, a signal is emitted
and the ,symbol flashes. To stop the signal,
press the >button.

49
Automatic switch on and If the food is to be baked or roasted later on, both
switch off the ON time and OFF time must be set.
1. Select the heating system and the oven
temperature.
2. Press the >button until the ?
symbol flashes and set the ON time with the
rotary knob (example: 1hour and 30 minutes).
3. Press the >button until the !symbol flashes
and set the OFF time with the rotary knob
(example: 12:30).
When the setting has been made, the current
time is displayed after approx. 4 seconds.
The !symbol signals automatic mode.
4. The oven is automatically switched on and off at
the preset times (e.g. 11:00 and 12:30).
5. When the time has elapsed, a signal is emitted
and the !symbol flashes. To stop the signal,
press the >button.
6. Switch the oven off.
7. To end automatic mode, press the >button.
Checking, correcting and 1. To check your settings, press the >button
cancelling settings until the symbol flashes.
2. If required, correct the settings with the rotary
knob.
3. If you want to cancel your settings, turn the set
time back to 0:00 and switch the oven off.
Note The automatic timer is best used with dishes which
require little attention.
The minute timer and OFF time can be pre-
programmed up to a max. 24 hours.
The settings can be displayed at any time by
pressing the >button.

50
Description of Oven Features
Hot-air circulation A fan system located in the rear oven wall circulates
the hot air in the oven, achieving an especially
effective heat transfer to the food being baked or
roasted.
Advantages:
–Simultaneous baking and roasting possible on up
to 3 levels
–low soiling of oven inferior
–shorter preheating times
–low oven temperatures
–gentile defrosting
Top and bottom heat The food being baked or roasted is exposed to heat
(Conventional heating system) radiation from heating elements located at the top
and bottom of the oven cavity.
Baking and roasting is possible on one slide-in level
only.
Advantages:
–Baking of cake with moist filling, pizza, quiche.
Surface grilling The food being prepared is exposed to heat radiation
from the heating element at the top of the oven
cavity.
Advantages:
–Particularly effective with flat, small cuts of meat,
i.e., steaks, sausages, fish, vegetables and toast.
*
/
)

51
Combination hot-air/ With combination hot-air/surface grilling, the air
surface grilling circulating fan and the grilling radiators are activated
in alternation.
The heat generated by the grilling radiator is evenly
distributed in the oven cavity.
Advantage:
–Particularly effective with poultry and larger cuts
of meal.
Bottom heat With this setting, only the heating element at the
bottom of the oven cavity is activated.
Advantage:
–Particularly useful with dishes and baked goods
that require a distinctive bottom crust or browning.
Use just before the end of the baking or roasting
time.
Defrost A fan in the rear wall of the oven circulates the air in
the oven around the frozen food.
The fan system is running without heating.
Advantages:
–Gentle defrosting.
–Frozen pieces of meat, poultry, bread and cakes
defrost evenly.
Rapid heat up Note
can be switched on with hot air.
,
.
e
s

52
Switching the Oven ON and OFF
Before switching on your oven, you should decide
which heating system you wish to use.
Switching the oven ON:
1. Use the function selector to determine the
desired system.
2. Set the temperature control knob to the desired
temperature.
The selected temperature will be controlled
automatically.
The oven temperature control lamp illuminates when
the oven is first switched on, and extinguishes when
the required temperature has been reached.
Switching the oven OFF:
To switch the oven OFF, turn both the temperature
selector and functions selector to the »0« position.
Notes:
The appliance features a cooling fan which runs until
the oven has cooled down.
Rapid heat up Switching the oven ON:
When the oven has been switched on, rapid heating
scan be switched on with hot air via the clock.
Press the >button until the ssymbol flashes.
After approx. 4 seconds rapid heat up sswitches
on. The ssymbol is lit during the heating-up
process. When the set temperature is reached, the
symbol goes out and a signal sounds.
Early cancelling:
Press the button >until the icon sappears.
Then cancel the rapid heating using the control
knob.

53
Baking
Using baking tins Always place baking tins in the centre of the
baking grill.
We recommend dark metallic baking tins.
Using baking sheets The slanted (handle) end of the baking sheet must
always face the oven door.
Always fully insert baking sheets into the oven.
Use only original baking sheets.
Notes You can influence the degree of browning by
changing the temperature setting.
Light coloured baking tins made from thin-wall
materials lead to longer baking times and uneven
browning of the cake.
If a cake collapses after removing it from the oven,
consider using a longer baking time, or use a slightly
lower temperature setting.
Using tinplate baking tins *Hot air Shelf position 1
/Top/bottom heat Shelf position 1
If the cake bottom gets too dark:
Check the slide-in level. Shorten the baking time,
and possibly use a lower baking temperature.
If the cake bottom stays too light:
Check the slide-in level. Increase the baking time,
select a lower temperature, or use a dark metal
baking tin.
Do not place baking forms or high cakes too close
to the rear oven wall.

54
Cooking Tips and Helpful Hints
The bottom of a cake baked Remove from the oven all baking sheets or universal
on a baking sheet stays too baking pan currently not in use.
light
The bottom of a cake baked Use a grill and not a baking sheet to support the
in a tin stays too light cake tin during baking.
The bottom of cake or Set cake or cookies into a higher set of slide-in
cookies gets too dark levels.
The cake gets too dry Select a slightly higher oven temperature, and shorter
baking time.
The cake is too moist Choose a slightly lower baking temperature.
on the inside Note: Higher temperatures do not shorten baking
times (done on the outside, raw on the inside).
Choose a slightly longer baking time, allow the dough
to rise slightly longer. Add less liquid to the dough.
When baked with hot-air Avoid blocking the air vents at the rear wall of the
circulation, cake baked in oven cavity with the cake tins.
round or square tins gets
too dark at the rear
Very moist cake dough (e.g. You can let the steam escape from the oven and
fruit cake) causes a lot of thereby reduce the forming of water droplets by
steam to generate in the briefly and carefully opening the oven door (once or
oven that condenses on the twice, in case of longer baking times more often).
oven door.
Very uneven browning when Check the slide-in level.
using hot air circulation
Cake collapses when taken Use less liquid.
out of the oven
To save energy Preheat only if expressly required by the recipe.
Dark baking tins have a higher degree of heat
absorption.
Residual heat: In the case of longer baking times,
you can switch off the oven 5-10 minutes before the
full baking time has elapsed.

55
Roasting Place the grill into the universal baking pan
and slide them together into the same slide-in
level.
Meat can be roasted in the oven in a particularly
economical fashion if the weight of the cut exceeds
750 grams.
Roasting in an uncovered Rinse the universal baking pan and/or the roaster
pot with water, and place the meat into it.
With fat meat and poultry, pour 125 to 250 ml of
water (to suit the size and kind of roast) into the
universal pan. At your discretion, baste lean meat
with fat, or cover it with bacon strips.
The roast drippings collecting in the universal pan
make a tasty gravy. Dissolve the drippings with hot
water, bring to a boil, thicken with corn starch,
season to taste and, if required, pass it through a
strainer.
No preheating is required. Save energy by putting
the roast into the oven while it is still cold.
Roasting in a covered pot Place the meat into the roasting pot (or Dutch oven),
cover it with a matching lid, and place it on the grill
in the oven. We recommend that beaf roast be
prepared in a covered roasting pot.
Roasting on the roasting
sheet
(Optional accessory available
from your dealer). Place the roasting sheet into the universal pan.
The roasting sheet prevents soiling of the oven.
Grease and juice drippings from the roast are
collected in the universal pan.
To render your roast more crispy when using the
roasting sheet, you may wish to set a slightly higher
temperature than indicated in the roasting table.

56
Tips Big, high roasts, goose, turkey, duck
= Long roasting times, low temperatures
Medium sized, low roasts
= Medium roasting times, medium temperatures
Small, flat roasts
= Short roasting times, high temperatures
Roasting time per cm of meat height without bones
app. 13-15 minutes
Roasting time per cm of meat height with bones
app. 15-18 minutes
We recommend using the lower of the stated
temperatures first.
In general, the lower temperature ensures a more
even browning.
We recommend turning the roast after half or two
thirds of the roasting time have elapsed when using
the setting /.
For roasting, use only cookware with oven-proof
handles.
Prepare large roast directly in the universal pan,
without using the grill.
Smaller cuts of roast can be roasted on aluminium
foil. To do so, bend the edges of the foil upward, as
if to form a dish, and place it on the grill.
After the end of the selected roasting time and with
the oven switched OFF, leave the roast in the closed
oven for approx. 10 minutes.
The roast is not done on Use a lower roasting temperature.
the inside Note: Higher temperatures do not shorten roasting
times (done on the outside, raw on the inside).
Choose slightly longer roasting times.
Very moist roasts (e.g. roasts You can let the steam escape from the oven and
prepared with water) cause a thereby reduce the forming of water droplets by
lot of steam to generate in briefly and carefully opening the oven door (once or
the oven that condenses on twice, in case of longer roasting times more often).
the oven door.

57
Grilling Exercise CAUTION when grilling.
Always keep children at a safe distance.
Notes on grilling Always close the oven door when grilling.
The grilling temperatures are variable.
Always use the grill and the universal pan.
Always place food to be grilled in the centre of the
wire grill.
If the grilling radiator (heating element) switches OFF
automatically, the overheating protection was
activated.
The radiator will be reactivated after a short period
of time.
Place the grill into the universal baking pan and
slide them together into the same slide-in level.
This manual suits for next models
2
Table of contents
Other NEFF Oven manuals

NEFF
NEFF B57VS22G1 User manual

NEFF
NEFF B 1554 Series User manual

NEFF
NEFF U14M42S0GB - annexe 1 User manual

NEFF
NEFF B55CR22.0B User manual

NEFF
NEFF C47C42S0 User manual

NEFF
NEFF C28CT26 0B Series User manual

NEFF
NEFF B4780N0 User manual

NEFF
NEFF B45E52.3GB User manual

NEFF
NEFF B57CS22 0 Series User manual

NEFF
NEFF C47D42.0 User manual

NEFF
NEFF B3CCC0A 0B Series User manual

NEFF
NEFF U1744 User manual

NEFF
NEFF B57CR22.0B User manual

NEFF
NEFF B17VR22N1 User manual

NEFF
NEFF M271ES - annexe 3 User manual

NEFF
NEFF B88VT38 0B Series User manual

NEFF
NEFF B57CR25 0 Series User manual

NEFF
NEFF B3ACE0A 0B Series User manual

NEFF
NEFF U14M42W3GB User manual

NEFF
NEFF B1428C2GB Safety guide