NEFF E35K22.0 User manual

2
ÚTable of contents
[en]Instructionmanual
Safety precautions..................................................................... 2
Before installation ...............................................................................2
Safety notes .........................................................................................2
Causes of damage .............................................................................3
Energy and environment tips ................................................... 3
Saving energy......................................................................................3
Environmentally-friendly disposal.....................................................3
Your new appliance ................................................................... 3
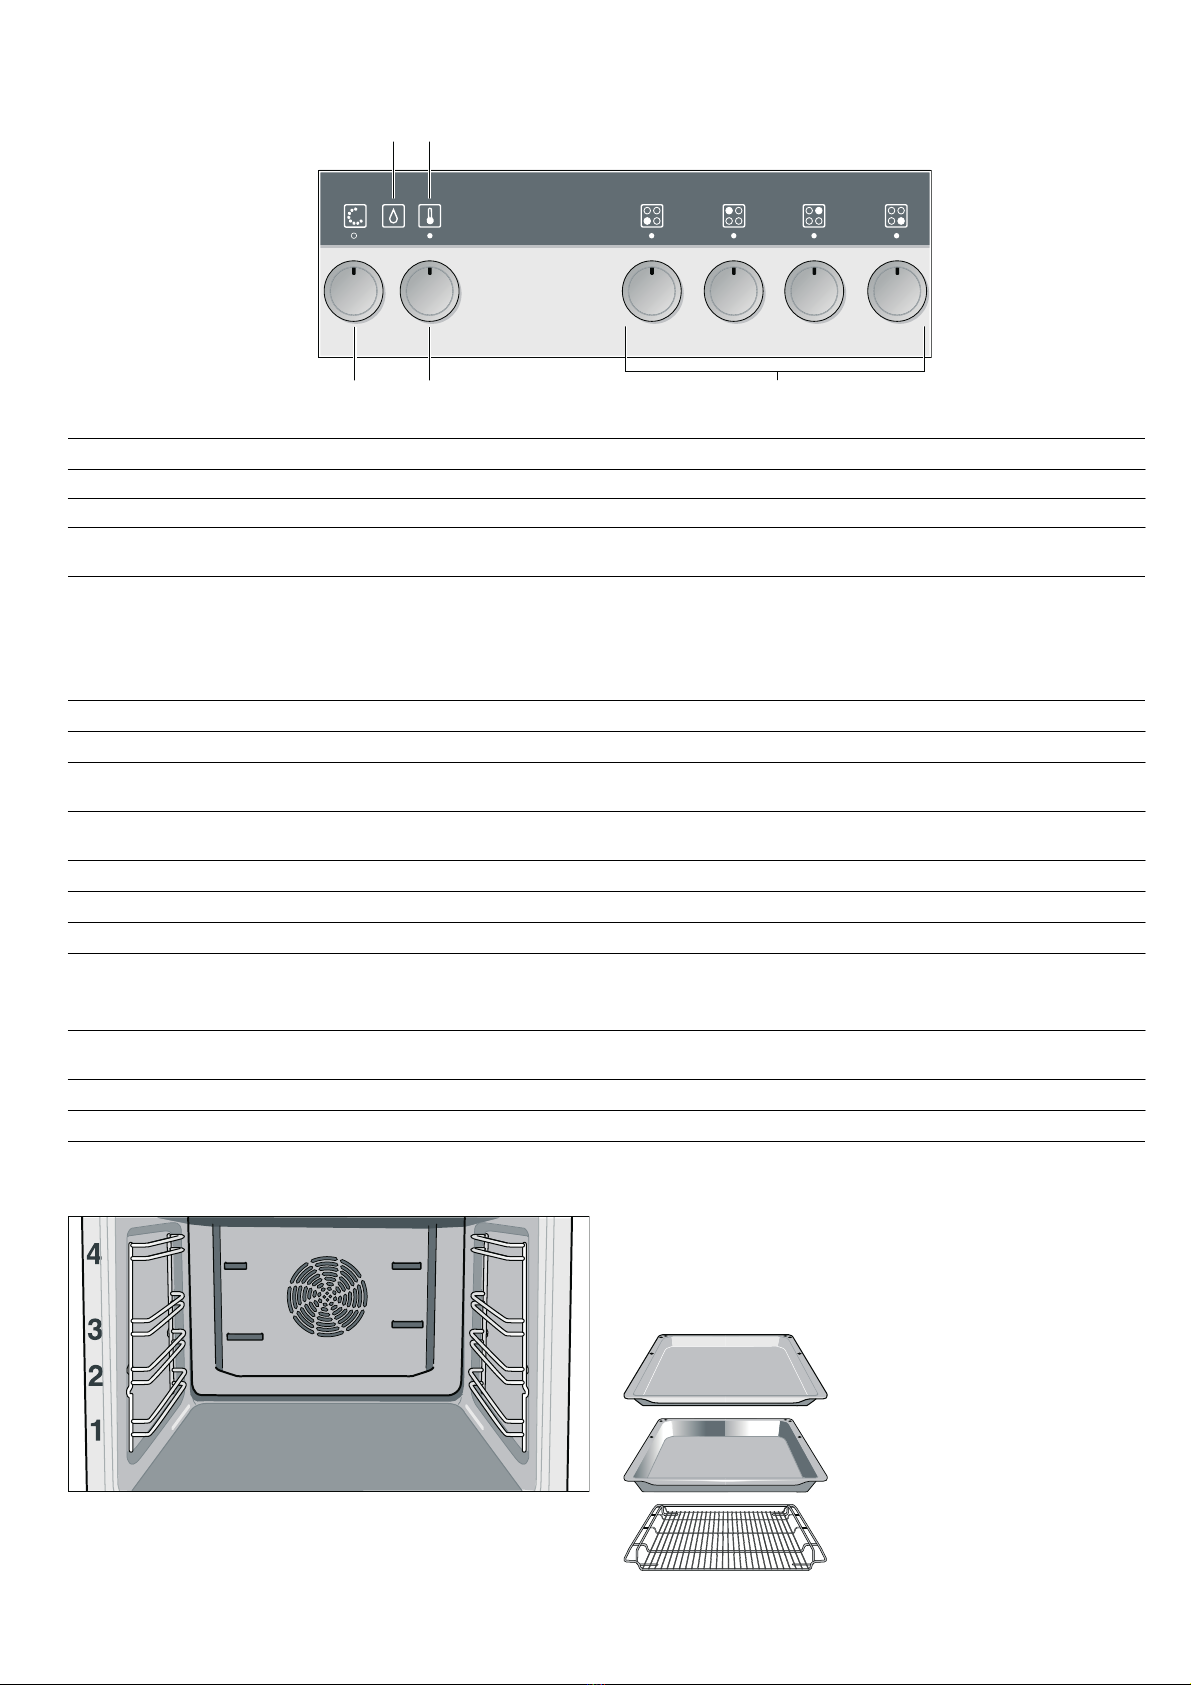
Control panel .......................................................................................4
Operating modes................................................................................4
Shelf positions .....................................................................................4
Accessories .........................................................................................4
Before using the appliance for the first time........................... 5
Operating the appliance............................................................ 5
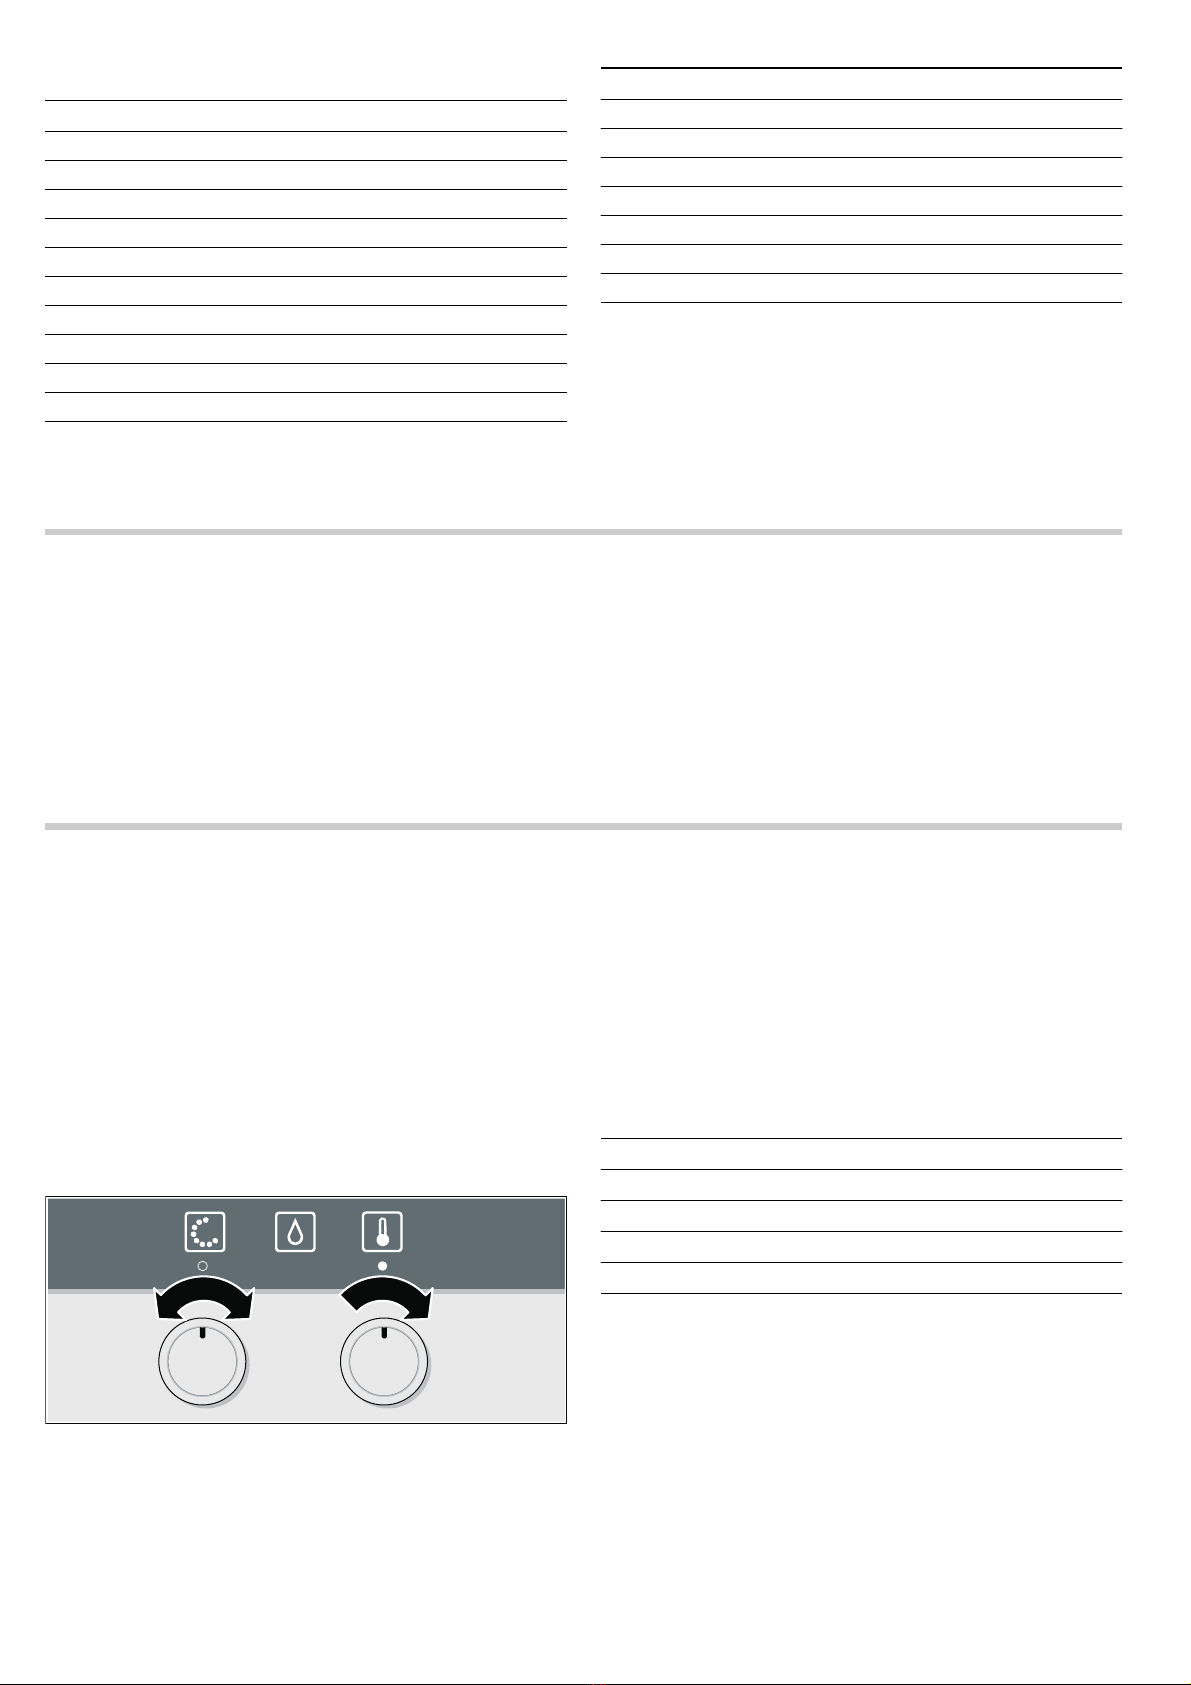
Switching on the appliance...............................................................5
Switching off the appliance...............................................................5
Switching the gas hob on and off....................................................5
Baking......................................................................................... 6
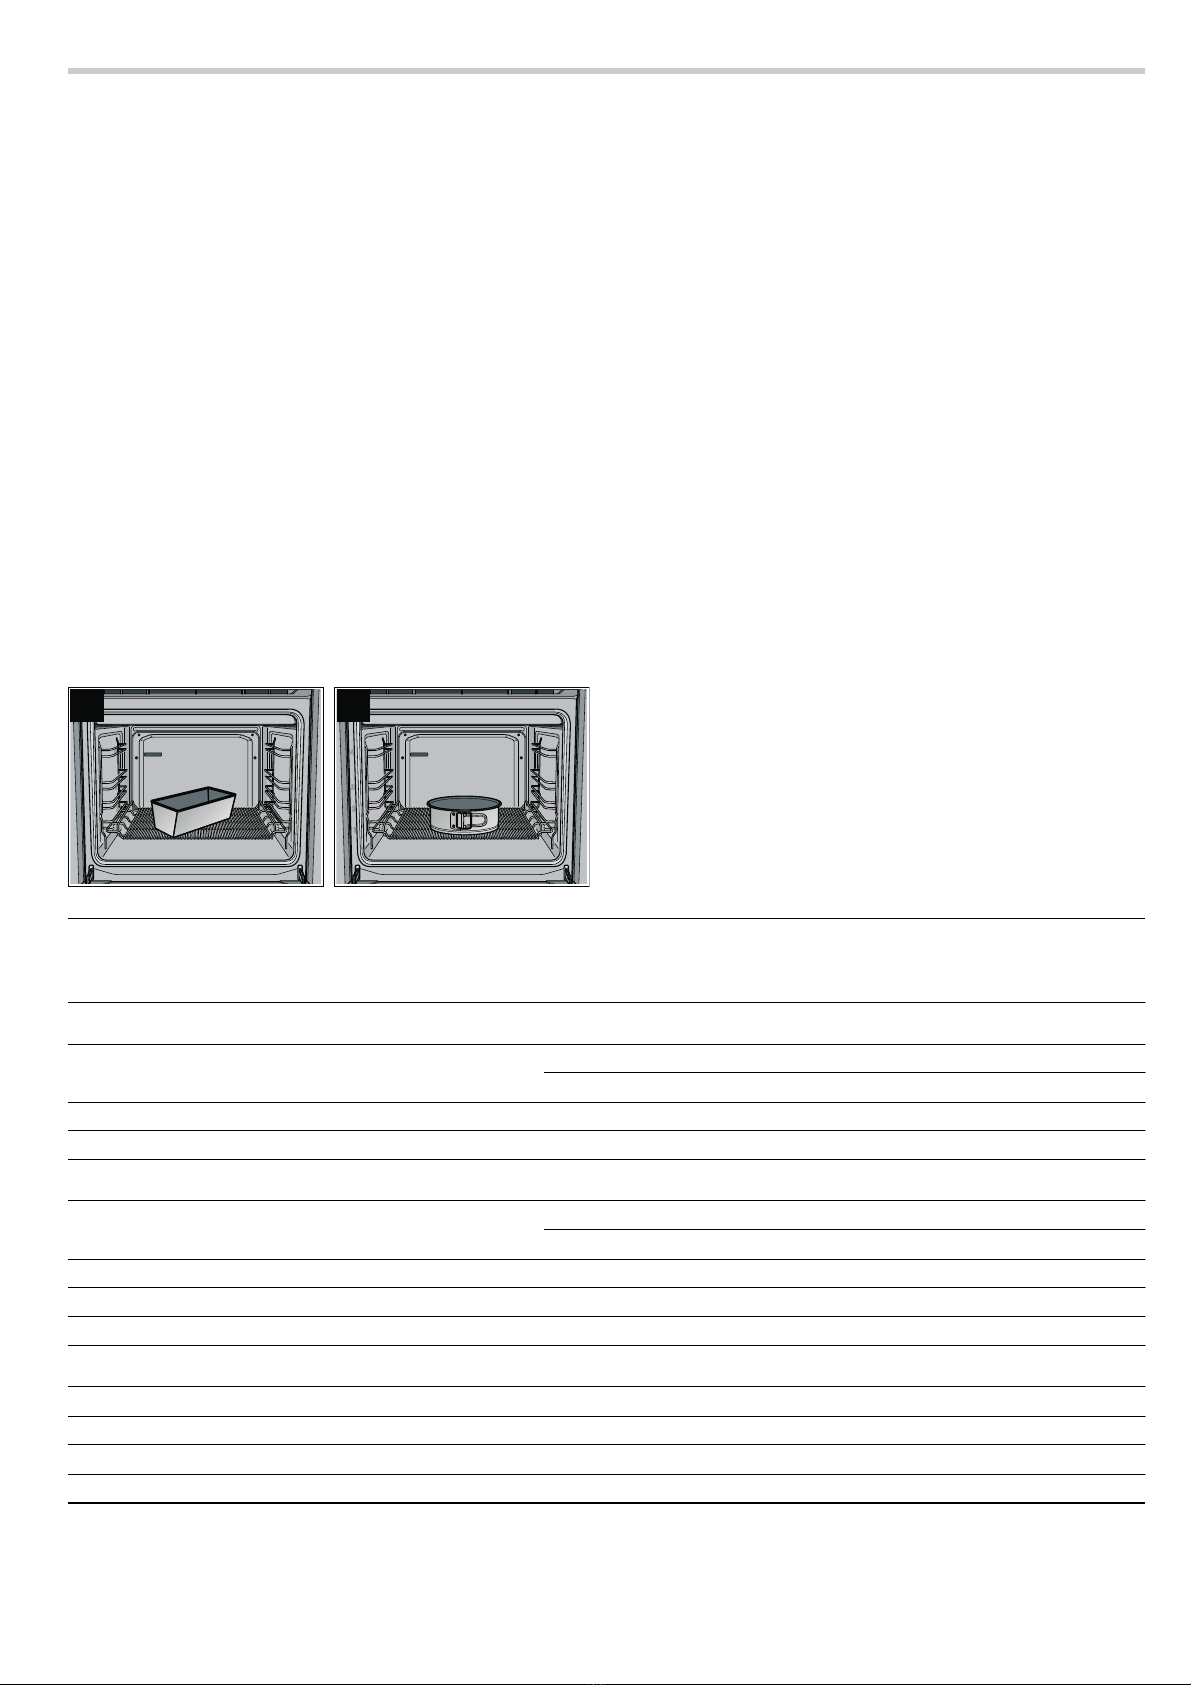
Baking in tins and on trays ...............................................................6
Baking on two or more levels ..........................................................6
Baking table for basic doughs/cake mixtures ..............................6
Baking table for fresh meals and frozen convenience
products................................................................................................7
Tips and tricks .....................................................................................8
Roasting...................................................................................... 9
Open roasting......................................................................................9
Roasting with a lid ..............................................................................9
Roasting table .................................................................................. 10
Tips and tricks .................................................................................. 11
Grilling .......................................................................................11
Circo-roasting ................................................................................... 11
Radiant grilling ................................................................................. 12
Defrosting..................................................................................13
Defrosting with CircoTherm®........................................................ 13
Defrost ............................................................................................... 13
Preserve ....................................................................................13
Cleaning and care.....................................................................14
Cleaning the appliance exterior .................................................... 14
Cleaning the cooking compartment............................................. 15
Self-cleaning surface....................................................................... 15
EasyClean®...................................................................................... 15
Removing and fitting the appliance door.................................... 16
Cleaning the door panels............................................................... 16
Cleaning the cooking compartment ceiling................................ 17
Cleaning the hook-in racks............................................................ 17
Faults and repairs.....................................................................18
Replacing the oven light bulb ....................................................... 18
Changing the door seal.................................................................. 18
After-sales service....................................................................18
E number and FD number ............................................................. 18
Test dishes ................................................................................19
Produktinfo
Additional information on products, accessories, replacement
parts and services can be found at www.neff-
international.com and in the online shop www.neff-
eshop.com
ã=Safety precautions
Please read this instruction manual
carefully. Please keep the instruction
and installation manuals in a safe
place. Please pass on these manuals
to the new owner if you sell the
appliance.
Before installation
Damage during transport
Check the appliance for damage after unpacking it. Do not
connect the appliance if it has been damaged in transit.
Electrical connection
Only a licensed expert may connect the appliance. You will lose
your warranty entitlement in the event of any damage caused
by incorrect connection.
Safety notes
This appliance is intended for domestic use only. This
appliance must only be used for food preparation.
Adults and children must not operate the appliance without
supervision,
■if they are physically or mentally incapable of doing so or
■if they have insufficient knowledge or experience.
Never let children play with the appliance.
Hot cooking compartment
Risk of burns!
■Never touch the interior surfaces of the cooking compartment
or the heating elements. Open the appliance door carefully.
Hot steam may escape. Small children must be kept at a safe
distance from the appliance.
■Never prepare food containing large quantities of drinks with
a high alcohol content. Alcoholic vapours can catch fire in the
cooking compartment. Only use small quantities of drinks
with a high alcohol content and open the appliance door
carefully.

3
Risk of fire!
■Never store combustible items in the cooking compartment.
Never open the appliance door if there is smoke inside.
Switch off the appliance. Pull out the mains plug or switch off
the circuit breaker in the fuse box.
■Do not place greaseproof paper loosely over accessories
during preheating. A draught is created when the appliance
door is opened. The greaseproof paper may come into
contact with the heating element and catch fire. Always
weight down the greaseproof paper with a dish or a baking
tin. Only cover the surface required with greaseproof paper.
The greaseproof paper must not protrude over the
accessories.
Risk of short circuit!
Never trap connecting cables of electrical appliances in the hot
appliance door. The cable insulation could melt.
Risk of scalding!
Never pour water into the hot cooking compartment. This will
produce hot steam.
Hot accessories and ovenware
Risk of burns!
Never remove ovenware or accessories from the cooking
compartment without an oven cloth or oven gloves.
Improper repairs
Risk of electric shock!
Improper repairs are dangerous. Repairs may only be carried
out by one of our trained after-sales engineers. If the appliance
is defective, pull out the mains plug or switch off the appliance
at the circuit breaker in the fuse box. Call the aftersales
service.
Causes of damage
Caution!
■Accessories, foil, greaseproof paper or ovenware on the
cooking compartment floor: do not place accessories on the
cooking compartment floor. Do not cover the cooking
compartment floor with any sort of foil or greaseproof paper.
Do not place ovenware on the cooking compartment floor if a
temperature of over 50 ºC has been set. This will cause heat
to accumulate. The baking and roasting times will no longer
be correct and the enamel will be damaged.
■Water in a hot cooking compartment: do not pour water into
the cooking compartment when it is hot. This will cause
steam. The temperature change can cause damage to the
enamel.
■Moist food: do not store moist food in the cooking
compartment when it is closed for prolonged periods This will
damage the enamel.
■Fruit juice: when baking particularly juicy fruit pies, do not
pack the baking tray too generously. Fruit juice dripping from
the baking tray leaves stains that cannot be removed. If
possible, use the deeper universal pan.
■Cooling with the appliance door open: only allow the cooking
compartment to cool when it is closed. Even if the appliance
door is only open a little, front panels of adjacent units could
be damaged over time.
■Heavily soiled oven seal: if the oven seal is heavily soiled, the
oven door will no longer close properly when the oven is in
operation. The fronts of adjacent units could be damaged.
Always keep the oven seal clean.
■Oven door as a bearing surface: do not stand or place
objects on the oven door when it is open. Do not place
ovenware or accessories on the oven door.
■Carrying the appliance: do not carry or hold the appliance by
the door handle. The door handle cannot support the weight
of the appliance and could break.
Energy and environment tips
Here you can find tips on how to save energy when baking and
roasting and how to dispose of your appliance properly.
Saving energy
Only preheat the oven if this is specified in the recipe or in the
operating instruction tables.
Use dark, black lacquered or enamelled baking tins. They
absorb the heat particularly well.
Open the appliance door as little as possible during cooking,
baking or roasting.
It is best to bake several cakes one after the other. The cooking
compartment is still warm. This may reduce the baking time for
the second cake.
For longer cooking times, you can switch the oven off
10 minutes before the end of the cooking time and use the
residual heat to finish cooking.
Environmentally-friendly disposal
Dispose of packaging in an environmentally-friendly manner.
Your new appliance
In this section, you will find information on
■the control panel
■the operating modes
■the shelf positions
■accessories
This appliance complies with European Directive
2002/96/EC on Waste Electrical and Electronic
Equipment (WEEE). The directive gives a framework for
the collection and recycling of old appliances, which is
valid across the EU.

4
Control panel
Operating modes
Here is an overview of the operating modes of your appliance.
Shelf positions
The cooking compartment has four shelf heights. The shelf
heights are counted from the bottom up.
Note: Do not use shelf height 2 when baking and roasting
with 3CircoTherm®. This will adversely affect air circulation
and your baking and roasting results will not be as good.
Accessories
The following accessories are supplied with your appliance:
Control element Use
Operating mode selector Selects the desired operating mode
Temperature selector Sets the desired temperature
Control knobs for hotplates Your hob comes with its own instructions for use. In it you will find information on oper-
ation
&RQWURONQREVIRUKRWSODWHV
7HPSHUDWXUHVHOHFWRU
,QGLFDWRUODPS
(DV\&OHDQ
,QGLFDWRUODPS
7HPSHUDWXUHVHOHFWRU
2SHUDWLQJ
PRGHVHOHFWRU
Operating mode Used for
3CircoTherm® For baking and roasting on one or more levels
%Top/bottom heating For baking and roasting on one level. Especially suitable for cakes with moist toppings
(e.g. cheesecake)
0CircoTherm intensive For frozen ready-made products and dishes which require a lot of heat from under-
neath (see section: Baking)
4Circo-roasting For poultry and larger pieces of meat
+Full-surface grill For large amounts of flat, small items for grilling (e.g. steaks, sausages)
(Centre area grill For small amounts of flat, small items for grilling (e.g. steaks, bread)
$Bottom heat For food and baked goods which should form a crust or need more browning on the
underside.
Only activate bottom heat for a short while at the end of the baking time.
ADefrost setting For gentle defrosting of pieces of meat, bread and delicate pastries
(e.g. cream gateau)
>EasyClean® Makes cleaning the cooking compartment easier
\Interior lighting Provides assistance when maintaining and cleaning the cooking compartment
Baking sheet, enamelled
for baking tray bakes and small
pastries
Enamelled universal pan
for baking moist cakes, roasting,
grilling and collecting dripping
liquids
Stepped wire shelf
for baking in baking tins, roasting in
roasting dishes and grilling

5
You can obtain further accessories from specialist retailers:
Note: The baking tray and universal pan may become distorted
during use. This is caused by the considerable temperature
differences acting on the accessories. This may happen when
only a part of the accessory is covered with food or when
frozen items such as pizza have been placed on the accessory.
Before using the appliance for the first time
In this section, you can read how to clean your appliance
before you use it for the first time.
1. Remove the accessories from the cooking compartment.
2. Completely remove any residual packaging (e.g. chips of
polystyrene) from the cooking compartment.
3. Clean the accessories and cooking compartment with hot
soapy water (see section: Cleaning and care).
4. Heat with %Top/bottom heat at 240 °C for 30 minutes.
5. Afterwards, wipe the cooled cooking compartment with hot,
soapy water.
6. Clean the outside of the appliance with a soft, damp cloth
and soapy water.
Operating the appliance
In this section, you can read about
■how to switch your appliance on and off
■how to select an operating mode and temperature
Switching on the appliance
1. Turn the operating mode selector until the desired operating
mode is selected.
2. Turn the temperature selector until the desired temperature is
selected.
The rindicator lamp lights up while the appliance is heating
up and during any subsequent heating.
Switching off the appliance
1. Turn the operating mode selector back to the Ûposition.
2. Turn the temperature selector back to the Úposition.
After the appliance is switched off, the cooling fan may
continue to run.
Switching the gas hob on and off
Your gas hob comes with its own instructions for use. Please
read all the safety notes given there before using the gas hob.
Switching the gas hob on
You can set the heat setting for the individual hotplates using
the four hotplate control knobs.
Caution!
In order not to damage the control knobs, do not turn them
past the stop after the œlow flame.
1. Turn the control knob slowly past the 8ignition position to ›
high flame.
The appliance will ignite automatically.
2. Set the flame to the desired size between ›high flame and œ
economy flame.
Switching the gas hob off
Turn the control knob clockwise as far as the stop to Ú.
Accessories Order no.
Mega system steamer N8642X0
System steamer N8642X0EU
Universal pan, enamelled Z1232X0
Universal pan, non-stick Z1233X0
Universal pan with wire insert Z1242X0
Glass pan Z1262X0
Roasting pan, enamelled Z1272X0
Baking tray, aluminium Z1332X0
Baking tray, enamelled Z1342X0
Baking tray, non-stick Z1343X0
Pizza tray Z1352X0
Wire rack, stepped with cut-out Z1432X0
Wire rack, flat Z1442X0
Roasting tray, enamelled, two-piece Z1512X0
CLOU 3x telescopic railings retrofit kit Z1742X1
CLOU 4x telescopic railings retrofit kit Z1752X1
Bread-baking stone Z1912X0
Universal roasting dish, enamelled Z9930X0
Accessories Order no.
Setting Meaning
ÚThe hotplate is turned off
8Ignition position
›High flame, highest power
œEconomy flame, low power

6
Baking
In this section, you will find information on
■Baking tins and trays
■Baking on two or more levels
■Baking basic doughs and cake mixtures (baking table)
■Baking pre-prepared frozen products and freshly prepared
meals (baking table)
■Tips and tricks for baking
Note: Do not use shelf height 2 when baking with 3
CircoTherm®. The air circulation would be impaired and this
will have a negative effect on your baking.
Baking in tins and on trays
Baking tins
We recommend that you use dark baking tins made from metal.
Tinplate and glass dishes increase the baking time required
and the cake will not brown evenly. If you wish to bake using
tinplate tins and %Top/bottom heat, you should use shelf
height 1.
If you are baking on one level with 3CircoTherm®, always
place a loaf tin diagonally (Fig. A) and a round tin in the centre
of the stepped wire rack (Fig. B).
Baking trays
We recommend that you only use original baking trays, as
these have been optimally designed for the cooking
compartment and the operating modes.
Always slide the baking tray or the universal pan in carefully as
far as it will go and make sure that the sloping edge is facing
the appliance door.
Use the universal pan if you are baking moist cakes, so that the
cooking compartment does not get dirty.
Baking on two or more levels
If you are baking on several levels, you should preferably use
baking trays and insert these at the same time.
Bear in mind that your items may brown at different rates on
each level. The items on the top level will brown more quickly
and can be taken out earlier.
If you wish to bake on two levels using a baking tray and a
universal pan, you should insert the baking tray at shelf
height 3 and the universal pan at shelf height 1.
Baking table for basic doughs/cake mixtures
The values in the table are guidelines and apply to enamelled
baking trays and dark baking tins. The values may vary
depending on the type and amount of dough/mixture and on
the baking tin.
The values for bread dough apply to both dough placed on a
tray and dough placed in a loaf tin.
We recommend that you set the lower of the specified
temperatures the first time. Lower temperatures will generally
allow more even browning.
If you are baking according to your own recipe, use similar
recipes in the table as a guide.
Observe the notes in the table about preheating.
$%
CircoTherm® 3Top/bottom heat %
Basic dough Shelf
height Tempera-
ture in °C Baking time in
minutes Shelf
height Tempera-
ture in °C
Rich sponge mixture
Tray bakes with topping 1 160 - 170 30 - 45 3 170 - 180
1 + 3 150 - 160 40 - 50 - -
Springform cake tin/loaf tin 1 150 - 160 60 - 80 2 160 - 170
Flan tin 1 160 - 170 20 - 35 2 170 - 180
Shortcrust pastry
Tray bake with dry topping, e.g. crumble 1 160 - 170 45 - 70 3 180 - 190
1 + 3 160 - 170 60 - 80 - -
Tray bake with moist topping, e.g. egg custard 1 150 - 170 60 - 80 - -
Springform cake tin, e.g. sponge base cheesecake 1 150 - 160 50 - 90 2 160 - 180
Flan tin 1 150 - 160* 20 - 35 2 170 - 180*
Sponge mixture
Swiss roll 1 180 - 190* 10 - 15 3 190 - 200*
Flan tin 1 160 - 170 20 - 30 2 160 - 170
Sponge (6 eggs) 1 150 - 160 30 - 45 2 160 - 170
Sponge (3 eggs) 1 150 - 160* 20 - 30 2 160 - 170*
* Preheat oven

7
Baking table for fresh meals and frozen
convenience products
Circotherm intensive 0is particularly suitable for freshly
prepared dishes that require a lot of heat from underneath and
for frozen convenience products.
Notes
■Use the universal pan for frozen products
■Line the universal pan with greaseproof paper or with special
grease absorbing paper if you are baking frozen potato
products
■Only use greaseproof paper that is suitable for the selected
temperature
■Spread chips out in a single layer
Yeast dough
Tray bake with dry topping, e.g. crumble 1 160 - 170 40 - 55 3 170 - 180
1 + 3 160 - 170 45 - 65 - -
Savarin/plaited loaf (500 g) 1 160 - 170 30 - 40 3 170 - 180
Springform cake tin 1 160 - 170 30 - 40 2 160 - 170
Ring cake tin 1 160 - 170 35 - 45 2 170 - 180
CircoTherm® 3Top/bottom heat %
Small baked items Shelf
height Tempera-
ture in °C Baking time in
minutes Shelf
height Tempera-
ture in °C
Yeast dough 1 160 - 170 20 - 25 3 170 - 180
1 + 3 160 - 170 20 - 30 - -
Meringue mixture 1 80 100 - 130 3 80
1 + 3 80 150 - 170 - -
Puff pastry 1 190 - 200* 20 - 30 3 200 - 210*
1 + 3 190 - 200* 25 - 35 - -
Choux pastry 1 190 - 200* 25 - 35 3 200 - 210*
1 + 3 190 - 200* 30 - 40 - -
Sponge mixture, e.g. muffins 1 150 - 160* 25 - 35 3 160 - 170*
1 + 3 150 - 160* 25 - 35 - -
Shortcrust pastry, e.g. butter biscuits 1 140 - 150* 15 - 20 3 140 - 150*
1 + 3 130 - 140* 20 - 30 - -
1 + 3+ 4 130 - 140* 20 - 35 - -
* Preheat oven
CircoTherm® 3Top/bottom heat %
Bread/bread rolls Shelf
height Tempera-
ture in °C Baking time in
minutes Shelf
height Tempera-
ture in °C
Bread rolls 1 220* 10 - 20 2 240*
Flatbread 1 220* 15 - 20 2 240*
Pasty 1 180* 30 - 40 3 200*
Bread dough 750 - 1,000 g
Final baking 1 220* 35 - 40 2 220*
Bread dough 1,000 - 1,250 g
Initial baking 1 220* 10 - 15 2 240*
Final baking 1 180 40 - 45 2 200
Bread dough 1,250 - 1,500 g
Initial baking 1 220* 10 - 15 2 240*
Final baking 1 180 40 - 50 2 200
* Preheat oven
CircoTherm® 3Top/bottom heat %
Basic dough Shelf
height Tempera-
ture in °C Baking time in
minutes Shelf
height Tempera-
ture in °C
* Preheat oven

8
■Turn frozen potato products half way through the baking time
■Only season frozen potato products after they have finished
baking
■Leave a little space between bread rolls when crisping them
up. Do not place too many on a baking tray
■Do not use frozen products with freezer burn
■Do not use frozen products that are heavily frosted
■Follow the manufacturer's instructions.
■You cannot bake on more than one level with CircoTherm
intensive
The values in the table are guidelines and apply to enamelled
baking trays. The values may vary depending on the type and
amount of dough/mixture and on the baking tin.
We recommend that you set the lower of the specified
temperatures the first time. Lower temperatures will generally
allow more even browning.
If you are baking according to your own recipe, use similar
recipes in the table as a guide.
Observe the notes in the table about preheating.
Tips and tricks
CircoTherm® 3Circotherm intensive 0
Dishes Shelf
height Tempera-
ture in °C Baking time in
minutes Shelf
height Tempera-
ture in °C
Pizza, fresh 1 180 - 200* 20 - 30 1 180 - 200
1 + 3 170 - 190 35 - 45 - -
Tarte flambée 1 180 - 200* 15 - 25 1 200 - 220
Quiche 1 180 - 200 50 - 60 1 170 - 190
Tart 1 180 - 200* 30 - 45 1 190 - 210
Swiss flan 1 170 - 190 45 - 55 1 170 - 190
Potato gratin made from raw potatoes 1 180 - 200 50 - 60 1 170 - 190
Strudel, frozen 1 180 - 200 35 - 45 1 180 - 200
Pizza, frozen
Pizza with thin base 1 180 - 200 10 - 20 1 200 - 220
1 + 3 170 - 190 20 - 30 - -
Pizza with deep-pan base 1 180 - 200 20 - 30 1 180 - 200
1 + 3 170 - 190 25 - 35 - -
Potato products
Chips 1 180 - 200 15 - 25 1 210 - 230
1 + 3 170 - 190 25 - 35 - -
Croquettes 1 180 - 200 15 - 25 1 200 - 220
Rösti (stuffed potato pockets) 1 180 - 200 15 - 25 1 200 - 220
Baked goods
Part-baked bread rolls/baguettes 1 180 - 200 5 - 15 1 180 - 200
Bread rolls/baguette, frozen 1 180 - 200 5 - 15 1 200 - 220
Bread rolls/baguette, part baked, frozen 1 180 - 200 10 - 20 1 180 - 200
Pretzel dough, frozen 1 170 - 190 15- 20 1 170 - 190
Processed portions, frozen
Fish fingers 1 180 - 200 15 - 20 1 190 - 210
Veggie burgers 1 180 - 200 20- 30 1 200 - 220
* Preheat oven
The cake is too light in colour Check the shelf height.
Check whether you have used the bakeware that we have recommended.
Place your tin on the wire rack and not on the baking tray.
If the shelf height and the bakeware are correct, then you should either extend the bak-
ing time or increase the temperature.
The cake is too dark Check the shelf height.
If the shelf height is correct, you should either shorten the baking time or reduce the
temperature.

9
Roasting
In this section, you will find information on
■roasting in general
■roasting without a lid
■roasting with a lid
■roasting meat, poultry and fish (roasting table)
■tips and tricks for roasting
ã=There is a risk of injury if you use roasting dishes that
are not heat-resistant!
Only use roasting dishes that are marked as being suitable for
use in the oven.
Do not use shelf height 2 when roasting with 3CircoTherm®.
The air circulation would be impaired and this will have a
negative effect on your roast.
Open roasting
For open roasting, a roasting dish without a lid is used.
When you are roasting with %Top/bottom heat, you should
turn the roast approximately half to two thirds of the way
through the roasting time.
Roasting in the universal pan
Juices escape from the roasting meat and are collected in the
universal pan. You can use these juices as the basis for a tasty
gravy.
Deglaze the pan of the juices with hot water, stock, wine or
similar. Bring to the boil, thicken with cornflour, season and
pass through a sieve if necessary.
You can also cook side dishes (e.g. vegetables) at the same
time as roasting meat in the universal pan.
For smaller joints, you can use a smaller roasting dish instead
of the universal pan. Place this directly on the wire rack.
Roasting in the universal pan with stepped wire rack
Place the stepped wire rack on the universal pan and slide
them in together at the same shelf height.
For fatty meat and poultry, add Xto ¼ litre water to the
universal pan, depending on the size and type of the joint.
While the meat is roasting, the liquid in the roasting dish will
evaporate. Pour in more hot water if required.
Roasting in the universal pan with roasting sheet
The roasting sheet reduces dirt in the cooking compartment.
Place the roasting sheet in the universal pan and slide them in
together at the same shelf height.
Dripping fat and meat juices are caught in the universal pan.
Roasting with a lid
This method is particularly suitable for pot roasts.
Place the joint in the roasting dish. Add water, wine, vinegar or
similar for the braising liquid. Place the lid on the dish, place
The cake is unevenly browned in the bak-
ing tin Check the shelf height.
Check the temperature.
Make sure that your baking tin is not placed directly in front of the air outlets in the rear
wall of the cooking compartment.
Check that the baking tin is in the correct position on the wire rack.
The cake on the baking tray is unevenly
browned Check the shelf height.
Check the temperature.
If you are baking on several levels, take out the baking trays at different times.
When baking small items, make sure that they are the same size and thickness.
The cake is too dry Set a slightly higher temperature and a slightly shorter baking time.
The cake is too moist in the centre Set a slightly lower temperature.
Note: Higher temperatures do not necessarily mean shorter baking times (cooked on
the outside, but not on the inside). Select a longer baking time and allow the cake mix-
ture to prove for longer. Add less liquid to the mixture.
With very moist cakes, e.g. fruit flans, a lot
of steam is generated in the cooking com-
partment which condenses on the appli-
ance door.
If you briefly and carefully open the appliance door (once or twice, or more often for
longer baking times), you can let the steam out of the cooking compartment and con-
siderably lessen the condensation.
The cake collapses when you take it out of
the oven Use less liquid for the mixture.
Set a longer baking time or a slightly lower temperature.
The specified baking time is not correct For small items, check the quantity on the baking tray. The items must not be touching
each other.
Frozen products are not browned evenly
after baking Check whether the frozen product is unevenly browned before baking. This uneven
browning will remain after the baking time.
Frozen products are not browned, not
crispy or the specified time is not correct Remove ice from frozen products before baking. Do not use frozen products that are
heavily frosted
Saving energy Only preheat the appliance when it is specified in the baking table that you should do
so.
Use dark baking tins as these absorb the heat better.
Make use of the residual heat with longer baking times and switch the oven off
510 minutes before the end of the baking time.

10
the dish on the wire rack and slide it into the cooking
compartment.
While the meat is roasting, the liquid in the roasting dish will
evaporate. Pour in more hot water if required.
Roasting table
The roasting time and temperature depend on the size, height,
type and quality of the item.
As a general rule: the larger the item, the lower the temperature
and the longer the roasting time.
Coat lean meat with fat or oil as required and cover it with strips
of bacon.
The information in the table is a guideline, and relates to items
cooked without a lid. The values may vary depending on the
type and quantity of the meat and on the roasting dish.
You should set the lower of the specified temperatures the first
time. Lower temperatures will generally allow more even
browning.
At the end of the roasting time, switch the oven off and leave
the roast to rest for approximately 10 minutes in the cooking
compartment with the door closed. The recommended rest time
is not included in the given roasting times.
The information in the table is for food placed in a cold oven
and for meat/fish taken directly from the refrigerator.
CircoTherm® 3Top/bottom heat %
Item Shelf
height Tempera-
ture in °C Roasting time in
minutes Shelf
height Tempera-
ture in °C
Meat loaf made from 500 g meat 1 170 - 180 60 - 70 2 200 - 210
Pork
Smoked pork 1 160 - 170 70 - 80 2 190 - 210
Fillet, medium (400 g) 1 170 - 180 30 - 45 3 200 - 230
Roast with rind (1.5 kg) 1 160 - 170 120 - 150 2 200 - 220
Roast with rind (2.5 kg) 1 160 - 170 150 - 180 2 190 - 210
Joint, marbled, without rind, e.g. neck (1.5 kg) 1 160 - 170 100 - 130 2 190 - 210
Joint, marbled, without rind, e.g. neck (2.5 kg) 1 160 - 170 120 - 150 2 180 - 200
Roast, lean (1 kg) 1 170 - 180 70 - 90 2 180 - 200
Roast, lean (2 kg) 1 170 - 180 80 - 100 2 180 - 200
Beef
Fillet, medium (1 kg) 1 180 - 190 45 - 65 2 200 - 220
Sirloin, medium rare (1.5 kg) 1 180 - 190 30 - 45 2 200 - 220
Pot roast (1.5 kg)** 1 170 - 180 120 - 150 2 200 - 220
Pot roast (2.5 kg)** 1 170 - 180 150 - 180 2 190 - 210
Veal
Joint/breast of veal (1.5 kg) 1 160 - 170 90 - 120 2 180 - 200
Joint/breast of veal (2.5 kg) 1 160 - 170 120 - 150 2 170 - 190
Knuckle 1 160 - 170 100 - 130 2 190 - 210
Lamb
Leg, boned 1 180 - 190 70 - 110 2 200 - 220
Loin on the bone 1 180 - 190* 40 - 50 2 200 - 220*
Loin, boned 1 180 - 190* 30 - 40 2 200 - 220*
Poultry
Chicken, whole (1 kg) 1 170 - 180 60 - 70 2 200 - 220
Duck, whole (2 3 kg) 1 150 - 160 90 - 120 2 190 - 210
Goose, whole (3 4 kg) 1 150 - 160 130 - 180 2*** 180 - 200
Game
Joint/leg of roe venison, boned (1.5 kg) 1 160 - 170 90 - 120 2 190 - 210
Wild boar joint (1.5 kg) 1 160 - 170 120 - 140 2 190 - 210
Joint of venison (1.5 kg) 1 160 - 170 100 - 120 2 190 - 210
Rabbit 1 160 - 170 70 - 80 2 180 - 200
* Preheat oven
** Roast pot roasts with a lid on the roasting dish
*** Use shelf height 1 for tall items

11
Tips and tricks
Grilling
In this section, you will find information on
■Grilling in general
■Circo-roasting 4
■Radiant grilling (Full-surface +and Centre-area grill ()
Caution!
There is a risk of damage to kitchen units if you grill with the
appliance door open: The adjacent units may be damaged by
the extreme heat. Keep the appliance door closed when using
the grill.
Notes
■Always use the wire rack and the universal pan when grilling
■Place the wire rack in the universal pan and slide them both
in at the height specified in the grilling table
■Always place the food to be grilled in the centre of the wire
rack
■If you are grilling more than one piece of meat, make sure
that they are the same sort of meat and that they are of
similar thickness and weight.
Circo-roasting
The 4Circo-roasting operating mode is particularly suitable for
poultry or meat (e.g. roast pork with crackling) that is to be
crispy.
Turn large items of food after approximately half to two-thirds of
the grilling time.
Pierce duck and goose skin under the wings and legs to allow
the fat to escape.
Depending on the food you are cooking, the cooking
compartment may become very dirty when you cook food on
the wire rack using Circo-roasting. You should therefore clean
the cooking compartment after every use so that the dirt does
not burn on.
The information in the table are guidelines and apply to the
enamelled universal pan with wire rack. The values may vary
depending on the type and amount of food to be grilled.
You should set the lower of the specified temperatures the first
time. Lower temperatures will generally allow more even
browning.
At the end of the cooking time, switch the grill off and leave the
food to stand for approximately 10 minutes in the cooking
compartment with the door closed. The recommended standing
time is not included in the grilling times specified.
The values are for food placed in a cold oven and for meat
taken directly from the refrigerator.
Fish
Fish, whole (300 g) 1 160 - 170 30 - 40 2 180 - 200
Fish, whole (700 g) 1 160 - 170 40 - 50 2 180 - 200
CircoTherm® 3Top/bottom heat %
Item Shelf
height Tempera-
ture in °C Roasting time in
minutes Shelf
height Tempera-
ture in °C
* Preheat oven
** Roast pot roasts with a lid on the roasting dish
*** Use shelf height 1 for tall items
Crust too thick and/or roast too dry Reduce the temperature or shorten the roasting time.
Check the shelf height.
Crust too thin Increase the temperature or switch on the grill briefly at the end of the roasting time.
The meat is not cooked right through Remove any accessories that are not required from the cooking compartment.
Increase the roasting time.
Check the core temperature of the joint using a meat thermometer.
Steam in the cooking compartment is con-
densing on the appliance door The steam dries during the course of the cooking. If there is an excessive volume of
steam, you can carefully open the door briefly to dissipate the steam more quickly.
Grilled food Shelf height Temperature in °C Grilling time in minutes
Sirloin, medium (1.5 kg) 2 220 - 240 40 - 50
Leg of lamb, boned, medium 2 170 - 190 120 - 150
Pork
Joint of pork with rind 2 170 - 190 140 - 160
Pork knuckle 2 180 - 200 120 - 150

12
Radiant grilling
For grilling large quantities of flat items, use the +Full-surface
grill (Fig. A).
For grilling small quantities of flat items, use the (Centre-area
grill. Place the food to be grilled in the centre of the wire rack
(Fig. B). You will save energy by using the centre-area grill.
Brush the items to be grilled with a little oil to taste.
Turn the items after half to two-thirds of the grilling time.
You can influence the grilling result by changing the type or
position of the wire rack.
Full-surface grill table +
The information in the table contains only guide values. The
values may vary depending on the type and amount of food to
be grilled. They are for food placed in a cold oven and for meat
taken directly from the refrigerator.
Centre-area grill (table
The information in the table contains only guide values. The
values may vary depending on the type and amount of food to be grilled. They are for food placed in a cold oven and for meat
taken directly from the refrigerator.
Poultry (unstuffed)
Chicken halves (1 or 2 halves) 2 210 - 230 40 - 50
Chicken, whole (1 or 2 chickens) 2 200 - 220 60 - 80
Duck, whole (2 - 3 kg) 2 180 - 200 90 - 120
Duck breast 3 230 - 250 30 - 45
Goose, whole (3 4 kg) 1 150 - 170 130 - 160
Goose breast 2 160 - 180 80 - 100
Goose leg 2 180 - 200 50 - 80
Grilled food Shelf height Temperature in °C Grilling time in minutes
$ %
Wire rack
position Use
¾Place the stepped wire rack in the universal pan
with the step pointing downwards: suitable for
items that should be well-done
½Place the stepped wire rack in the universal pan
with the step pointing upwards: suitable for items
that should be rare to medium
Grilled food Shelf
height Tempera-
ture in °C Grilling time
in minutes Notes
Toast with topping 3 220 10 - 15 The shelf height should be adapted to the height of
the topping
Vegetables 4 270 15 - 20
Sausages 4 250 10 - 14 Prick skins
Pork
Fillet steaks, medium-sized
(3 cm thick) 4 270 12 - 15 The cooking result can be influenced by the position
of the wire rack
Steak, well-done (2 cm thick) 4 270 15 - 20
Beef
Fillet steaks (3 - 4 cm thick) 4 270 15 - 20 The grilling time can be increased or shortened
depending on how well-done the meat should be
Tournedos 4 270 12 - 15
Lamb
Fillets 4 270 8 - 12 The grilling time can be increased or shortened
depending on how well-done the meat should be
Chops 4 270 10 - 15
Poultry
Chicken drumsticks 3 250 25 - 30 Piercing the skin will prevent blisters from forming dur-
ing grilling
Small chicken portions 3 250 25 - 30
Fish
Steaks 4 220 15 - 20 The pieces should be of equal thickness
Chops 4 220 15 - 20
Whole fish 3 220 20 - 25

13
Defrosting
In this section, you can read about
■how to defrost using 3CircoTherm®
■how to use the ADefrost operating mode
Defrosting with CircoTherm®
Use 3CircoTherm® to defrost and cook frozen products.
Notes
■Frozen products that have been defrosted (meat in particular)
require shorter cooking times than fresh products
■The cooking time for frozen meat increases by the defrosting
time
■Always defrost frozen poultry before cooking so that you can
remove the giblets
■Cook frozen fish at the same temperatures as fresh fish
■You can place large quantities of ready made frozen
vegetables in aluminium dishes in the cooking compartment
at the same time
■Use shelf height 1 when defrosting on one level, and shelf
heights 1 + 3 when using two levels
■Observe the instructions on the packaging when using frozen
foods.
Defrost
Using defrost setting Ayou can defrost delicate pastries
particularly well (e.g. cream cakes).
1. Switch on the ADefrost operating mode.
2. Defrost the frozen food for 25-45 minutes, depending on type
and size.
3. Remove the frozen food from the cooking compartment and
let it thaw for 30 - 45 minutes.
With small quantities (pieces), the defrosting time is shortened
to 1520 minutes and the extended defrosting time is shortened
to 1015 minutes.
Preserve
ã=Risk of injury!
Preserving jars containing incorrectly preserved food can burst.
Please observe the following instructions:
■Fruit and vegetables must be fresh and in good condition
■Only use clean and undamaged preserving jars
■The preserving jars must not touch each other in the cooking
compartment during preserving
With 3CircoTherm® , the cooking compartment can be used
to preserve the contents of up to six ½, 1 or 1½ litre preserving
jars at the same time.
Notes
■For each preserving process, only use preserving jars that
are the same size and contain the same food.
■Pay attention to cleanliness when preparing and closing the
preserving jars.
■Only use heat resistant rubber rings.
■You cannot preserve the following food in your appliance: the
contents of tin cans, meat, fish or pie filling.
Preparing fruit
1. Wash fruit and, depending on the type, peel, remove the
seeds and finely chop.
2. Fill the preserving jars with fruit up to approx. 2 cm below the
rim.
Grilled food Shelf
height Tempera-
ture in °C Grilling time
in minutes Notes
Toast with topping 3 220 12 - 18 The shelf height should be adapted to the height of
the topping
Vegetables 4 270 15 - 20
Sausages 4 250 12 - 16 Prick skins
Poultry
Chicken drumsticks 3 250 35 - 45 Piercing the skin will prevent blisters from forming
during grilling
Small chicken portions 3 250 30 - 40
Fish
Steaks 4 230 15 - 20 The pieces should be of equal thickness
Chops 4 230 15 - 20
Whole fish 3 230 20 - 25
Frozen meals Tempera-
ture in °C Defrosting
time in min-
utes
Raw frozen products/ foods 50 30 - 90
Bread/Bread rolls (750 - 1,500 g) 50 30 - 60
Dry, frozen tray bakes 60 45 - 60
Moist, frozen tray bakes 50 50 - 70

14
3.Fill the preserving jars with hot, skimmed sugar solution
(approx. Yl for a one litre jar).
To one litre water:
■approx. 250 g sugar for sweet fruit
■approx. 500 g sugar for sour fruit
Preparing vegetables
1.Wash vegetables and depending on the type, clean and finely
chop.
2.Fill the preserving jars with vegetables up to approx. 2 cm
below the rim.
3.Fill the preserving jars immediately with hot, boiled water.
Closing the preserving jars
1.Wipe the rims of the preserving jars with a clean, damp cloth.
2.Put a wet rubber ring and lid in place and close the jars with
the clips.
Starting the preserving process
1.Insert the universal pan at shelf height 1.
2.Position the preserving jars in a triangle without them
touching each other.
3.Pour ½ litre of hot water (approx. 80 °C) into the universal
pan.
4.Set 3CircoTherm® at 160 °C.
■Preserving jars containing ½ or 1 litre will start to bubble
after approx. 50 minutes
■Preserving jars containing 1½ litres will start to bubble after
approx. 60 minutes
Ending the preserving process
For fruit, gherkins and tomato purée:
1.Turn off the appliance, once all preserving jars are bubbling.
2.Allow the preserving jars to stand in the closed cooking
compartment for several minutes longer.
■Raspberries, strawberries, cherries or gherkins: approx.
5-10minutes
■Other fruit: approx. 10 - 15 minutes
■Tomato or apple purée: approx. 15 - 20 minutes
For vegetables:
1.Reduce the temperature to 100 °C once all the preserving
jars are bubbling. Allow the preserving jars to continue
bubbling for approx.60 minutes in the closed cooking
compartment.
2.Switch off the appliance.
3.Allow the preserving jars to stand in the closed cooking
compartment for approx. 15 - 30 minutes longer.
Removing the preserving jars
1.Place the preserving jars on a clean cloth, cover and protect
from draughts.
2.Remove clips only when the jars are cold.
Cleaning and care
In this section, you will find information on
■cleaning and care of your appliance
■Cleaning agents and aids
■self-cleaning surfaces in the cooking compartment
■EasyClean® cleaning aid
ã=Risk of short circuit!
Do not use high-pressure cleaners or steam jet cleaners to
clean your appliance.
Caution!
Surface damage due to incorrect cleaning: Do not use any
■harsh or abrasive cleaning agents
■cleaning agents that contain alcohol
■abrasive cleaning aids such as steel wool or scourers.
Observe the specifications in the tables.
Note: Highly recommended cleaning and care products can be
purchased through our after-sales service. Observe the
manufacturer's instructions.
Cleaning the appliance exterior
Appliance part/surface Cleaning agent/aid
Stainless steel surfaces Apply commercially available washing-up liquid with a soft, damp cloth or chamois; dry
with a soft cloth.
Use cleaners for matted stainless steel if very dirty.
Painted surfaces Apply commercially available washing-up liquid with a soft, damp cloth or chamois; dry
with a soft cloth.
Glass surfaces Apply commercially available washing-up liquid with a soft, damp cloth or chamois; dry
with a soft cloth.

15
Cleaning the cooking compartment
Caution!
Risk of damaging the surface. Do not clean the appliance while
still warm, even if using oven cleaners specially intended for
this purpose.
Notes
■Enamel is baked on at very high temperatures during
manufacture. This can cause some slight colour variation.
This is normal and does not affect proper functioning.
■The edges of thin trays cannot be completely enamelled. As
a result, these edges can be rough. Anti-corrosion protection
is still guaranteed, however.
Keeping the appliance clean
To avoid getting the cooking compartment dirty,
■clean the cooking compartment after each use, as dirt will
bake on the next time it is heated up, and this can only be
removed with difficulty
■always remove flecks of limescale, grease, starch and
albumin (e.g. egg white) immediately
■use 3CircoTherm® whenever possible. This operating
mode creates less dirt
■Use the universal pan to bake very moist cakes
■use suitable ovenware when roasting (e.g. roasting dish) or a
roasting sheet (see section: Accessories)
Self-cleaning surface
The back wall of the cooking compartment is coated with self-
cleaning enamel. This coating absorbs and disintegrates
splashes from baking and roasting while the oven is in
operation.
Large splashes only disappear after the oven has been used
several times.
Discolouration on the rear wall does not affect the self-cleaning
function.
Caution!
Damage to surfaces on self-cleaning areas due to applying
oven cleaner.Never clean the self-cleaning surfaces with oven
cleaner.
If oven cleaner accidentally gets onto self-cleaning surfaces,
remove it immediately with a sponge and plenty of water.
Caution!
Damage to surfaces on self-cleaning areas due to the use of
abrasive and acidic cleaning agents and aids.
Do not use cleaning agents containing abrasive substances or
acids.
Do not use abrasive cleaning aids such as steel wool or
scourers.
EasyClean®
Your appliance comes with an >EasyClean® function to
make cleaning the cooking compartment easier. An
automatically controlled vaporisation of soapy water loosens
residues and makes it easier to remove them afterwards.
In the case of persistent dirt, you can
■allow the soapy water to penetrate for a while before
switching on EasyClean
■rub detergent onto the dirty surfaces before switching on the
cleaning aid
■repeat the EasyClean® function once the cooking
compartment has cooled
Preparation and switching on
EasyClean® only starts when the cooking compartment is cool.
ã=Risk of scalding and surface damage!
Never pour water into the cooking compartment when it is hot.
Water vapour will be created and the enamel may be damaged
because of the change in temperature.
1. Remove the accessories from the cooking compartment.
2. Carefully pour 0.4 litres of water (not distilled water) with
some detergent into the base trough of the cooking
compartment (Fig. A).
Door panels Use a commercially available glass cleaner or washing-up liquid with a soft, damp
cloth or chamois; dry with a soft cloth.
The inner door panel on the appliance door has a coating which reduces the tempera-
ture and reflects the heat. The view through the appliance door is not impaired by this.
When the appliance door is open this coating can have the effect of a light-coloured
film. This is part of the design and is not due to any quality defect.
Hob Your hob comes with its own instructions for use. They contain information on care and
cleaning.
Appliance part/surface Cleaning agent/aid
Appliance part Cleaning agent/aid
Enamel surfaces (smooth surfaces) To facilitate cleaning, you can switch on the interior lighting and detach the appliance
door if necessary.
Apply commercially available washing-up liquid or a vinegar solution with a soft, damp
cloth or chamois; dry with a soft cloth.
Loosen baked on food residues with a damp cloth and detergent.
We recommend using oven cleaning gel if the oven is very dirty. This can be applied
neat to the affected area.
Leave the cooking compartment open to dry after cleaning.
Self-cleaning surfaces (rough surfaces) Please see the notes in section: Self-cleaning surfaces
Door seal Hot soapy water
Hook-in rack/telescopic shelf Hot soapy water
Accessories Soak in hot soapy water, clean with a brush and sponge or wash in the dishwasher.

16
3.Close the appliance door.
4.Switch on >EasyClean®.
The rand > indicator lamps light up.
The rindicator lamp goes out after about 4 minutes.
EasyClean® finishes after a further 17 minutes. A signal
sounds.
5.Turn the operating mode selector back to the Û position.
Cleaning up and switching off
Do not leave the remaining water in the cooking compartment
for a long time (e.g. overnight).
1.Open the appliance door and remove the remaining water
with an absorbent sponge cloth (Fig. B).
2.Clean the cooking compartment with a sponge cloth, a soft
brush or a plastic saucepan scrubber.
Note: You can remove any remaining, persistent residue with
a glass scraper for glass ceramic.
3.Remove limescale with a cloth soaked in vinegar, then wipe
with clean water and rub dry with a soft cloth. Remember to
dry under the door seal.
4.After cleaning, leave the appliance door ajar in the stop
position (approx. 30°) for approx. 1 hour to allow the enamel
surfaces in the cooking compartment to dry thoroughly.
Rapid drying
1.After cleaning, leave the appliance door ajar in the stop
position (approx. 30°).
2.Set 3 CircoTherm® at 50 °C.
3.After 5 minutes, switch off the appliance and close the
appliance door.
Removing and fitting the appliance door
You can remove the appliance door to clean it more
thoroughly.
ã=Risk of injury!
The hinges of the appliance door may snap shut with great
force. Always open the hinge locking lever fully when removing
the appliance door and close it fully after refitting. Do not reach
into the hinge.
ã=Risk of injury!
If the appliance door has only been unhinged on one side, do
not reach into the hinge. The hinge can snap back with great
force. Call the aftersales service.
Removing the appliance door
1.Open the appliance door fully.
2.Open the locking levers on the left and right-hand side fully.
The hinges are secured and cannot snap closed.
3.Close the appliance door until resistance becomes
noticeable (figure A)
4.With both hands, grip the door on the left and right-hand side,
close the door a little more and pull it out (figure B).
Fitting the appliance door
1.Insert the hinges in the left and right-hand holders (figure C).
The notch on both hinges must engage.
2.Open the appliance door fully.
3.Close the locking levers on the left and right-hand side fully
(figure D).
The appliance door is secured and can no longer be
removed.
4.Close the appliance door.
Cleaning the door panels
To facilitate cleaning, you can remove the door panels from the
appliance door.
ã=Risk of injury!
The components inside the appliance door may have sharp
edges. Take care not to cut yourself. Wear protective gloves.
ã=Risk of injury!
The appliance must not be used again until the door panels
and appliance door have been correctly fitted.
Removing the door panel
1.Unhook the appliance door and lay it on a soft, clean surface
with the front side facing downwards (see section:Removing
and installing the appliance door).
2.Grip the door panel next to the hinges and pull it out of the
plug-in holders (not visible).
$ %
$ %
&'

17
3. Lift the door panel slightly and remove it in the direction of the
hinges.
Removing the intermediate panel
Before removing, make a note of the position in which the
intermediate panel is fitted, so that you do not refit it the wrong
way round later.
1. Press the left and right-hand holders outwards.
The intermediate panel disengages upwards.
2. Lift the intermediate panel slightly and take it out.
Cleaning
Clean the door panels with glass cleaner and a soft cloth.
Caution!
Do not use any sharp or abrasive medium or a glass scraper.
The glass could be damaged.
Fitting the intermediate panel
1. Insert the intermediate panel on the left and right into the
supports.
2. Push the intermediate panel downwards in the retainers.
Fitting the door panel
1. Insert the door panel on the left and right into the supports.
2. Press the door panel downwards into the plug-in holders.
3. Refit the appliance door.
Cleaning the cooking compartment ceiling
The grill element can be folded down to allow quick and easy
cleaning of the cooking compartment ceiling.
ã=Risk of burning due to hot components in the cooking
compartment!
Wait until the cooking compartment has cooled down.
1. Pull the grill element retaining bracket towards the front and
push it upwards until you hear the grill element disengage
(figure A).
2. Hold the grill element and fold it downwards (figure B).
3. Clean the cooking compartment ceiling.
4. Pull the retaining bracket towards the front and keep it
pushed upwards.
5. Fold the grill element upwards, until it clicks into place.
Cleaning the hook-in racks
You can remove the hook-in racks for easier cleaning.
ã=Risk of burning due to hot components in the cooking
compartment!
Wait until the cooking compartment has cooled down.
1. Push the hook-in rack upwards at the front and unhook to the
side (figure A).
2. Pull the hook-in rack forwards at the rear and unhook to the
side (figure B).
3. Clean the hook-in rack with washing-up liquid and a sponge
or brush.
4. Align the hook-in rack with the indentation (a) facing
downwards, so that the shelf heights match.
5. Insert the hook-in rack at the rear as far as it will go and push
to the rear (figure C).
6. Insert the hook-in rack at the front as far as it will go and push
downwards (figure D).
$%
$ %
D
D
& '

18
Faults and repairs
It is not always necessary to call the after-sales service.
Sometimes, you can find a remedy yourself. You will find some
tips for troubleshooting in the following table.
ã=Risk of electric shock!
■Work on the appliance electronics may only be performed by
a specialist.
■Always disconnect the appliance from the power supply
when work is carried out on the electronics. Switch off the
circuit breaker or remove the fuse from your household fuse
box.
Replacing the oven light bulb
Replace faulty oven light bulbs.
You can obtain replacement light bulbs from customer service
or specialist retailers: E14, 220 - 240 V, 40 W, heat resistant to
300 °C. Only use these oven light bulbs.
ã=Risk of electric shock !
Disconnect the appliance from the power supply. Switch off the
circuit breaker or remove the fuse from the household fuse box.
1.Place a tea towel in the cold cooking compartment to prevent
damage.
2.Turn the glass cover anticlockwise and remove it.
3.Replace the oven light bulb with a bulb of the same type.
4.Screw on the glass cover again.
5.Remove the tea towel and switch on the circuit breaker.
Note: If the glass cover cannot be unscrewed: use rubber
gloves to turn it. You can order a special removal tool through
the after-sales service (order no. 613634)
Changing the door seal
If the door seal is defective, it must be replaced. Replacement
seals for your appliance can be obtained from the after-sales
service.
The door seal is attached in four places (figure A). When
replacing it, disconnect and attach the hooks at all four points
(figure B).
Check again to ensure that the seal is seated correctly in the
corners in particular.
After-sales service
Our after-sales service is there for you if your appliance needs
to be repaired. We will always find the right solution in order to
avoid unnecessary visits from a service technician.
E number and FD number
When calling us, please give the product number (E no.) and
the production number (FD no.) so that we can provide you with
the correct advice. The rating plate containing these numbers
can be found on the right-hand side of the oven door. You can
Problem Possible cause Remedial action
Electrical operation is faulty (e.g. indicator
lamps do not light up) Fuse defective Check fuses in the fuse box and replace if
necessary
Liquid or thin dough runs to one side Appliance not installed level Check the appliance installation (see the
Installation instructions)
Smoke is generated during roasting or grill-
ing Fat is burning on the grill element Continue grilling or roasting until the fat on
the grill element is burnt away
Wire rack or universal pan inserted incor-
rectly Place the wire rack in the universal pan
and insert them together at a lower shelf
height
High levels of condensation are generated
in the cooking compartment Normal occurrence (e.g. when baking with
very moist toppings or roasting a large
joint)
Open the appliance door briefly from time
to time during operation
Enamelled accessories have light, matt
marks Normal occurrence caused by dripping
meat or fruit juices Not possible
Door panels are misted up Normal occurrence caused by tempera-
ture differences Heat the appliance up to 100 °C and then
switch off again after 5 minutes
$ %

19
make a note of the numbers of your appliance and the
telephone number of the after-sales service in the space below
to save time should it be required.
Please note that there will be a fee for a visit by a service
technician in the event of a malfunction, even during the
warranty period.
Please find the contact data of all countries in the enclosed
customer service list.
To book an engineer visit and product advice
Trust the expertise of the manufacturer, and rest assured that
the repair will be carried out by trained service technicians
using original spare parts for your domestic appliance.
Test dishes
Test dishes tested to standard EN 50304/EN 60350 (2009)
and IEC 60350. Please note the information in the tables about
preheating.
E no. FD no.
After-sales service O
GB 0844 8928989
Calls from a BT landline will be charged at up to
3 pence per minute. A call set-up fee of up to 6 pence
may apply.
IE 01450 2655
Baking Shelf height Operating
mode Temperature
in °C Baking time in
minutes
Viennese whirls 3 %140 - 150* 20 - 35
13140 - 150* 20 - 35
1 + 3 3140 - 150* 25 - 40
1 + 3 + 4 3130 - 150* 25 - 50
Small cakes (20 per tray) 3 %160 - 170** 20 - 30
13150 - 160** 20 - 30
1 + 3 3150 - 160** 25 - 35
1 + 3 + 4 3150 - 160** 25 - 35
Hot water sponge cake 2 %160 - 170* 25 - 35
13150 - 160* 25 - 35
Double crust apple pie (tinplate tins next to one another,
figure A) 10170 - 180* 70 - 85
Double crust apple pie (black tins placed diagonally across
from each other, figure B) 1 + 3 3170 - 180* 65 - 80
* Preheat oven
** Preheat for 10 minutes
$ %
Grilling Shelf height Wire rack
position Operating
mode Tempera-
ture in °C Grillingtime
in minutes
Toast (universal pan + stepped wire rack) 4 ¾+275* 1 - 2
Beef steaks x 12 (universal pan + stepped wire rack) 4 ¾+275 20 - 25**
* Preheat for 10 minutes
** turn over after Zof the cooking time

910413
*9000540038*
9000540038
Constructa Neff
Vertriebs-GmbH
Carl-Wery-Straße 34
D-81739 München
Table of contents
Other NEFF Oven manuals

NEFF
NEFF B64FT53G0B User manual

NEFF
NEFF B64FS31.0B User manual

NEFF
NEFF B45M62N0GB User manual

NEFF
NEFF B45E54.3GB User manual

NEFF
NEFF B57VS22G1 User manual

NEFF
NEFF B 1524 Series User manual

NEFF
NEFF B1442B0GB Safety guide

NEFF
NEFF U1452N3GB Safety guide

NEFF
NEFF U15E42.3AU User manual

NEFF
NEFF B58CT68.0B User manual

NEFF
NEFF B17CR22 1 Series User manual

NEFF
NEFF B57CS26 0B Series User manual

NEFF
NEFF U1661N2AU User manual

NEFF
NEFF B15E42 0GB Series User manual

NEFF
NEFF U16E74N0GB - annexe 2 User manual

NEFF
NEFF B27CS24G0B User manual

NEFF
NEFF N70 B24CR31G0B User manual

NEFF
NEFF B55CR22 0B Series User manual

NEFF
NEFF B55CS22.0B User manual

NEFF
NEFF B14M42 5GB Series User manual