NEILPRYDE FLY 1.4 User manual

User Manual

WARNING
3
DO NOT USE THIS PRODUCT UNLESS YOU HAVE READ AND
UNDERSTAND THESE WARNINGS AND INSTRUCTIONS WHICH
ARE FORYOUR SAFETY AND PROTECTION.THIS INFORMATION
MAY BE SUBJECT TO CHANGE AT ANY TIME.
PLEASE VISIT OUR WEBSITE AT: WWW.NEILPRYDE.COM FOR
CURRENT UPDATES.
IF YOU ARE BELOW THE AGE OF 18, YOU SHOULD HAVE
YOUR PARENT OR GUARDIAN READ THESE WARNINGS AND
INSTRUCTIONS AND SHOULD NOT USETHIS PRODUCT UNLESS
YOU ARE UNDER THE PROPER GUIDANCE AND SUPERVISION
OF SUCH A PERSON.
The use of this product exposes the user to many unavoidable
and unexpected risks, dangers and hazards. The suppliers of this
product are not responsible for any damage to property or any
personal injury caused by any active negligence of the suppliers
or by any use, misuse, abuse or irresponsible use of this product
by the user.

4
Make sure to attach the
twist pump adapter (in
blue) to correctly inflate
the wing
Overview
Recommended Inflation pressure
LE inflation Strut inflation
Model pressure (PSI) pressure (PSI)
FLY 1.4
10.0 10.0
FLY 1.8
10.0 10.0
FLY 2.1
9.5 9.5
FLY 2.5
9.5 9.5
FLY 2.9
9.0 9.0
FLY 3.3
9.0 9.0
FLY 3.6
9.0 9.0
FLY 4.0
8.5 8.5
FLY 4.3
8.5 8.5
FLY 4.7
8.5 8.5
FLY 5.0
8.0 8.5
FLY 5.4
8.0 8.5
FLY 5.7
7. 5 8.0
FLY 6.0
7. 5 8.0
Windows Strut Mini
Battens
Control
Handles
LE Valve
Leading Edge Handle
Leading Edge
Leash
Attachement
Strut valve
Harness Line
Attachement
(optional)
Bladder
Anti-Twist
System
Bladder
Anti-Twist
System

5
Instructions to inflate your wing
1- Make sure that the valve is correctly
positioned, by twisting it and pulling it
up. Connect the pump to the valve to
open it
3- Make sure that the valve is correctly positioned, by twisting it and
pulling it up. Connect the pump to the valve to open it
Strut valve
Leading
edge valve
2- Pump the strut accordingly the
pressure values specified for each model
(see page 4)
Always pump the Strut
first, before than the
Leading Edge valve.
4- Pump the leading edge accordingly the pressure values specified for
each model (see page 4)
Any use of an air compressor may result in poor performance or damage to the wing, and
automatically avoids all warranties. If you leave your wing exposed to the hot sun, check the
pressure and deflate it slightly. Otherwise the wing may become over inflated and stretch the
material. The ambient temperature affects the tube’s internal pressure: a variation of 1° C/ 1.8° F
causes a variation of the pressure in the tube of +/- 0.06psi (4 mBar).

6
RECOMMENDED WING FOIL PRACTICE
• Wing foiling is a HAZARDOUS activity and the use of this equipment involves
the risk of serious personal injury to any part of the user’s body or death.
• Injuries are an INHERENT RISK of wing foiling and the participation in this
sport implies the user’s express assumption of those risks.
• Do NOT use the wing out of the wind ranges that they were specified for.
Always check the weather forecast to ensure that the wind range is apropriate.
• Do NOT exceed the recommended pressure indicated for each part of the
wing and do NOT leave the wing in the sun when not in use.
• Injuries are an INHERENT RISK of foiling and the participation in foiling implies
the user’s acceptance of those risks.
• Wear a helmet when appropriate.
• Children should always be under adult supervision.
• It is strongly recommended that beginners take lessons from a licensed or
certified instructor.
• Always inspect your equipment for signs of wear and tear each time before
riding.
• IF any products are found to show signs of wear and tear these should be
repaired or replaced immediately and before further use. If in doubt about
any signs of wear and tear, please contact your local NeilPryde ONE-DESIGN
vendor. Contact details are available from www.neilpryde.com.
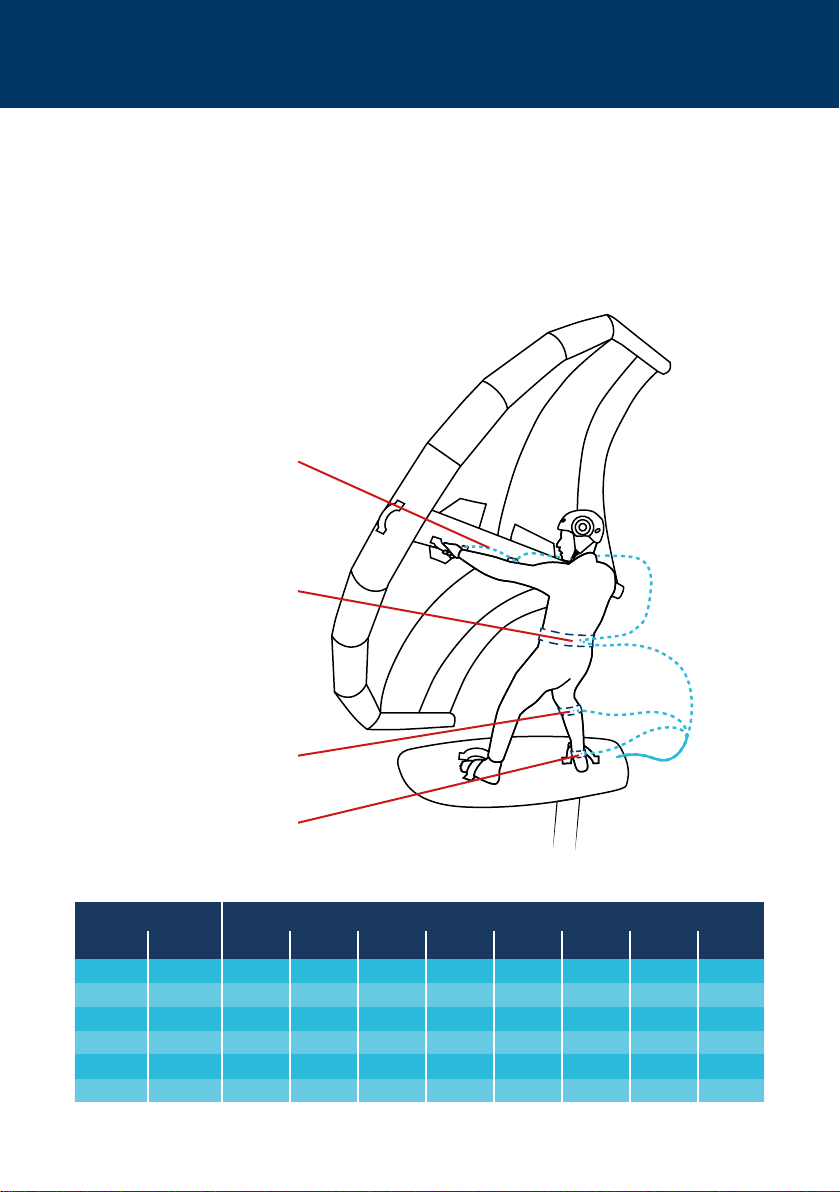
• Make sure that your wing is connected with a leash to your body (wrist or
waist) when in use.
• NEVER place yourself in a situation where breakage of any one of the various
components would pose a risk to yourself or others, or make it impossible to
return to the shore safely and unassisted.
• Take time to study the conditions including sea state, tides, currents and
weather forecasts before you decide to go sailing. Beware of sailing in offshore
winds.
• Familiarize yourself with any new location before venturing onto the water.
Ask the locals to tell you about any hazards.
• Watch out for other beach users, especially swimmers, divers and small
children. Make sure you keep your board and wing under control at all times and
that they don’t get blown about on the beach or in the water.
•
Always use appropriate safety and floatation devices. Wear the correct
protective clothing for the conditions such as a wetsuit or a UV top. Cold water
and cold weather can result in hypothermia. Always carry identification.
• Make sure someone knows where you’ve gone & when you are expected
back – never sail alone.
• Be aware of the conditions as they change. Always return to the beach if
there is a significant change in the conditions, i.e. wind dropping or wind and
waves increasing.
Tips for a safe use

7
Min Max < 40
40-50 50-60 60-70 70-78 78-85 85-95
> 95
30 40+ 1.4 1.4 1.4 1.8 1.8 2.2 2.5 2.9
25 35 1.4 1.8 1.8 1.8 2.2 2.5 2.9 3.6
20 30 1.8 1.8 2.2 2.5 2.9 3.3 3.6 4.3
16 25 2.2 2.5 3.9 3.3 3.6 4.0 4.3 5.0
12 20 2.9 3.3 3.6 4.0 4.3 4.7 5.0 6.0
8 15 3.6 4.0 4.3
4.7/5.0
5.0/5.4
5.4/5.7
6.0 6.0*
Wind (kn) Rider’s Weight (kg)
Wing-size-weight recommendation
Leash positioning options
*Min 10-12 knots
Waist Leash
(Board or Wing)
Wrist Leash
(Wing)
Knee Leash
(Board)
Ankle Leash
(Board)
•
As you learn the sport, work within your own limitations and do not exceed them.
• Make sure to stay hydrated. This is a physically demanding sport and
dehydration can also occur in cold temperatures.
• Do not alter, modify or change this product.
•
This product is designed and manufactured exclusively for wing foiling on water.
• Do not operate the wing under the influence of drugs or alcohol.
• Keep these instructions for future reference.

8
How to attach the leash
INSTRUCTIONS
The leash has one side with a short loop plus the
swivel (on the left), and the other side with a bigger
loop (on the left). The short loop needs to be attached
either to the wrist cuff or the waist belt, depending
how you like to use your leash.
1- Push the shorter loop through the
attachment point of the wrist cuff or
waiste belt
2- Push the bigger loop through the
short loop until the leash is tight
3- Make sure to pull it as tight as
possible, making a node

9
4- On the other side, push the bigger
loop through the attachment point of
the wing
5- Push the wrist band or waist
belt through the loop
6- Make sure to pull it as tight as
possible, making a node

10
Instructions to deflate your wing
2- Find the LE valve, push its pin
down and twist it.The air will start
flow to the outside
3- Find the strut valve, push its
pin down and twist it, the same
way it was done for the LE valve
1- After using the wing, whenever possible, rinse it with fresh water

11
1- Flip the wing over, so
the handles are down
3- Fold both trailing edges forward
- position the crease line just after the
mini battens end
5- Fold it in half between the handles to
make it compact. Use the waist leash belt
or wrist leash to secure it
4- Roll from wingtips to center strut
2- Fold the wing in half at the strut, so
the handles are sticking out
Instructions to fold your wing

12
Repair instructions - removing the valve
2- Use the key provided in the repair kit to
remove the valve.
1- Make sure that the wing is rinsed, dry and deflated before starting
the repair.
4- Remove the valve by pulling it up,
with the assistance of the key.
3
- Turn the key anti-clockwise direction, until
the valve is completely out of the thread.
5-
After removing the
valve and the bladder
anti-twist system (only LE),
remove the bladder. Repair
the bladder using the repair
patches provided with the
repair kit by glueing them
over the hole. Insert the
bladder and re-install the
valve and the bladder anti-
twist system (LE only).

13
1- Position inner part right under the black
part and aling the little notch of both parts
Press the inner clear plastic part through
the black outside part (sewed on the LE)
with your thumb. Do this on the left and
right side of the LE.
Removing bladder
anti-twist system
INSERTing bladder
anti-twist system
3- Make sure that both parts completely
overlap each other and that the bladder is not
squeezed in between.
2
- Bend both parts slightly and press
the inner part from underneath with your
fingers thru the outside part.
Repair instructions - Bladder anti-twist system

14
Limited Warranty
NeilPryde warrants that this product, when it is purchased from an authorized
NeilPryde vendor, will be free from defects in materials and workmanship for
a period of 12 months from the date of purchase by the original customer.
This warranty is solely for the benefit of the original customer and may not be
assigned.
For customer Limited Warranty claims, proof of purchase from an authorized
NeilPryde vendor is required. If the date of purchase cannot be established,
NeilPryde will make a determination based upon on the last production year of
the particular model, or on the condition of the equipment claimed.
If you have any questions about the NeilPryde Limited Warranty or procedures
for making claims thereunder, please contact NeilPryde at
WWW.NEILPRYDE.COM
.
The NeilPryde Warranty Center will determine if a product is covered under this
Limited Warranty. If covered, NeilPryde will, at NeilPryde’s sole option, repair
or replace the product in question. All warranty claims must be submitted
directly on www.neilpryde.com NeilPryde team will process the request and
communicate with the customer directly. Any repair or replacement of any
product under this Limited Warranty is not available for ordinary wear and tear,
including scratches or paint chipping, or for any damage caused by misuse,
abuse, unauthorized modification or repairs, accident, heat, excessive exposure
to sunlight, improper handling, storage, environments; use in reef waves,
shorebreak or off the water; any blow or impact with a hard object or any other
irresponsible use.
THE FOREGOING LIMITED WARRANTY IS EXCLUSIVE AND IN LIEU OF ALL
OTHER WARRANTIES OF QUALITY AND PERFORMANCE, WRITTEN, ORAL
OR IMPLIED AND ALL OTHER WARRANTIES, INCLUDING ANY IMPLIED
WARRANTIES OF MERCHANTABILITY OR FITNESS FOR A PARTICULAR
PURPOSE, ARE HEREBY DISCLAIMED. IN NO EVENT SHALL NEILPRYDE
BE LIABLE FOR SPECIAL, INDIRECT, INCIDENTAL, CONSEQUENTIAL,
STATUTORY OR EXEMPLARY DAMAGES, WHETHER IN CONTRACT, TORT,
NEGLIGENCE, STRICT LIABILITY OR OTHERWISE including, without limitation,
loss to property other than this product, loss of use of said product, or other
property or other economic losses. NeilPryde shall not be liable for contribution
or indemnification, whatever the cause.
Some jurisdictions do not allow limitations on how long an implied warranty
lasts and/or the exclusion or limitation of incidental or consequential damages,
so the above limitation and exclusion may not apply to particular customers.
NeilPryde’s obligations under any warranty shall be limited, to the greatest
extent allowed by law, as provided in this NeilPryde Limited Warranty. This
Limited Warranty gives you specific legal rights; you may also have other rights,
which vary from one jurisdiction to another.

This manual suits for next models
13
Table of contents
Other NEILPRYDE Windsurfing Equipment manuals